> ## Documentation Index
> Fetch the complete documentation index at: https://help.fieldpulse.com/llms.txt
> Use this file to discover all available pages before exploring further.
# Setting Up a Yealink VoIP Phone
> Connect a Yealink VoIP desk phone to FieldPulse Engage — find its IP address, enter your Engage SIP server details, and export the config file.
> **Who uses this:** Admins and Team Managers who manage Engage phone lines. **Availability:** United States and Canada · requires the Engage add-on and a Yealink VoIP desk phone you have administrative access to.
To connect a Yealink VoIP desk phone to [Engage](https://www.fieldpulse.com/features/engage), you find the phone's IP address, log into the Yealink web interface, enter your Engage SIP server details, and export the configuration file. The screenshots on this page show the Yealink T-54W model.
## Overview
A Yealink desk phone only rings through Engage once it points at your Engage SIP servers — until then, the office phone and your customer records sit on two separate systems. The steps below get the phone talking to Engage. You enter the **SIP Server #1** and **SIP Server #2** details from your Engage Settings into the Yealink web interface, then export the phone's configuration file and import it back onto the phone. Following these steps also gives the FieldPulse team the information it needs to assist with your VoIP phone setup.
## Before you begin
* **Confirm administrative access to the Yealink phone.** If you purchased the phone through another provider, you may not have administrative access — contact that provider, or purchase a new VoIP phone if they cannot grant it.
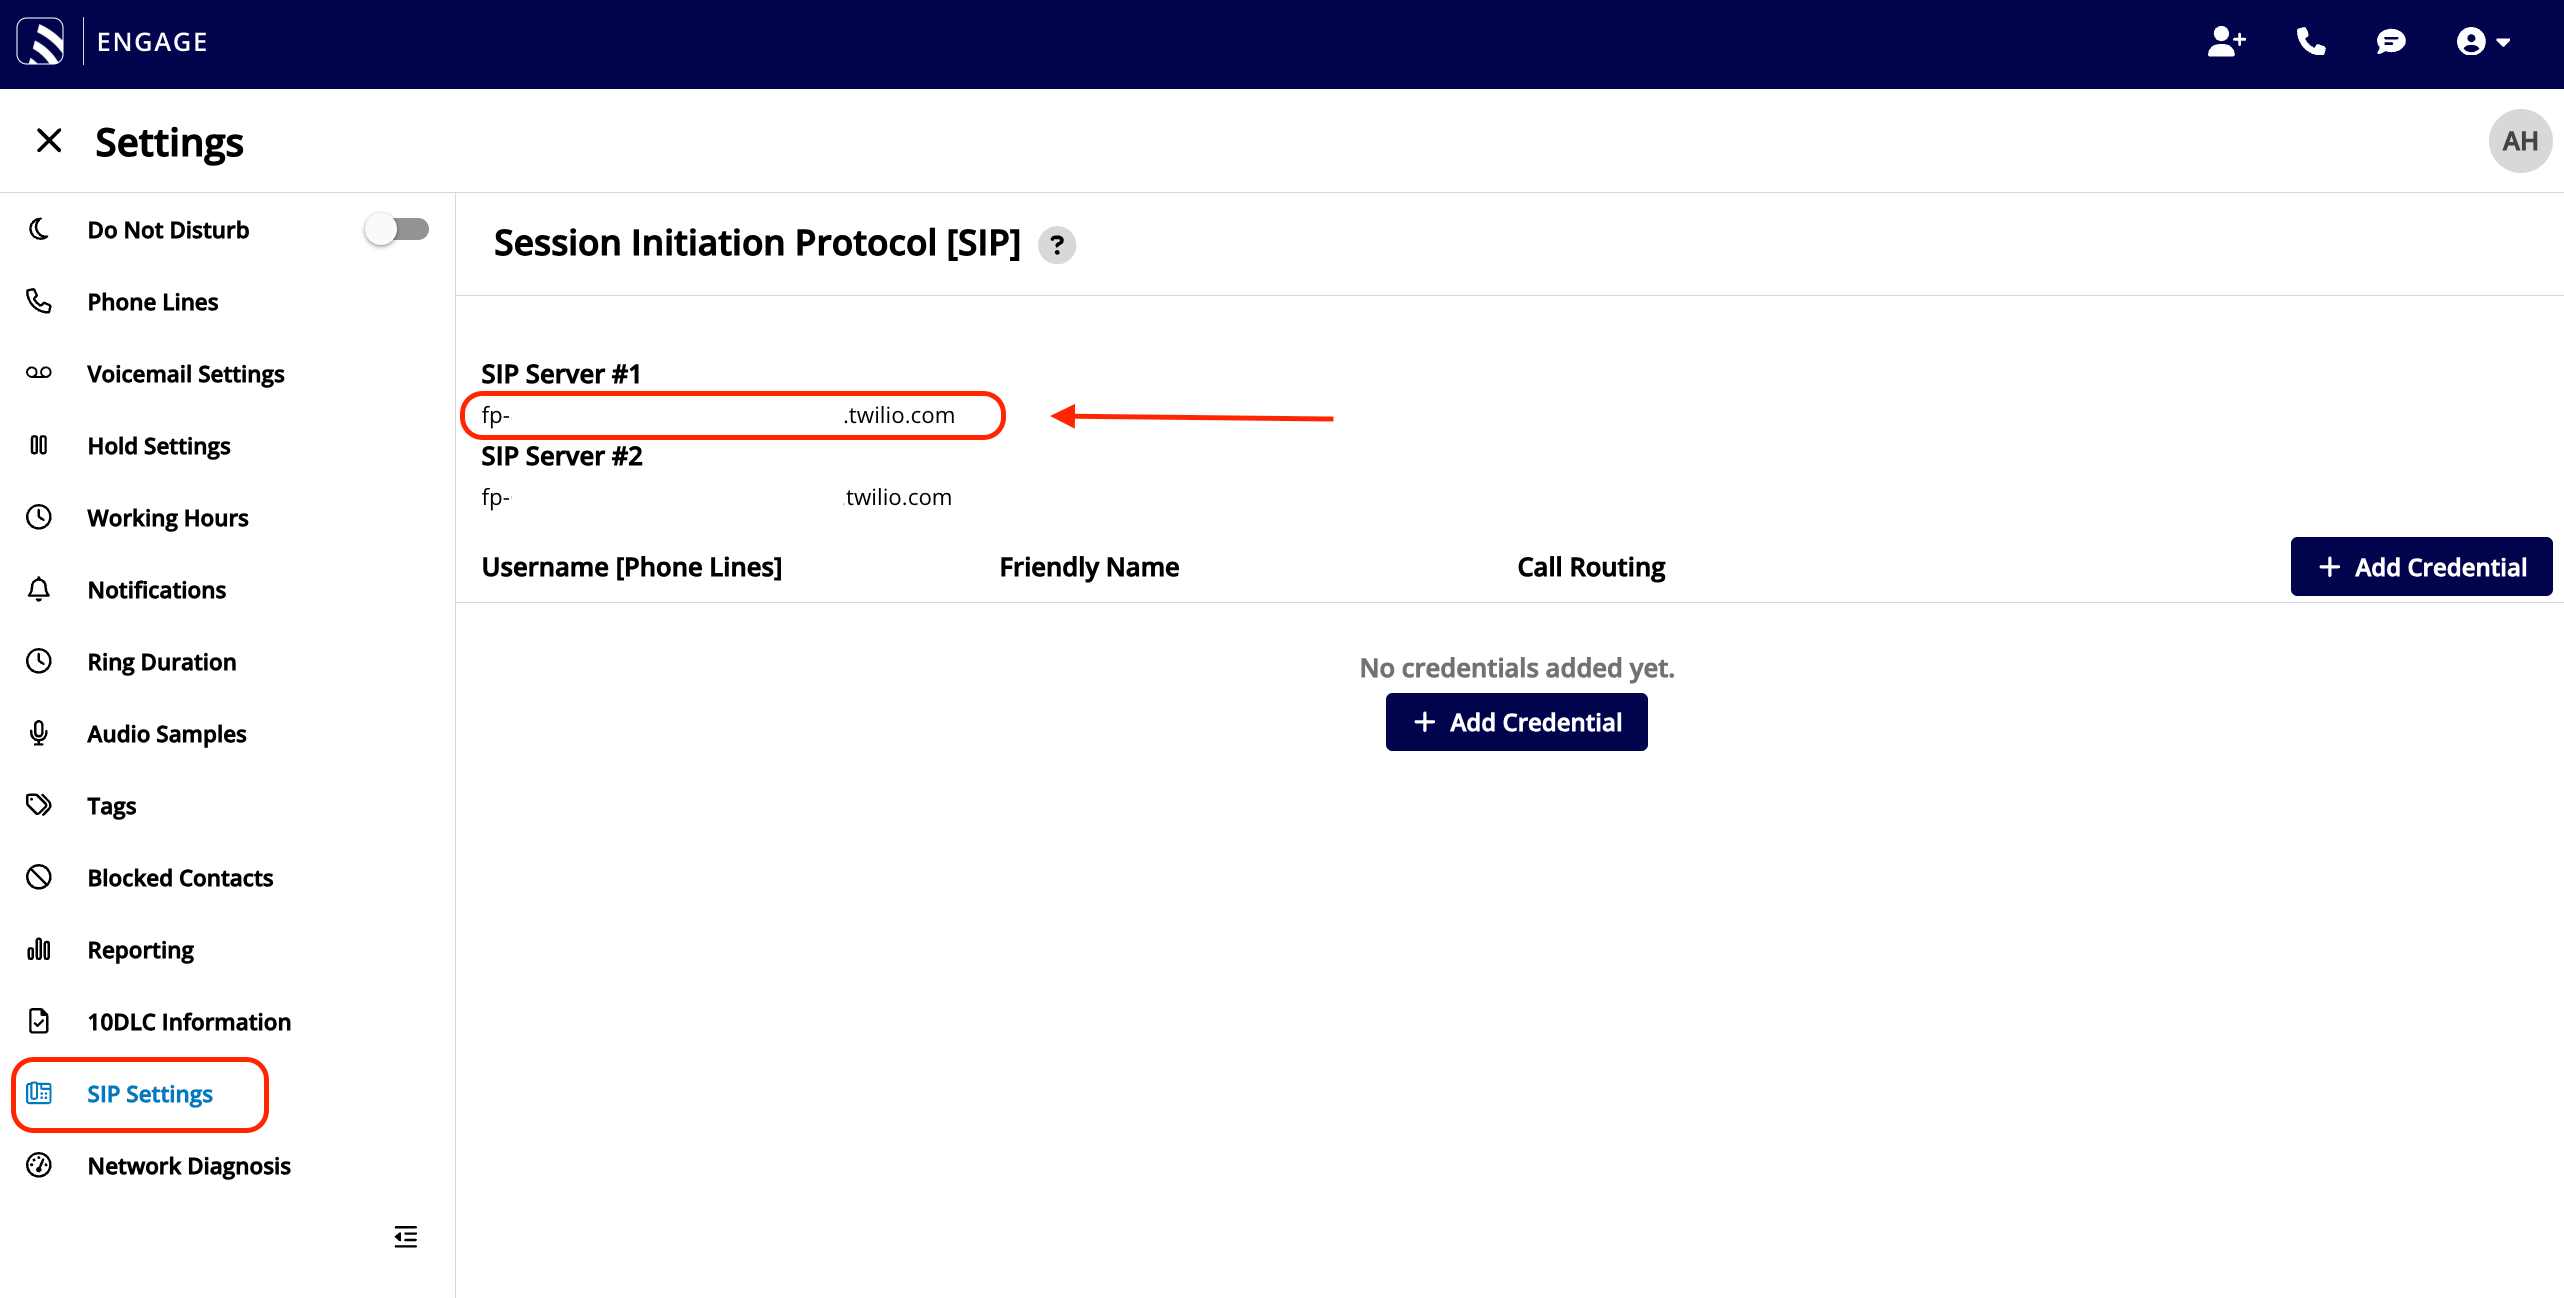
* **Set up SIP in Engage first.** You need your **SIP Server #1** and **SIP Server #2** details, shown in Engage under **Settings** > **SIP Settings**. See [Setting Up Engage via SIP (DID)](/add-ons/engage/sip-did).
* **Use a recommended browser.** Apple Safari and Mozilla Firefox are recommended for the Yealink web interface.
## Step-by-step setup
1. Back up the phone and its records so you don't lose any important information.
2. Make sure the Yealink phone is powered on and plugged in.
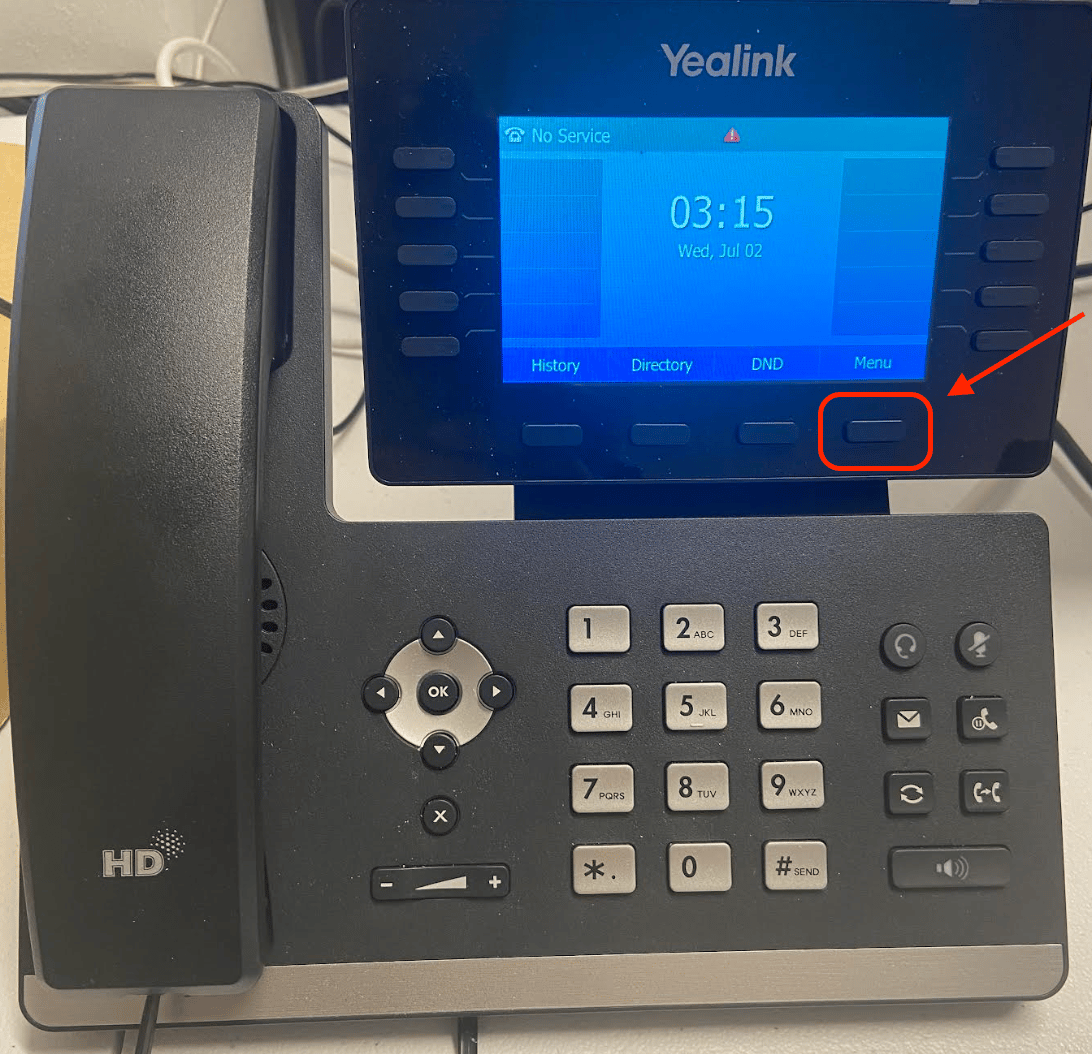
3. On the phone, select **Menu** by pressing the button at the bottom-right corner of the phone screen.
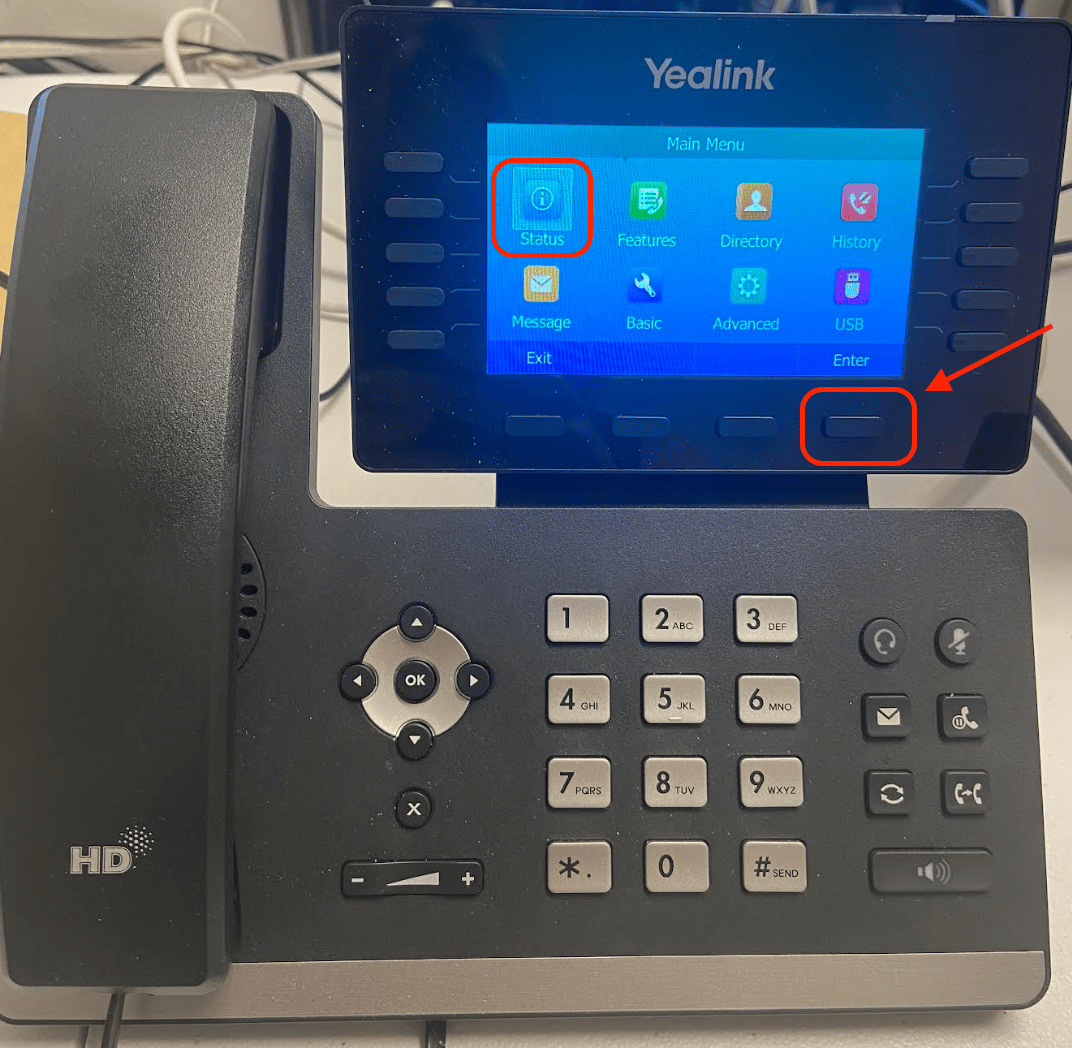
 4. Select the **Status** icon by pressing the button at the bottom-right corner of the phone screen.
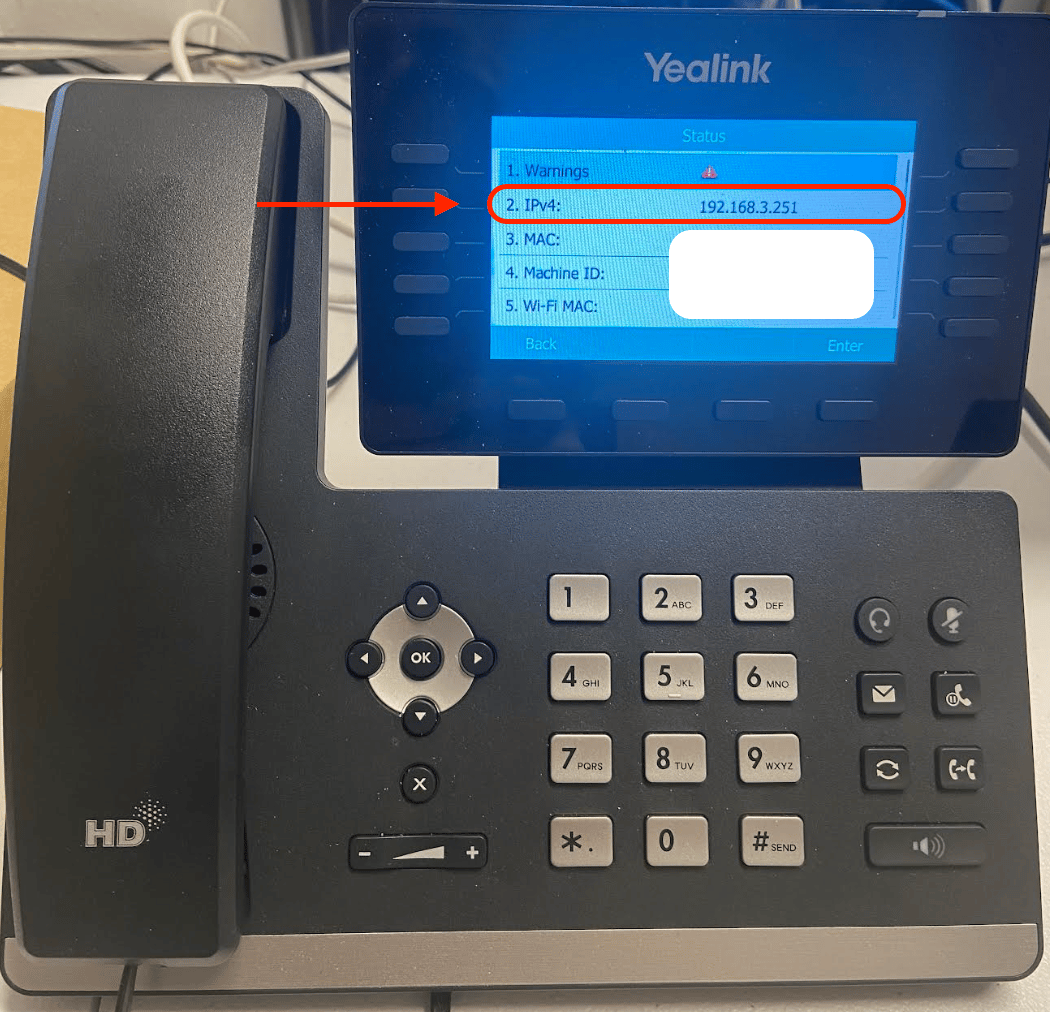
 5. Read the **IPv4** address shown on the **Status** screen.
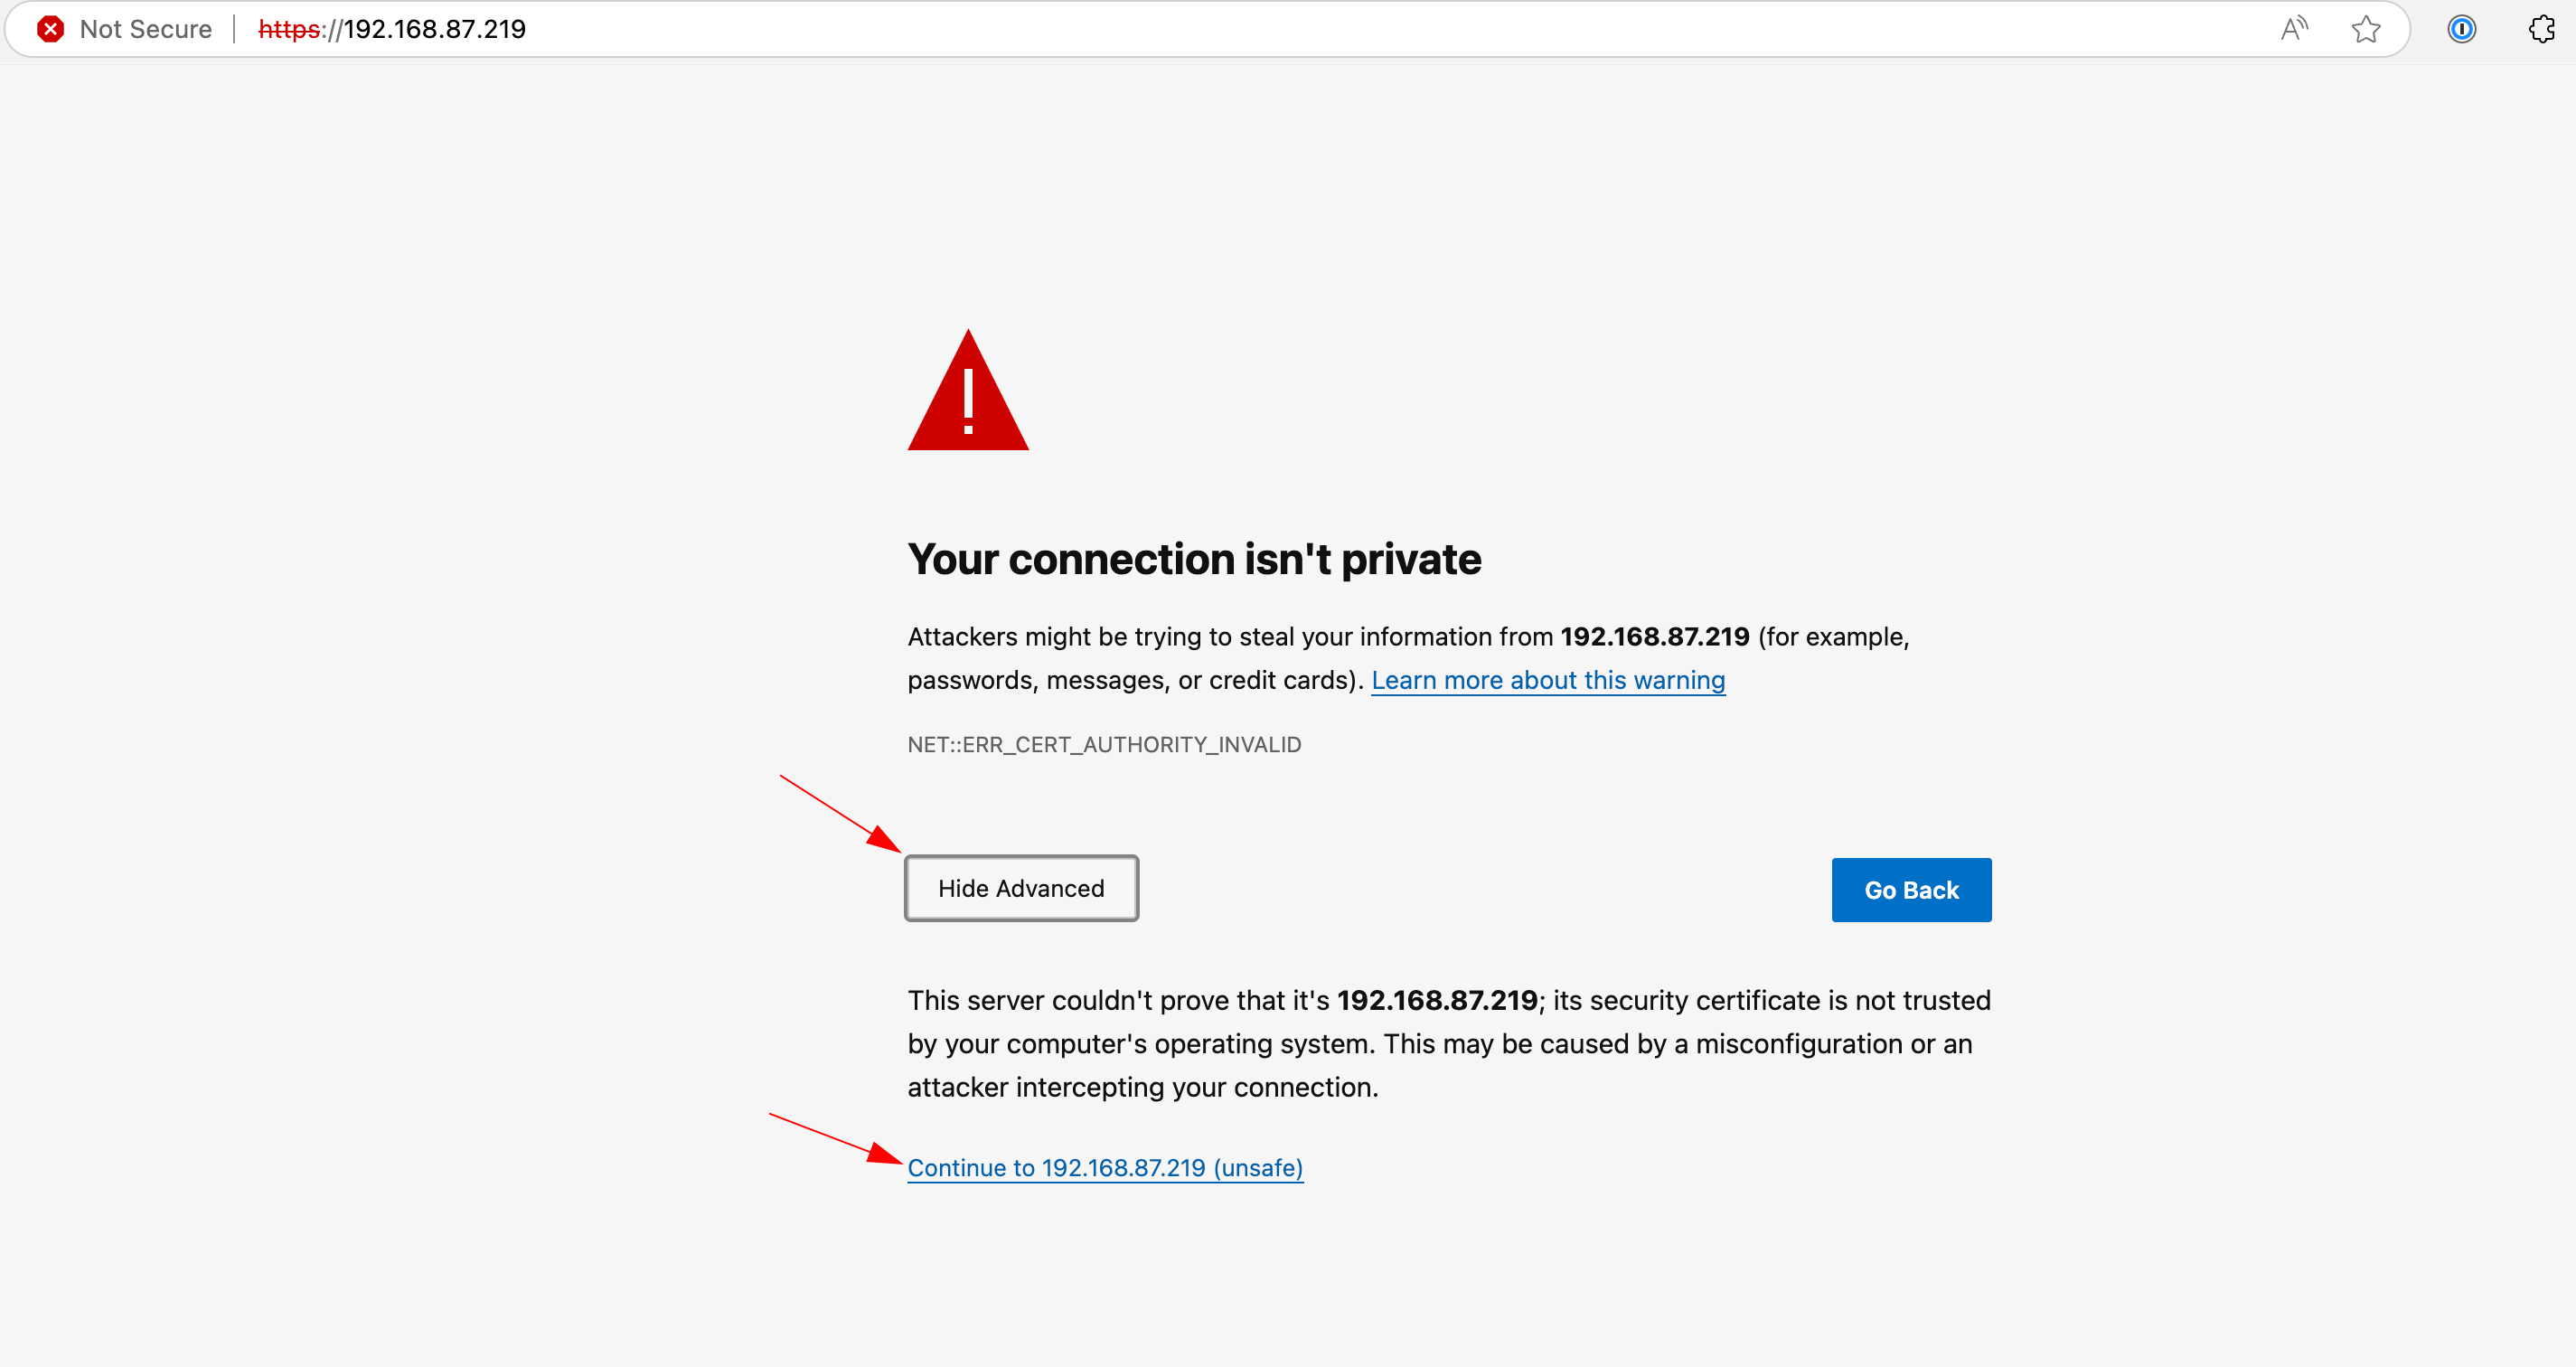
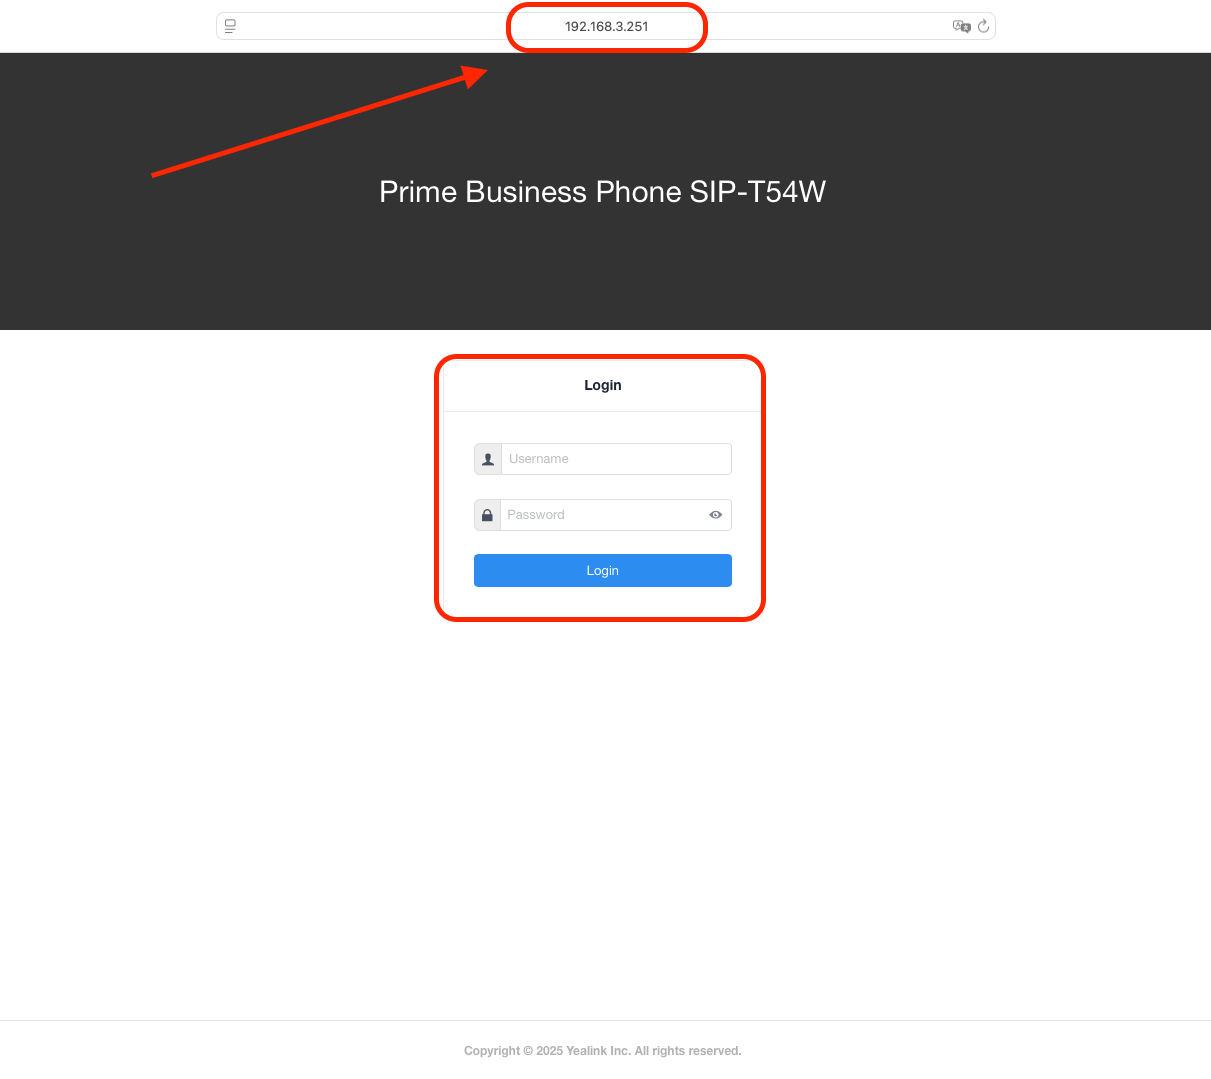
 6. Enter the IPv4 address in a web browser on your computer.
 A security warning might appear after you enter the IPv4 address. Select **Advanced**, then **Continue** to proceed to the login page.
 7. Log in on the Yealink login page. You are in the right place when your screen displays the login form.
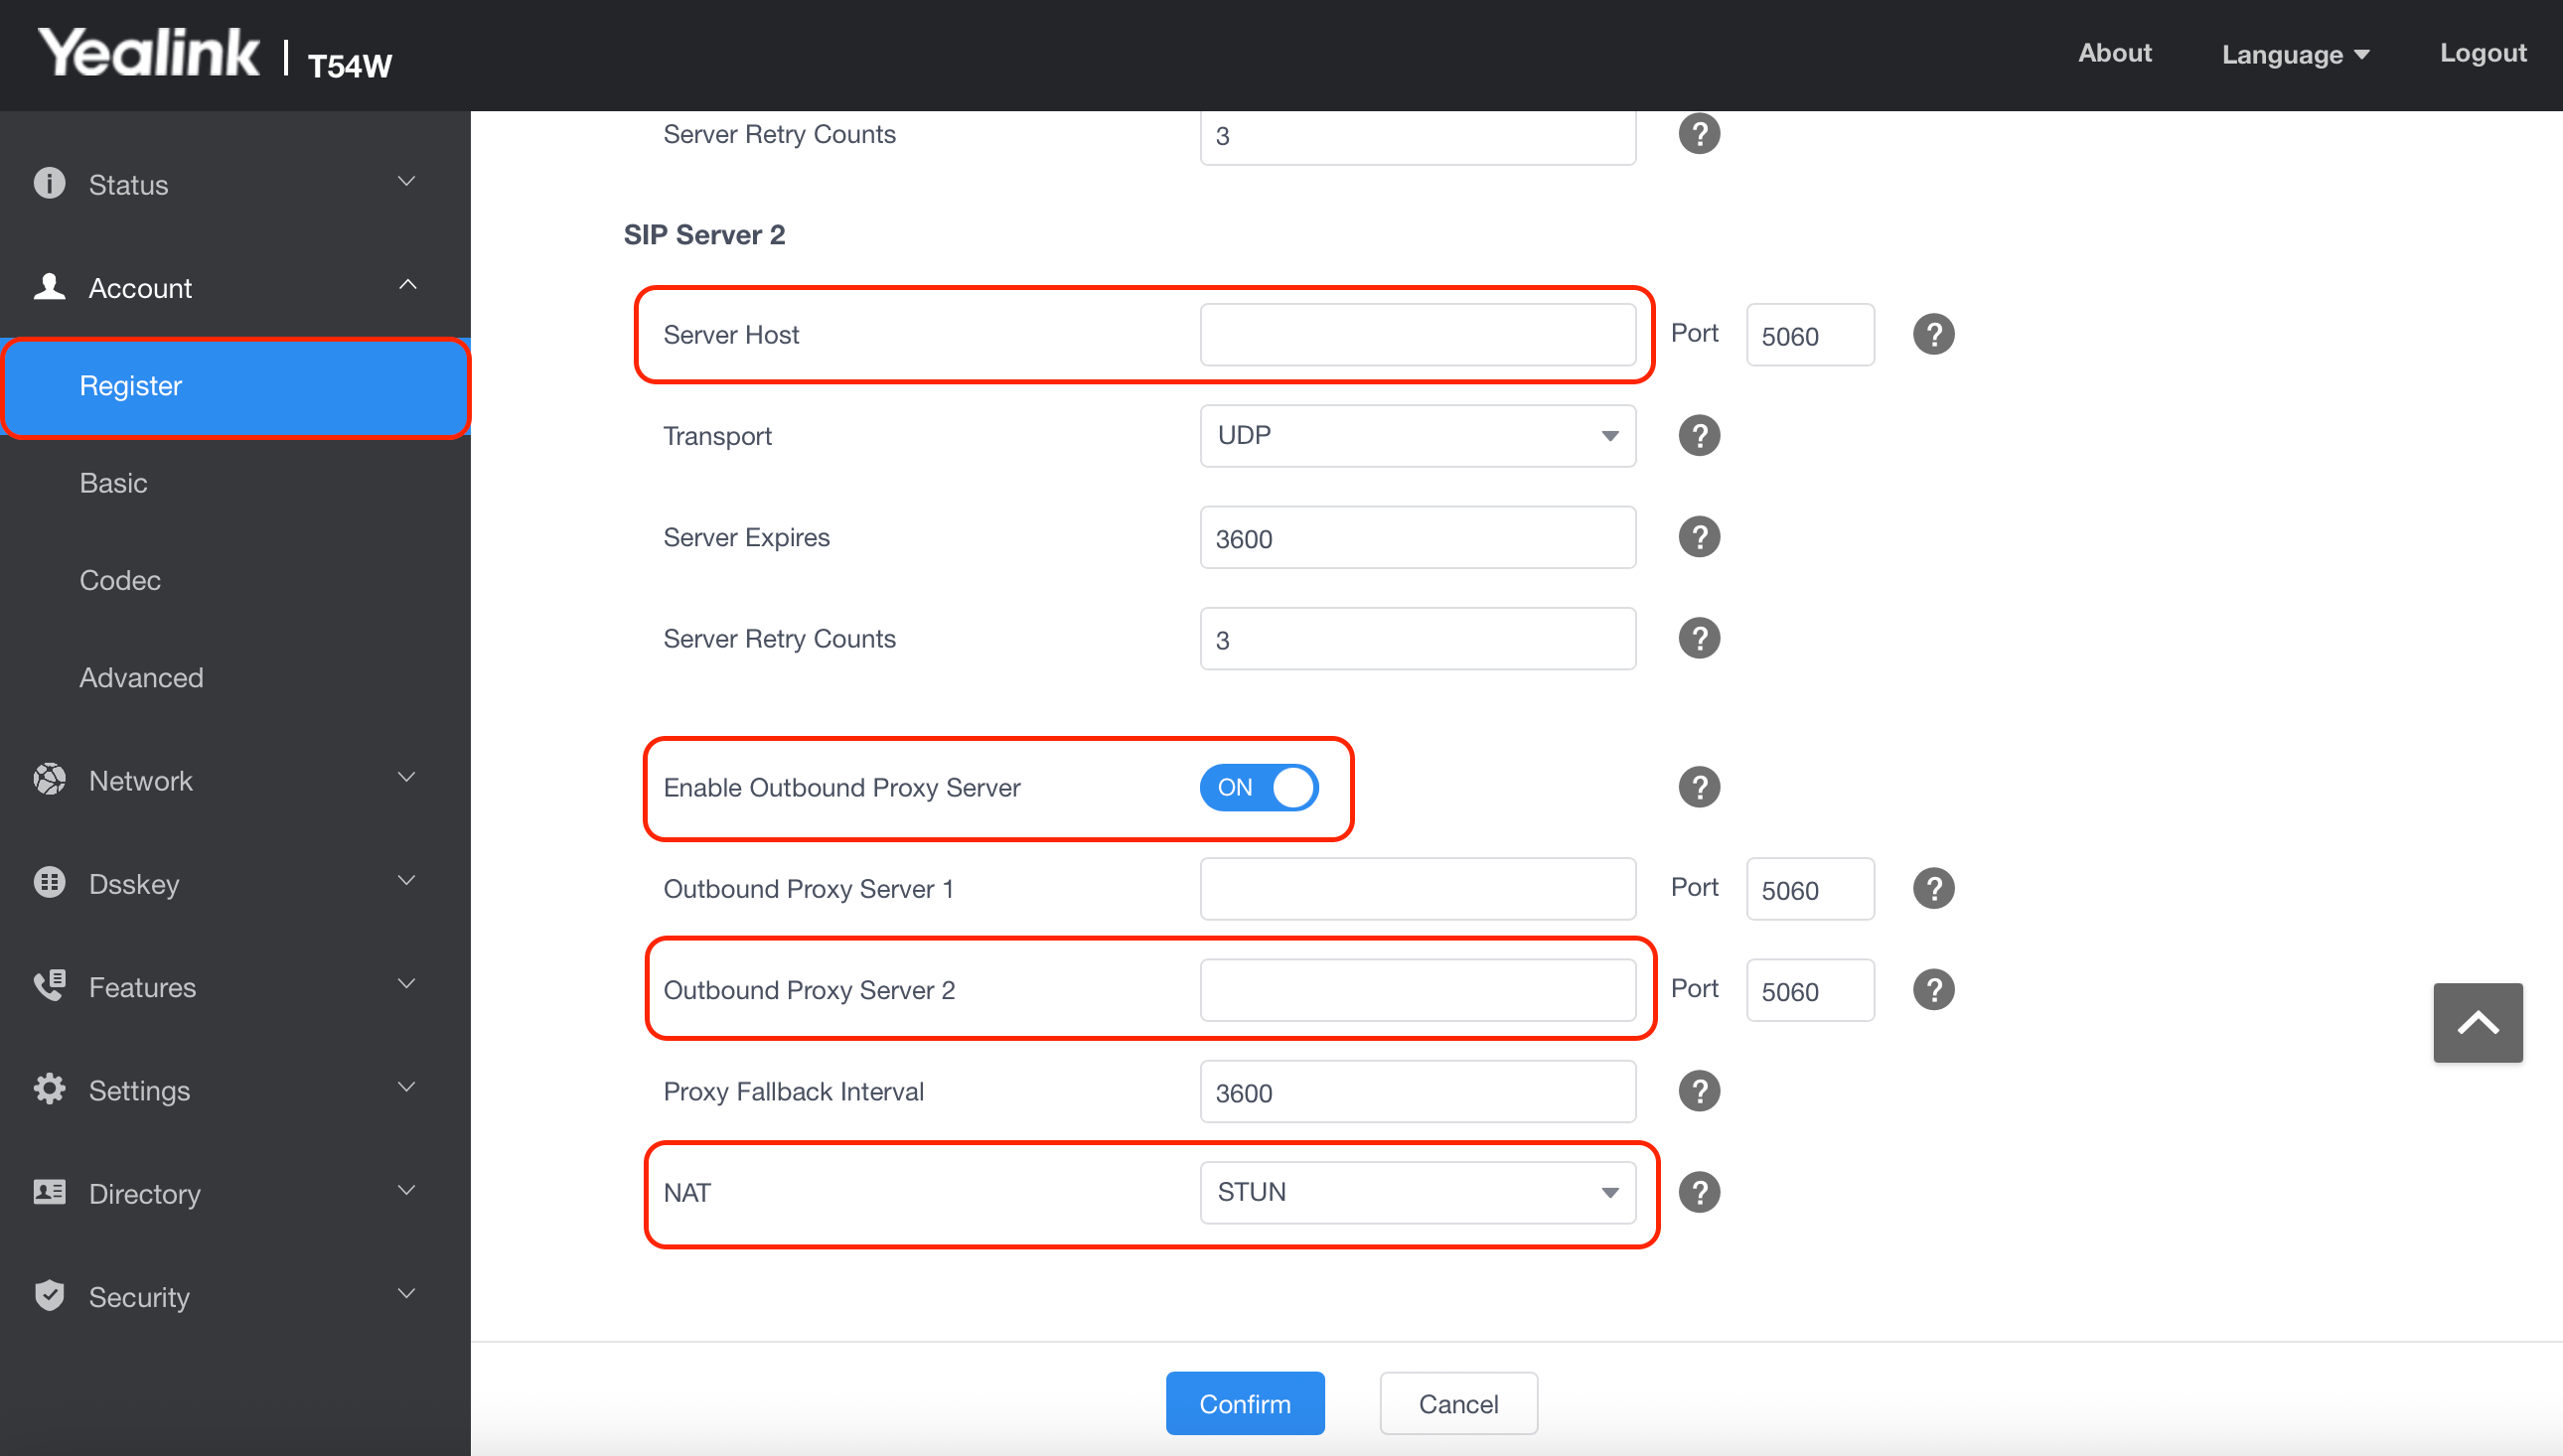
 8. Select the **Account** tab from the menu on the left side of your screen, then select the **Register** subtab.
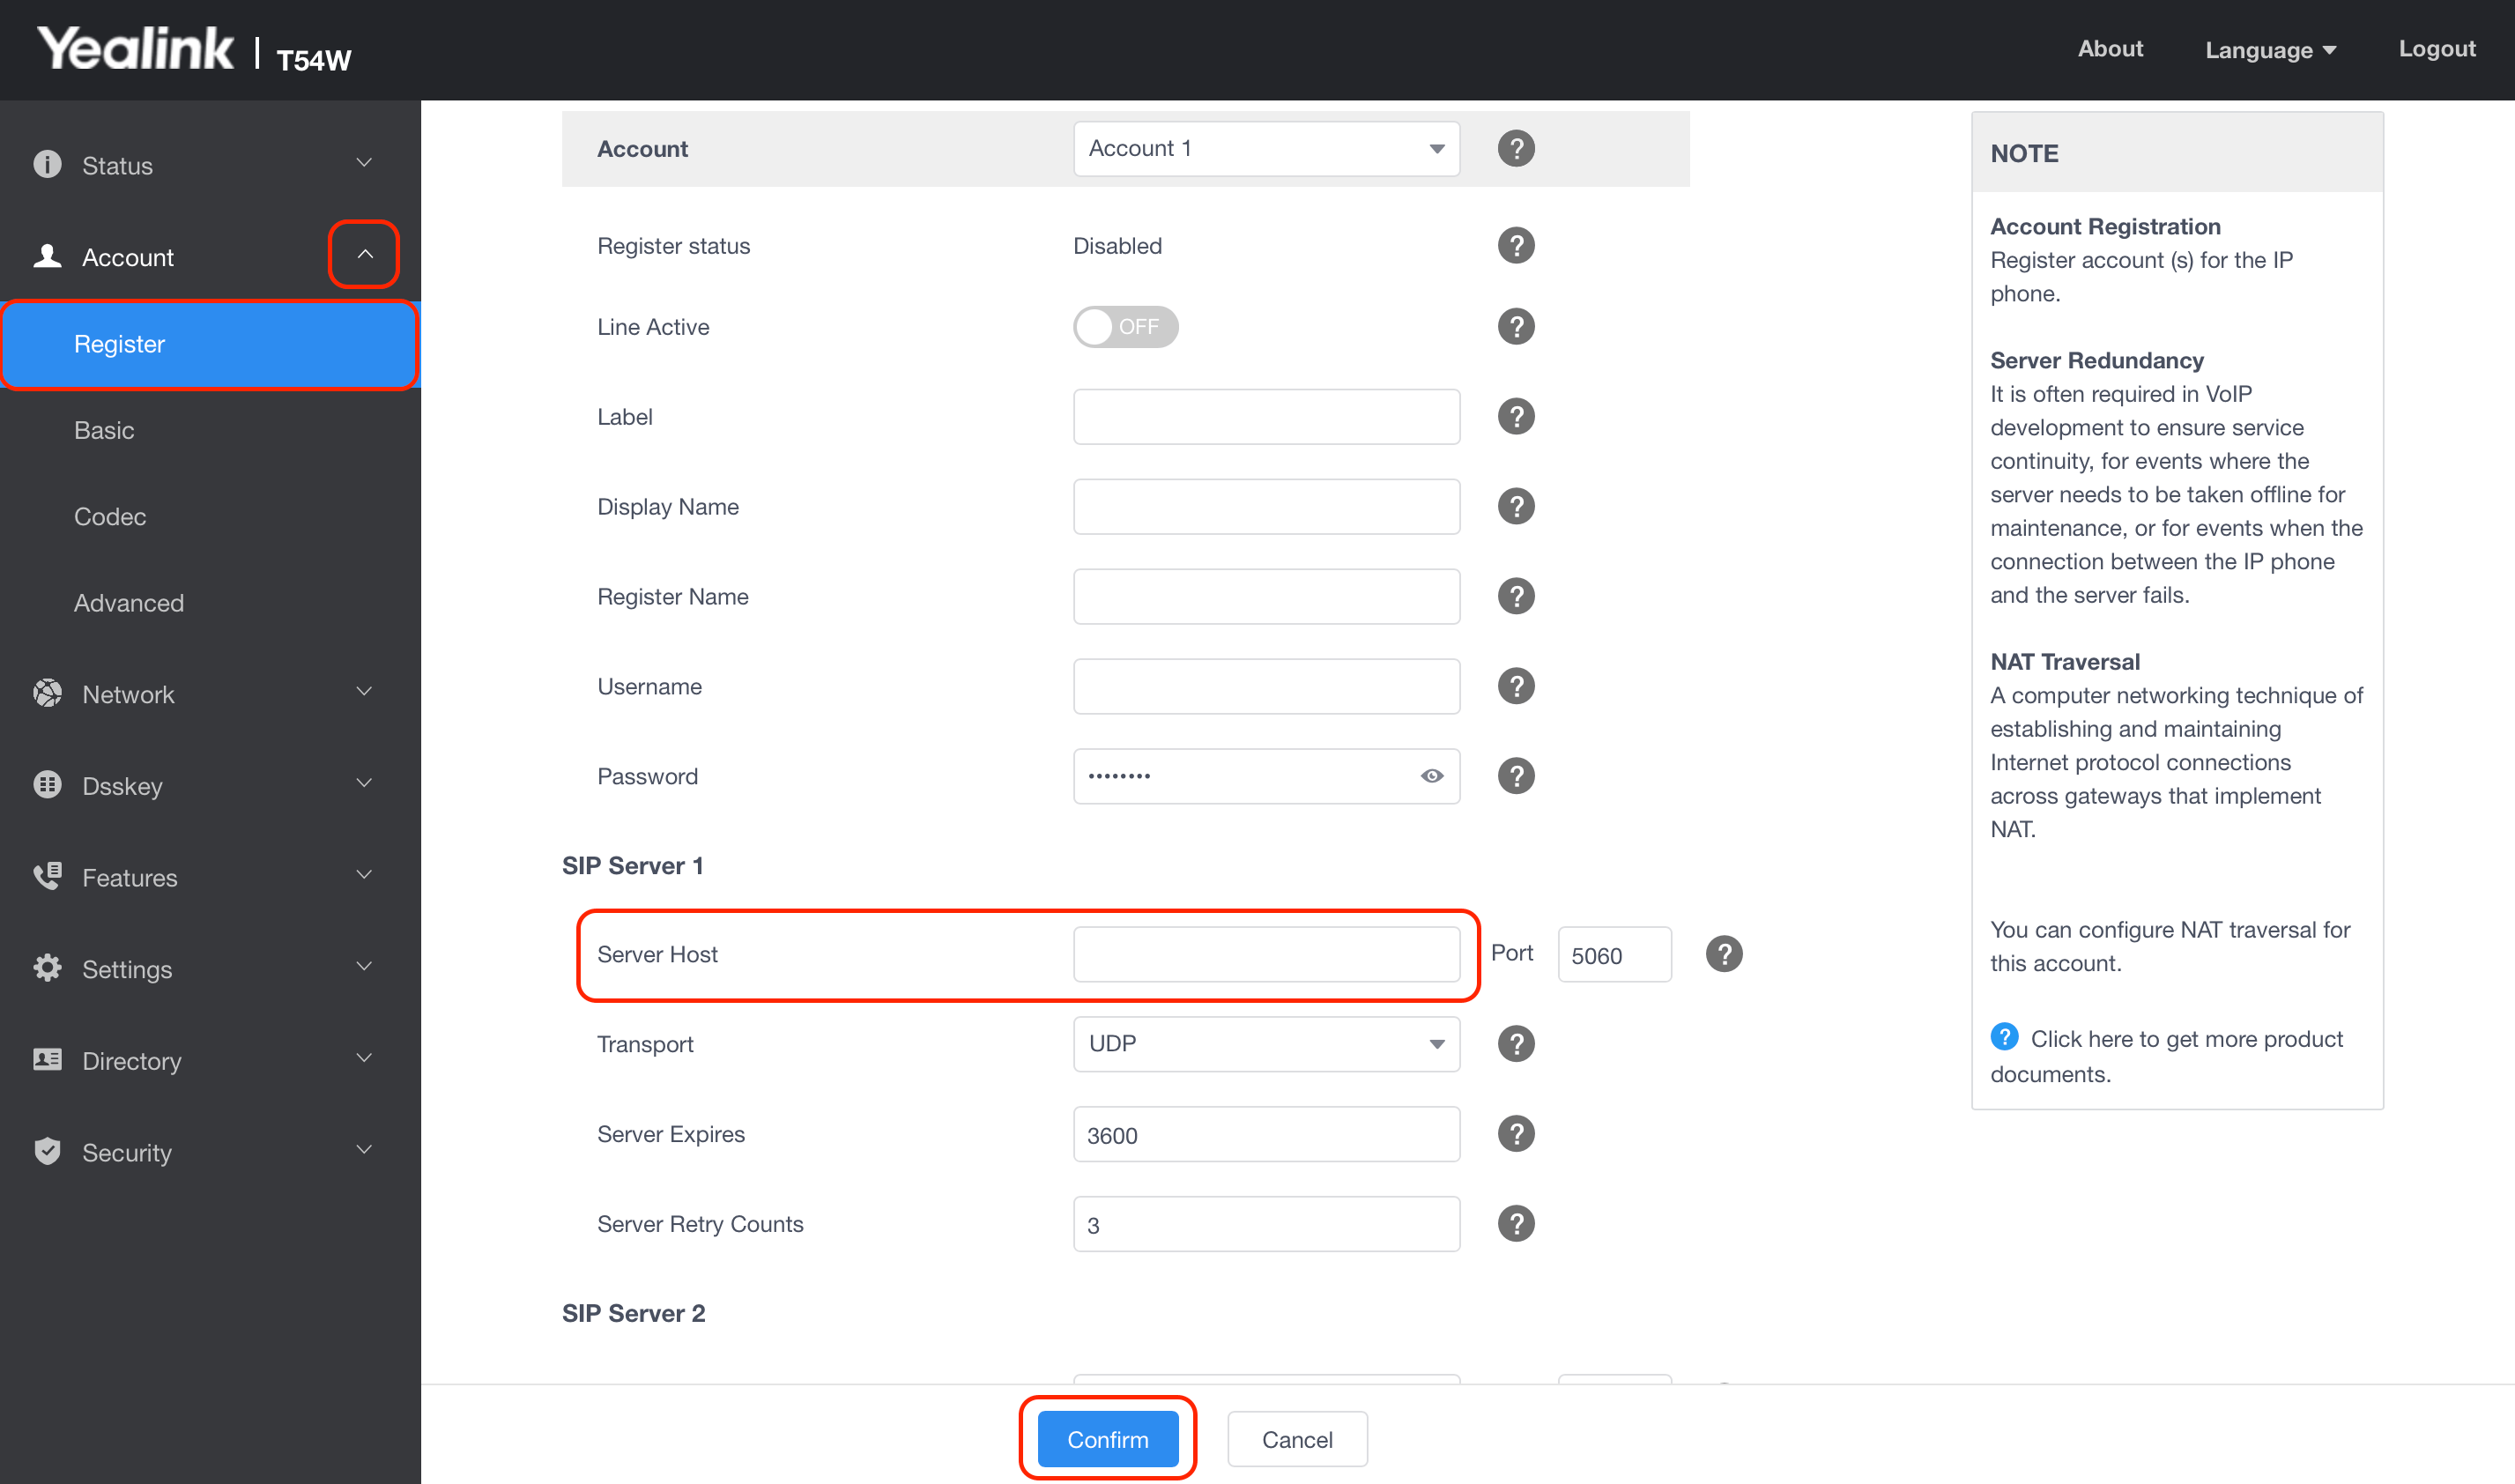 9. Under **SIP Server 1**, enter your **SIP Server #1** details in the **Server Host** field. The **SIP Server #1** details are listed in Engage under **Settings** > **SIP Settings**.
 10. Enter the same **SIP Server #1** details in the **Outbound Proxy Server 1** field.
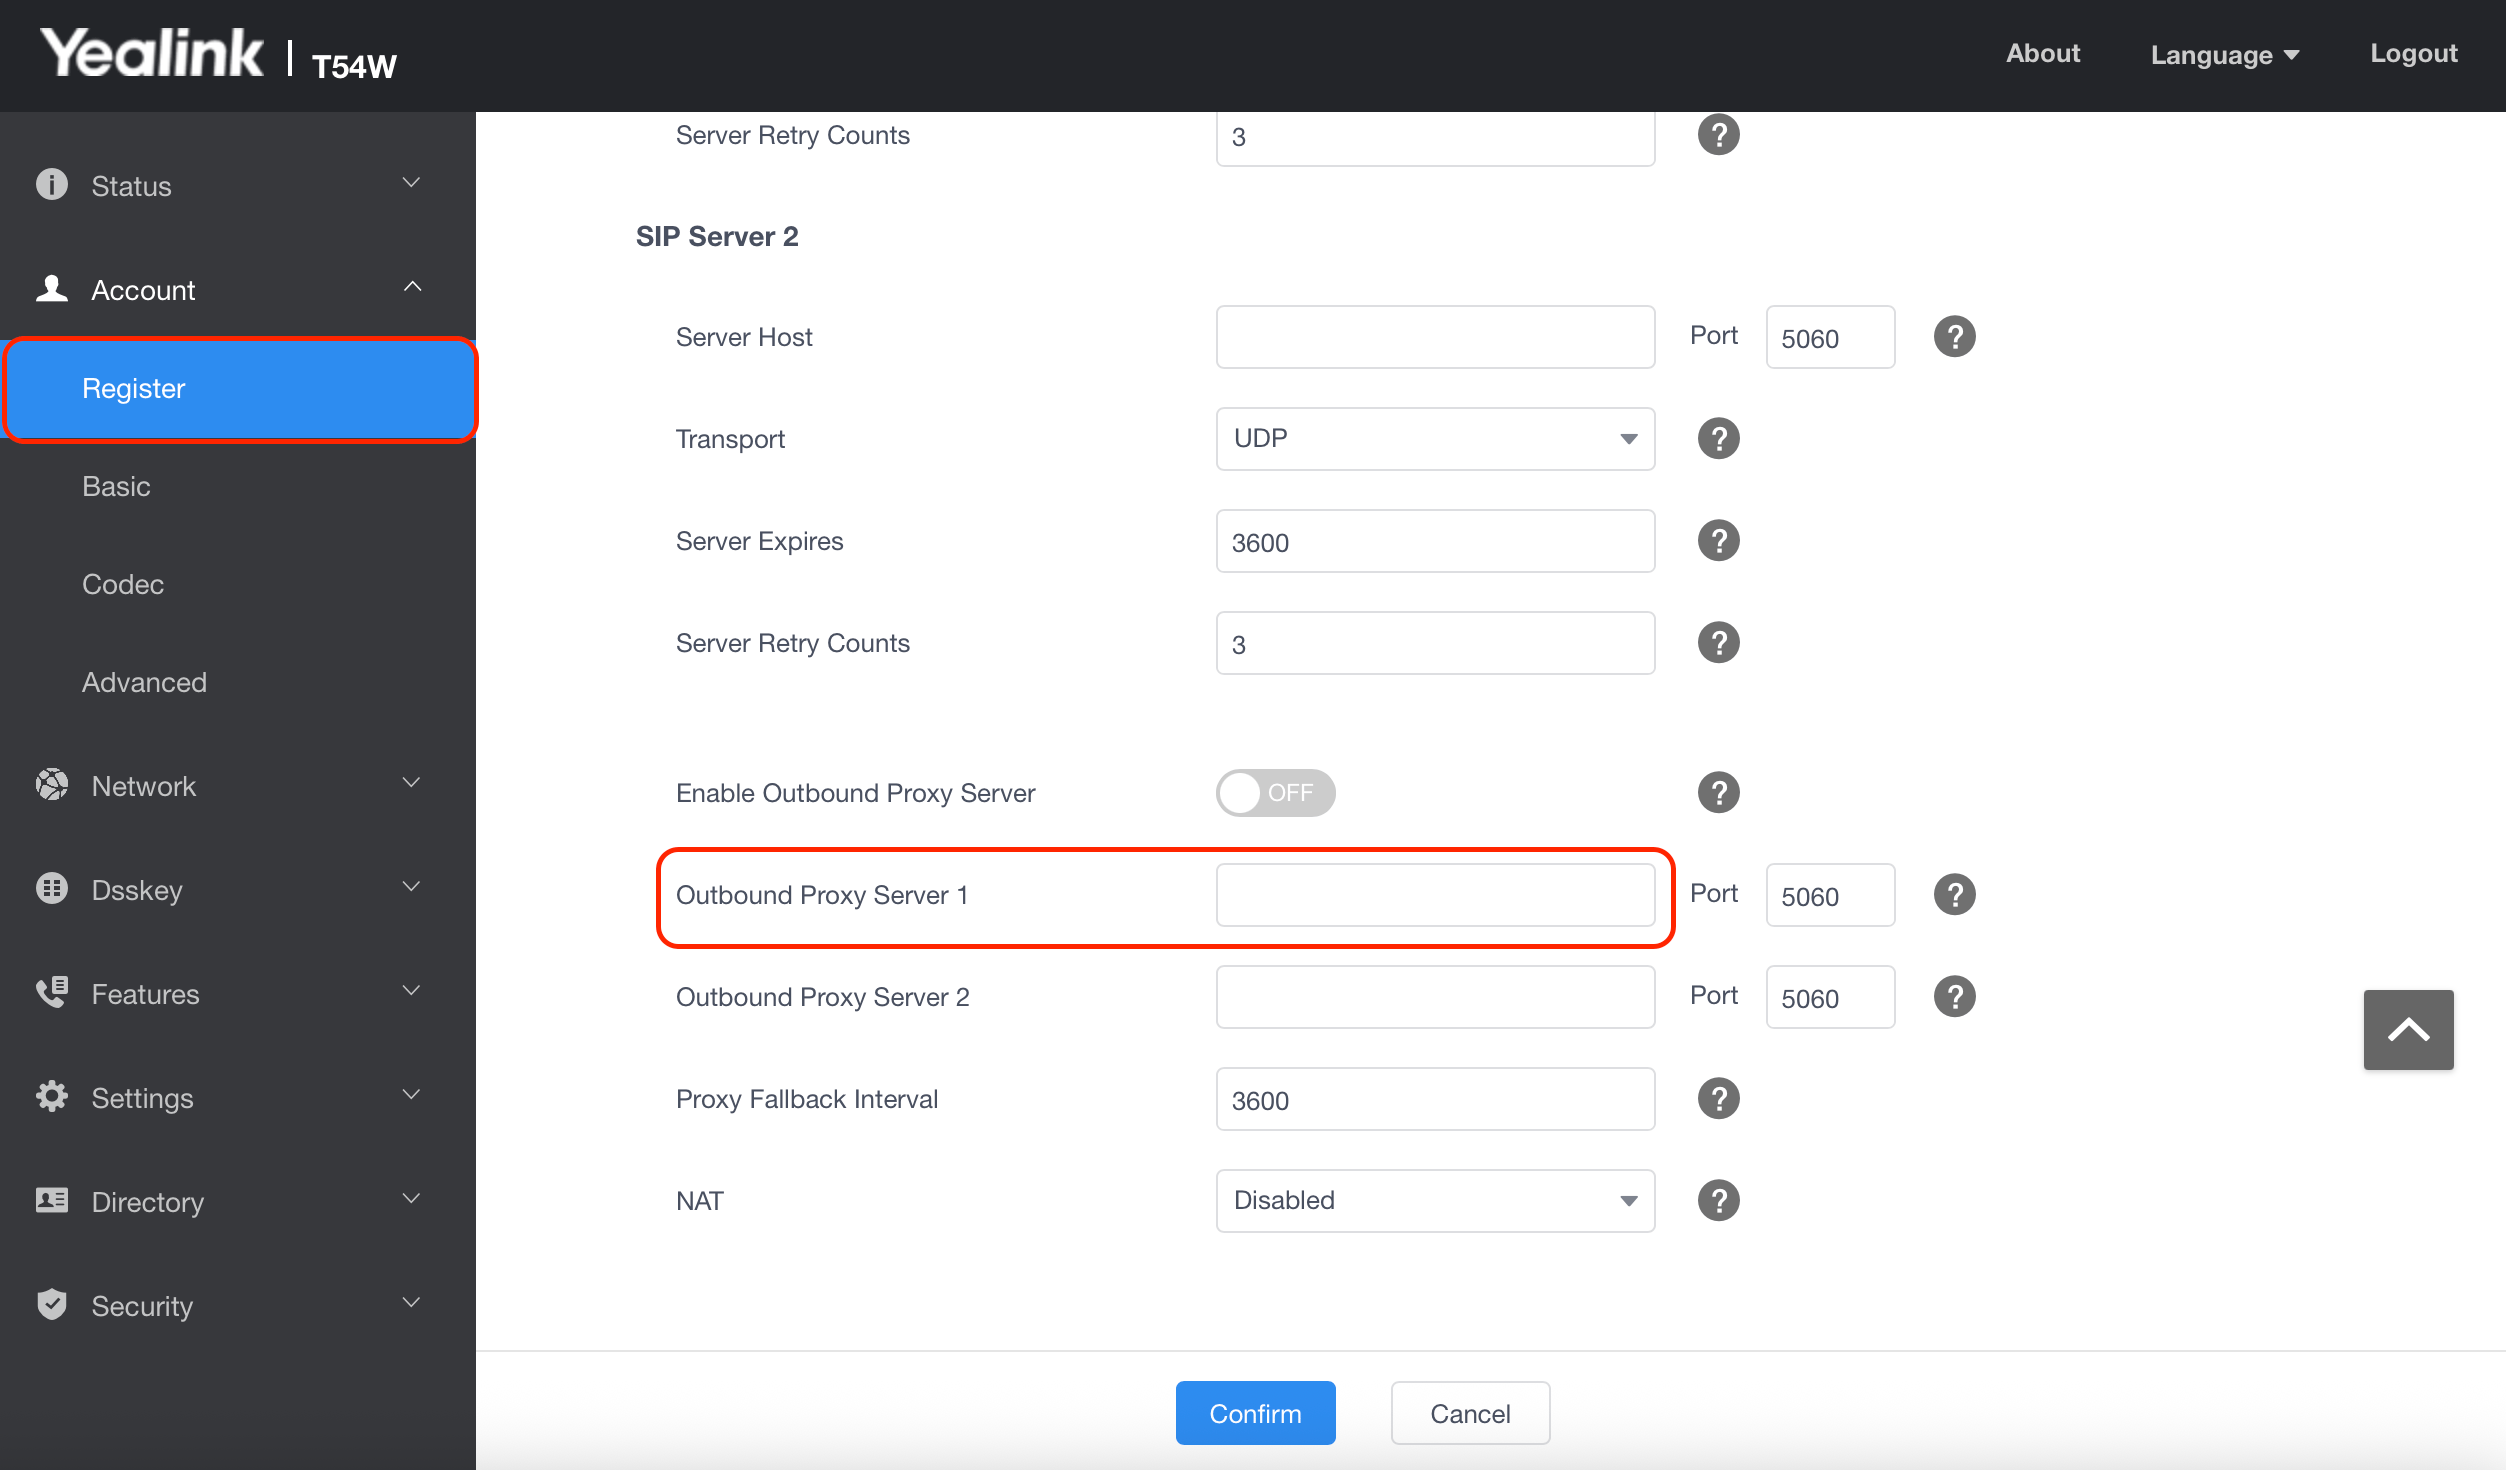 11. Under **SIP Server 2**, enter your **SIP Server #2** details from your Engage Settings in both the **Server Host** field and the **Outbound Proxy Server 2** field.
12. Toggle on **Enable Outbound Proxy Server**, and in the **NAT** field, select **STUN** from the drop-down.
11. Under **SIP Server 2**, enter your **SIP Server #2** details from your Engage Settings in both the **Server Host** field and the **Outbound Proxy Server 2** field.
12. Toggle on **Enable Outbound Proxy Server**, and in the **NAT** field, select **STUN** from the drop-down.
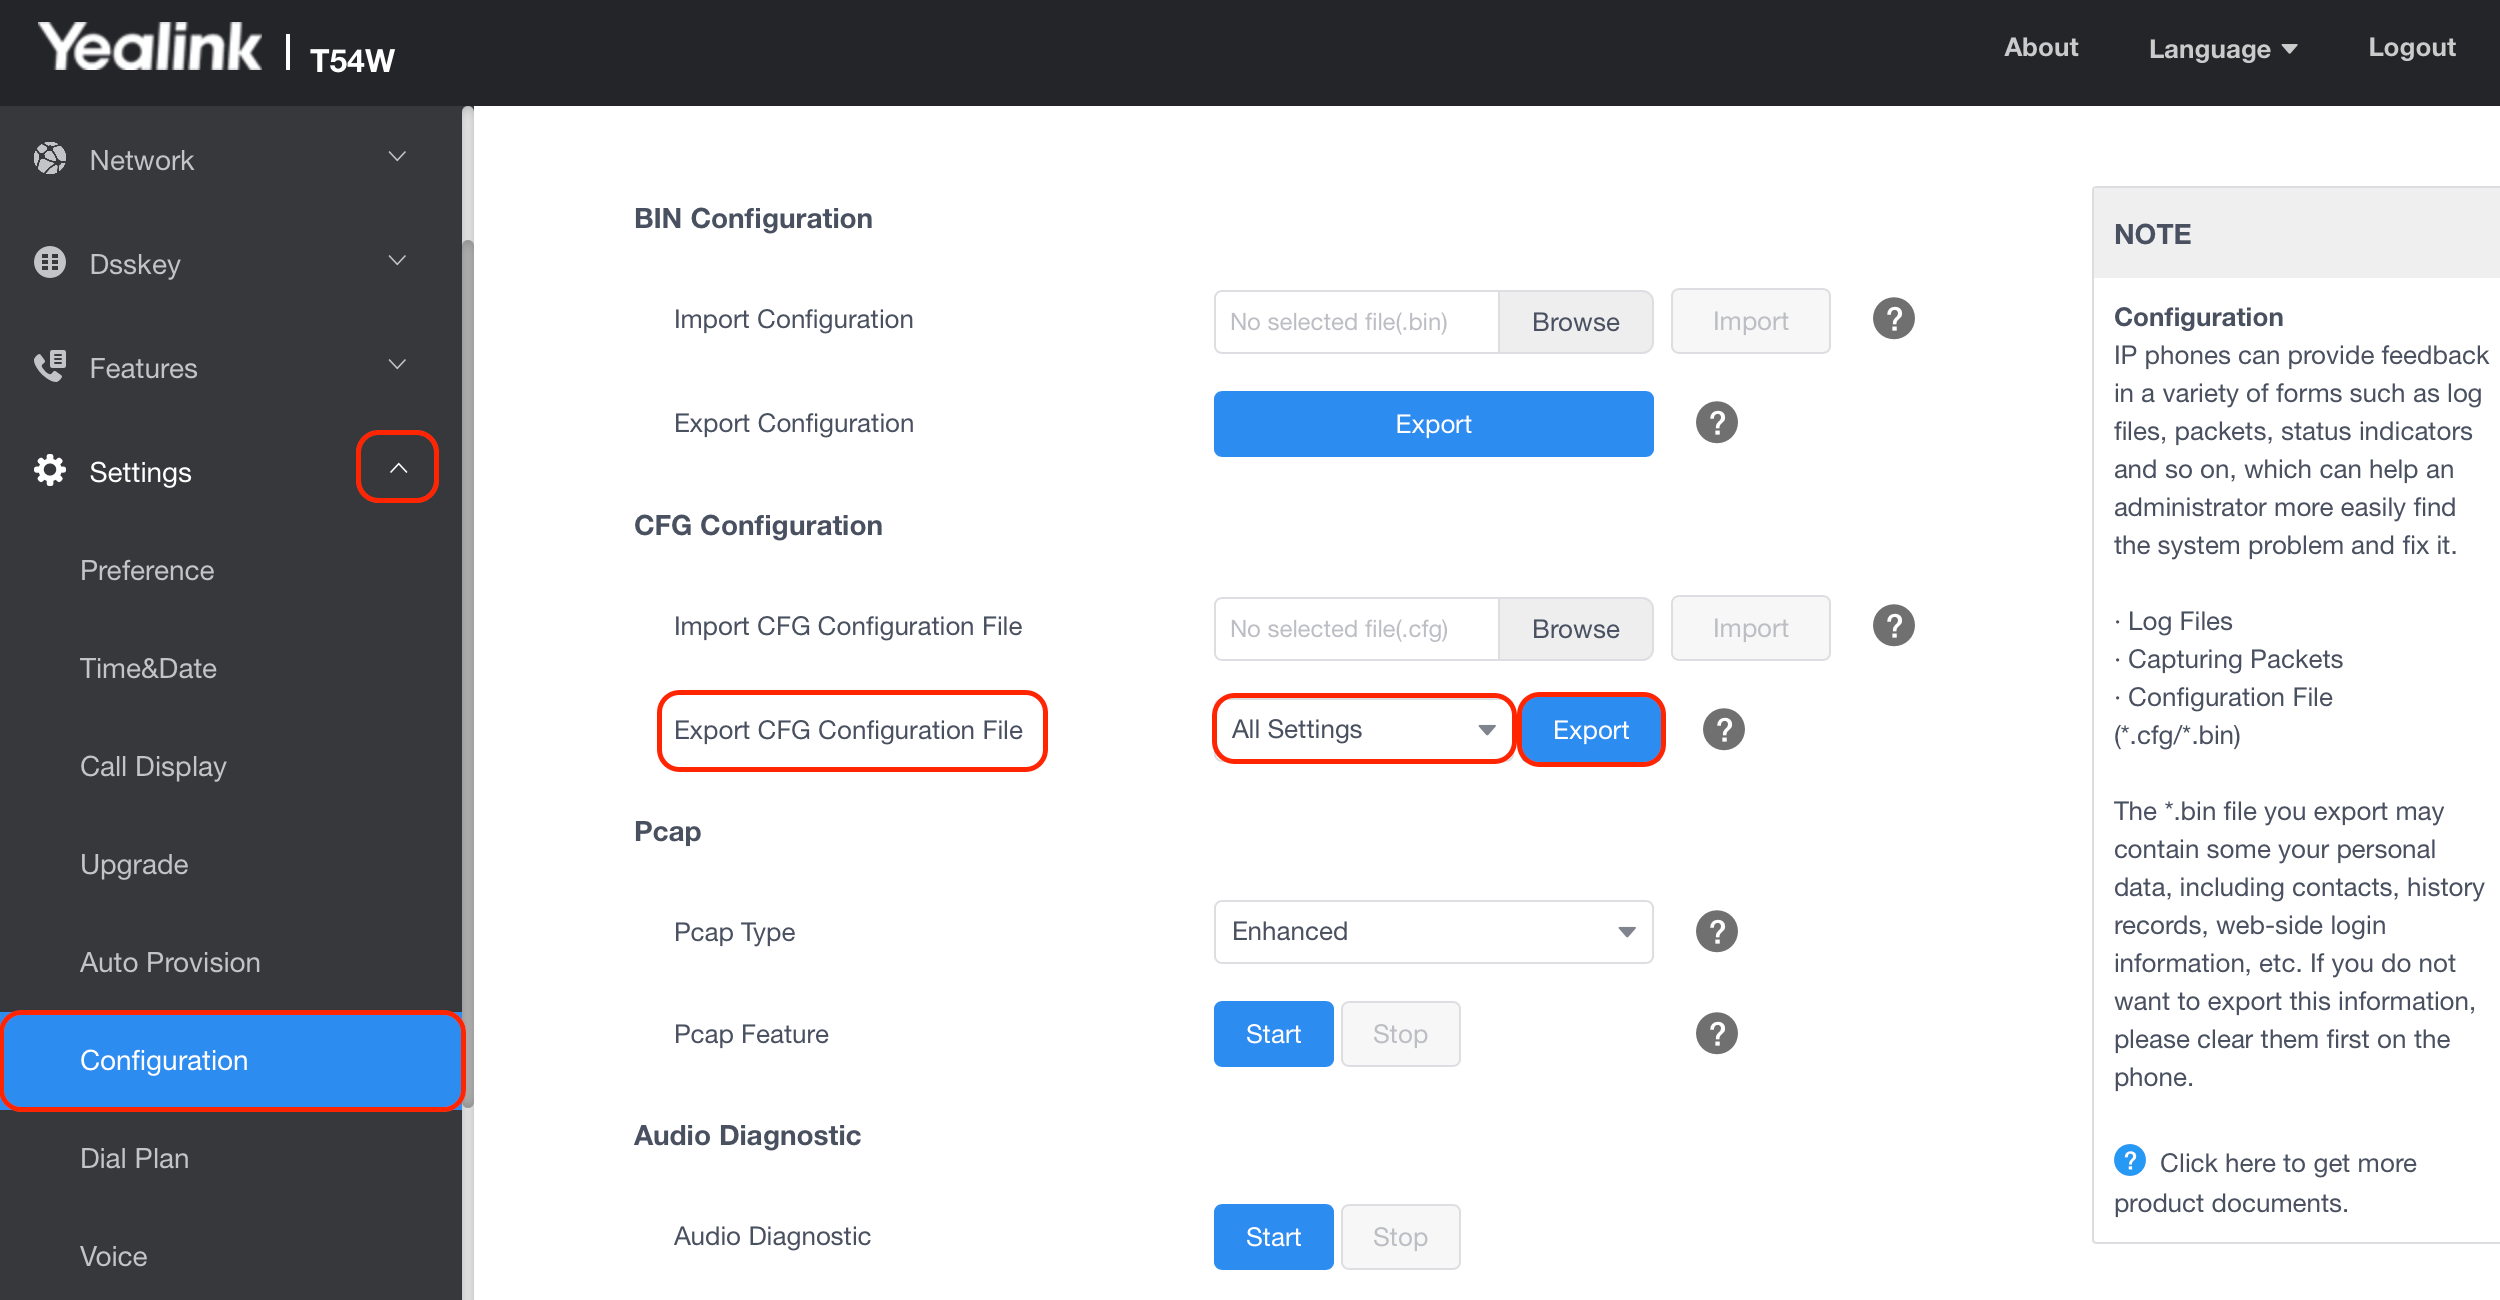
 13. Select the **Settings** tab from the menu on the left side of your screen, then select the **Configuration** subtab.
14. Under **CFG Configuration**, make sure **All Settings** is selected next to **Export CFG Configuration File**, then select **Export**.
13. Select the **Settings** tab from the menu on the left side of your screen, then select the **Configuration** subtab.
14. Under **CFG Configuration**, make sure **All Settings** is selected next to **Export CFG Configuration File**, then select **Export**.
 > **FieldPulse Pro Tip:** Name each configuration file you export according to the model of the VoIP phone you are using — this helps both you and the FieldPulse team identify and manage the files. (Example: `Yealink_T-54W_YOUR COMPANY NAME_DATE`)
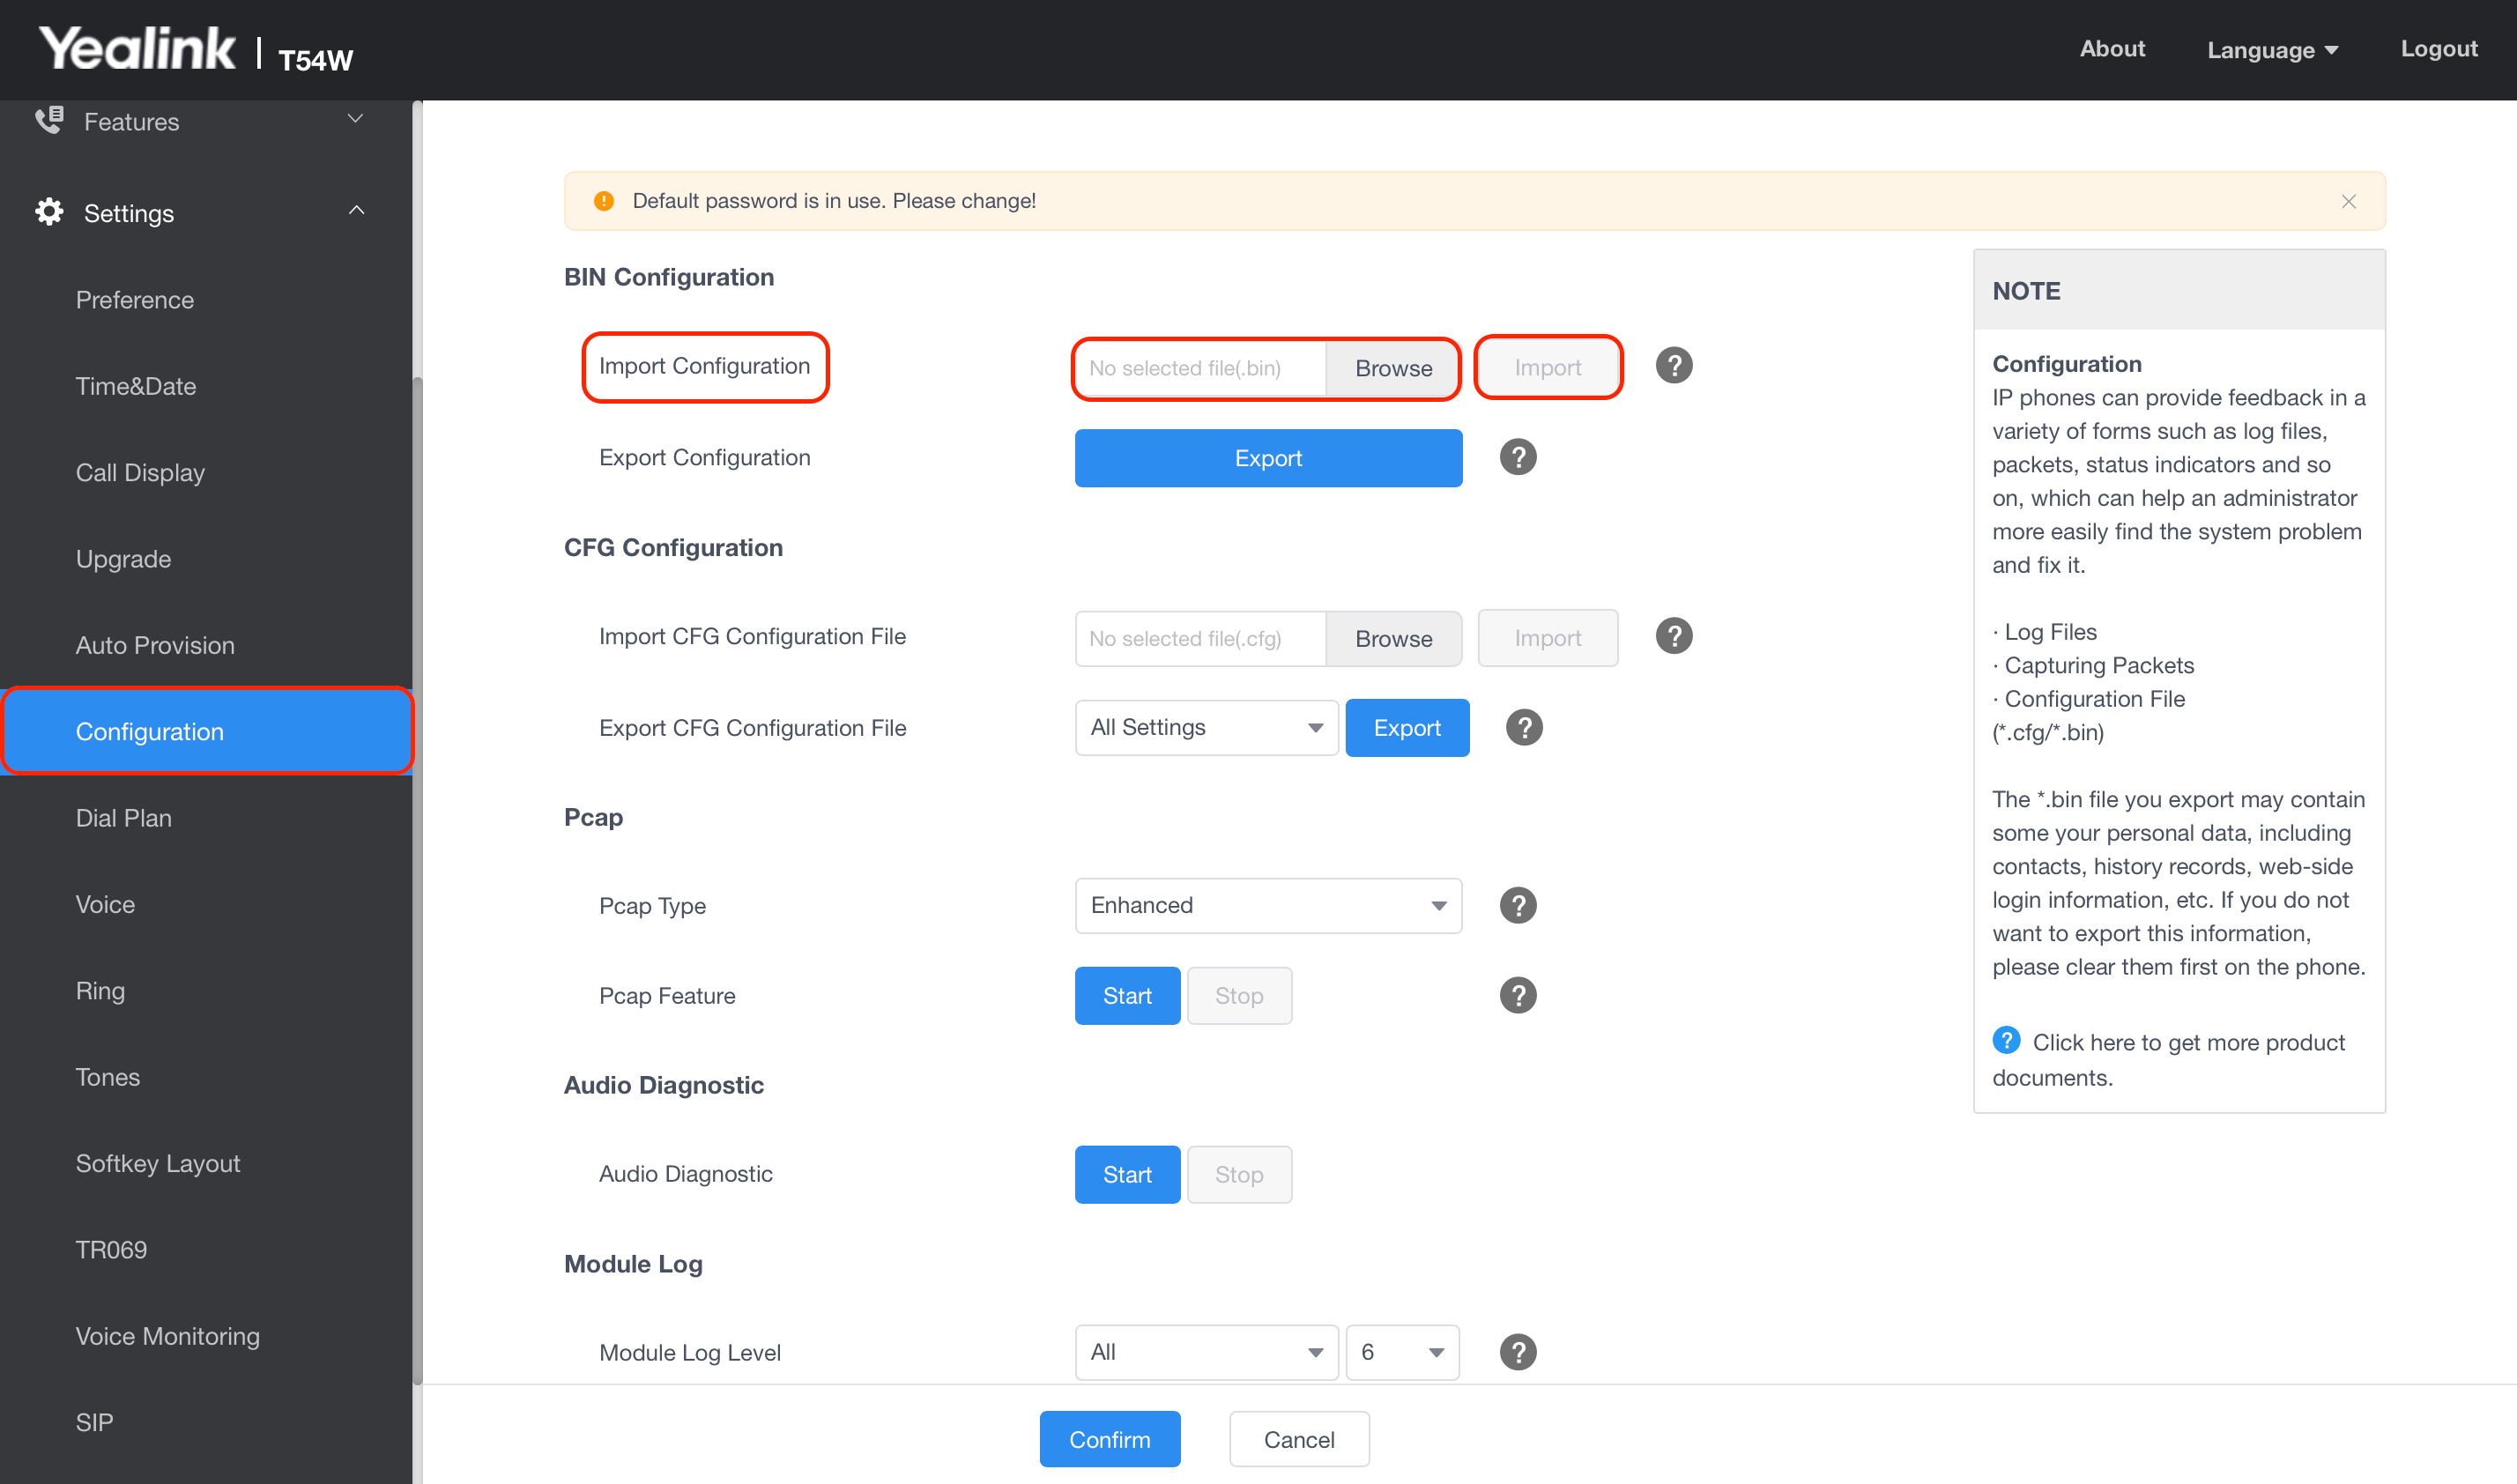
15. Under **BIN Configuration** on the same **Configuration** subtab, attach the file you exported in the **Import Configuration** field, then select **Import**.
> **FieldPulse Pro Tip:** Name each configuration file you export according to the model of the VoIP phone you are using — this helps both you and the FieldPulse team identify and manage the files. (Example: `Yealink_T-54W_YOUR COMPANY NAME_DATE`)
15. Under **BIN Configuration** on the same **Configuration** subtab, attach the file you exported in the **Import Configuration** field, then select **Import**.
 ## Settings reference
| **Field** | **What to enter** |
| --------------------------------- | ------------------------------------------------------------------------------------------------------------------------------------------------------------------------------ |
| **Server Host (SIP Server 1)** | Your **SIP Server #1** details from Engage **Settings** > **SIP Settings**. |
| **Outbound Proxy Server 1** | Your **SIP Server #1** details from Engage **Settings** > **SIP Settings**. |
| **Server Host (SIP Server 2)** | Your **SIP Server #2** details from Engage **Settings** > **SIP Settings**. |
| **Outbound Proxy Server 2** | Your **SIP Server #2** details from Engage **Settings** > **SIP Settings**. |
| **Enable Outbound Proxy Server** | Toggle on. |
| **NAT** | Select **STUN** from the drop-down. |
| **Export CFG Configuration File** | Select **All Settings**, then **Export**. Name the file by phone model — for example, `Yealink_T-54W_YOUR COMPANY NAME_DATE` — so you and the FieldPulse team can identify it. |
## Related articles
* [Setting Up Engage via SIP (DID)](/add-ons/engage/sip-did)
* [Engage Overview](/add-ons/engage/overview)
* [Troubleshooting Dropped or Rough Engage Calls](/add-ons/engage/network-diagnosis)
Your Yealink phone is set up when its **SIP Server 1** and **SIP Server 2** fields hold your Engage SIP details, the configuration file is exported and imported, and the FieldPulse team has the information it needs to assist with the rest of your setup.
## Related topics
- [Setting Up Engage via SIP (DID)](/add-ons/engage/sip-did.md)
- [Troubleshooting Dropped or Rough Engage Calls](/add-ons/engage/network-diagnosis.md)
- [Engage Phone System](/add-ons/engage/index.md)
- [Setting Up Operator AI](/add-ons/ai/operator-ai.md)
## Settings reference
| **Field** | **What to enter** |
| --------------------------------- | ------------------------------------------------------------------------------------------------------------------------------------------------------------------------------ |
| **Server Host (SIP Server 1)** | Your **SIP Server #1** details from Engage **Settings** > **SIP Settings**. |
| **Outbound Proxy Server 1** | Your **SIP Server #1** details from Engage **Settings** > **SIP Settings**. |
| **Server Host (SIP Server 2)** | Your **SIP Server #2** details from Engage **Settings** > **SIP Settings**. |
| **Outbound Proxy Server 2** | Your **SIP Server #2** details from Engage **Settings** > **SIP Settings**. |
| **Enable Outbound Proxy Server** | Toggle on. |
| **NAT** | Select **STUN** from the drop-down. |
| **Export CFG Configuration File** | Select **All Settings**, then **Export**. Name the file by phone model — for example, `Yealink_T-54W_YOUR COMPANY NAME_DATE` — so you and the FieldPulse team can identify it. |
## Related articles
* [Setting Up Engage via SIP (DID)](/add-ons/engage/sip-did)
* [Engage Overview](/add-ons/engage/overview)
* [Troubleshooting Dropped or Rough Engage Calls](/add-ons/engage/network-diagnosis)
Your Yealink phone is set up when its **SIP Server 1** and **SIP Server 2** fields hold your Engage SIP details, the configuration file is exported and imported, and the FieldPulse team has the information it needs to assist with the rest of your setup.
## Related topics
- [Setting Up Engage via SIP (DID)](/add-ons/engage/sip-did.md)
- [Troubleshooting Dropped or Rough Engage Calls](/add-ons/engage/network-diagnosis.md)
- [Engage Phone System](/add-ons/engage/index.md)
- [Setting Up Operator AI](/add-ons/ai/operator-ai.md)