> ## Documentation Index
> Fetch the complete documentation index at: https://help.fieldpulse.com/llms.txt
> Use this file to discover all available pages before exploring further.
# How to Create Geofences in Pulse Fleet Tracking
> Draw a geofence around a job site or office in FieldPulse's Pulse Fleet Tracking to log vehicle arrivals and departures, set alerts, and run reports.
> **Who uses this:** Admins — geofences are managed under **Admin > Geofences** in Pulse Fleet Tracking. **Availability:** United States and Canada · Requires the Pulse Fleet Tracking add-on.
A geofence is a virtual boundary you draw around a location — a job site, a customer address, or your office. When a vehicle enters or exits that boundary, Pulse Fleet Tracking logs it automatically, so you can set alerts and run a report showing every arrival and departure. This page covers creating a geofence and running the geofence report.
## Overview
Geofences turn "I think the tech got there around 10" into a logged fact. With a geofence, every entry and exit is timestamped, alerts can notify you the moment a vehicle arrives or leaves, and the geofence report shows how long each vehicle spent inside the boundary. You create geofences and run their reports from inside your Pulse Fleet Tracking account.
## Before you begin
* You need an active Pulse Fleet Tracking account. If it isn't set up yet, start with [Setting Up Pulse Fleet Tracking](/add-ons/fleet/pulse-fleet-tracking).
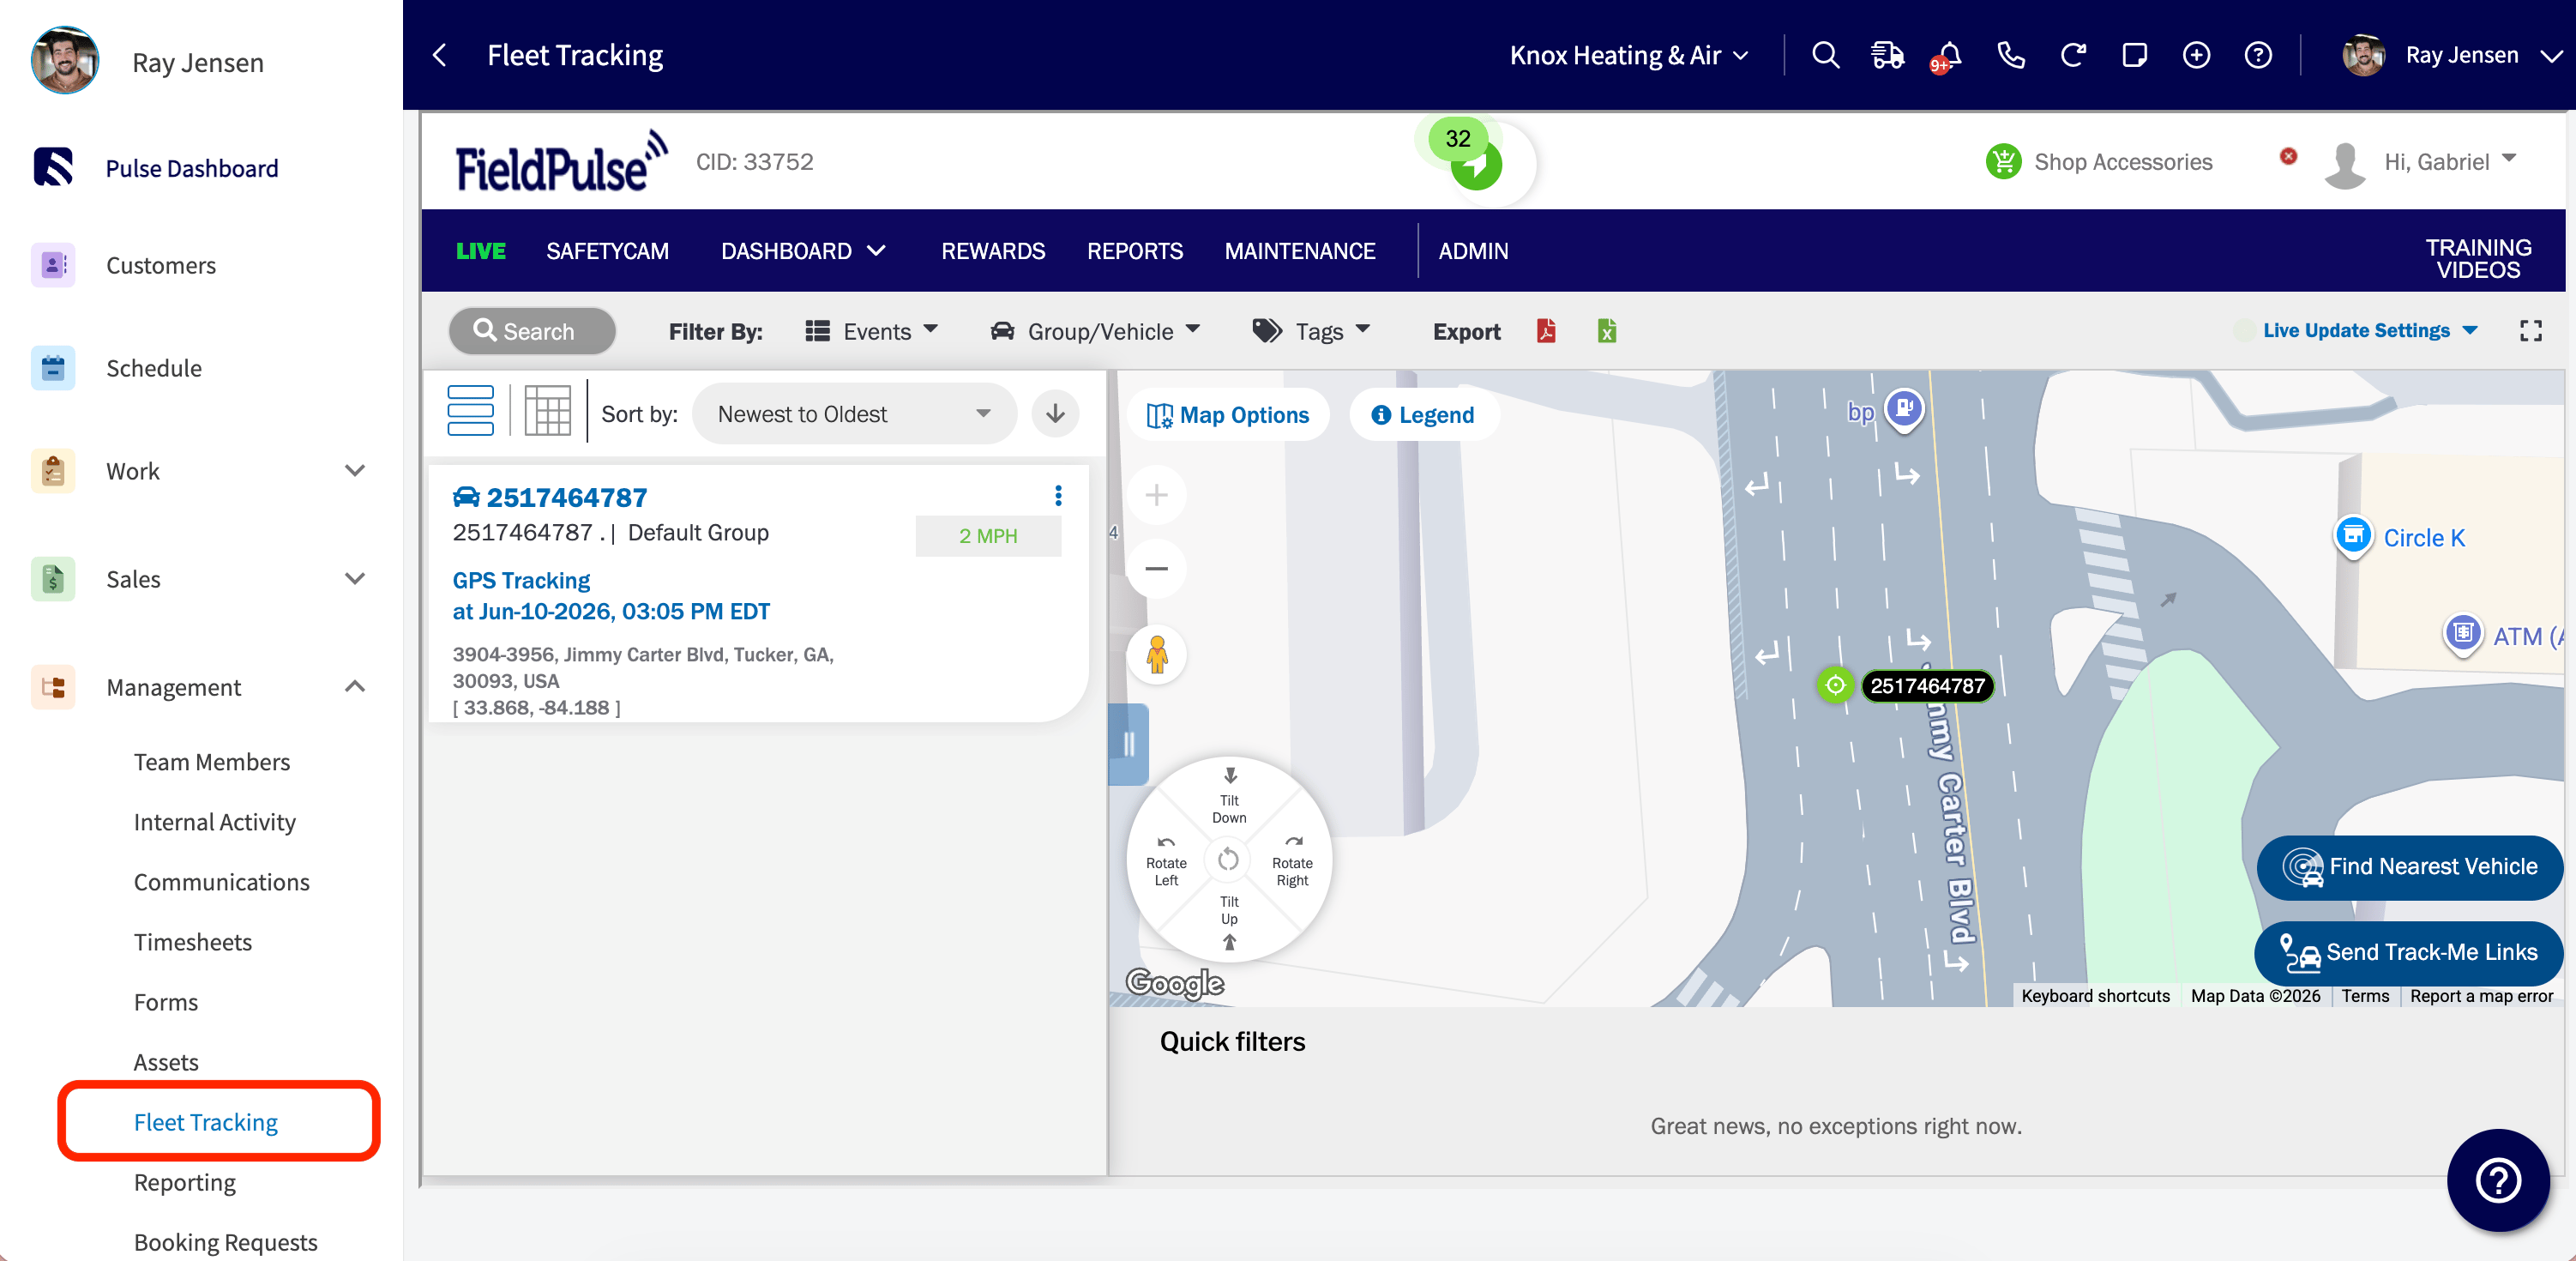
* Open Pulse Fleet Tracking first: from the left-side navigation in FieldPulse, select **Fleet Tracking** under **Management**. This opens your Pulse Fleet Tracking account.
 ## Create a geofence
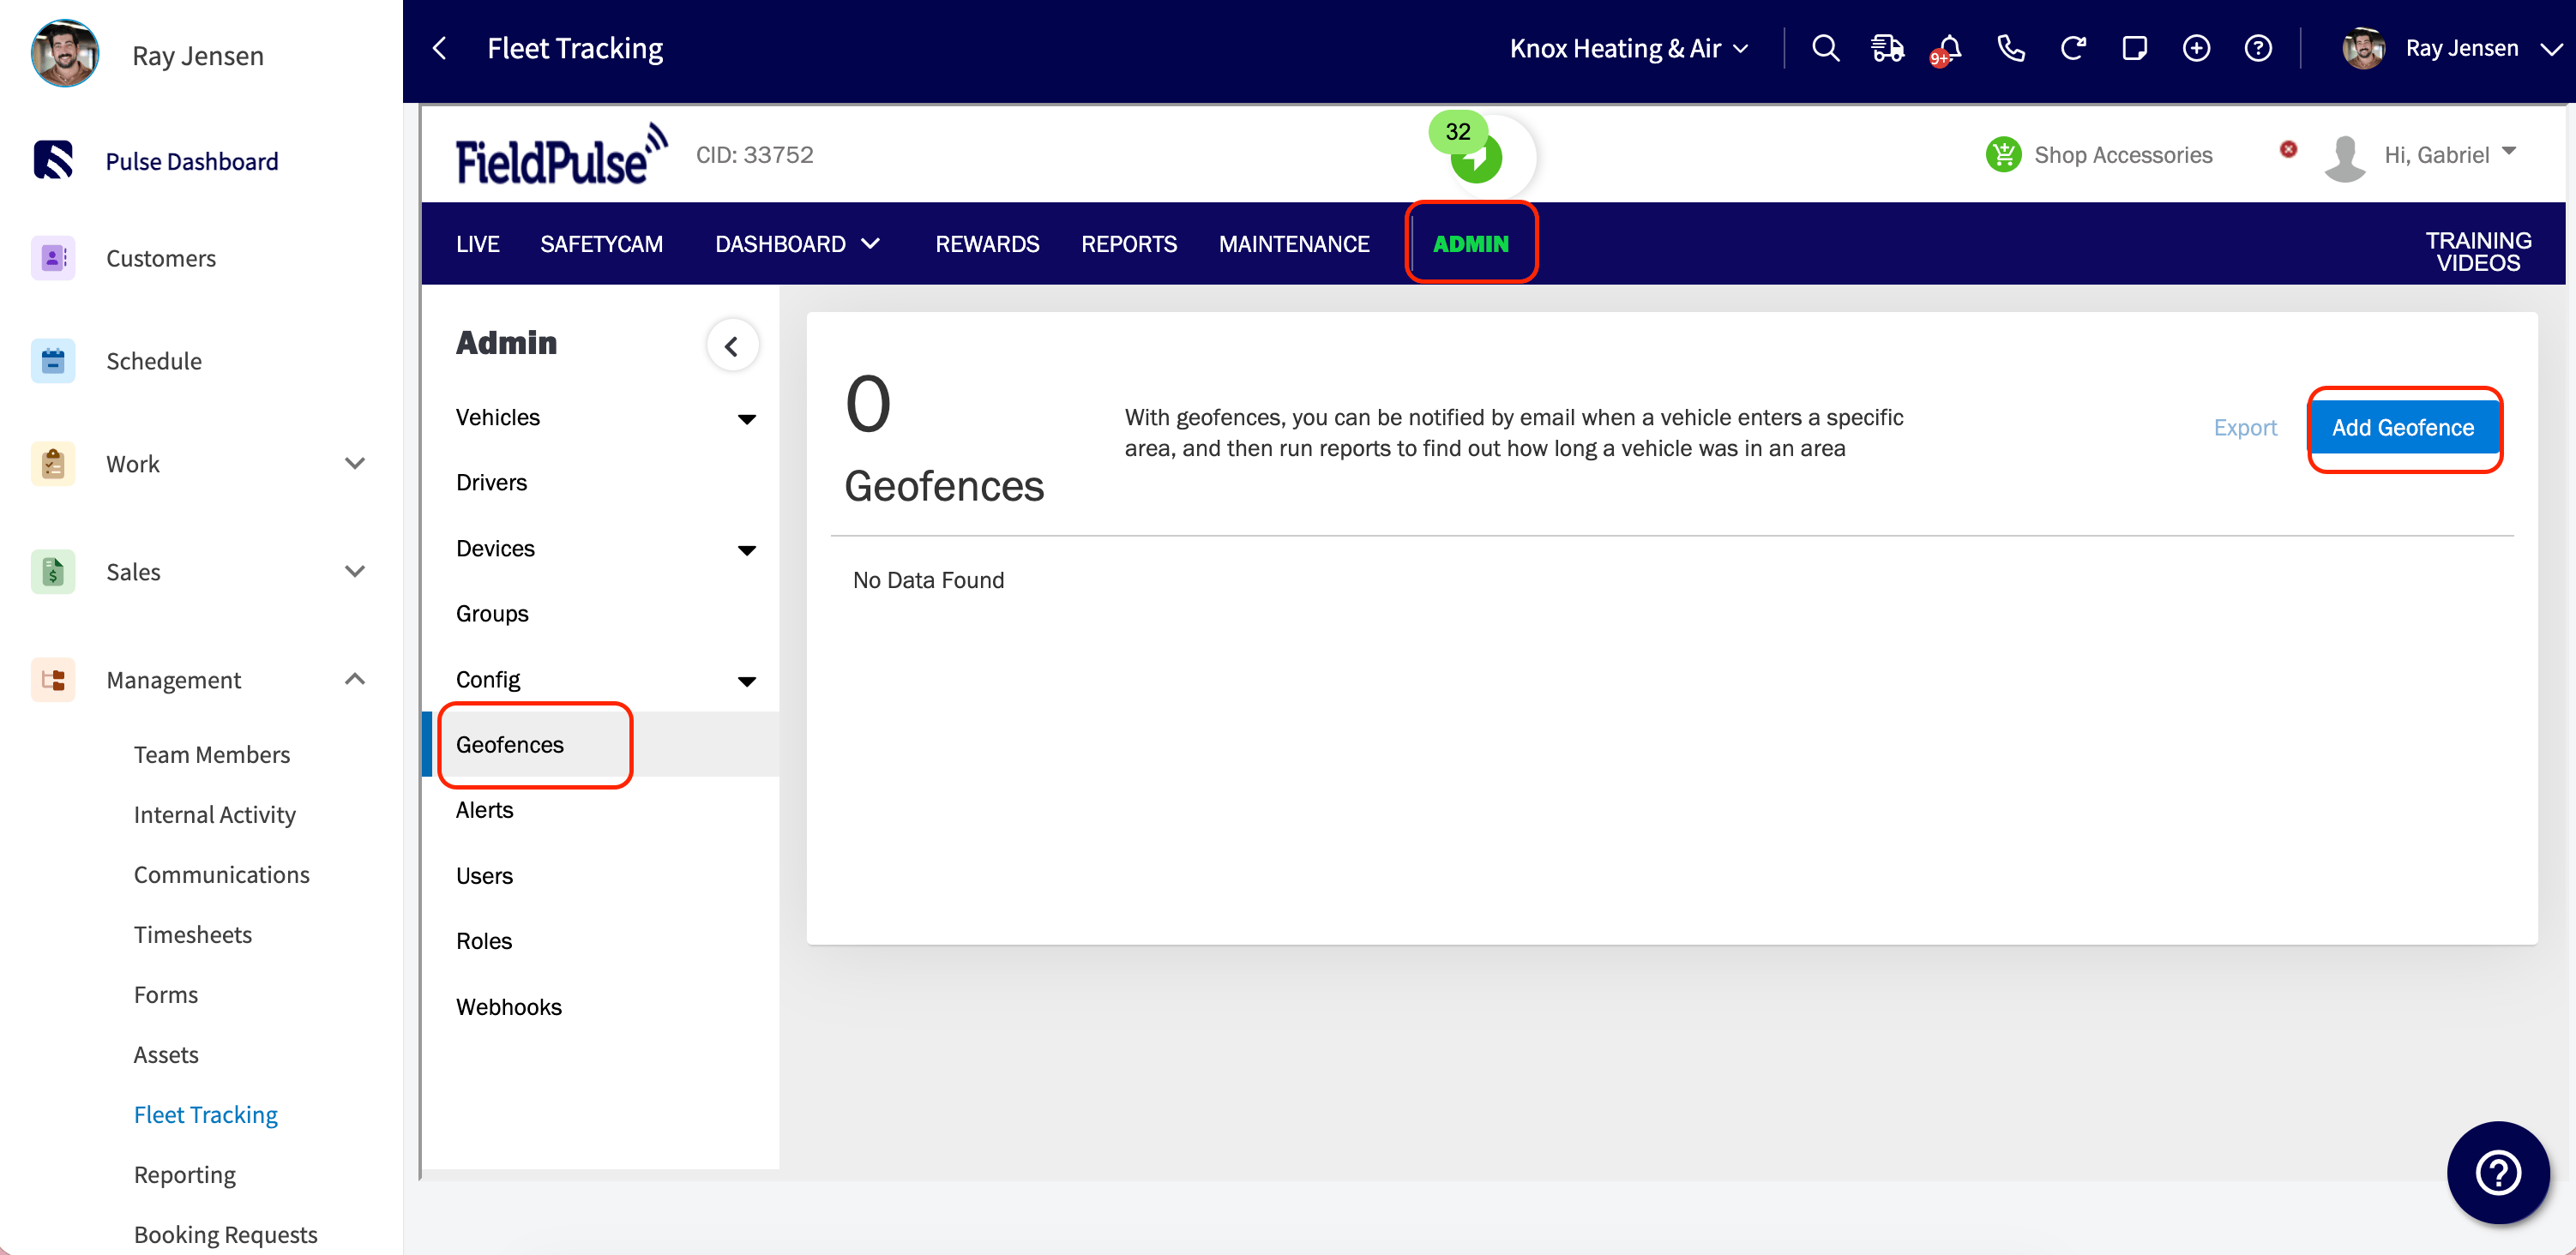
1. Go to **Admin > Geofences** and select **Add Geofence**.
## Create a geofence
1. Go to **Admin > Geofences** and select **Add Geofence**.
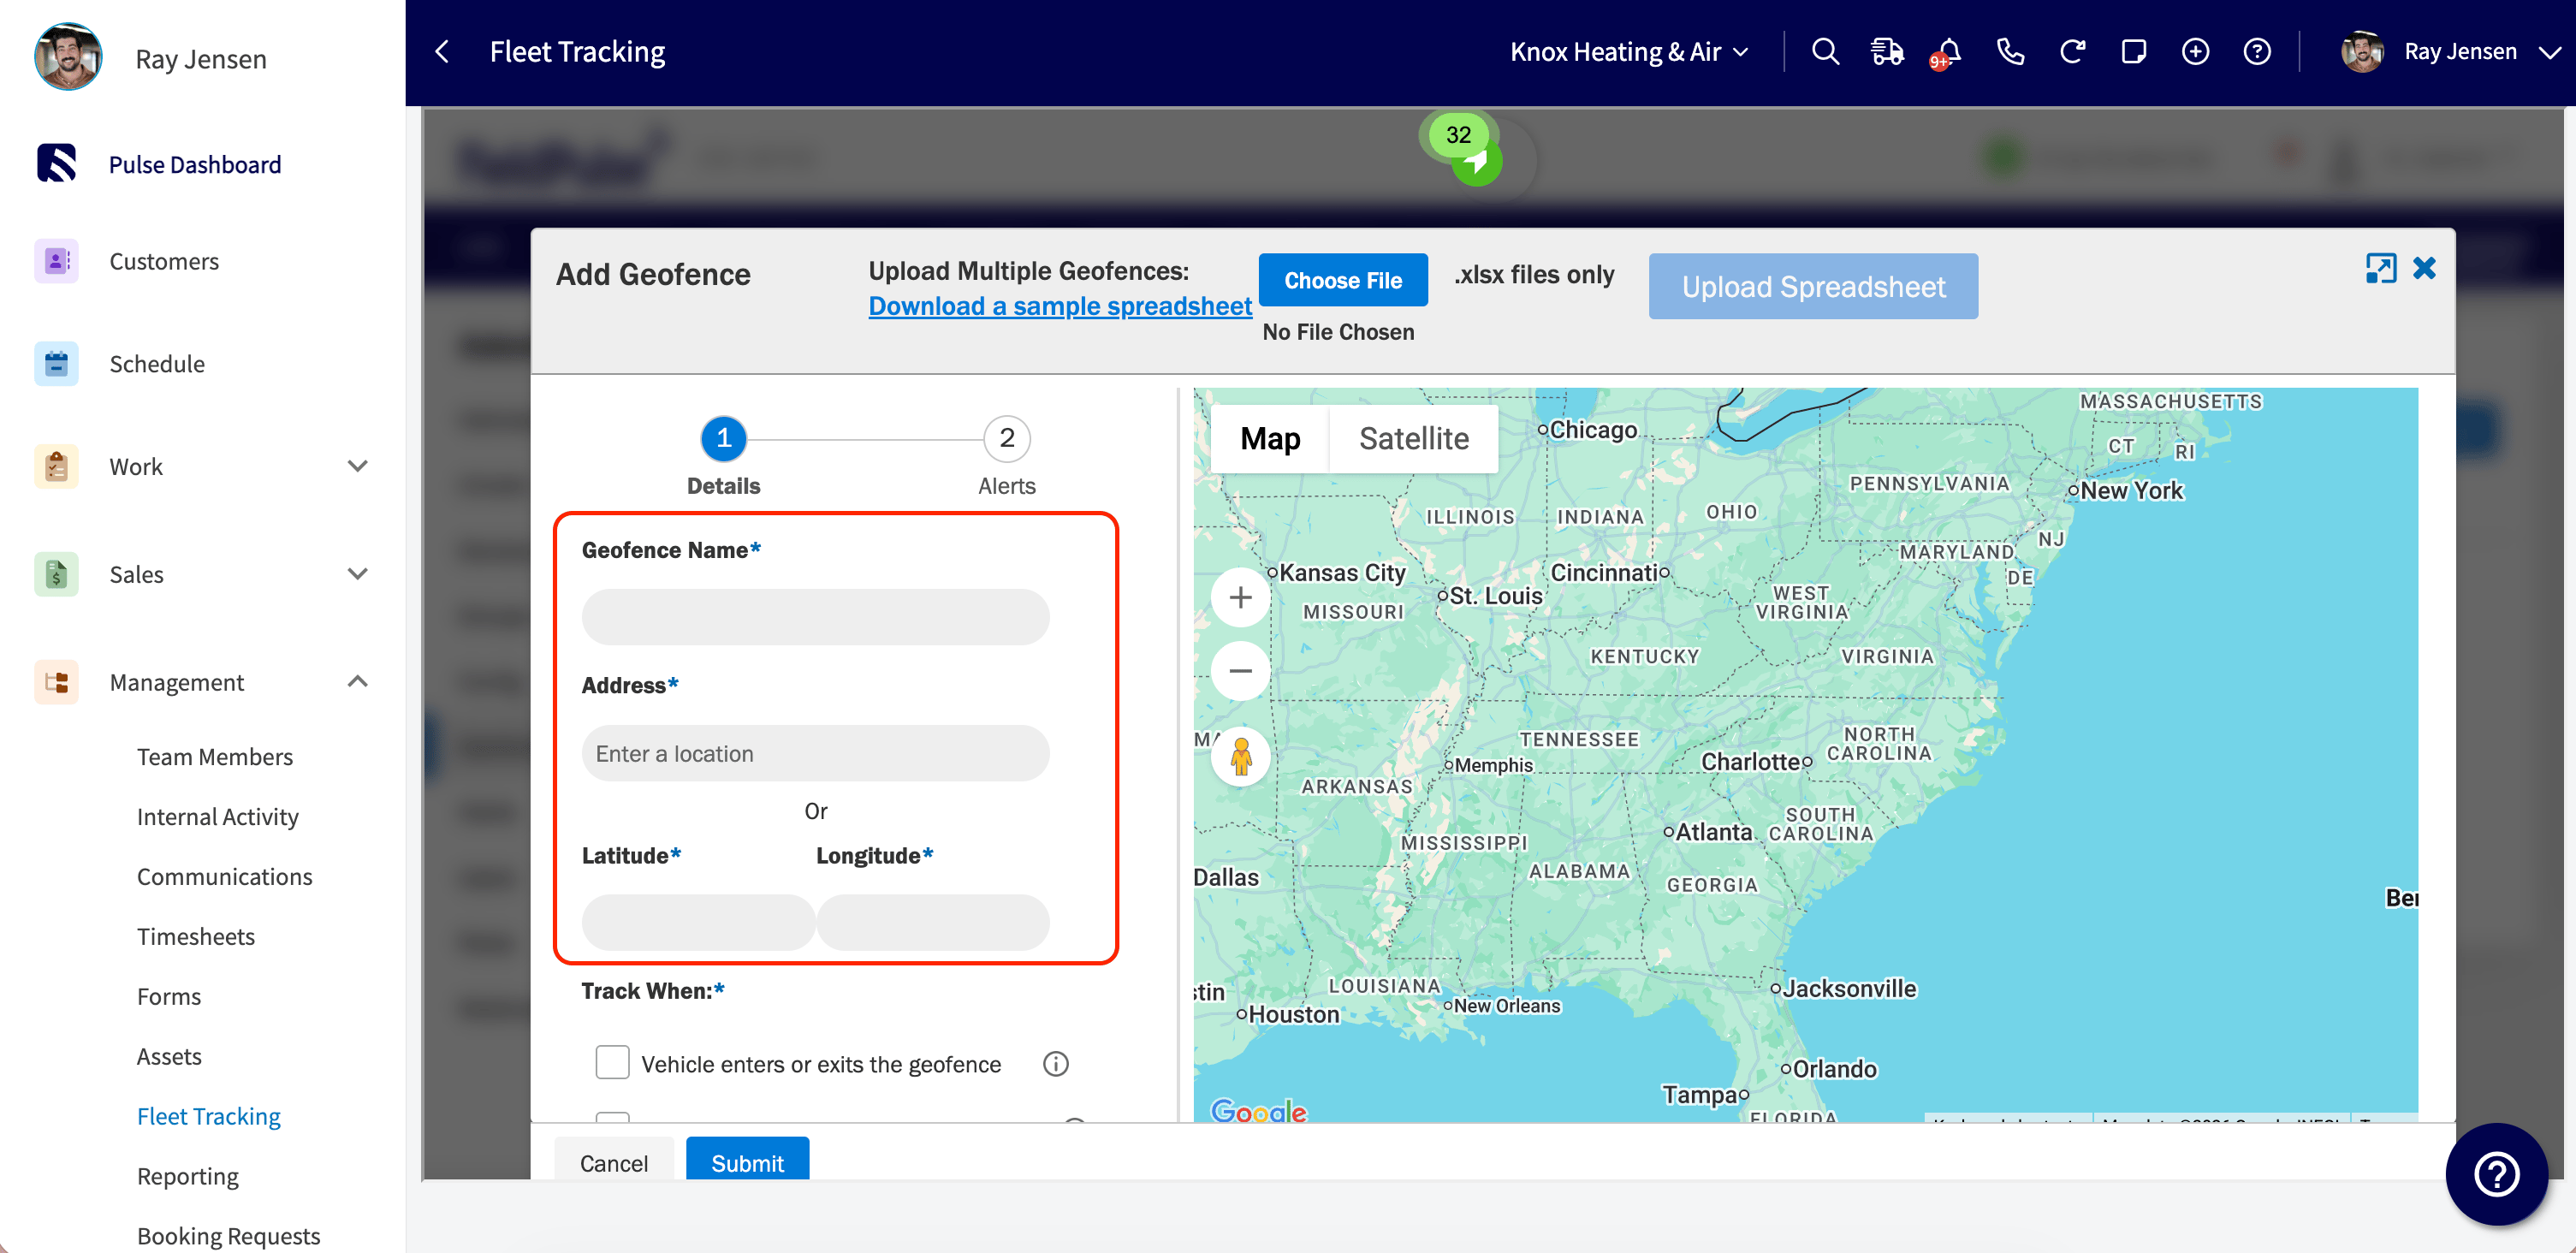
 2. Enter a **Geofence Name** and **Address**. You can use a street address or latitude/longitude coordinates.
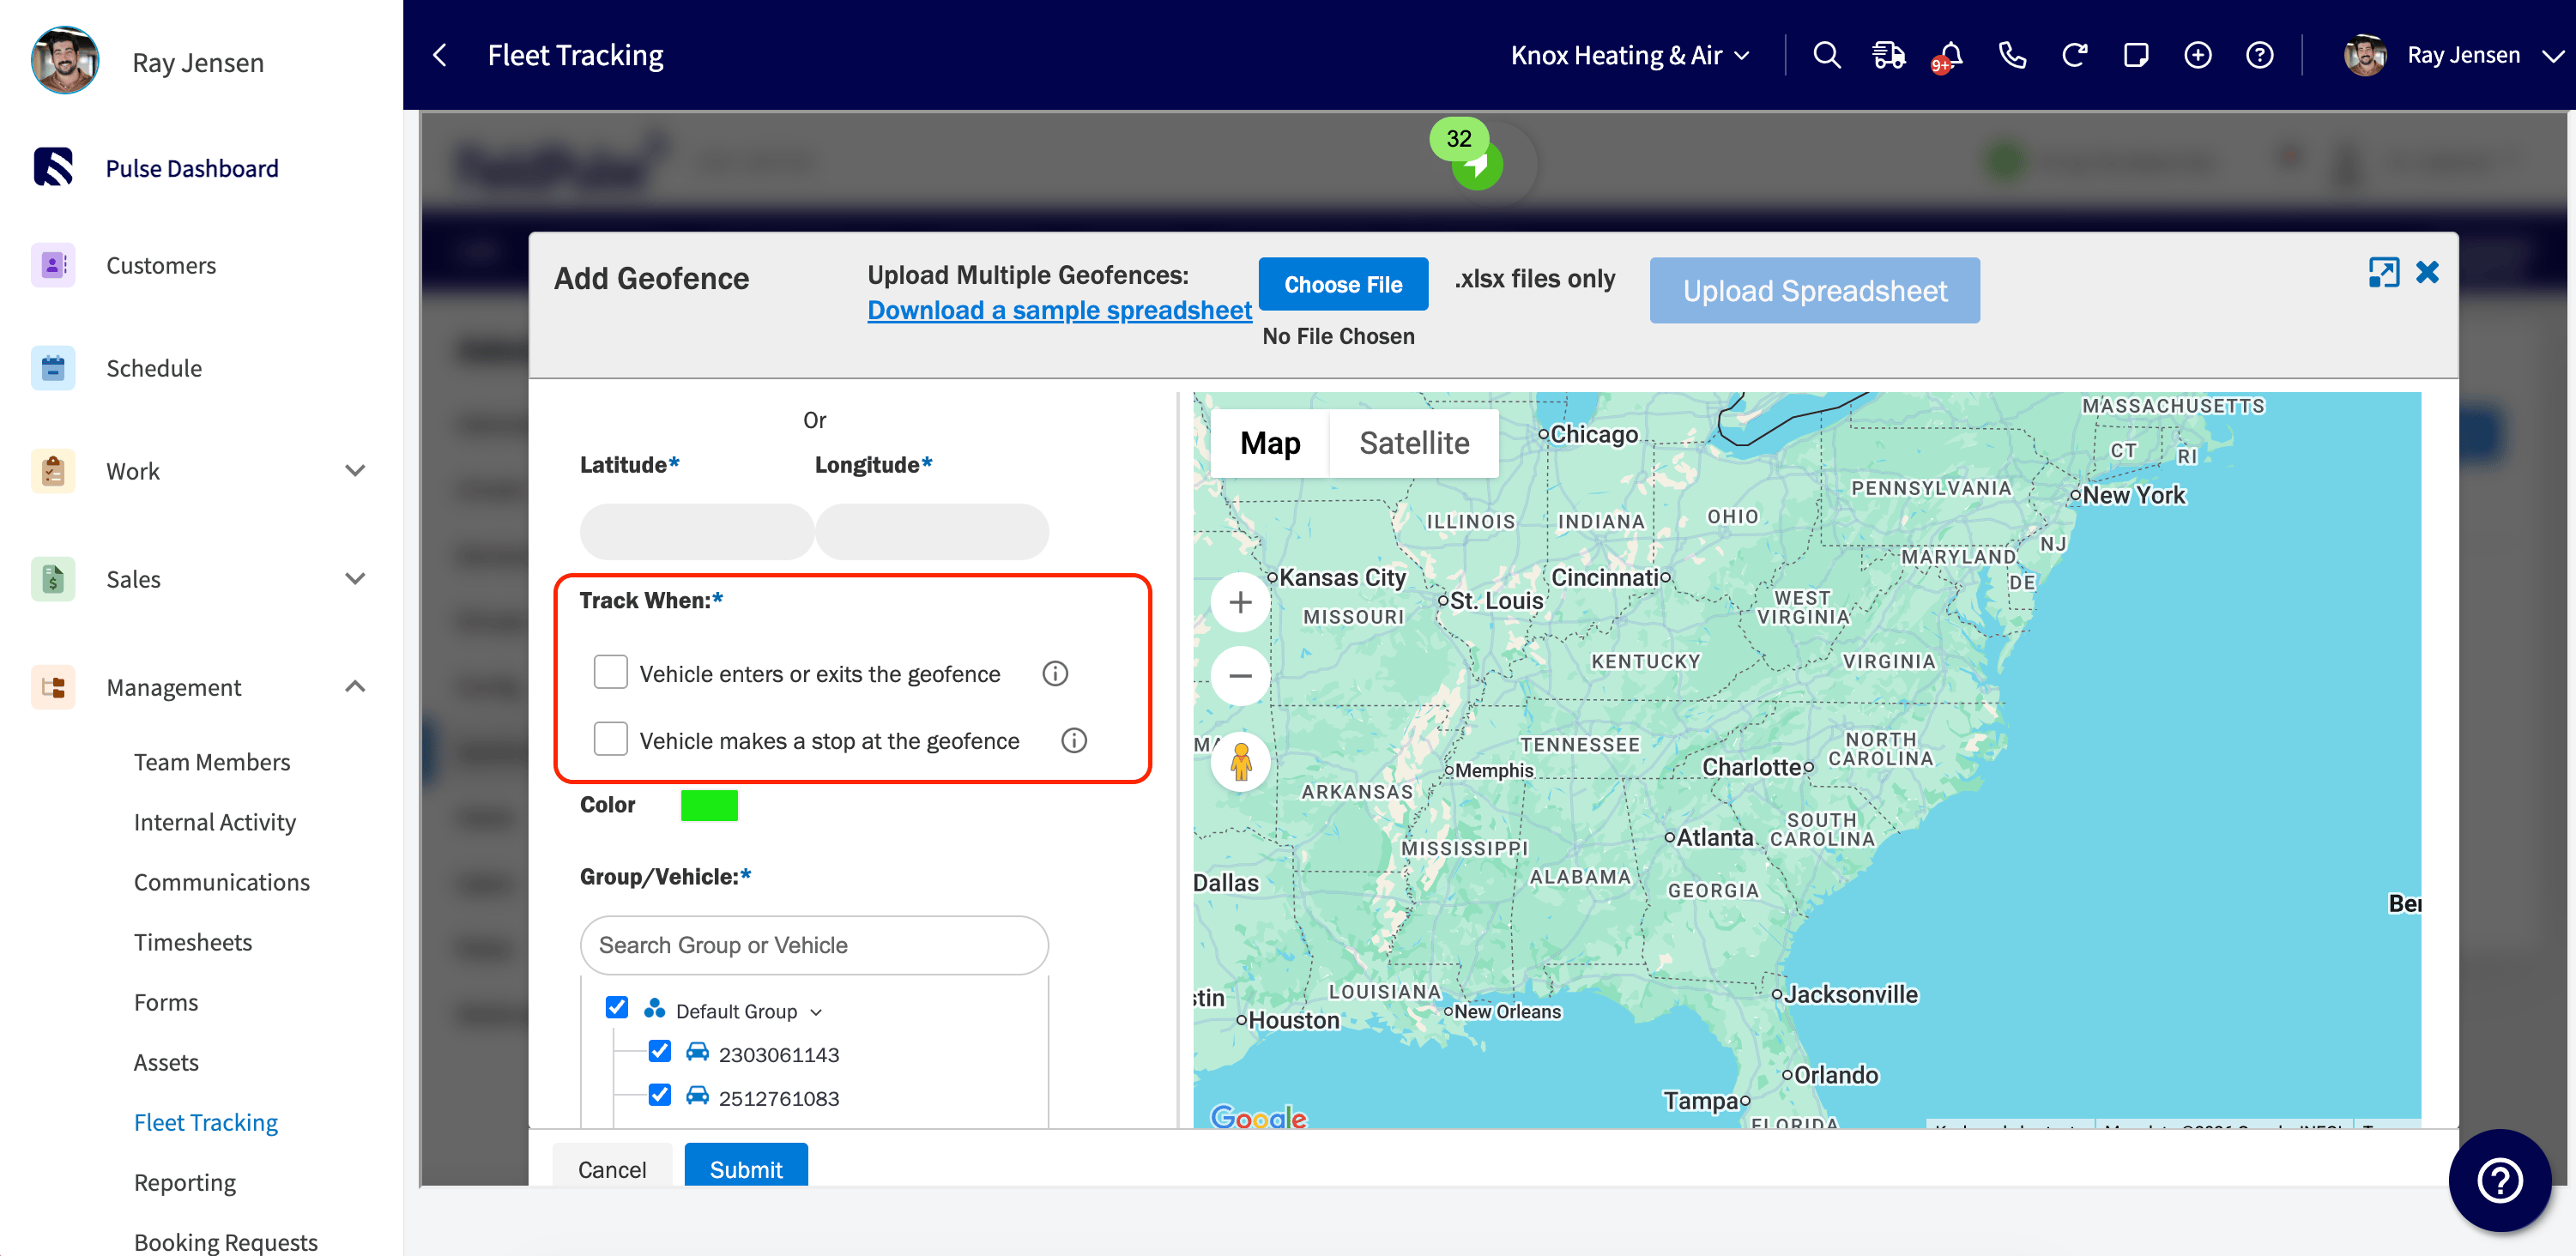
 3. Under **Track When**, choose how the geofence triggers:
* **Vehicle enters or exits the geofence** — logs entry and exit events. Set the boundary as a circle or a polygon.
* **Vehicle makes a stop at the geofence** — logs when a vehicle stops at the location. Best for known addresses like home, office, or customer sites. The default radius is 50 meters.
3. Under **Track When**, choose how the geofence triggers:
* **Vehicle enters or exits the geofence** — logs entry and exit events. Set the boundary as a circle or a polygon.
* **Vehicle makes a stop at the geofence** — logs when a vehicle stops at the location. Best for known addresses like home, office, or customer sites. The default radius is 50 meters.
 4. Choose the **Group** or individual **Vehicles** to monitor with this geofence.
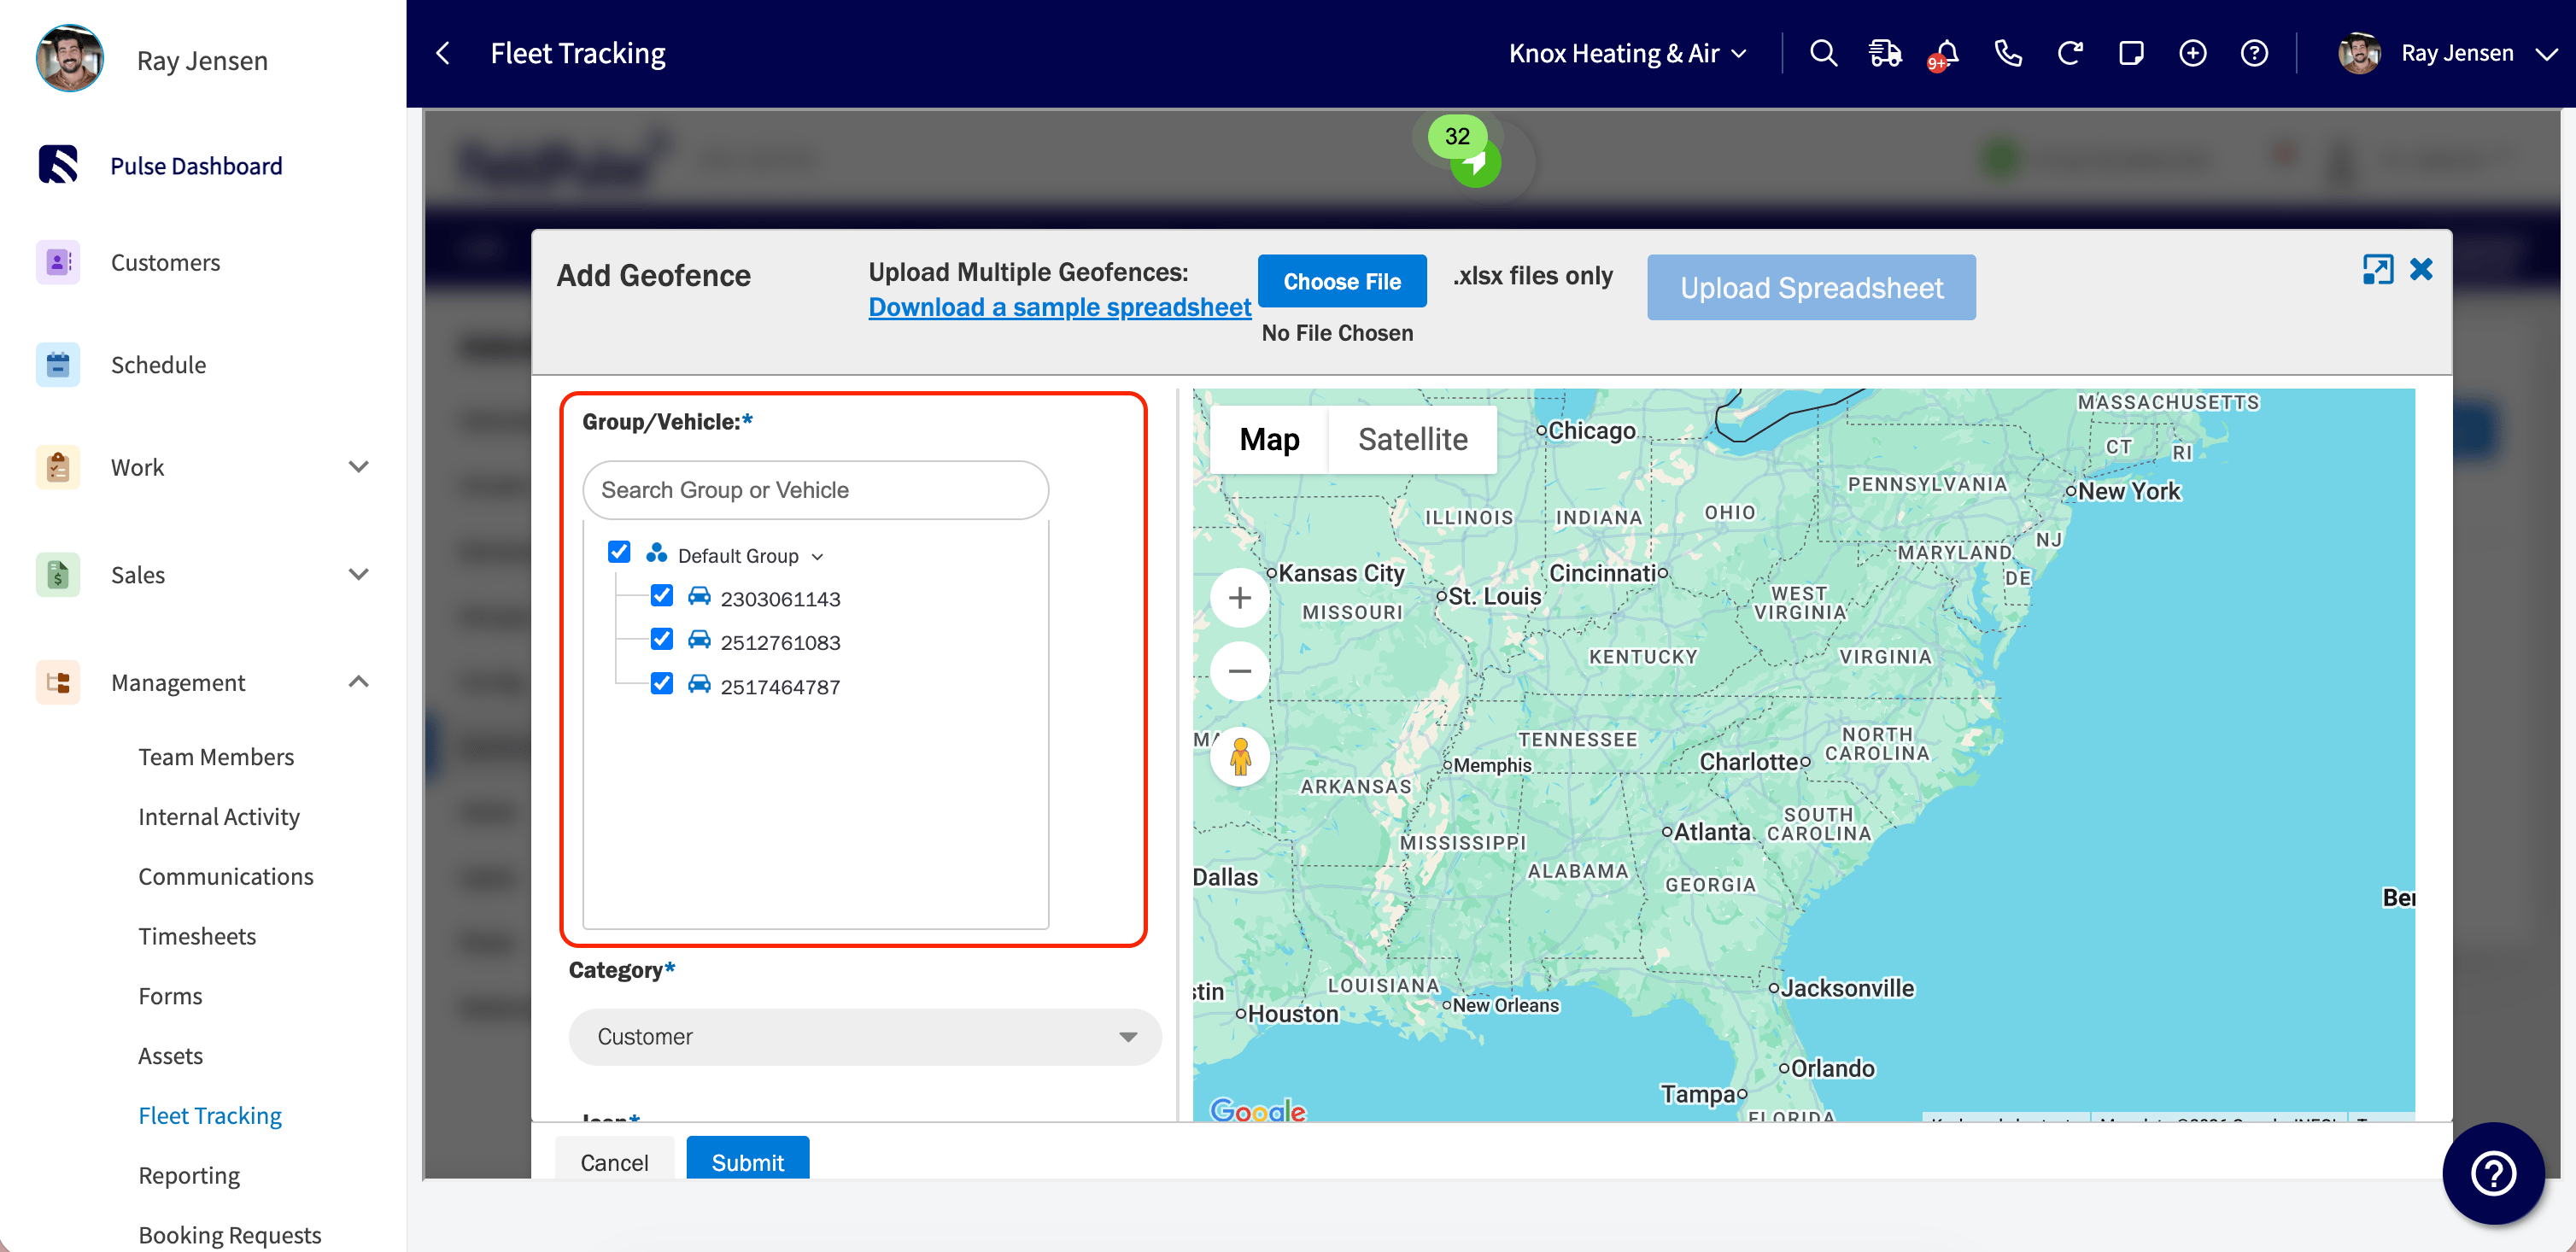 5. Choose the **Category**, **Icon**, and **Time Frame** — **24/7**, or **Custom hours** to limit the geofence to specific days and times.
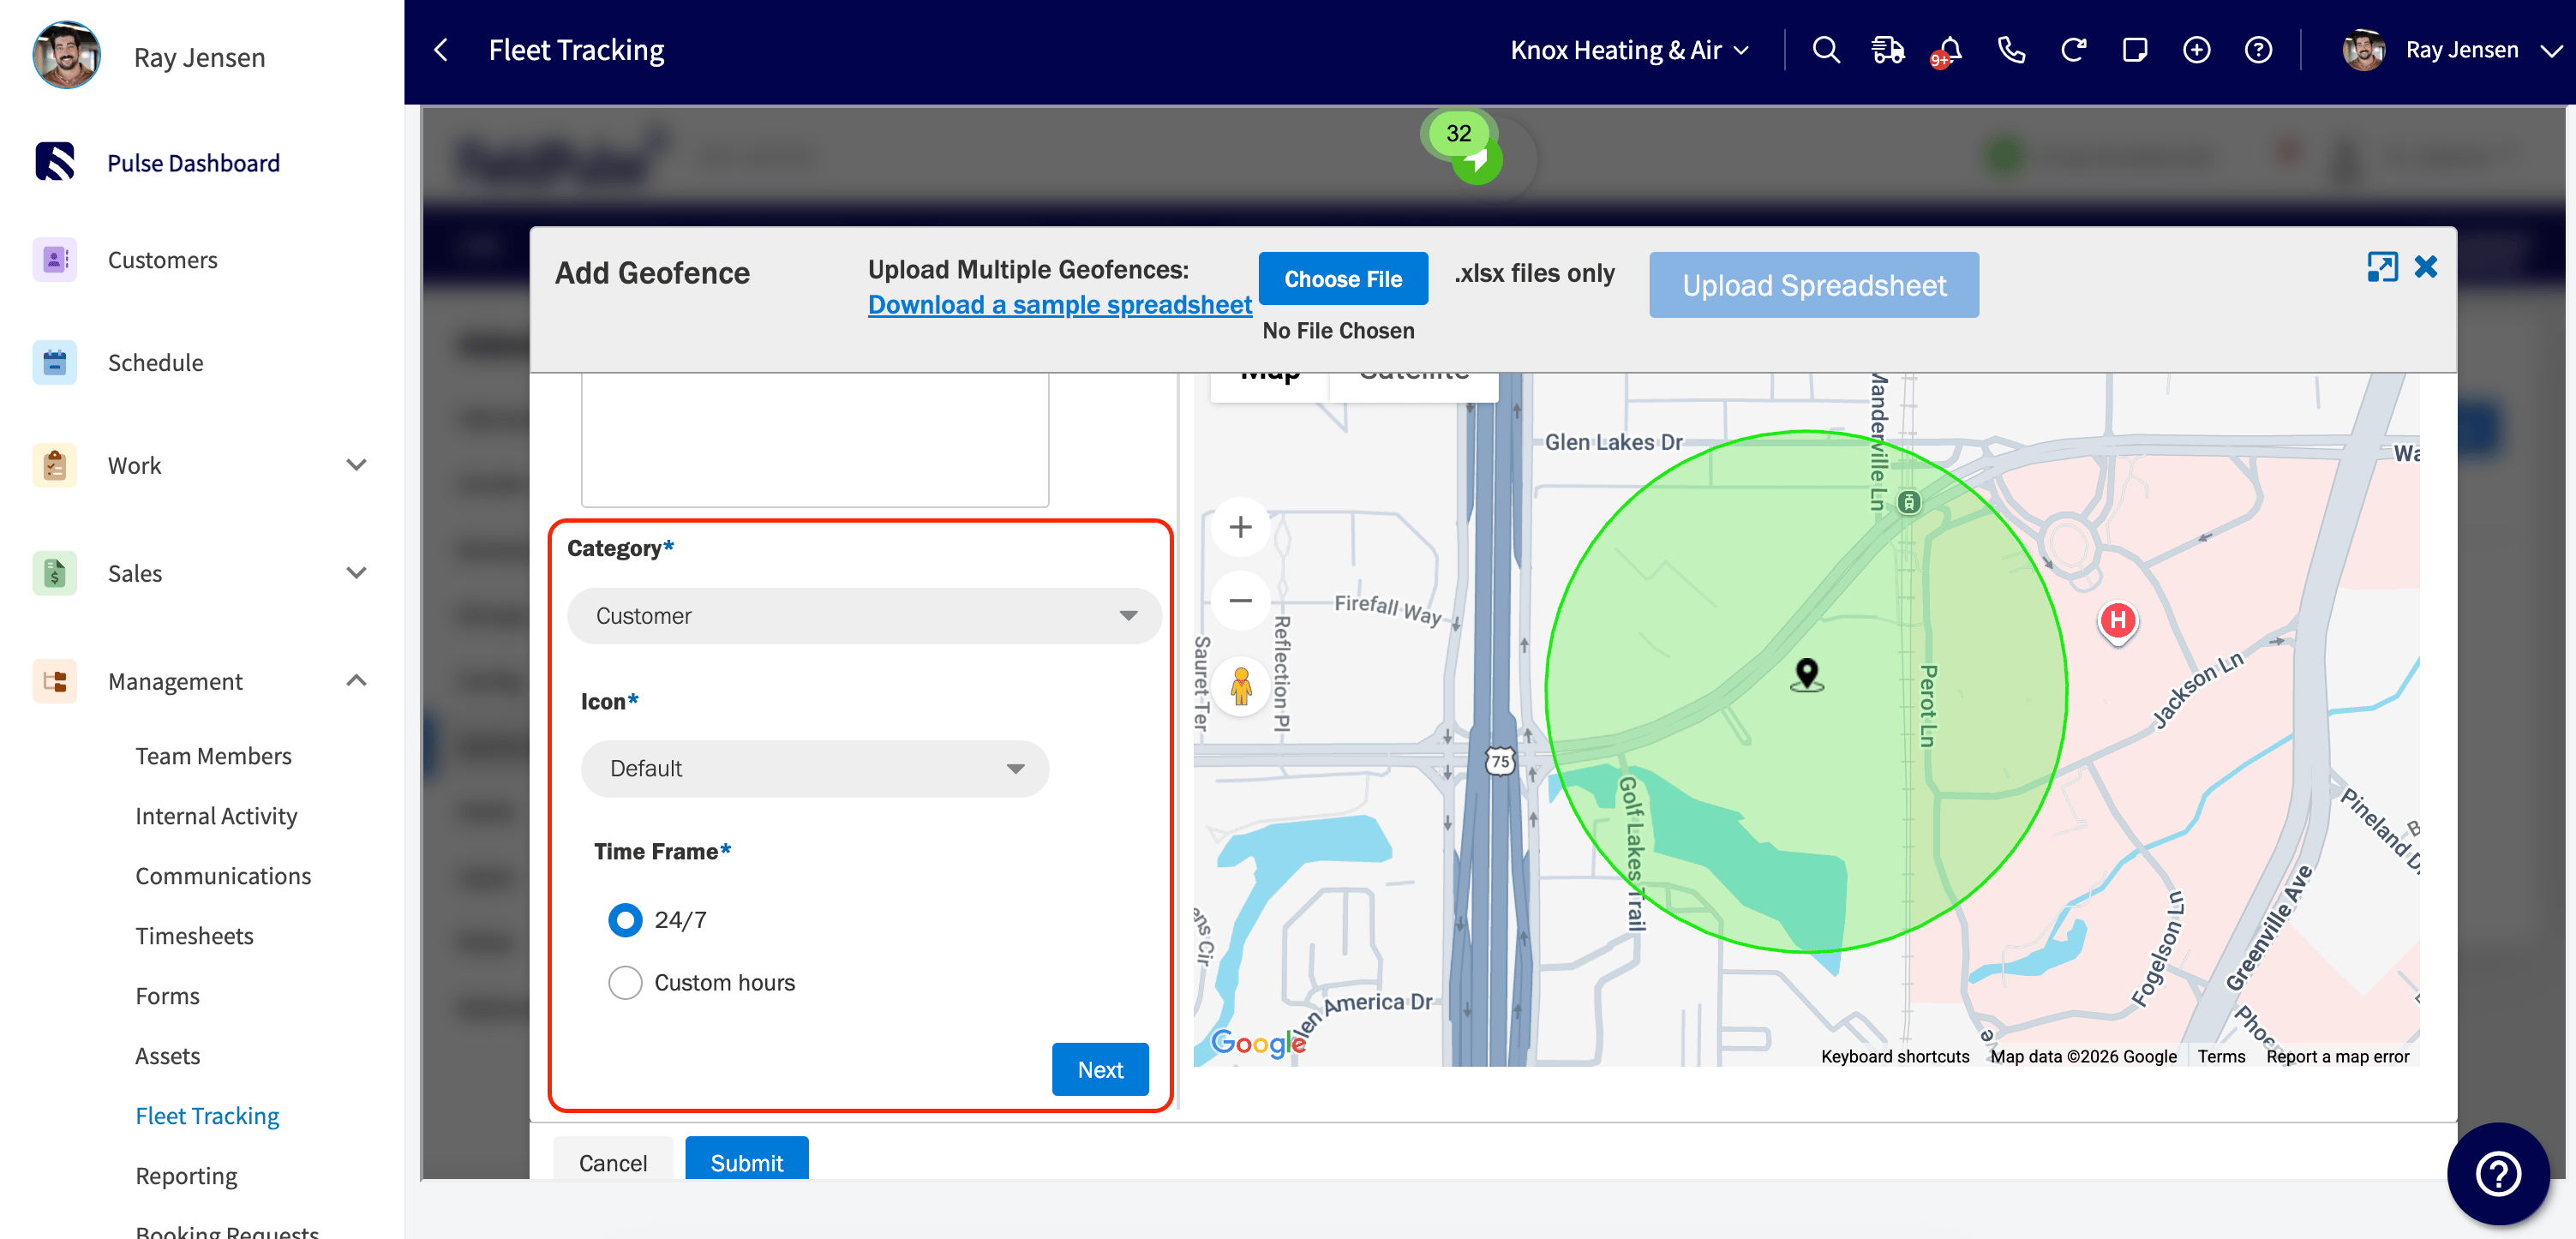 6. Select **Next** to configure alerts:
* Toggle **Alert Notifications** on.
* Add any extra recipients in the **CC** field.
* Choose the alert frequency — **As soon as each alert occurs**, or **A summary of alert once every X hours**.
* Under **Send alerts to**, select who receives them: **Group Admin**, **Paired Driver**, or both.
6. Select **Next** to configure alerts:
* Toggle **Alert Notifications** on.
* Add any extra recipients in the **CC** field.
* Choose the alert frequency — **As soon as each alert occurs**, or **A summary of alert once every X hours**.
* Under **Send alerts to**, select who receives them: **Group Admin**, **Paired Driver**, or both.
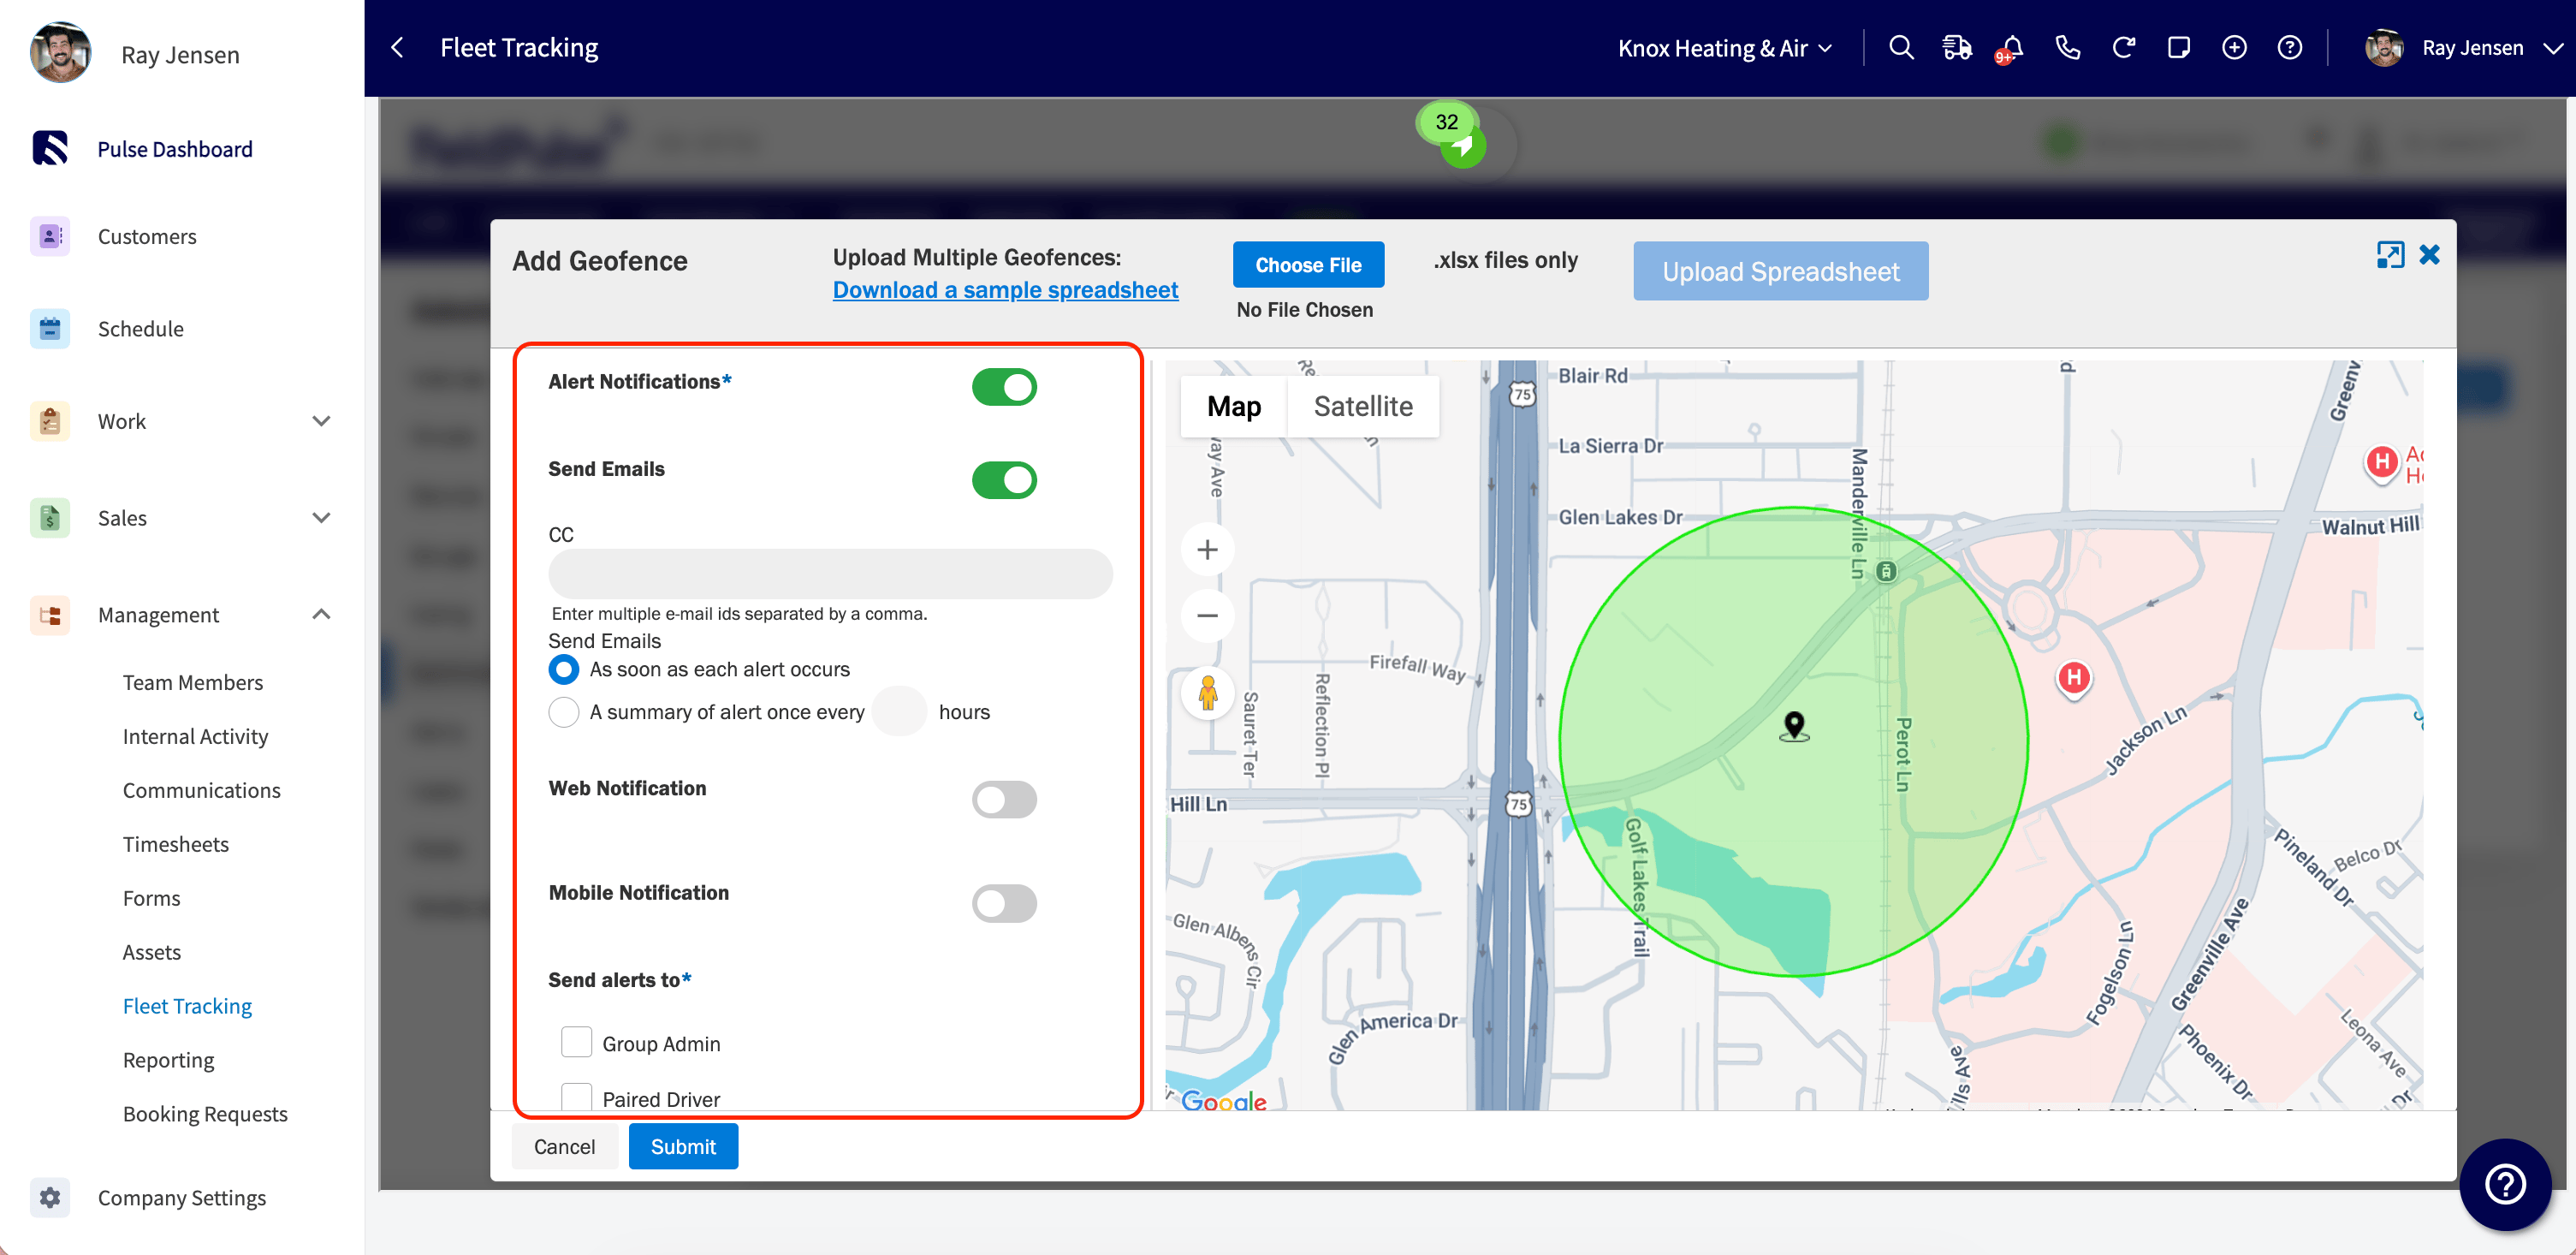 7. Select **Submit** to create the geofence.
## Run a geofence report
The geofence report shows entry and exit history for your vehicles, including timestamps and how long each vehicle spent inside a geofence.
1. Go to **Reports > Geofences**.
7. Select **Submit** to create the geofence.
## Run a geofence report
The geofence report shows entry and exit history for your vehicles, including timestamps and how long each vehicle spent inside a geofence.
1. Go to **Reports > Geofences**.
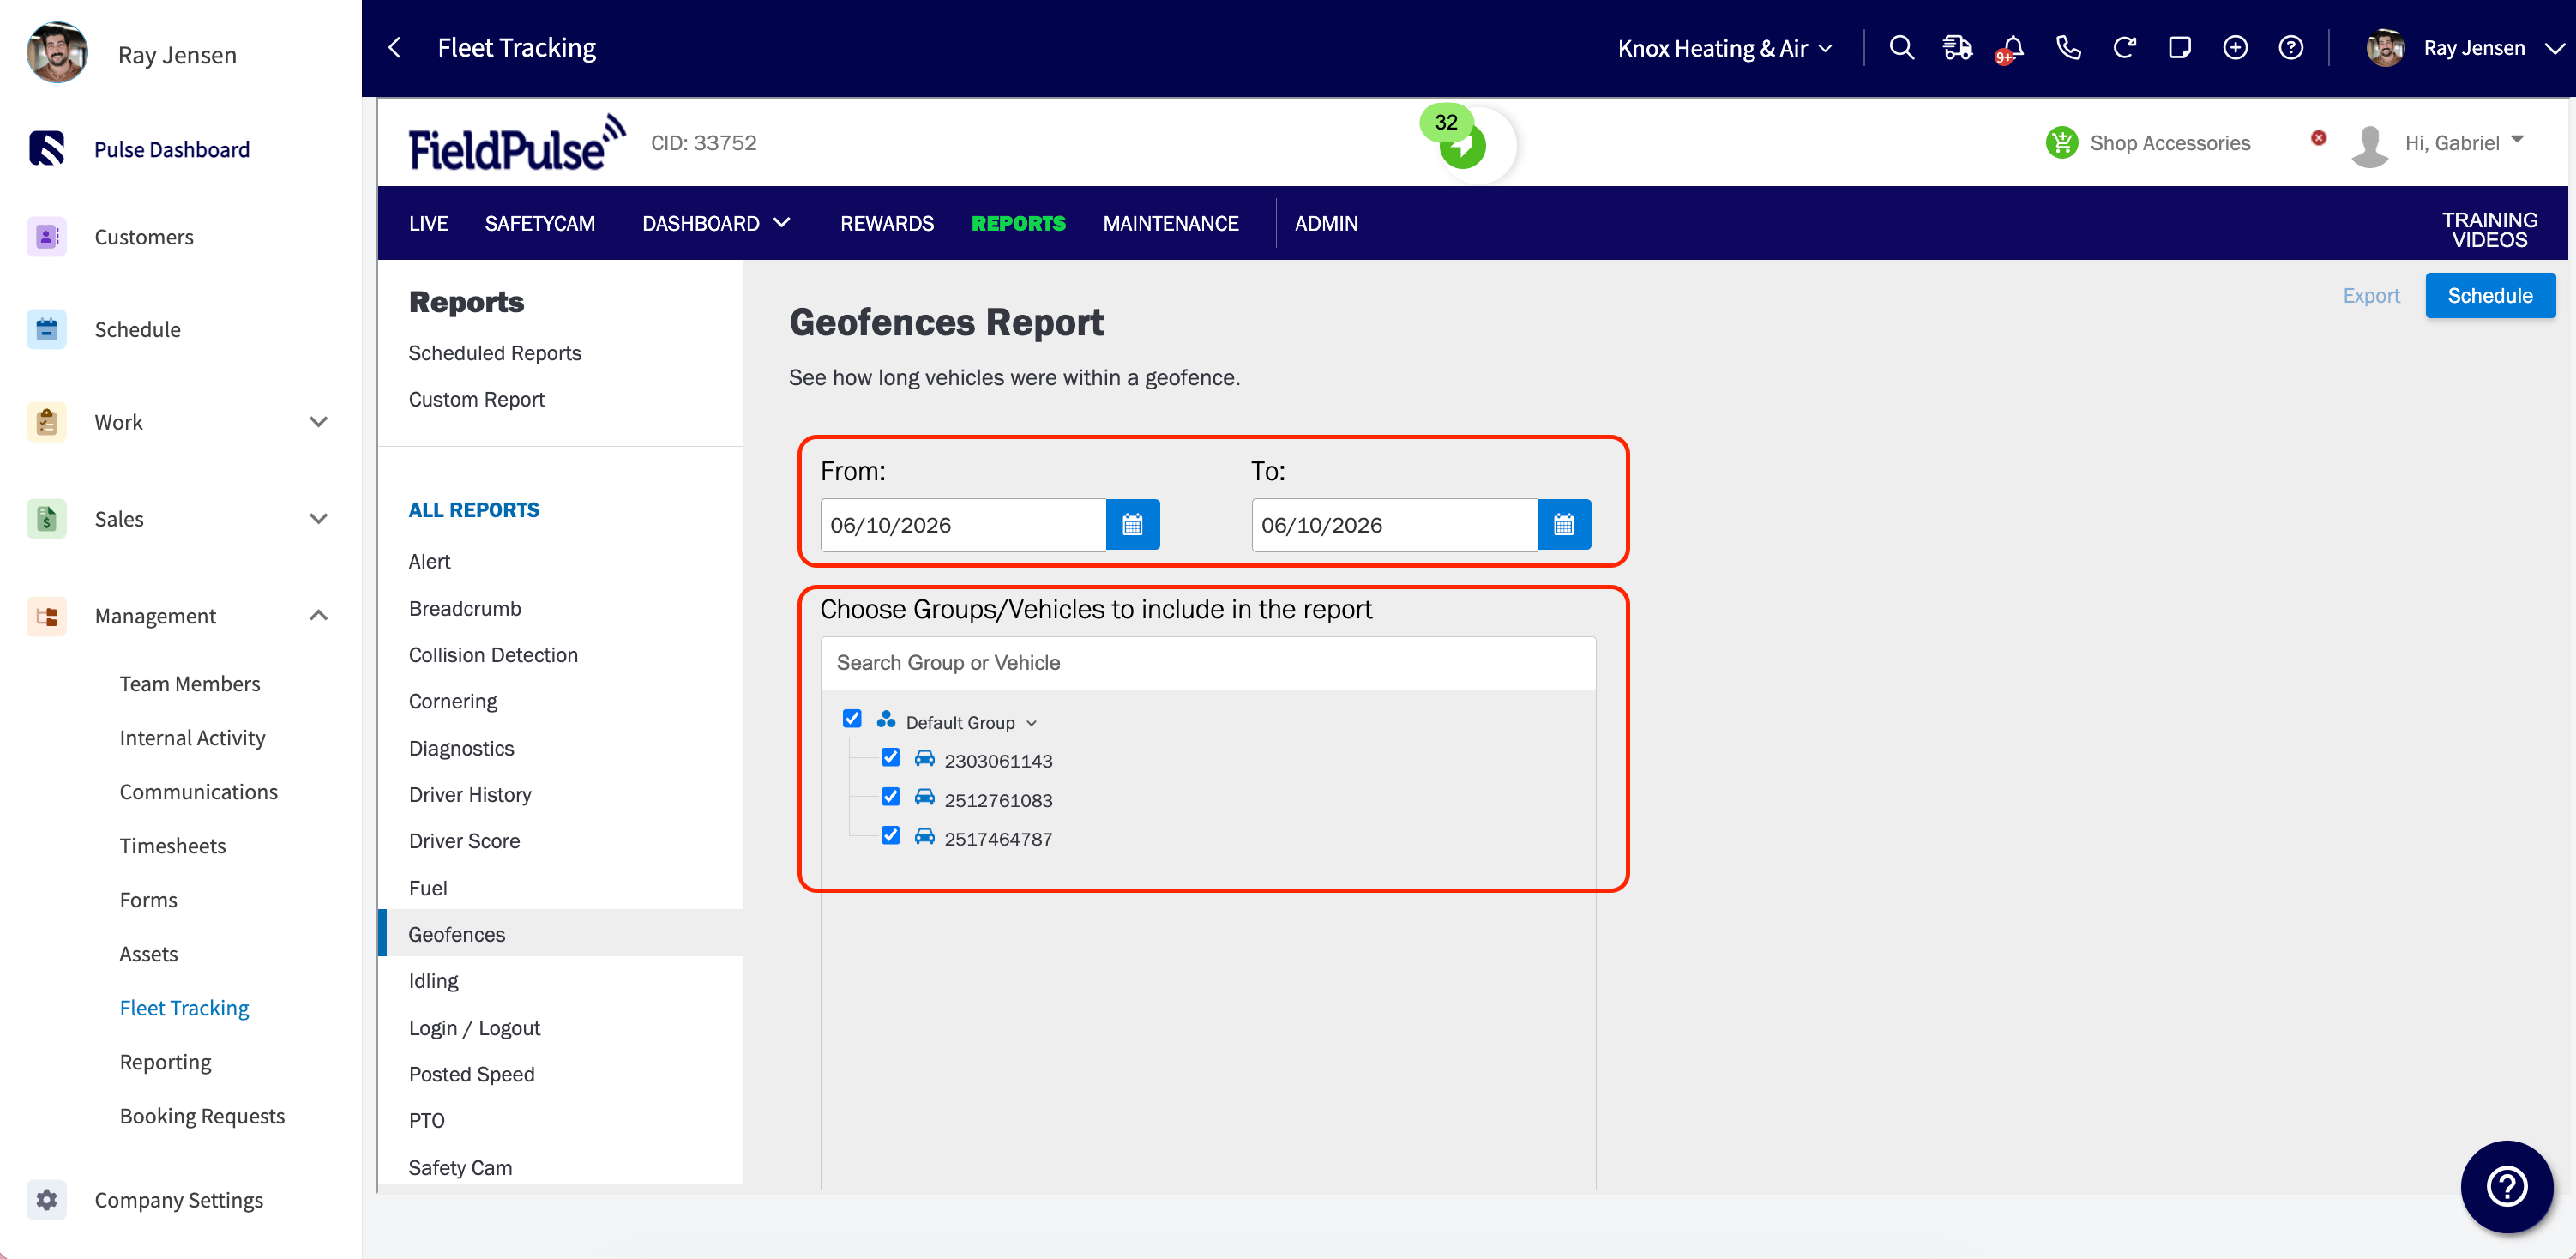
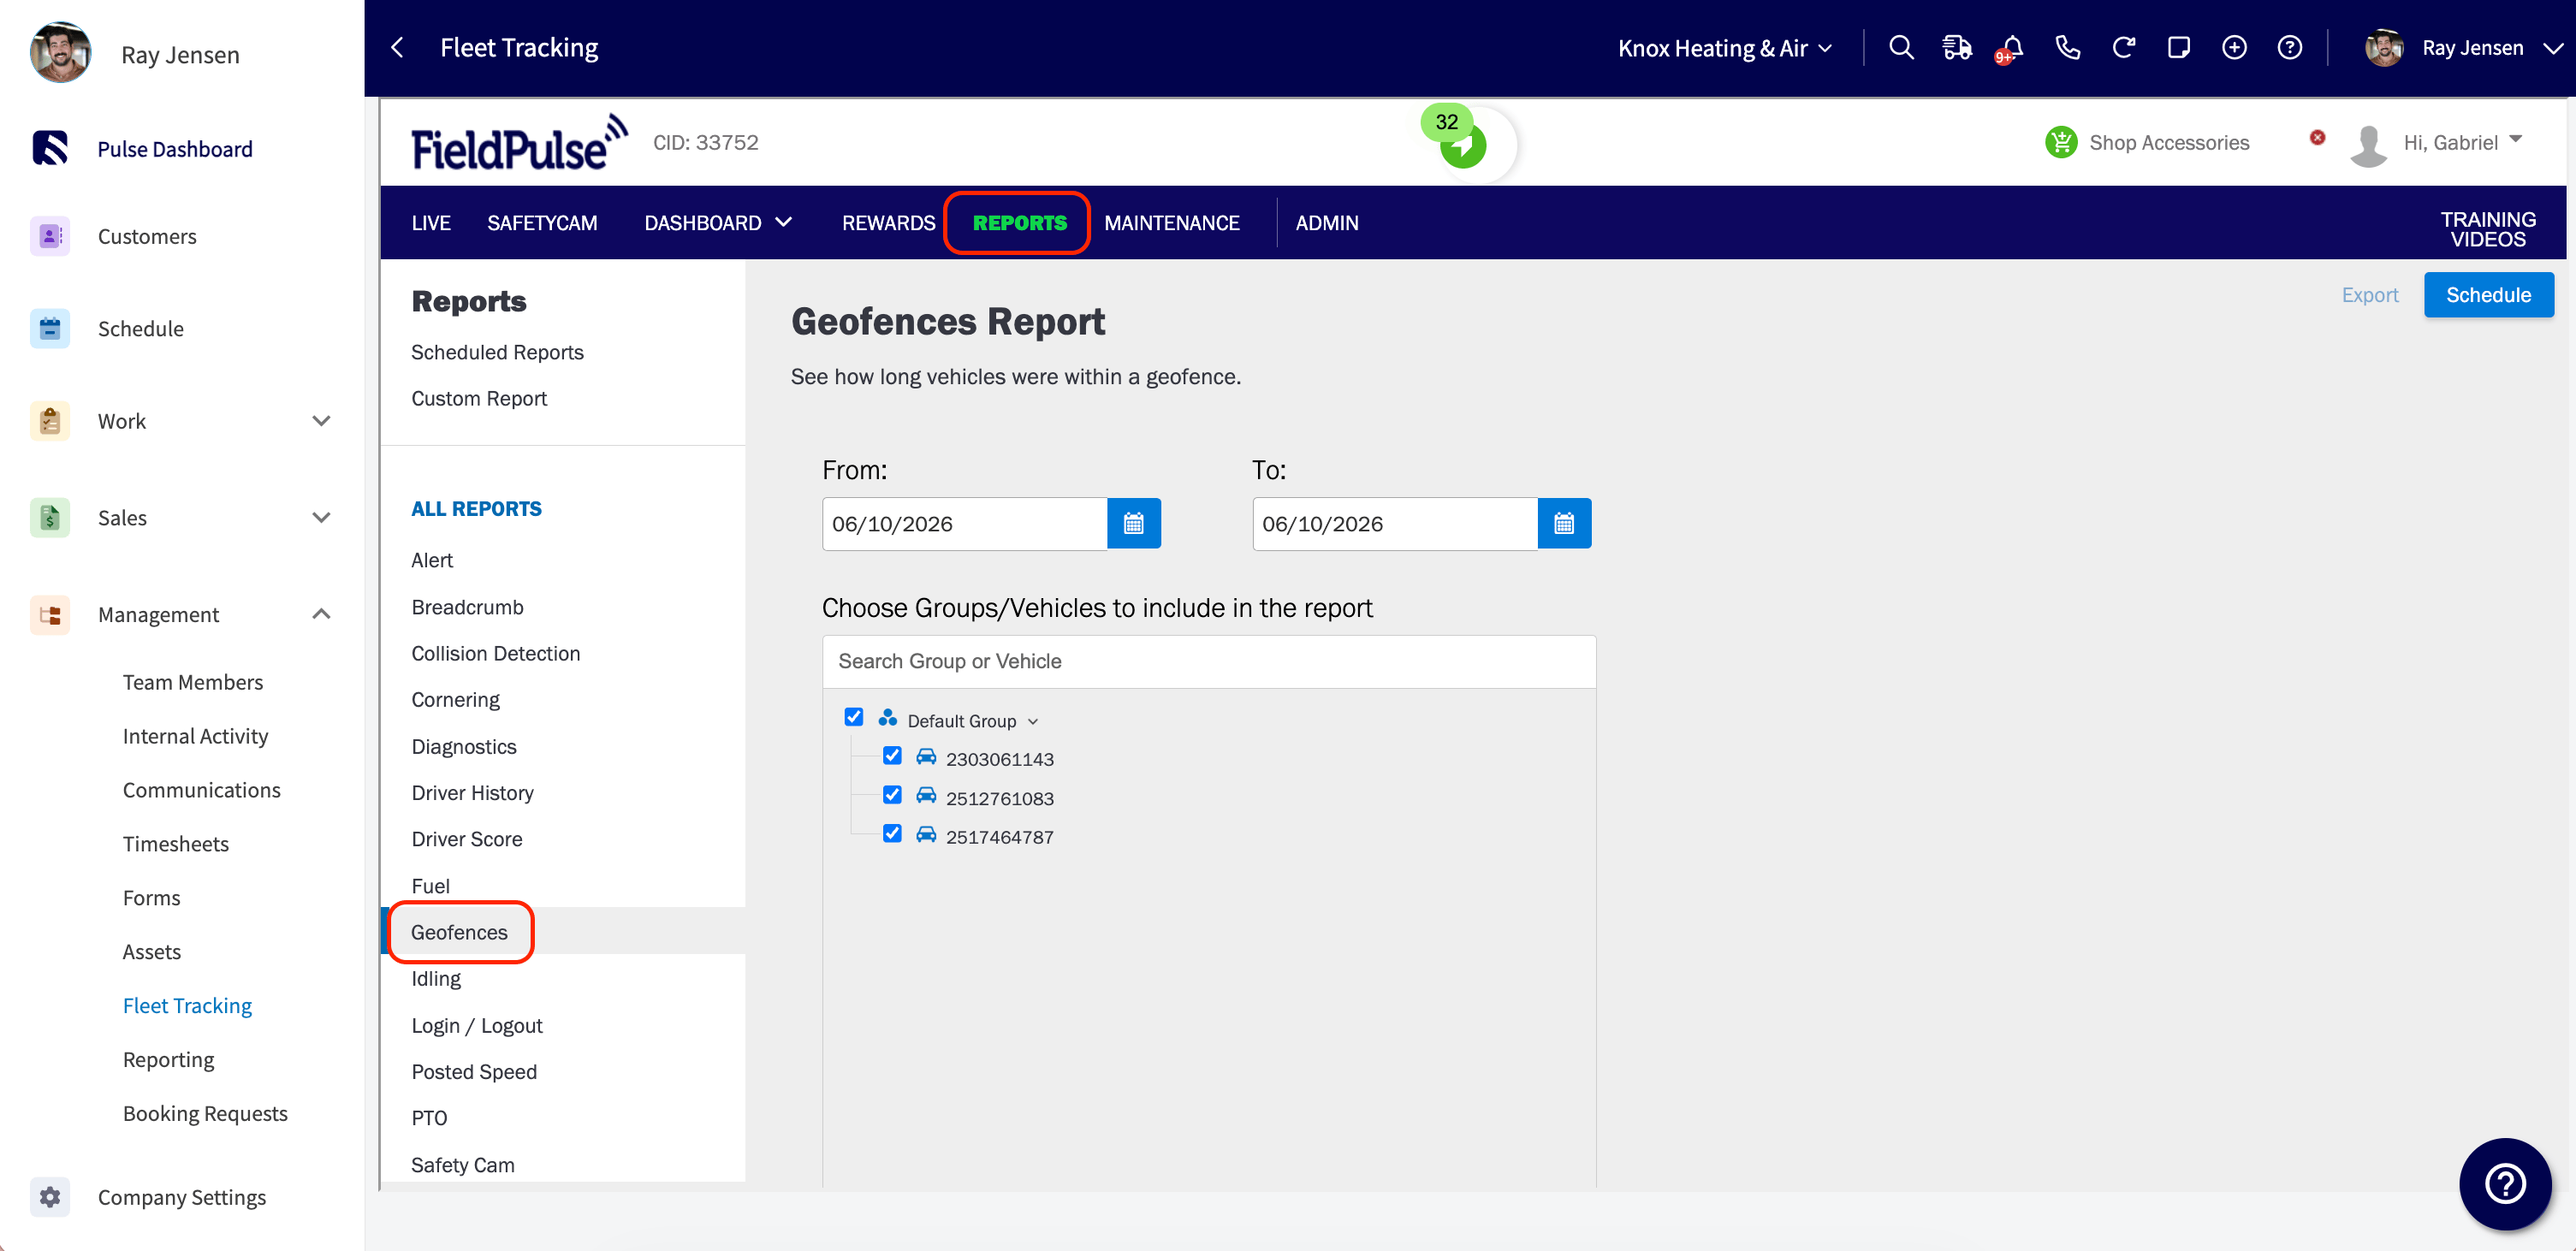 2. Use the date picker to select your reporting period. **Date ranges must be 93 days or less.**
3. Under **Choose Groups/Vehicles to include in the report**, select the groups or vehicles to include.
2. Use the date picker to select your reporting period. **Date ranges must be 93 days or less.**
3. Under **Choose Groups/Vehicles to include in the report**, select the groups or vehicles to include.
 4. Under **Choose Geofence to include in the report**, select the geofence to report on.
5. Under **Filters**, select which event types to include:
* Geofence Entry & Exit
* Geofence Entry Only
* Geofence Exit Only
* Geofence Exit & Entry
6. Optionally, set a **Minimum time spent in the Geofence** to filter out brief stops.
4. Under **Choose Geofence to include in the report**, select the geofence to report on.
5. Under **Filters**, select which event types to include:
* Geofence Entry & Exit
* Geofence Entry Only
* Geofence Exit Only
* Geofence Exit & Entry
6. Optionally, set a **Minimum time spent in the Geofence** to filter out brief stops.
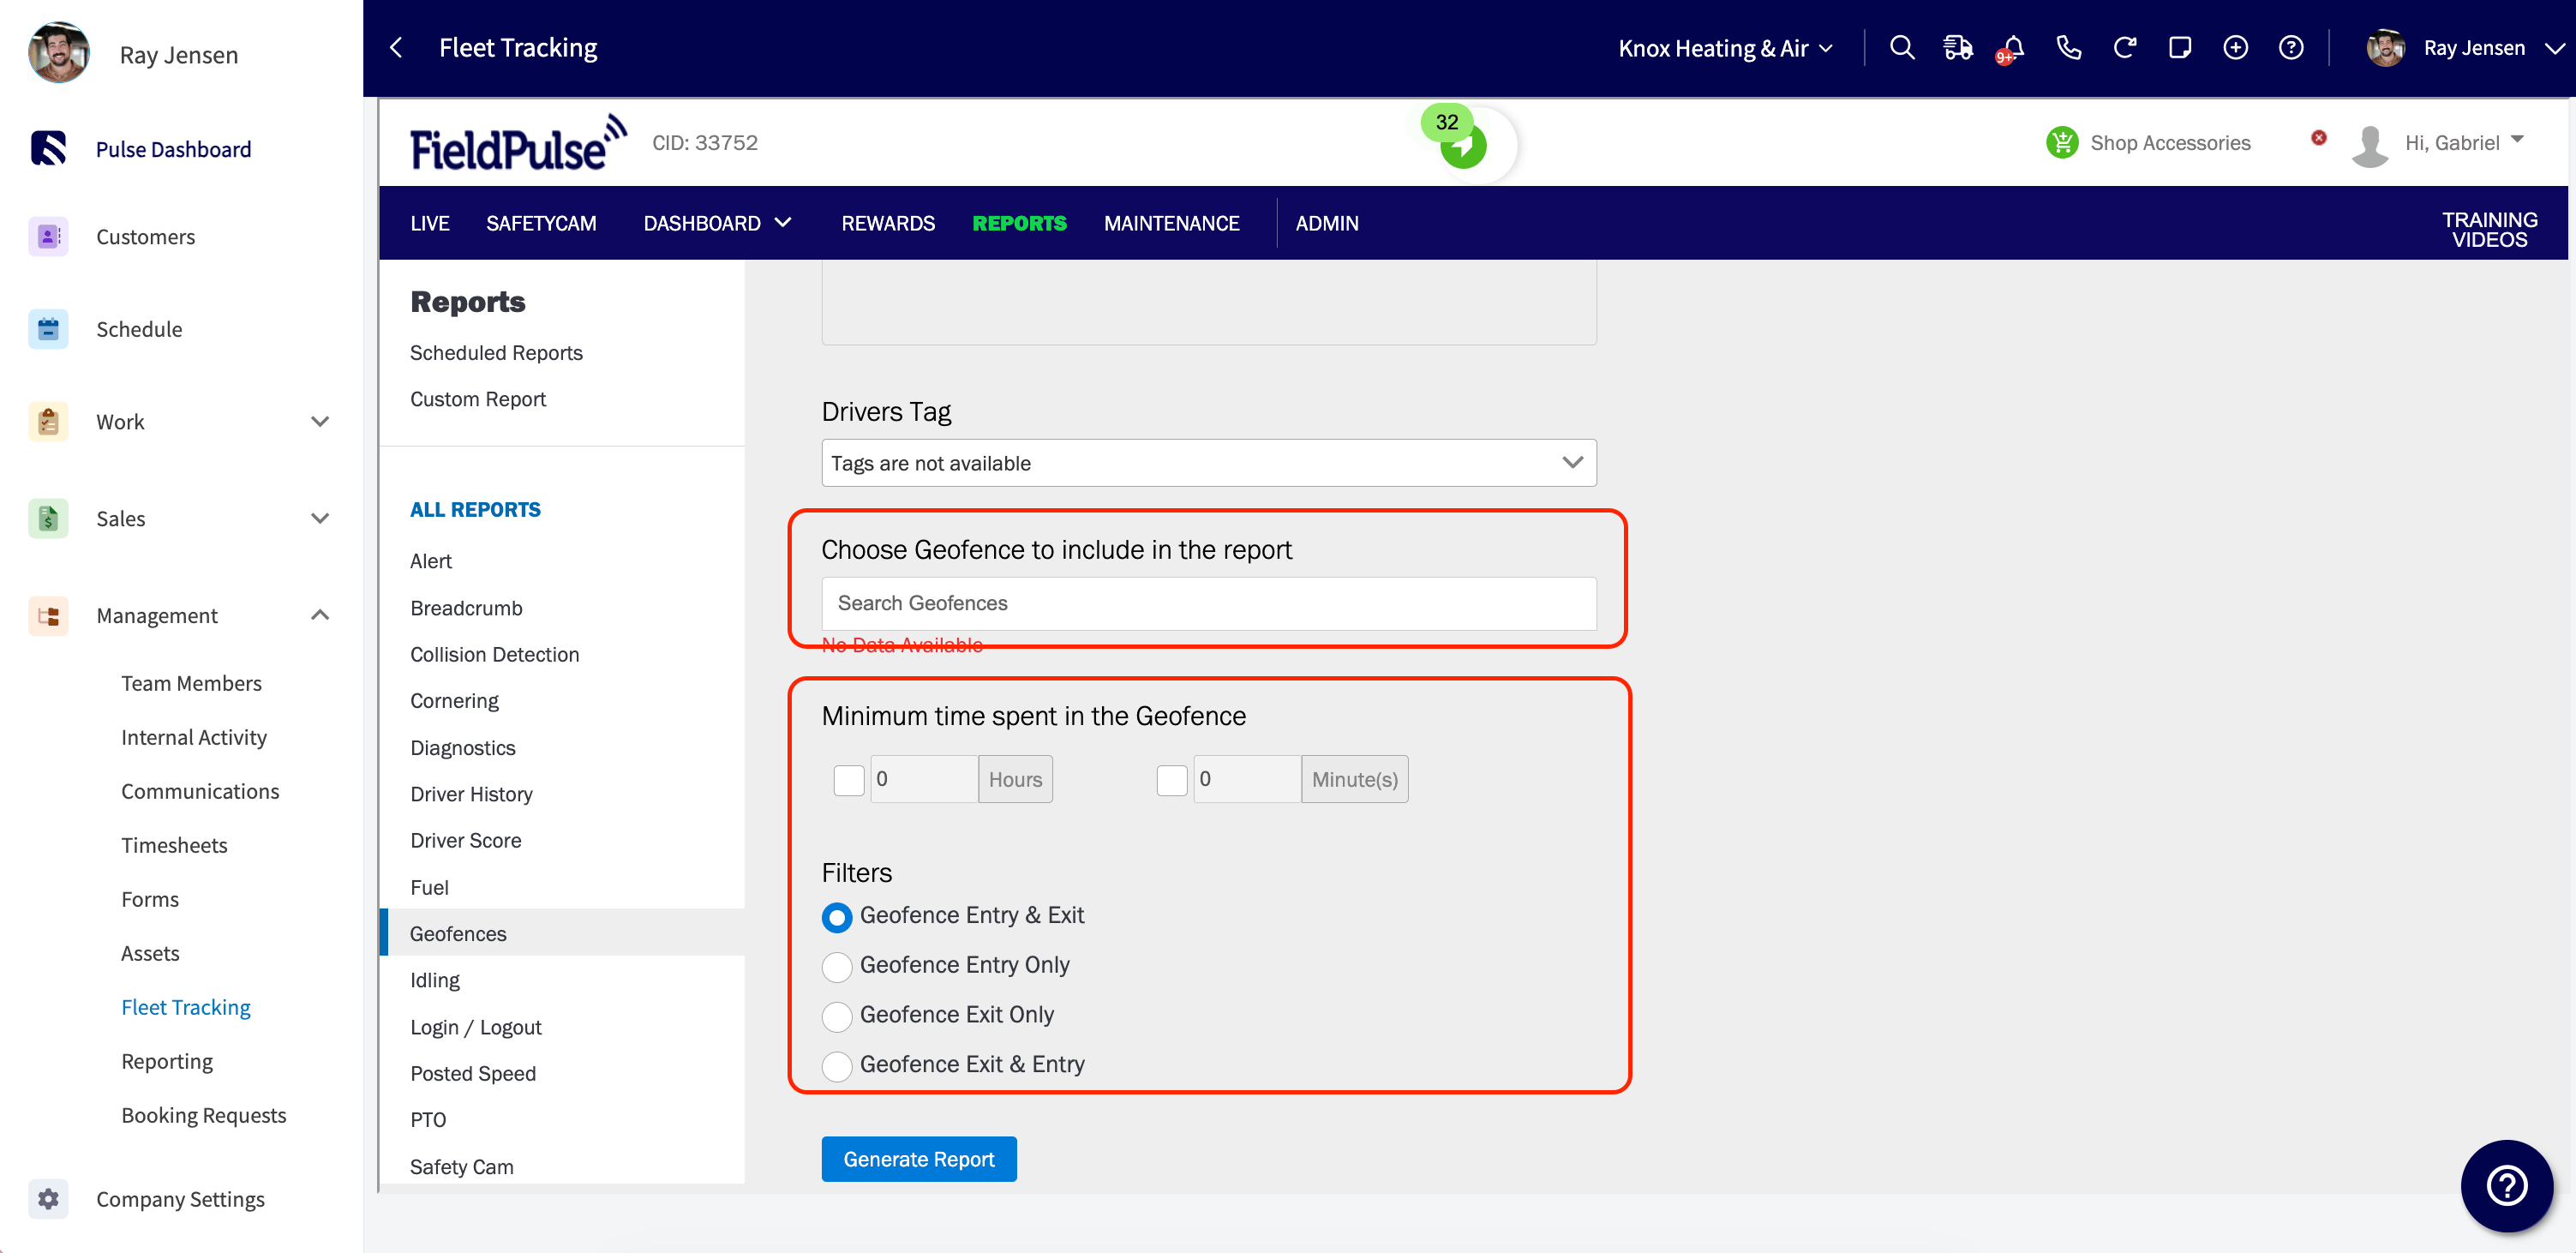 7. Select **Generate Report**. To save the report, select **Export** to download it as a PDF or XLSX file.
> **Quick Tip:** You can schedule the geofence report to run automatically and have it delivered to your inbox on a regular basis.
## Related articles
* [Setting Up Pulse Fleet Tracking](/add-ons/fleet/pulse-fleet-tracking)
* [How to Use the Schedule Map View](/scheduling-dispatch/dispatch/using-schedule-map-view)
Your geofence is working when a monitored vehicle crosses the boundary, the alert you configured arrives, and the entry shows up with a timestamp on the geofence report.
## Related topics
- [Fleet Tracking](/add-ons/fleet/index.md)
- [Setting Up Pulse Fleet Tracking](/add-ons/fleet/pulse-fleet-tracking.md)
- [How to Use Employee Timesheets](/jobs/timesheets/employee-timesheets.md)
- [Customer Communications Overview](/customers/communications/overview.md)
7. Select **Generate Report**. To save the report, select **Export** to download it as a PDF or XLSX file.
> **Quick Tip:** You can schedule the geofence report to run automatically and have it delivered to your inbox on a regular basis.
## Related articles
* [Setting Up Pulse Fleet Tracking](/add-ons/fleet/pulse-fleet-tracking)
* [How to Use the Schedule Map View](/scheduling-dispatch/dispatch/using-schedule-map-view)
Your geofence is working when a monitored vehicle crosses the boundary, the alert you configured arrives, and the entry shows up with a timestamp on the geofence report.
## Related topics
- [Fleet Tracking](/add-ons/fleet/index.md)
- [Setting Up Pulse Fleet Tracking](/add-ons/fleet/pulse-fleet-tracking.md)
- [How to Use Employee Timesheets](/jobs/timesheets/employee-timesheets.md)
- [Customer Communications Overview](/customers/communications/overview.md)