> ## Documentation Index
> Fetch the complete documentation index at: https://help.fieldpulse.com/llms.txt
> Use this file to discover all available pages before exploring further.
# Setting Up Your Pricebook
> Build a flat-rate Pricebook in FieldPulse with categories, add-on lists, and good-better-best options your team quotes from on web and mobile.
> **Who uses this:** Each pricebook's **Pricebook Visibility** setting controls which team roles can view it. **Availability:** Sales Suite add-on — the Pricebook must be enabled on your account.
The Pricebook is a flat-rate sales tool your team quotes from instead of pricing each job from scratch. You build it once — categories, flat-rate jobs, and add-on options with your own labor, overhead, and markup baked in — and your techs select from a menu that fills the pricing and line items into an estimate, invoice, or variant proposal.
## Overview
The Pricebook is where your pricing lives so it doesn't live in someone's head. Each **flat-rate job** carries its labor hours, materials, and markup, so the price the customer sees is consistent no matter who quotes it. You organize flat-rate jobs into **categories** and **sub-categories**, offer **add-on lists** for upsells, and display jobs as a plain list or in a **Good / Better / Best** format that gives the customer a choice.
Because the Pricebook feeds your [estimates and invoices](https://www.fieldpulse.com/features/estimates-and-invoices), the numbers a tech sees on-site are the numbers you set — including your costs and profitability on each job — so your team can quote with confidence and take signatures and payment on the spot.
## Before you begin
* Confirm the Pricebook is enabled on your account. If it isn't, contact the FieldPulse team at [support@fieldpulse.com](mailto:support@fieldpulse.com) or use the chat in the bottom-right corner of your screen.
* Know your numbers: your hourly labor cost, your hourly overhead cost, and the markup percentages you want to charge.
* Confirm the line items you'll use already exist in your Item List, or be ready to create them as you build — see [Setting Up Item List & Inventory](/inventory-materials/item-list/adding-items).
* Already keep a pricebook in a spreadsheet? You can import it instead of building by hand — see [How to Import a Pricebook](/add-ons/sales-suite/importing-pricebook).
## Step-by-step setup
### 1. Find the Pricebook
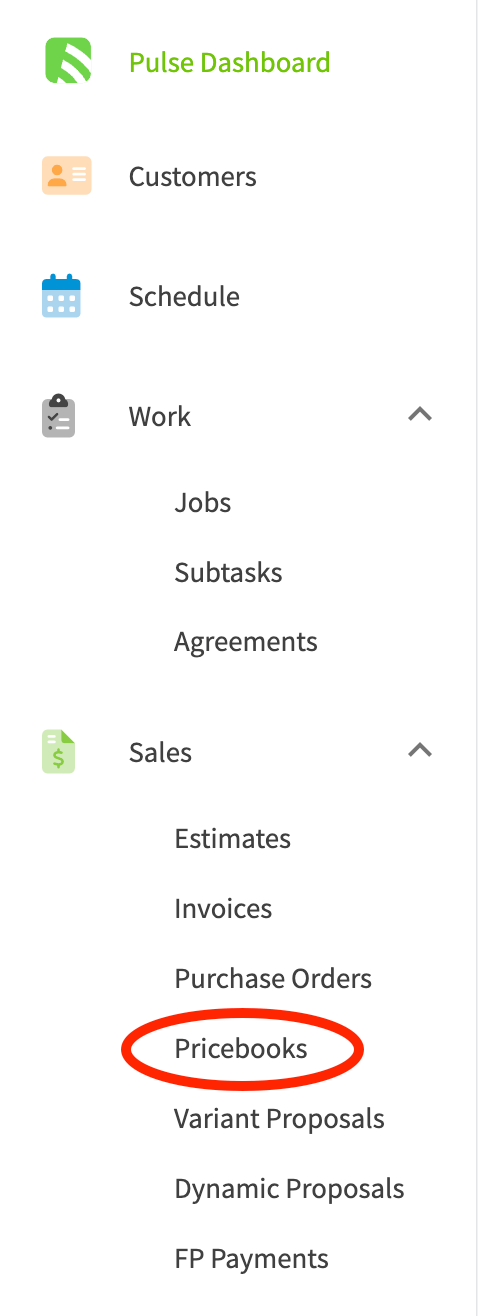
Once the Pricebook is enabled, it appears under the **Sales** section in the left menu. You can build and use pricebooks in the FieldPulse web app or the mobile app.
 ### 2. Create a pricebook
You have three ways to start a pricebook:
* **Build a new one** — Select **+ Create Pricebook** and start entering your information.
* **Import an existing one** — Bring in a pricebook from Excel, Google Sheets, or CSV. See [How to Import a Pricebook](/add-ons/sales-suite/importing-pricebook).
* **Start from a FieldPulse template** — Contact [support@fieldpulse.com](mailto:support@fieldpulse.com) or use the chat in the bottom-right corner of your screen to have a starter pricebook imported into your account.
### 2. Create a pricebook
You have three ways to start a pricebook:
* **Build a new one** — Select **+ Create Pricebook** and start entering your information.
* **Import an existing one** — Bring in a pricebook from Excel, Google Sheets, or CSV. See [How to Import a Pricebook](/add-ons/sales-suite/importing-pricebook).
* **Start from a FieldPulse template** — Contact [support@fieldpulse.com](mailto:support@fieldpulse.com) or use the chat in the bottom-right corner of your screen to have a starter pricebook imported into your account.
 ### 3. Set the basic info and rates
Once you create, import, or open a pricebook, set its **Pricebook Title** and description on the **Basic Info & Setup** tab, choose which team roles can view it under **Pricebook Visibility**, and adjust the **Theme** to match your brand.
### 3. Set the basic info and rates
Once you create, import, or open a pricebook, set its **Pricebook Title** and description on the **Basic Info & Setup** tab, choose which team roles can view it under **Pricebook Visibility**, and adjust the **Theme** to match your brand.
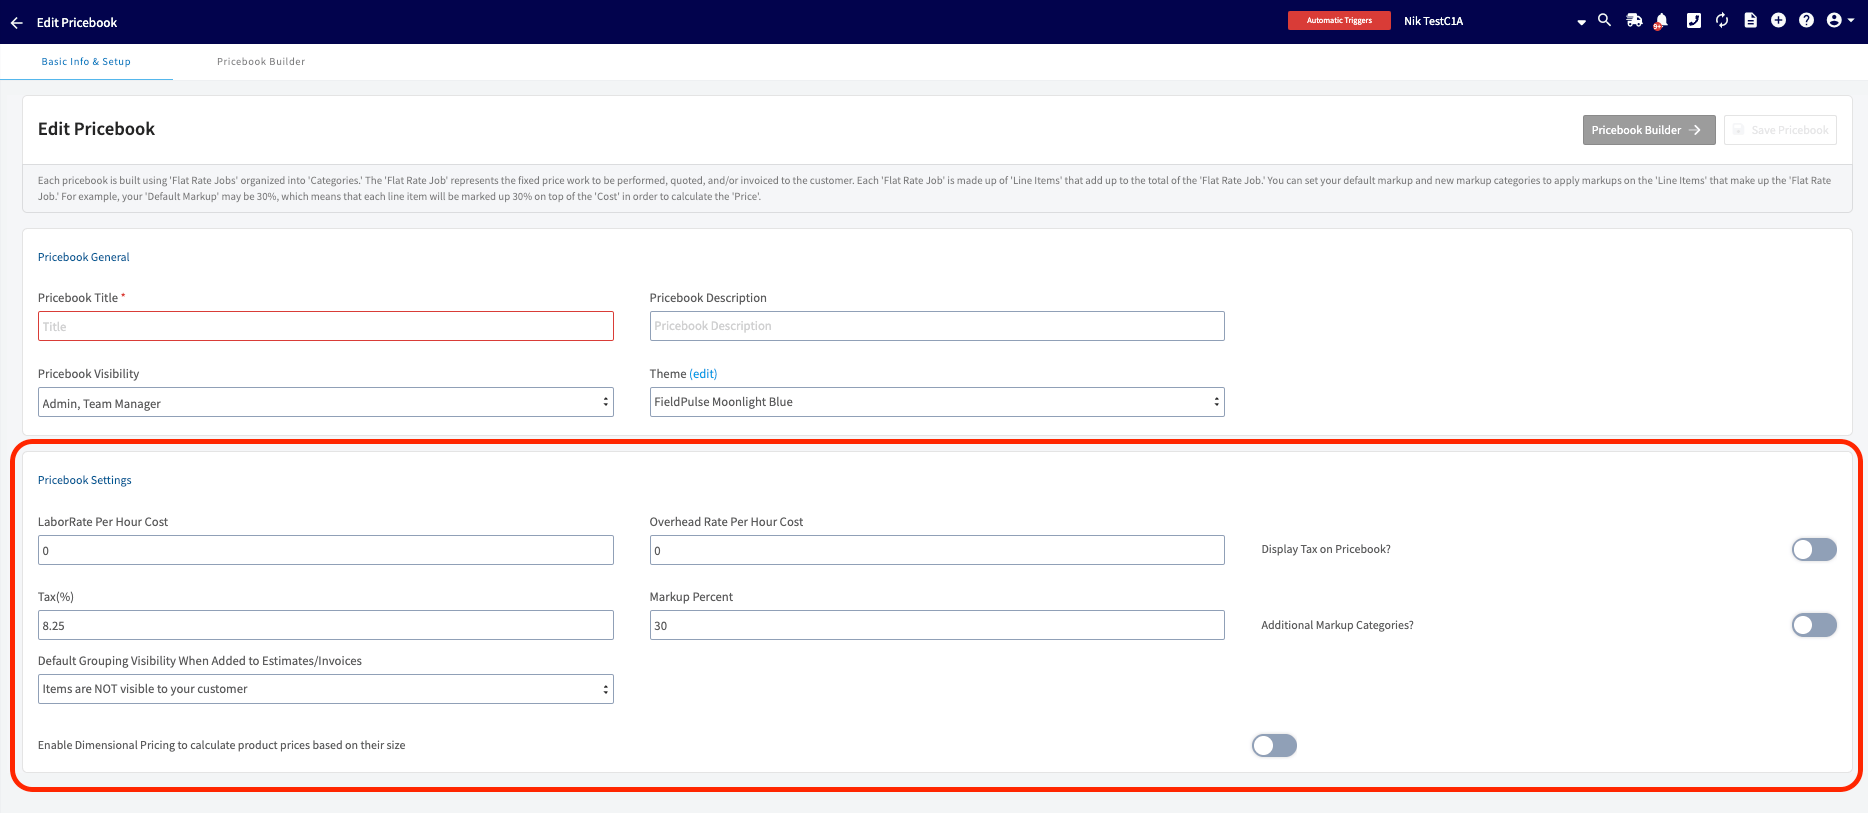
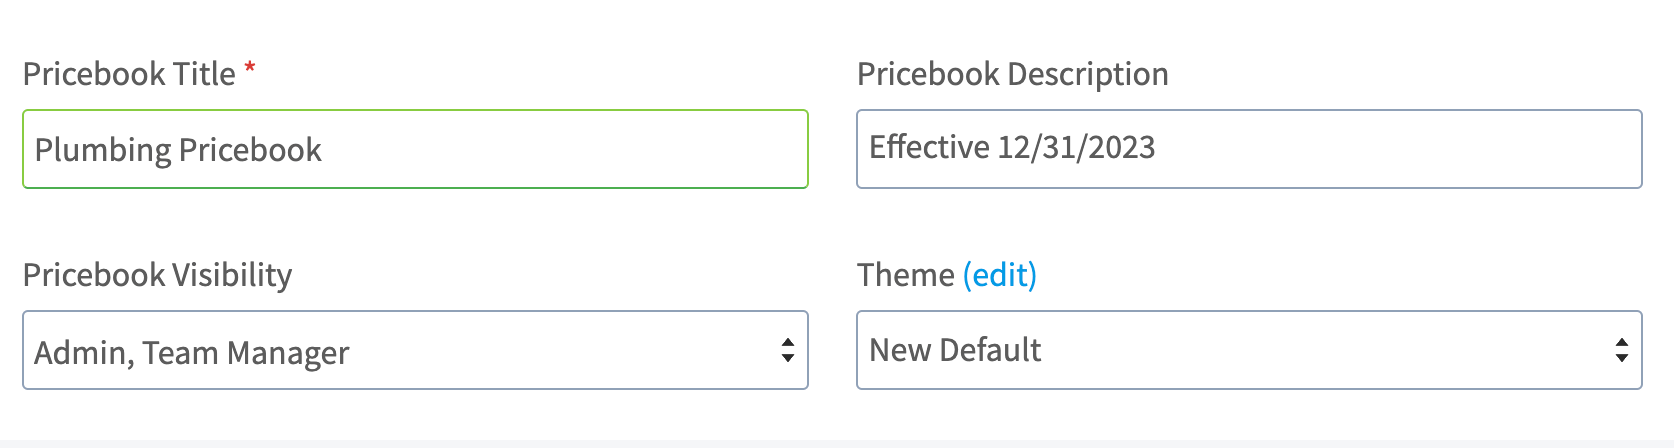 Then set the rates that drive every price in the book:
1. Enter your **Labor Rate per Hour Cost** — what labor costs *you* per hour, not what you charge the customer.
2. Enter your **Overhead Rate per Hour Cost** — your hourly overhead. This number may take some calculating, but entering it means every job in the book is priced to turn a profit.
3. Set your default **Markup Percent** for all labor, supplies, and equipment.
4. Add **Markup Categories** to customize markups beyond the default — for example, a rate for labor, a rate for supplies costing \$1–\$50, or a rate for all stainless steel items. Select **Add Markup Category**, enter a title and percentage, and select **+ Save** after each one. You can create as many markup categories as you need.
5. Set **Default Grouping Visibility When Added to Estimates/Invoices** to control whether groupings show by default; you can override this for individual flat-rate jobs when adding them to estimates or invoices. When you change it, a pop-up asks whether to update the default for future use or apply it to all existing jobs in the pricebook.
Then set the rates that drive every price in the book:
1. Enter your **Labor Rate per Hour Cost** — what labor costs *you* per hour, not what you charge the customer.
2. Enter your **Overhead Rate per Hour Cost** — your hourly overhead. This number may take some calculating, but entering it means every job in the book is priced to turn a profit.
3. Set your default **Markup Percent** for all labor, supplies, and equipment.
4. Add **Markup Categories** to customize markups beyond the default — for example, a rate for labor, a rate for supplies costing \$1–\$50, or a rate for all stainless steel items. Select **Add Markup Category**, enter a title and percentage, and select **+ Save** after each one. You can create as many markup categories as you need.
5. Set **Default Grouping Visibility When Added to Estimates/Invoices** to control whether groupings show by default; you can override this for individual flat-rate jobs when adding them to estimates or invoices. When you change it, a pop-up asks whether to update the default for future use or apply it to all existing jobs in the pricebook.
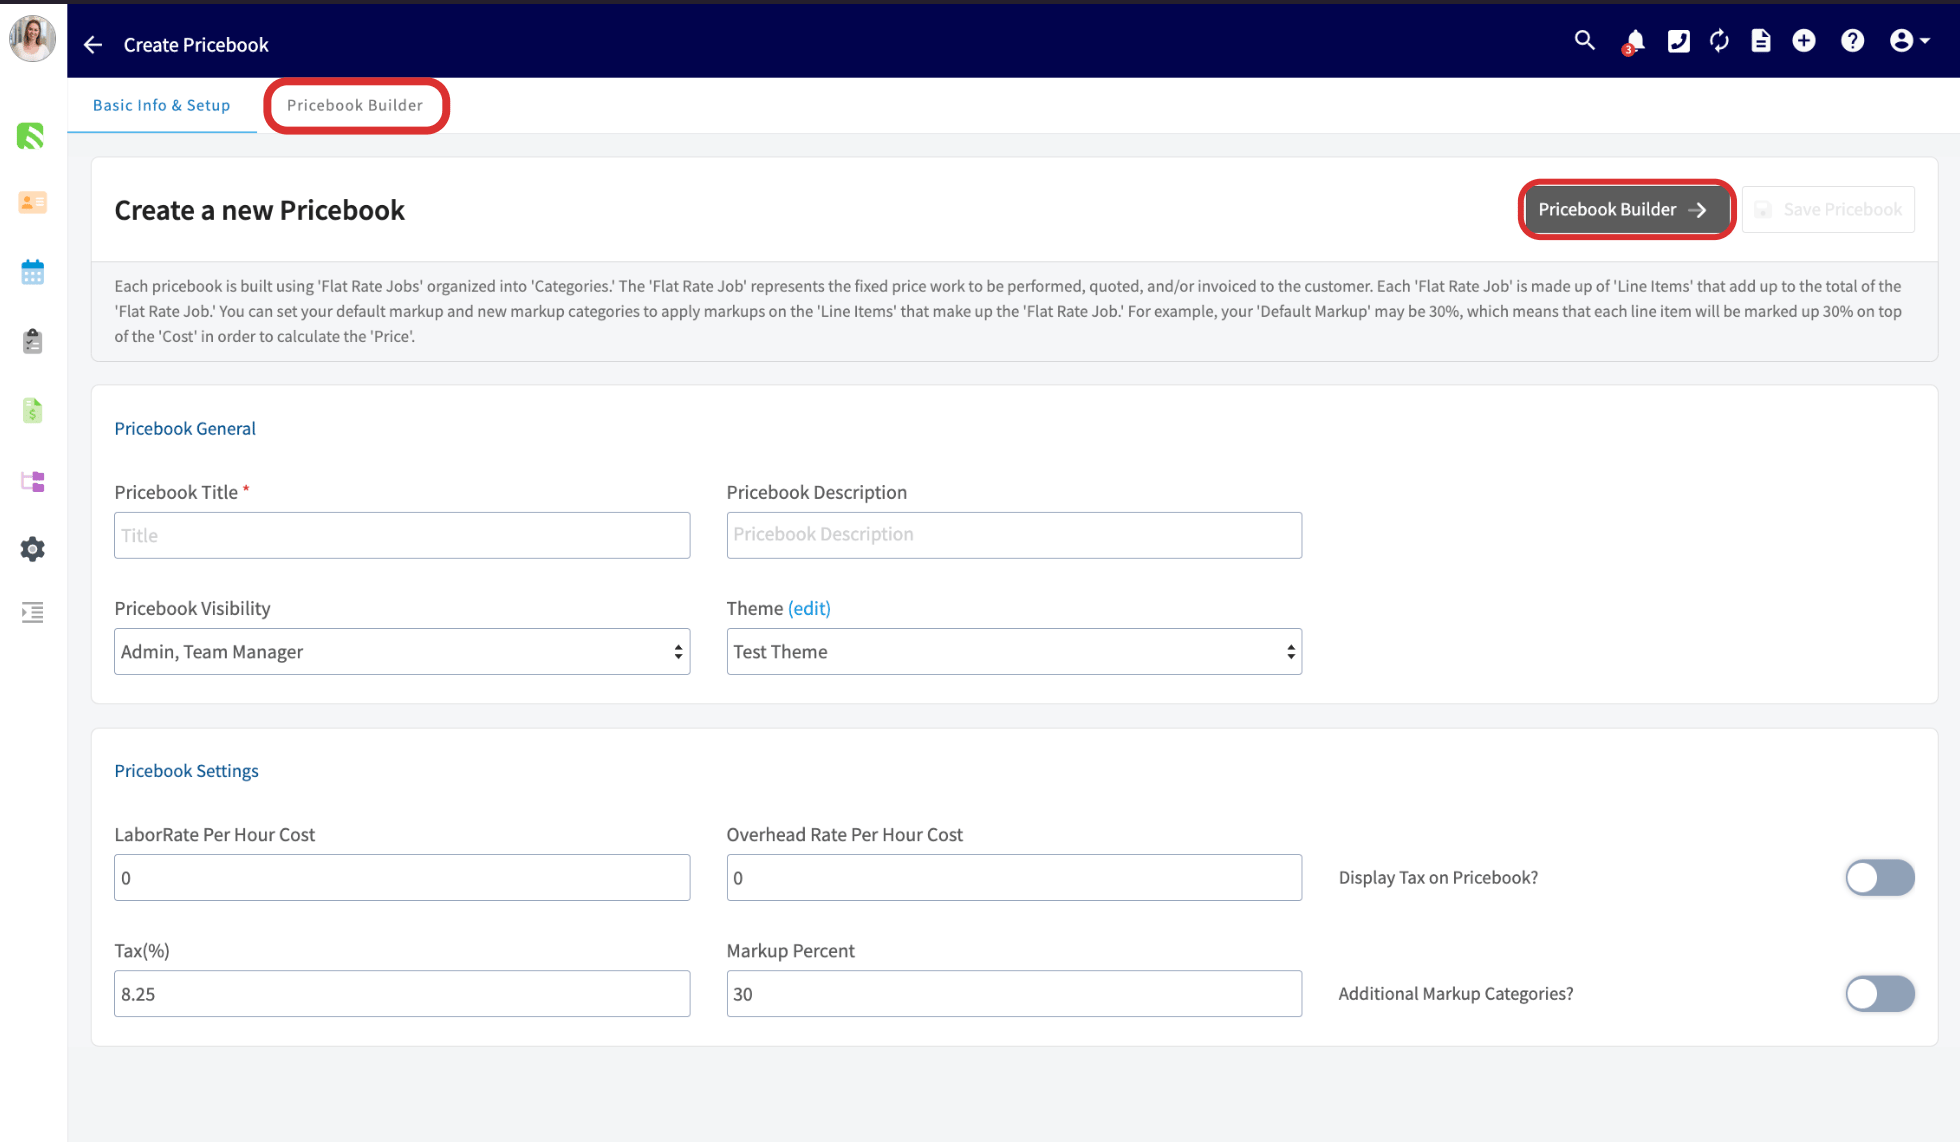
 ### 4. Open the Pricebook Builder
When you're ready to add categories, flat-rate jobs, and add-ons, select **Pricebook Builder**.
### 4. Open the Pricebook Builder
When you're ready to add categories, flat-rate jobs, and add-ons, select **Pricebook Builder**.
 ### 5. Create categories
Categories organize your flat-rate jobs:
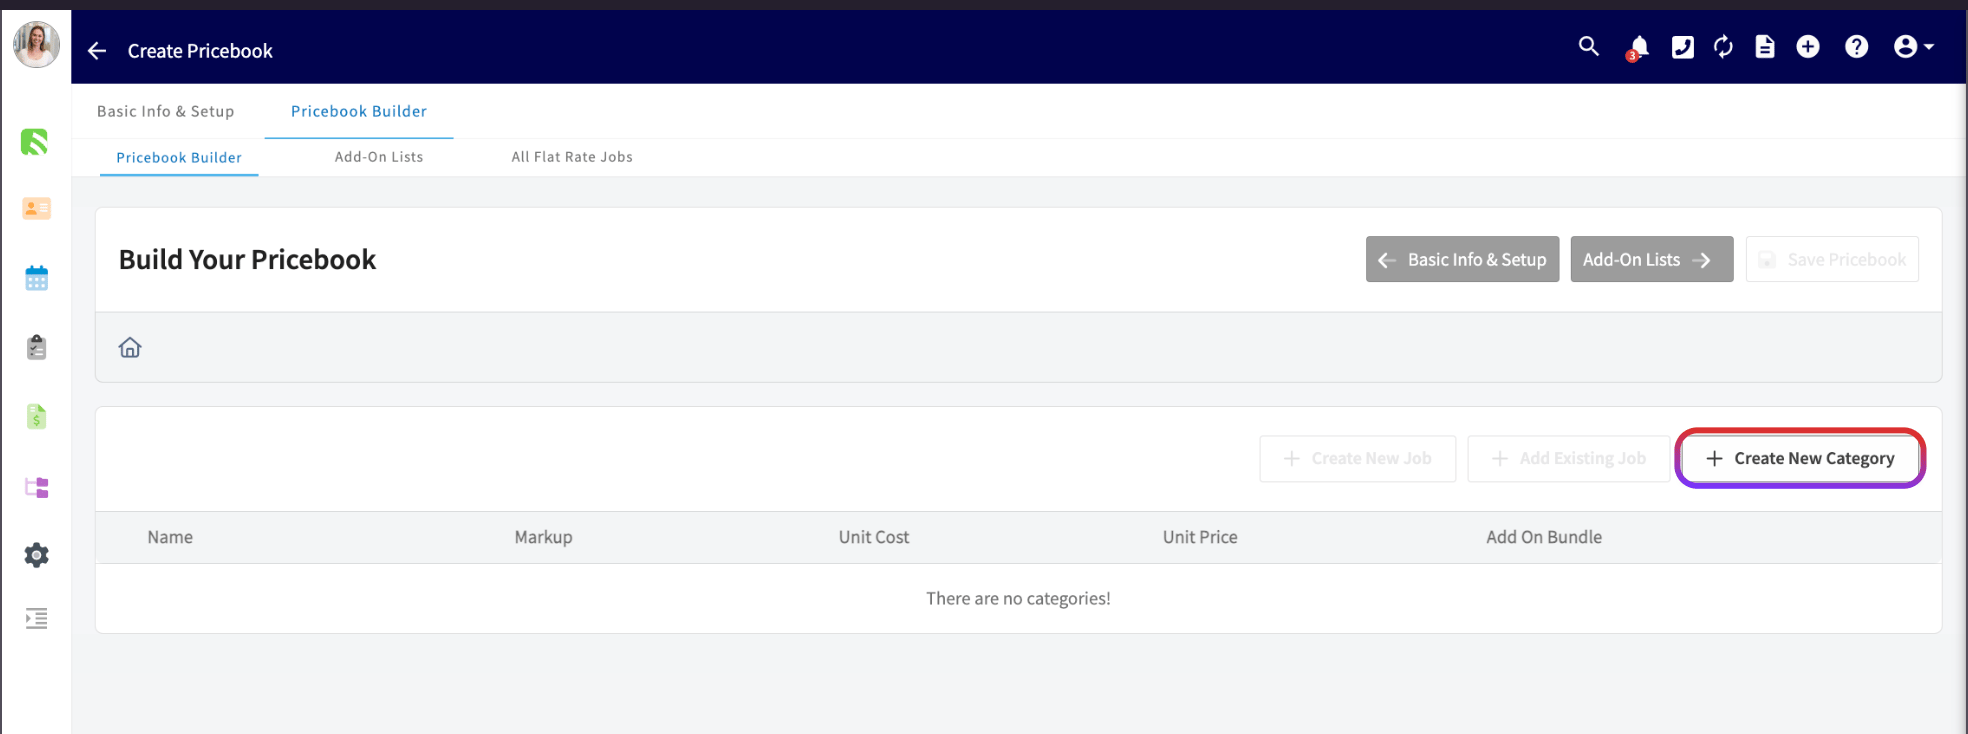
1. On the **Pricebook Builder** tab, select **Create New Category**.
### 5. Create categories
Categories organize your flat-rate jobs:
1. On the **Pricebook Builder** tab, select **Create New Category**.
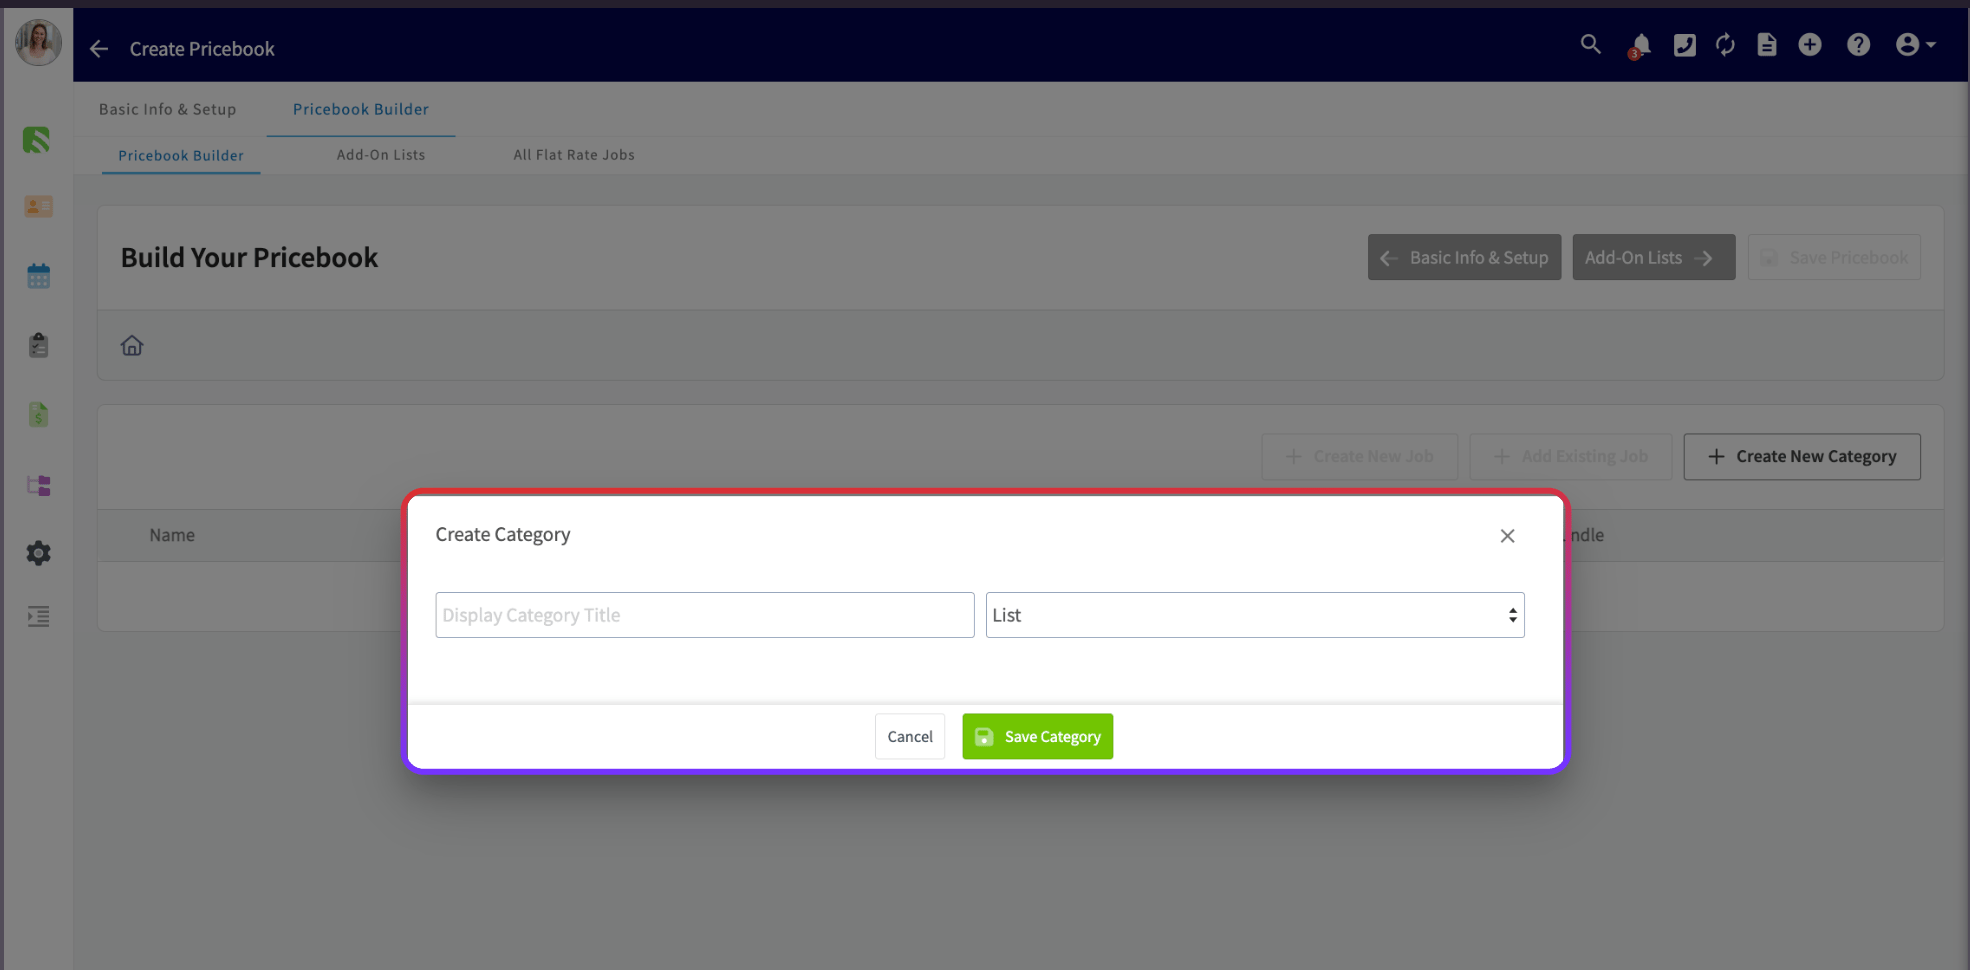
 2. Enter a display category title.
3. Choose whether jobs in this category appear as a **List** or in a **Good/Better/Best** format. If you aren't sure, you can change this later.
4. Select **Save Category**.
2. Enter a display category title.
3. Choose whether jobs in this category appear as a **List** or in a **Good/Better/Best** format. If you aren't sure, you can change this later.
4. Select **Save Category**.
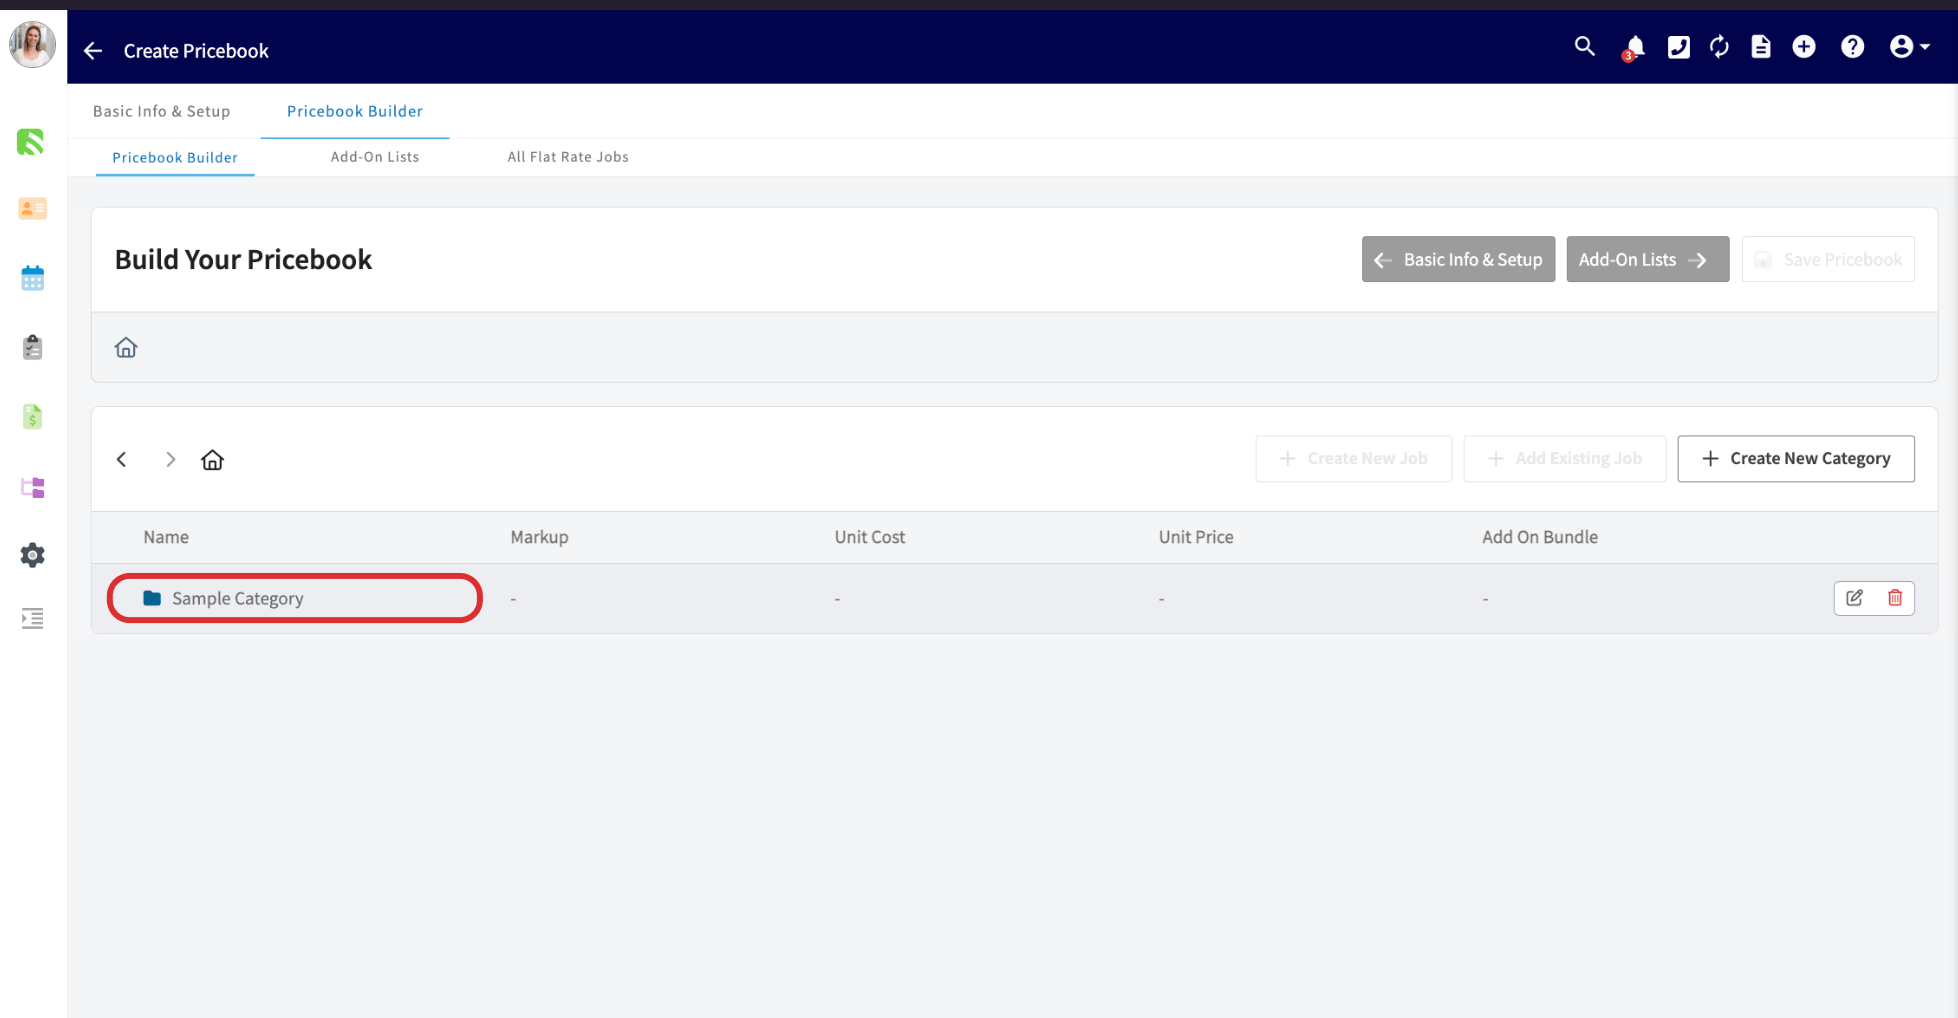
 Example display categories: Diagnostic/Evaluation, Gas Furnace, Heat Pump Systems.
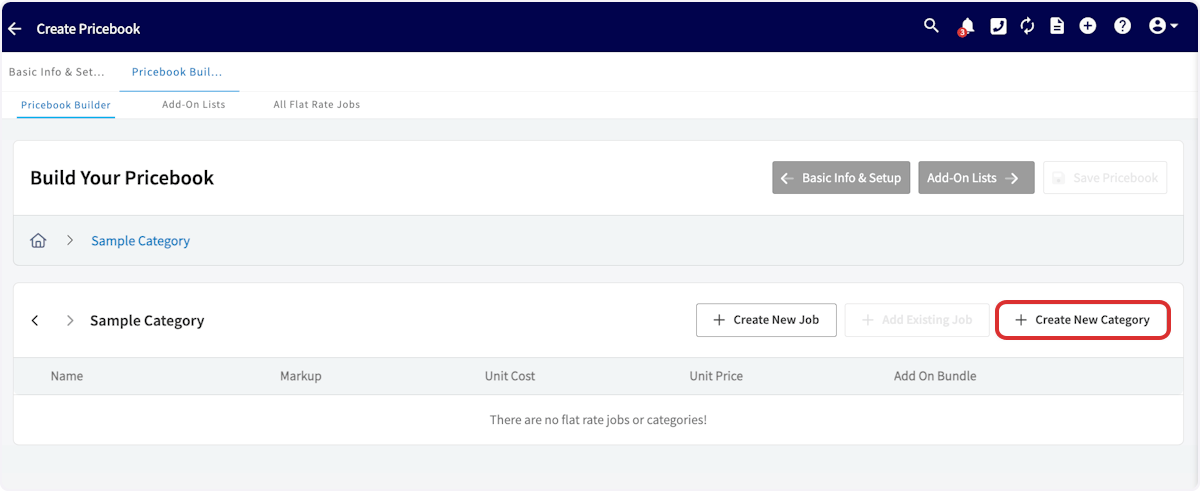
To organize further, select the category you'd like to nest under, then select **Create New Category** to add a sub-category inside it. Select the home icon to return to the full list of display categories at any time.
Example display categories: Diagnostic/Evaluation, Gas Furnace, Heat Pump Systems.
To organize further, select the category you'd like to nest under, then select **Create New Category** to add a sub-category inside it. Select the home icon to return to the full list of display categories at any time.
 ### 6. Create add-on lists
Add-on lists are upsell options you link to flat-rate jobs:
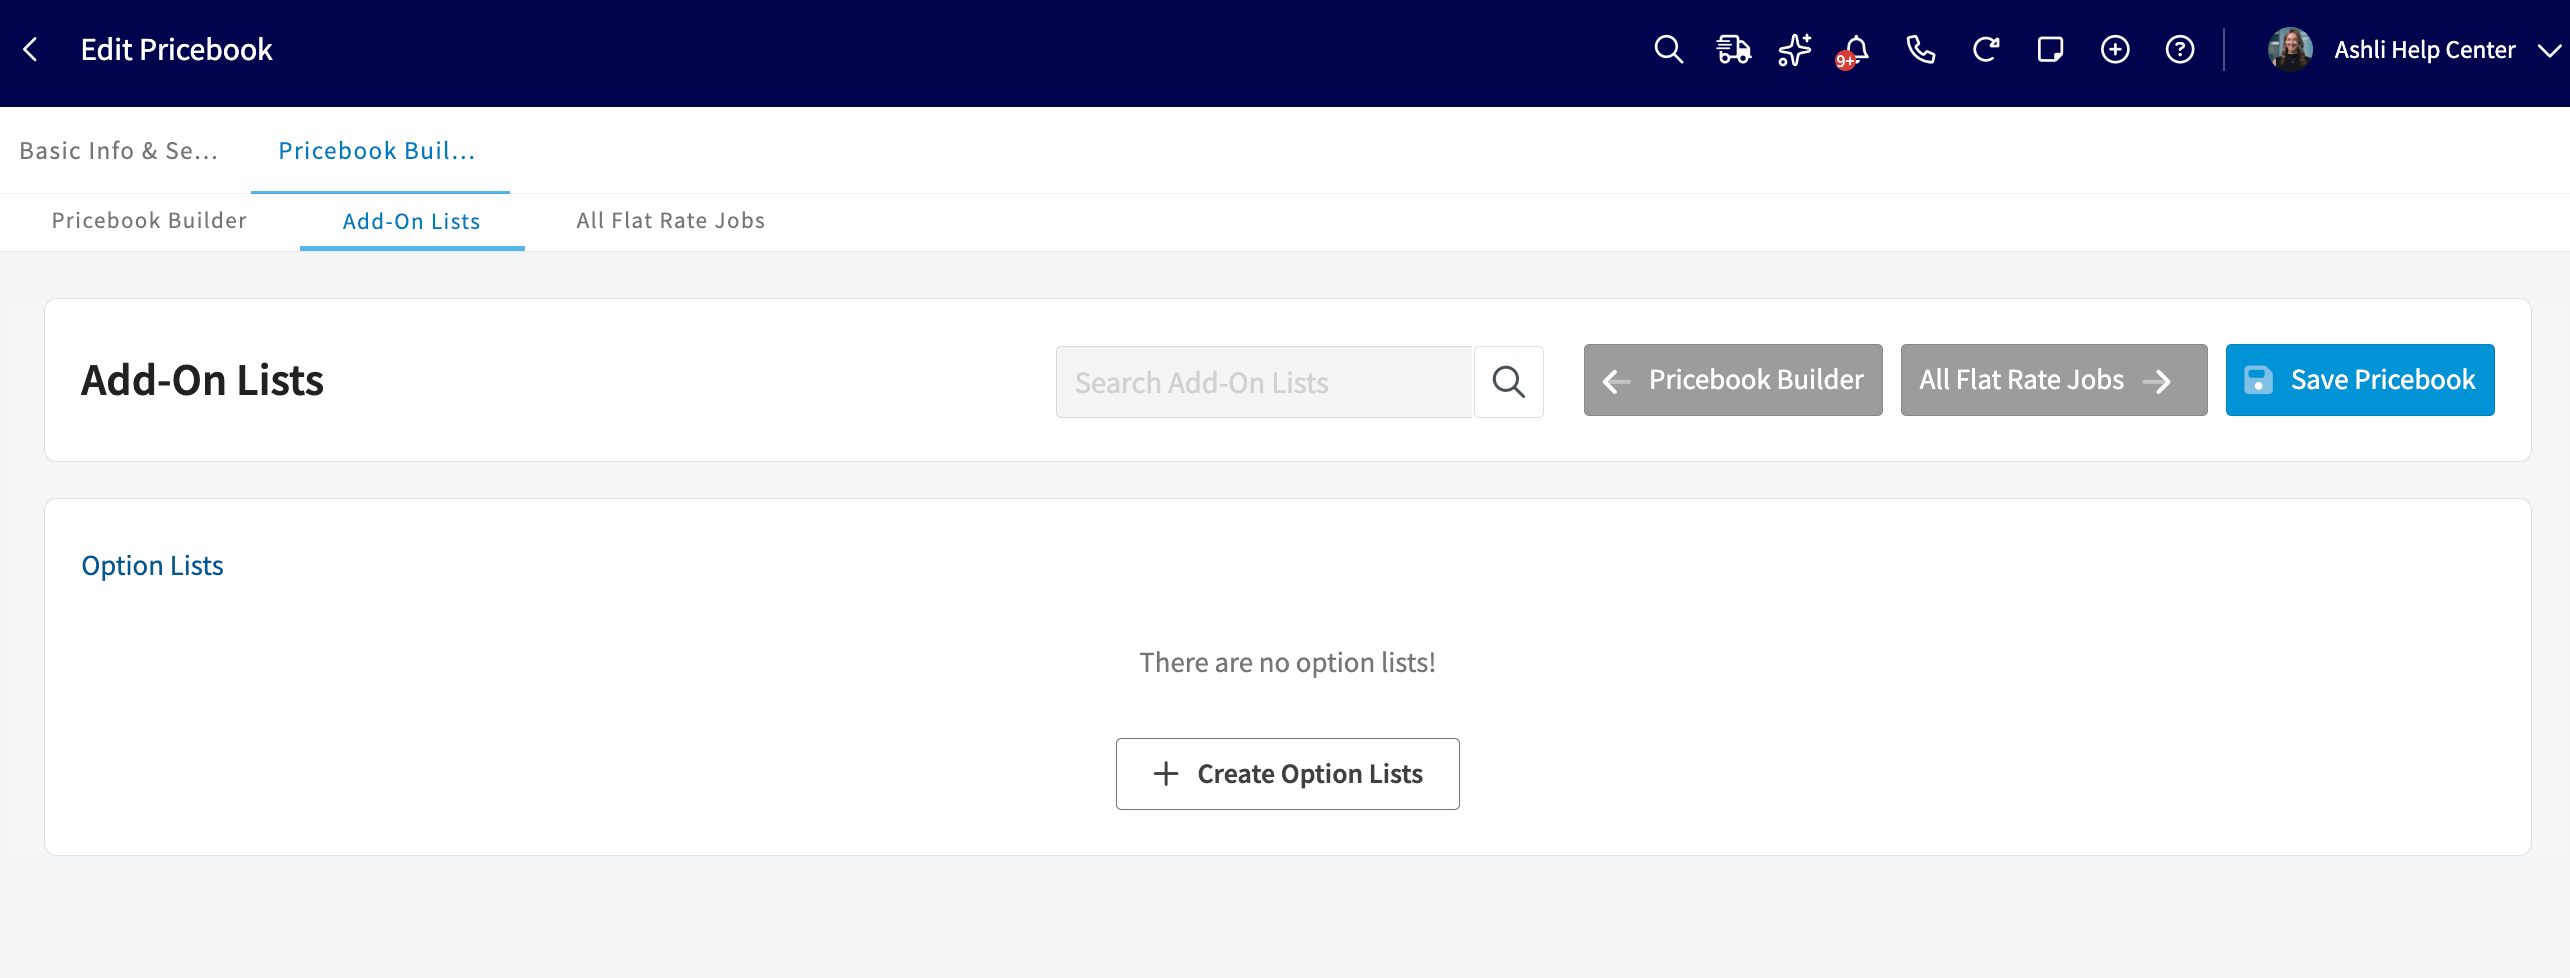
1. Select **Add-On Lists**, then select **Create Option Lists**.
### 6. Create add-on lists
Add-on lists are upsell options you link to flat-rate jobs:
1. Select **Add-On Lists**, then select **Create Option Lists**.
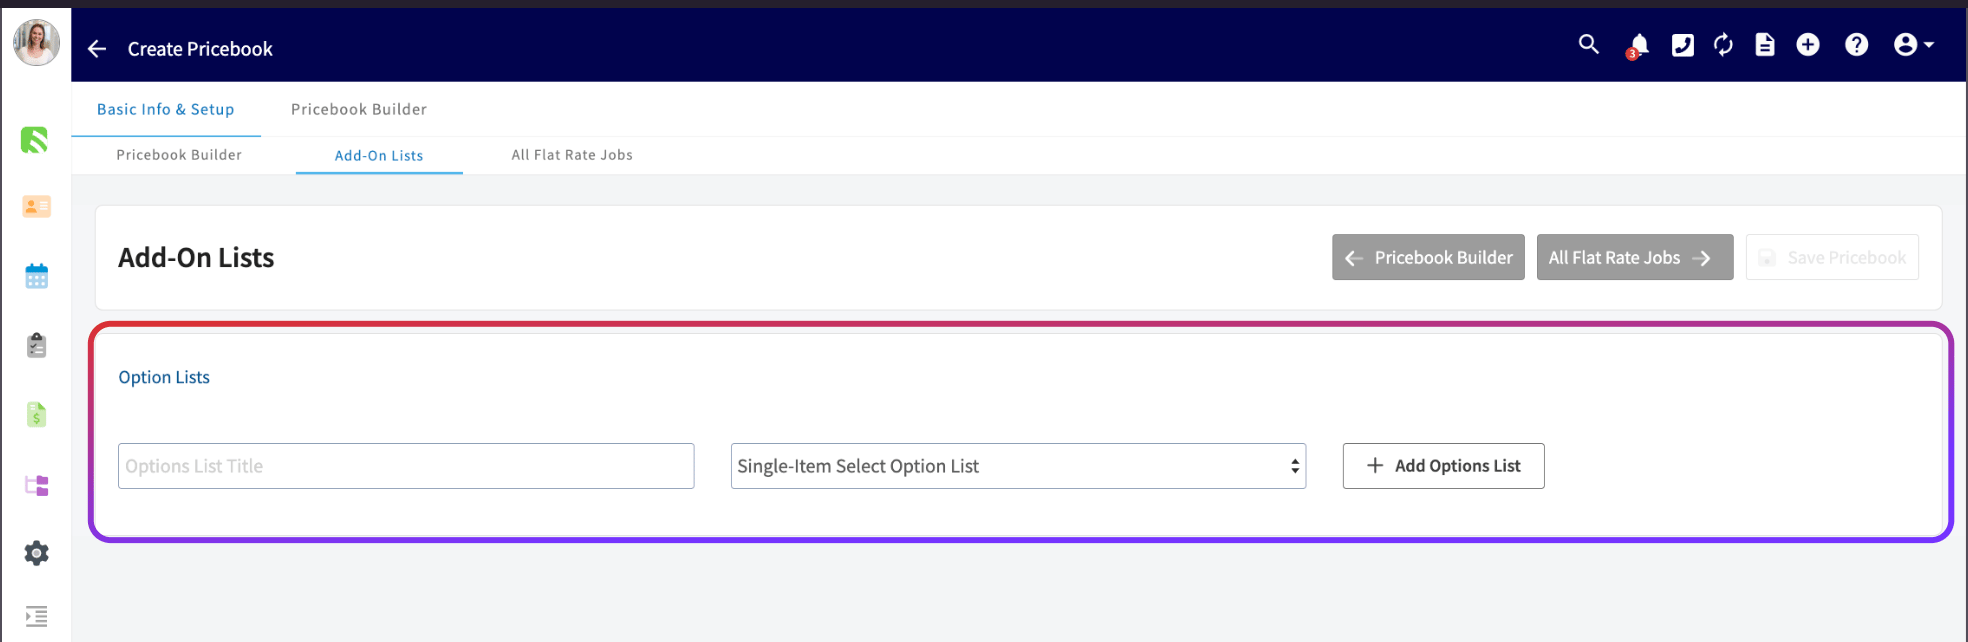
 2. Enter an options list title, then choose whether the list is **single-item select** (you or your customer can pick only one item from the list) or **multiple-item select** (you or your customer can pick as many items as desired), and select **Add Options List**. If you aren't sure, you can change this later.
 3. Under **Add Flat Rate Job**, search and add each flat-rate job you want housed under this options list. A flat-rate job can appear in more than one options list.
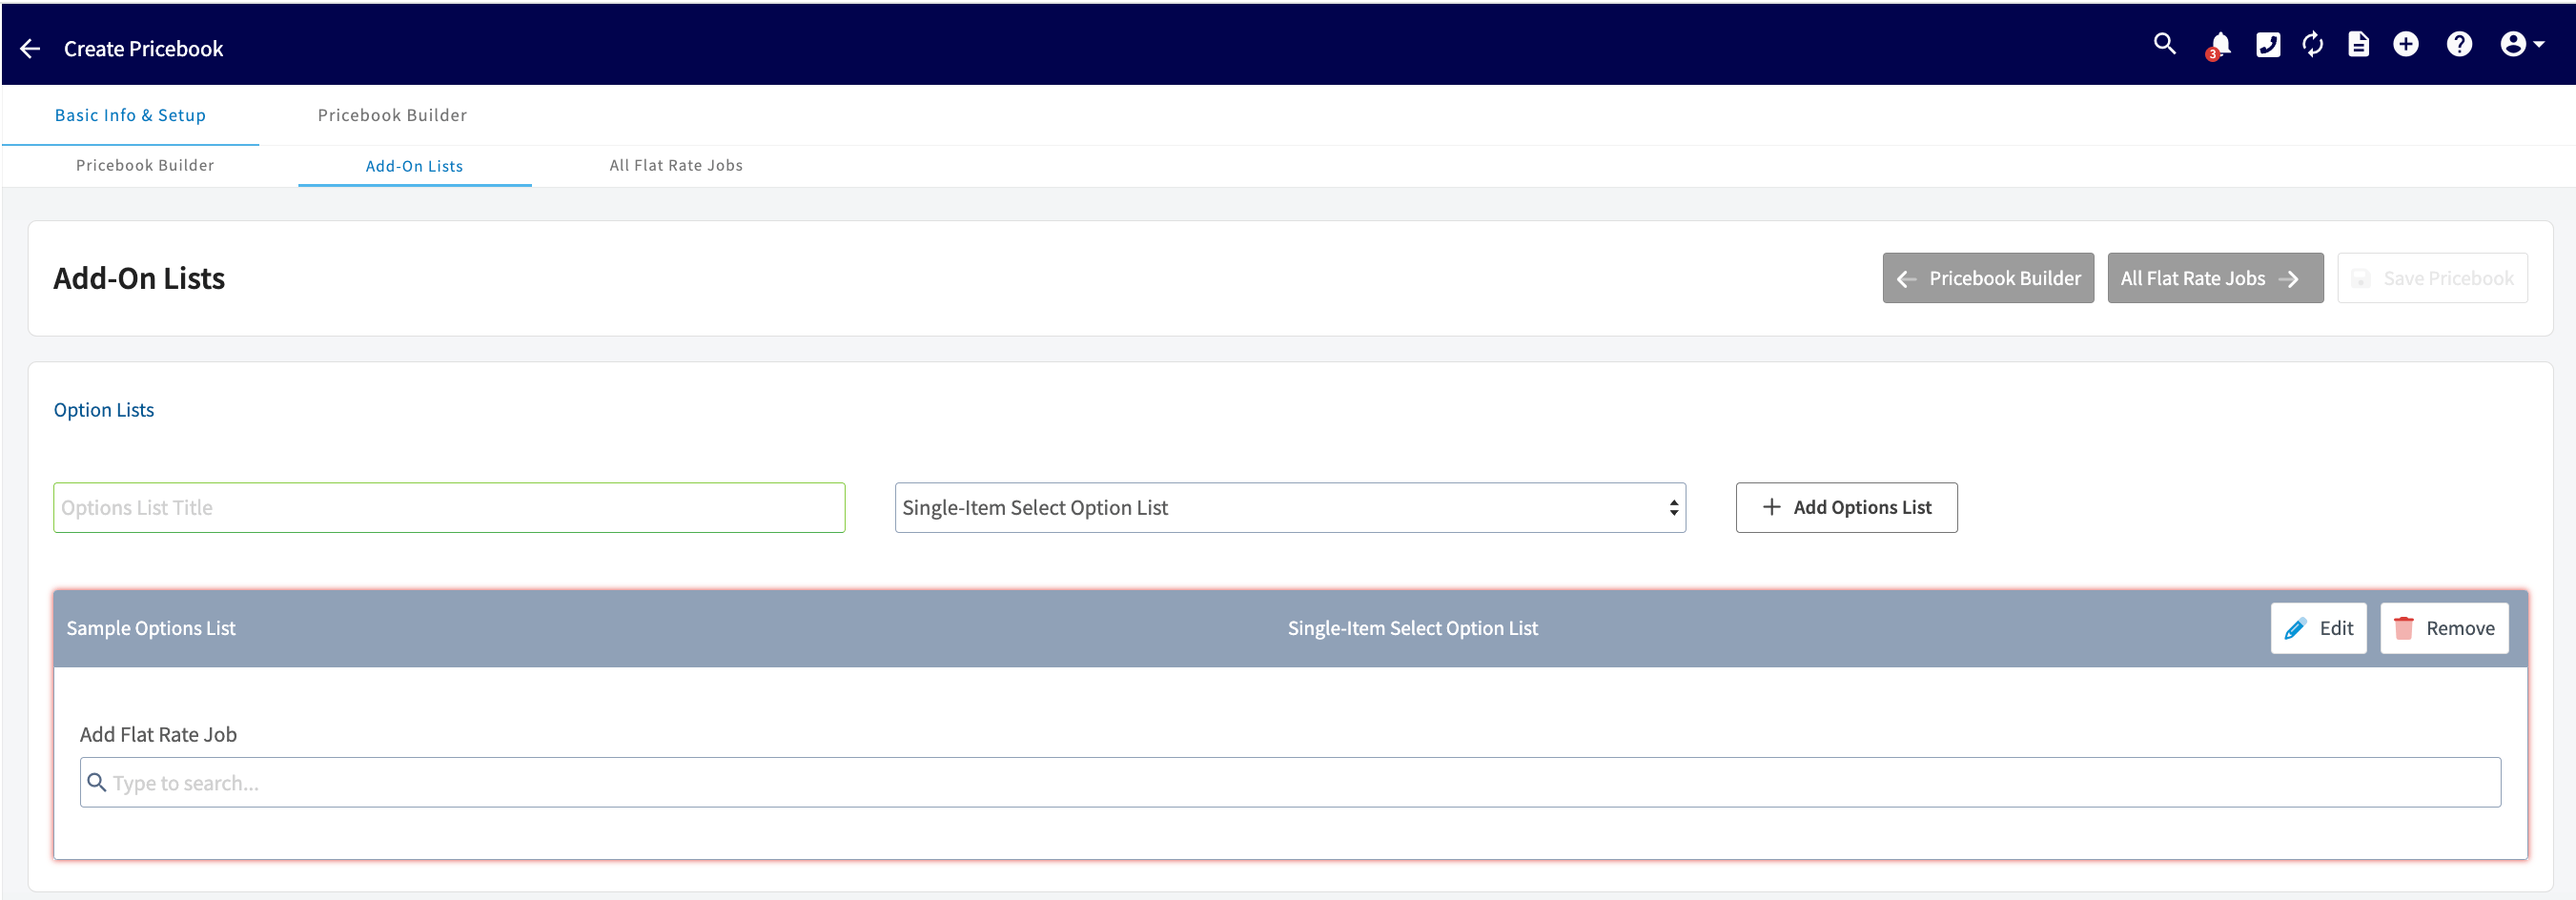 Example options list titles: Condenser Coil Add-Ons, Washing Machine Extended Warranties, Thermostat Upgrades.
### 7. Create flat-rate jobs
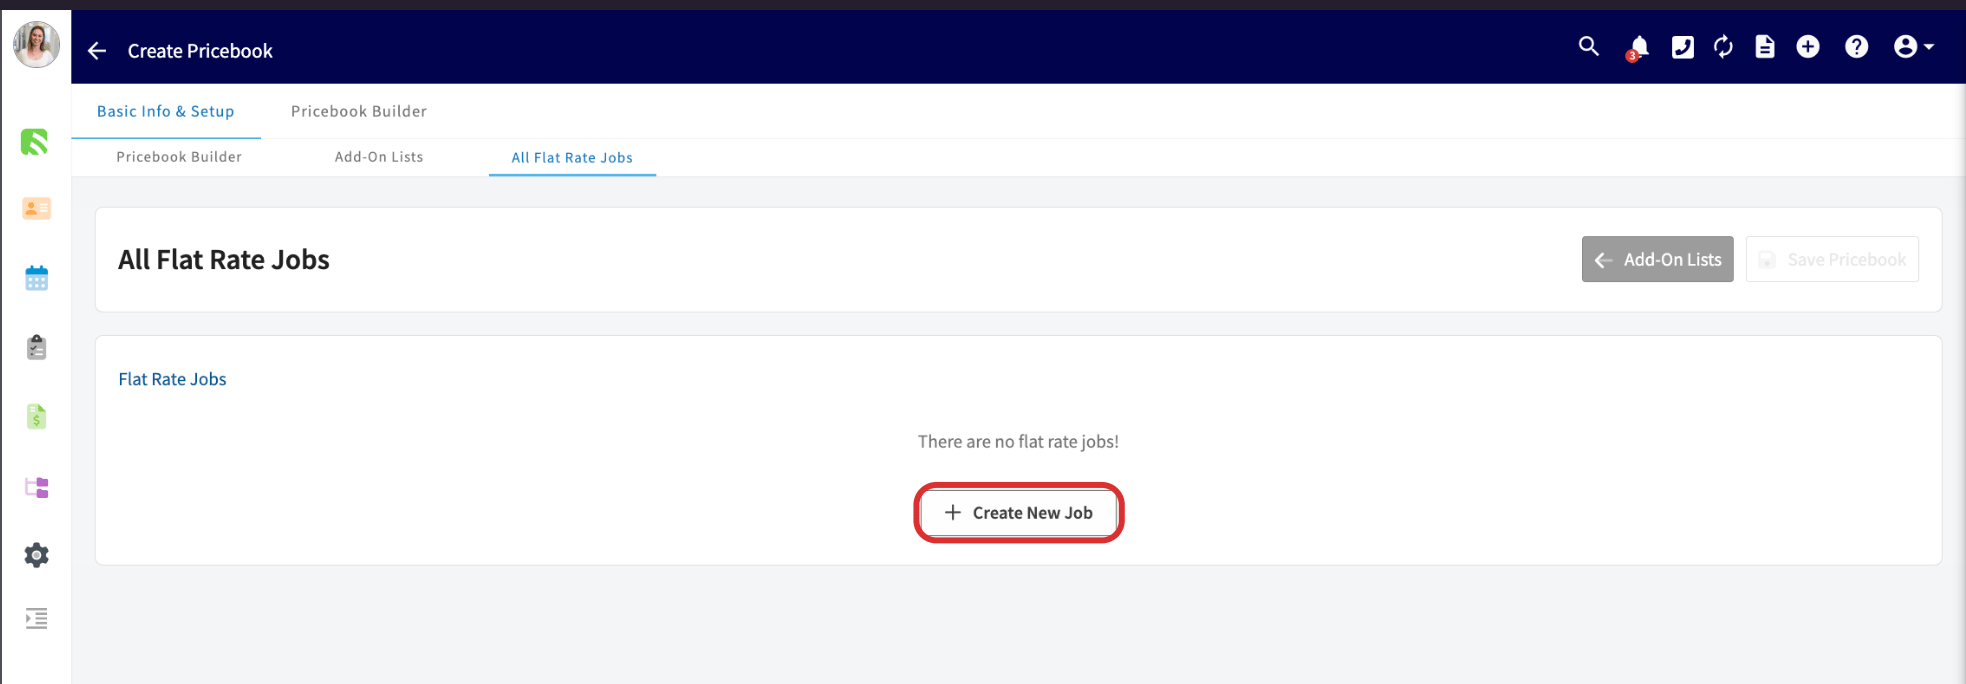
1. Select **All Flat Rate Jobs**, then select **Create New Job**.
Example options list titles: Condenser Coil Add-Ons, Washing Machine Extended Warranties, Thermostat Upgrades.
### 7. Create flat-rate jobs
1. Select **All Flat Rate Jobs**, then select **Create New Job**.
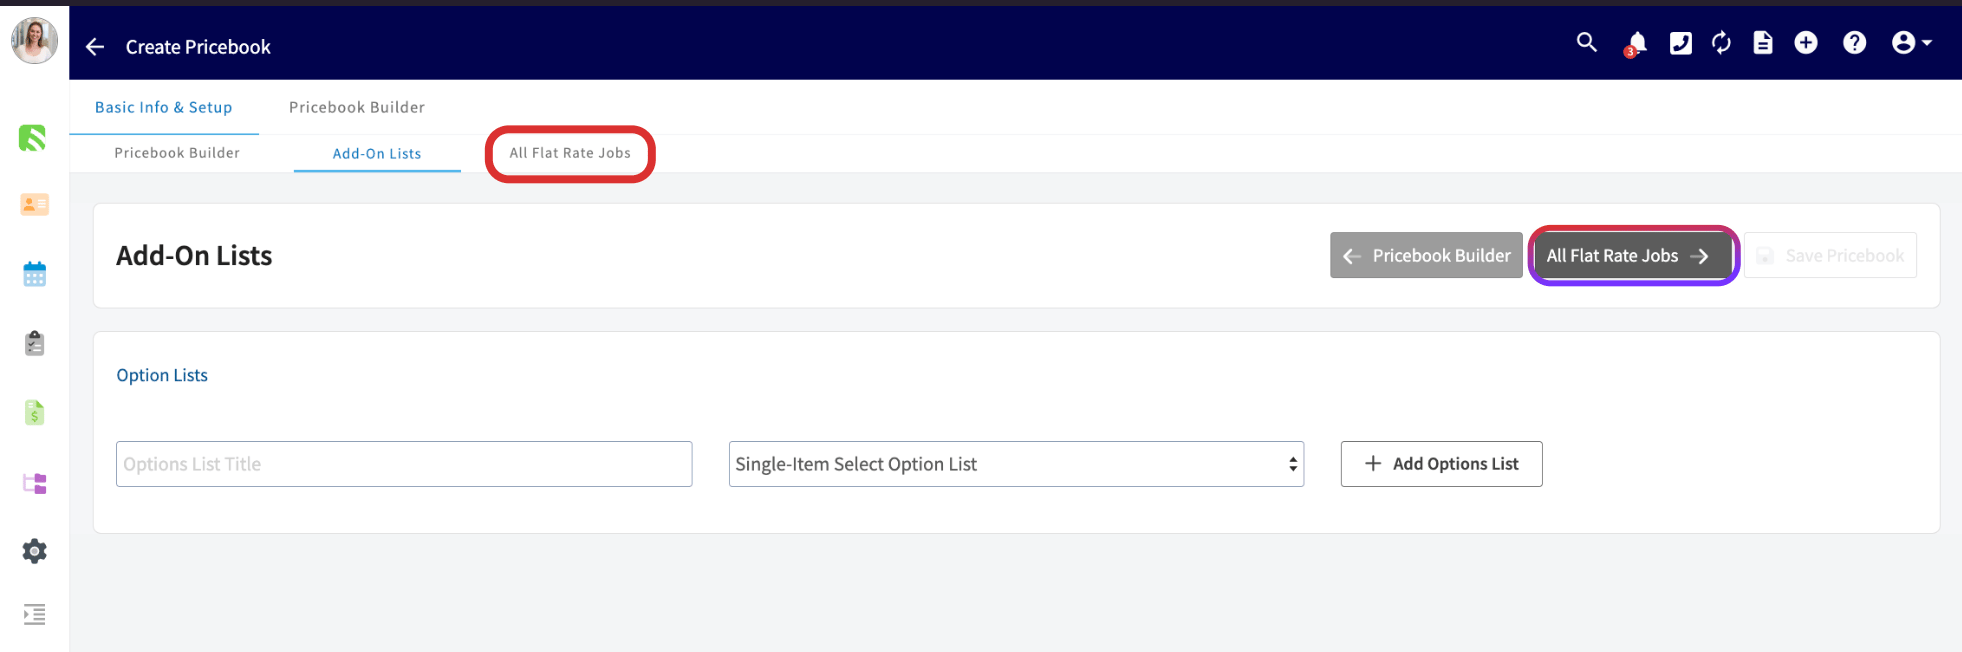
 2. Enter a **Job Name**. Add a description, an image, and tags if you want them.
3. Select the **Markup Category** for this job from the dropdown — the default markup you set earlier, unique markups by item, or one of the markup categories you created.
2. Enter a **Job Name**. Add a description, an image, and tags if you want them.
3. Select the **Markup Category** for this job from the dropdown — the default markup you set earlier, unique markups by item, or one of the markup categories you created.
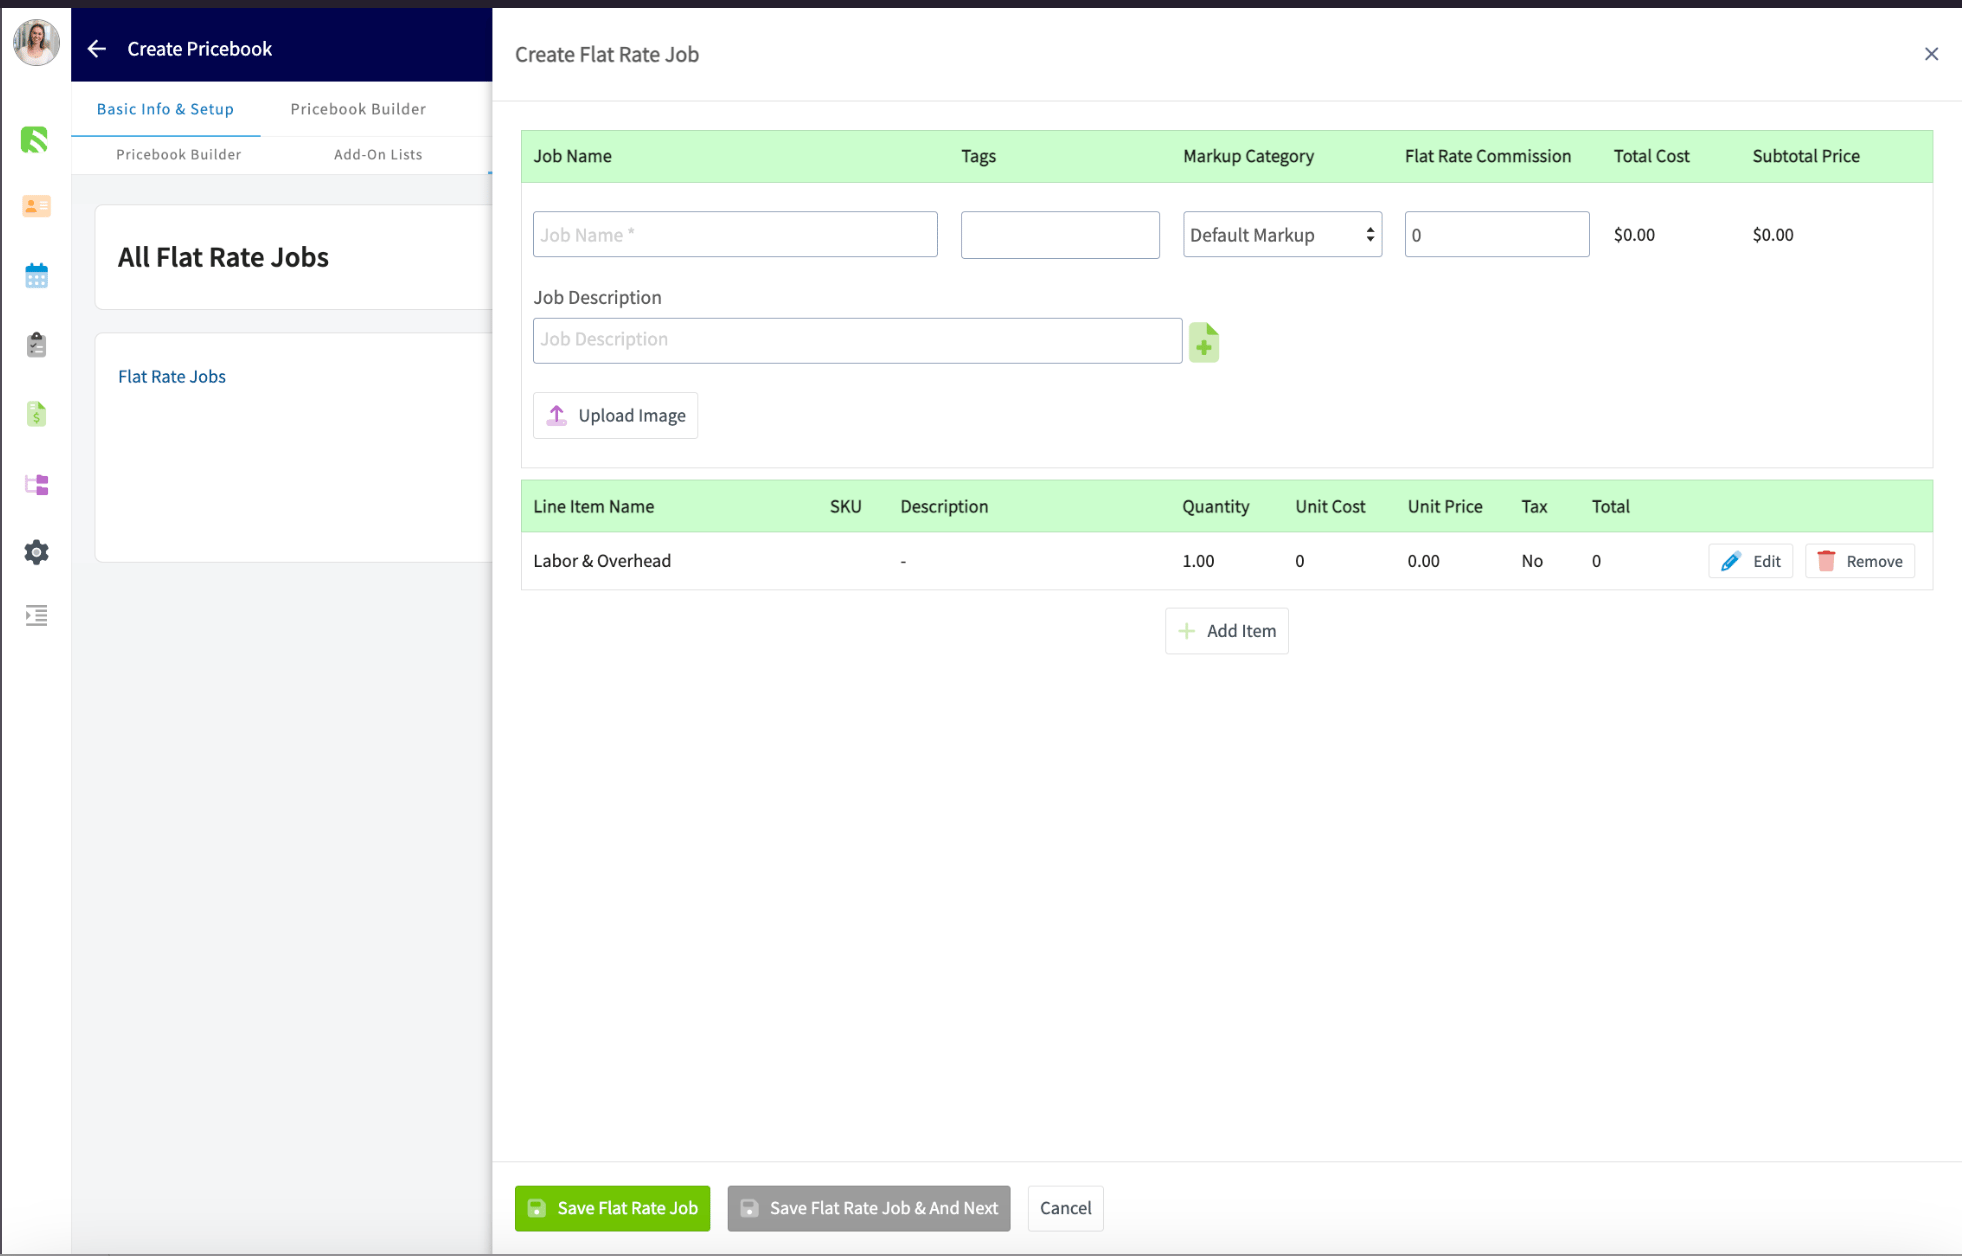 4. Select **Edit** on the **Labor & Overhead** line to enter the quantity of hours the job requires and a description, then select **Save Item**.
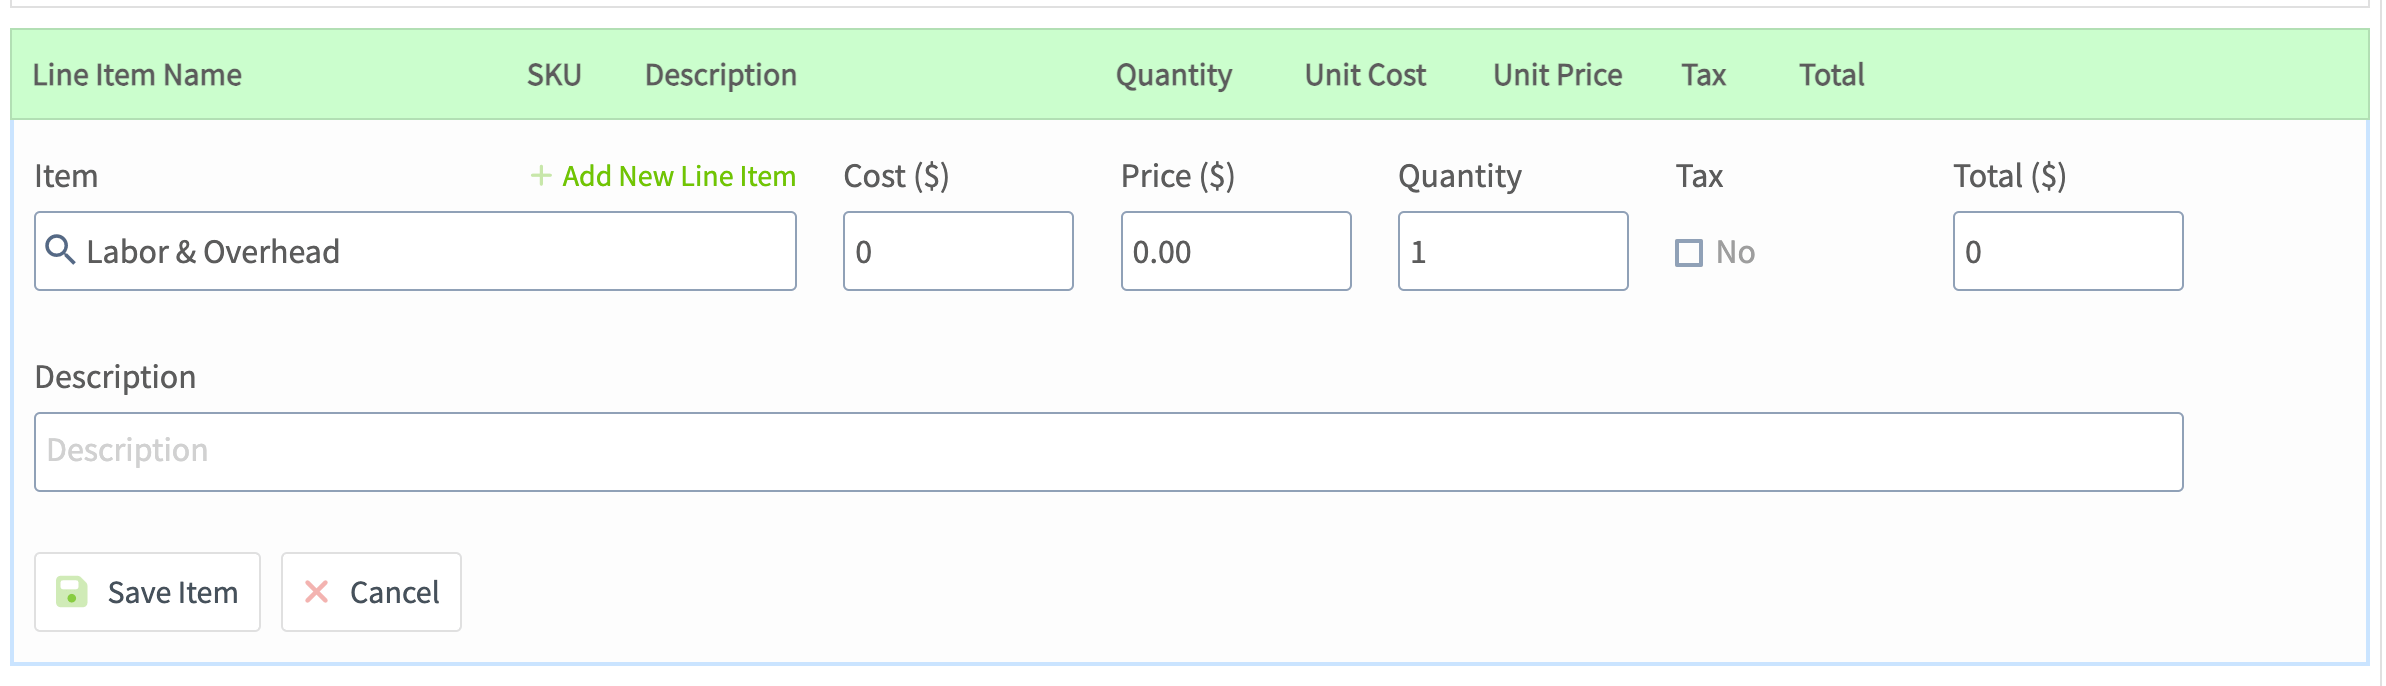 5. Select **+ Add Item** for every material the job needs. The Pricebook pulls from your Item List, or you can create a new line item. Cost, price, and description fill in automatically when you select an item; adjust them and the quantity as needed.
6. To reorder line items, click and hold the six-dot icon to the left of a line item and drag it into place. The new order applies to future estimates and invoices built from this flat-rate job.
7. Repeat **Create New Job** for each flat-rate job, and select **Save Pricebook** when you're done.
## On mobile
Use the Pricebook in the field to build estimates, invoices, and variant proposals with clear pricing and add-ons in front of the customer:
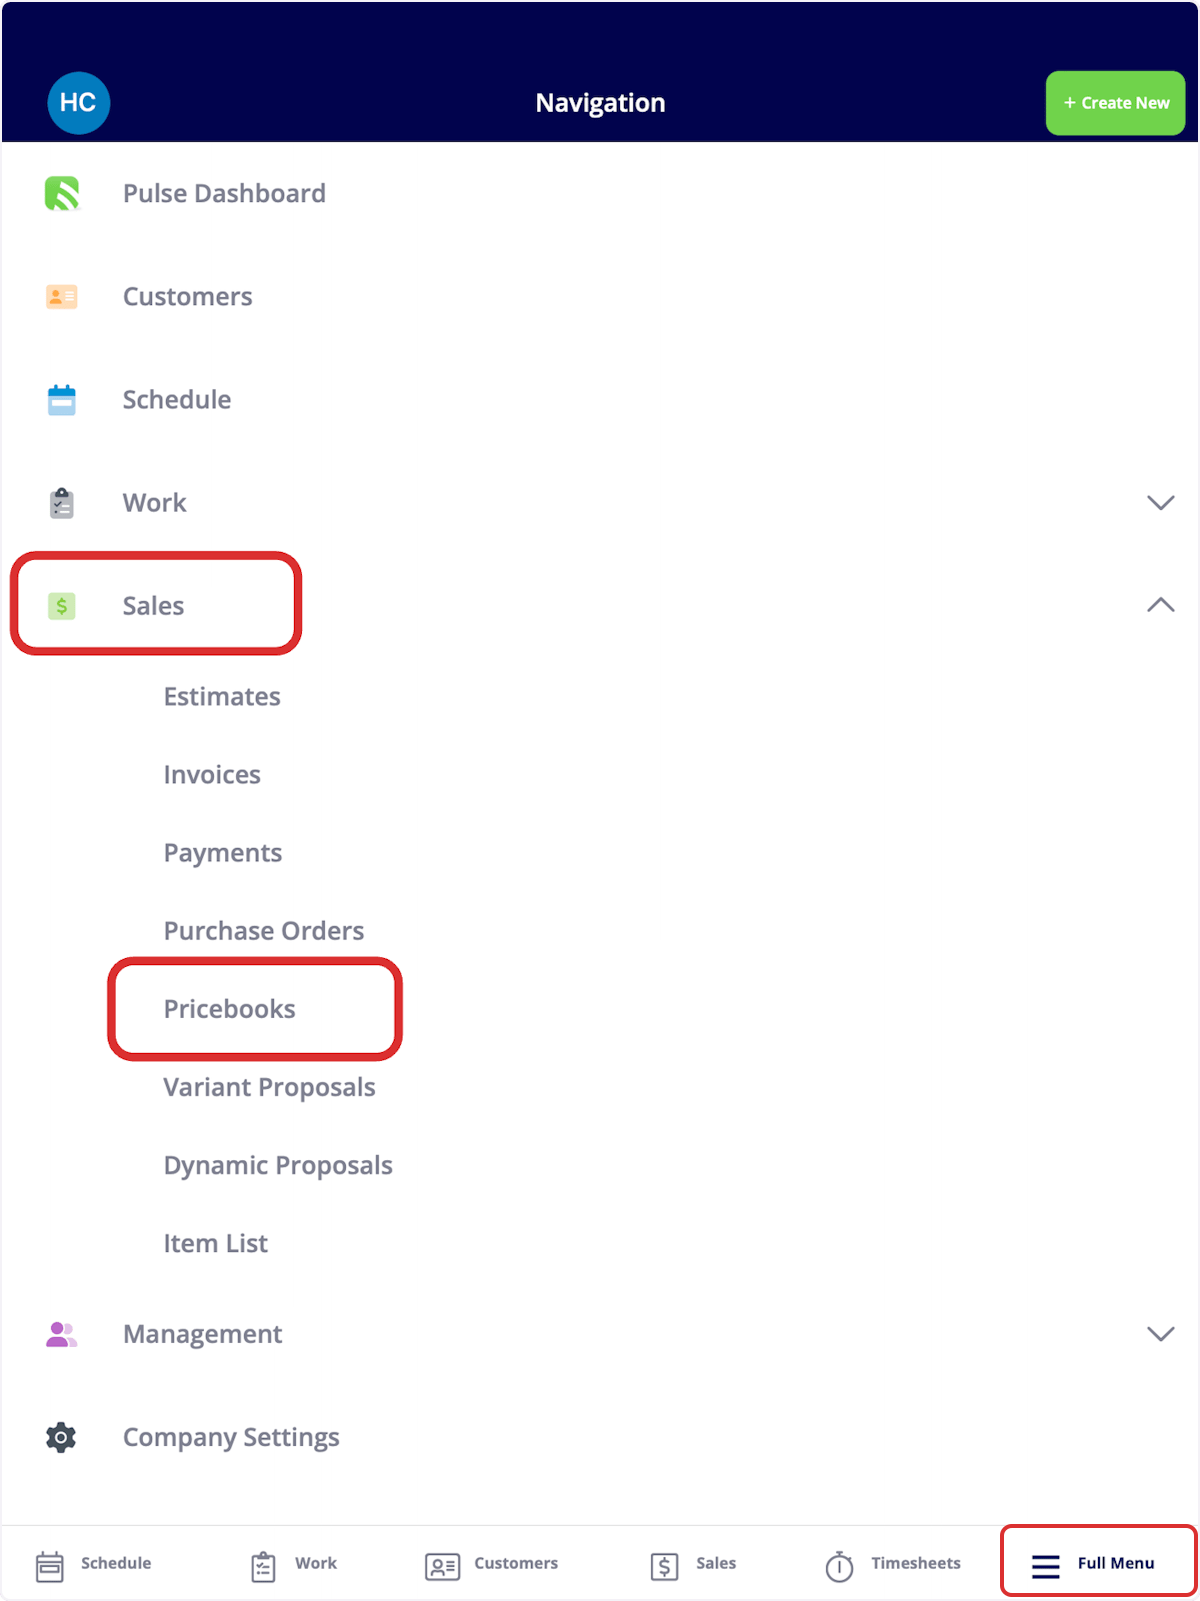
1. Select the **Sales** tab at the bottom of the screen and select **Pricebooks**, or select **Full Menu** > **Sales** > **Pricebooks**.
5. Select **+ Add Item** for every material the job needs. The Pricebook pulls from your Item List, or you can create a new line item. Cost, price, and description fill in automatically when you select an item; adjust them and the quantity as needed.
6. To reorder line items, click and hold the six-dot icon to the left of a line item and drag it into place. The new order applies to future estimates and invoices built from this flat-rate job.
7. Repeat **Create New Job** for each flat-rate job, and select **Save Pricebook** when you're done.
## On mobile
Use the Pricebook in the field to build estimates, invoices, and variant proposals with clear pricing and add-ons in front of the customer:
1. Select the **Sales** tab at the bottom of the screen and select **Pricebooks**, or select **Full Menu** > **Sales** > **Pricebooks**.
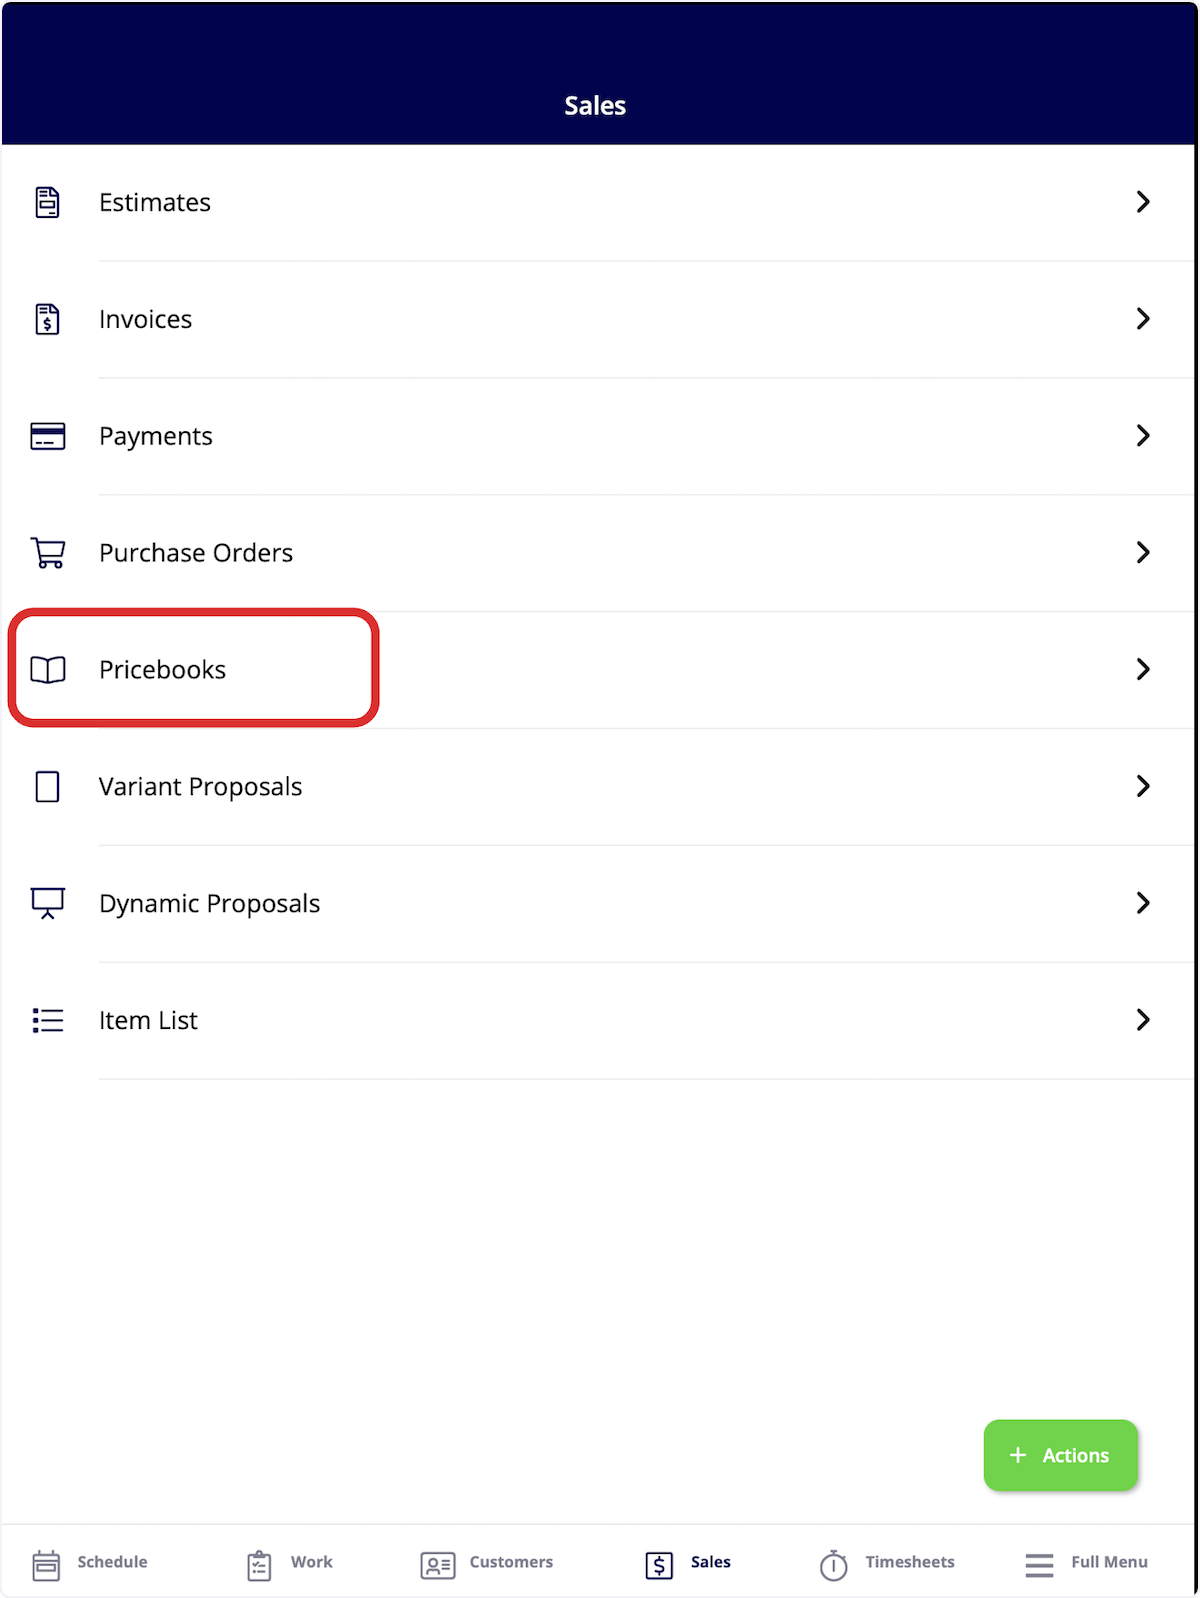
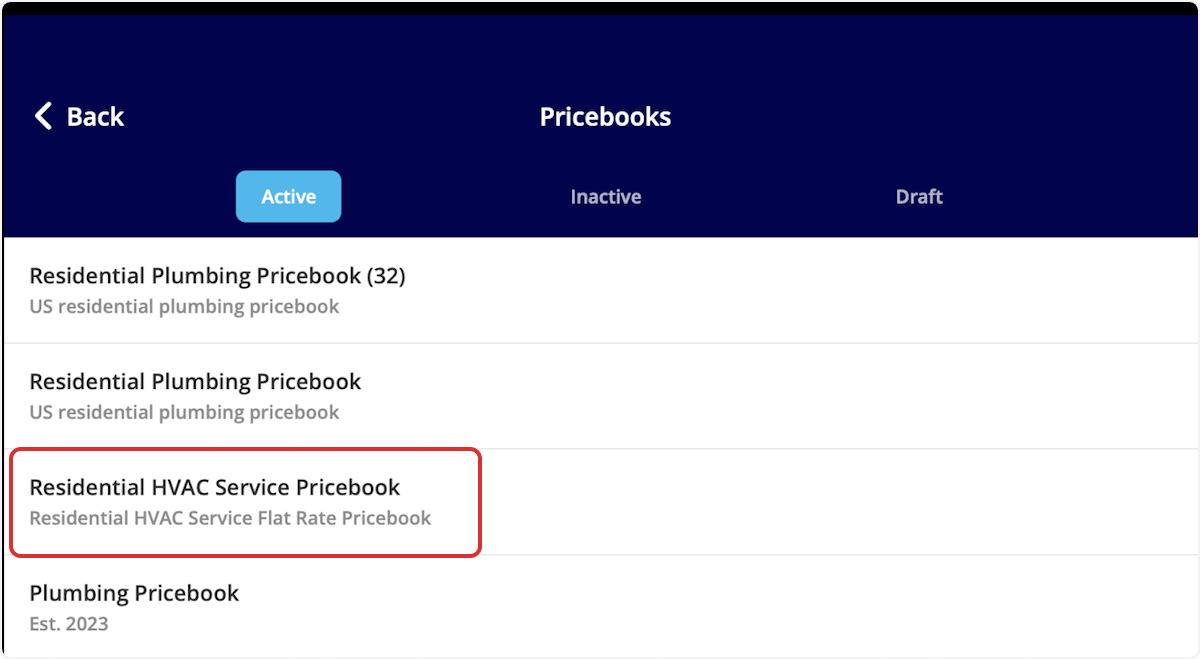
 2. Select the pricebook you want to use.
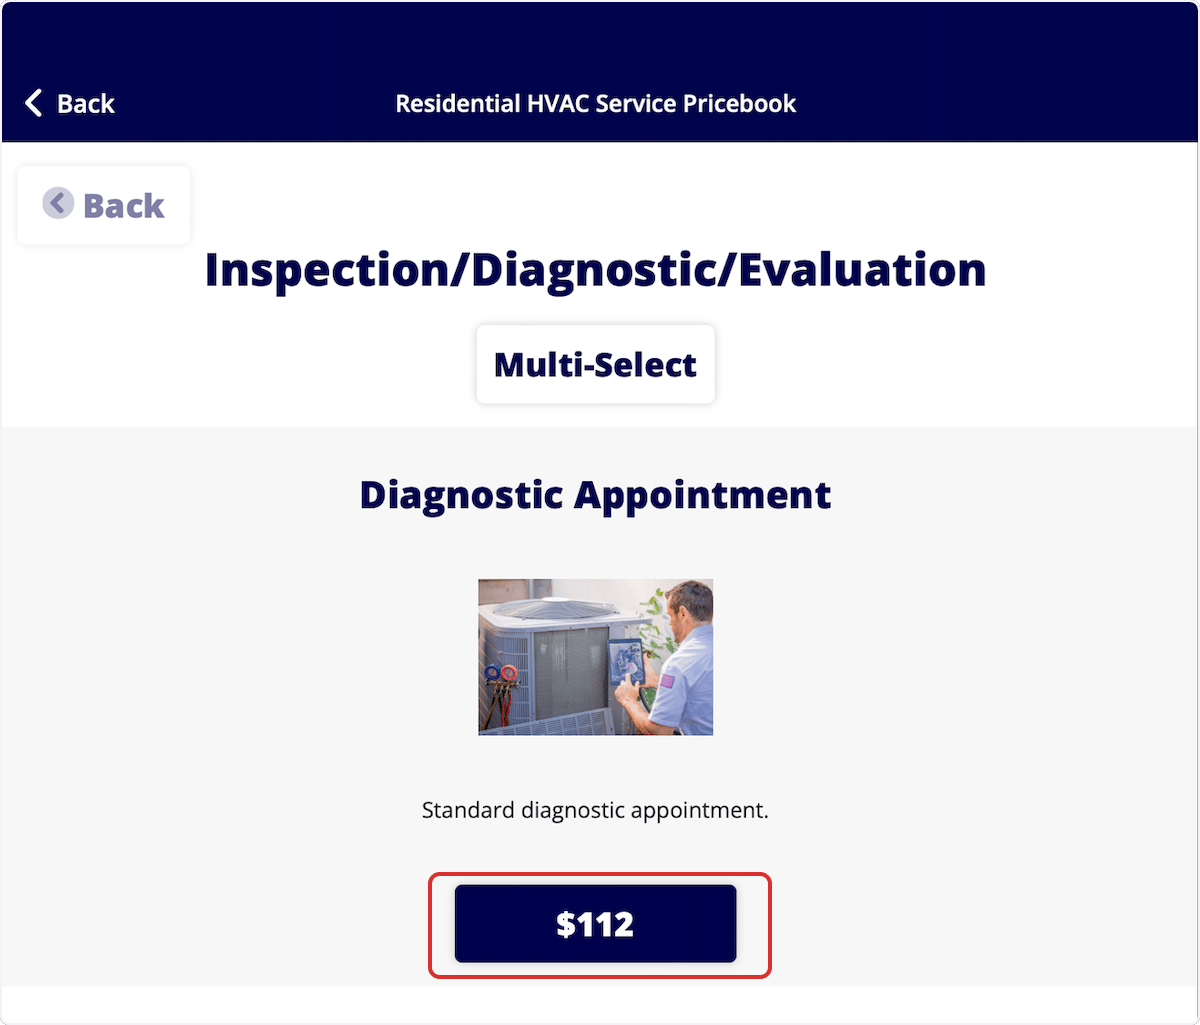
 3. Select the category your job is under. Select **Multi-Select** to add several flat-rate jobs, or tap the listed price to add a single flat-rate job.
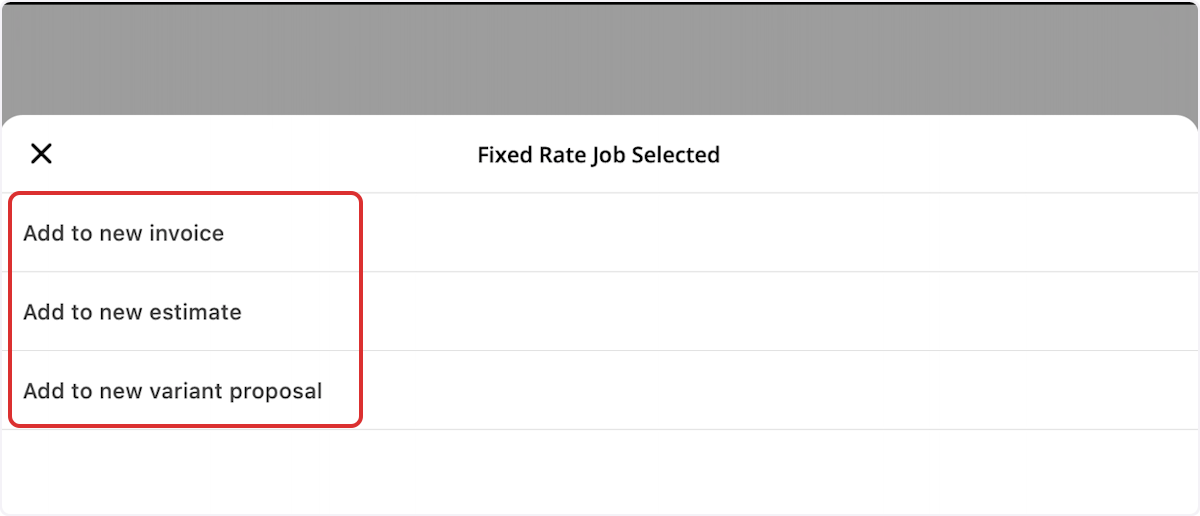
 4. Choose whether to add the flat-rate job(s) to a new **invoice**, **estimate**, or **variant proposal**.
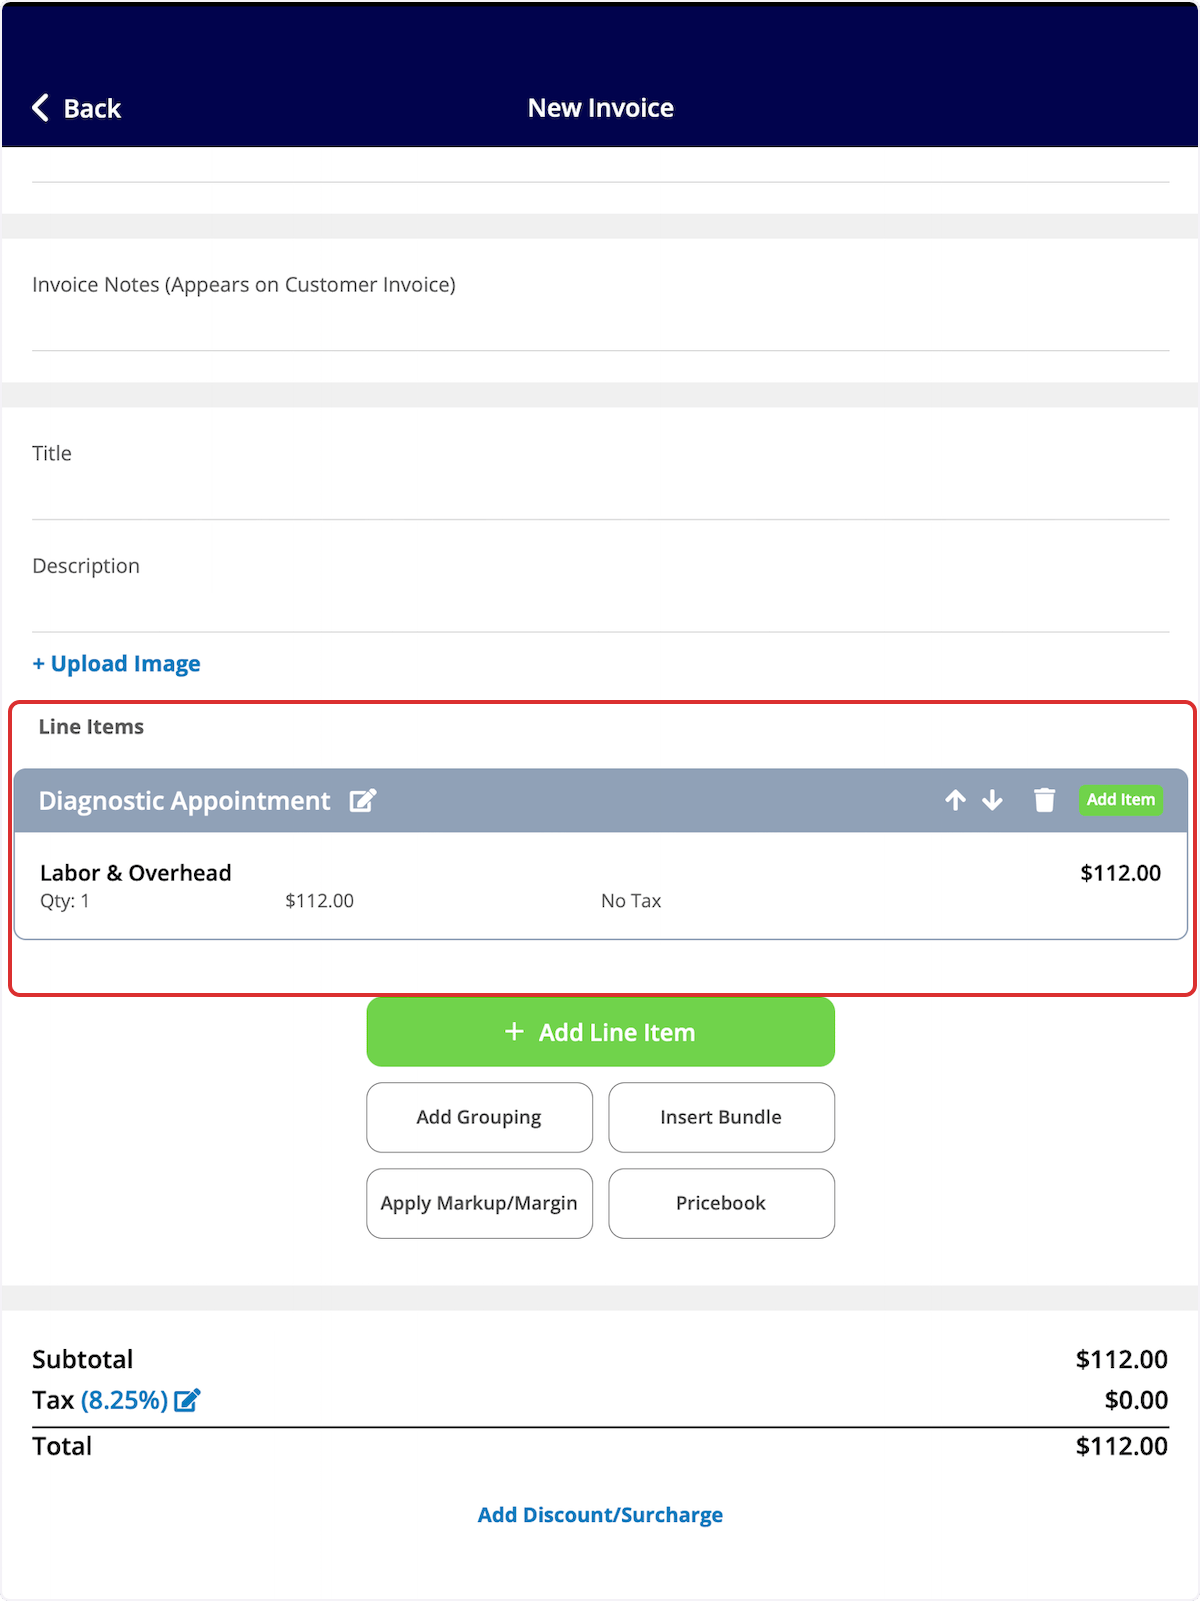
 5. The pricing and item details auto-populate into the document. Add the customer details and anything else you want to capture, then send it to your customer, present it on-site, or collect payment.
 ## Settings reference
These settings on the **Basic Info & Setup** tab control how jobs in the pricebook are priced and displayed:
| **Setting** | **What it controls** |
| ---------------------------------------------------------------- | --------------------------------------------------------------------------------------------------------- |
| **Labor Rate per Hour Cost** | What labor costs you per hour — not the customer-facing price. |
| **Overhead Rate per Hour Cost** | Your hourly overhead, factored into each job so it's priced to profit. |
| **Markup Percent** | The default markup applied to all labor, supplies, and equipment. |
| **Markup Categories** | Custom markup rates for specific labor, price bands, or item types, overriding the default. |
| **Default Grouping Visibility When Added to Estimates/Invoices** | Whether groupings show by default when a flat-rate job is added to a document; can be overridden per job. |
## Related articles
* [Sales Suite Overview](/add-ons/sales-suite/overview)
* [Setting Up Dimensional Pricebook](/add-ons/sales-suite/dimensional-pricebook)
* [How to Import a Pricebook](/add-ons/sales-suite/importing-pricebook)
* [How to Create an Estimate](/estimates-invoices/creating/estimate)
* [How to Create an Invoice](/estimates-invoices/creating/invoice)
Your Pricebook is working when a tech opens it on an estimate or invoice, picks a flat-rate job, and the price, line items, and add-ons fill in exactly as you set them — no call to the office, no guessing.
## Related topics
- [How to Create an Invoice](/estimates-invoices/creating/invoice.md)
- [How to Create an Estimate](/estimates-invoices/creating/estimate.md)
- [Setting Up Dimensional Pricebook](/add-ons/sales-suite/dimensional-pricebook.md)
- [How to Import a Pricebook](/add-ons/sales-suite/importing-pricebook.md)
## Settings reference
These settings on the **Basic Info & Setup** tab control how jobs in the pricebook are priced and displayed:
| **Setting** | **What it controls** |
| ---------------------------------------------------------------- | --------------------------------------------------------------------------------------------------------- |
| **Labor Rate per Hour Cost** | What labor costs you per hour — not the customer-facing price. |
| **Overhead Rate per Hour Cost** | Your hourly overhead, factored into each job so it's priced to profit. |
| **Markup Percent** | The default markup applied to all labor, supplies, and equipment. |
| **Markup Categories** | Custom markup rates for specific labor, price bands, or item types, overriding the default. |
| **Default Grouping Visibility When Added to Estimates/Invoices** | Whether groupings show by default when a flat-rate job is added to a document; can be overridden per job. |
## Related articles
* [Sales Suite Overview](/add-ons/sales-suite/overview)
* [Setting Up Dimensional Pricebook](/add-ons/sales-suite/dimensional-pricebook)
* [How to Import a Pricebook](/add-ons/sales-suite/importing-pricebook)
* [How to Create an Estimate](/estimates-invoices/creating/estimate)
* [How to Create an Invoice](/estimates-invoices/creating/invoice)
Your Pricebook is working when a tech opens it on an estimate or invoice, picks a flat-rate job, and the price, line items, and add-ons fill in exactly as you set them — no call to the office, no guessing.
## Related topics
- [How to Create an Invoice](/estimates-invoices/creating/invoice.md)
- [How to Create an Estimate](/estimates-invoices/creating/estimate.md)
- [Setting Up Dimensional Pricebook](/add-ons/sales-suite/dimensional-pricebook.md)
- [How to Import a Pricebook](/add-ons/sales-suite/importing-pricebook.md)