> ## Documentation Index
> Fetch the complete documentation index at: https://help.fieldpulse.com/llms.txt
> Use this file to discover all available pages before exploring further.
# Setting Up Custom Estimate & Invoice Themes
> Build a theme with your brand colors in FieldPulse Company Settings, set it as your default, and switch a single estimate or invoice to another theme.
> **Who uses this:** Admins — themes live in **Company Settings**, which only the Admin role can view. Anyone who can open an estimate or invoice record can switch that single document to another saved theme. **Availability:** All regions, all plans. Themes are created on the web app.
A theme controls the colors on the [estimates and invoices](https://www.fieldpulse.com/features/estimates-and-invoices) your customers receive. Build a theme once with your brand colors, set it as your default, and every estimate and invoice you send carries those colors without anyone styling a document by hand.
## Overview
A theme is a saved set of colors made up of one main branding color plus five sub-colors. You can let FieldPulse generate the five sub-colors from the main branding color, or set each sub-color yourself with a color picker or a color code.
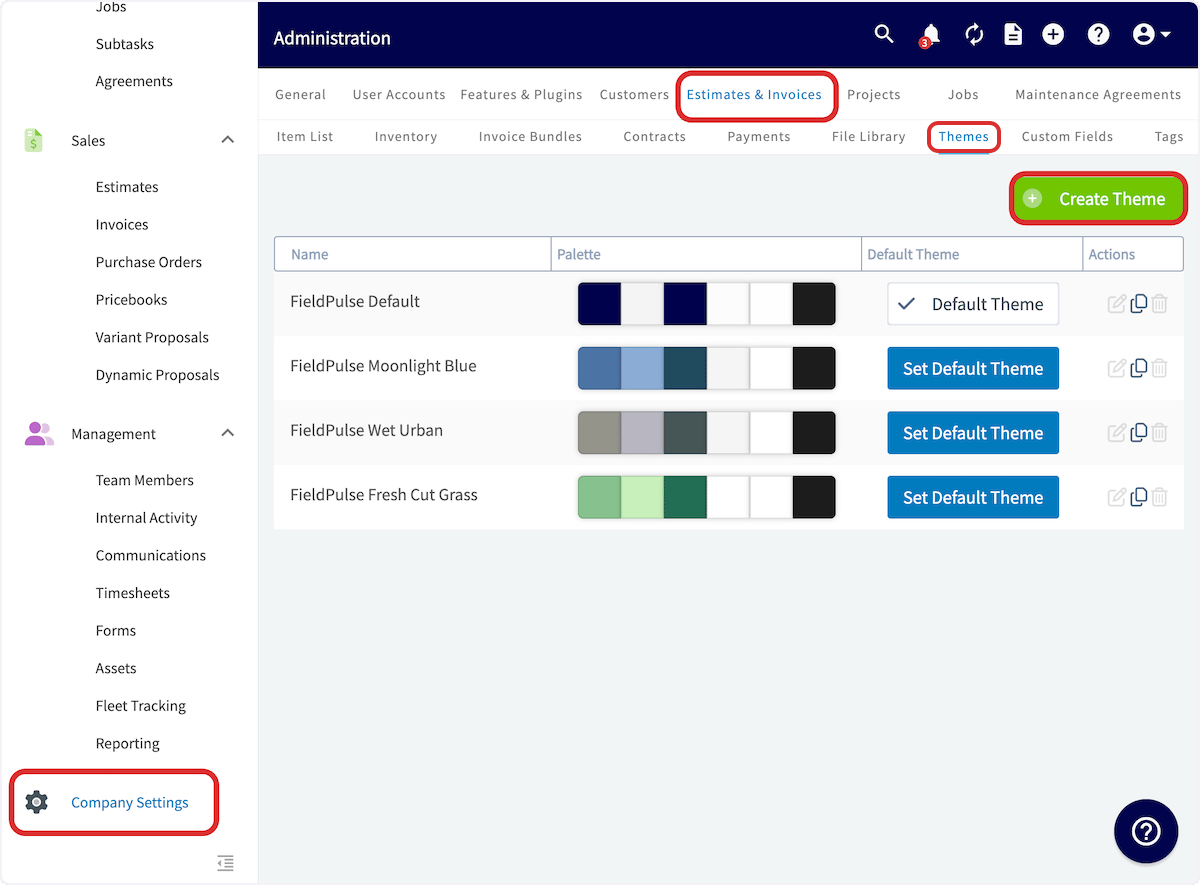
FieldPulse ships with four built-in themes — **FieldPulse Default**, **FieldPulse Moonlight Blue**, **FieldPulse Wet Urban**, and **FieldPulse Fresh Cut Grass**. Creating your own theme adds it to that same list, where you can set it as the default for every new estimate and invoice. A single estimate or invoice can also be switched to a different theme from its preview settings, without changing the account default.
You create and manage themes in **Company Settings** under **Estimates & Invoices**.
## Video walkthrough
Watch the [custom estimate and invoice themes walkthrough](https://www.loom.com/share/25a3e59120414480ba3c97b568549d31) for a full run-through. The written steps below stand on their own.
## Before you begin
* Confirm your user role is **Admin**. Only Admins can view Company Settings, which is where themes are created and edited.
* Have your **brand color codes** ready, or know the specific colors you want to use. Each color can be picked visually or entered as a color code.
* Decide whether you want FieldPulse to generate your sub-colors from the main branding color, or to set all six colors yourself.
## Step-by-step setup
### 1. Create the theme
1. Go to **Company Settings**, then select **Estimates & Invoices**.
2. Select **Themes** in the sub-header.
3. Select **Create Theme**.
 4. Enter a **Theme Name**. The name is required and is how the theme appears in the themes list.
5. Select a main **Branding Color**.
6. Turn **Sub-colors based on the main color** on to have FieldPulse generate the five sub-colors from your branding color, or turn it off to set each sub-color yourself.
7. With the toggle off, select each color box to adjust the color or enter a color code. See the Settings reference below for what each color field controls.
4. Enter a **Theme Name**. The name is required and is how the theme appears in the themes list.
5. Select a main **Branding Color**.
6. Turn **Sub-colors based on the main color** on to have FieldPulse generate the five sub-colors from your branding color, or turn it off to set each sub-color yourself.
7. With the toggle off, select each color box to adjust the color or enter a color code. See the Settings reference below for what each color field controls.
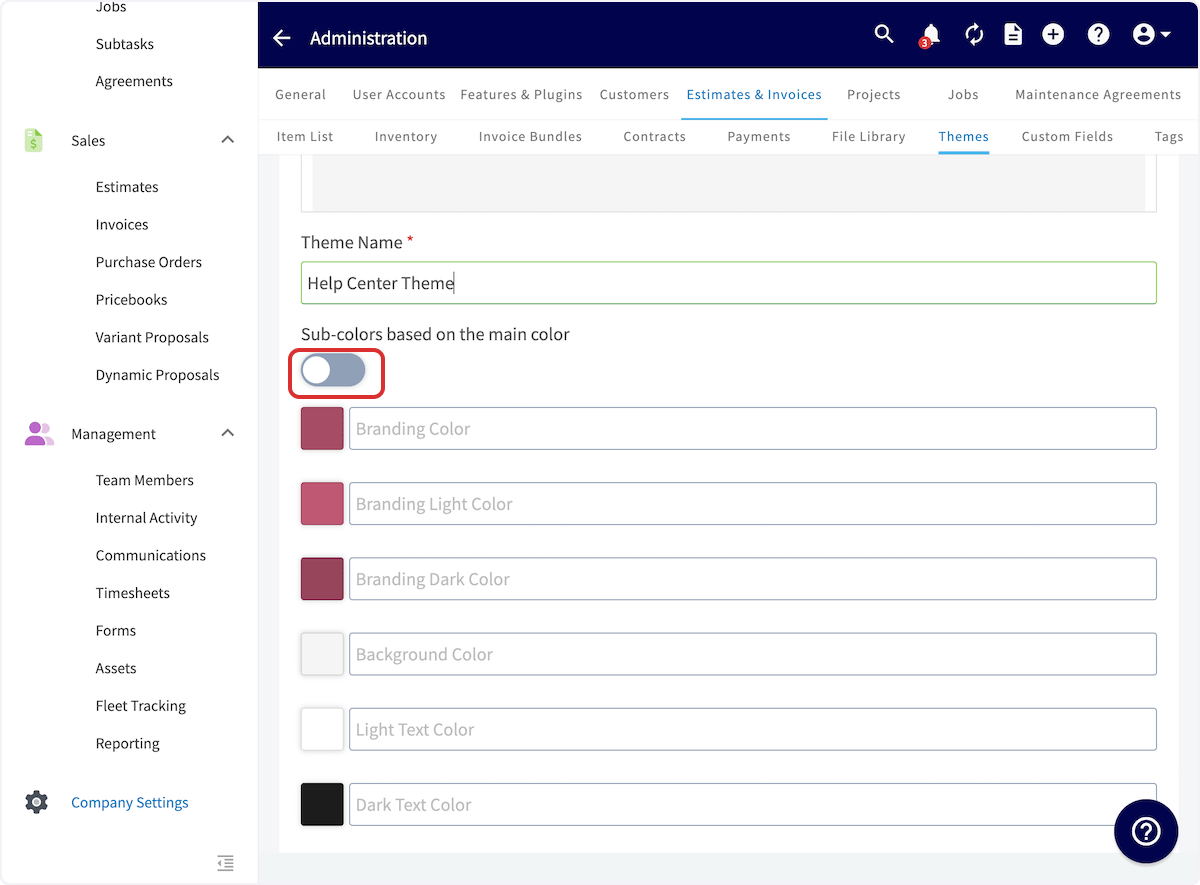 8. Select **Save**.
The theme now appears in the themes list with its color palette shown next to the name.
### 2. Set the default theme
The default theme applies to every new estimate and invoice in the account. To change it, select **Set Default Theme** on the row of the theme you want to use. The theme currently in use shows a check mark and reads **Default Theme** instead.
8. Select **Save**.
The theme now appears in the themes list with its color palette shown next to the name.
### 2. Set the default theme
The default theme applies to every new estimate and invoice in the account. To change it, select **Set Default Theme** on the row of the theme you want to use. The theme currently in use shows a check mark and reads **Default Theme** instead.
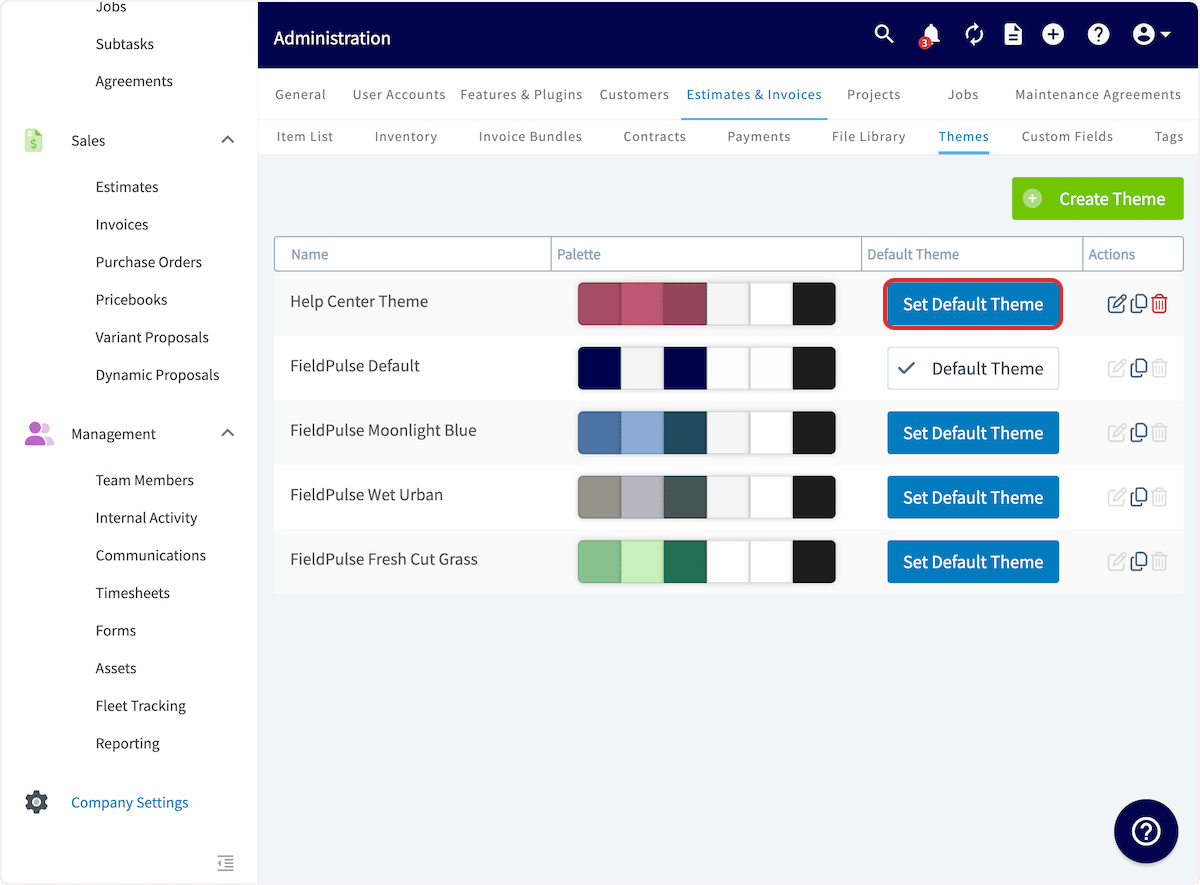 Each row also has **Actions** icons for editing, duplicating, and deleting a theme. Those actions are available on the themes you create; the four built-in FieldPulse themes appear greyed out. To start from a built-in look, create a new theme with the colors you want instead of editing the built-in one.
### 3. Change the theme on a single estimate or invoice
Use a different theme on one document without changing your account default:
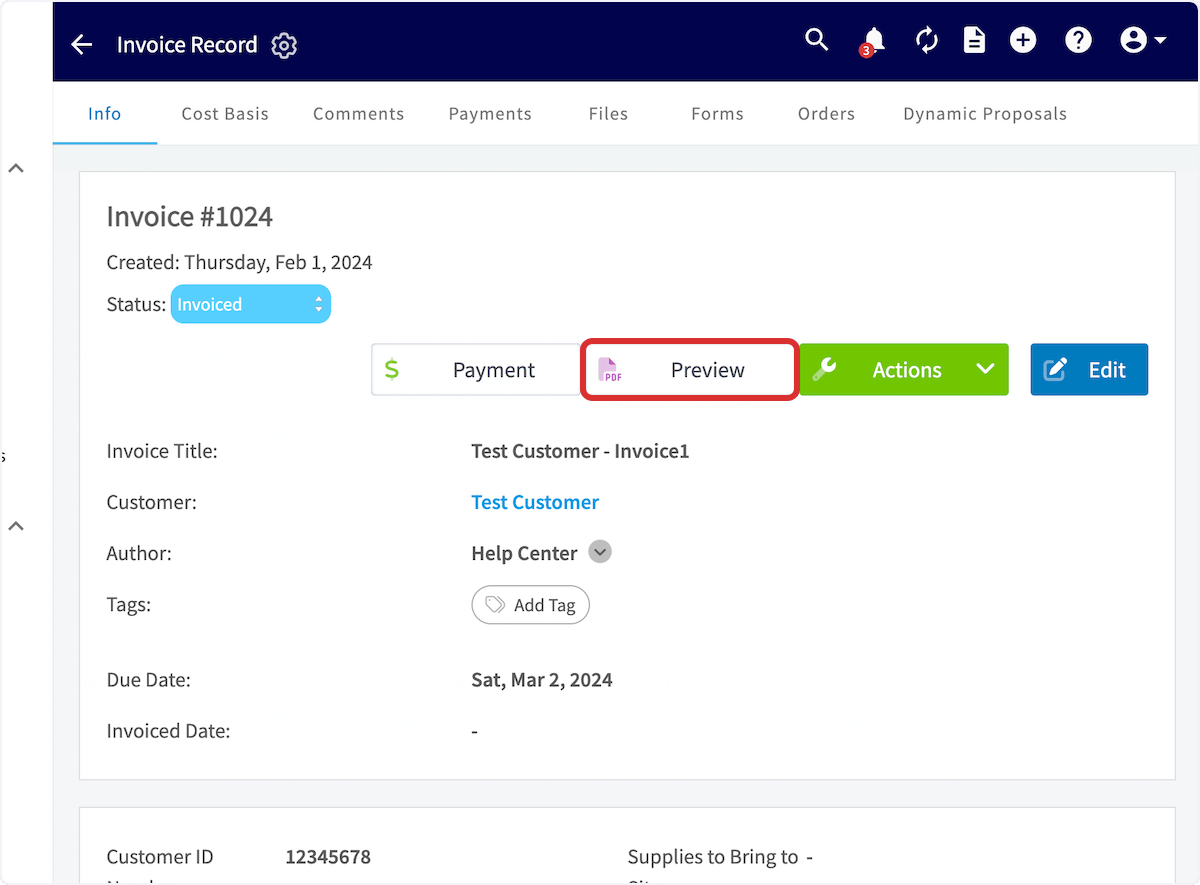
1. Open the estimate or invoice record and select **Preview**.
Each row also has **Actions** icons for editing, duplicating, and deleting a theme. Those actions are available on the themes you create; the four built-in FieldPulse themes appear greyed out. To start from a built-in look, create a new theme with the colors you want instead of editing the built-in one.
### 3. Change the theme on a single estimate or invoice
Use a different theme on one document without changing your account default:
1. Open the estimate or invoice record and select **Preview**.
 2. Scroll down through the settings on the right side of the preview until you reach **Theme**.
3. Select the theme you want to use for this estimate or invoice. The selection applies to that document only.
2. Scroll down through the settings on the right side of the preview until you reach **Theme**.
3. Select the theme you want to use for this estimate or invoice. The selection applies to that document only.
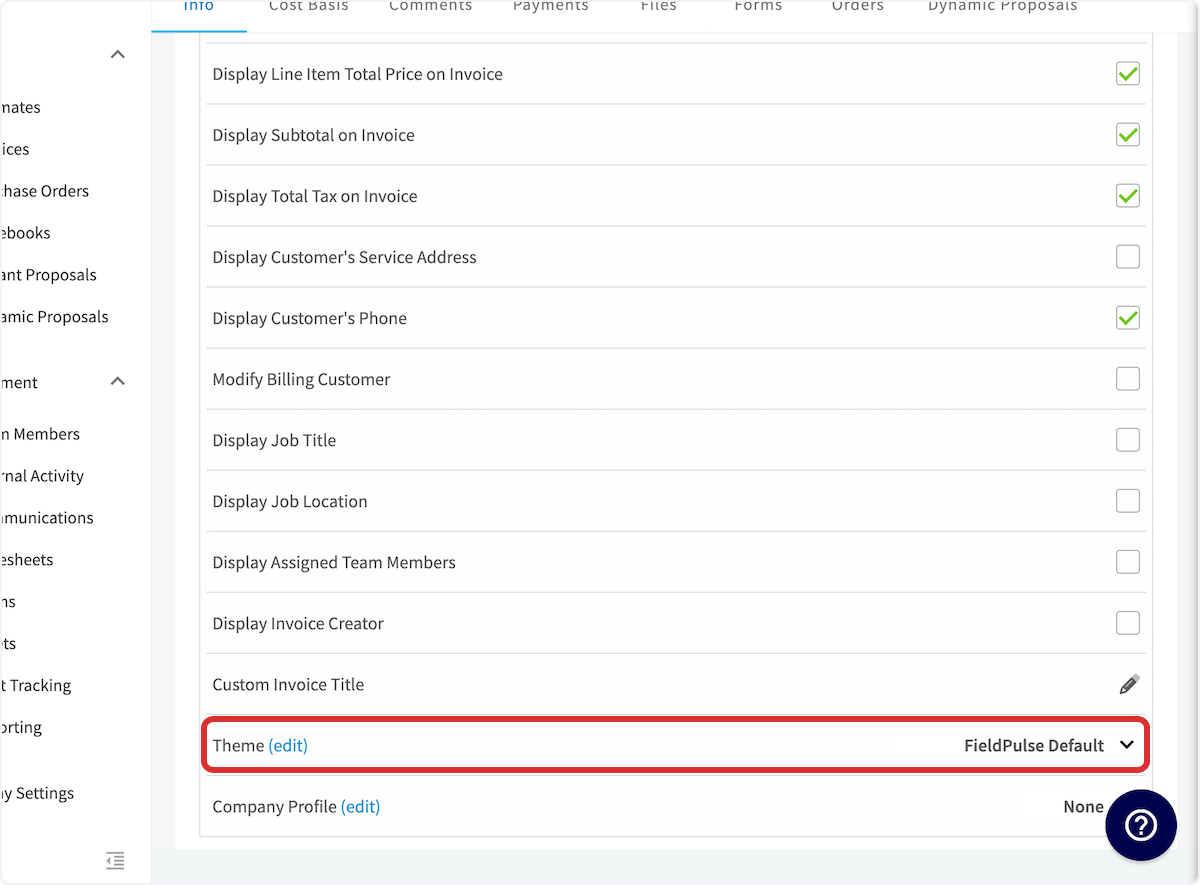 To change the colors inside a theme rather than which theme is applied, select **Edit** next to **Theme**, or go back to **Company Settings** and edit the theme there.
## Settings reference
### Theme color fields
| **Color field** | **What it sets** | **Generated automatically when "Sub-colors based on the main color" is on** |
| ------------------------ | --------------------------------------------------------- | --------------------------------------------------------------------------- |
| **Branding Color** | The main brand color the rest of the theme is built from. | No — you always choose this color. |
| **Branding Light Color** | The lighter shade of the branding color. | Yes |
| **Branding Dark Color** | The darker shade of the branding color. | Yes |
| **Background Color** | The background behind the document's content. | Yes |
| **Light Text Color** | Text that sits on branded or dark areas. | Yes |
| **Dark Text Color** | The main body text on the document. | Yes |
### Themes list columns
| **Column** | **What it shows** |
| ----------------- | -------------------------------------------------------------------------------- |
| **Name** | The theme name you entered when creating it. |
| **Palette** | Swatches of the theme's branding color and sub-colors. |
| **Default Theme** | A check mark on the current default; **Set Default Theme** on every other theme. |
| **Actions** | Edit, duplicate, and delete icons, available on the themes you create. |
## Related articles
* [Setting Up Alternative Company Profiles](/estimates-invoices/templates/company-profiles)
* [Setting Up Default Estimate & Invoice Settings](/estimates-invoices/creating/default-settings)
* [Setting Up Estimate & Invoice Templates](/estimates-invoices/templates/creating-templates)
* [How to Send Estimates & Invoices to Customers](/estimates-invoices/creating/sending)
* [Estimate & Invoice Customer Experience Overview](/estimates-invoices/creating/customer-view)
Your theme is set up correctly when it shows **Default Theme** with a check mark in the themes list, every new estimate and invoice previews in your brand colors, and you can switch one document to another theme from its preview settings without changing that default.
## Related topics
- [Templates & Themes](/estimates-invoices/templates/index.md)
- [Setting Up Estimate & Invoice Templates](/estimates-invoices/templates/creating-templates.md)
- [Estimate & Invoice Customer Experience Overview](/estimates-invoices/creating/customer-view.md)
- [Setting Up Alternative Company Profiles](/estimates-invoices/templates/company-profiles.md)
To change the colors inside a theme rather than which theme is applied, select **Edit** next to **Theme**, or go back to **Company Settings** and edit the theme there.
## Settings reference
### Theme color fields
| **Color field** | **What it sets** | **Generated automatically when "Sub-colors based on the main color" is on** |
| ------------------------ | --------------------------------------------------------- | --------------------------------------------------------------------------- |
| **Branding Color** | The main brand color the rest of the theme is built from. | No — you always choose this color. |
| **Branding Light Color** | The lighter shade of the branding color. | Yes |
| **Branding Dark Color** | The darker shade of the branding color. | Yes |
| **Background Color** | The background behind the document's content. | Yes |
| **Light Text Color** | Text that sits on branded or dark areas. | Yes |
| **Dark Text Color** | The main body text on the document. | Yes |
### Themes list columns
| **Column** | **What it shows** |
| ----------------- | -------------------------------------------------------------------------------- |
| **Name** | The theme name you entered when creating it. |
| **Palette** | Swatches of the theme's branding color and sub-colors. |
| **Default Theme** | A check mark on the current default; **Set Default Theme** on every other theme. |
| **Actions** | Edit, duplicate, and delete icons, available on the themes you create. |
## Related articles
* [Setting Up Alternative Company Profiles](/estimates-invoices/templates/company-profiles)
* [Setting Up Default Estimate & Invoice Settings](/estimates-invoices/creating/default-settings)
* [Setting Up Estimate & Invoice Templates](/estimates-invoices/templates/creating-templates)
* [How to Send Estimates & Invoices to Customers](/estimates-invoices/creating/sending)
* [Estimate & Invoice Customer Experience Overview](/estimates-invoices/creating/customer-view)
Your theme is set up correctly when it shows **Default Theme** with a check mark in the themes list, every new estimate and invoice previews in your brand colors, and you can switch one document to another theme from its preview settings without changing that default.
## Related topics
- [Templates & Themes](/estimates-invoices/templates/index.md)
- [Setting Up Estimate & Invoice Templates](/estimates-invoices/templates/creating-templates.md)
- [Estimate & Invoice Customer Experience Overview](/estimates-invoices/creating/customer-view.md)
- [Setting Up Alternative Company Profiles](/estimates-invoices/templates/company-profiles.md)