> ## Documentation Index
> Fetch the complete documentation index at: https://help.fieldpulse.com/llms.txt
> Use this file to discover all available pages before exploring further.
# Creating a Custom Form
> Turn the paper checklists and inspection sheets your crew still fills by hand into digital forms techs complete on their phones in the field.
# Why Custom Forms?
Click [the custom forms overview](/features-add-ons/custom-forms/custom-forms-overview) to find out how it can save you time and streamline your workflow.
***
# Enabling Custom Forms
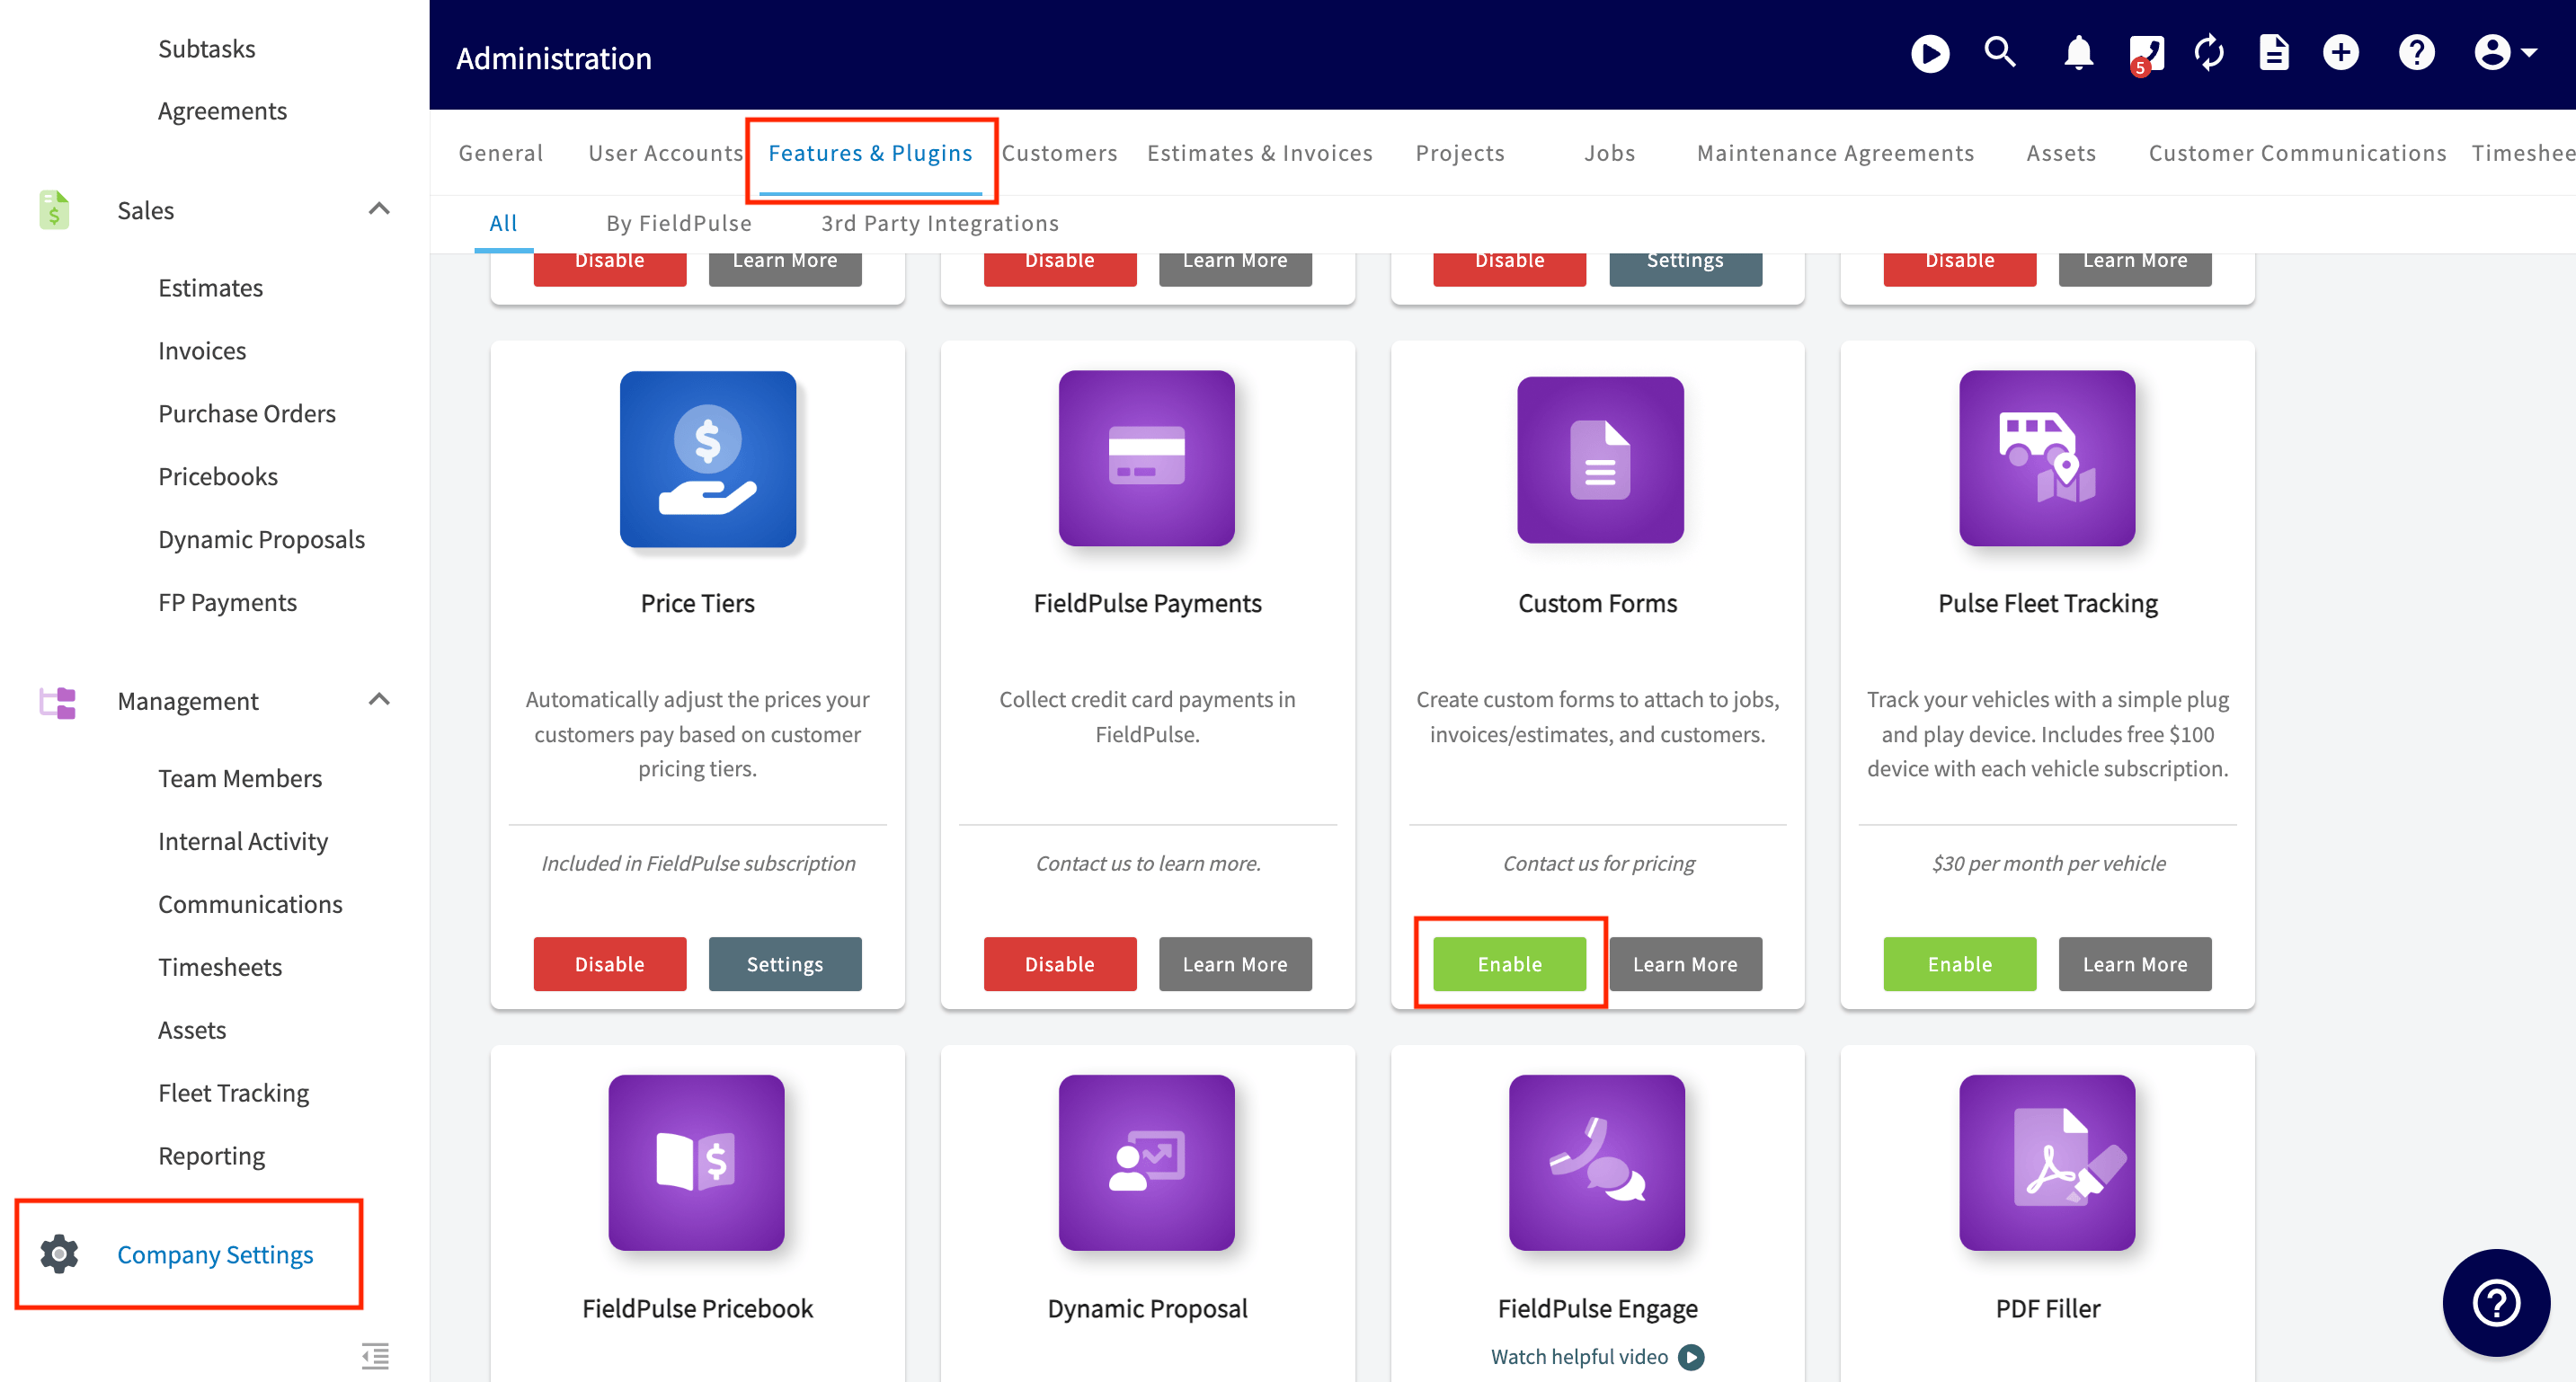
Contact us for pricing! To begin using, you'll need to enable the feature. Start by clicking on *Company Settings* and selecting *Features & Plugins.* Navigate to *Custom Forms* and select *Enable*. Now you're ready to begin customizing forms to streamline your operations!
 ***
# PDF Filler
Within our Custom Forms you have the ability to import PDFs and image files to use as a background on the custom forms you desire to create. This is useful if your company has existing forms that you've seen great success with or forms that must be in a specific format for regulatory purposes.
After enabling Custom Forms, navigate to *Company Settings* then select *Custom Forms.* From here, select the green *Import PDF* button.
***
# PDF Filler
Within our Custom Forms you have the ability to import PDFs and image files to use as a background on the custom forms you desire to create. This is useful if your company has existing forms that you've seen great success with or forms that must be in a specific format for regulatory purposes.
After enabling Custom Forms, navigate to *Company Settings* then select *Custom Forms.* From here, select the green *Import PDF* button.
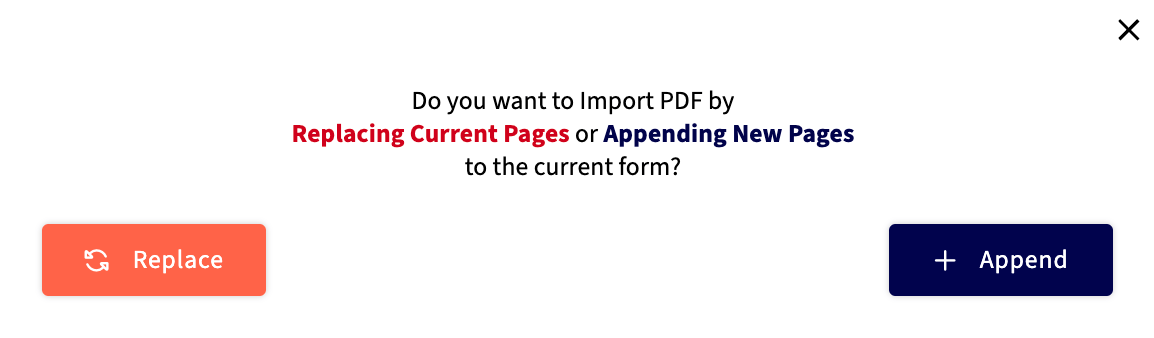
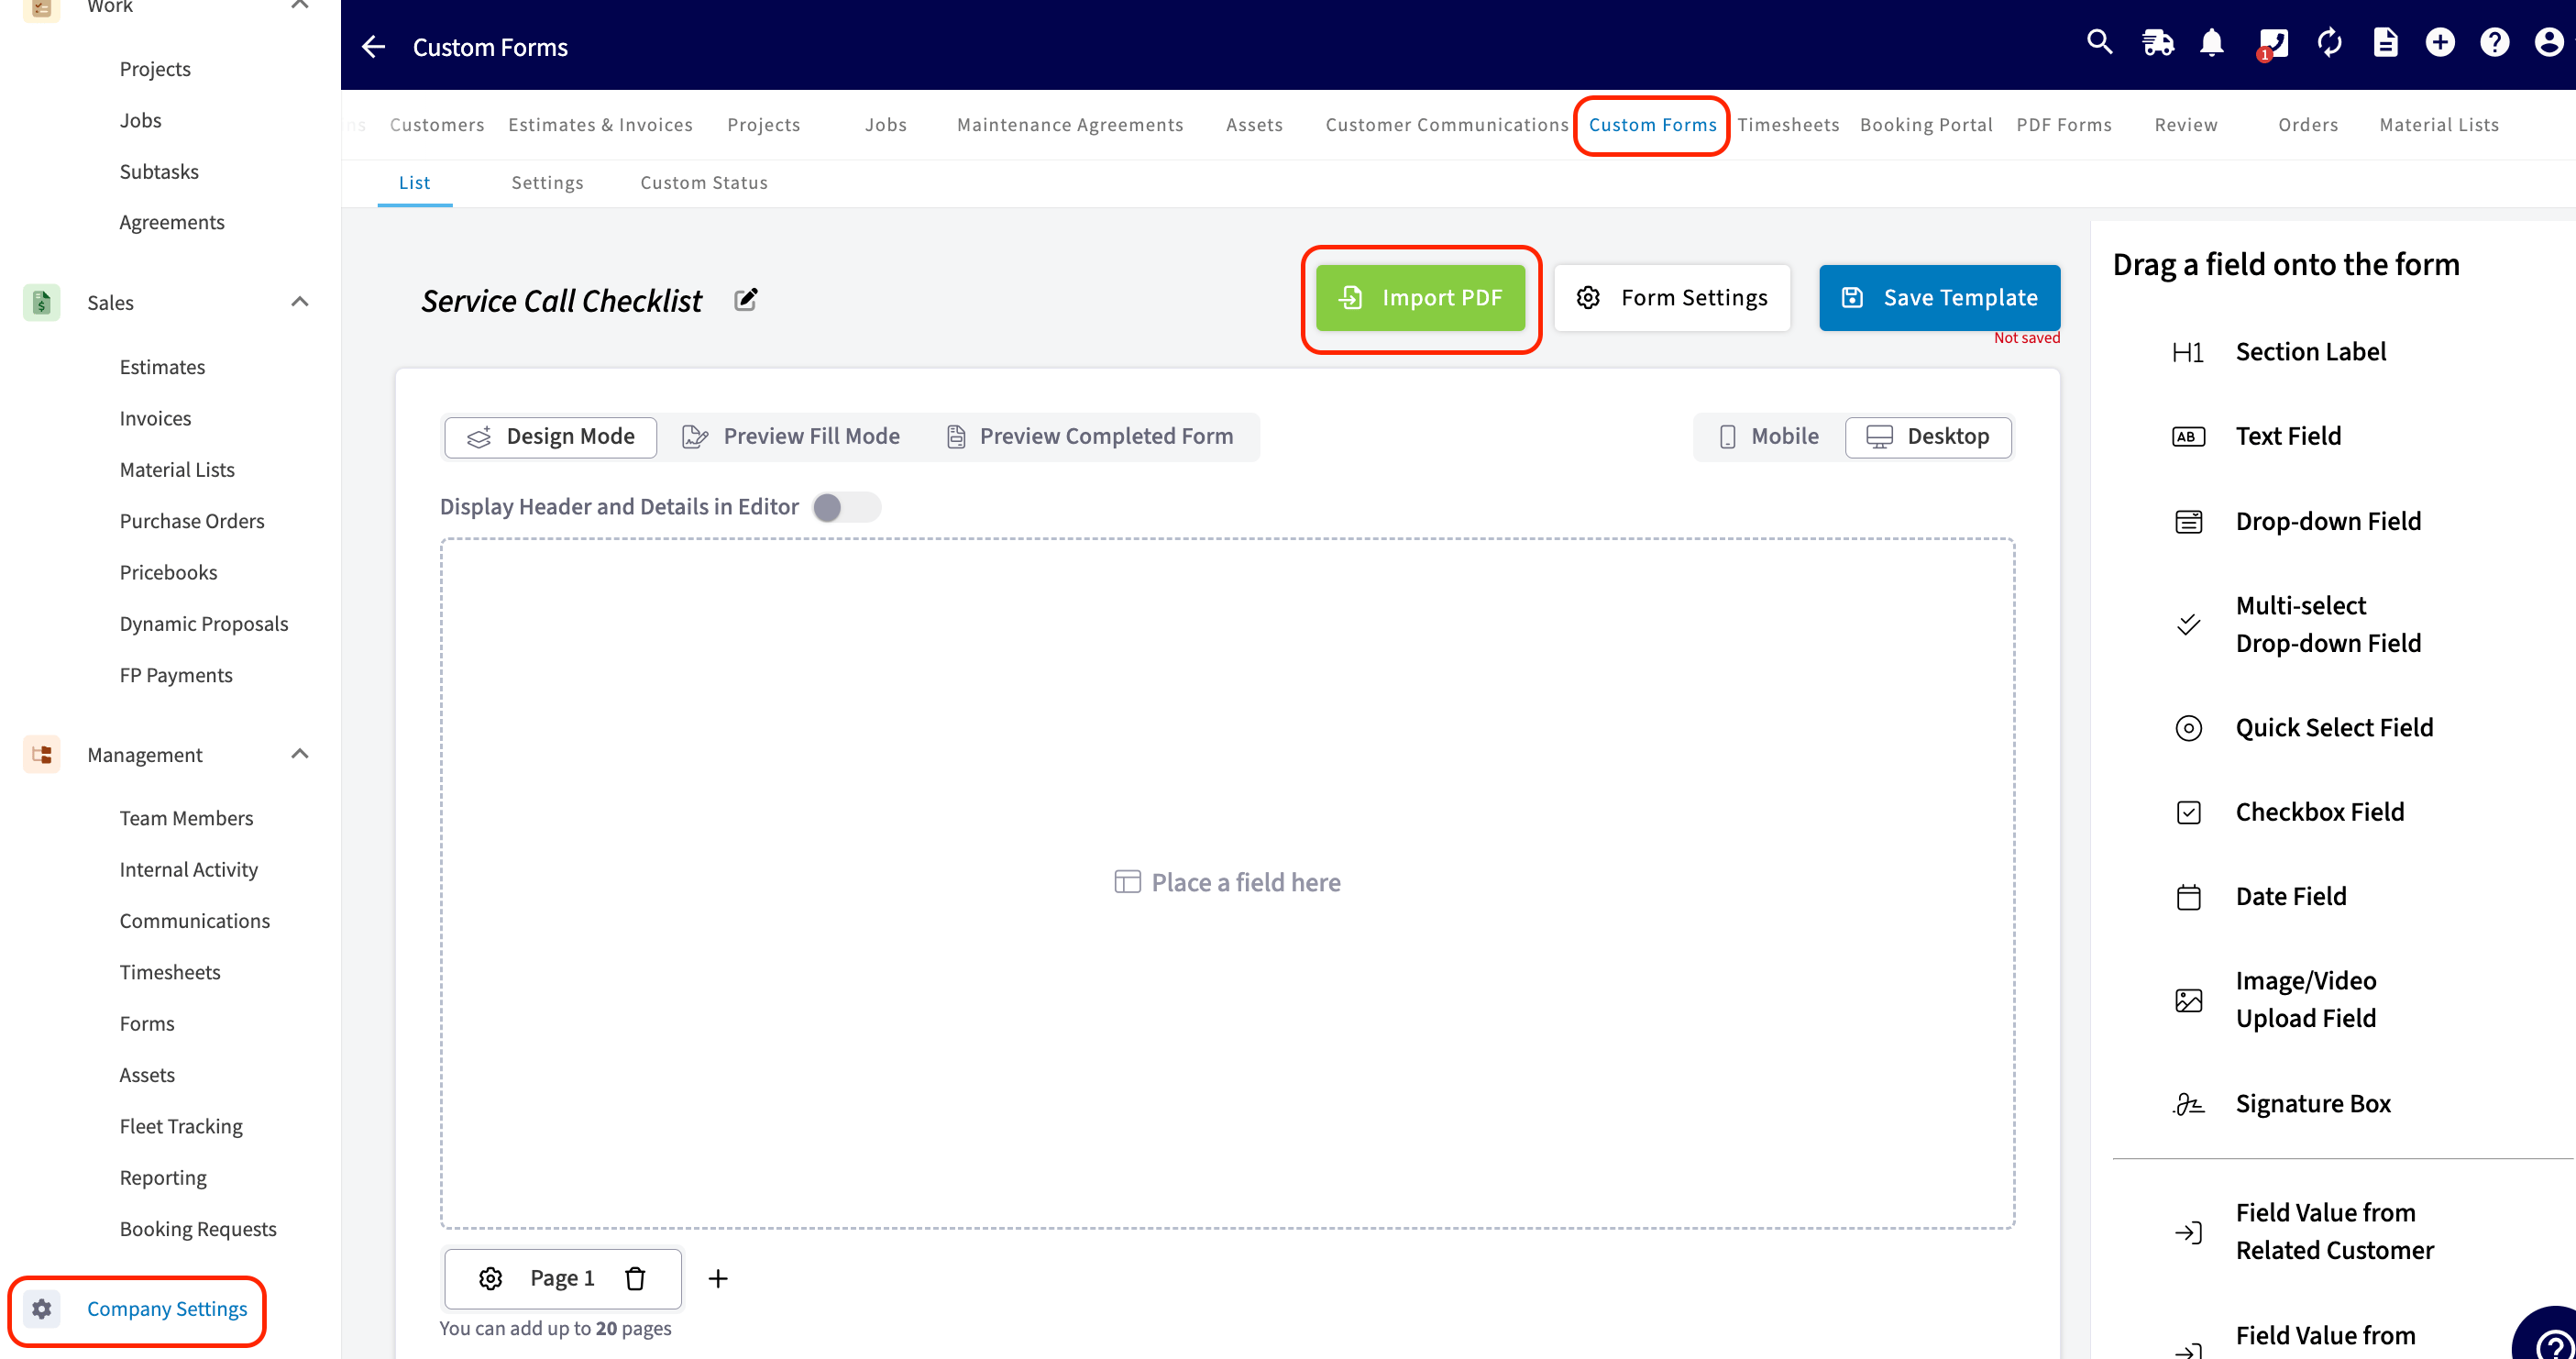 After selecting the green *Import PDF* button, a screen may pop up asking if you'd like to replace the current pages you have open or if you would like to append, or add, new pages to the page that it currently open. Choose which options makes the most sense for you, your company, and the form you are wanting to import/create.
 ## Once your PDF has been imported, you can
* Easily click and drag fields from the right-side menu onto your form.
* To remove a field, click and drag it back to the right hand side, select the field and hover over the green *Actions* button at the bottom right then select *Delete*, or select the field and simply press the backspace button on your keyboard to initiate the removal of the field.
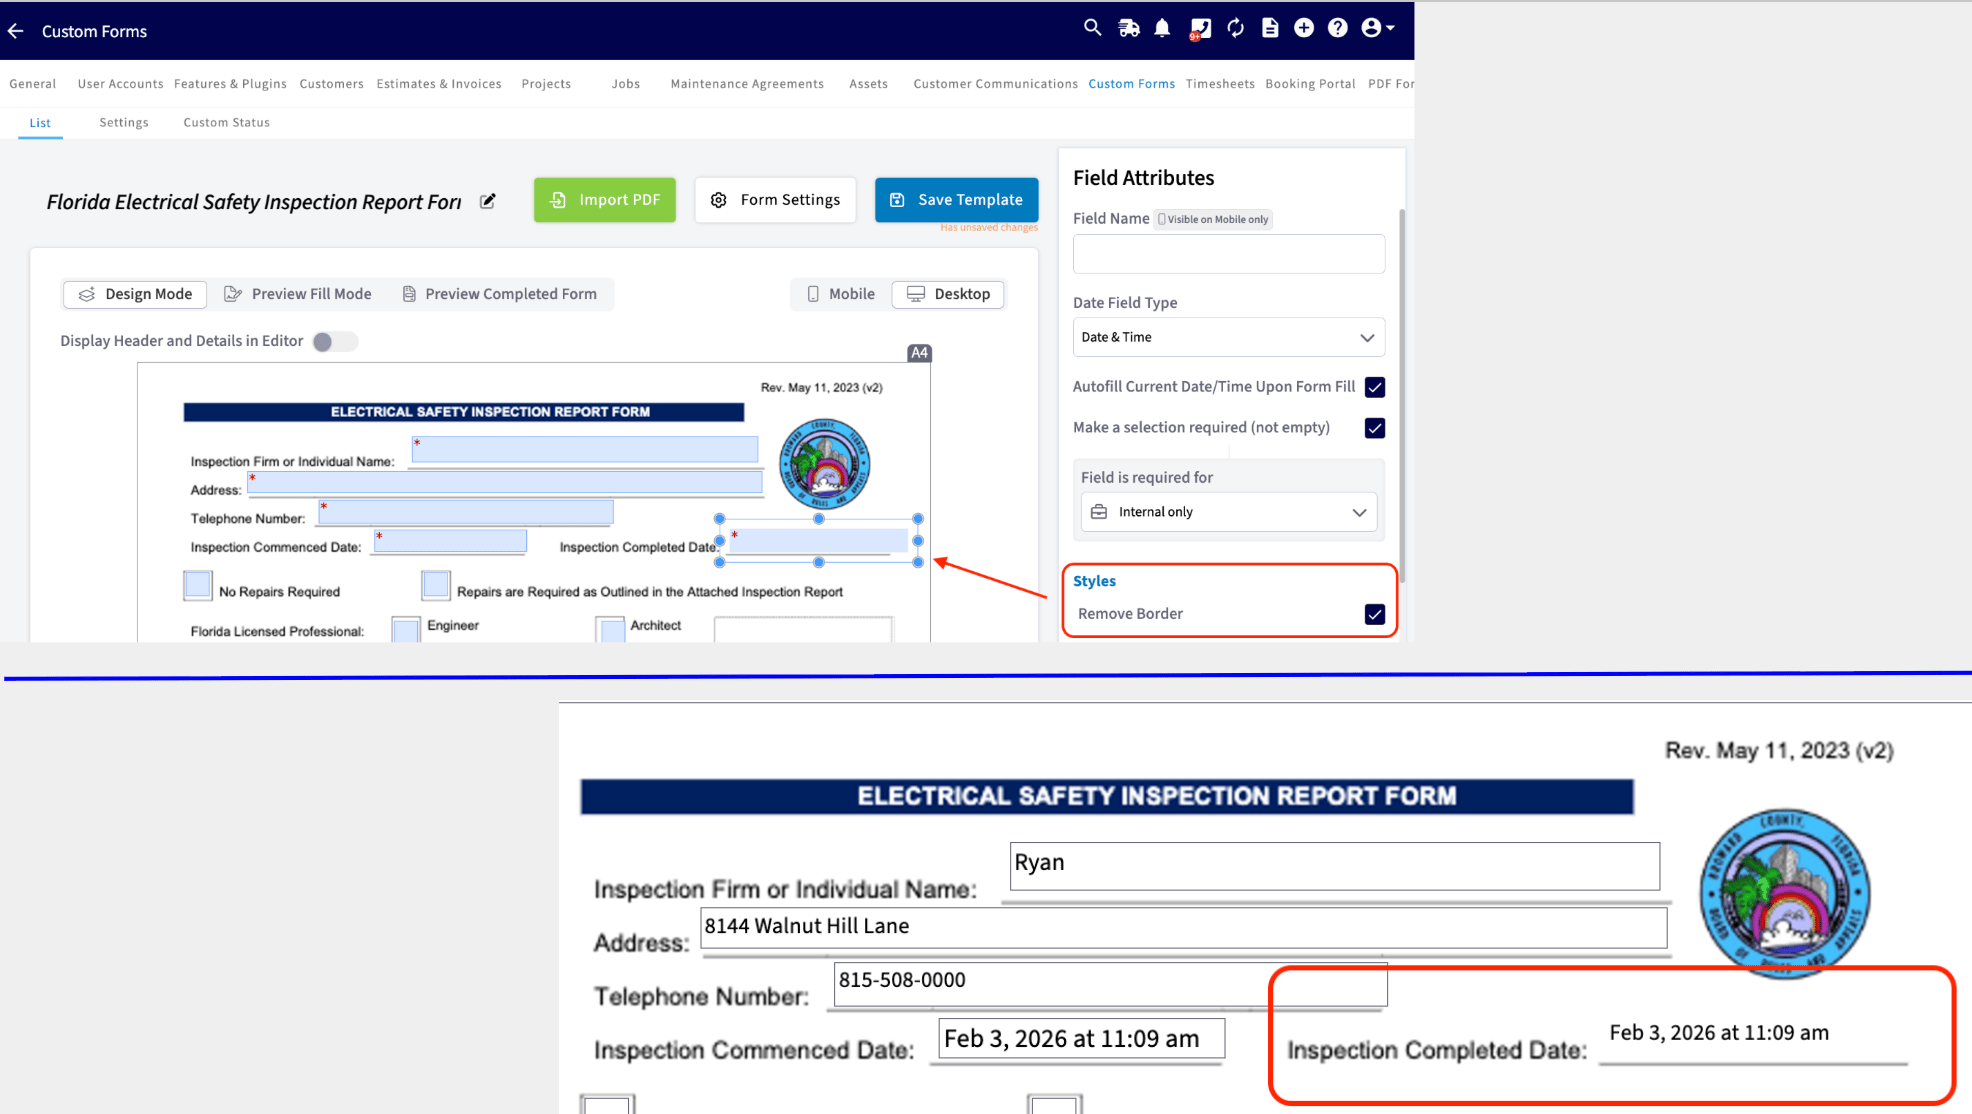
* Decide to remove the *Field Borders* on an individual field basis. This will ensure that what is entered in the field appears without any box around it when presented to your customer.
## Once your PDF has been imported, you can
* Easily click and drag fields from the right-side menu onto your form.
* To remove a field, click and drag it back to the right hand side, select the field and hover over the green *Actions* button at the bottom right then select *Delete*, or select the field and simply press the backspace button on your keyboard to initiate the removal of the field.
* Decide to remove the *Field Borders* on an individual field basis. This will ensure that what is entered in the field appears without any box around it when presented to your customer.
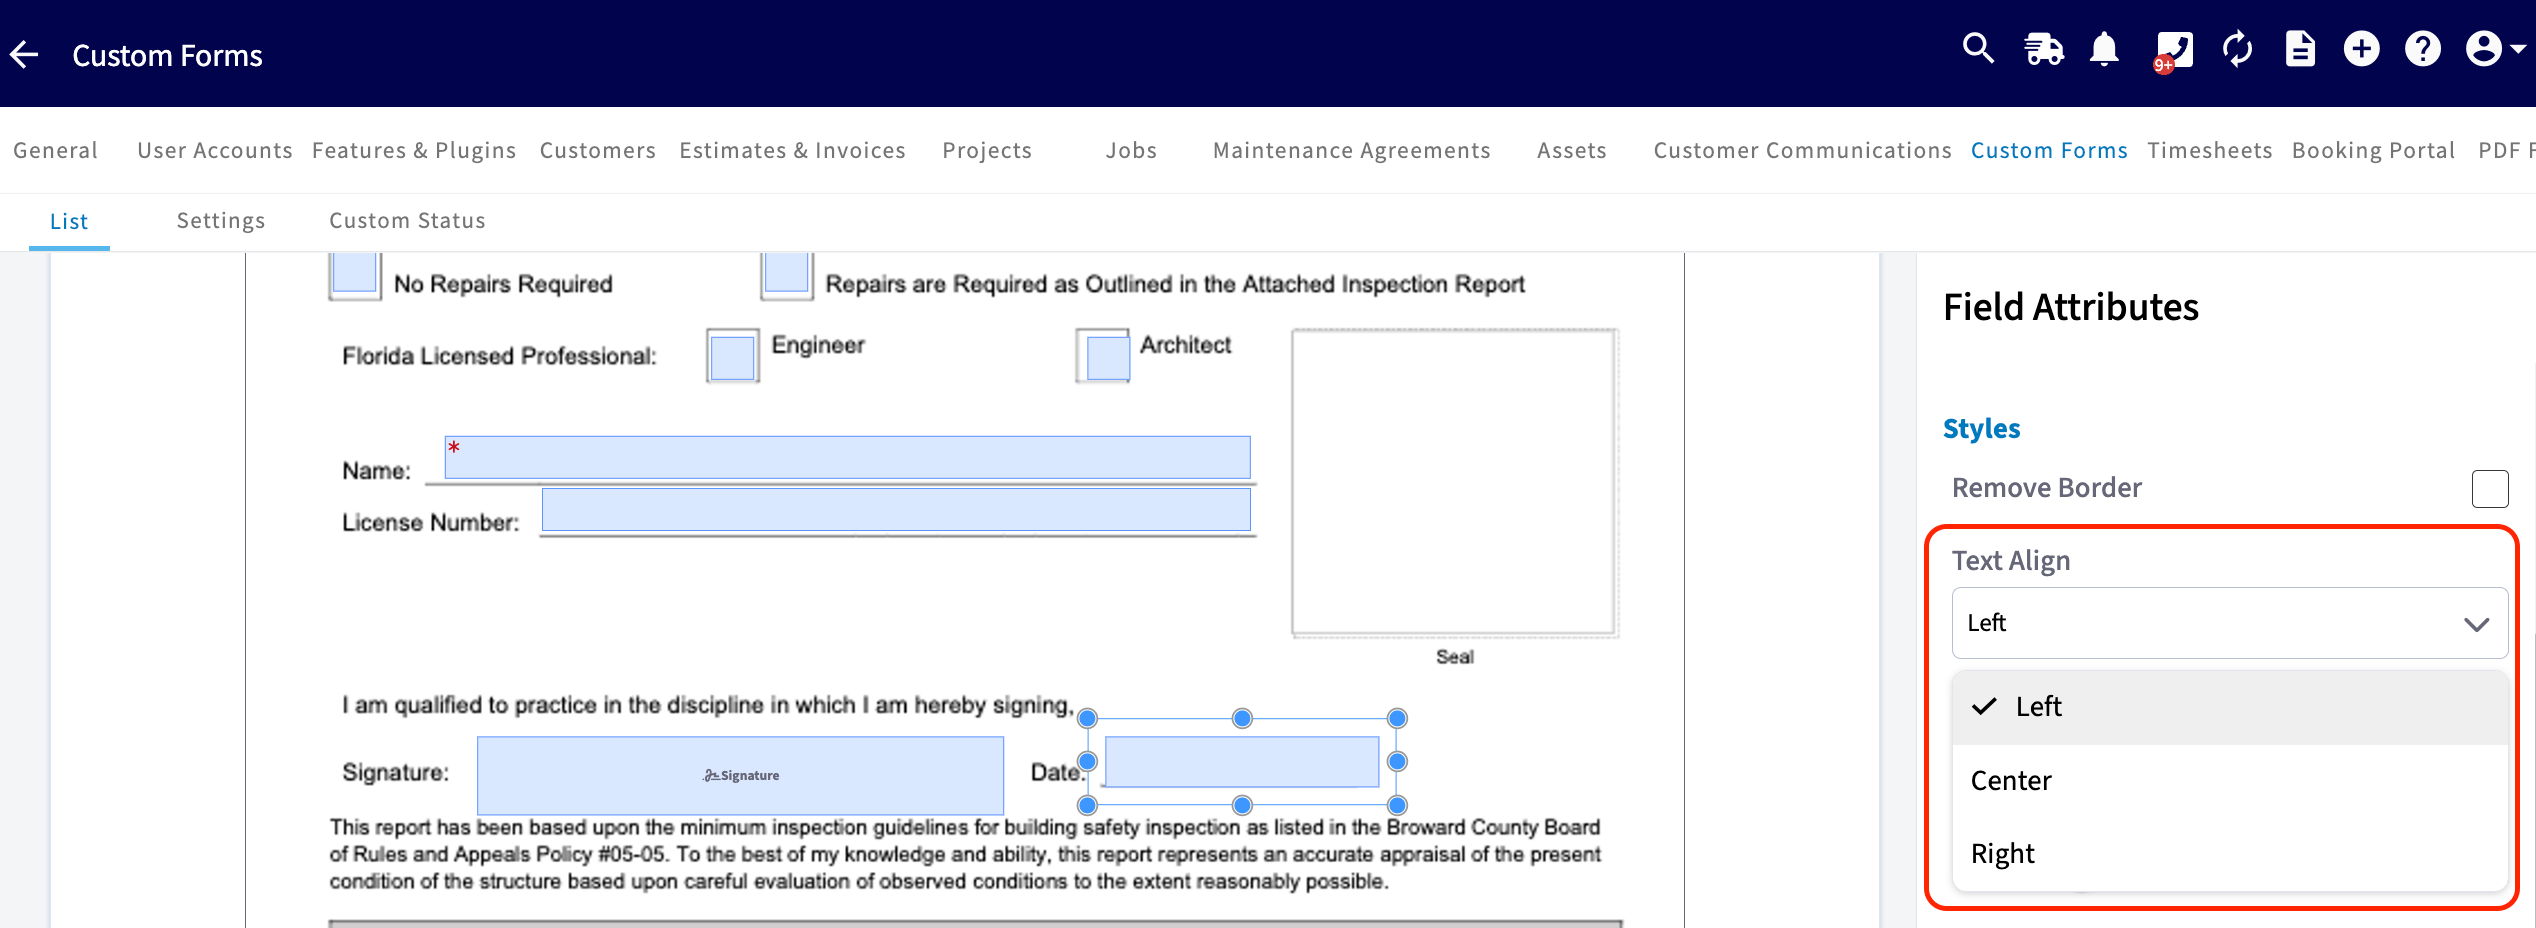
 * Decide the text alignment for each individual field: Left, Center, or Right.
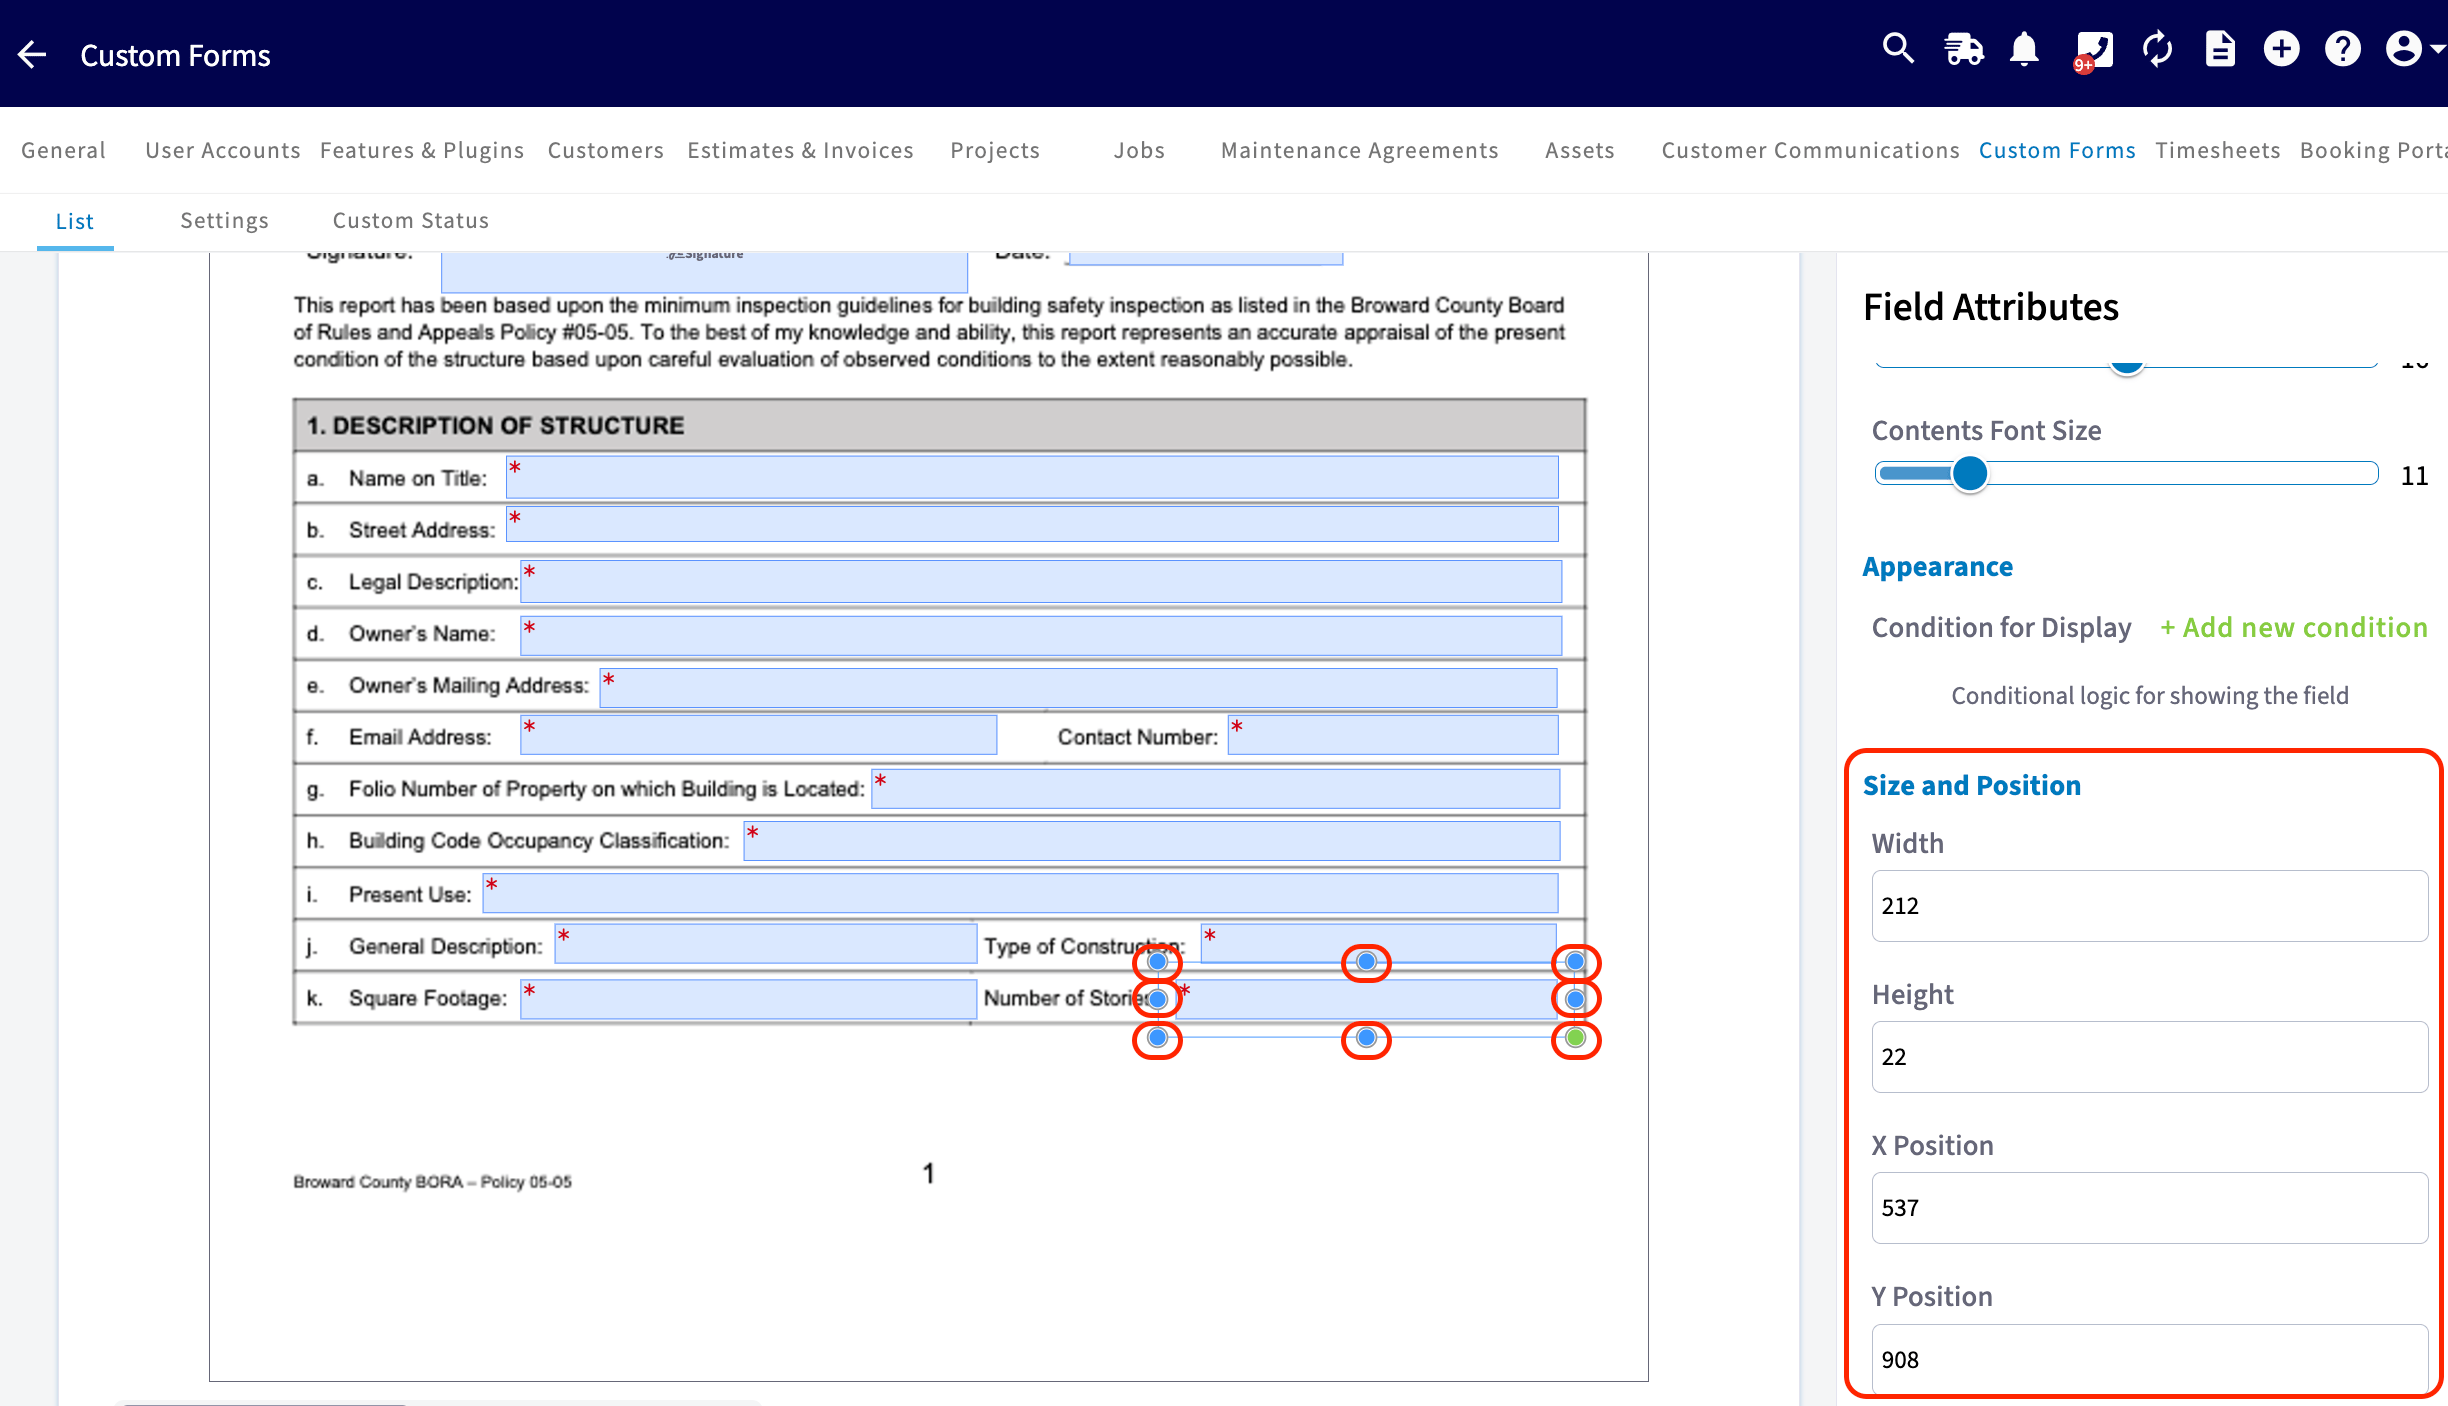
 * Size and position each field. This can be done by manually dragging and stretching each field, setting the exact width and height, or by setting the exact X and Y coordinates.
 ## PDF Filler Modes
Use the various mode options to view your form in different scenarios. You can also preview the appearance of your form from a **Mobile** or **Desktop** view.
* **Design Mode** - You can create and edit a form by dragging and dropping fields.
* **Preview Fill Mode** - You can preview how the form will look when someone is filling it out. You can also choose if a field is editable by a customer or not in this view.
* **Preview Completed Form** - You can preview how the form will look once it has been completely filled out.
## PDF Filler Modes
Use the various mode options to view your form in different scenarios. You can also preview the appearance of your form from a **Mobile** or **Desktop** view.
* **Design Mode** - You can create and edit a form by dragging and dropping fields.
* **Preview Fill Mode** - You can preview how the form will look when someone is filling it out. You can also choose if a field is editable by a customer or not in this view.
* **Preview Completed Form** - You can preview how the form will look once it has been completely filled out.
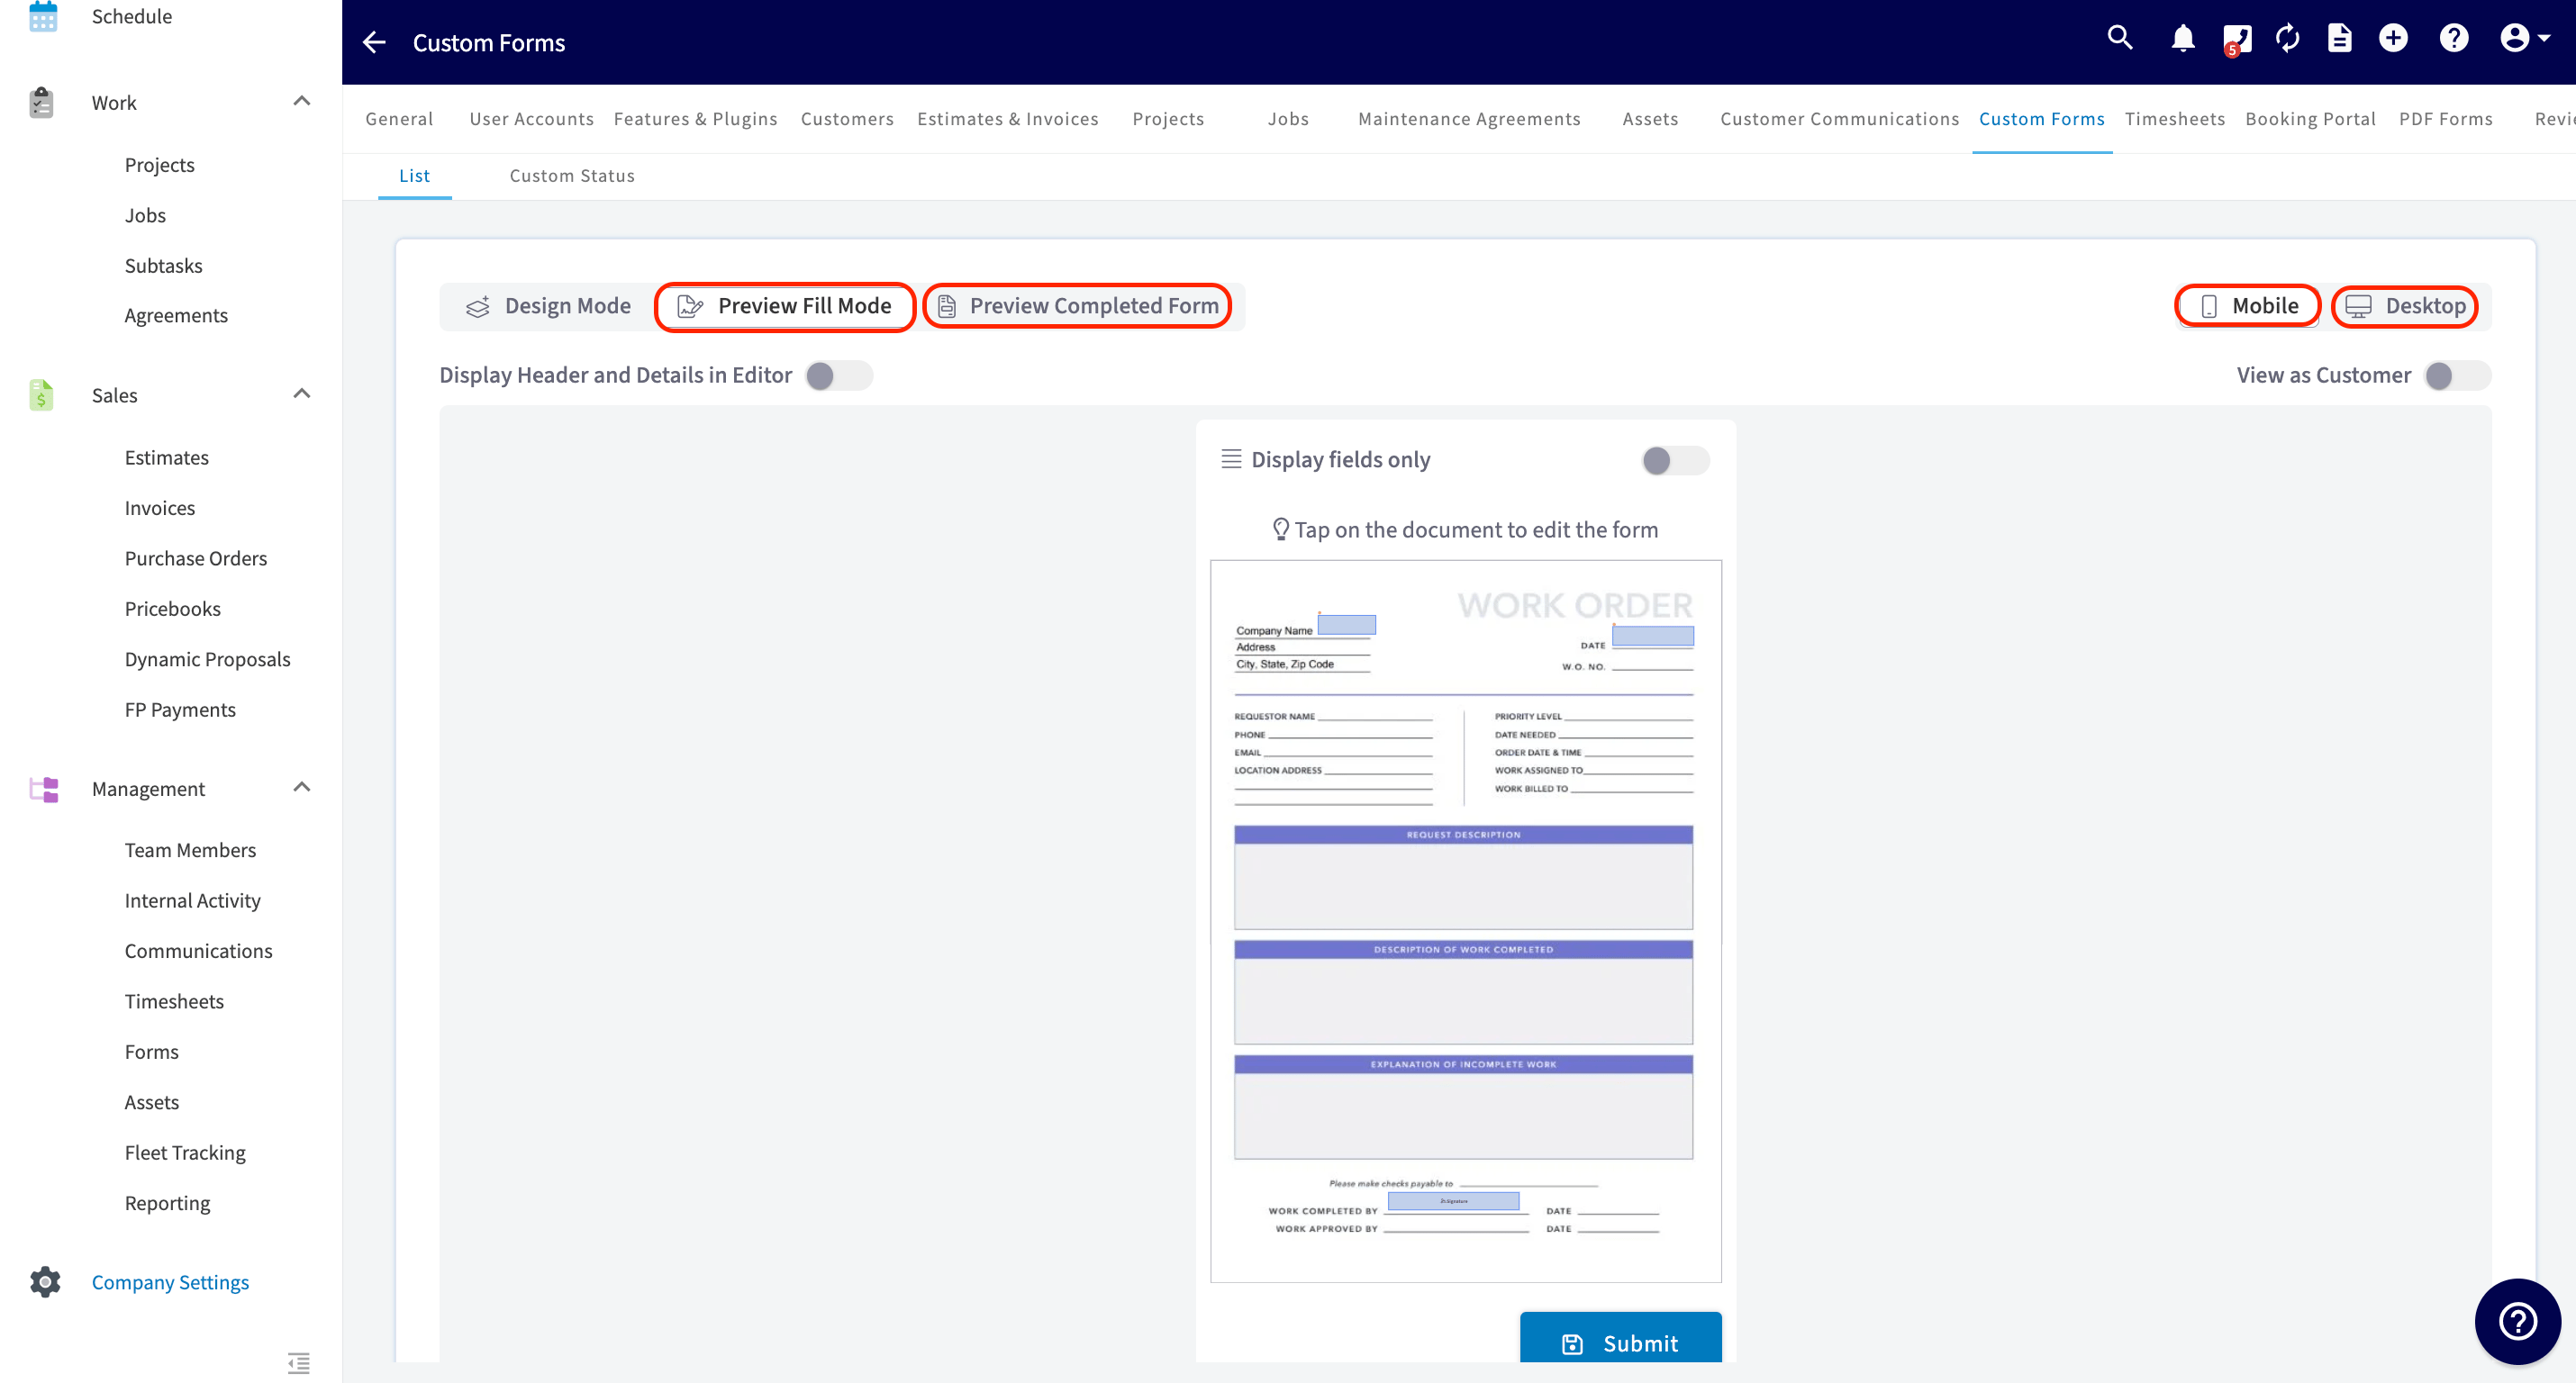 The PDF form with overlay fields will translate well to Mobile! It can be viewable either in its full size with the ability to zoom in/out (pictured in the example above) or as fields one-by-one. This all will depend on what the user chooses.
***
# Create a New Form
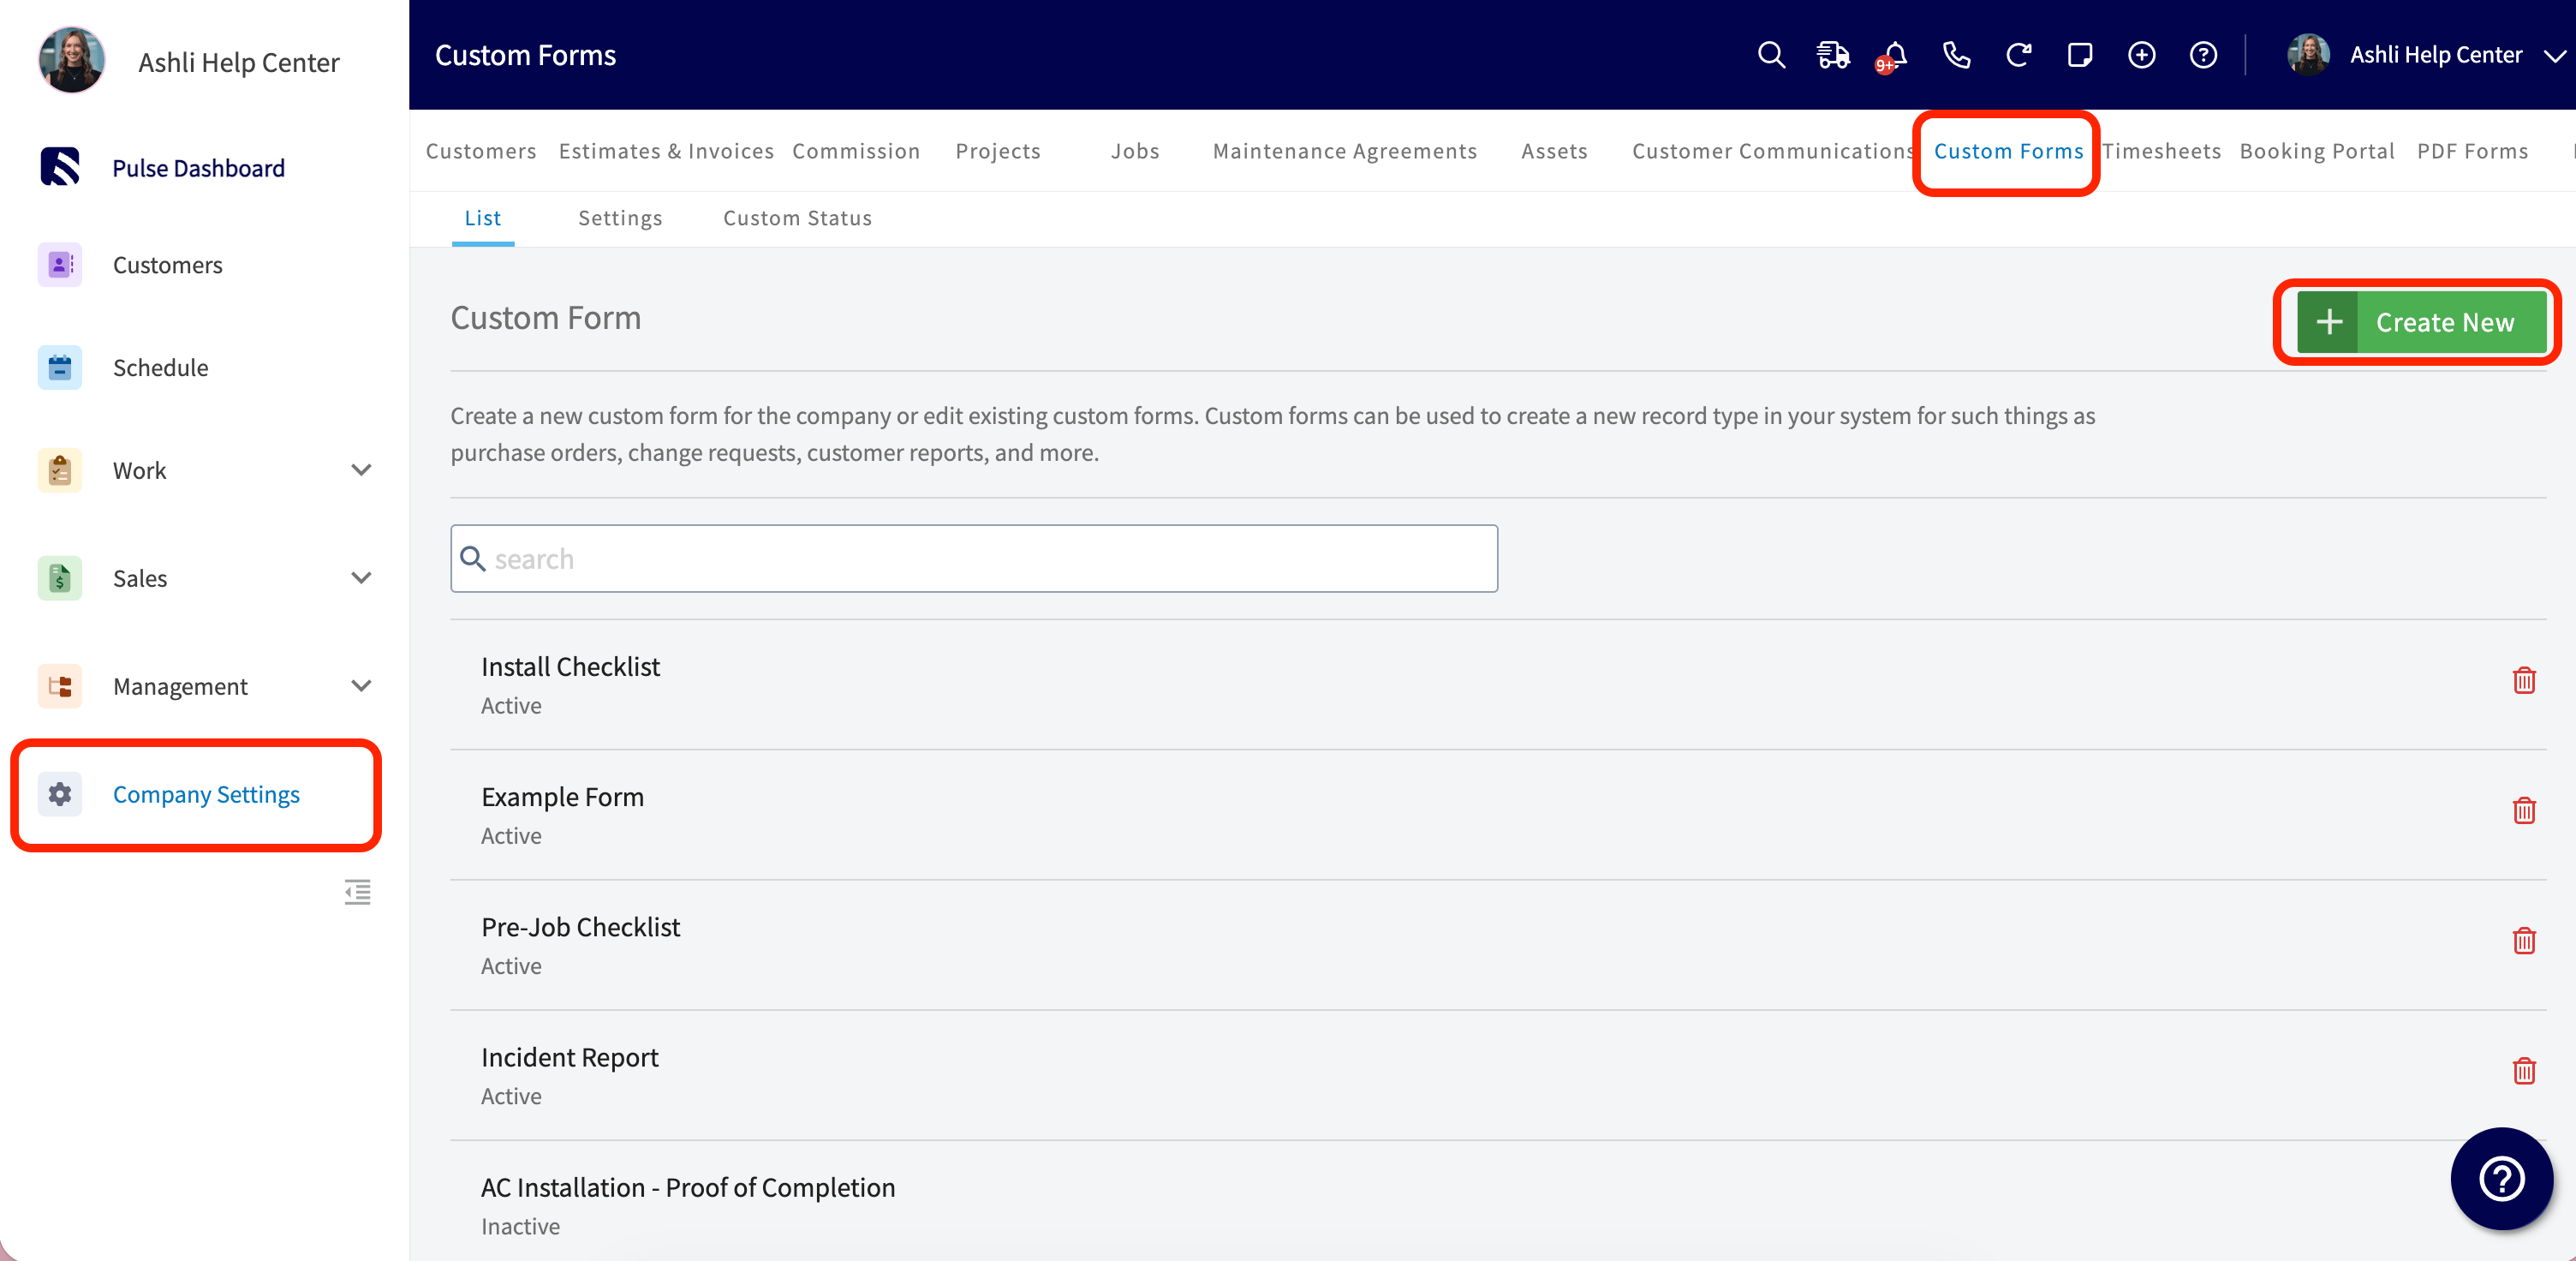
After enabling Custom Forms, navigate to *Company Settings* then select *Custom Forms.* On this page you can view Custom Forms you've previously created or select *Create New*.
The PDF form with overlay fields will translate well to Mobile! It can be viewable either in its full size with the ability to zoom in/out (pictured in the example above) or as fields one-by-one. This all will depend on what the user chooses.
***
# Create a New Form
After enabling Custom Forms, navigate to *Company Settings* then select *Custom Forms.* On this page you can view Custom Forms you've previously created or select *Create New*.
 ***
# Form Settings
Begin personalizing your custom form by navigating to *Form Settings*.
***
# Form Settings
Begin personalizing your custom form by navigating to *Form Settings*.
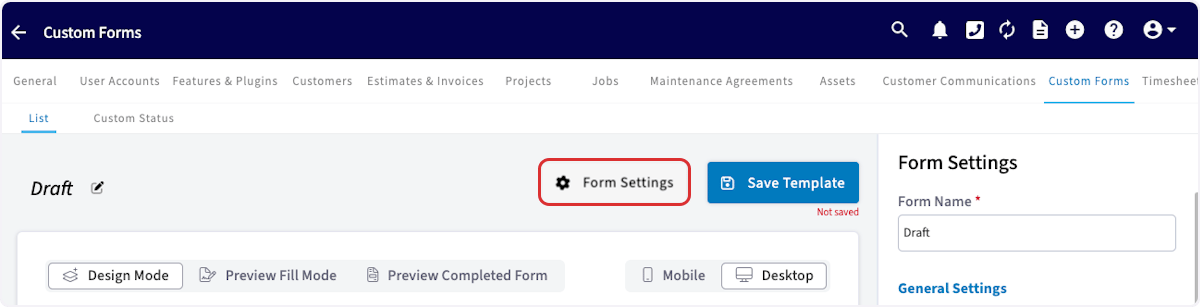 For a full breakdown of every setting available, see [Custom Form Settings](#).
***
# Page Count for Custom Forms
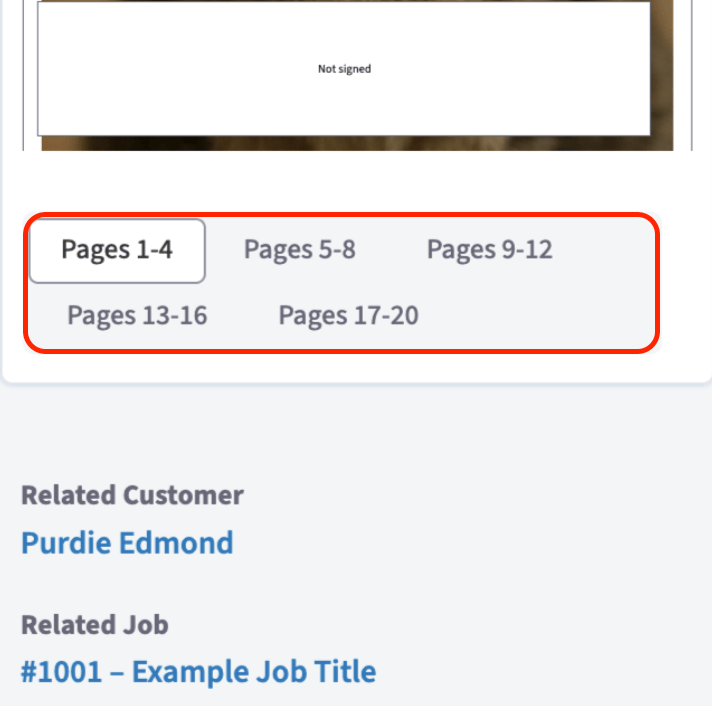
The maximum page count for Custom Forms is 20 pages. To ensure all pages load properly, especially those with PDF backgrounds, we have implemented Pagination.
* **Web App**: Custom Forms will paginate every 10 pages.
* **Mobile App**: Custom Forms will paginate every 4 pages.
For a full breakdown of every setting available, see [Custom Form Settings](#).
***
# Page Count for Custom Forms
The maximum page count for Custom Forms is 20 pages. To ensure all pages load properly, especially those with PDF backgrounds, we have implemented Pagination.
* **Web App**: Custom Forms will paginate every 10 pages.
* **Mobile App**: Custom Forms will paginate every 4 pages.
 ***
# Building a Custom Form
After you've adjusted your form settings, it's time to begin building your Custom Form! Easily click and drag fields from the right-side menu onto your blank custom form. **(Note: Be sure you're not still in *Form Settings*. To close the settings, click on *Form Settings* again.)**
***
# Building a Custom Form
After you've adjusted your form settings, it's time to begin building your Custom Form! Easily click and drag fields from the right-side menu onto your blank custom form. **(Note: Be sure you're not still in *Form Settings*. To close the settings, click on *Form Settings* again.)**
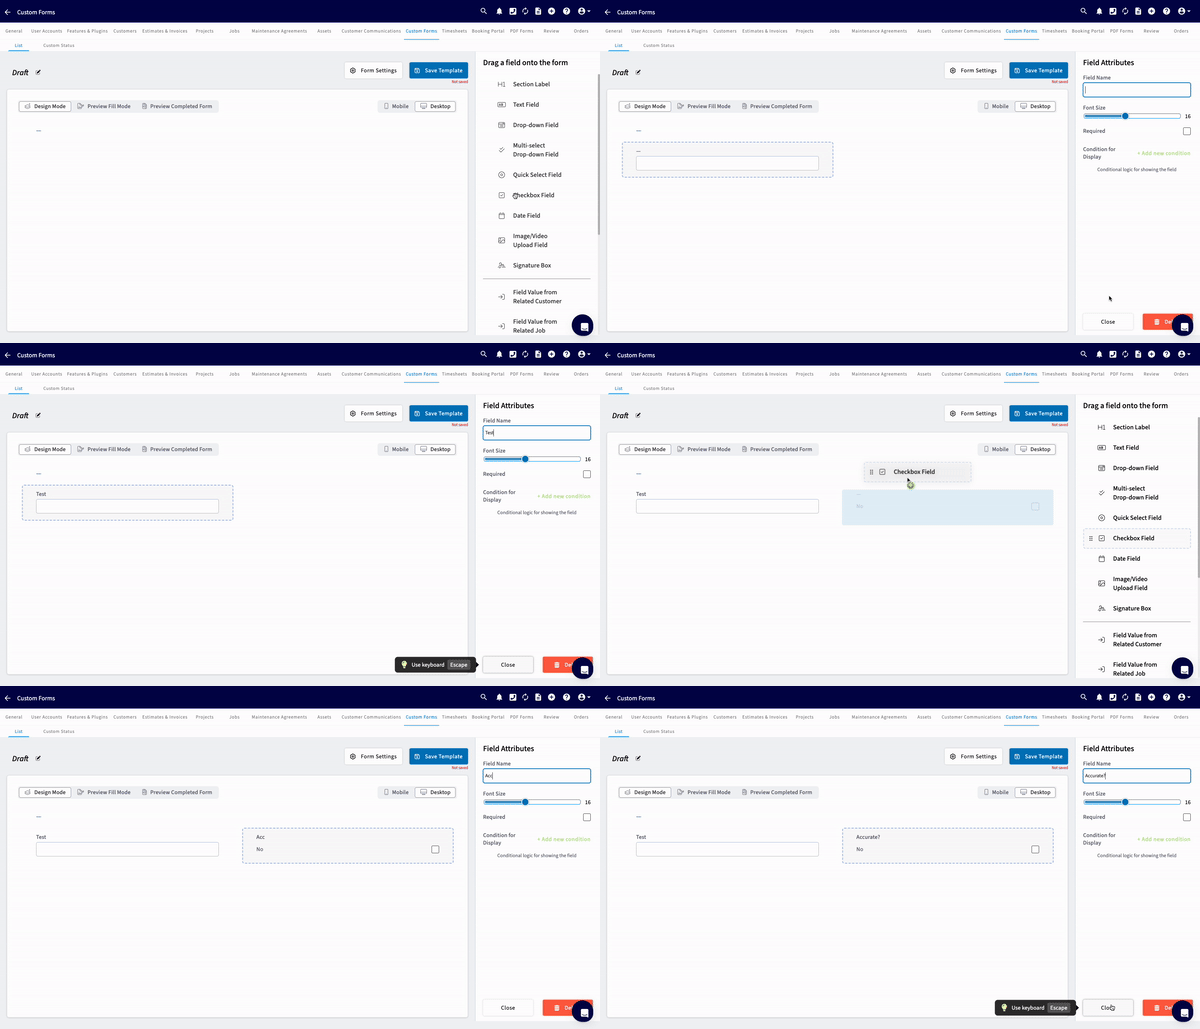 Once a field is placed on a form, you can resize and reorder each field to your liking. To remove a field, click and drag it back to the right hand side, select the field and hover over the green *Actions* button at the bottom right then select *Delete*, or select the field and simply press the backspace button on your keyboard to initiate the removal of the field.
## Field types that can be added to your Custom Form
* **Section Labels** - Section header for names and titles
* **Text Fields** - Here you have the option to add "free text", allowing you/your customer to write/type freely in their own words
* **Number Field** - Collect numeric-only input. When setting up a Number Field, you can optionally add a *Unit of Measure* (like \$, hr, ft, PSI, or °F). Use the *Show unit before value* checkbox to control whether the unit appears before or after the value.
* **Drop-down Field** - Select a single option from a dropdown list
* **Multi-select Dropdown Field** - Select multiple options from a dropdown list.(Note: You have the ability to specify minimum/maximum number of selections someone can make here)
* **Quick Select** - Multiple choice - you can add up to 5 options here
* **Checkbox** - Select (yes) or leave blank (no)
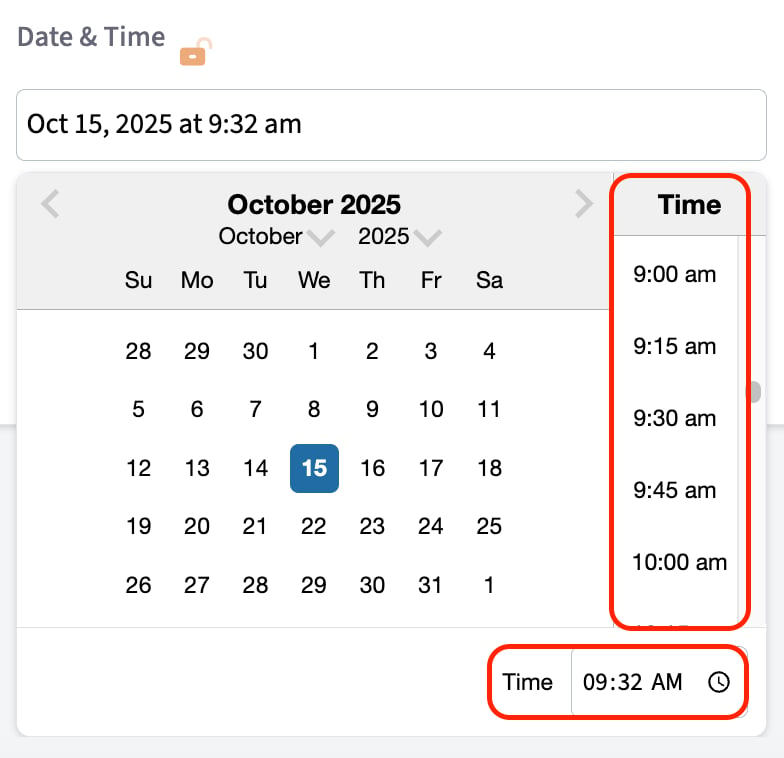
* **Date & Time** - Collect the date and time. You can check the box to autofill the current date and time when the form is submitted. The time selection features a scroll panel set in **15-minute increments**. Additionally, you can enter the exact time, down to the minute, by editing the *Time* field in the bottom right corner.
Once a field is placed on a form, you can resize and reorder each field to your liking. To remove a field, click and drag it back to the right hand side, select the field and hover over the green *Actions* button at the bottom right then select *Delete*, or select the field and simply press the backspace button on your keyboard to initiate the removal of the field.
## Field types that can be added to your Custom Form
* **Section Labels** - Section header for names and titles
* **Text Fields** - Here you have the option to add "free text", allowing you/your customer to write/type freely in their own words
* **Number Field** - Collect numeric-only input. When setting up a Number Field, you can optionally add a *Unit of Measure* (like \$, hr, ft, PSI, or °F). Use the *Show unit before value* checkbox to control whether the unit appears before or after the value.
* **Drop-down Field** - Select a single option from a dropdown list
* **Multi-select Dropdown Field** - Select multiple options from a dropdown list.(Note: You have the ability to specify minimum/maximum number of selections someone can make here)
* **Quick Select** - Multiple choice - you can add up to 5 options here
* **Checkbox** - Select (yes) or leave blank (no)
* **Date & Time** - Collect the date and time. You can check the box to autofill the current date and time when the form is submitted. The time selection features a scroll panel set in **15-minute increments**. Additionally, you can enter the exact time, down to the minute, by editing the *Time* field in the bottom right corner.
 * **Image/Video** - Upload jpg, pdf, mp4, and png files. You have the ability to specify the minimum/maximum number of files allowed (1-10 files permitted)
* **Signature** - Easily collect a signature with this field
* **Related Record Fields** - Import data from related records within FieldPulse. See examples of these fields below:
* ***Field Value from Related Customers***
* Here you can pull any of the following information from the Customer record: name, notes, job notes, email, phone, billing address, location **(Note: if a customer has multiple locations or contacts, you can specify which user's information to fill the form with)**, status/type, pipeline status, lead source, tags, and any other custom fields you may have added to your Customer records.
* ***Field Value from Related Jobs***
* Here you can pull any of the following information from the Job record: title, location name, location, job notes, field notes, status, assigned team members, scheduled date/time, customer arrival window, created by, tags, and any other custom fields you may have added to your Job records.
* ***Field Value from Related Estimates***
* Here you can pull any of the following information from the Estimates record: title, estimate notes, internal notes, estimate date, author, status, location, reference, expiration date, tags, and any other custom fields you may have added to your Estimate records.
* ***Field Value from Related Invoices***
* Here you can pull any of the following information from the Invoices record: title, invoice notes, internal notes, invoice date, author, status, location, reference, due date, tags, and any other custom fields you may have added to your Invoice records.
* ***Field Value from Related Projects***
* Here you can pull any of the following information from the Projects record: title, notes, job notes, start date, end date, completion percentage, and any other custom fields you may have added to your Project records.
* ***Field Value from Related Maintenance Agreements***
* Here you can pull any of the following information from the Maintenance Agreements record: title, job location, status, price per bill, total annual fee, agreement notes, job notes, and any other custom fields you may have added to your Maintenance Agreement records.
* ***Field Value from Related Assets***
* Here you can pull any of the following information from the Assets record: asset tag, title, asset notes, install date, location, location details, category, manufacturer, model, model number, serial number, model year, model details, warranty, condition, warranty information, and any other custom fields you may have added to your Asset records.
## [Click here for more details on adding relating field values on Custom Forms.](/features-add-ons/custom-forms/custom-forms-linked-to-job-records)
## Field Formulas
Field Formulas take the math off your team's plate. Instead of calculating a value by hand and typing it in, you can set up a Number Field to calculate its value automatically from other fields and constants.
**Step 1:** Select a Number Field on your form to open its settings.
* **Image/Video** - Upload jpg, pdf, mp4, and png files. You have the ability to specify the minimum/maximum number of files allowed (1-10 files permitted)
* **Signature** - Easily collect a signature with this field
* **Related Record Fields** - Import data from related records within FieldPulse. See examples of these fields below:
* ***Field Value from Related Customers***
* Here you can pull any of the following information from the Customer record: name, notes, job notes, email, phone, billing address, location **(Note: if a customer has multiple locations or contacts, you can specify which user's information to fill the form with)**, status/type, pipeline status, lead source, tags, and any other custom fields you may have added to your Customer records.
* ***Field Value from Related Jobs***
* Here you can pull any of the following information from the Job record: title, location name, location, job notes, field notes, status, assigned team members, scheduled date/time, customer arrival window, created by, tags, and any other custom fields you may have added to your Job records.
* ***Field Value from Related Estimates***
* Here you can pull any of the following information from the Estimates record: title, estimate notes, internal notes, estimate date, author, status, location, reference, expiration date, tags, and any other custom fields you may have added to your Estimate records.
* ***Field Value from Related Invoices***
* Here you can pull any of the following information from the Invoices record: title, invoice notes, internal notes, invoice date, author, status, location, reference, due date, tags, and any other custom fields you may have added to your Invoice records.
* ***Field Value from Related Projects***
* Here you can pull any of the following information from the Projects record: title, notes, job notes, start date, end date, completion percentage, and any other custom fields you may have added to your Project records.
* ***Field Value from Related Maintenance Agreements***
* Here you can pull any of the following information from the Maintenance Agreements record: title, job location, status, price per bill, total annual fee, agreement notes, job notes, and any other custom fields you may have added to your Maintenance Agreement records.
* ***Field Value from Related Assets***
* Here you can pull any of the following information from the Assets record: asset tag, title, asset notes, install date, location, location details, category, manufacturer, model, model number, serial number, model year, model details, warranty, condition, warranty information, and any other custom fields you may have added to your Asset records.
## [Click here for more details on adding relating field values on Custom Forms.](/features-add-ons/custom-forms/custom-forms-linked-to-job-records)
## Field Formulas
Field Formulas take the math off your team's plate. Instead of calculating a value by hand and typing it in, you can set up a Number Field to calculate its value automatically from other fields and constants.
**Step 1:** Select a Number Field on your form to open its settings.
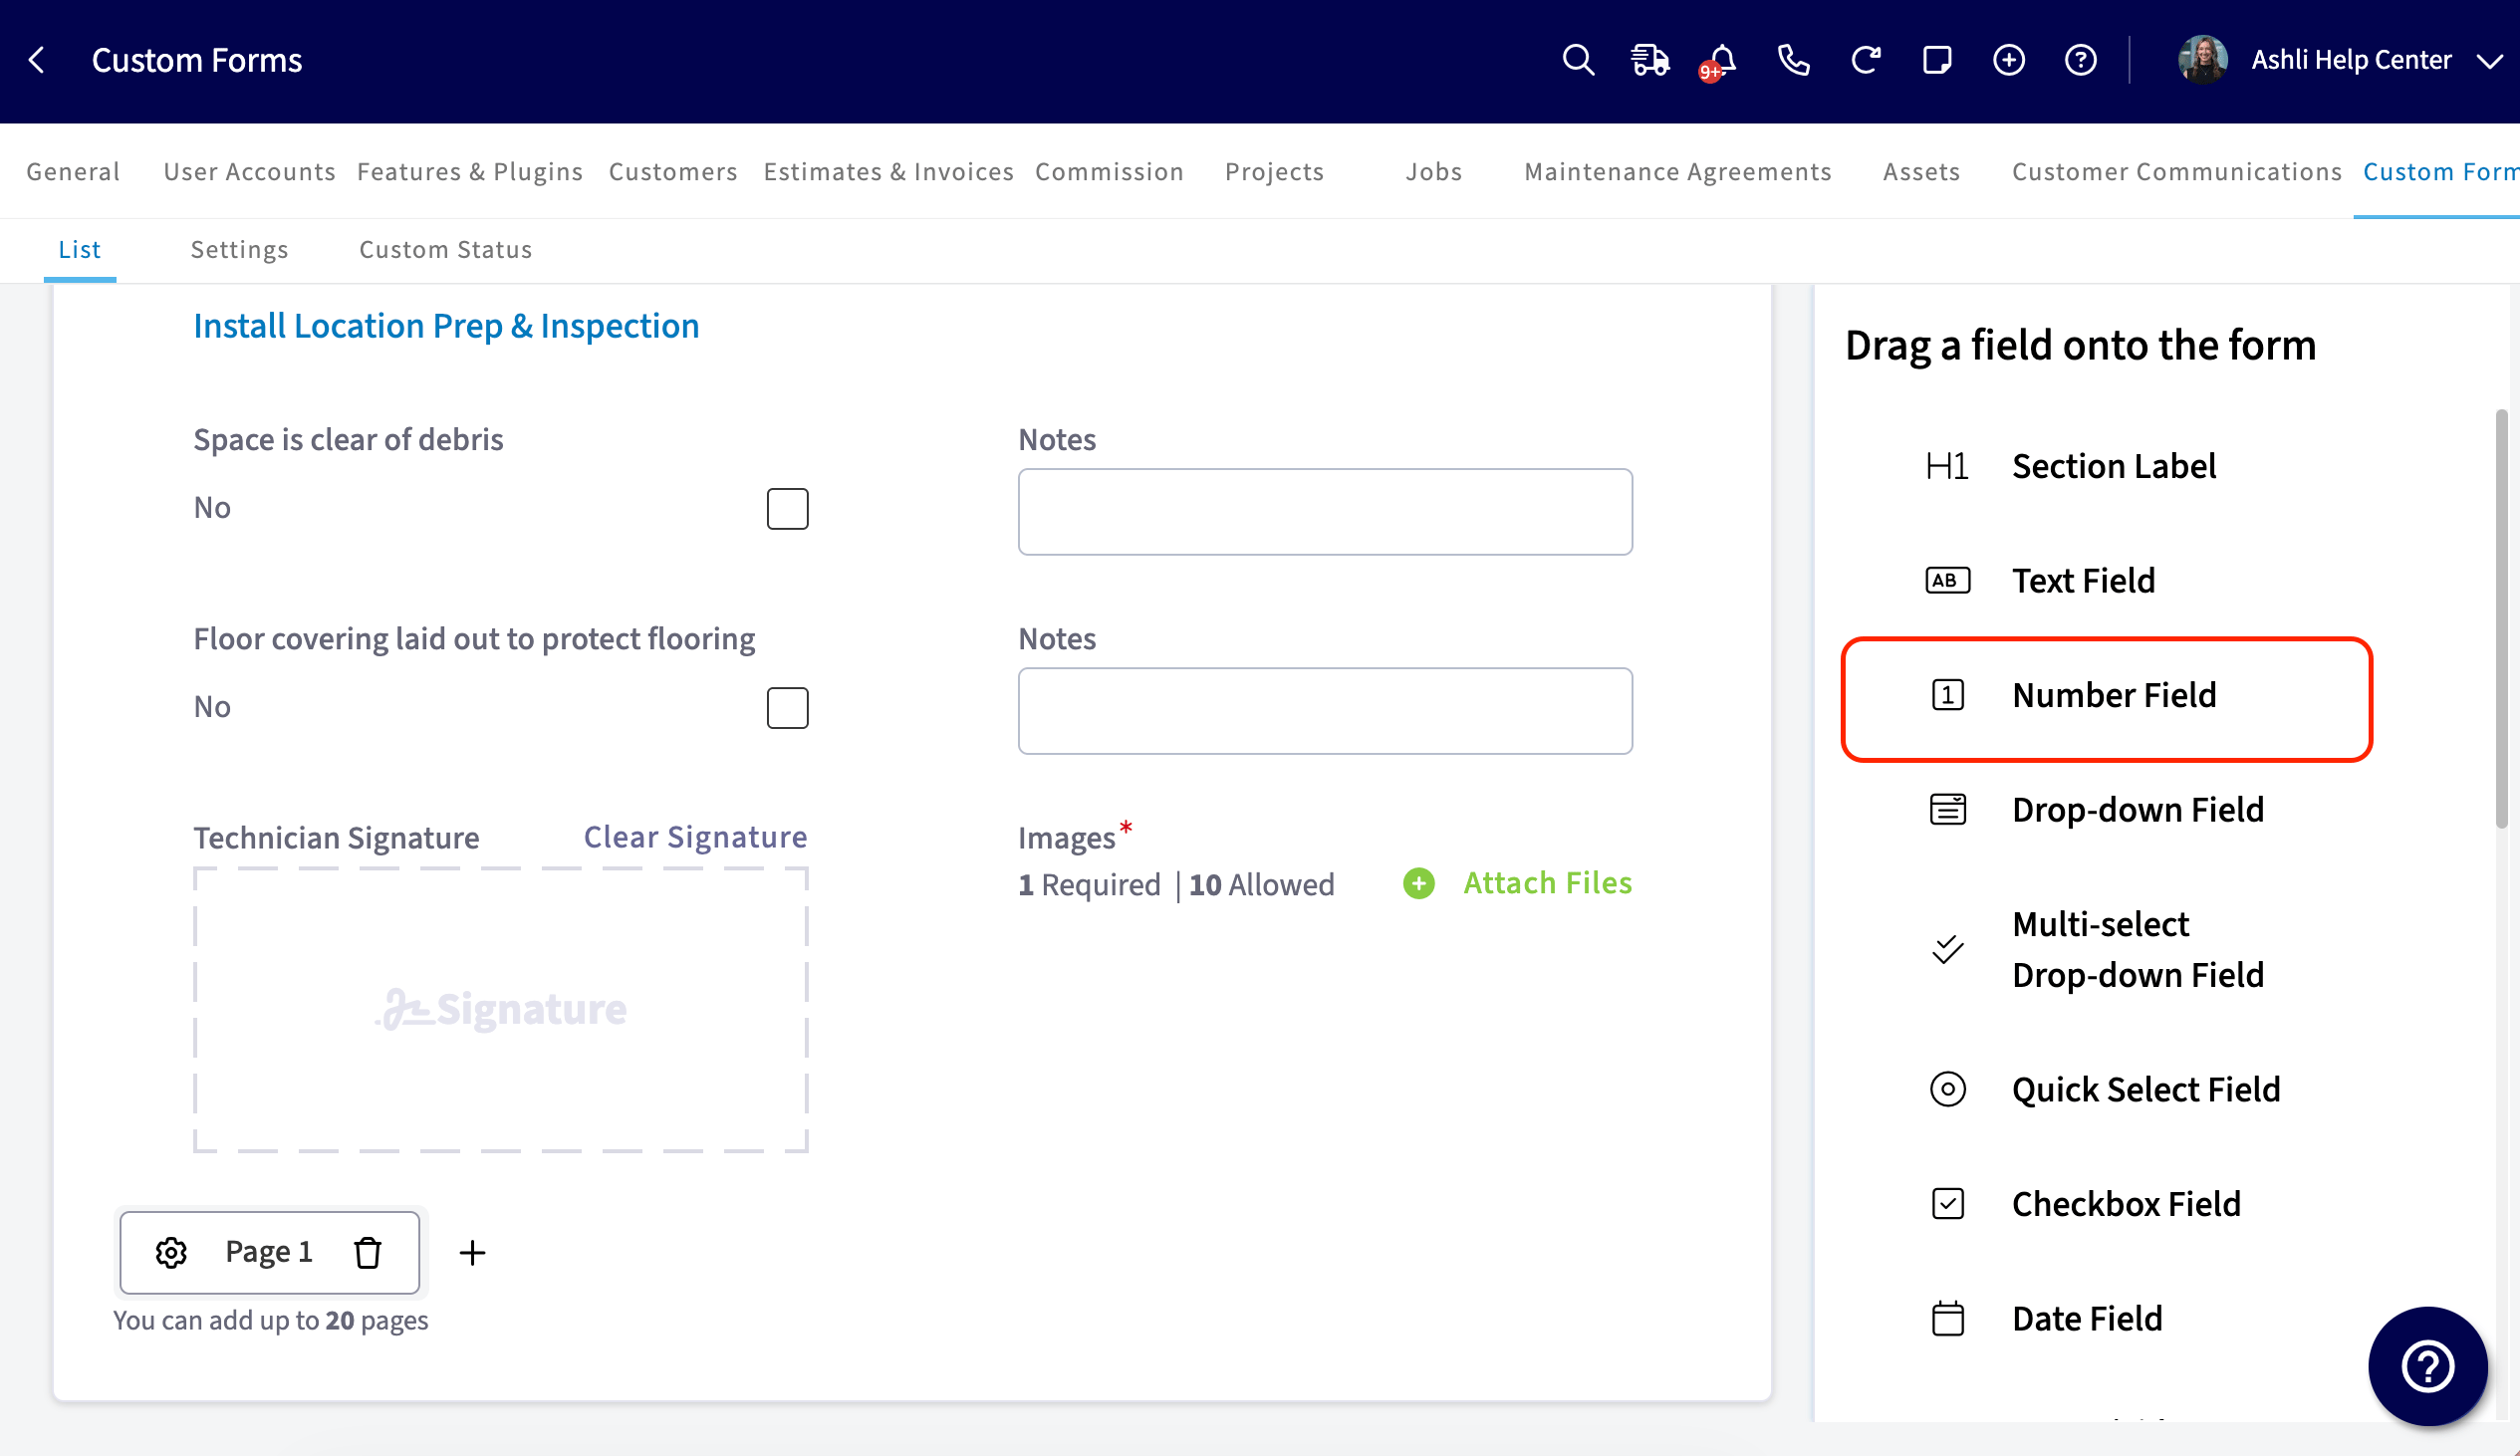 **Step 2:** Click *Use Formula as Default Value* above the Default Value field.
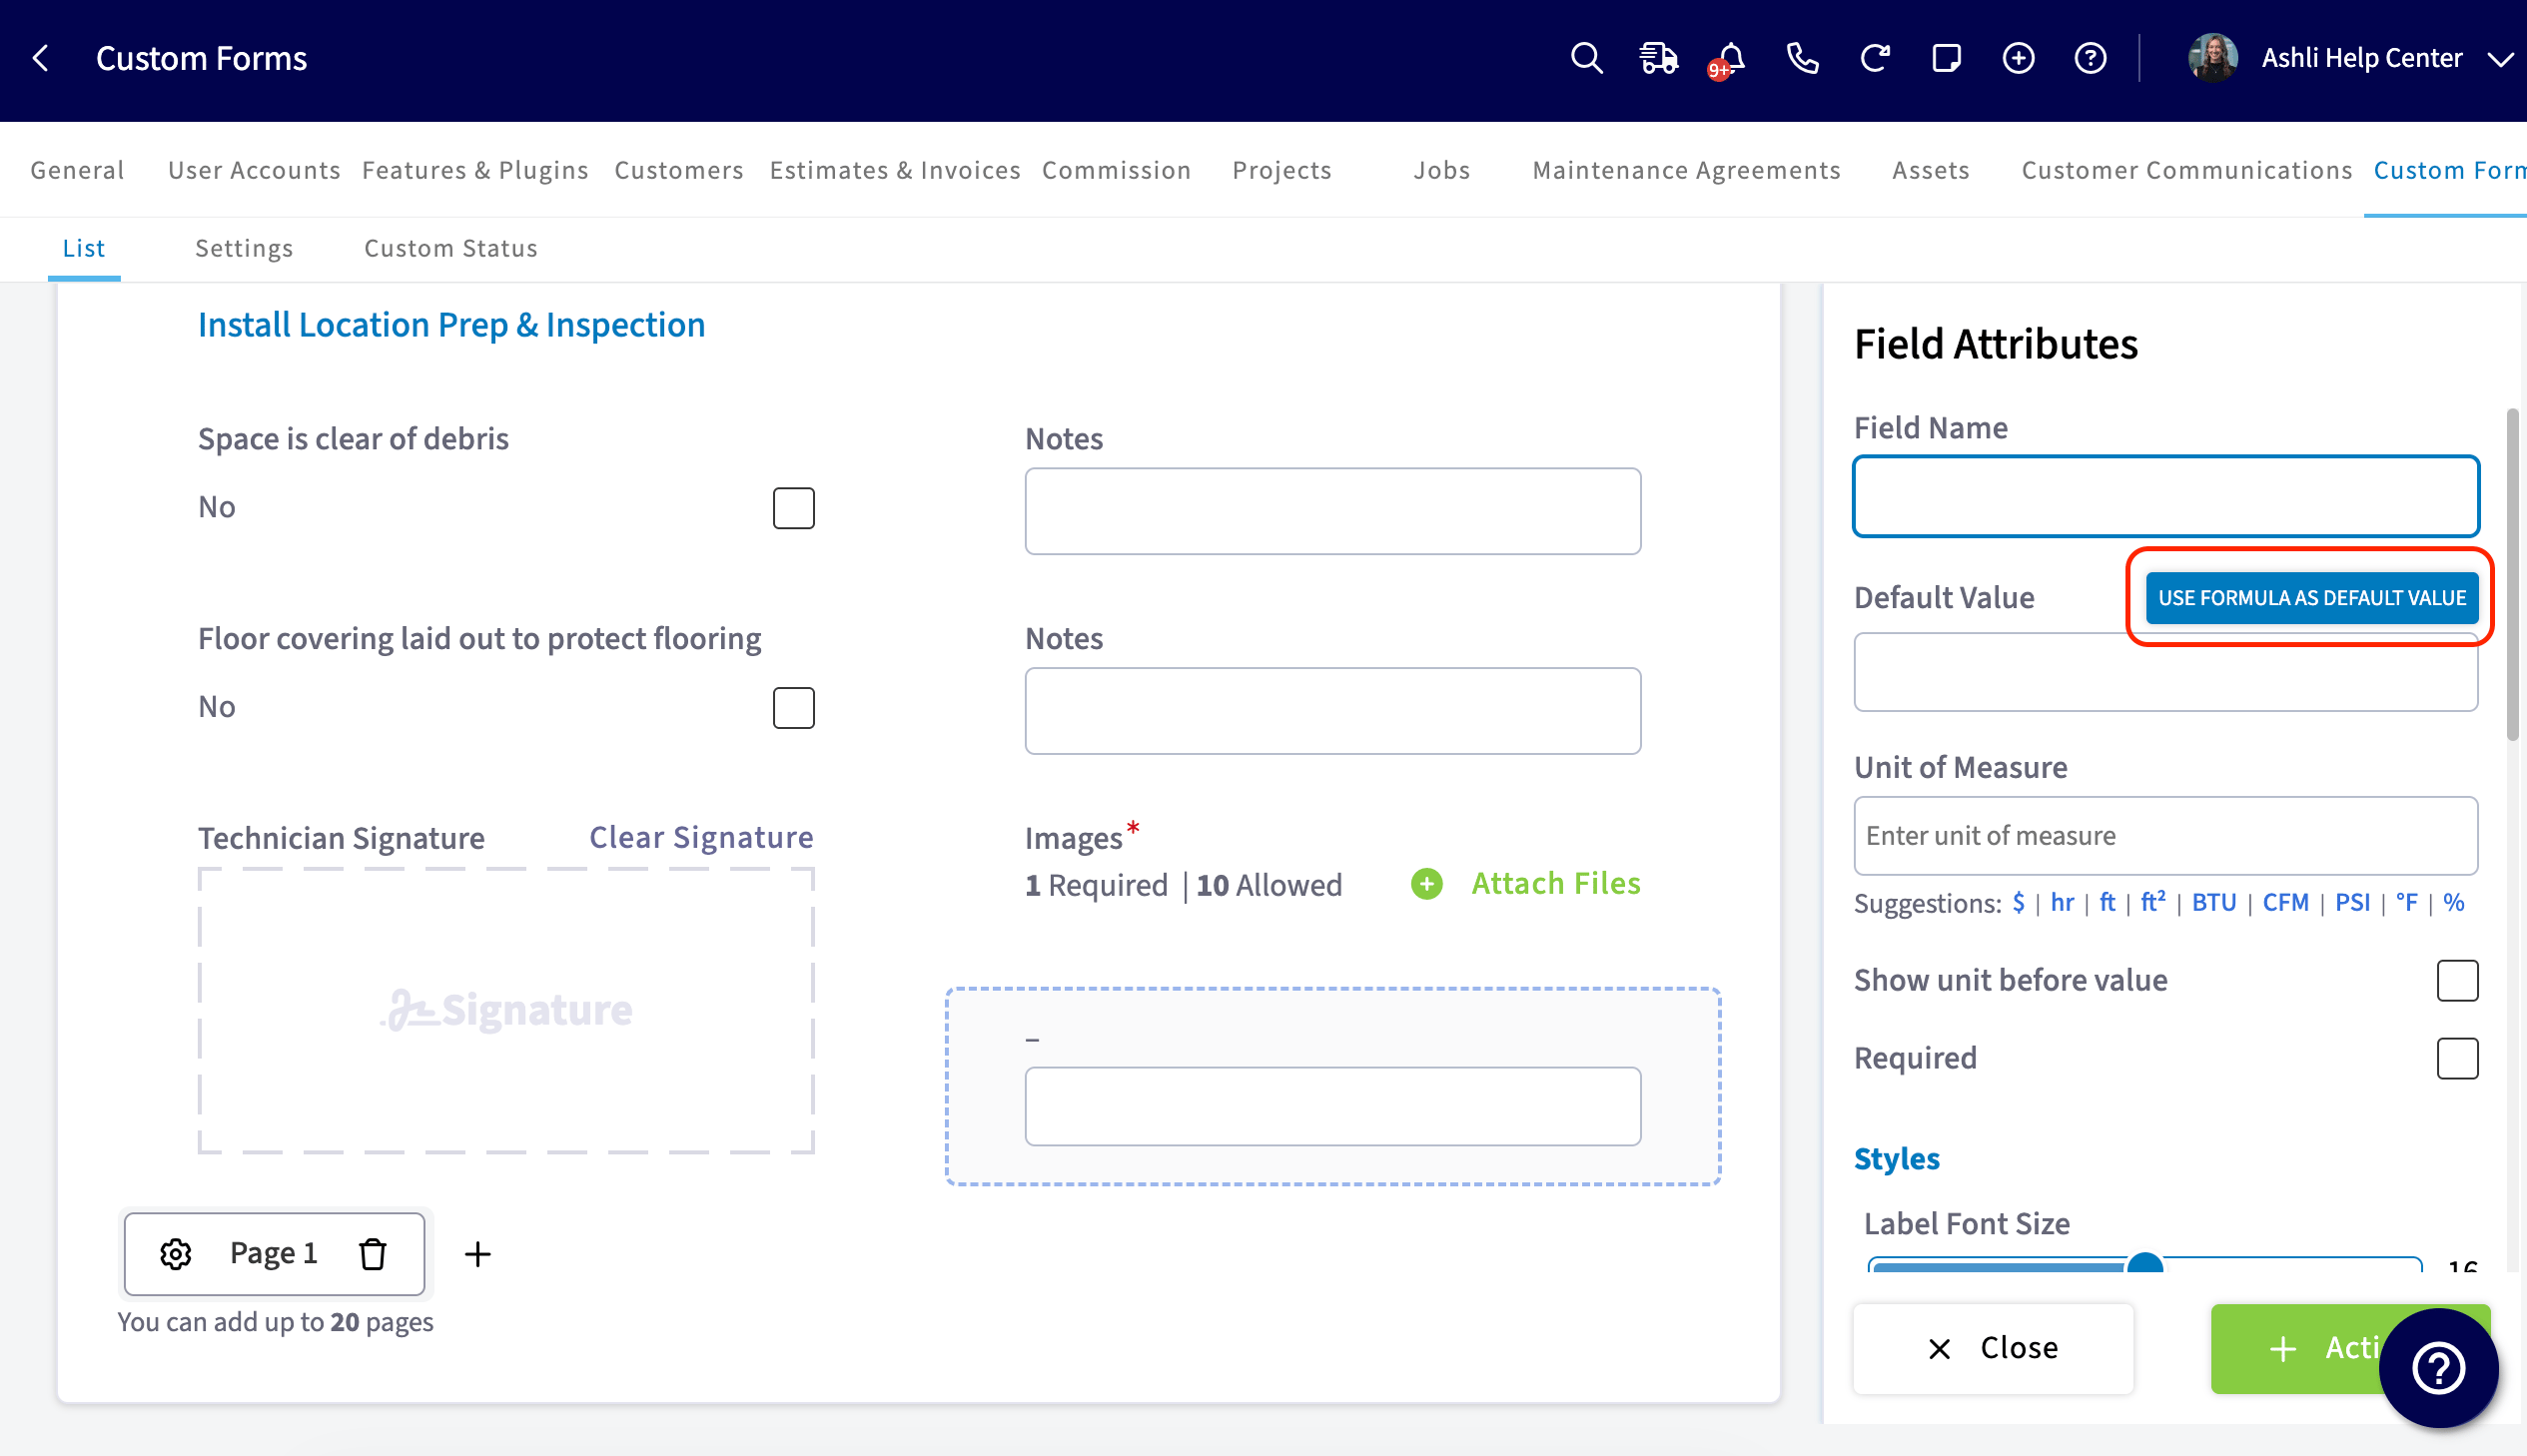 **Step 3:** From the Default Value selector, choose an existing formula or select *Add or Edit Formulas*.
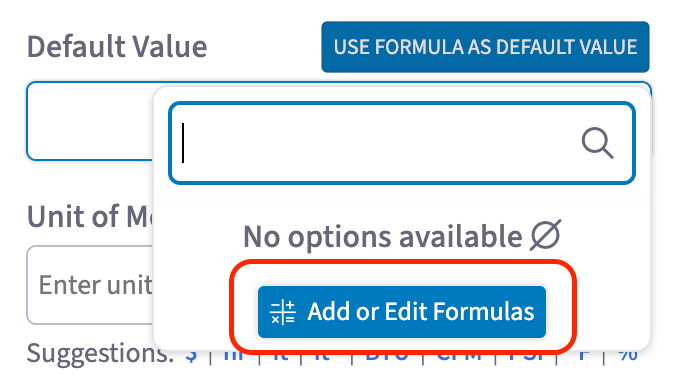 **Step 4:** In the Formulas modal, click *Add Formula* and give it a name.
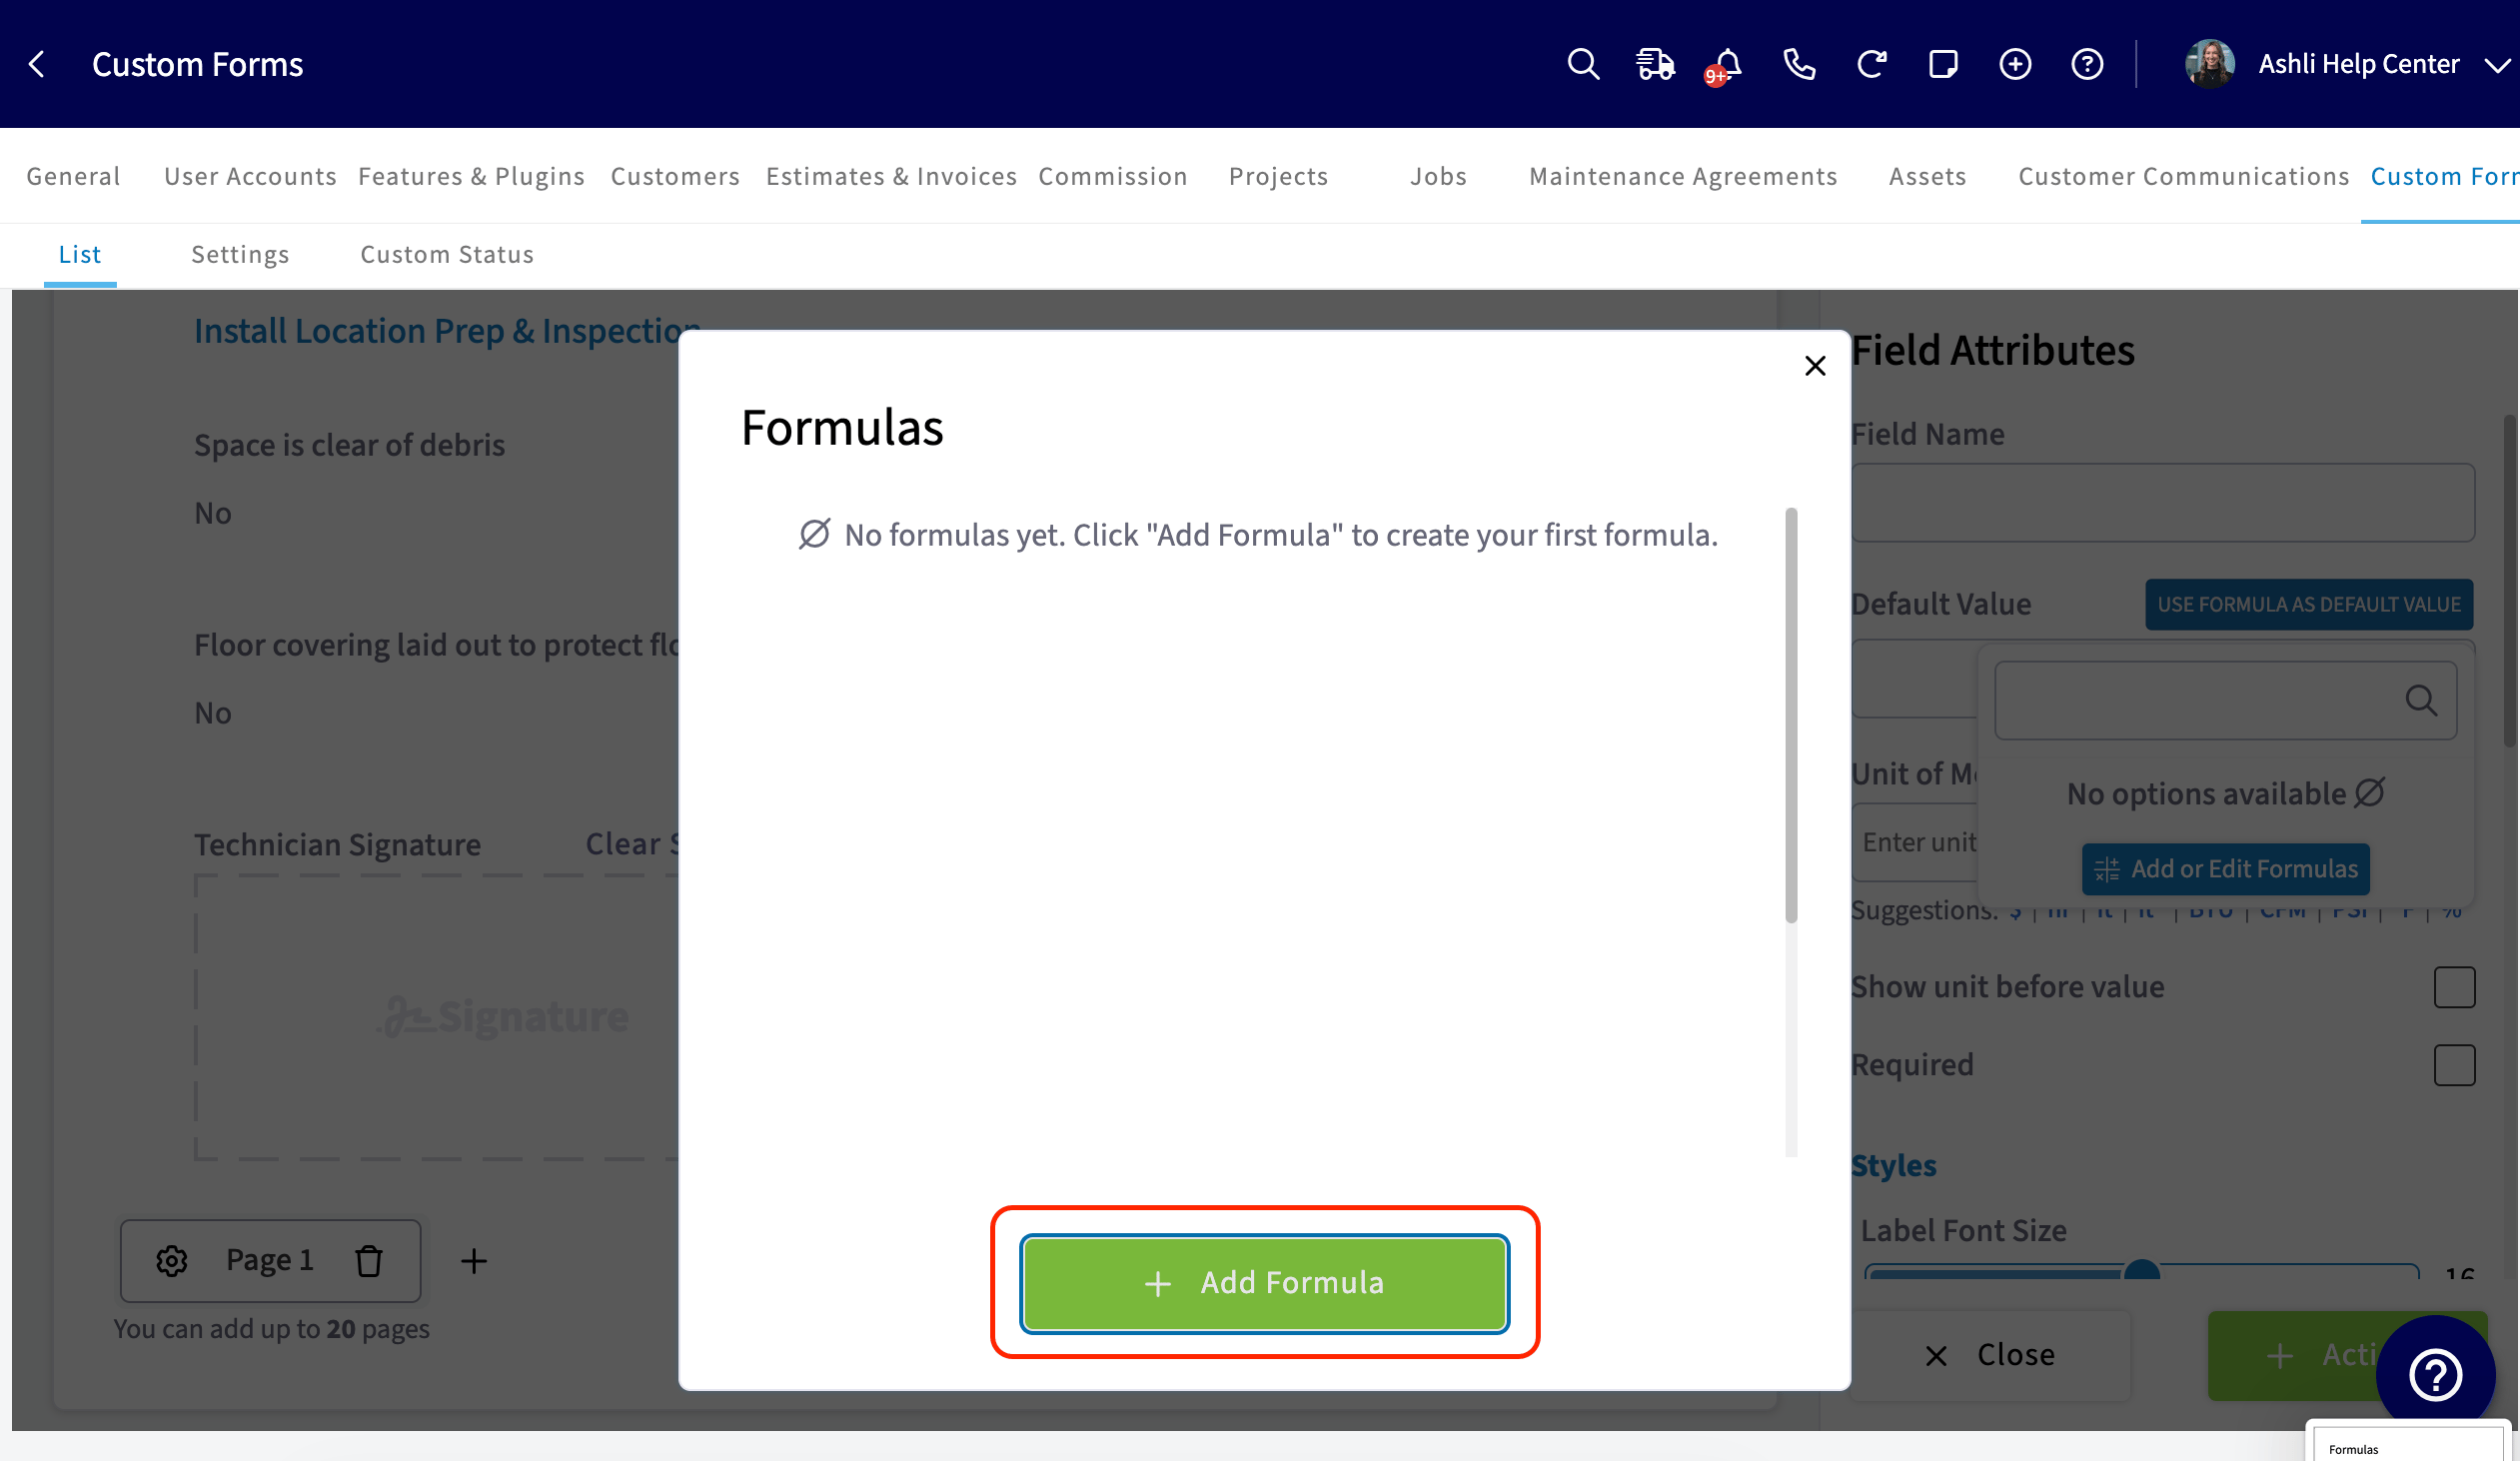 **Step 5:** Click *Insert Numeric Field or Formula* to bring in other Number Fields or existing formulas as variables. Connect them with arithmetic operators (add, subtract, multiply, divide), and you can also multiply a field by a set constant. Formulas can even reference other formulas, so you can build on top of existing calculations.
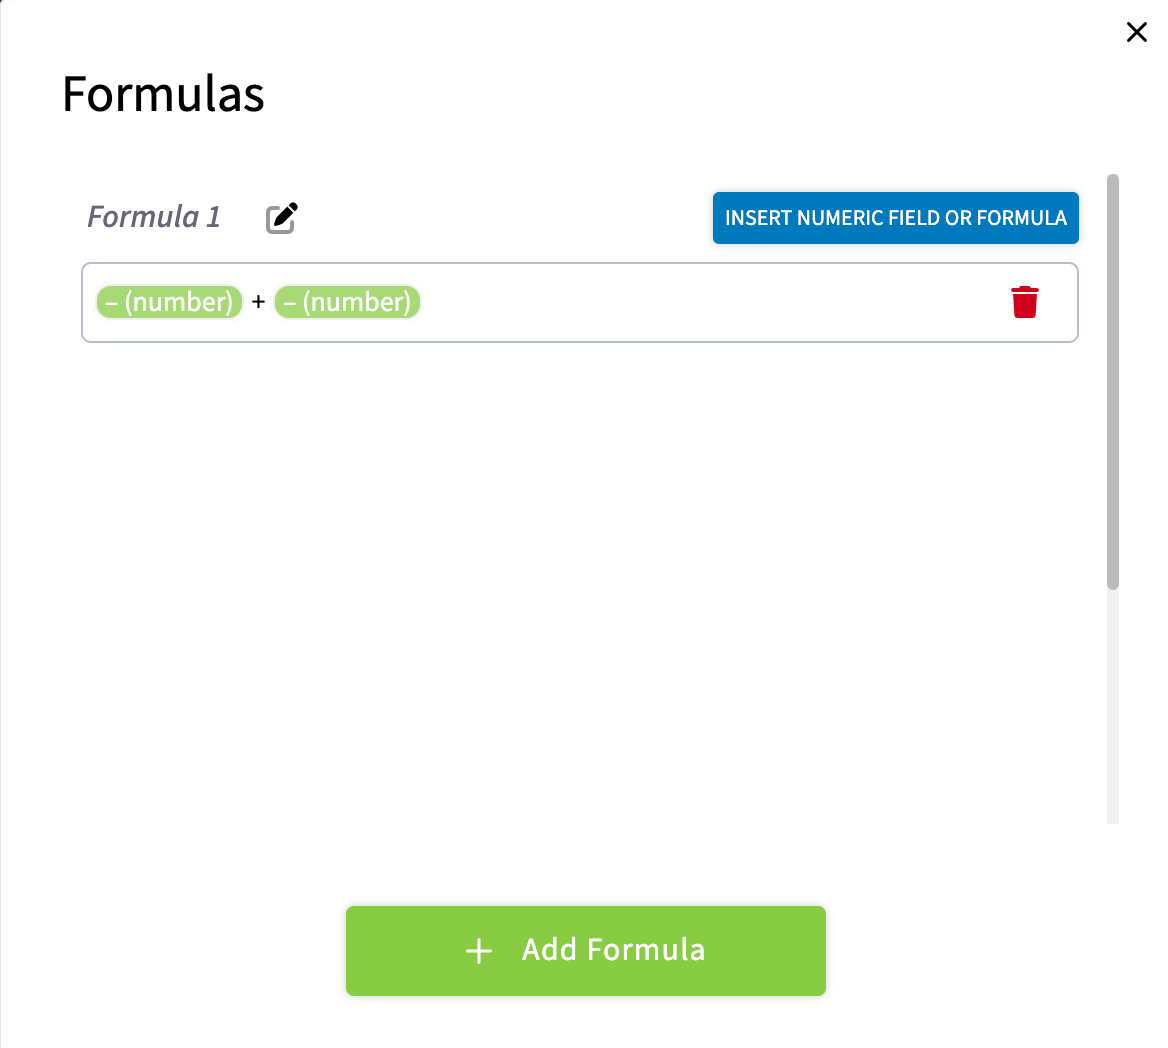 Save the formula, close the modal, and select it as the Default Value for your field. Once a formula is set, the Number Field will be read-only when someone fills out the form since the value is being calculated automatically. If you ever want to remove it, just click *Remove* in the field settings.
## Internal vs. Customer Facing Fields
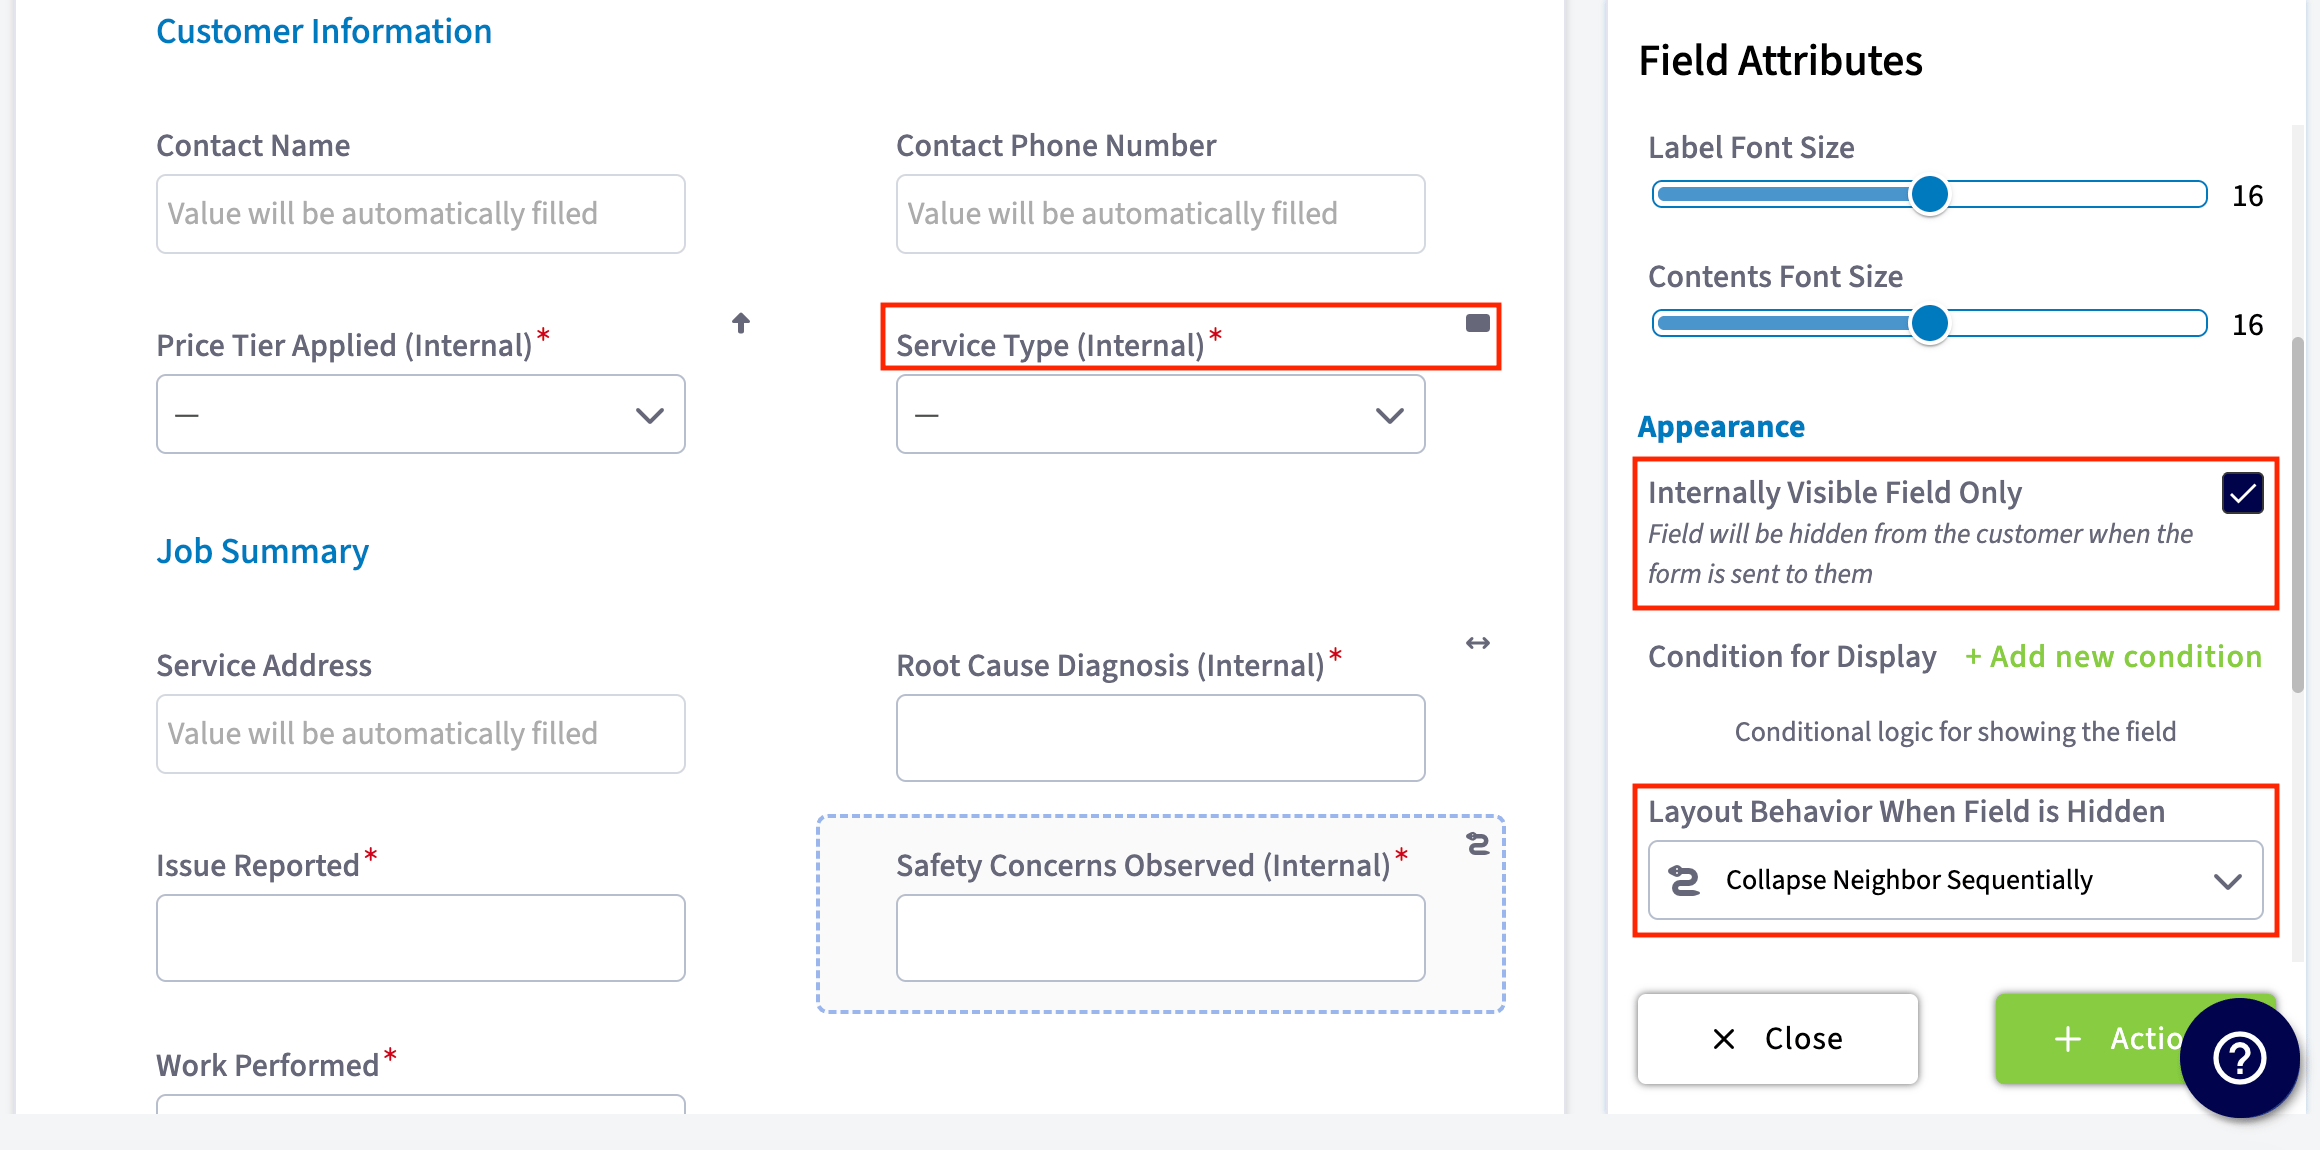
You can now designate Custom Form fields as *Internally Visible Only*, ensuring that your customers see only the fields they need to complete. Your team can still access internal notes, checkboxes, and other operational details.
When a field is hidden, the rest of the form automatically adjusts. You can control how the layout responds, so your forms stay clean and professional.
Save the formula, close the modal, and select it as the Default Value for your field. Once a formula is set, the Number Field will be read-only when someone fills out the form since the value is being calculated automatically. If you ever want to remove it, just click *Remove* in the field settings.
## Internal vs. Customer Facing Fields
You can now designate Custom Form fields as *Internally Visible Only*, ensuring that your customers see only the fields they need to complete. Your team can still access internal notes, checkboxes, and other operational details.
When a field is hidden, the rest of the form automatically adjusts. You can control how the layout responds, so your forms stay clean and professional.
 **Why We Released This:**
* **Streamlined Forms:** Your customers face shorter, clearer forms.
* **Less Confusion:** Clearly differentiates between fields your team fills out and those required by your customers.
**Features:**
* Fields marked as *Internally Visible Only* won’t show on customer-facing displays, including PDFs.
* Required fields set to be internally required only.
* Hidden internal related record Custom Field values can now cascade to Custom Forms.
* Ability to designate internal PDFs for printing, allowing internal fields to appear on the copy.
**Dynamic Formatting / Layout Behavior:**
* Custom forms can consolidate blank spaces effectively, enhancing visual appeal:
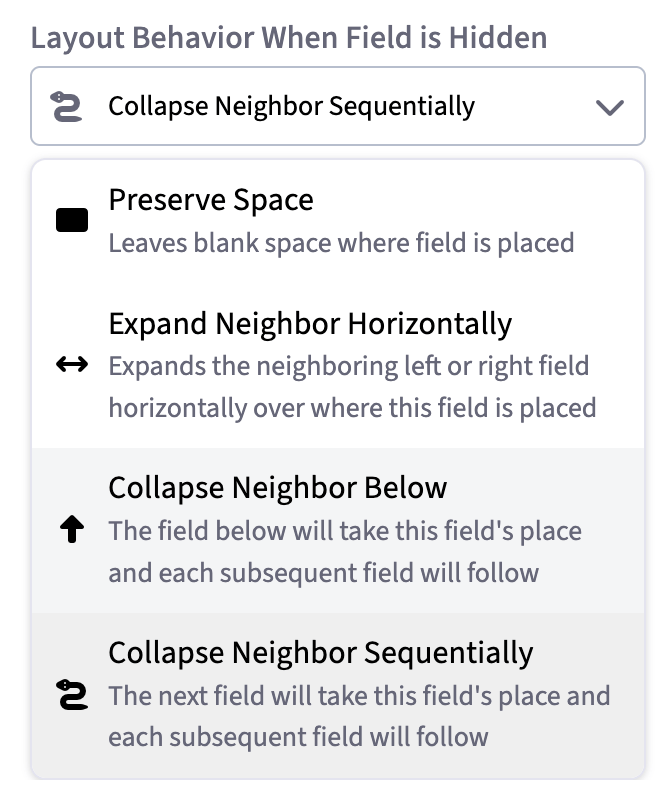
* **Preserve Space:** Keeps the original layout.
* **Expand Neighbor Horizontally:** Expands adjacent fields.
* **Collapse Neighbor Below:** Pulls up fields directly below.
* **Collapse Neighbor Sequentially:** Adjusts layout in a cascading manner.
**Why We Released This:**
* **Streamlined Forms:** Your customers face shorter, clearer forms.
* **Less Confusion:** Clearly differentiates between fields your team fills out and those required by your customers.
**Features:**
* Fields marked as *Internally Visible Only* won’t show on customer-facing displays, including PDFs.
* Required fields set to be internally required only.
* Hidden internal related record Custom Field values can now cascade to Custom Forms.
* Ability to designate internal PDFs for printing, allowing internal fields to appear on the copy.
**Dynamic Formatting / Layout Behavior:**
* Custom forms can consolidate blank spaces effectively, enhancing visual appeal:
* **Preserve Space:** Keeps the original layout.
* **Expand Neighbor Horizontally:** Expands adjacent fields.
* **Collapse Neighbor Below:** Pulls up fields directly below.
* **Collapse Neighbor Sequentially:** Adjusts layout in a cascading manner.
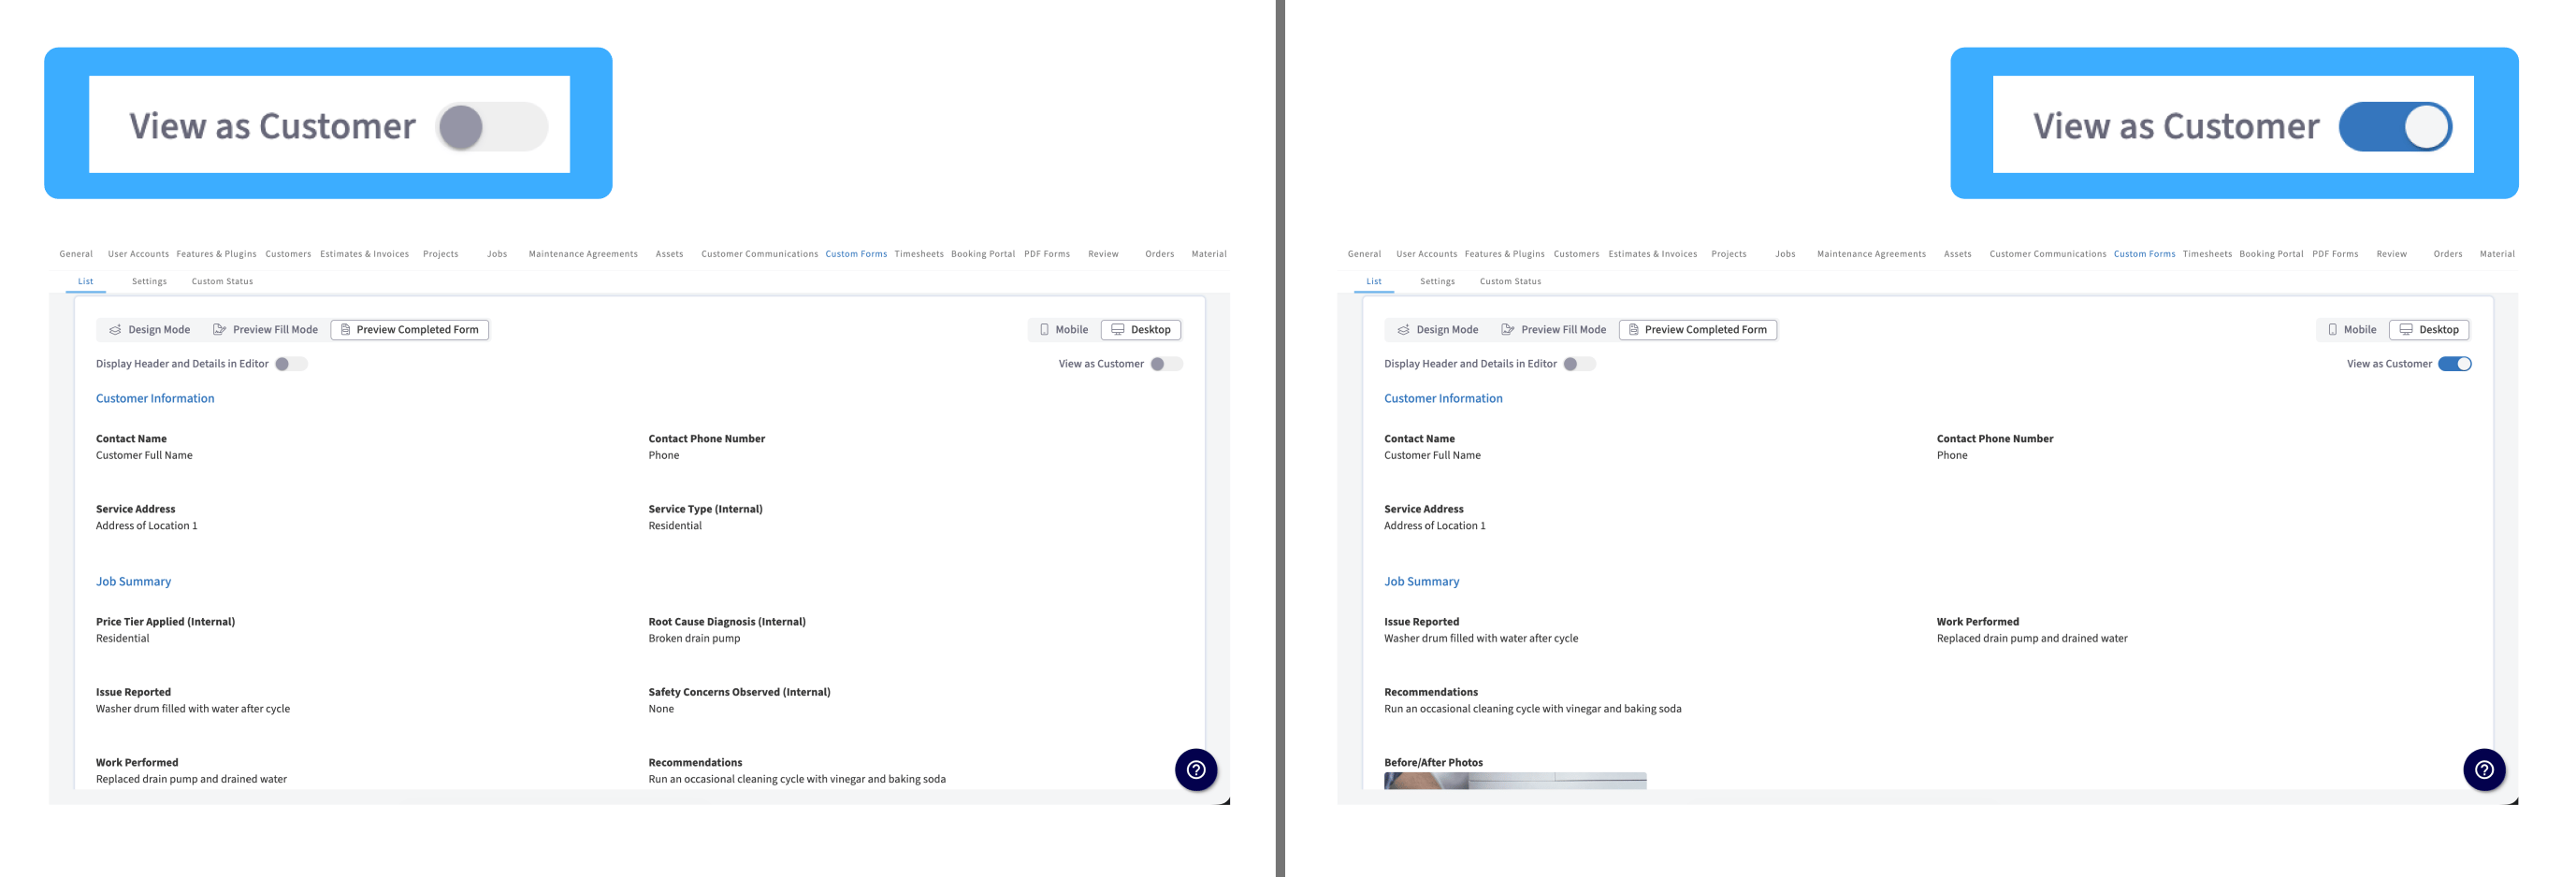 *Comparing Internal vs. Customer Facing Fields on a Custom Form*
## Required Fields
You have the option to require a field to be filled out by your employee and/or your customer by simply checking a box.
## Editable Fields
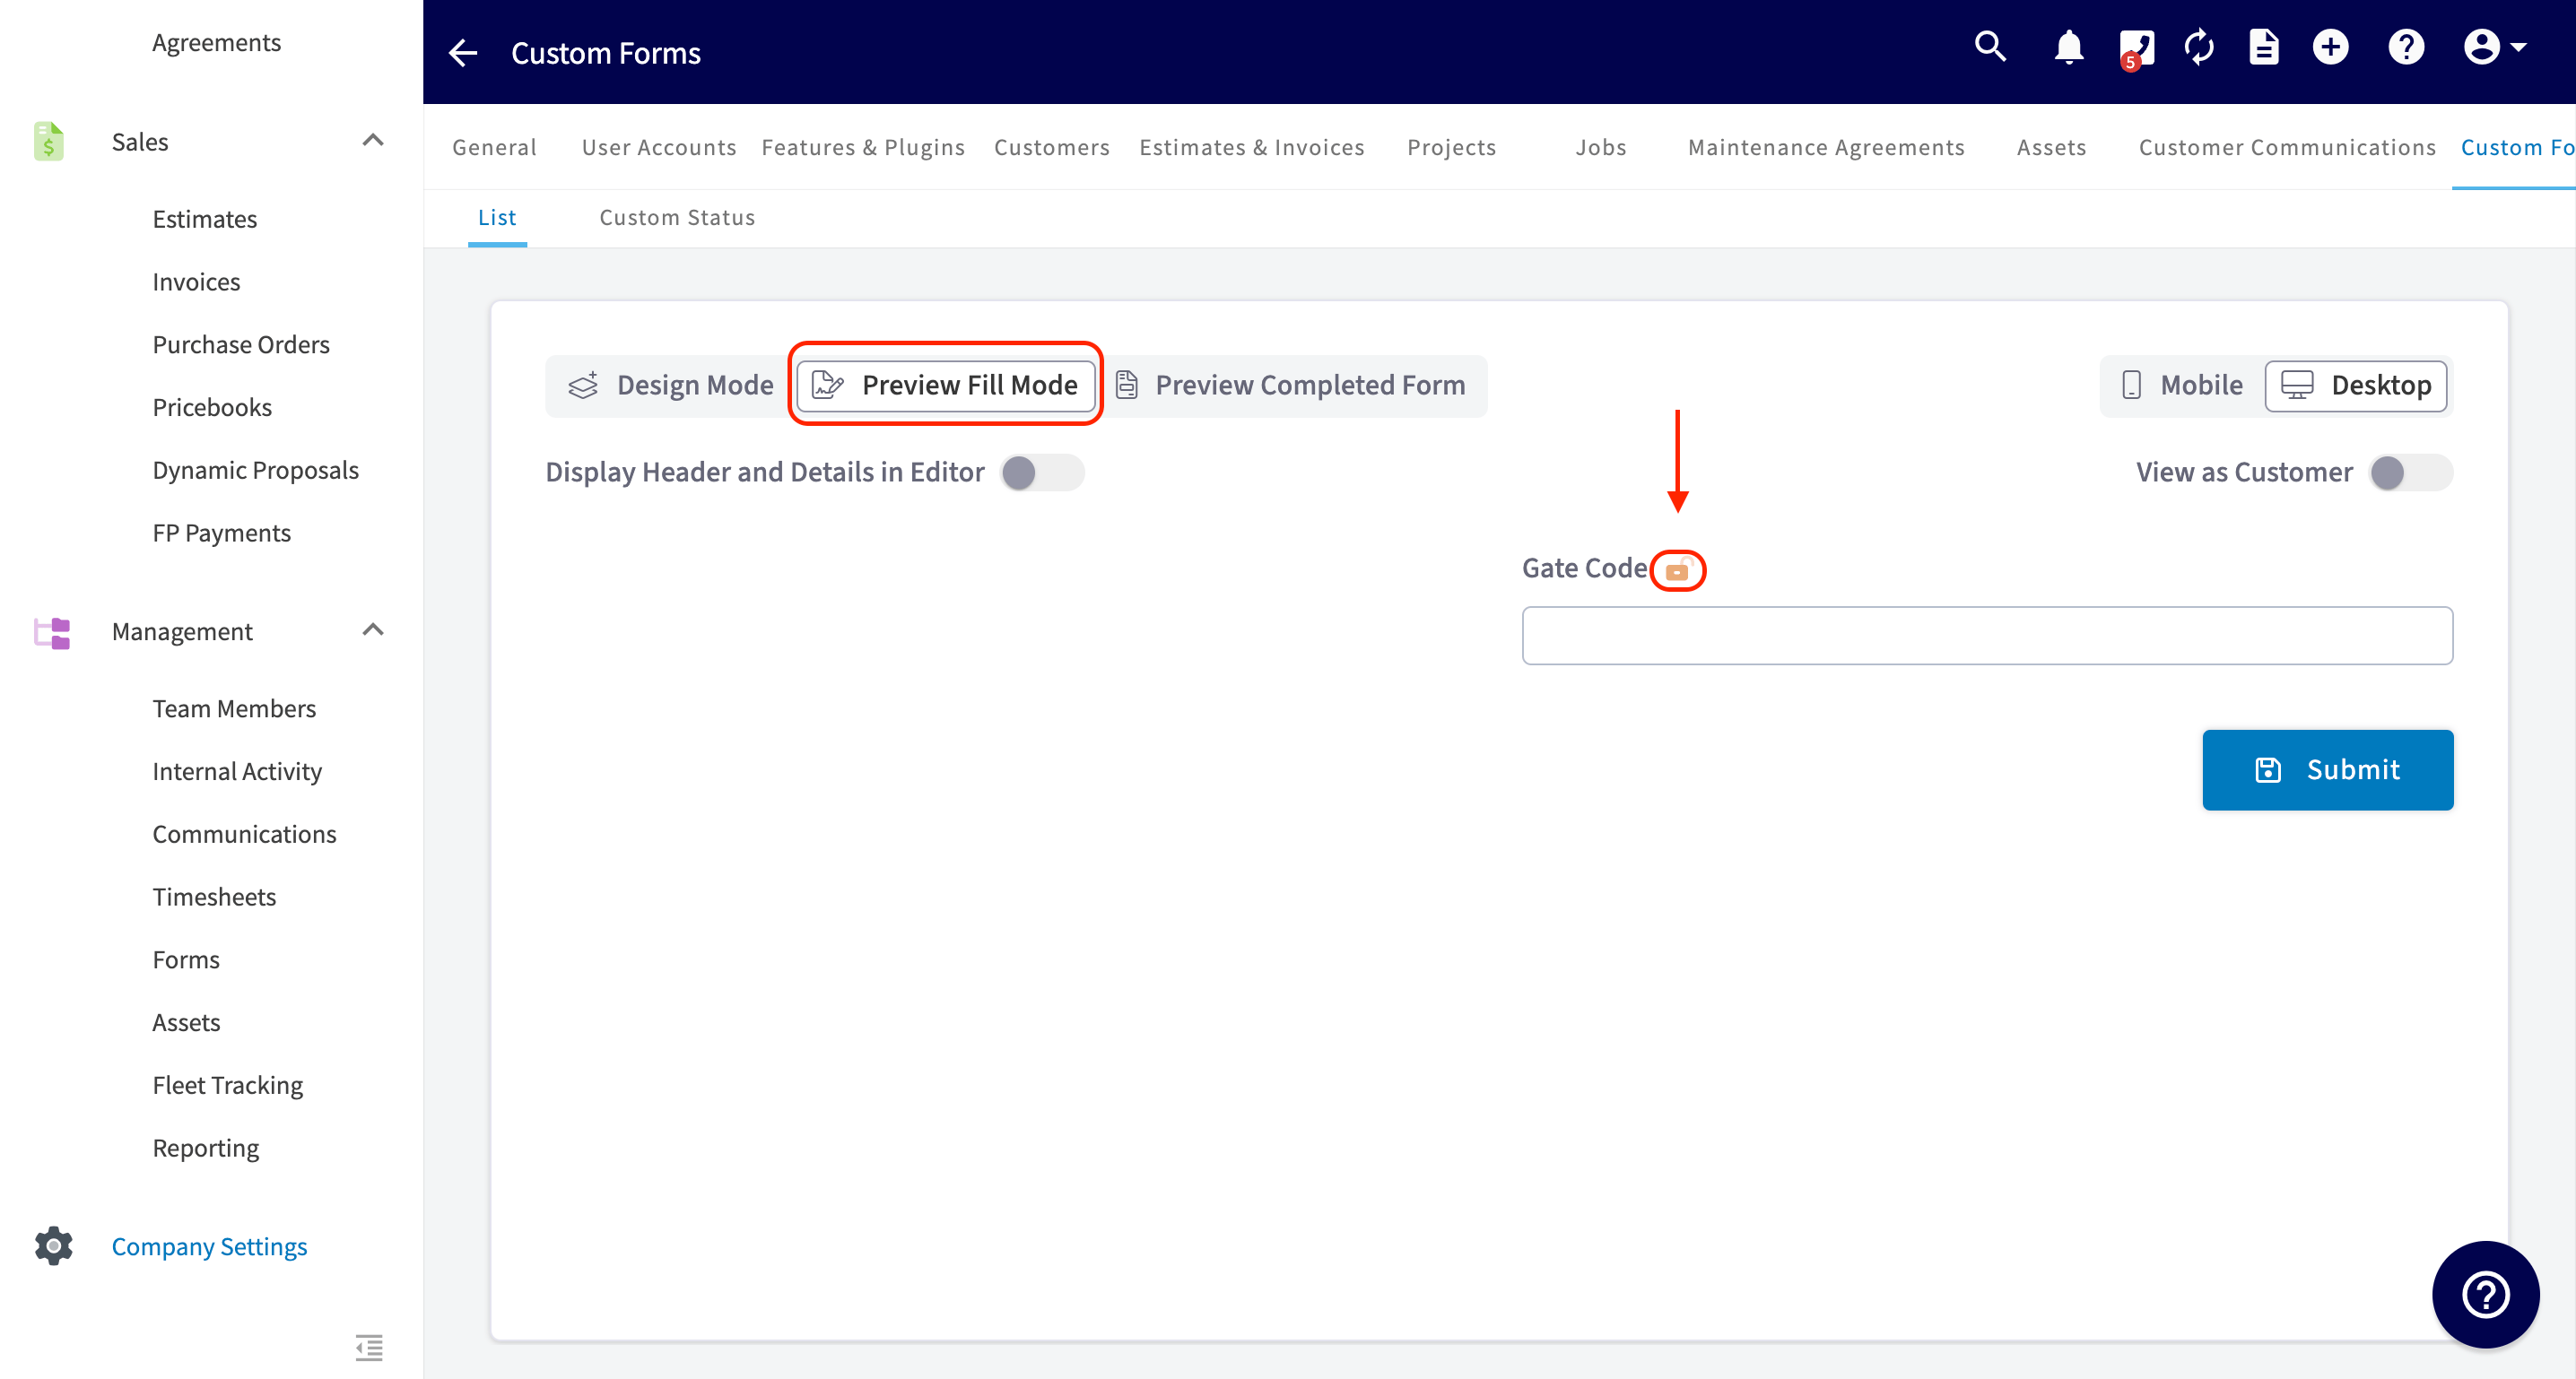
You can also choose if a field is editable by a customer or not. To see this, instead of being in *Design Mode*, select *Preview Fill Mode*. Next to each individual field you will see a lock or unlock icon. This allows you to give your customer and/or employee the right to edit the field or not.
*Comparing Internal vs. Customer Facing Fields on a Custom Form*
## Required Fields
You have the option to require a field to be filled out by your employee and/or your customer by simply checking a box.
## Editable Fields
You can also choose if a field is editable by a customer or not. To see this, instead of being in *Design Mode*, select *Preview Fill Mode*. Next to each individual field you will see a lock or unlock icon. This allows you to give your customer and/or employee the right to edit the field or not.
 ## Conditional Logic
Conditional logic allows certain fields to appear or change based on the responses the individual interacting with the form provides. This helps the form gather only relevant information.
In the example below, we want to create conditional logic for the field titled "Gate Code", so it only appears for the user when certain criteria are met in the field titled "Gate Code Required for Entry?". When you're ready to create conditional logic for the "Gate Code" field, click on the "Gate Code" field and select *Add New Condition*.
## Conditional Logic
Conditional logic allows certain fields to appear or change based on the responses the individual interacting with the form provides. This helps the form gather only relevant information.
In the example below, we want to create conditional logic for the field titled "Gate Code", so it only appears for the user when certain criteria are met in the field titled "Gate Code Required for Entry?". When you're ready to create conditional logic for the "Gate Code" field, click on the "Gate Code" field and select *Add New Condition*.
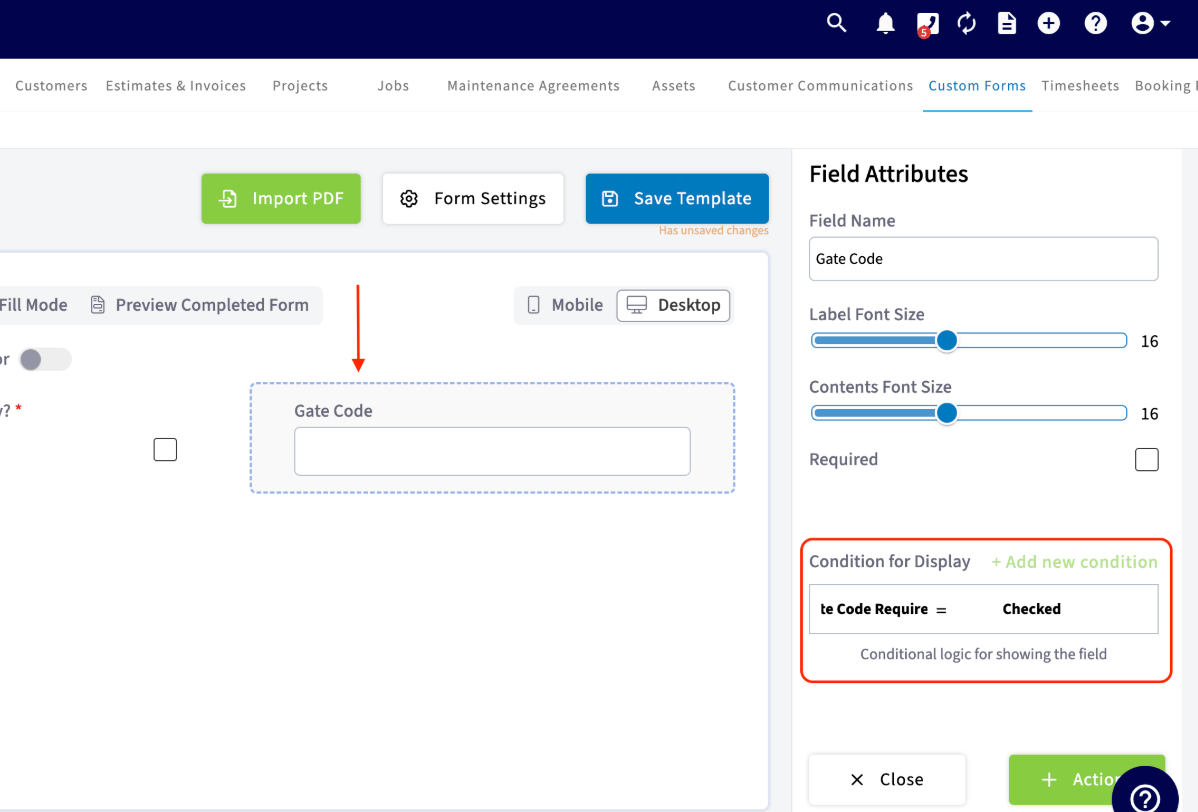
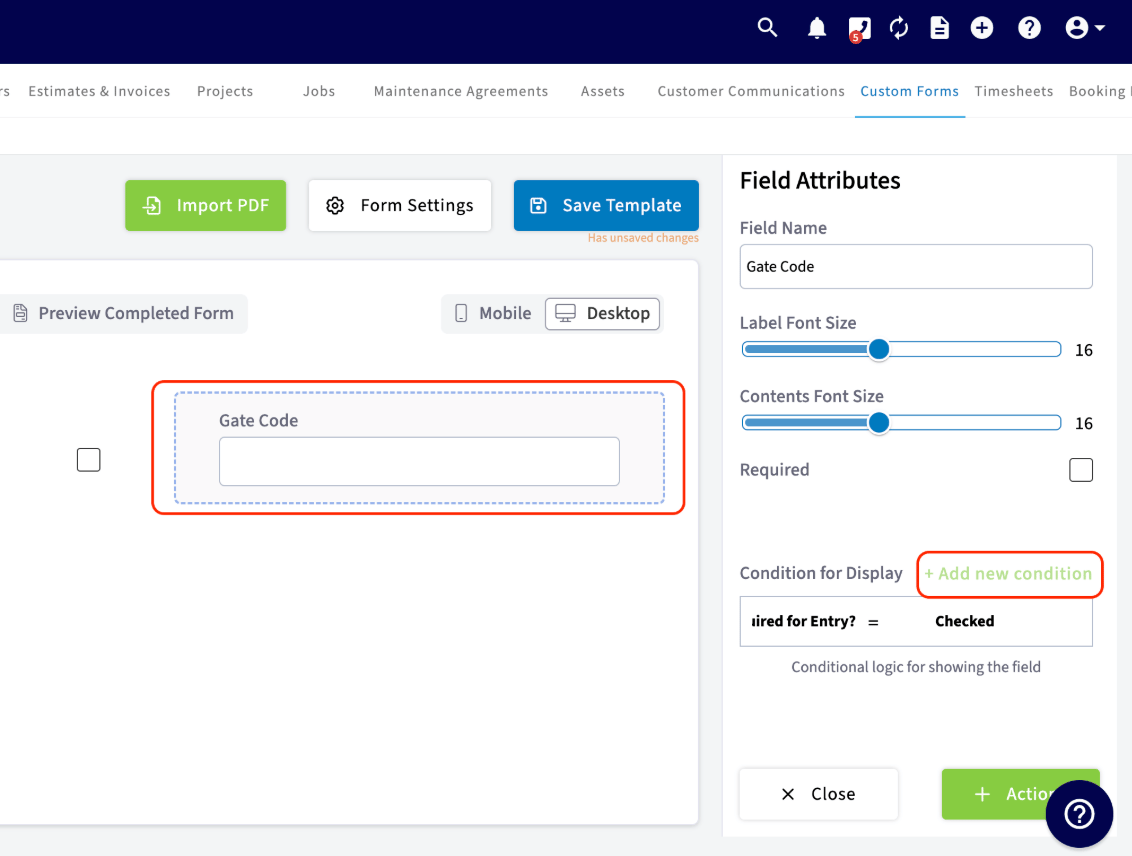 If you want the "Gate Code" field to **only** display if the "Gate Code Required for Entry" contains a certain value, select the "Is Gate Code Required for Entry" field and your desired value. The desired value will depend on the kind of field you added. In this example, our condition is: "Gate Code Required for Entry? = Checked". This means if the box is checked indicating that YES a gate code is required for entry, then the field to enter the gate code will pop up for the user filling out the form.
 ## Modes
Use the various mode options to view your form in different scenarios. You can also preview the appearance of your form from a Mobile or Desktop view.
## Modes
Use the various mode options to view your form in different scenarios. You can also preview the appearance of your form from a Mobile or Desktop view.
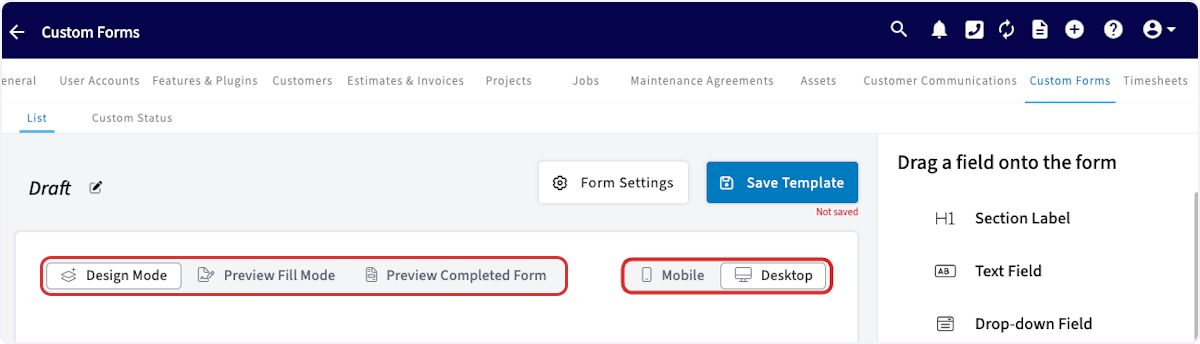 * **Design Mode** - You can create and edit a form by dragging and dropping fields.
* **Preview Fill Mode** - You can preview how the form will look when someone is filling it out. You can also choose if a field is editable by a customer or not in this view.
* **Preview Completed Form** - You can preview how the form will look once it has been completely filled out.
***
# Using the Custom Forms You Created
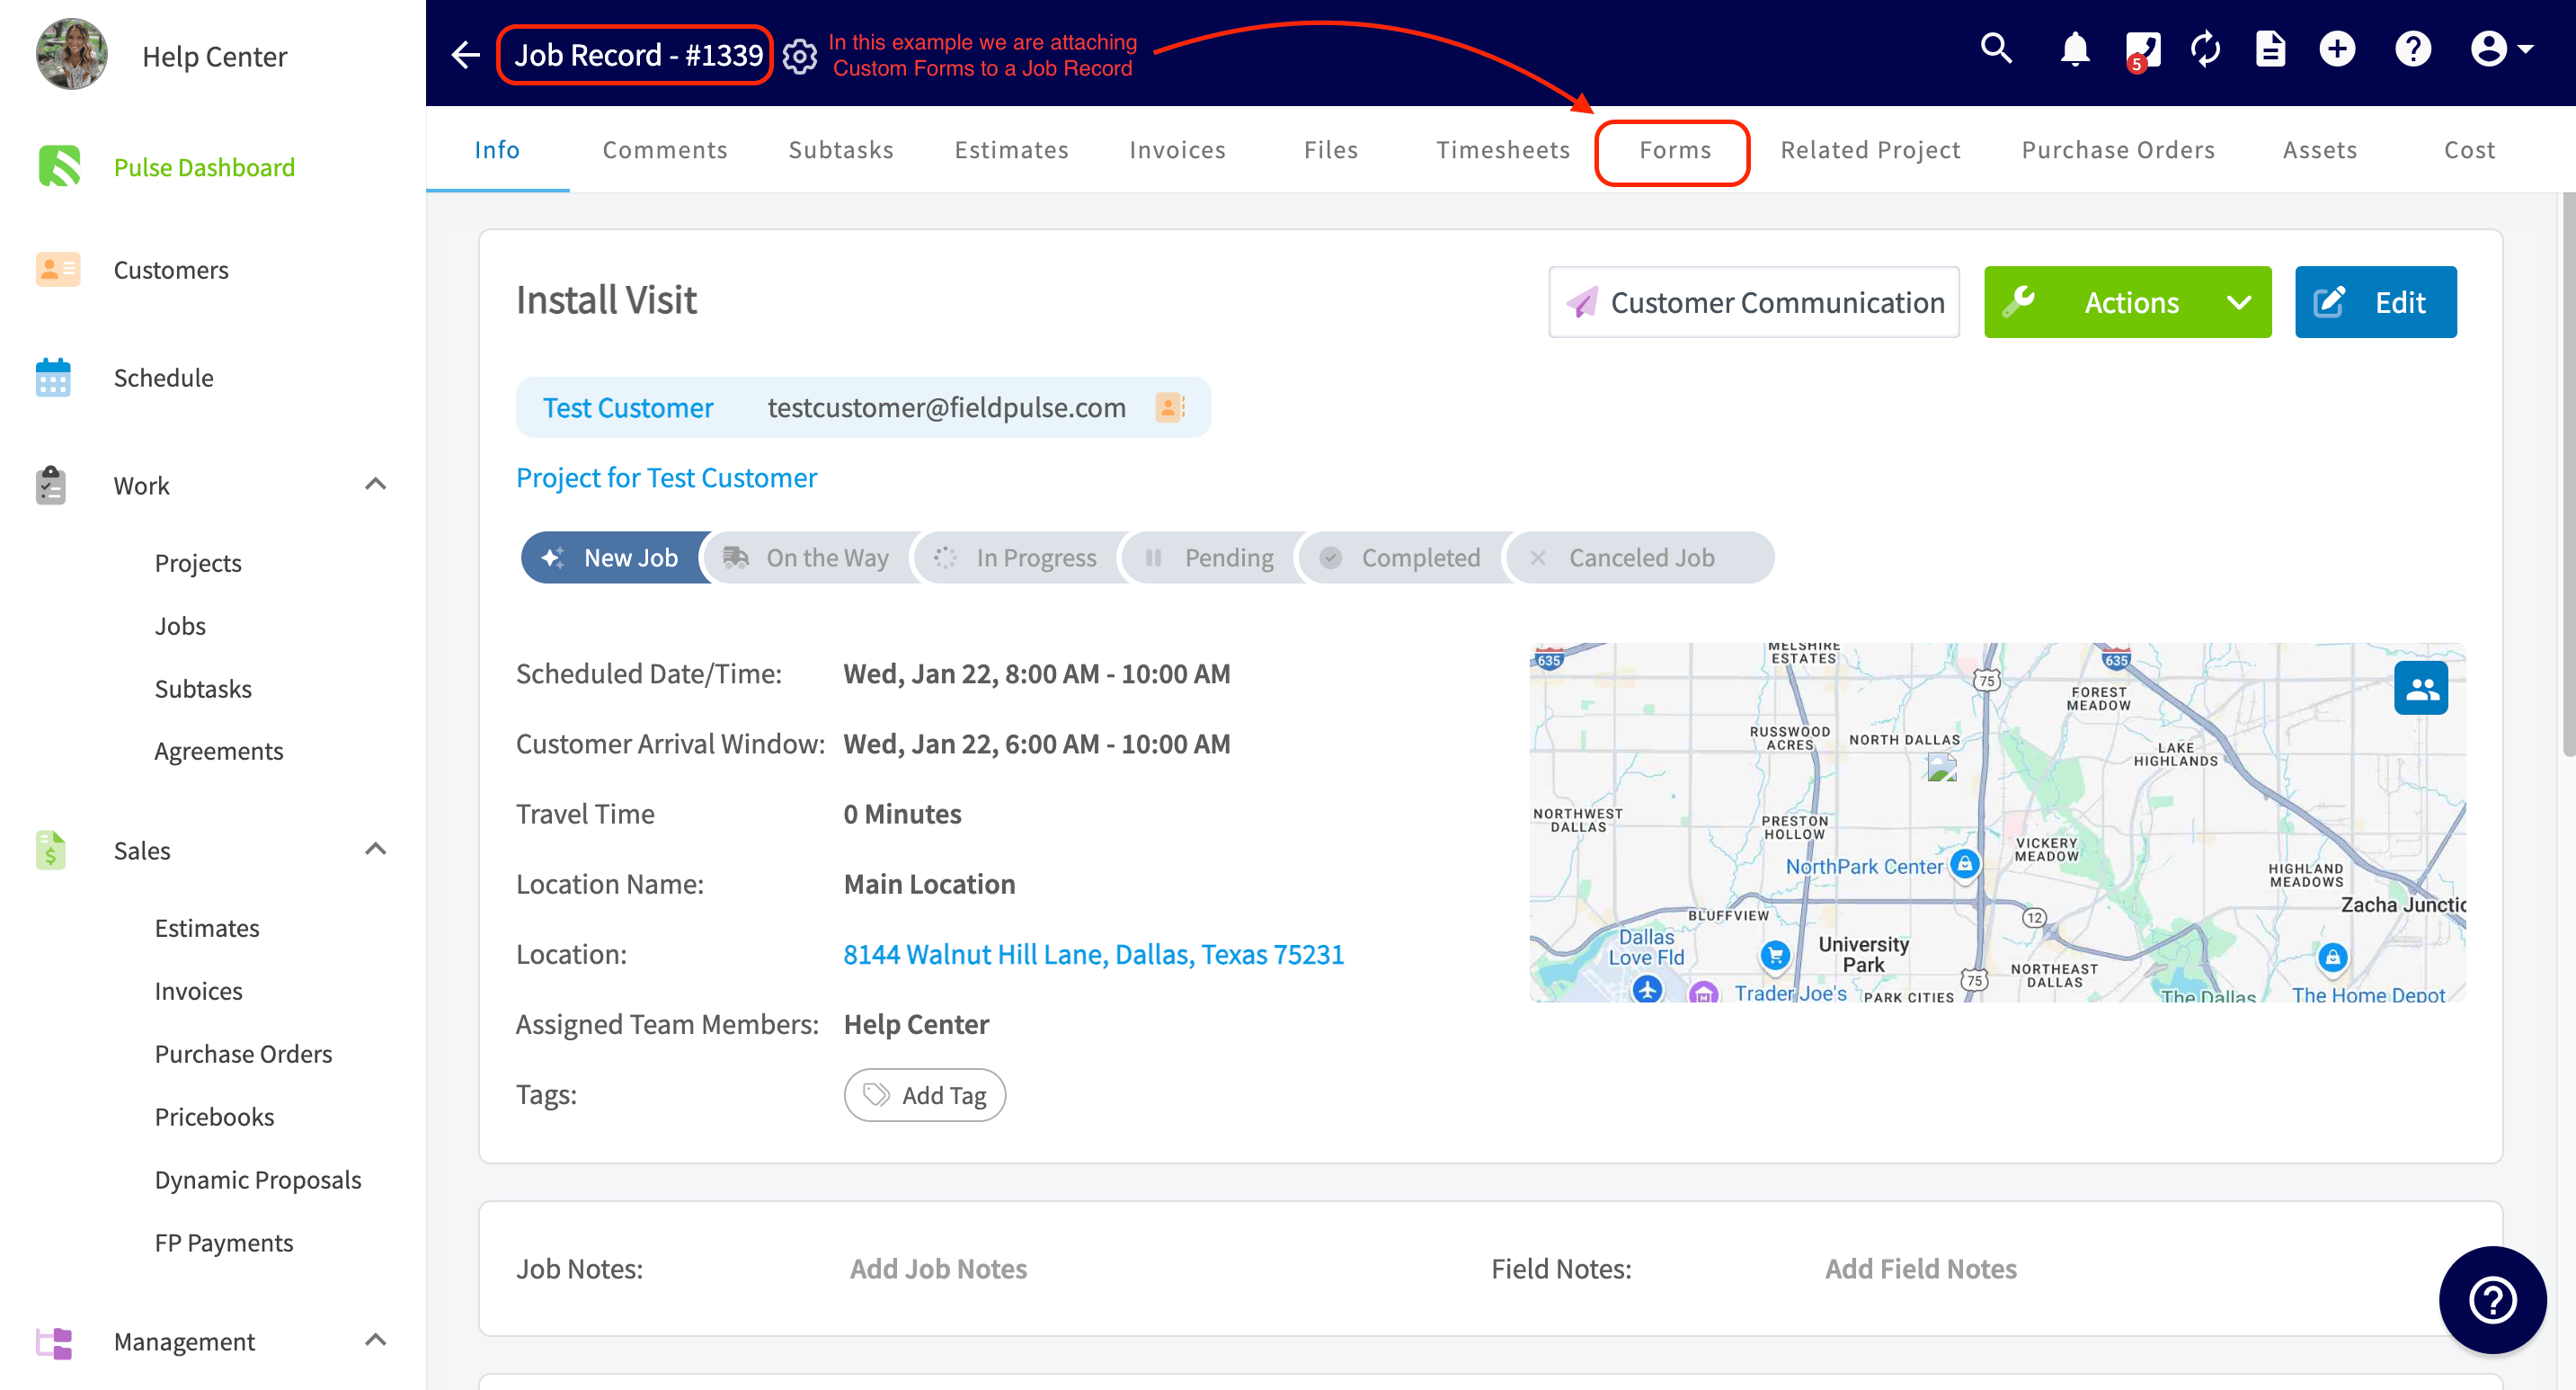
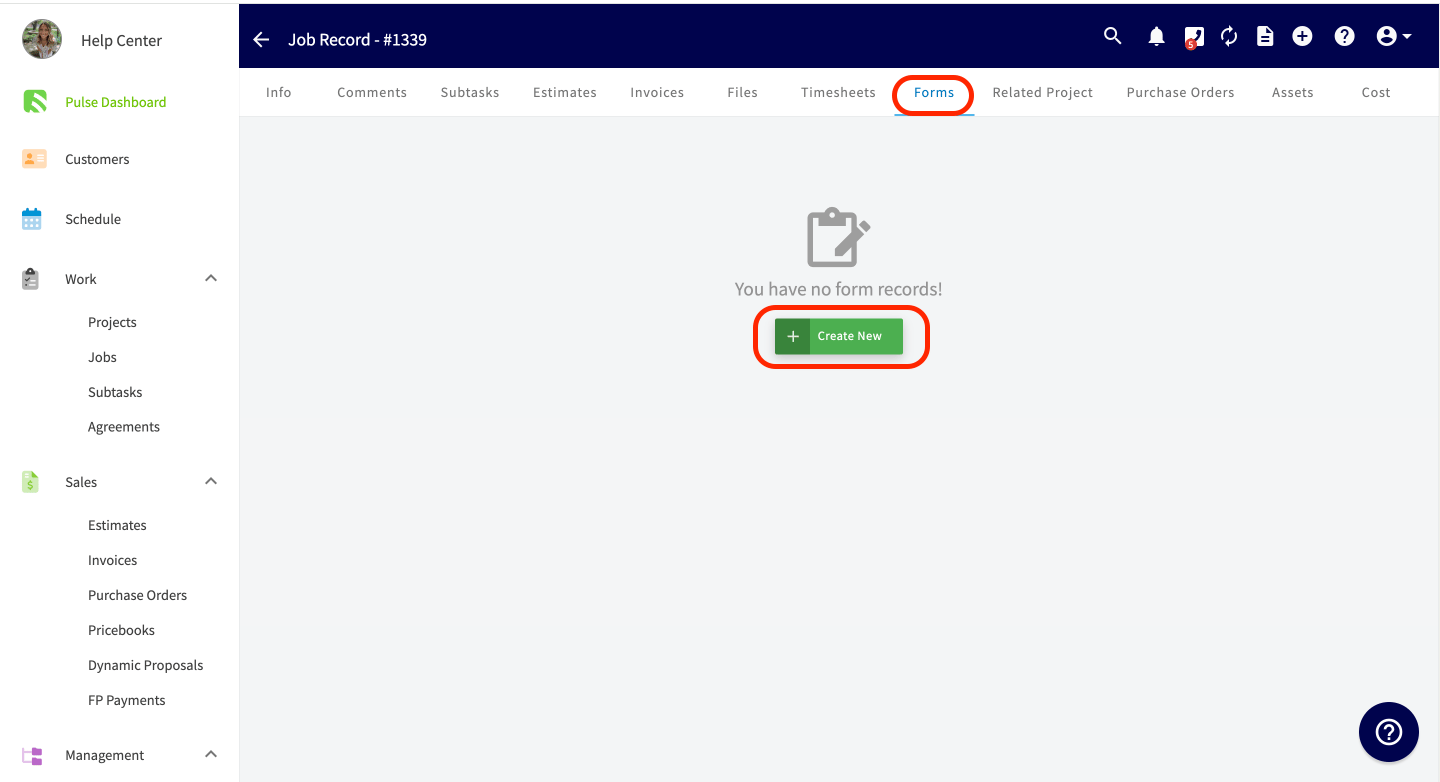
To attach a custom form to a record, begin by clicking on/entering the record where you want to insert and include the form. This could be a customer, job, estimate, or invoice. Once you click on the record, select *Forms* from the top menu, then *Create New*.
* **Design Mode** - You can create and edit a form by dragging and dropping fields.
* **Preview Fill Mode** - You can preview how the form will look when someone is filling it out. You can also choose if a field is editable by a customer or not in this view.
* **Preview Completed Form** - You can preview how the form will look once it has been completely filled out.
***
# Using the Custom Forms You Created
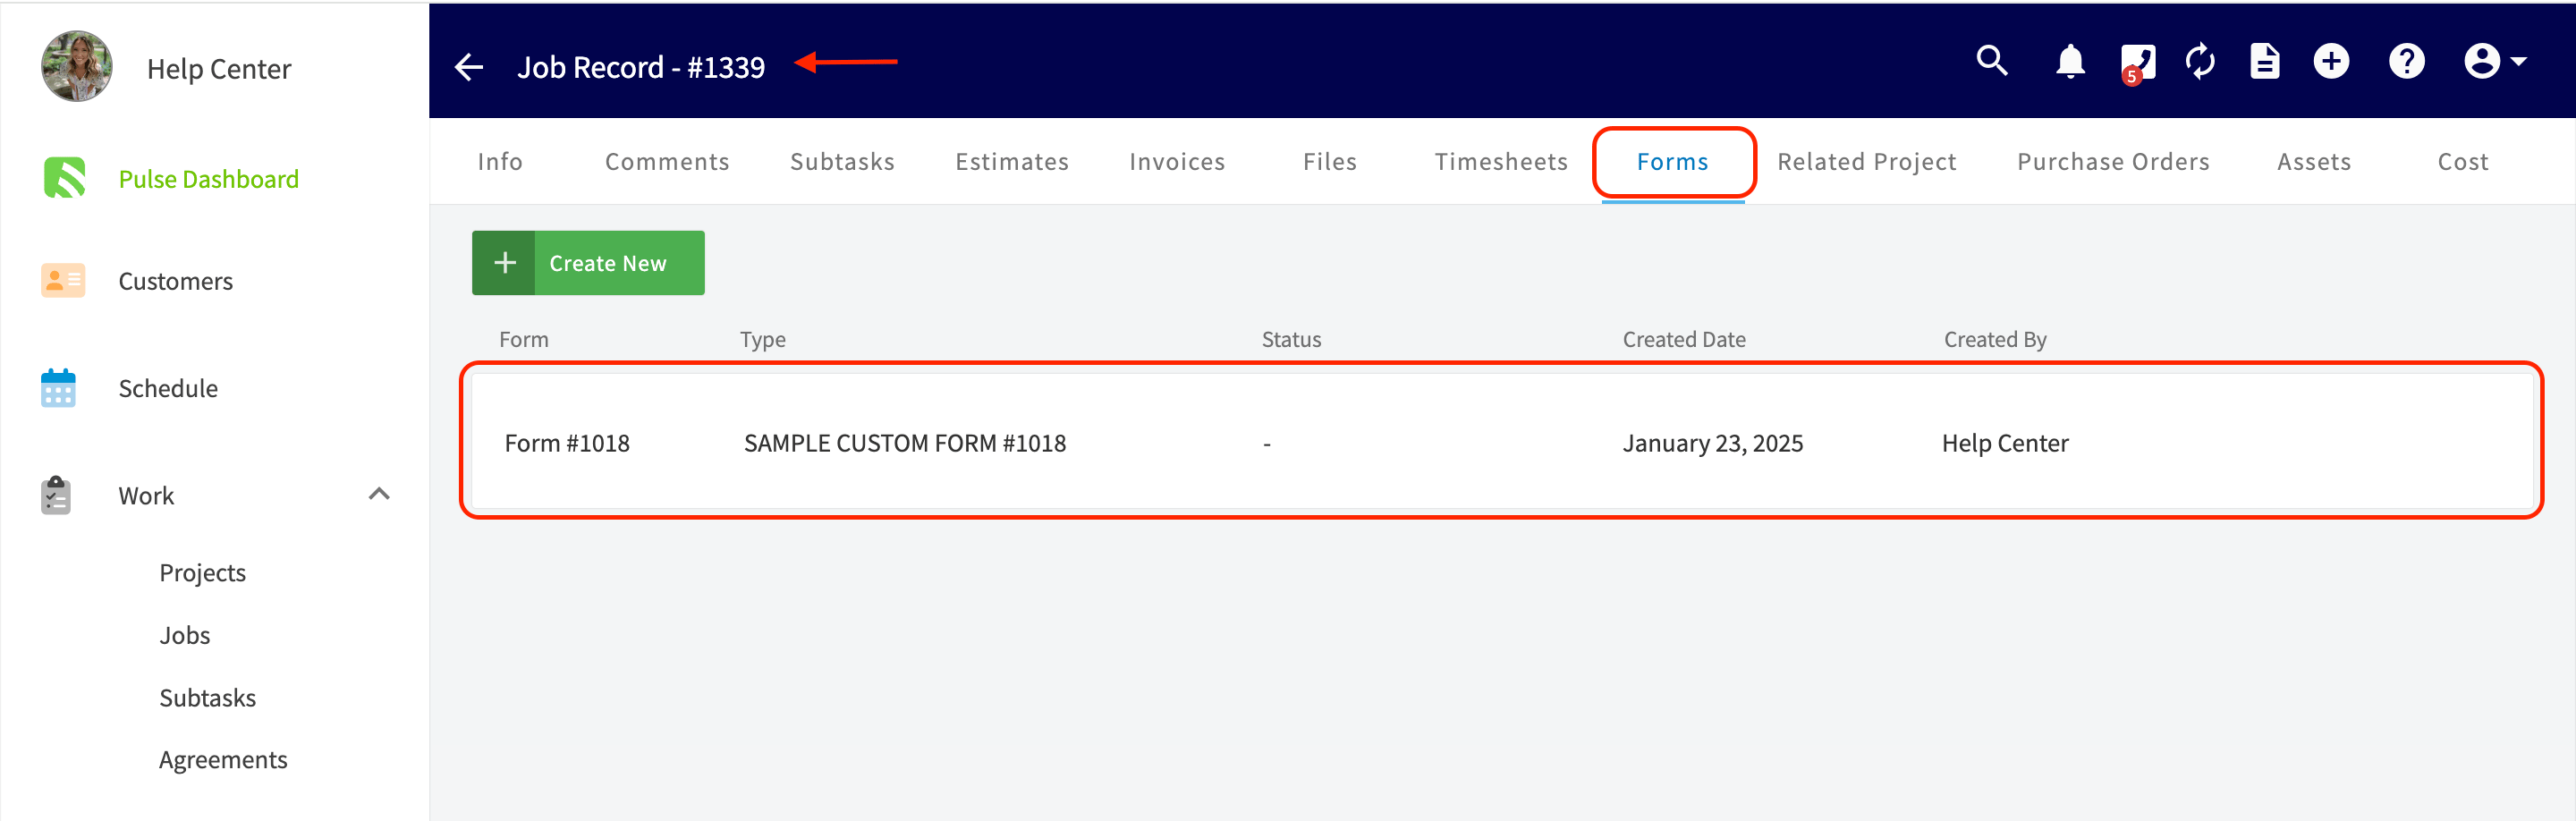
To attach a custom form to a record, begin by clicking on/entering the record where you want to insert and include the form. This could be a customer, job, estimate, or invoice. Once you click on the record, select *Forms* from the top menu, then *Create New*.
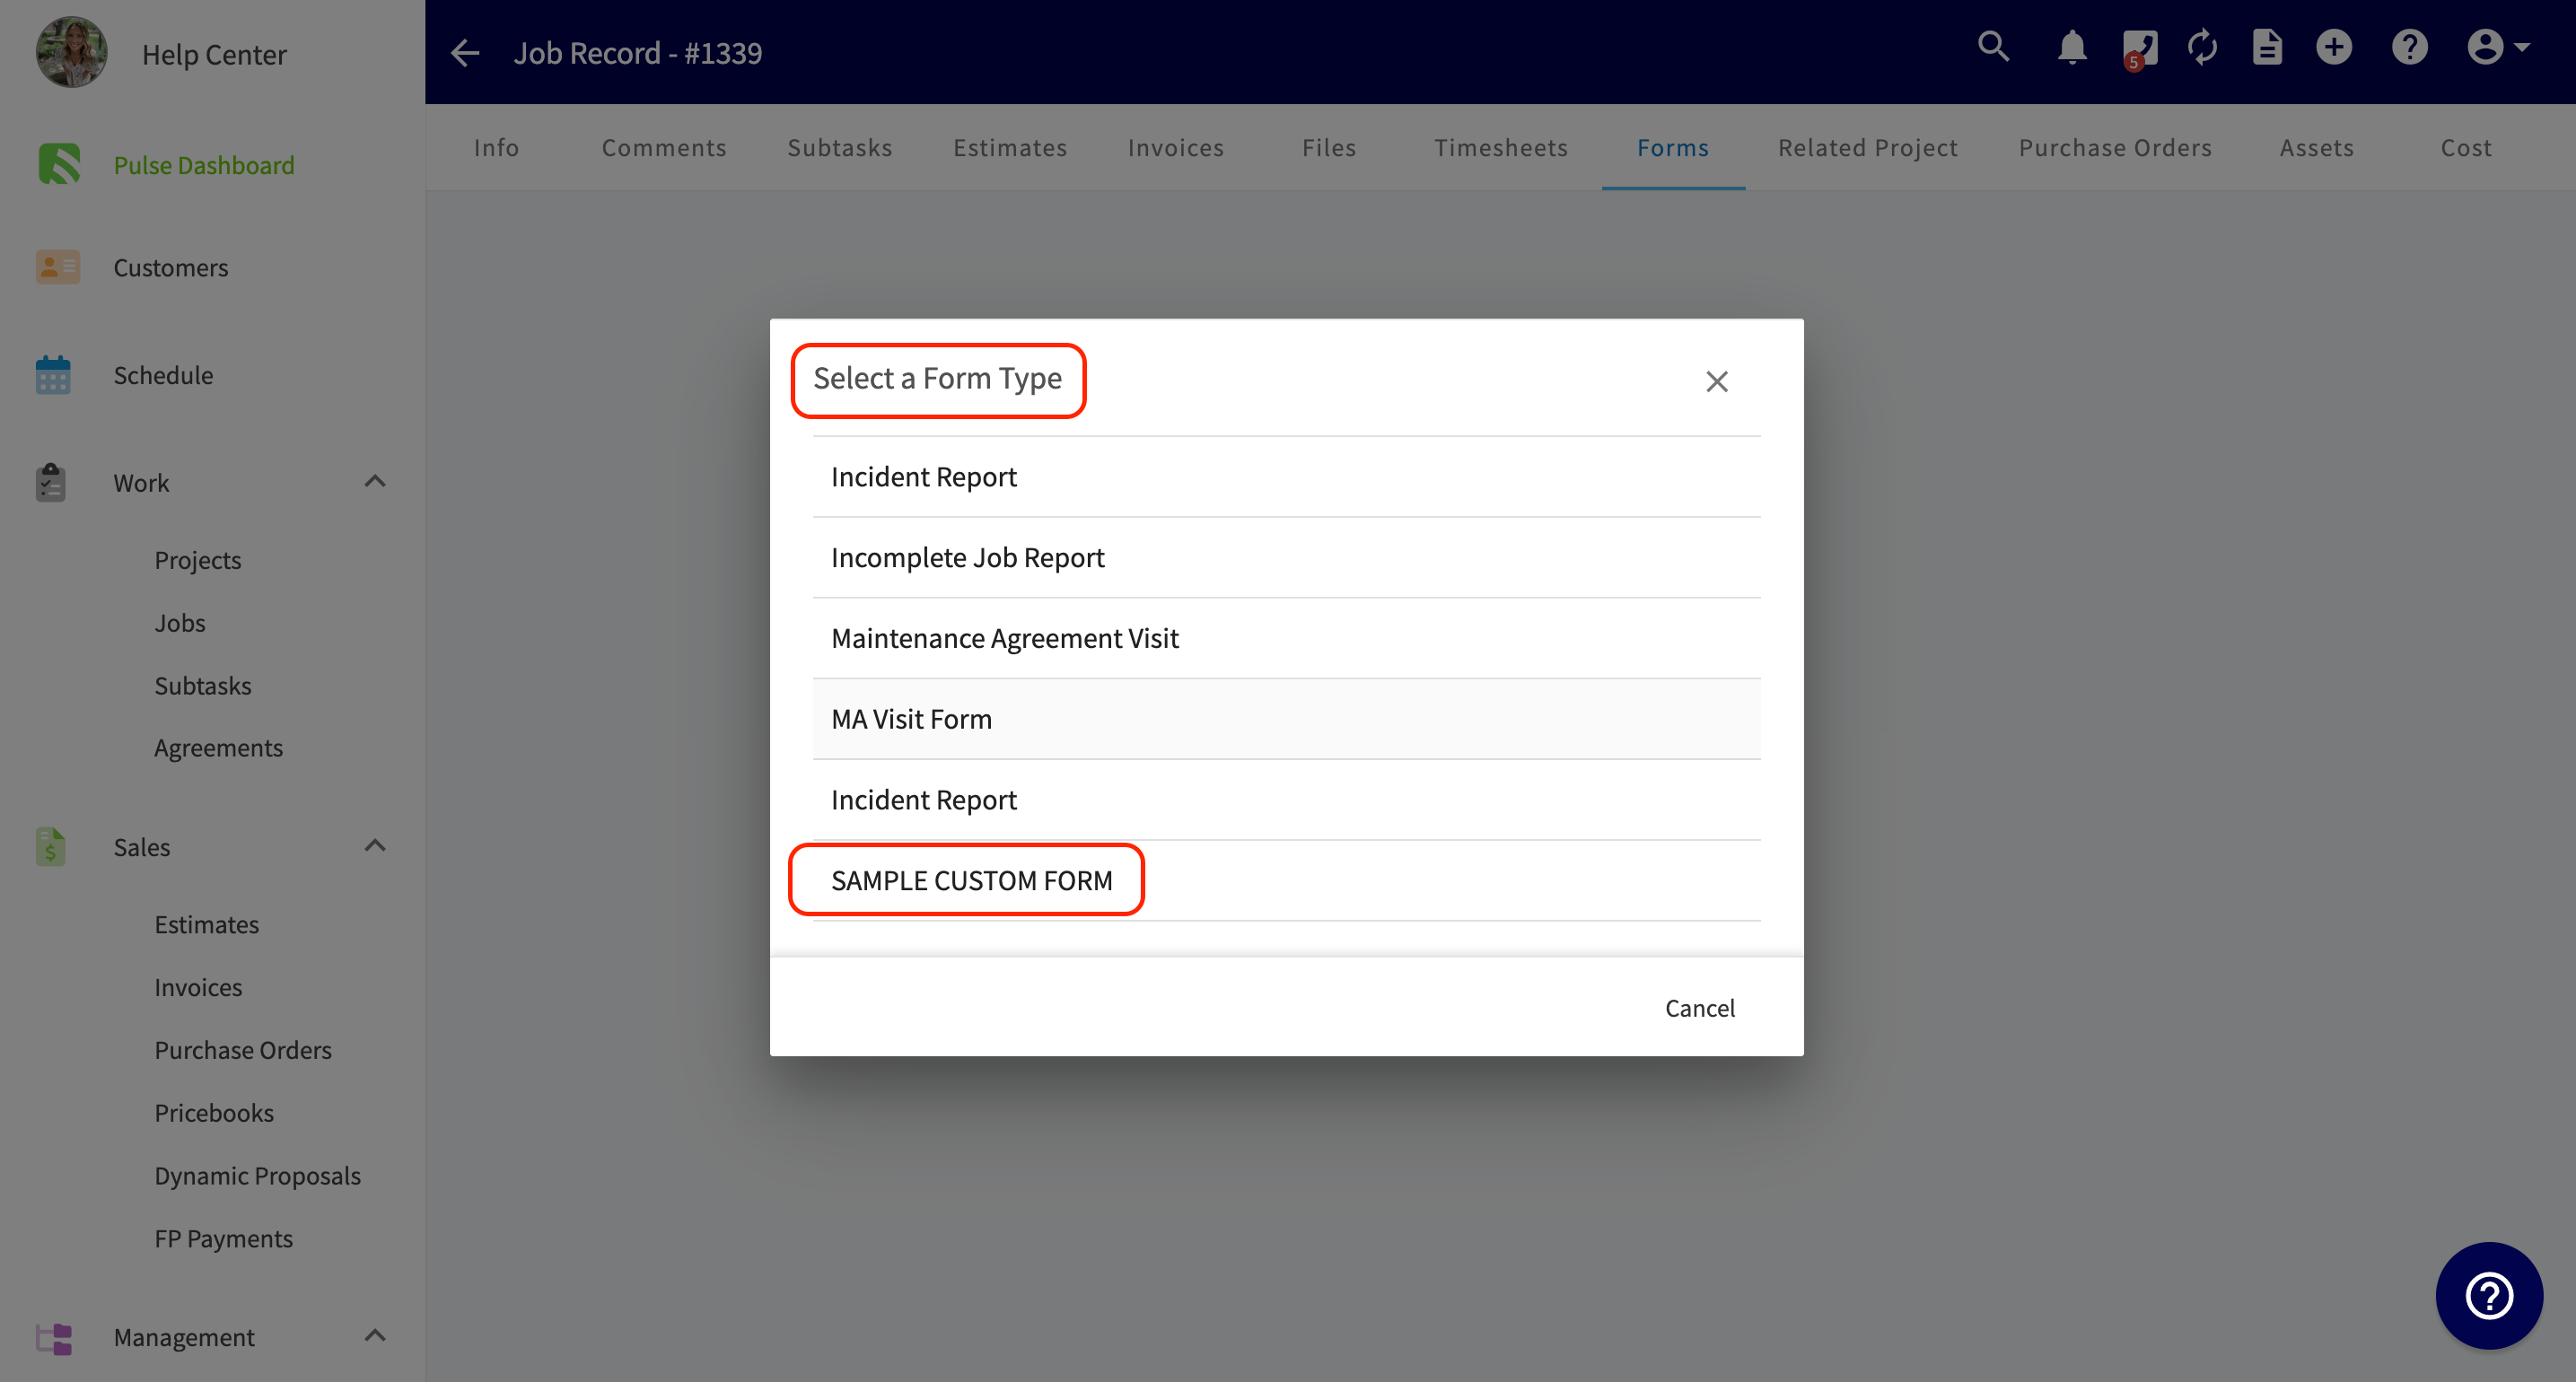
 You will now see a list of all of the custom forms you've created. You can choose which form to attach to this record. In this example, you can see the Custom Form we created titled "SAMPLE CUSTOM FORM" is available to be attached.
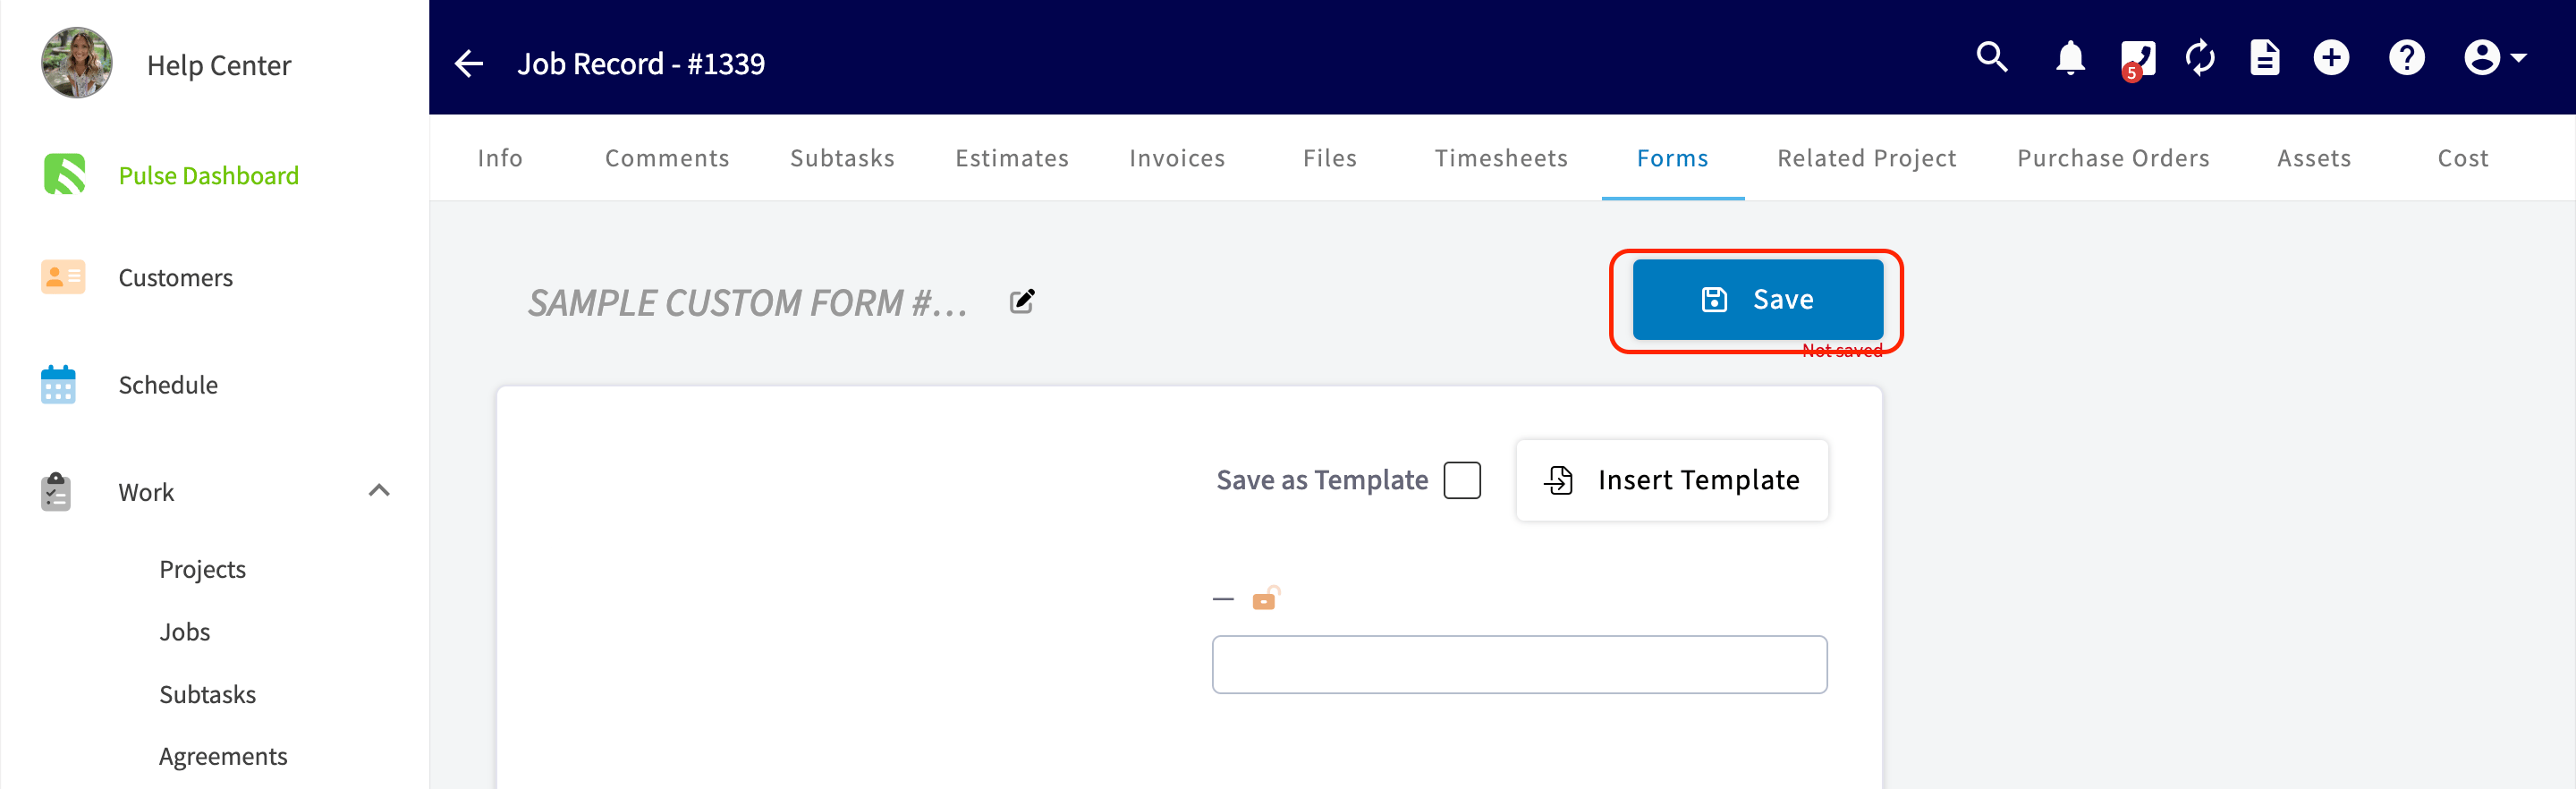
 Now, you can complete the form or save it to the record to be completed at a later date.
 To view the form attached to the record, navigate to the *Forms* tab and click on the applicable form to open it.
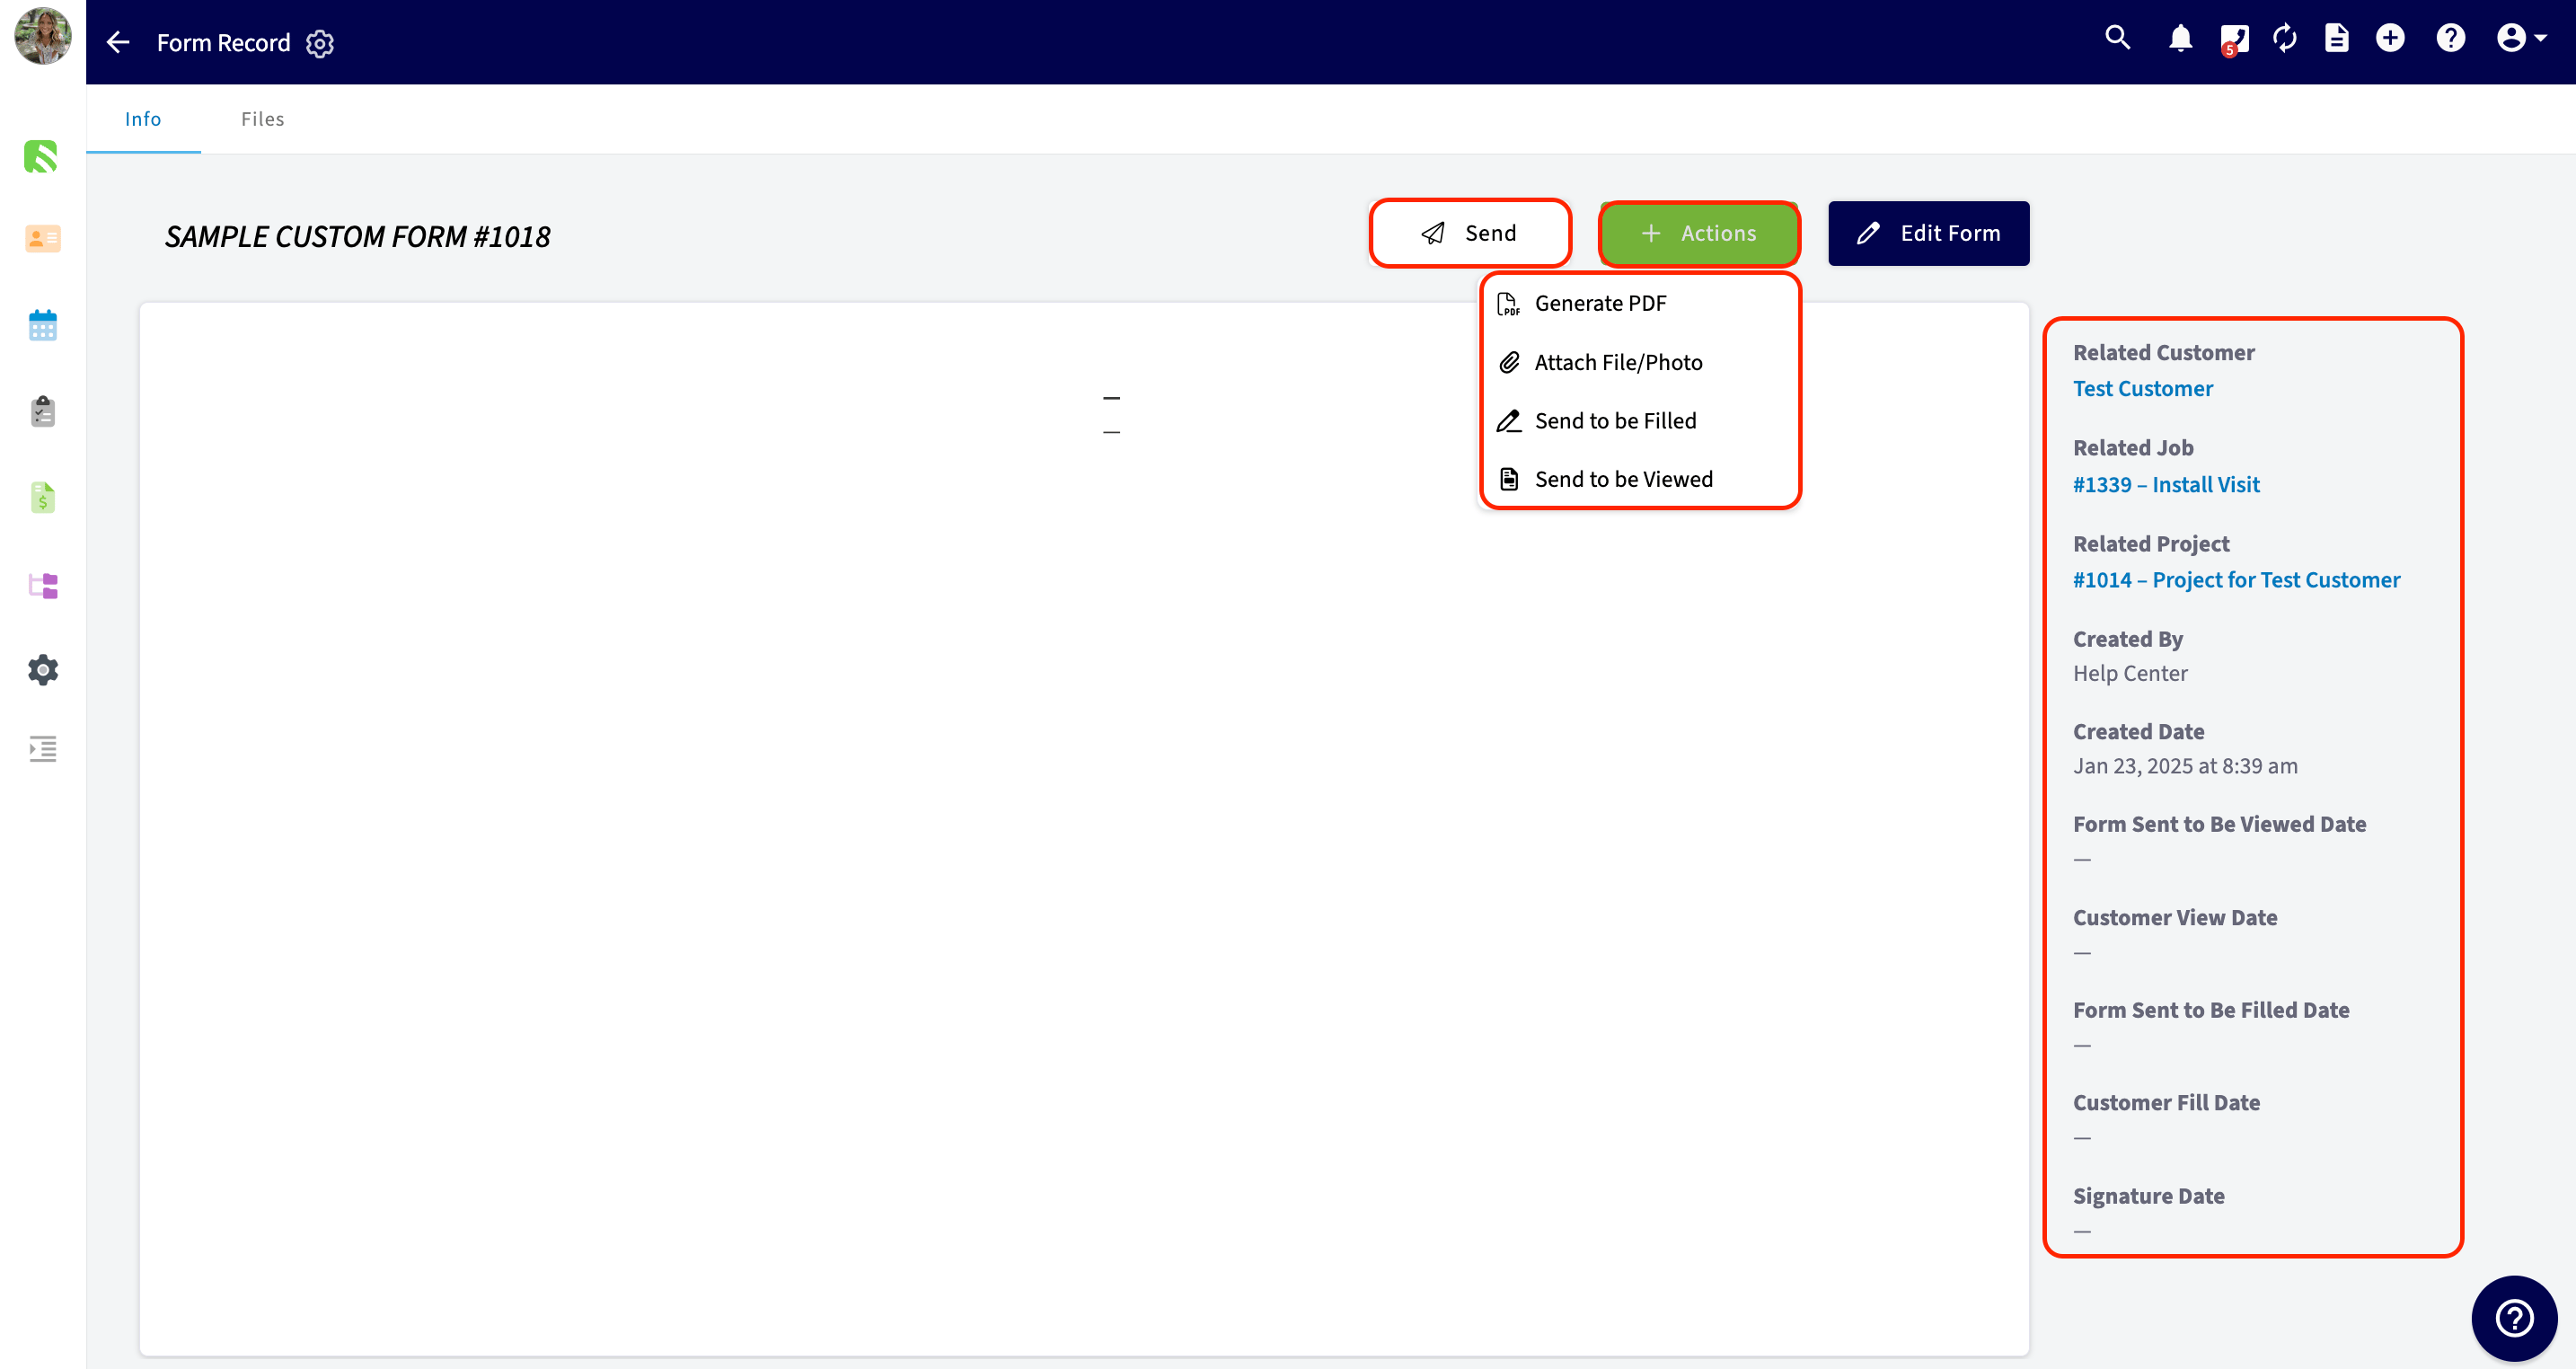
 After clicking into the form, you have the option to attach files, send it to be filled out by your customer, or send it to be viewed by your customer. You can view important details about the form on the right-side of the screen. These details include: the name of the related customer, job, project, who the form was created by, the date it was created, when the form was **sent** to be viewed, when the form was actually viewed, when the form was **sent** to be filled, when the form was actually filled, and a signature date.
 ***
# Custom Form Notifications
When a custom form is filled by your customer or when your customer signs a custom form you can decide how you will be notified. Head to *Company Settings* > *Customer Communications* > *Notification Settings* to make your customizations.
***
# Custom Form Notifications
When a custom form is filled by your customer or when your customer signs a custom form you can decide how you will be notified. Head to *Company Settings* > *Customer Communications* > *Notification Settings* to make your customizations.
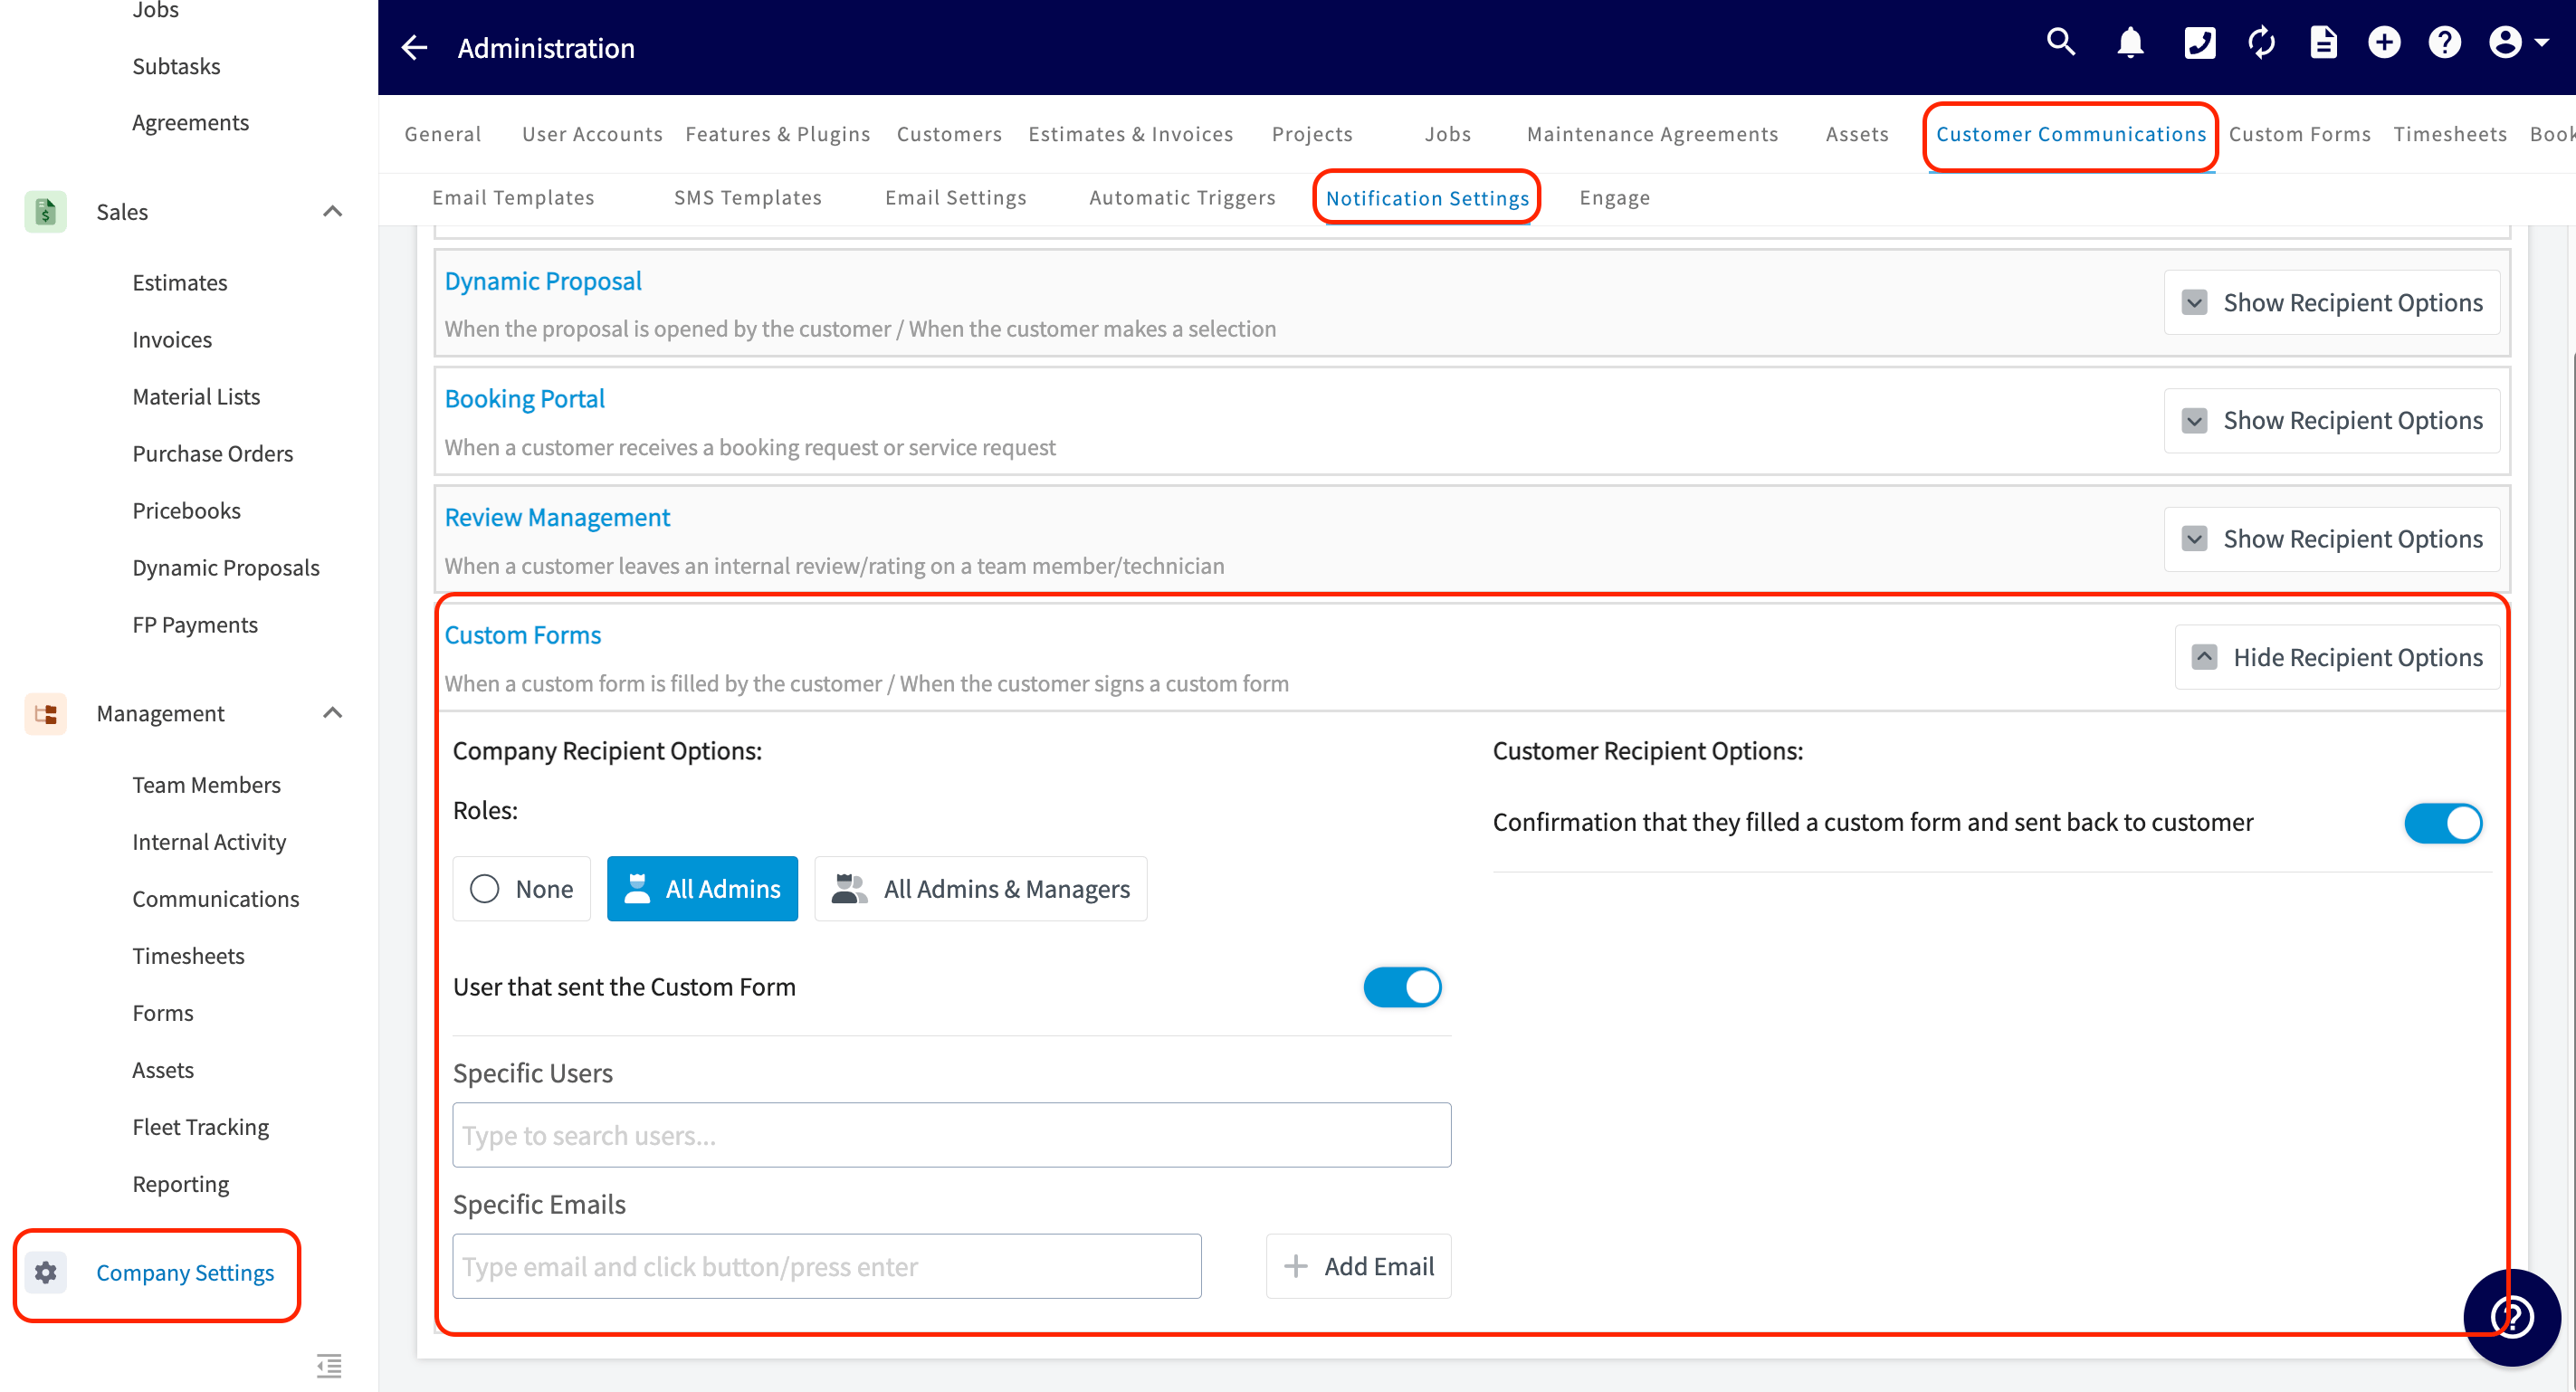 Choose to notify all admin, managers, and/or individual team members. You also have the option to enter in specific email addresses. This would be great if you want to loop in an outside contractor, accountant, or just have a notification emailed to your personal email address.
***
# Customizing PDF Page Layout for Forms
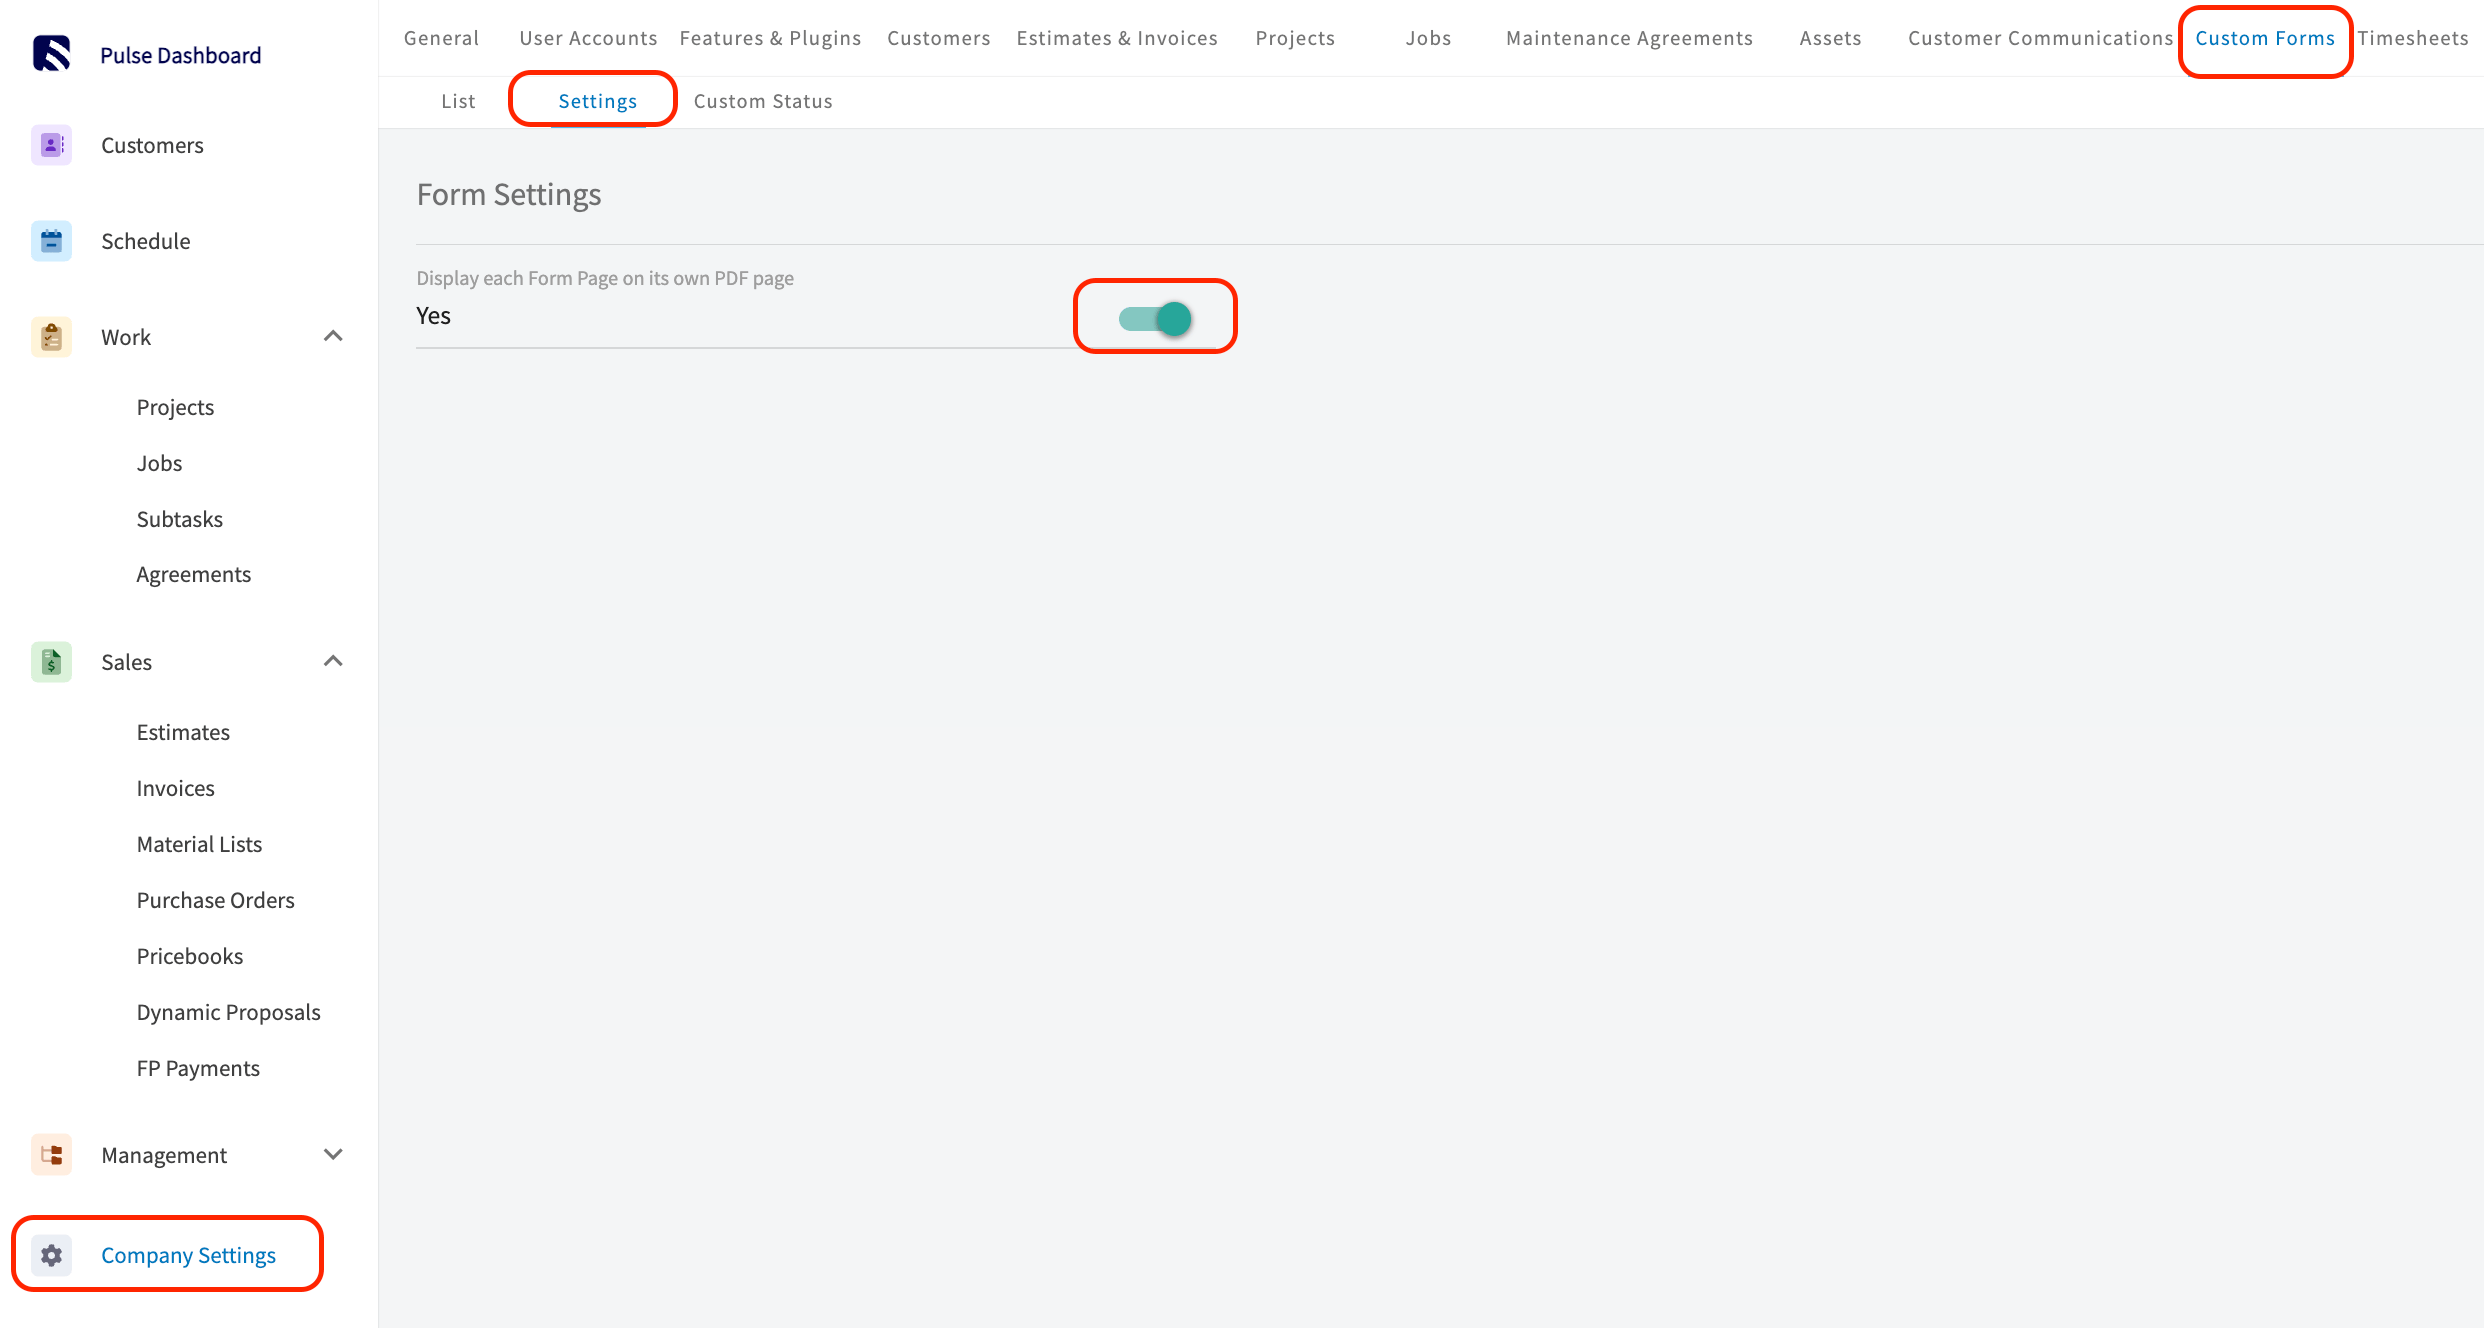
You can now choose to display each form page on its own separate PDF page with page breaks, instead of having all pages flow continuously.
## To enable this feature
1. Navigate to **Company Settings**.
2. Go to the **Custom Forms** tab.
3. Select the **Settings** tab.
4. Toggle the option ON/OFF.
Choose to notify all admin, managers, and/or individual team members. You also have the option to enter in specific email addresses. This would be great if you want to loop in an outside contractor, accountant, or just have a notification emailed to your personal email address.
***
# Customizing PDF Page Layout for Forms
You can now choose to display each form page on its own separate PDF page with page breaks, instead of having all pages flow continuously.
## To enable this feature
1. Navigate to **Company Settings**.
2. Go to the **Custom Forms** tab.
3. Select the **Settings** tab.
4. Toggle the option ON/OFF.
 ***
# Offline Mode for Custom Forms
In Offline Mode, you can open and edit any Custom Forms linked to your Job and Project records. Additionally, you can access and modify these Custom Forms while viewing the associated Customer record.
## **Forms:**
While in Offline Mode, you can access and edit a total of 600 existing forms—200 for each record type: Jobs, Projects, and Customers. You can create as many new drafts as you need without any restrictions. These forms will include those attached to your Job/Service records and Project records **for the current work week.**
### **Form Templates:**
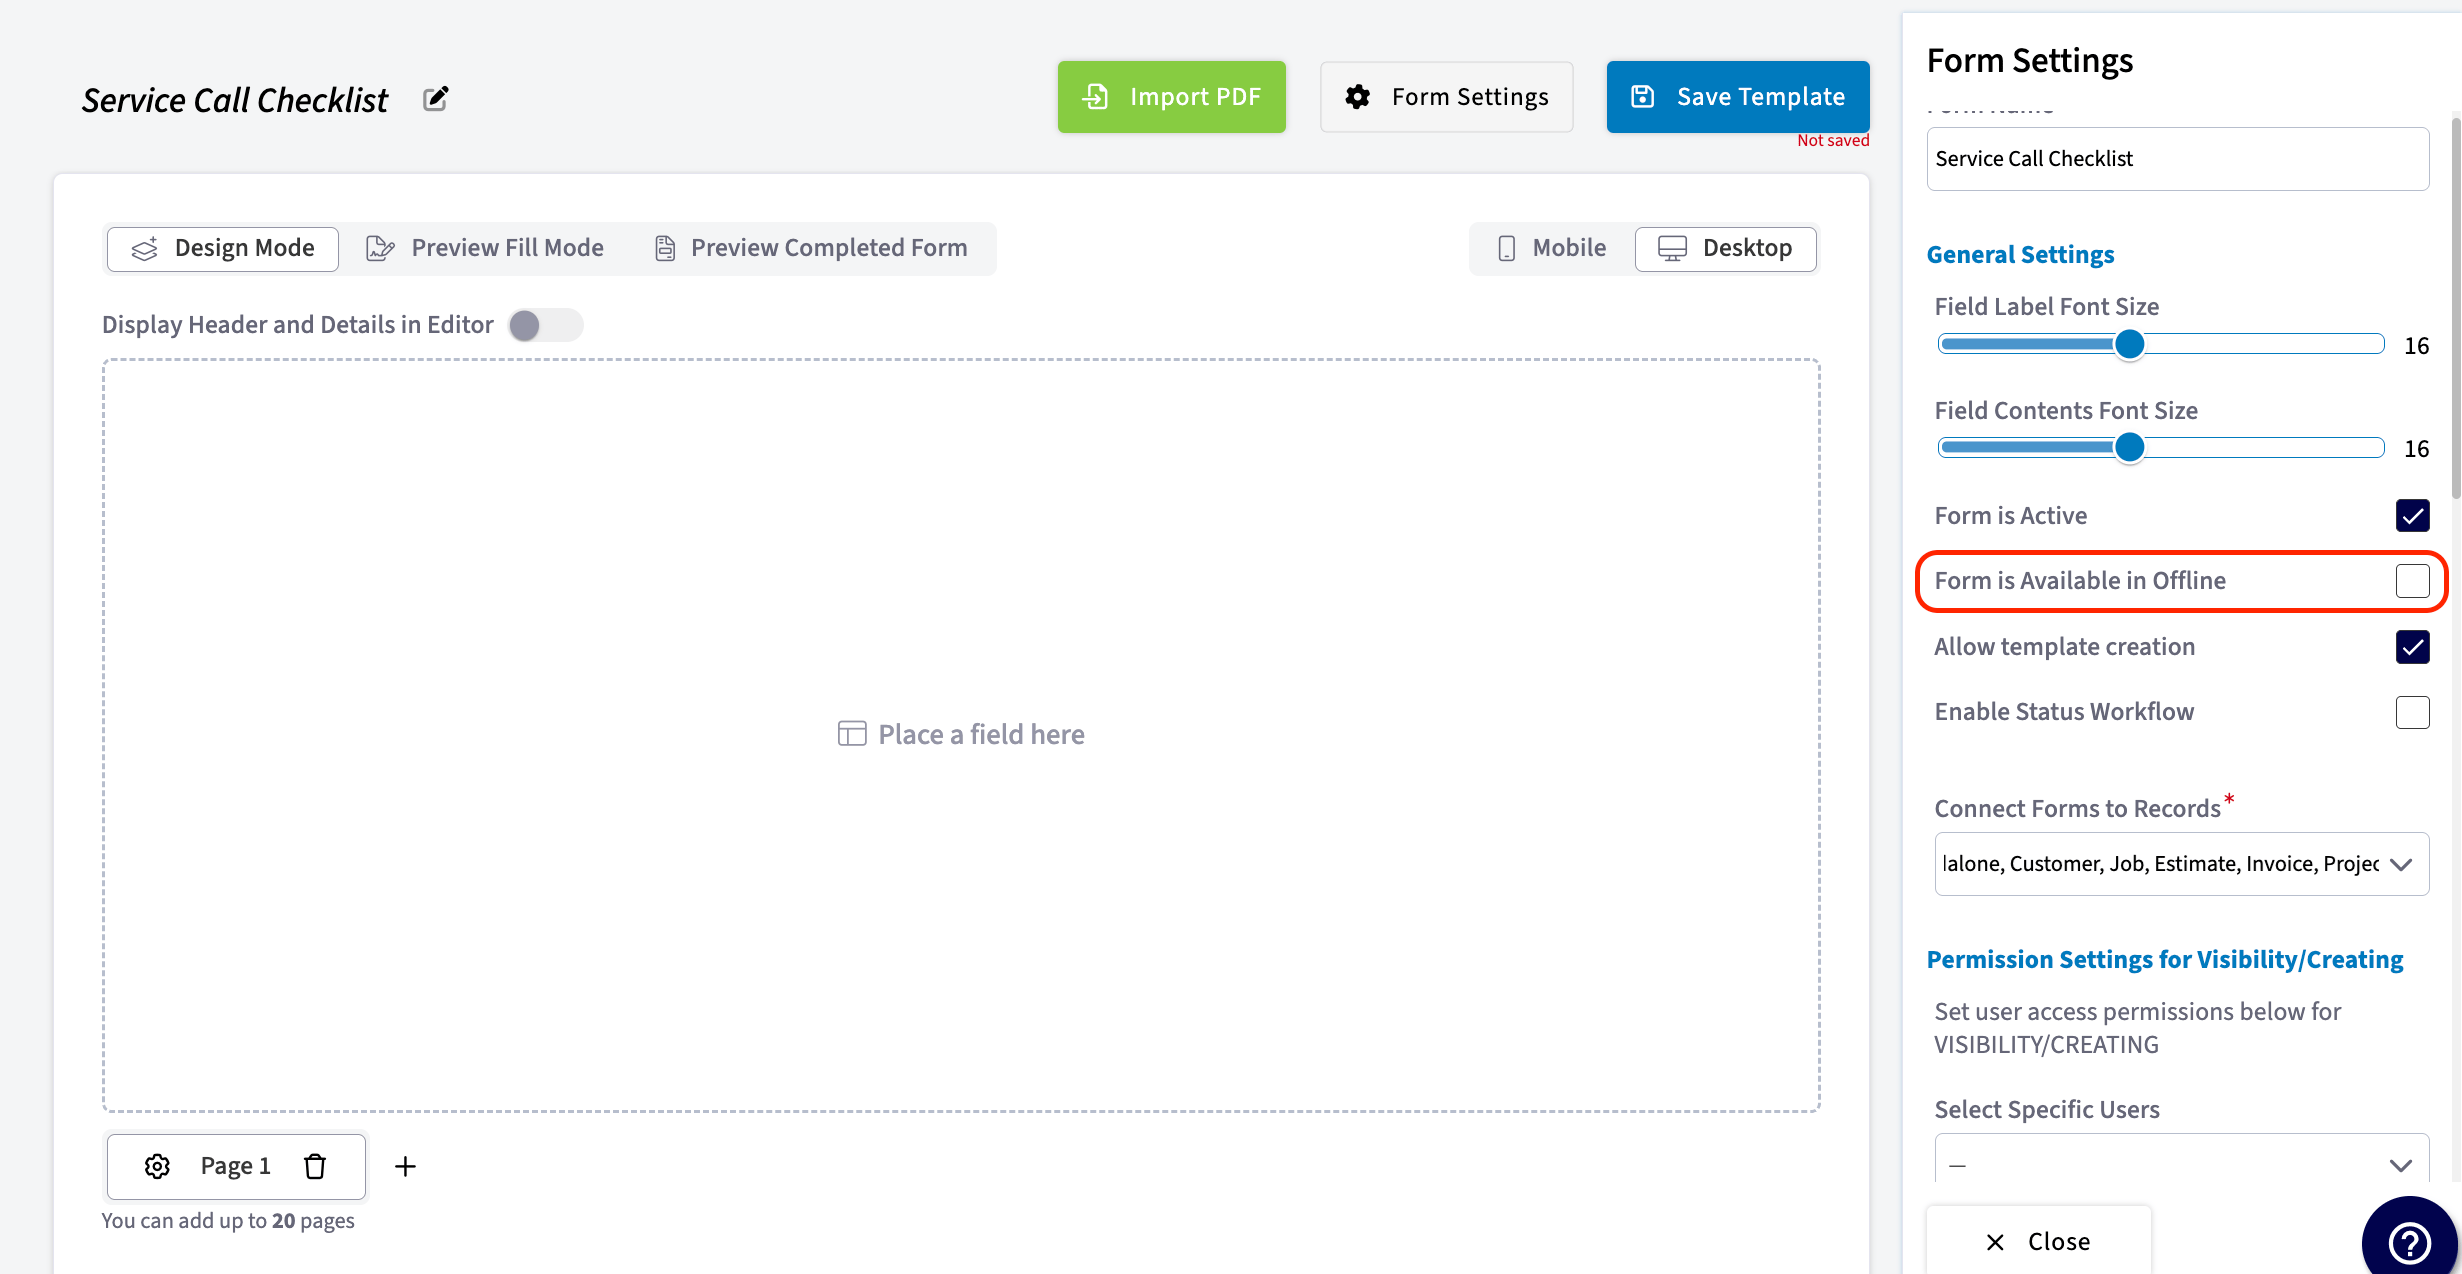
Twenty Custom Form templates will be available for use in Offline Mode. In the Settings of each Custom Form, you can specify which templates you want to make available by toggling the switch on or off.
***
# Offline Mode for Custom Forms
In Offline Mode, you can open and edit any Custom Forms linked to your Job and Project records. Additionally, you can access and modify these Custom Forms while viewing the associated Customer record.
## **Forms:**
While in Offline Mode, you can access and edit a total of 600 existing forms—200 for each record type: Jobs, Projects, and Customers. You can create as many new drafts as you need without any restrictions. These forms will include those attached to your Job/Service records and Project records **for the current work week.**
### **Form Templates:**
Twenty Custom Form templates will be available for use in Offline Mode. In the Settings of each Custom Form, you can specify which templates you want to make available by toggling the switch on or off.
 ### **Making Edits and Creating New Forms:**
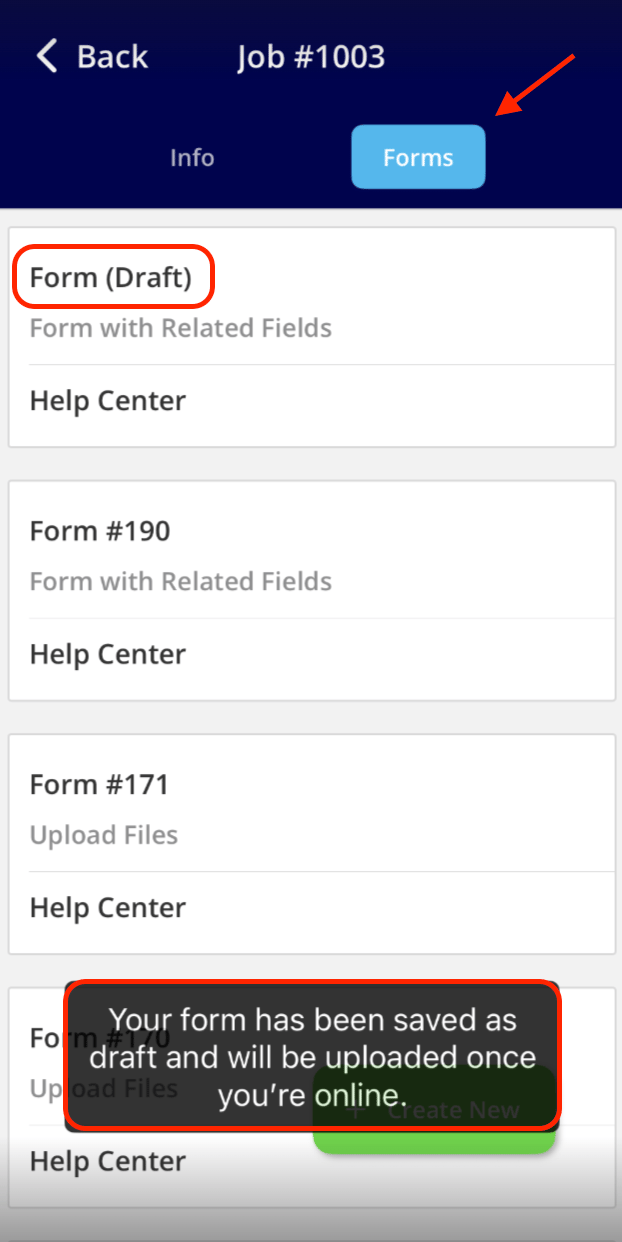
In Offline Mode, any edits made or new forms created will be labeled as *Offline Drafts*. Once you reconnect to the internet, the forms you've edited or created will be permanently saved, and the *Offline Draft* label will be removed. If multiple users make updates to forms in Offline Mode, the system will apply updates in the order that users return to Online Mode. For example, if User 1 makes updates and then returns online, their updates will be applied first. If User 2 then makes updates and returns online, their updates will be applied next.
### **Making Edits and Creating New Forms:**
In Offline Mode, any edits made or new forms created will be labeled as *Offline Drafts*. Once you reconnect to the internet, the forms you've edited or created will be permanently saved, and the *Offline Draft* label will be removed. If multiple users make updates to forms in Offline Mode, the system will apply updates in the order that users return to Online Mode. For example, if User 1 makes updates and then returns online, their updates will be applied first. If User 2 then makes updates and returns online, their updates will be applied next.
 ### **Related Fields on a Custom Form:**
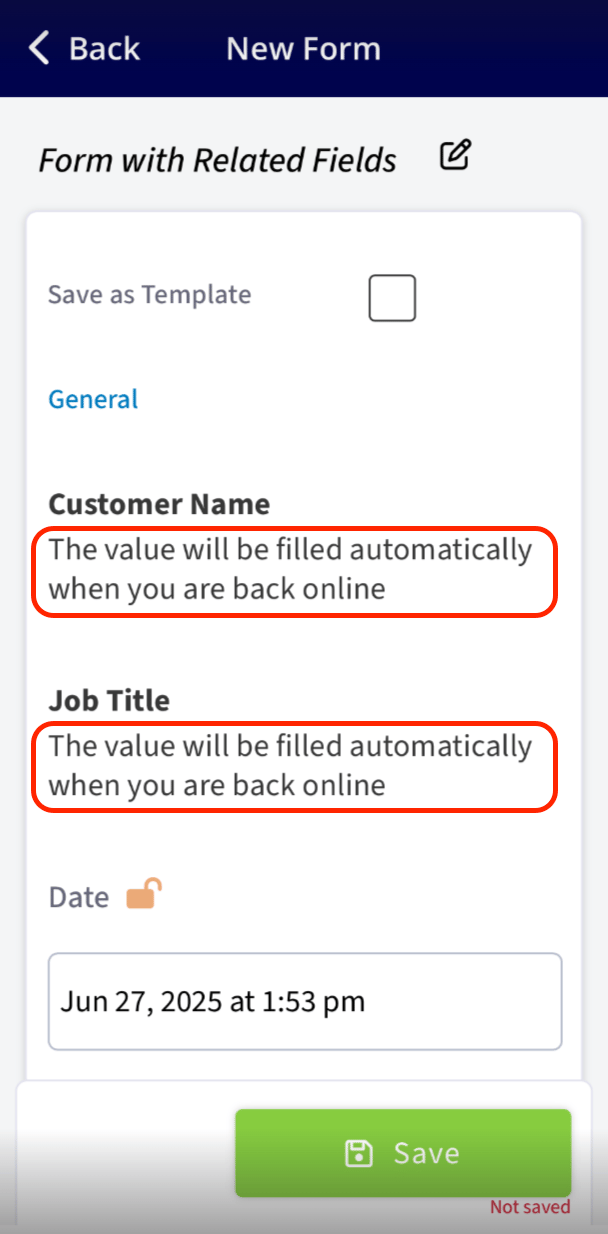
In Offline Mode, related field values will not automatically populate. Instead, you will see the message: *Value will be automatically filled when Online* in the text box/field. Once you reconnect to the internet, these field values will automatically populate with the appropriate information.
### **Related Fields on a Custom Form:**
In Offline Mode, related field values will not automatically populate. Instead, you will see the message: *Value will be automatically filled when Online* in the text box/field. Once you reconnect to the internet, these field values will automatically populate with the appropriate information.
 ### **Adding Photos and Videos to a Custom Form:**
No need to worry—you can still add photos and video files to your Custom Forms while in Offline Mode. They will be uploaded automatically once you reconnect to the internet.
***
# Video Tutorial
***
**Have additional questions?**
*Contact us at [support@fieldpulse.com](mailto:support@fieldpulse.com) or use the chat feature in the bottom right corner of your screen.*
### **Adding Photos and Videos to a Custom Form:**
No need to worry—you can still add photos and video files to your Custom Forms while in Offline Mode. They will be uploaded automatically once you reconnect to the internet.
***
# Video Tutorial
***
**Have additional questions?**
*Contact us at [support@fieldpulse.com](mailto:support@fieldpulse.com) or use the chat feature in the bottom right corner of your screen.*