> ## Documentation Index
> Fetch the complete documentation index at: https://help.fieldpulse.com/llms.txt
> Use this file to discover all available pages before exploring further.
# Get Started as a Field Technician
> Run the full job loop from your FieldPulse mobile app: get dispatched, do the work, invoice, get paid, and keep working offline.
# Welcome to FieldPulse
As a Service Agent (Technician), most of your day happens in the mobile app. This page walks you through the full loop from getting dispatched to closing out the paperwork, plus what to do when you lose signal. Follow the steps in order and you'll have everything you need to run a job.
Everything below is written for the mobile app, since that's where most Technicians live day to day. Your Admin controls exactly which of these actions you have access to — see the [Service Agent permissions](https://help.fieldpulse.com/using-fieldpulse/users-teams/user-roles#service-agent) if something looks different on your account.
## Get the Job
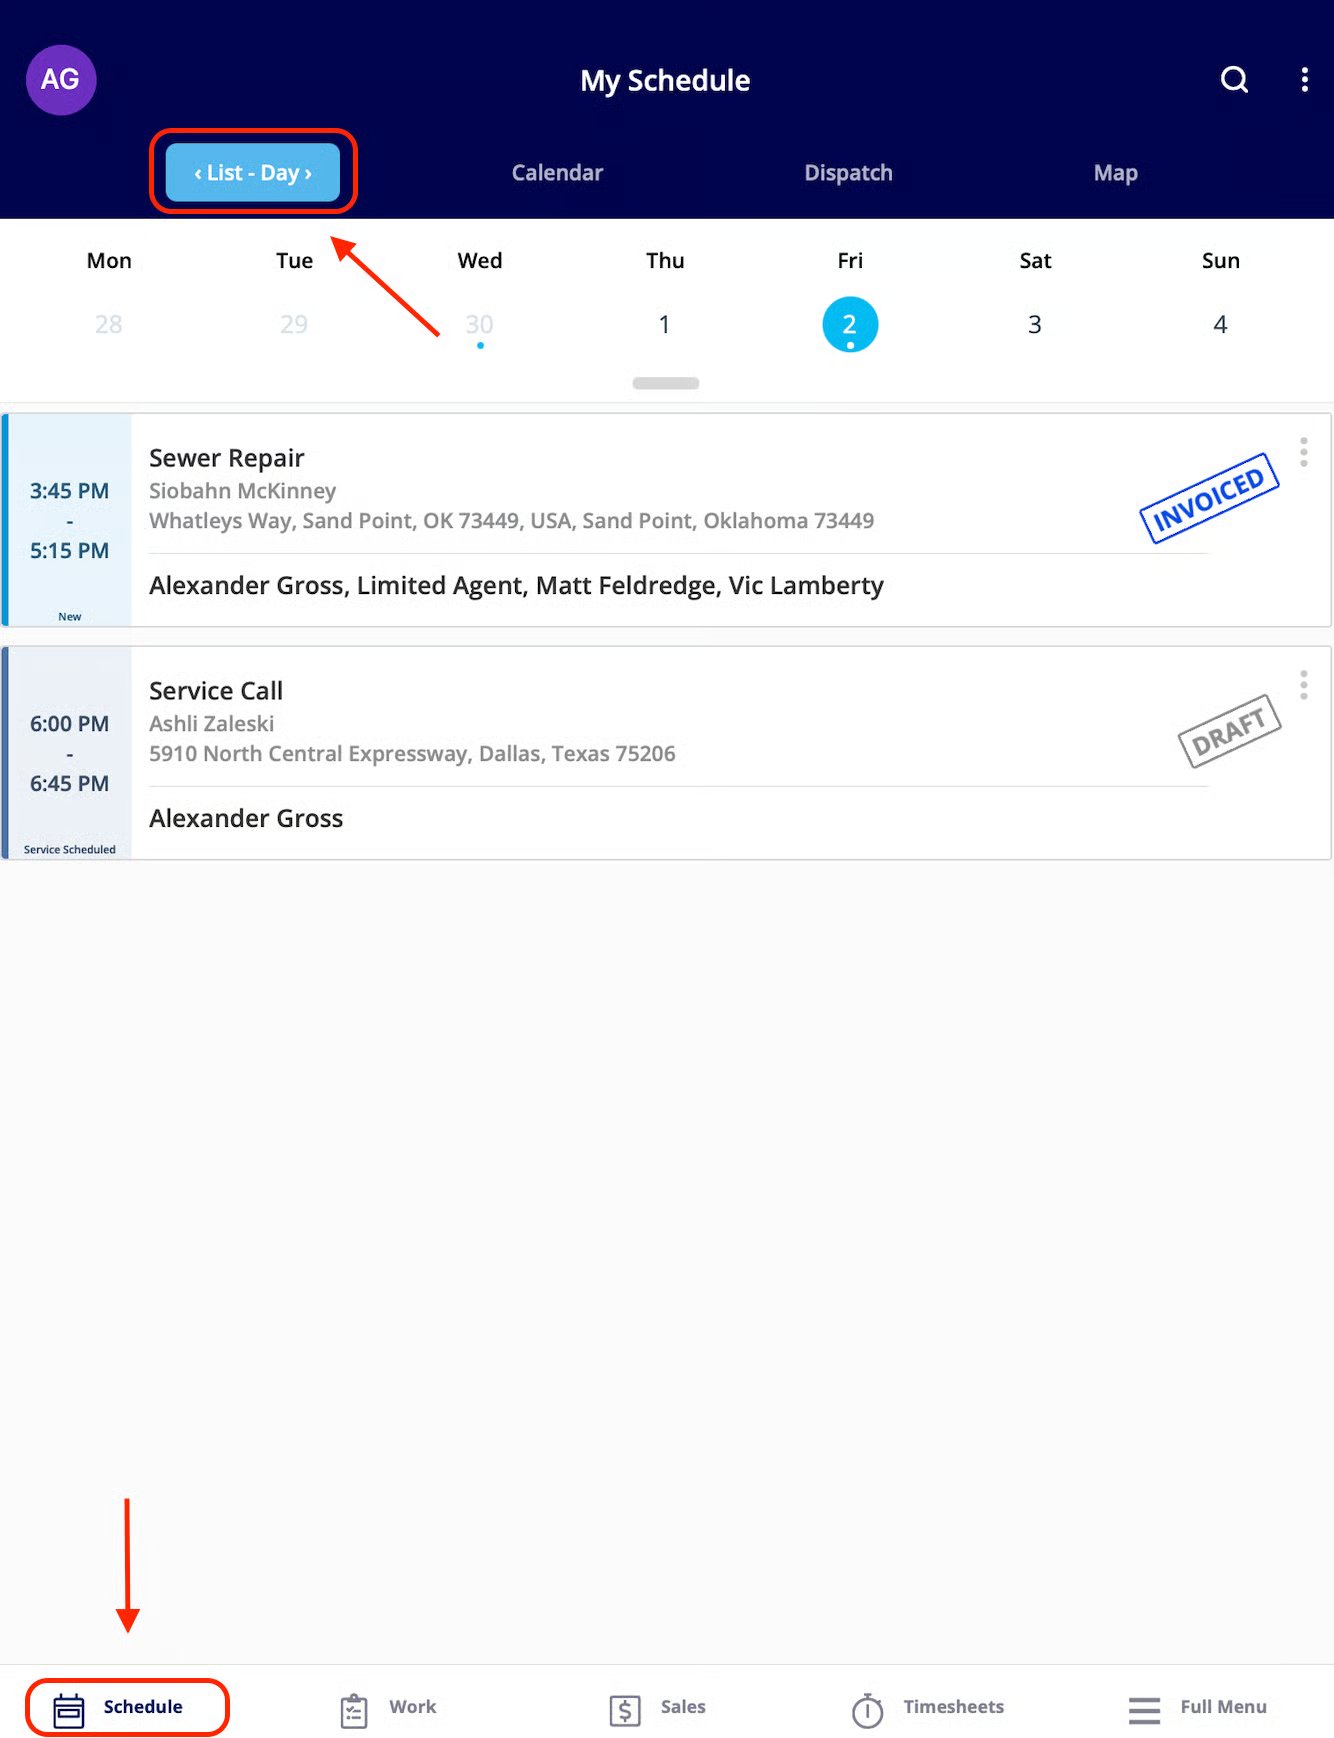
Open the *Schedule* or *Work* tab in the bottom menu to see your assigned jobs. Tap a job to open its full record, where you'll find:
* **Customer Details:** name and address
* **Notes:** internal notes, highlighted in yellow
* **Tags:** existing job tags, or add your own
 **Read more:** [Completing a Job](https://help.fieldpulse.com/using-fieldpulse/work/completing-a-job)
## Head Out
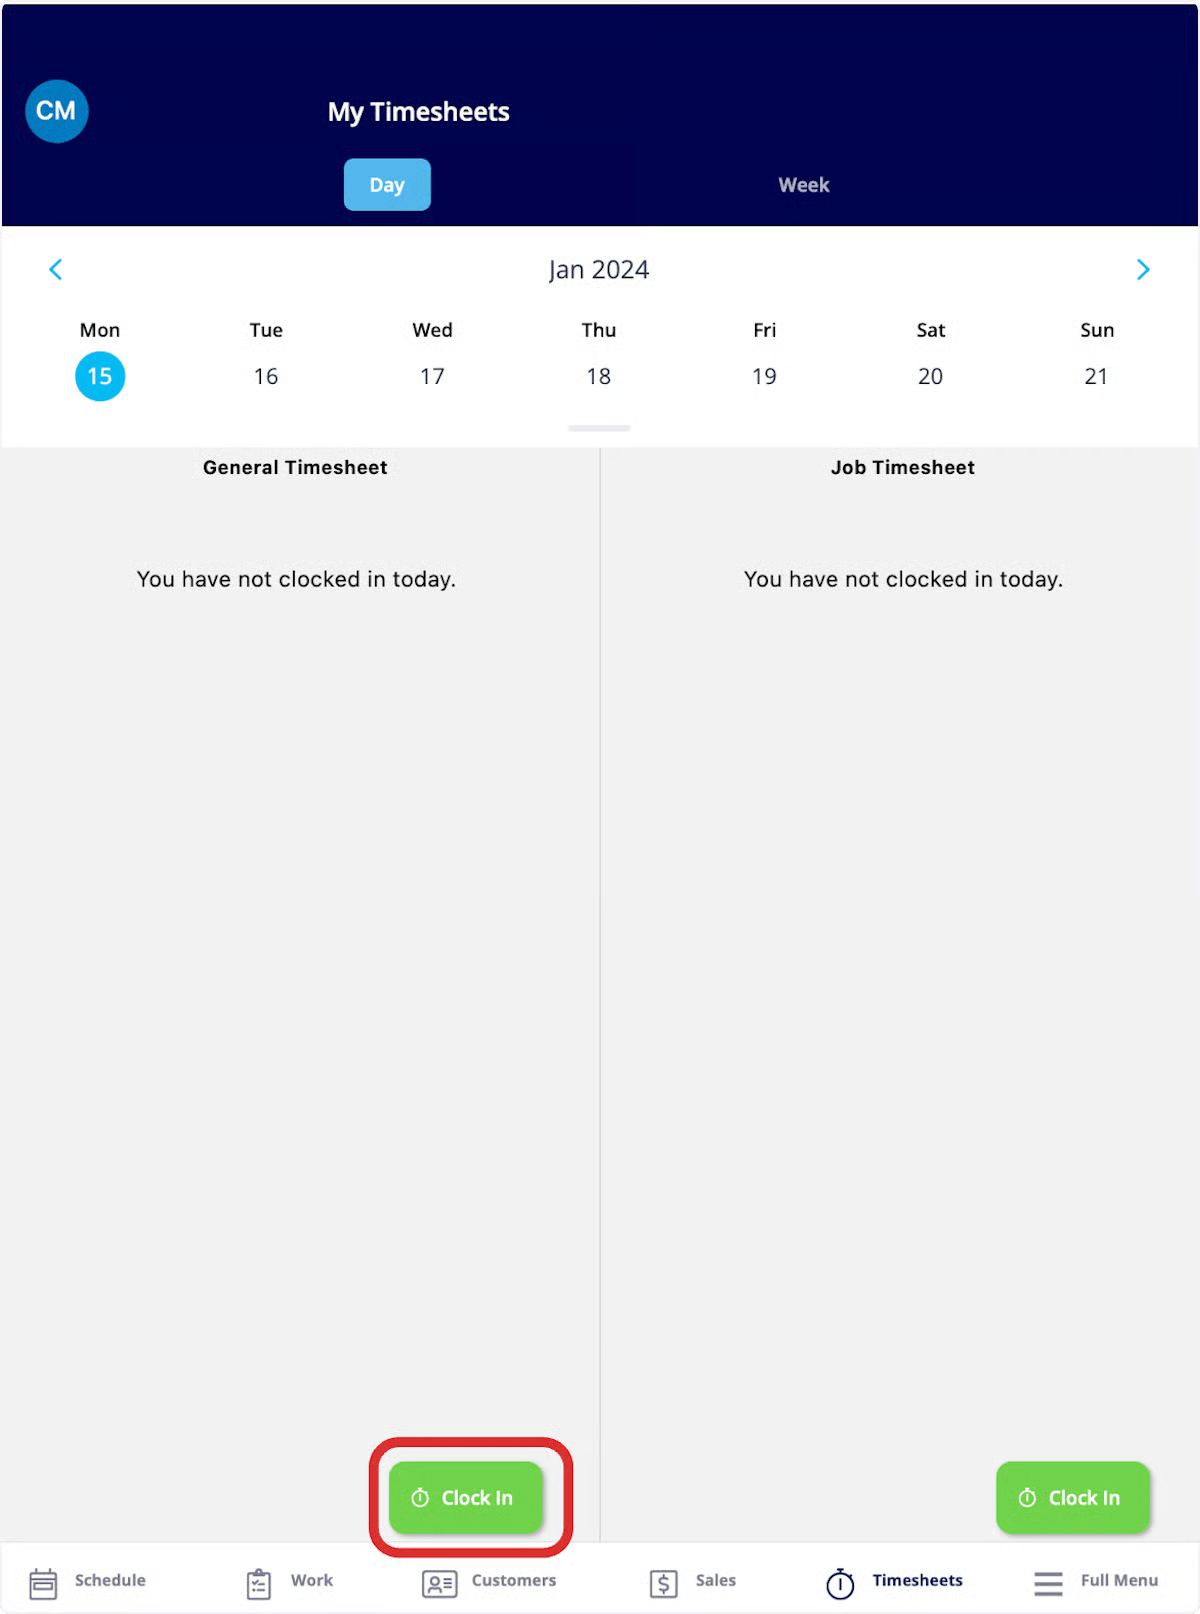
From the job record, tap *Actions*, then *Clock In*. Next, tap the customer's address to pull up a map, then tap *Navigate to Location* for turn-by-turn directions in your preferred map app.
If you're tracking hours separately from job time, FieldPulse supports both a General timesheet (for payroll, not tied to a job) and a Job Tracking timesheet (tied to the specific job). Ask your Admin which one your company uses.
**Read more:** [Completing a Job](https://help.fieldpulse.com/using-fieldpulse/work/completing-a-job)
## Head Out
From the job record, tap *Actions*, then *Clock In*. Next, tap the customer's address to pull up a map, then tap *Navigate to Location* for turn-by-turn directions in your preferred map app.
If you're tracking hours separately from job time, FieldPulse supports both a General timesheet (for payroll, not tied to a job) and a Job Tracking timesheet (tied to the specific job). Ask your Admin which one your company uses.
 **Read more:** [Employee Timesheets](https://help.fieldpulse.com/using-fieldpulse/work/employee-timesheets)
## Do the Work
Tap the status bar on the job's Info page any time to update the job status — FieldPulse tracks how long the job spends in some statuses automatically. This helps the office manage jobs better with visibility into the job progress. From the same record, you can:
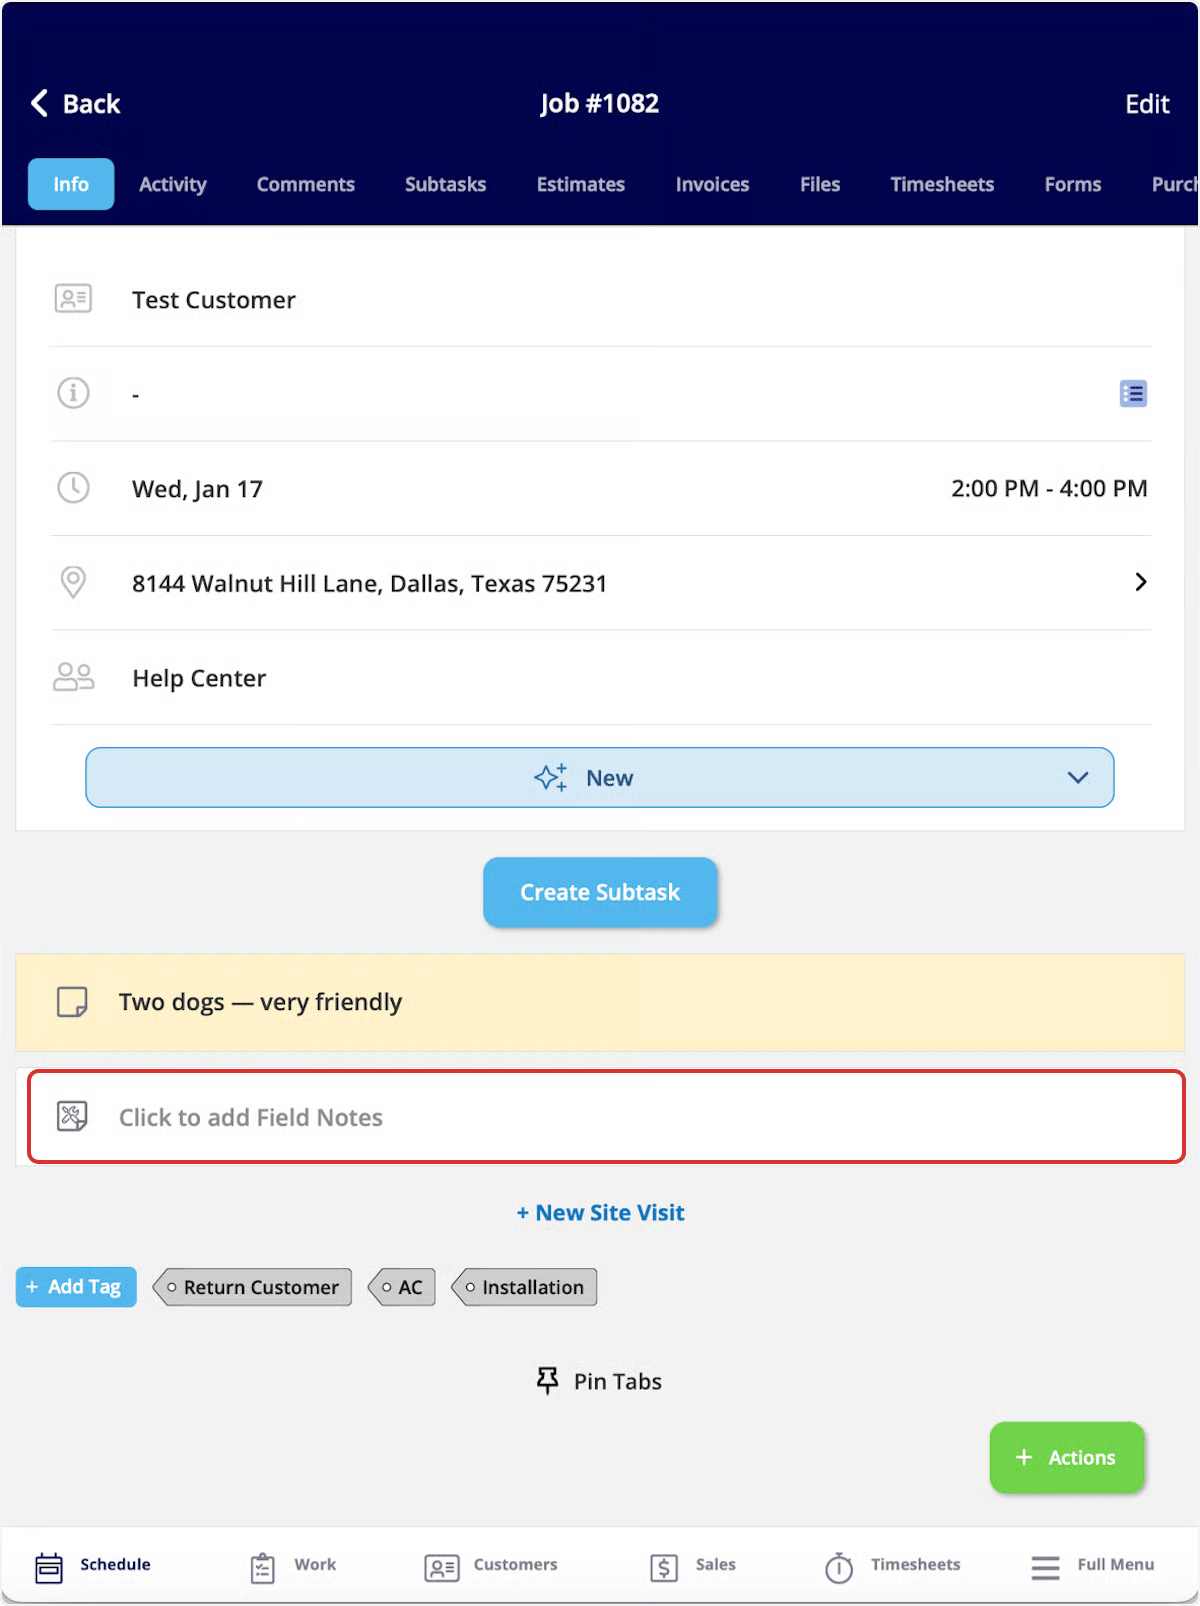
* Add **Field Notes** right on the Info page.
* Snap or upload photos in the **Files** tab (*Attach File*, *Upload Photo*, or *Take Photo* to use the in-app camera).
* Leave **Comments** for your team under the *Comments* tab.
**Read more:** [Employee Timesheets](https://help.fieldpulse.com/using-fieldpulse/work/employee-timesheets)
## Do the Work
Tap the status bar on the job's Info page any time to update the job status — FieldPulse tracks how long the job spends in some statuses automatically. This helps the office manage jobs better with visibility into the job progress. From the same record, you can:
* Add **Field Notes** right on the Info page.
* Snap or upload photos in the **Files** tab (*Attach File*, *Upload Photo*, or *Take Photo* to use the in-app camera).
* Leave **Comments** for your team under the *Comments* tab.
 **Read more:** [Completing a Job](https://help.fieldpulse.com/using-fieldpulse/work/completing-a-job)
## Wrap It Up
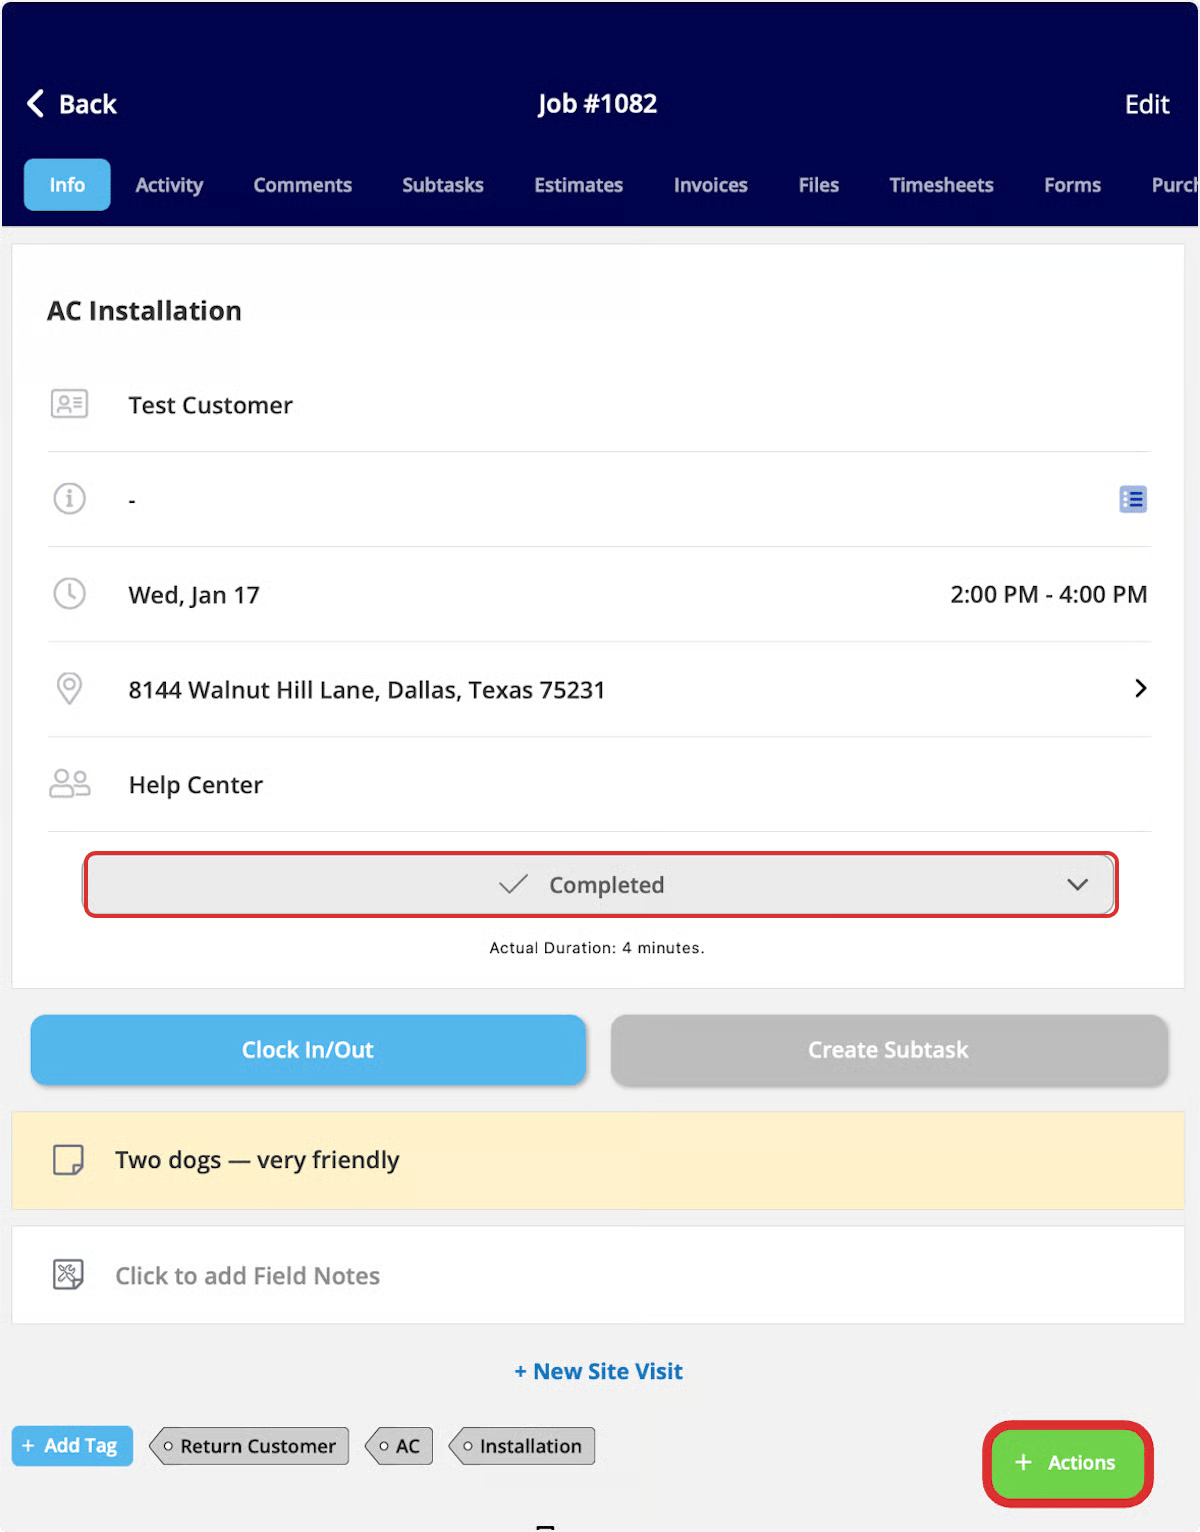
Once the work is done, tap the status bar and select the status that marks the job as finished (often called Completed). Then tap *Actions* and select *Clock Out* to stop tracking your time on the job.
If a pop-up asks whether you want to mark payment on the related invoice when you complete a job, that's a company-level setting your Admin controls — it can be turned off in *Company Settings > Jobs > General*.
**Read more:** [Completing a Job](https://help.fieldpulse.com/using-fieldpulse/work/completing-a-job)
## Wrap It Up
Once the work is done, tap the status bar and select the status that marks the job as finished (often called Completed). Then tap *Actions* and select *Clock Out* to stop tracking your time on the job.
If a pop-up asks whether you want to mark payment on the related invoice when you complete a job, that's a company-level setting your Admin controls — it can be turned off in *Company Settings > Jobs > General*.
 **Read more:** [Completing a Job](https://help.fieldpulse.com/using-fieldpulse/work/completing-a-job)
## Create the Invoice
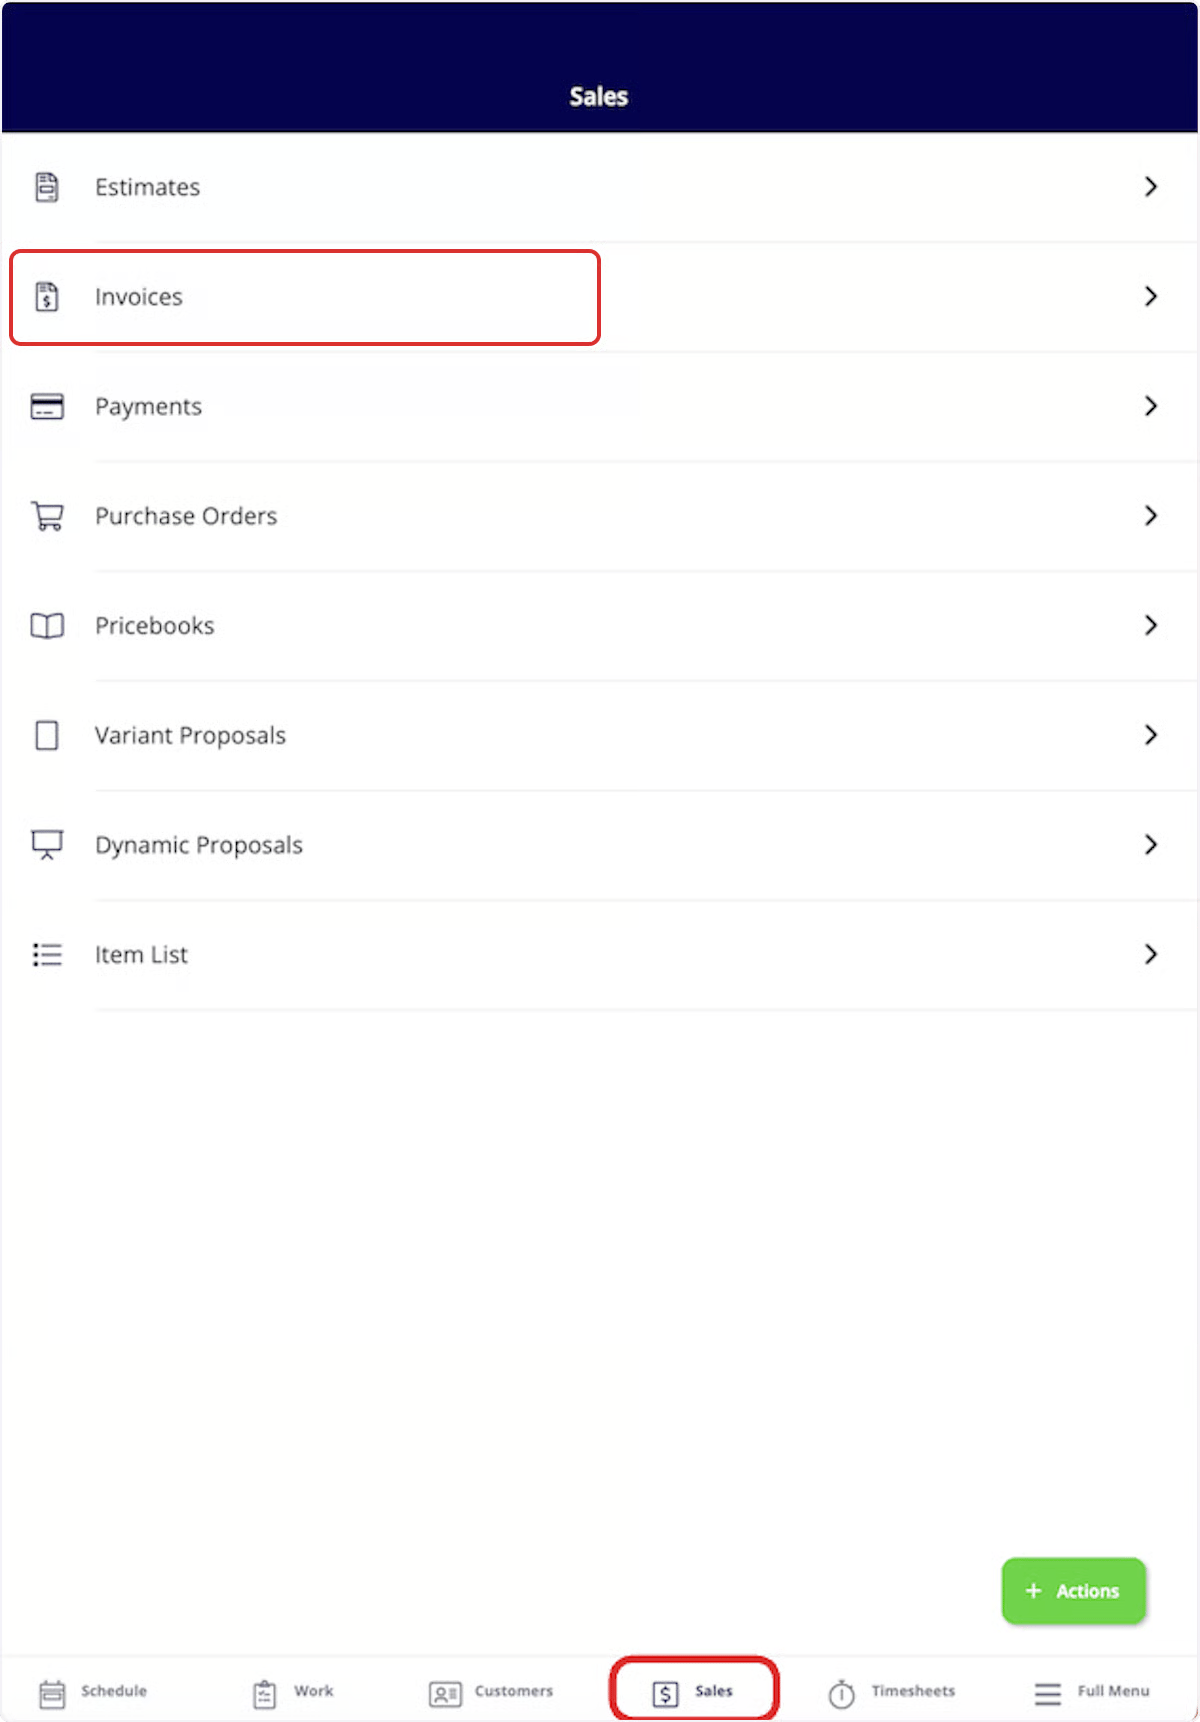
From the job record, tap *Actions*, then *Create Invoice*. If you already sent an estimate and the customer accepted it, open the *Estimates* tab at the top of the job record, open the estimate, and tap *Convert to Invoice* instead. Add your line items, then tap *Finalize Invoice* when you're ready to bill the customer.
**Read more:** [Completing a Job](https://help.fieldpulse.com/using-fieldpulse/work/completing-a-job)
## Create the Invoice
From the job record, tap *Actions*, then *Create Invoice*. If you already sent an estimate and the customer accepted it, open the *Estimates* tab at the top of the job record, open the estimate, and tap *Convert to Invoice* instead. Add your line items, then tap *Finalize Invoice* when you're ready to bill the customer.
 **Read more:** [Estimates & Invoices Quick Start](https://help.fieldpulse.com/getting-started/core-features-first-tasks/fieldpulse-foundations/estimates-invoices-quick-start)
## Get Paid
On the invoice, tap *Payment*. If your company uses FieldPulse Payments, you have two options:
* **Collect Payment:** Take an ACH or card payment on the spot.
* **Send Payment Request via Email:** Bill the customer later — they'll get an email with a secure link to pay online.
**Read more:** [Estimates & Invoices Quick Start](https://help.fieldpulse.com/getting-started/core-features-first-tasks/fieldpulse-foundations/estimates-invoices-quick-start)
## Get Paid
On the invoice, tap *Payment*. If your company uses FieldPulse Payments, you have two options:
* **Collect Payment:** Take an ACH or card payment on the spot.
* **Send Payment Request via Email:** Bill the customer later — they'll get an email with a secure link to pay online.
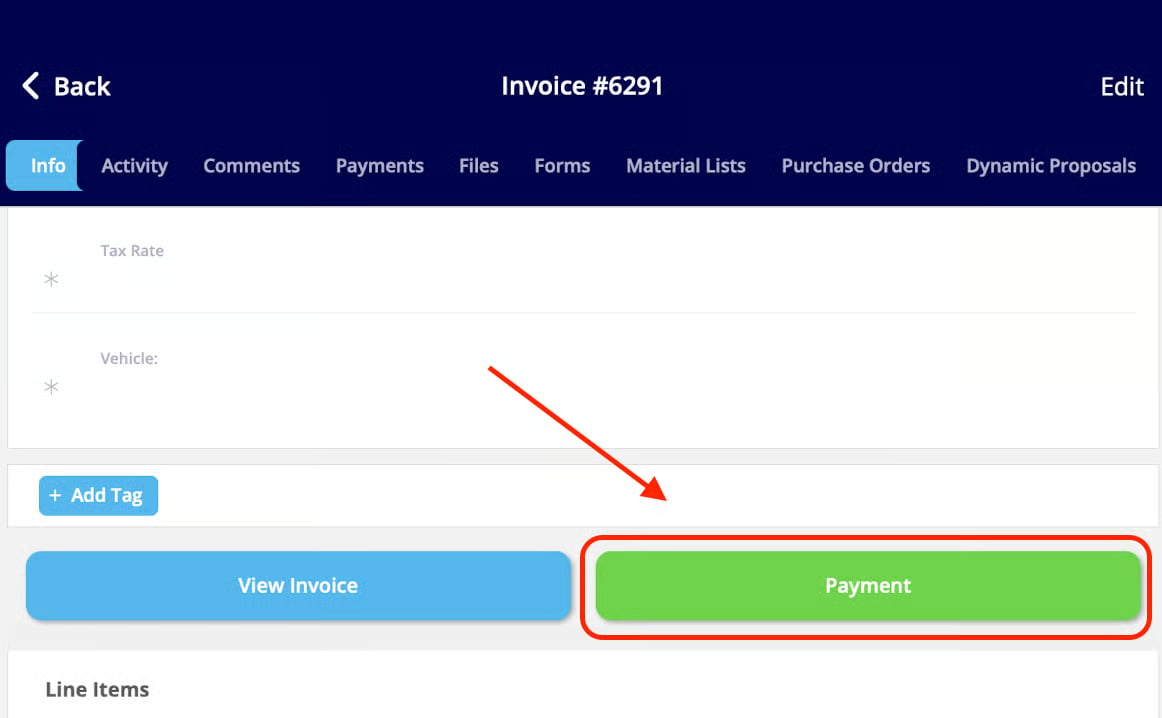 If your company doesn't use FieldPulse Payments, use *Mark Payment* to record a cash or check payment manually. Either way, the invoice status updates to Paid automatically once payment is collected, and you can see the full payment history under *Payments* on the invoice.
**Read more:** [Collecting Payments: 3 General Methods](https://help.fieldpulse.com/using-fieldpulse/payments/how-to/collecting-payments-3-general-methods)
## No Signal? No Problem
FieldPulse's Offline Mode keeps you working even without a connection, everything syncs automatically once you're back online. Here's what you can count on in the field:
| What | Offline? |
| ------------------------------------------------------------- | ----------------------------------------- |
| View your cached jobs (up to 1 week) | Yes |
| Add notes, upload up to 50 photos, change job status | Yes |
| Clock in/out on General and Job Timesheets | Yes |
| Preview, sign, and update status on cached estimates/invoices | Yes |
| Collect a payment | No — resumes once you're reconnected |
| Create a brand-new customer or job | No — create these once you're back online |
**Read more:** [Offline Mode Overview](https://help.fieldpulse.com/offline-mode/offline-mode-overview)
Stuck? We've got you. Browse the [full FieldPulse Help Center](https://help.fieldpulse.com/) for step-by-step articles and videos on every feature, anytime.
***
**Have additional questions?**
*Contact us at [support@fieldpulse.com](mailto:support@fieldpulse.com) or use the chat feature in the bottom right corner of your screen.*
If your company doesn't use FieldPulse Payments, use *Mark Payment* to record a cash or check payment manually. Either way, the invoice status updates to Paid automatically once payment is collected, and you can see the full payment history under *Payments* on the invoice.
**Read more:** [Collecting Payments: 3 General Methods](https://help.fieldpulse.com/using-fieldpulse/payments/how-to/collecting-payments-3-general-methods)
## No Signal? No Problem
FieldPulse's Offline Mode keeps you working even without a connection, everything syncs automatically once you're back online. Here's what you can count on in the field:
| What | Offline? |
| ------------------------------------------------------------- | ----------------------------------------- |
| View your cached jobs (up to 1 week) | Yes |
| Add notes, upload up to 50 photos, change job status | Yes |
| Clock in/out on General and Job Timesheets | Yes |
| Preview, sign, and update status on cached estimates/invoices | Yes |
| Collect a payment | No — resumes once you're reconnected |
| Create a brand-new customer or job | No — create these once you're back online |
**Read more:** [Offline Mode Overview](https://help.fieldpulse.com/offline-mode/offline-mode-overview)
Stuck? We've got you. Browse the [full FieldPulse Help Center](https://help.fieldpulse.com/) for step-by-step articles and videos on every feature, anytime.
***
**Have additional questions?**
*Contact us at [support@fieldpulse.com](mailto:support@fieldpulse.com) or use the chat feature in the bottom right corner of your screen.*