> ## Documentation Index
> Fetch the complete documentation index at: https://help.fieldpulse.com/llms.txt
> Use this file to discover all available pages before exploring further.
# Setting Up Item List & Inventory
> Add services and products to your FieldPulse catalog by import, accounting sync, or by hand, so every estimate and invoice pulls from the same list.
> **Who uses this:** Admins and Founding Users have full access; Team Managers and Service Agents need the **Ability to View Item List** permission. **Availability:** All regions.
The item list is your catalog of everything you sell — services, products you track, and products you do not track. When you build an [estimate or invoice](https://www.fieldpulse.com/features/estimates-and-invoices), every line item on it comes from the item list. You build the item list three ways — a mass import, an accounting sync, or adding items by hand — and inventory is the slice of that same list you have chosen to track by quantity, value, and location.
## Overview
The item list and inventory are two views of the same catalog, and keeping the two terms straight makes the rest of this page simple.
The **item list** holds every product and service you offer — *service*, *product - inventory*, and *product - non inventory* items — along with relevant information such as quantity, value, and other attributes. Line items on estimates and invoices are added from the item list.
**Inventory** is the catalog of only the line items you have designated as *product - inventory*, along with relevant information such as quantity, value, location, and other attributes. Every inventory item is an item-list item, but not every item-list item is inventory.
The item type you choose on each item is what decides which of the two views it lands in:
| **Item type** | **What it is** | **Examples** |
| --------------------------- | ----------------------------------------------------------------------------- | ------------------------------- |
| **Service** | A non-physical item. | Labor, equipment hire, overhead |
| **Product - inventory** | A material you track. | Pipe, hot water unit |
| **Product - non inventory** | A material you do not track — a material you order from a supplier as needed. | Water softener system |
## Video walkthrough
## Before you begin
* Decide which materials you track as **product - inventory** and which you offer without tracking stock as **service** or **product - non inventory**. The item type is set on each item as you create it.
* Set up your [Inventory Hubs Overview](/inventory-materials/item-list/inventory-hubs) first if you want stock counted by location, so you can assign quantities to a hub while you add each item.
* Confirm the user has the **Ability to View Item List** permission turned on. See [Setting Up Inventory Permissions](/inventory-materials/item-list/permissions).
## Step-by-step setup
### Choose how to add your items
You can add line items to the item list three ways. Pick the one that matches where your items live today.
| **Method** | **Use it when** | **Where to start** |
| -------------------------- | --------------------------------------------------------------------------------------------------------- | ---------------------------------------------------------------------------------------------------------------------------------------------------------------------------------------------------------------------------------- |
| **Mass import** | Your catalog is already in a spreadsheet and you want to bring it in all at once. | [How to Import Your Item List](/settings/data/importing-item-list) |
| **Accounting integration** | Your line items already live in QuickBooks Online, QuickBooks Desktop, or Xero, and you want them synced. | [QuickBooks Online Overview](/integrations/accounting/quickbooks-online/overview), [QuickBooks Desktop Overview](/integrations/accounting/quickbooks-desktop/overview), or [Xero Overview](/integrations/accounting/xero/overview) |
| **Manual add** | You are building the catalog a few items at a time. | The steps below |
### Add a line item on web
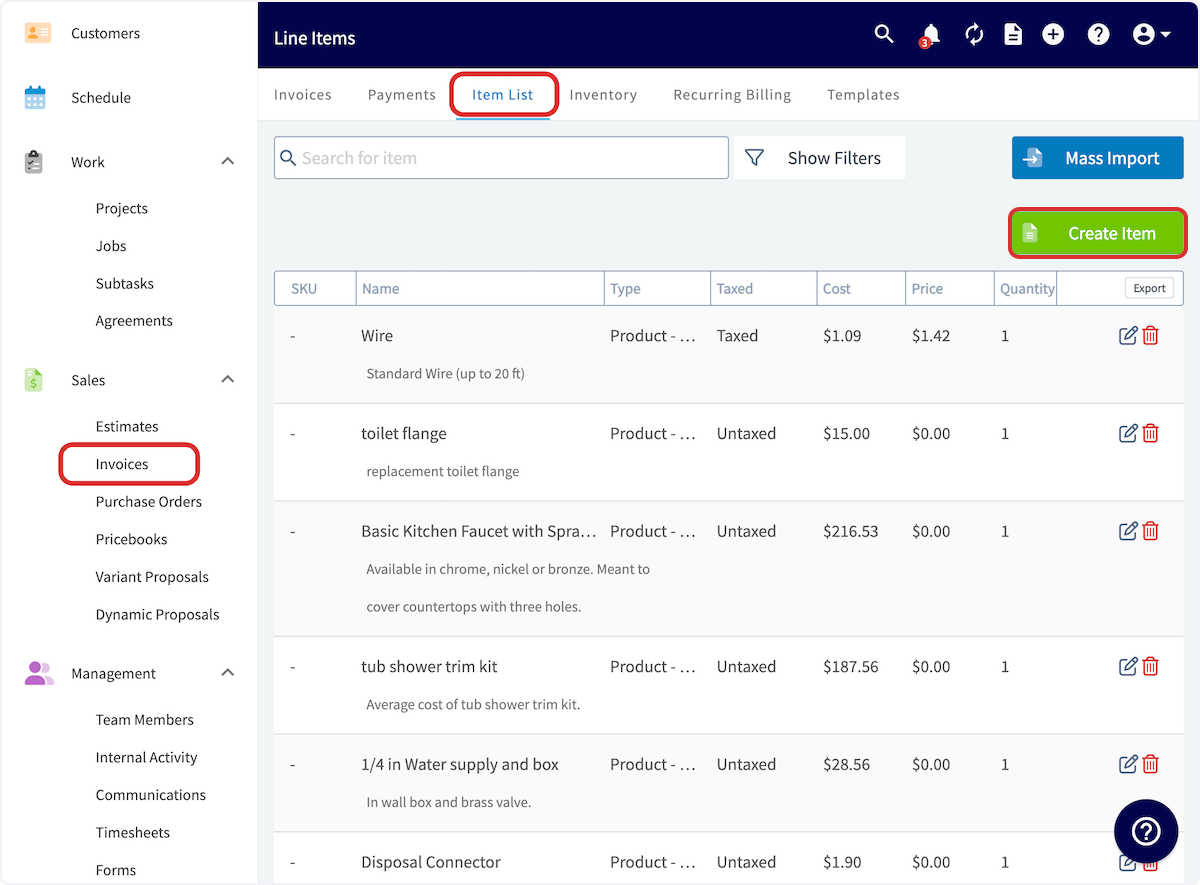
1. Select **Invoices** in the left-side menu, then select the **Item List** tab in the header.
2. Select **Create Item**.
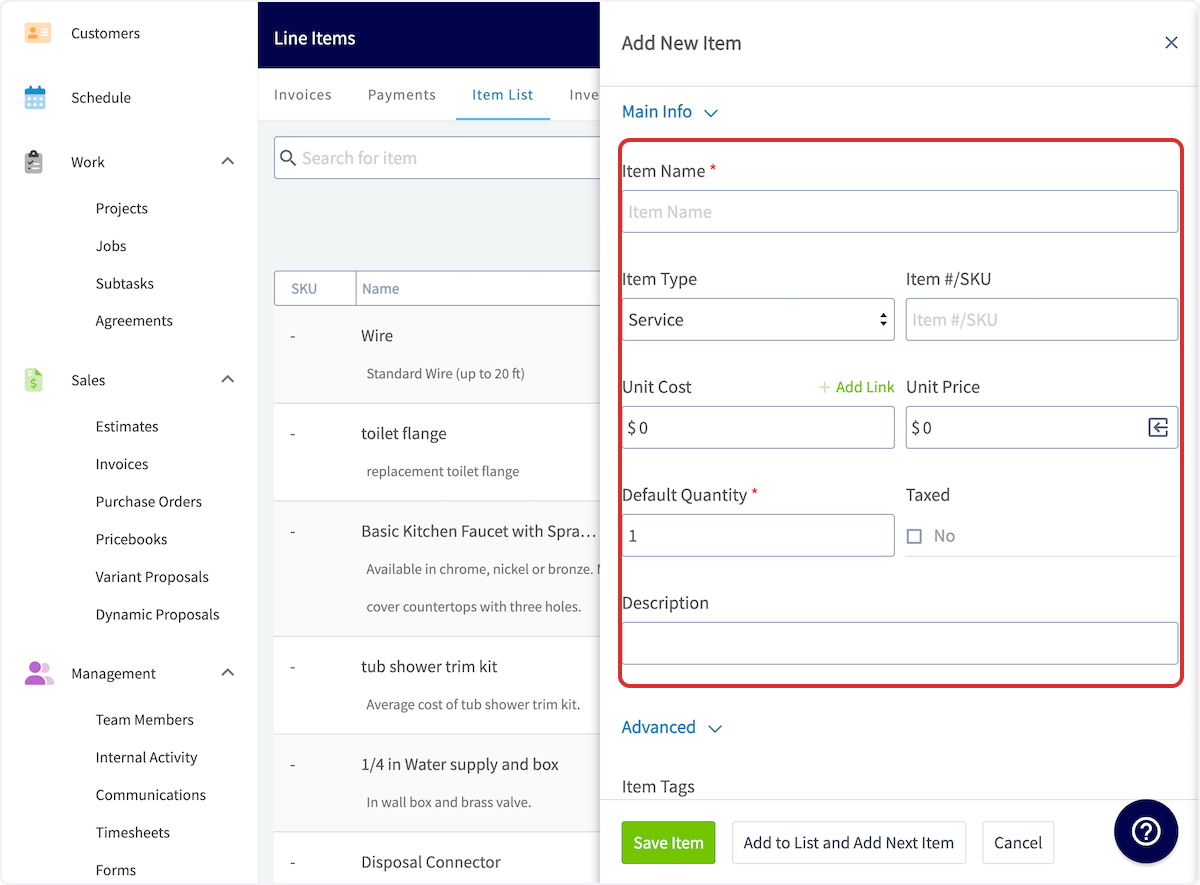
 3. Enter the **Item Name**.
4. Choose the **Item Type** — a service, a product you track in inventory, or a product you do not track in inventory.
5. Enter an **Item #/SKU** if you use one.
6. Optionally set the **Unit Cost**, **Unit Price**, **Default Quantity**, **Taxed**, and **Description**. None of these are required, because price, quantity, and taxation can be modified after the item is inserted into an invoice. If you do fill them out, they automatically populate the line item with default values in all of your invoices, and those values can still be modified after they are added.
3. Enter the **Item Name**.
4. Choose the **Item Type** — a service, a product you track in inventory, or a product you do not track in inventory.
5. Enter an **Item #/SKU** if you use one.
6. Optionally set the **Unit Cost**, **Unit Price**, **Default Quantity**, **Taxed**, and **Description**. None of these are required, because price, quantity, and taxation can be modified after the item is inserted into an invoice. If you do fill them out, they automatically populate the line item with default values in all of your invoices, and those values can still be modified after they are added.
 7. Optionally add a **markup percentage**. See [How to Use Markups & Margins](/payments/commissions/markups-margins).
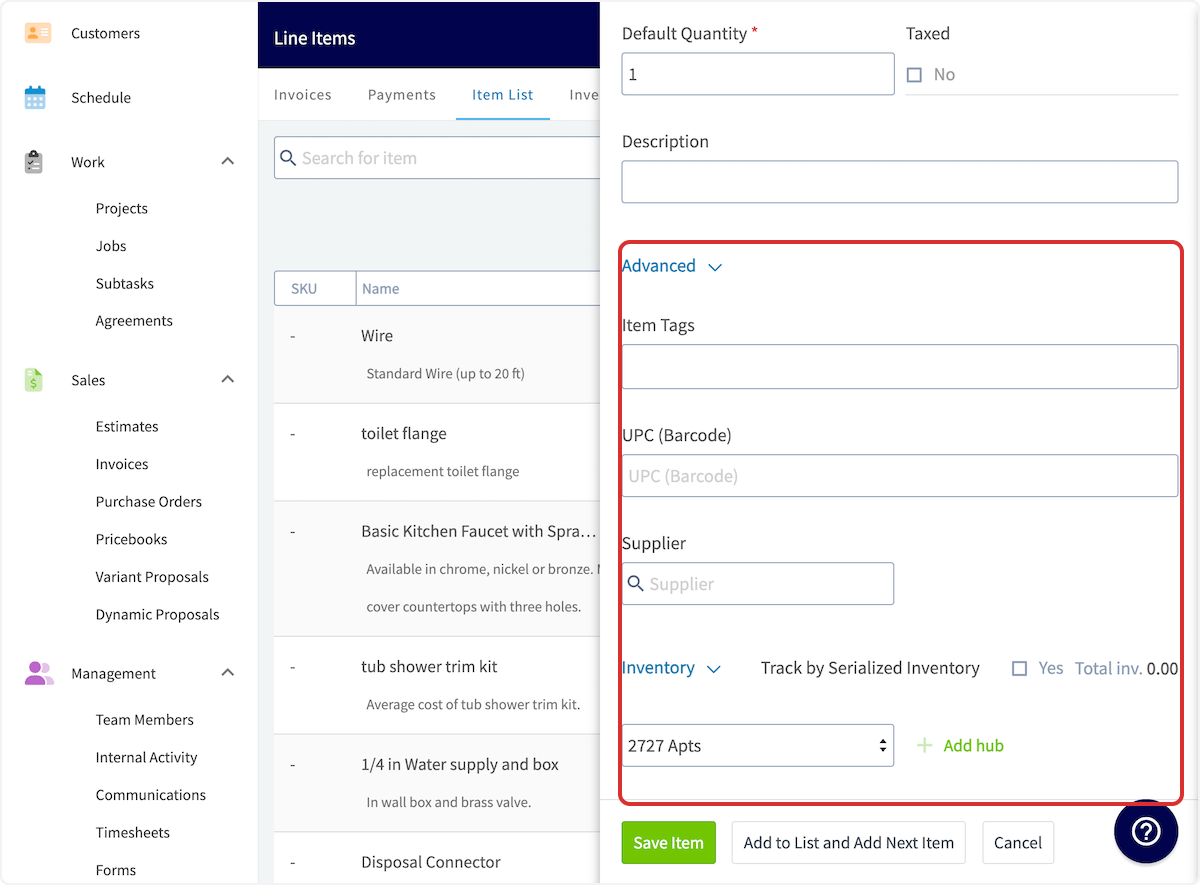
8. Under **Advanced**, add **Item Tags** and a **UPC (Barcode)** for the item if you use them.
9. Link a **Supplier** if the item type is *product - non inventory* or *product - inventory*.
10. For a *product - inventory* item, turn on **Track by Serialized Inventory** to give each unit a serial number. See [Serialized Inventory Overview](/inventory-materials/item-list/serialized-inventory).
11. For a *product - inventory* item, add inventory to different hubs and set up auto-replenishment. See [Inventory Hubs Overview](/inventory-materials/item-list/inventory-hubs) and [How to Manage Purchase Orders](/inventory-materials/purchase-orders/managing).
7. Optionally add a **markup percentage**. See [How to Use Markups & Margins](/payments/commissions/markups-margins).
8. Under **Advanced**, add **Item Tags** and a **UPC (Barcode)** for the item if you use them.
9. Link a **Supplier** if the item type is *product - non inventory* or *product - inventory*.
10. For a *product - inventory* item, turn on **Track by Serialized Inventory** to give each unit a serial number. See [Serialized Inventory Overview](/inventory-materials/item-list/serialized-inventory).
11. For a *product - inventory* item, add inventory to different hubs and set up auto-replenishment. See [Inventory Hubs Overview](/inventory-materials/item-list/inventory-hubs) and [How to Manage Purchase Orders](/inventory-materials/purchase-orders/managing).
 12. Select **Save Item**. The new line item is saved in the item list and you can now use it on estimates and invoices.
### Add or update items by barcode on mobile
The mobile barcode scanner adds new items and updates existing ones without searching by name, and it lets you update cost, pricing, inventory, and inventory location quickly.
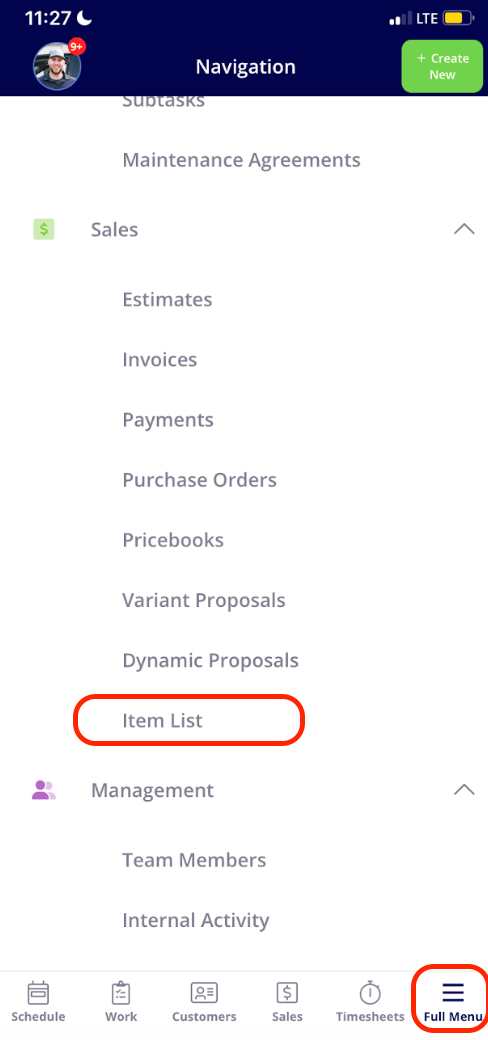
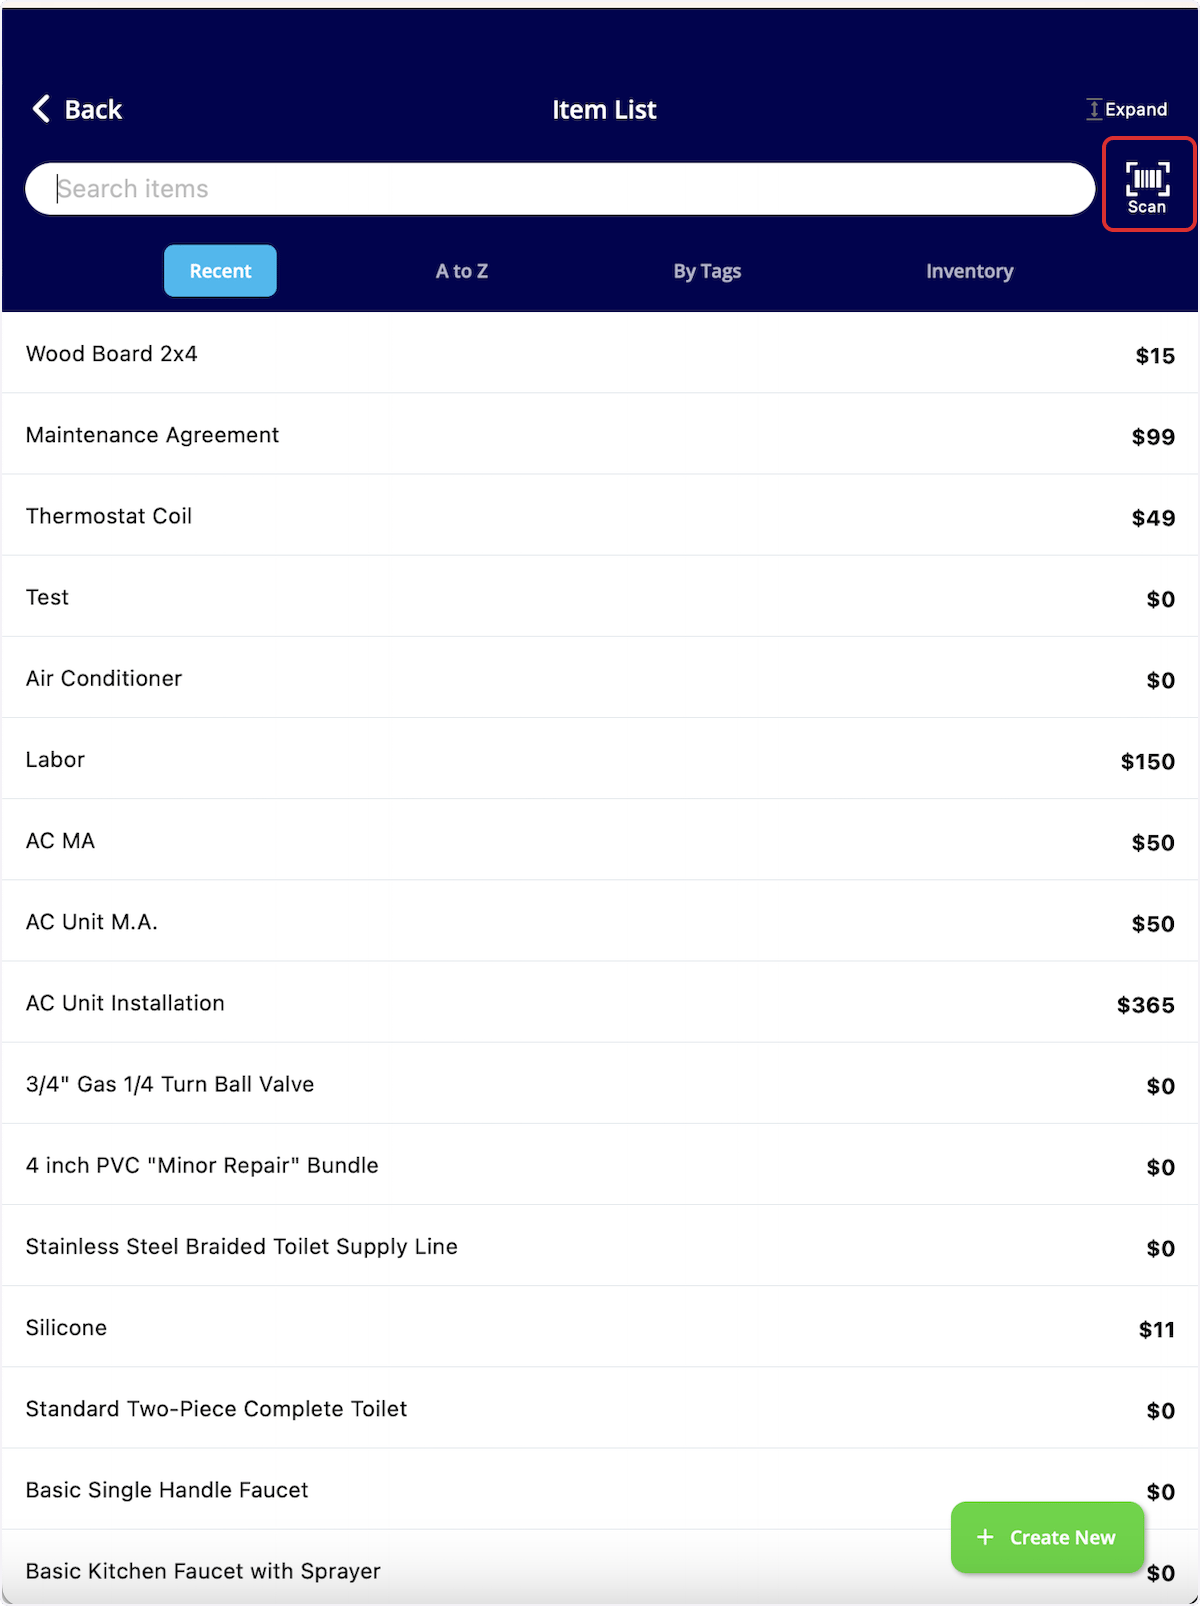
1. In the mobile app, select **Full Menu**, then select **Item List**.
2. Select the barcode **Scan** icon.
12. Select **Save Item**. The new line item is saved in the item list and you can now use it on estimates and invoices.
### Add or update items by barcode on mobile
The mobile barcode scanner adds new items and updates existing ones without searching by name, and it lets you update cost, pricing, inventory, and inventory location quickly.
1. In the mobile app, select **Full Menu**, then select **Item List**.
2. Select the barcode **Scan** icon.
 3. Point your device camera at the barcode.
4. If the barcode does not exist in your system, the screen reads **No Results Found**. Select **Create New Item** to add it.
5. If the barcode is already in your system, adjust the item name, unit cost, and unit price on the scan screen.
3. Point your device camera at the barcode.
4. If the barcode does not exist in your system, the screen reads **No Results Found**. Select **Create New Item** to add it.
5. If the barcode is already in your system, adjust the item name, unit cost, and unit price on the scan screen.
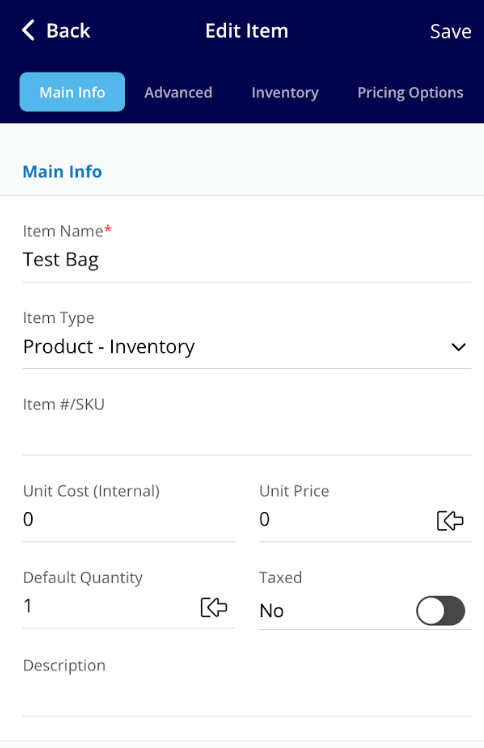
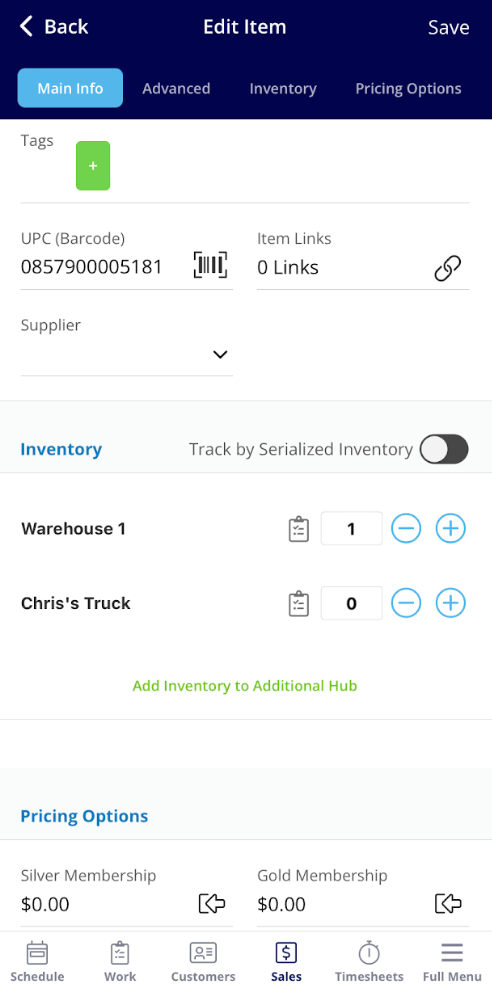
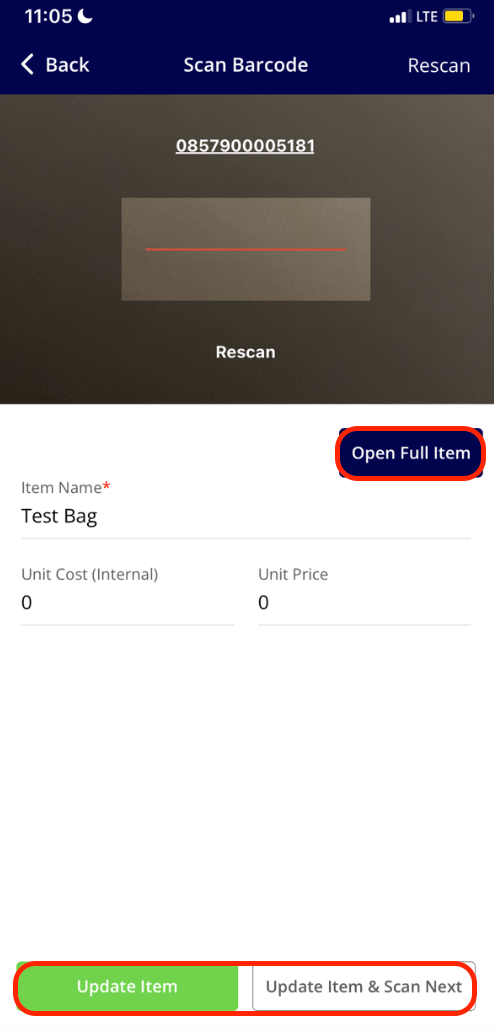 6. Select **Open Full Item** to edit the rest of the item. From there you can make edits on the **Main Info**, **Advanced**, and **Pricing Options** tabs, and adjust the count for each inventory hub in the **Inventory** section below.
 ## Settings reference
Every field on an item-list item, and what it is for:
| **Field** | **What it means** | **Example** |
| --------------------------------- | ------------------------------------------------------------------------------------ | -------------------------------------------------------- |
| **Item Name** | A descriptive name for the item. | Copper Pipe - 1/2 inch x 10 feet |
| **Item Type** | Whether the item is a service, a material you track, or a material you do not track. | Service, Product - Inventory, or Product - Non-Inventory |
| **Item #/SKU** | A unique identifier or stock-keeping unit for tracking the item. | CP125-10FT |
| **Unit Cost** | The cost incurred per unit for the item. | \$5.00 per unit |
| **Unit Price** | The price at which the item is sold per unit. | \$10.00 per unit |
| **Default Quantity** | The default quantity on hand for the item. | 100 units |
| **Taxed** | Whether the item is subject to taxes. | Yes or No |
| **Item Tag** | A label or tag for additional categorization or grouping. | "High-Demand", "Special Order" |
| **UPC (Barcode)** | The Universal Product Code or barcode for the item. | 012345678912 |
| **Supplier** | The company or entity the item is sourced from. | Plumbing Supply Co. |
| **Track by Serialized Inventory** | Whether each item has a unique serial number for tracking. | Yes or No |
| **Hub Selection** | Selects from your current hubs and adds inventory levels to a specific hub. | "Office", "Brice's Truck" |
## Related articles
* [Serialized Inventory Overview](/inventory-materials/item-list/serialized-inventory)
* [Inventory Hubs Overview](/inventory-materials/item-list/inventory-hubs)
* [How to Deduct and Count Inventory](/inventory-materials/item-list/deducting-counting)
* [Setting Up Inventory Permissions](/inventory-materials/item-list/permissions)
* [Setting Up Item Custom Fields](/inventory-materials/item-list/item-custom-fields)
* [How to Import Your Item List](/settings/data/importing-item-list)
Your setup is working when the **Item List** tab shows the items you added, each one pulls onto an estimate or invoice as a line item, and the items you saved as *product - inventory* appear under **Inventory** with a quantity against them.
## Related topics
- [Material Lists Overview](/inventory-materials/material-lists/material-lists.md)
- [How to Manage Purchase Orders](/inventory-materials/purchase-orders/managing.md)
- [Setting Up Your Pricebook](/add-ons/sales-suite/pricebook.md)
- [How to Create an Estimate](/estimates-invoices/creating/estimate.md)
## Settings reference
Every field on an item-list item, and what it is for:
| **Field** | **What it means** | **Example** |
| --------------------------------- | ------------------------------------------------------------------------------------ | -------------------------------------------------------- |
| **Item Name** | A descriptive name for the item. | Copper Pipe - 1/2 inch x 10 feet |
| **Item Type** | Whether the item is a service, a material you track, or a material you do not track. | Service, Product - Inventory, or Product - Non-Inventory |
| **Item #/SKU** | A unique identifier or stock-keeping unit for tracking the item. | CP125-10FT |
| **Unit Cost** | The cost incurred per unit for the item. | \$5.00 per unit |
| **Unit Price** | The price at which the item is sold per unit. | \$10.00 per unit |
| **Default Quantity** | The default quantity on hand for the item. | 100 units |
| **Taxed** | Whether the item is subject to taxes. | Yes or No |
| **Item Tag** | A label or tag for additional categorization or grouping. | "High-Demand", "Special Order" |
| **UPC (Barcode)** | The Universal Product Code or barcode for the item. | 012345678912 |
| **Supplier** | The company or entity the item is sourced from. | Plumbing Supply Co. |
| **Track by Serialized Inventory** | Whether each item has a unique serial number for tracking. | Yes or No |
| **Hub Selection** | Selects from your current hubs and adds inventory levels to a specific hub. | "Office", "Brice's Truck" |
## Related articles
* [Serialized Inventory Overview](/inventory-materials/item-list/serialized-inventory)
* [Inventory Hubs Overview](/inventory-materials/item-list/inventory-hubs)
* [How to Deduct and Count Inventory](/inventory-materials/item-list/deducting-counting)
* [Setting Up Inventory Permissions](/inventory-materials/item-list/permissions)
* [Setting Up Item Custom Fields](/inventory-materials/item-list/item-custom-fields)
* [How to Import Your Item List](/settings/data/importing-item-list)
Your setup is working when the **Item List** tab shows the items you added, each one pulls onto an estimate or invoice as a line item, and the items you saved as *product - inventory* appear under **Inventory** with a quantity against them.
## Related topics
- [Material Lists Overview](/inventory-materials/material-lists/material-lists.md)
- [How to Manage Purchase Orders](/inventory-materials/purchase-orders/managing.md)
- [Setting Up Your Pricebook](/add-ons/sales-suite/pricebook.md)
- [How to Create an Estimate](/estimates-invoices/creating/estimate.md)