> ## Documentation Index
> Fetch the complete documentation index at: https://help.fieldpulse.com/llms.txt
> Use this file to discover all available pages before exploring further.
# Setting Up Item Custom Fields
> Add fields for details like expiration dates or supplier lead times to every FieldPulse item — product or service — and set who sees each one.
> **Who uses this:** Administrators create item custom fields — Company Settings is Administrator-only; **Field Visibility by Role** sets whether Managers, Service Agents, or both see a field. **Availability:** All regions.
An item custom field stores extra data on the items in your item list — the details a standard item record doesn't hold, like an expiration date, storage conditions, or a supplier's lead time. When that detail lives only in one person's head, it is out of reach the moment they are off the job. An item custom field keeps it on the item record itself, where the roles you choose can see it.
## Overview
An item custom field is a field you add to items in your item list to capture and display data the standard item record doesn't hold. You create each field once in **Company Settings**, choose what kind of data it holds, and choose which roles can see it. You can also set the order your item custom fields appear in.
Item custom fields apply to **all** items in your item list regardless of type — **Product - Inventory**, **Product - Non Inventory**, or **Service**. They are available on the items in your item list only, so they do not appear on invoices, estimates, or material lists. On an item, they sit in the **Custom Fields** section of the item record.
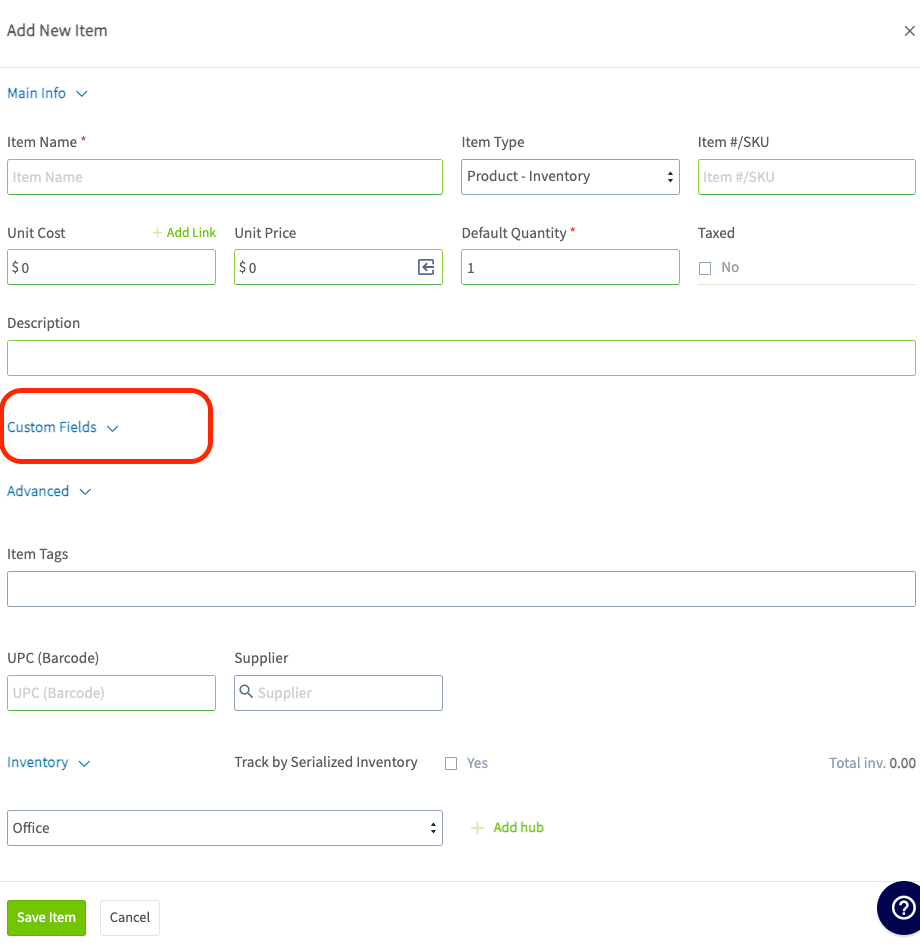 Common uses for an item custom field include:
* **Expiration Date**
* **Storage Conditions**
* **Supplier Lead Time**
Each item custom field holds up to 250 characters.
## Before you begin
* Decide who should see each field before you create it. Every item custom field carries **Field Visibility by Role**, so know whether the field is for Managers, Service Agents, or both.
* Confirm your item list is set up — see [Setting Up Item List & Inventory](/inventory-materials/item-list/adding-items).
* Know the difference between the two kinds of custom field. Item custom fields appear on every item in your item list, while [Setting Up Inventory Item Custom Fields](/inventory-materials/item-list/inventory-item-custom-fields) appear only on inventory items, in addition to your item custom fields.
## Step-by-step setup
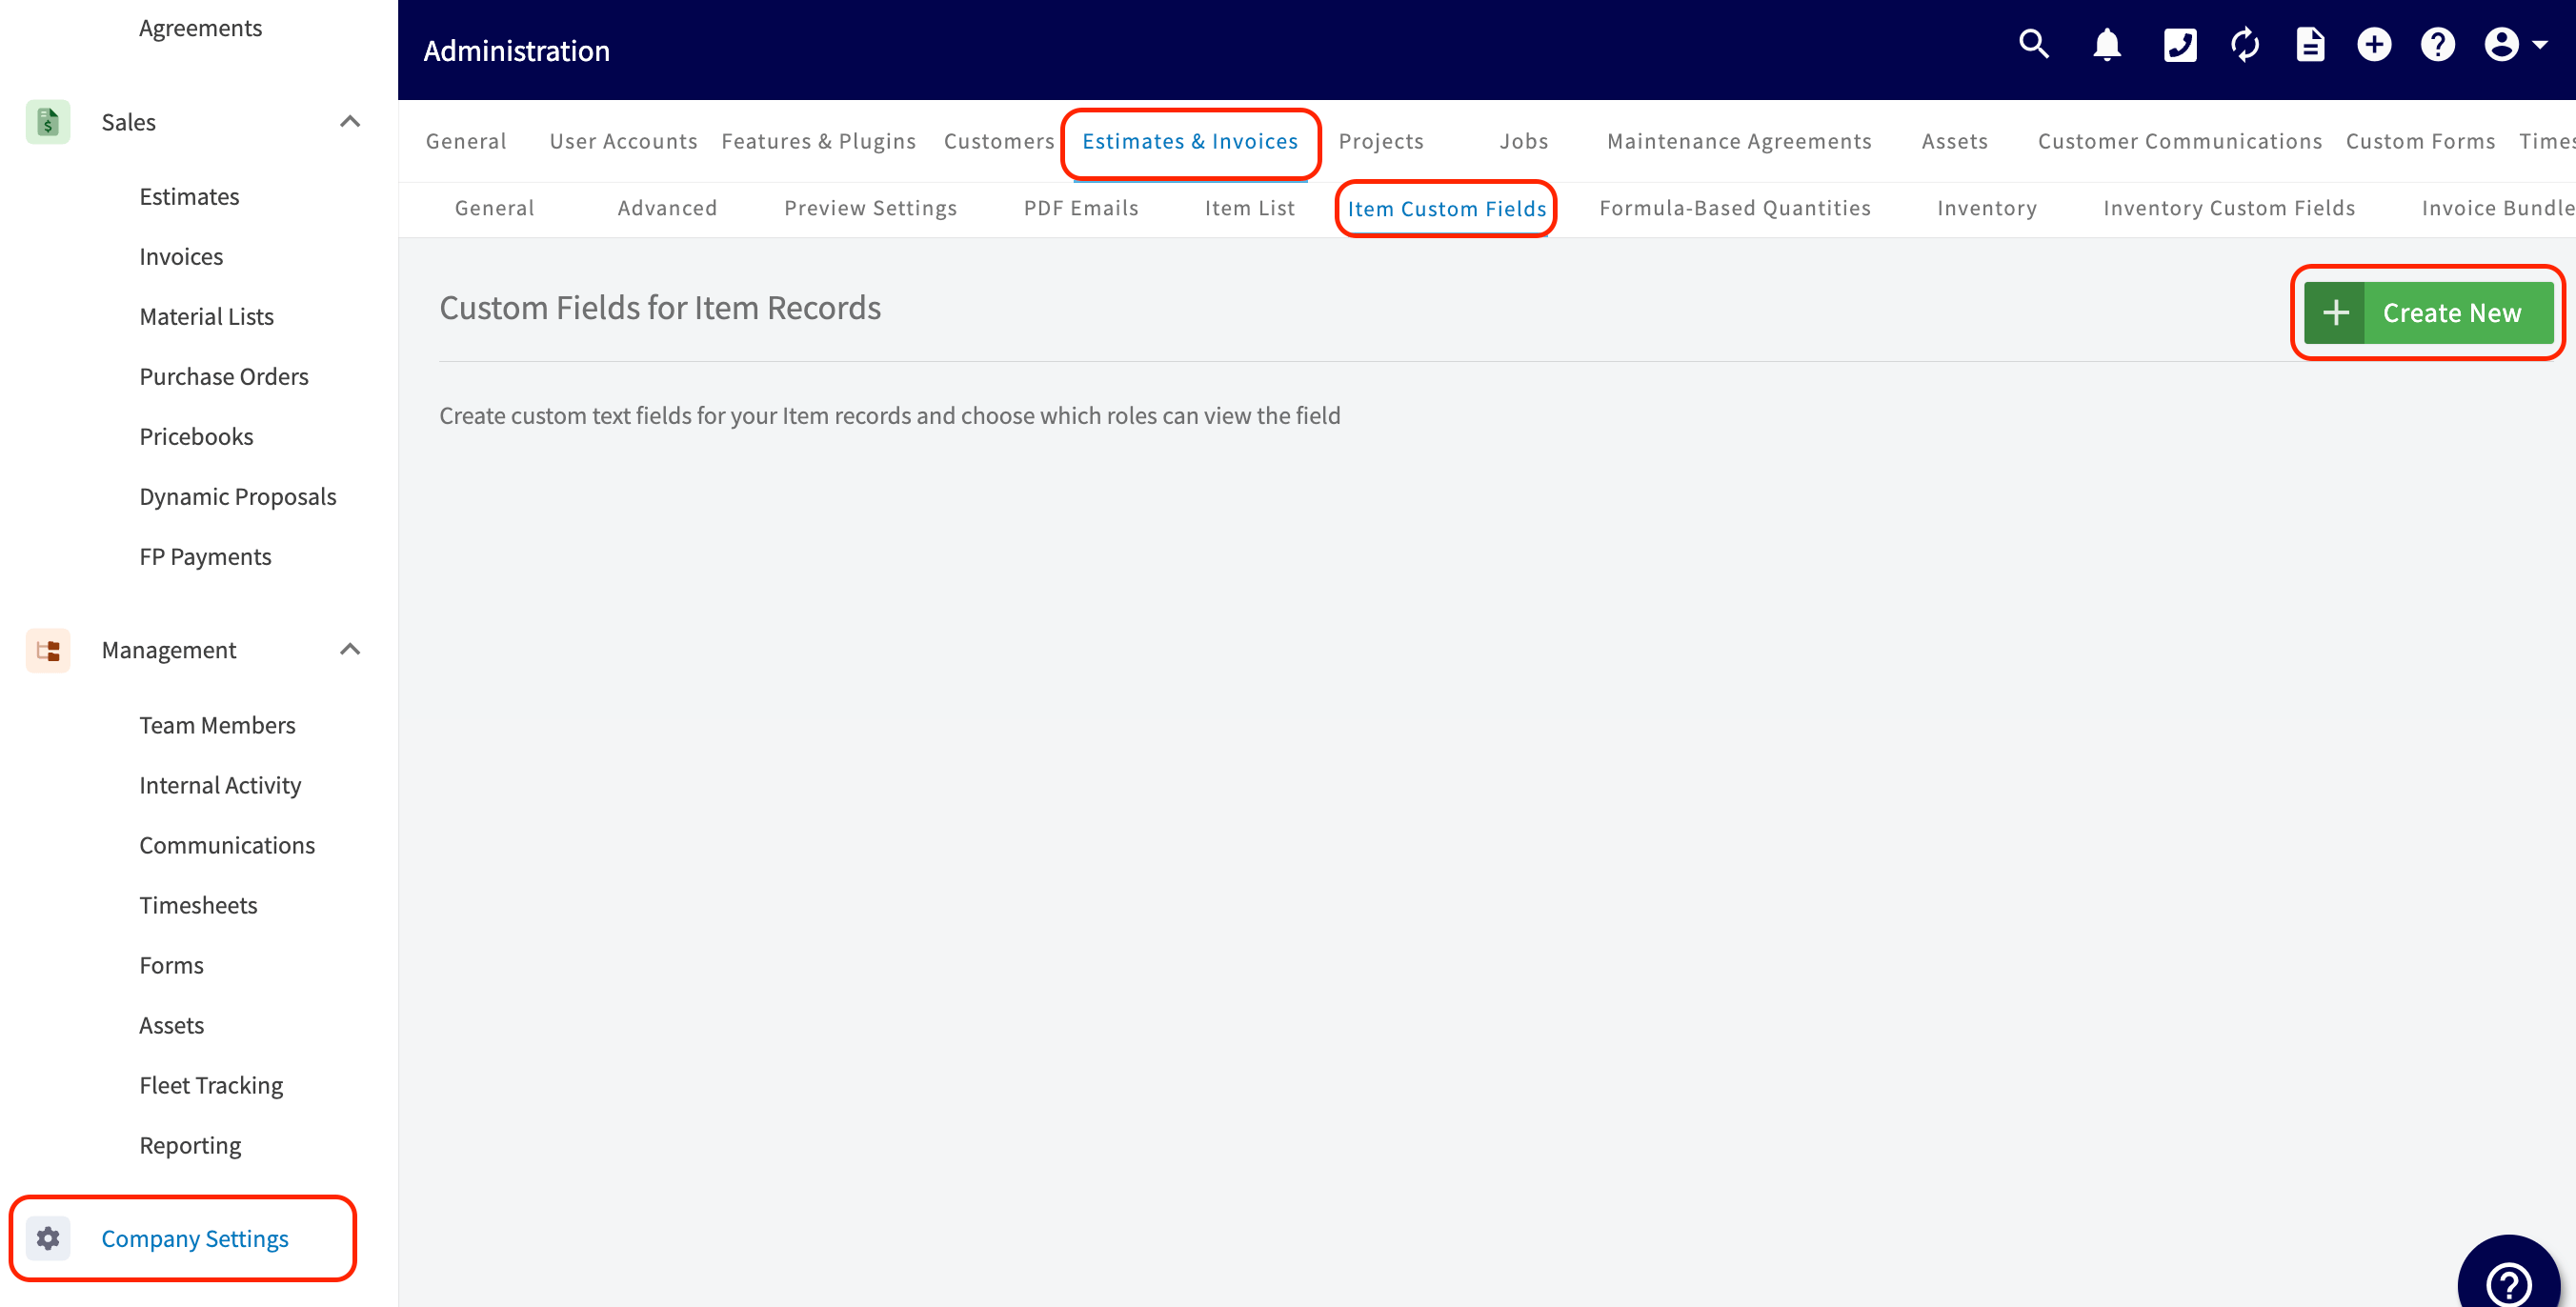
1. Go to **Company Settings**, select **Estimates & Invoices**, then the **Item Custom Fields** tab.
2. On the **Custom Fields for Item Records** page, select **Create New**.
Common uses for an item custom field include:
* **Expiration Date**
* **Storage Conditions**
* **Supplier Lead Time**
Each item custom field holds up to 250 characters.
## Before you begin
* Decide who should see each field before you create it. Every item custom field carries **Field Visibility by Role**, so know whether the field is for Managers, Service Agents, or both.
* Confirm your item list is set up — see [Setting Up Item List & Inventory](/inventory-materials/item-list/adding-items).
* Know the difference between the two kinds of custom field. Item custom fields appear on every item in your item list, while [Setting Up Inventory Item Custom Fields](/inventory-materials/item-list/inventory-item-custom-fields) appear only on inventory items, in addition to your item custom fields.
## Step-by-step setup
1. Go to **Company Settings**, select **Estimates & Invoices**, then the **Item Custom Fields** tab.
2. On the **Custom Fields for Item Records** page, select **Create New**.
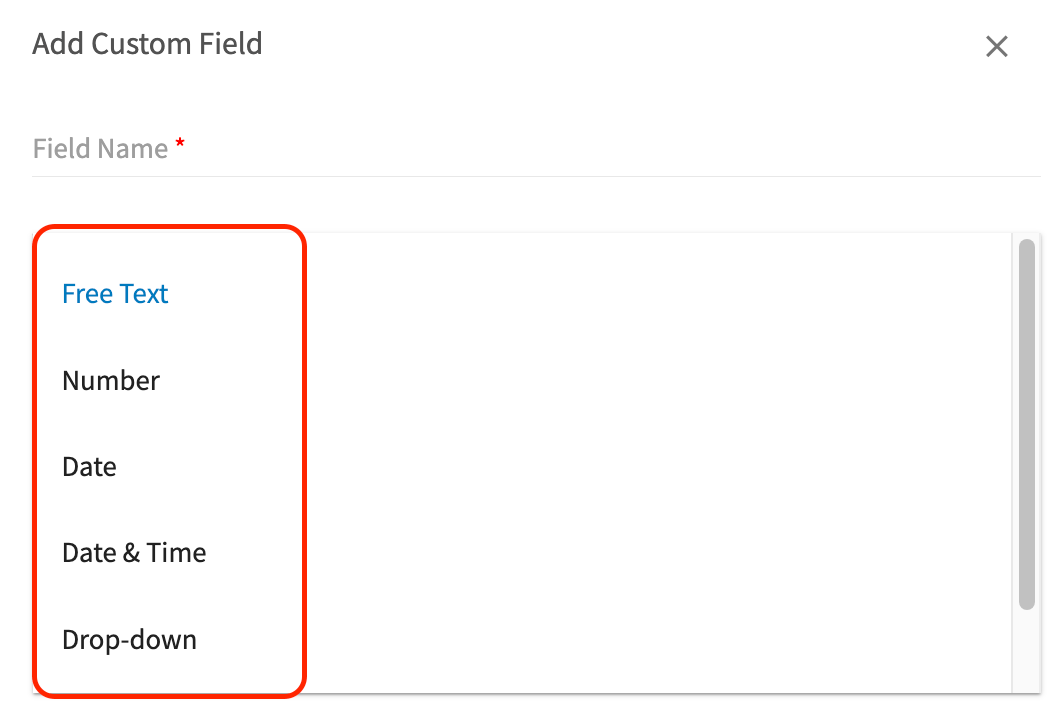
 3. In the **Add Custom Field** window, enter the **Field Name**.
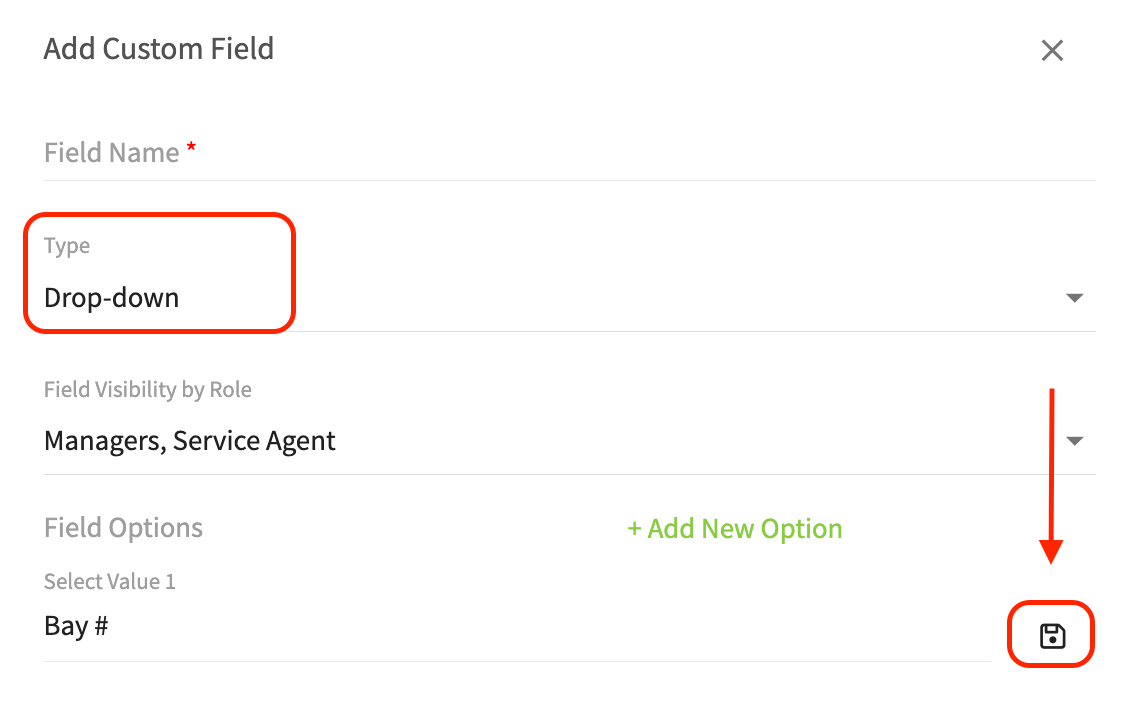
4. Select the field type from the **Type** list — **Free Text**, **Number**, **Date**, **Date & Time**, or **Drop-down**. The **Settings reference** below covers what each type stores.
3. In the **Add Custom Field** window, enter the **Field Name**.
4. Select the field type from the **Type** list — **Free Text**, **Number**, **Date**, **Date & Time**, or **Drop-down**. The **Settings reference** below covers what each type stores.

 5. If you chose **Drop-down**, select **+ Add New Option** under **Field Options**, name the option, and select the save icon beside it. Repeat for every option you want on the list.
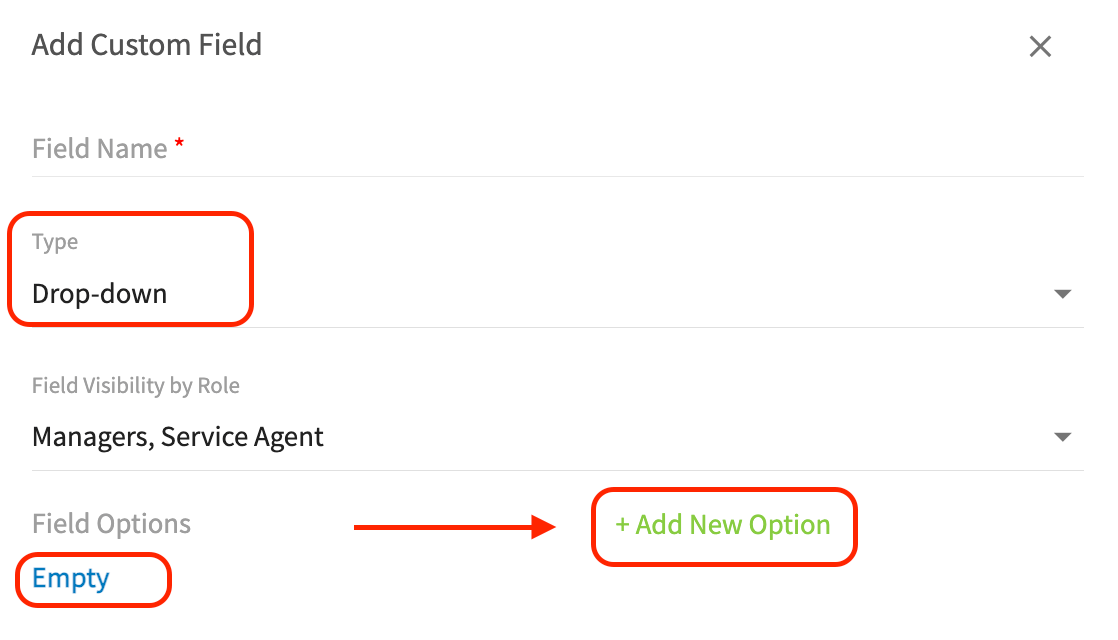
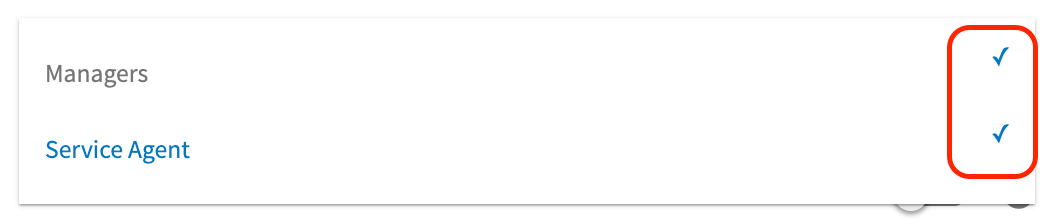
 6. Set **Field Visibility by Role** by checking **Managers**, **Service Agent**, or both.
 7. Save the custom field.
## Settings reference
An item custom field is one of five types:
| **Field type** | **What it stores** |
| --------------- | --------------------------------------------------------------------------------------- |
| **Free Text** | Text you type in your own words, in no set format. |
| **Number** | A number or quantity for the item. |
| **Date** | A date, filled in from the calendar icon. |
| **Date & Time** | A date and a time. The time defaults to today at 8 am, and you can adjust it. |
| **Drop-down** | One option, chosen on the item record from the list you define under **Field Options**. |
**Field Visibility by Role** controls who sees the field on an item record. Check **Managers**, **Service Agent**, or both.
## Related articles
* [Setting Up Inventory Item Custom Fields](/inventory-materials/item-list/inventory-item-custom-fields)
* [Setting Up Item List & Inventory](/inventory-materials/item-list/adding-items)
* [Setting Up Custom Fields on Material Lists](/inventory-materials/material-lists/custom-fields)
* [Setting Up Custom Fields on Purchase Orders](/inventory-materials/purchase-orders/custom-fields)
Your setup is working when a team member opens an item in your item list, expands **Custom Fields**, and finds the fields you created — in the order you set, and visible only to the roles you chose.
## Related topics
- [Setting Up Inventory Item Custom Fields](/inventory-materials/item-list/inventory-item-custom-fields.md)
- [Setting Up Item List & Inventory](/inventory-materials/item-list/adding-items.md)
- [Inventory & Item List](/inventory-materials/item-list/index.md)
- [Setting Up Custom Fields on Purchase Orders](/inventory-materials/purchase-orders/custom-fields.md)
7. Save the custom field.
## Settings reference
An item custom field is one of five types:
| **Field type** | **What it stores** |
| --------------- | --------------------------------------------------------------------------------------- |
| **Free Text** | Text you type in your own words, in no set format. |
| **Number** | A number or quantity for the item. |
| **Date** | A date, filled in from the calendar icon. |
| **Date & Time** | A date and a time. The time defaults to today at 8 am, and you can adjust it. |
| **Drop-down** | One option, chosen on the item record from the list you define under **Field Options**. |
**Field Visibility by Role** controls who sees the field on an item record. Check **Managers**, **Service Agent**, or both.
## Related articles
* [Setting Up Inventory Item Custom Fields](/inventory-materials/item-list/inventory-item-custom-fields)
* [Setting Up Item List & Inventory](/inventory-materials/item-list/adding-items)
* [Setting Up Custom Fields on Material Lists](/inventory-materials/material-lists/custom-fields)
* [Setting Up Custom Fields on Purchase Orders](/inventory-materials/purchase-orders/custom-fields)
Your setup is working when a team member opens an item in your item list, expands **Custom Fields**, and finds the fields you created — in the order you set, and visible only to the roles you chose.
## Related topics
- [Setting Up Inventory Item Custom Fields](/inventory-materials/item-list/inventory-item-custom-fields.md)
- [Setting Up Item List & Inventory](/inventory-materials/item-list/adding-items.md)
- [Inventory & Item List](/inventory-materials/item-list/index.md)
- [Setting Up Custom Fields on Purchase Orders](/inventory-materials/purchase-orders/custom-fields.md)