> ## Documentation Index
> Fetch the complete documentation index at: https://help.fieldpulse.com/llms.txt
> Use this file to discover all available pages before exploring further.
# How to Create a Custom Form
> Build a custom form template in FieldPulse, drag in the fields you need, mark which are required or internal, then attach it to a job or customer record.
> **Who uses this:** Administrators build and edit custom form templates in **Company Settings**, which only Administrators can reach. By default, if no restrictions are set in the form's permission settings, the form is accessible to all users. **Availability:** [Custom Forms](https://www.fieldpulse.com/features/custom-forms) must be enabled in Company Settings before you can build a form — contact the FieldPulse team for pricing.
A custom form starts as a blank template you build in Company Settings. You drag in the fields you need, arrange them, decide which fields are required and which stay internal, then choose the records the form can attach to. Once the template is saved, your team pulls it up on any of those records and fills it out.
## Overview
You build custom forms in **Company Settings > Custom Forms**. Each form is a template made of fields you drag onto the canvas from the right-side menu. Open **Form Settings** first to name the form, set the field label and contents font sizes, and choose which record types it can attach to — then lay out the fields. When the template is saved, you attach it to a record and complete it there.
For the full list of field types, related-record fields, formulas, and conditional logic, see [Custom Form Field Types and Formulas Details](/jobs/custom-forms/field-types).
## Video walkthrough
## Before you begin
* Turn the feature on first if it isn't already — see [Setting Up Custom Forms](/jobs/custom-forms/enabling).
* Decide which record types the form belongs on (customer, job, estimate, invoice, and so on), since you set that in **Form Settings** before you lay out fields.
## Build the form
### Create a new form
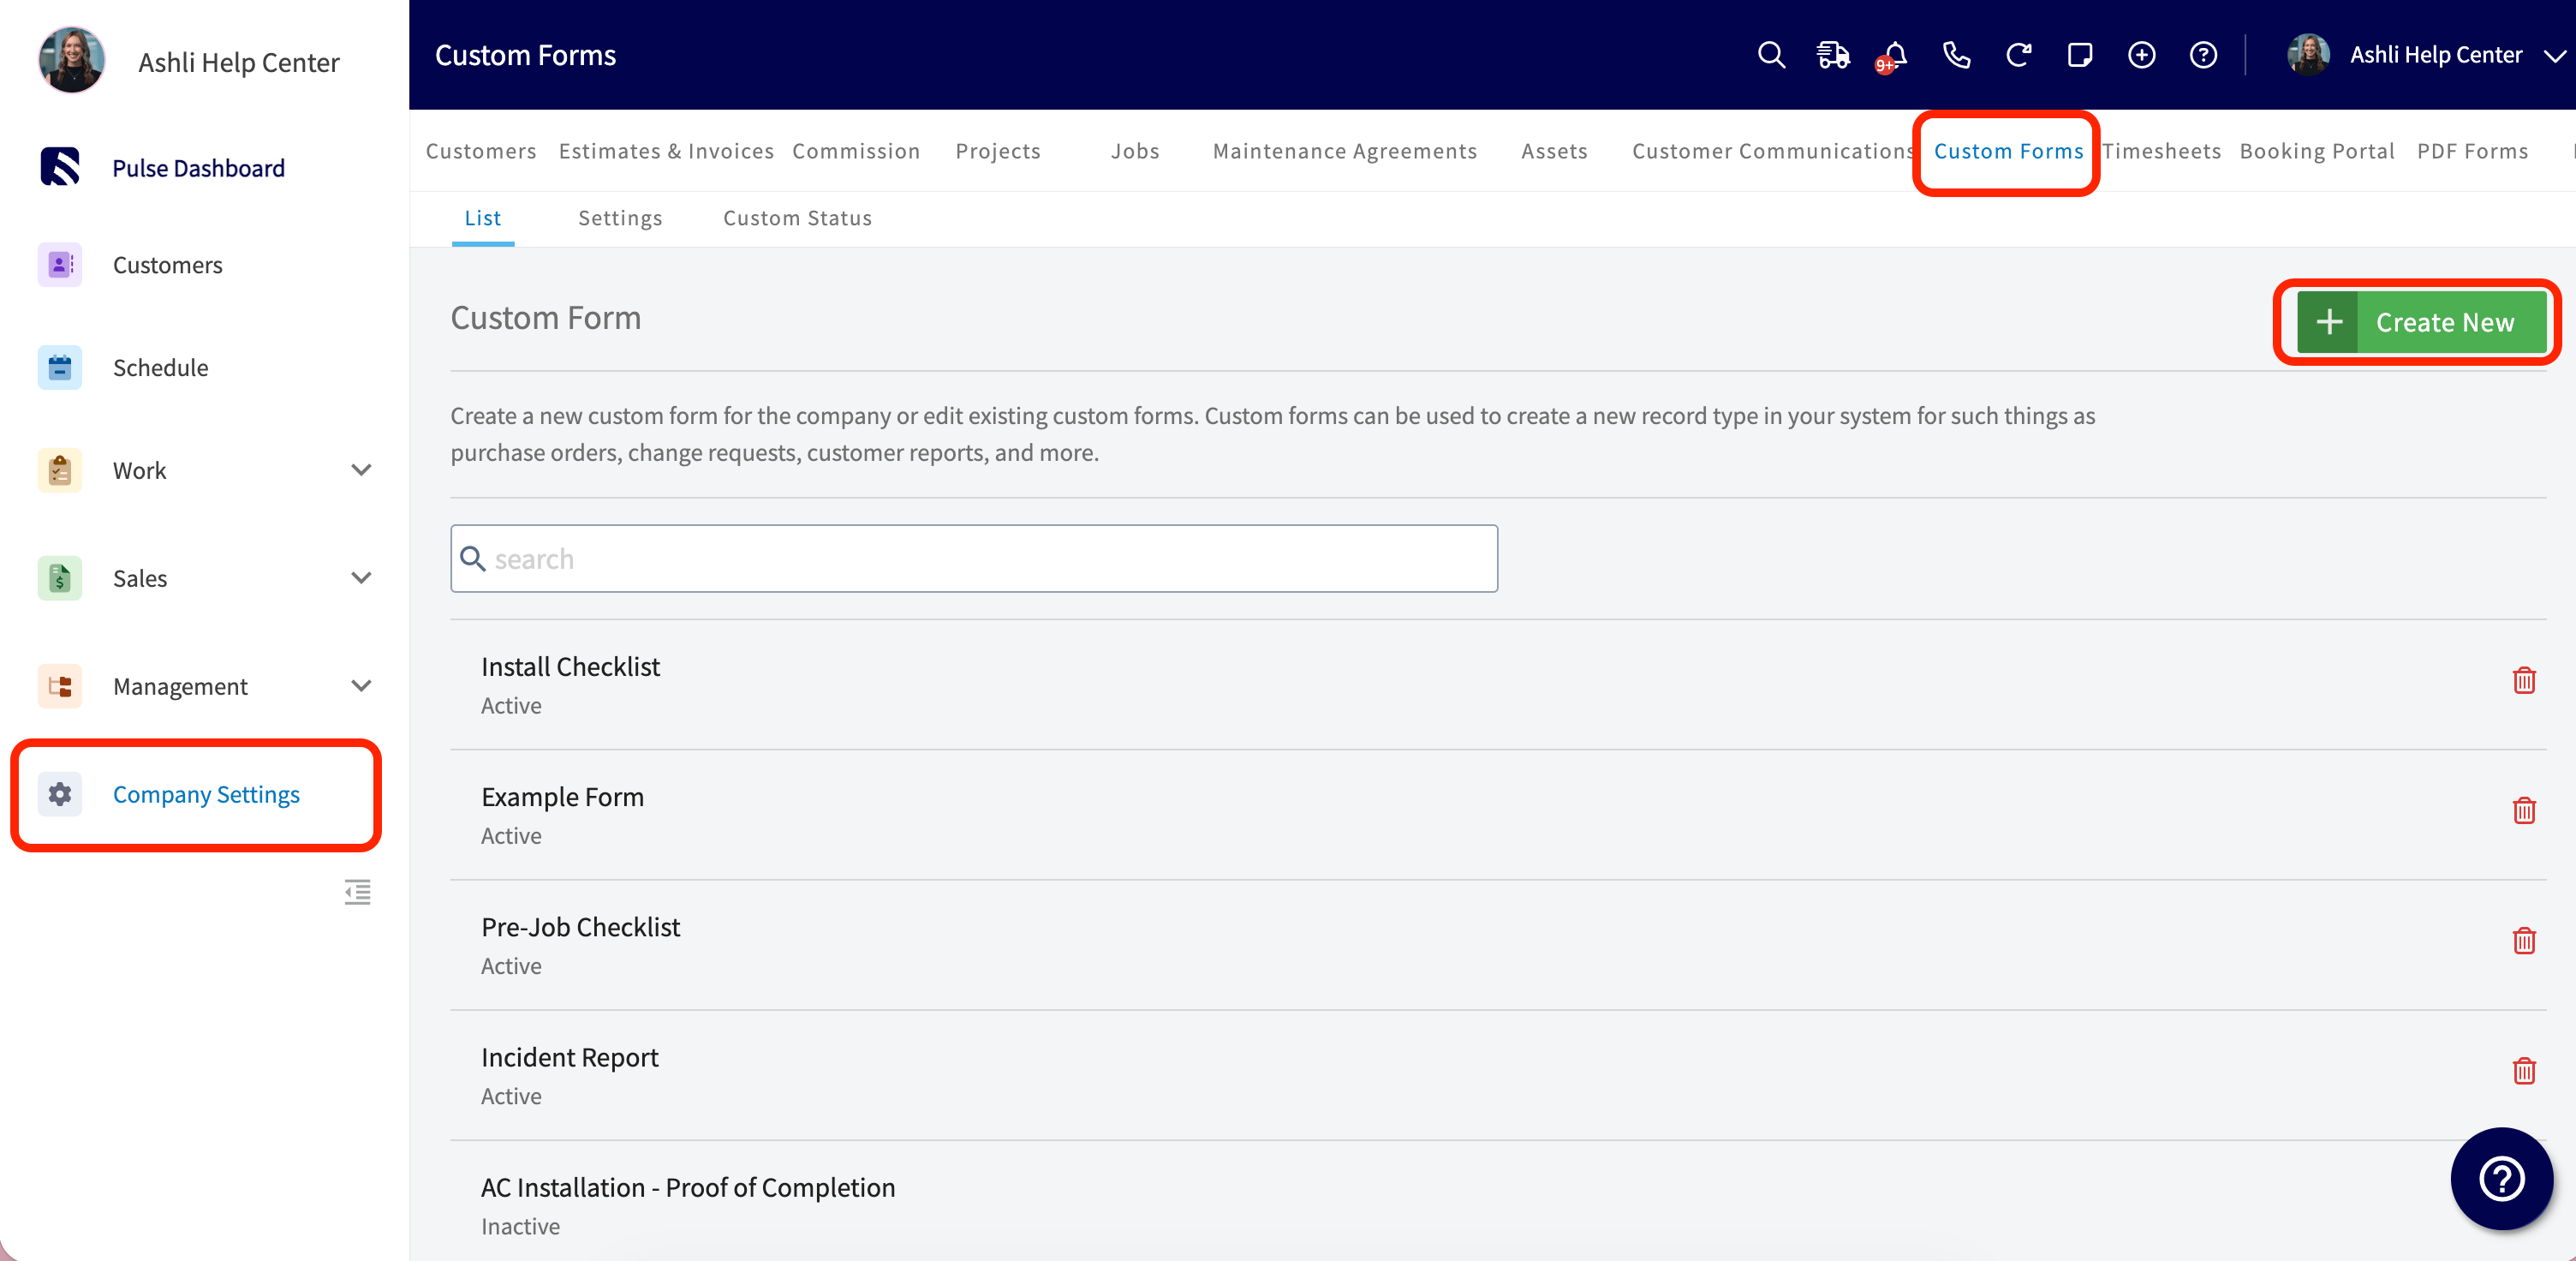
1. Go to **Company Settings** and select **Custom Forms**.
2. Review the forms you've already created, or select **Create New**.
 3. Select **Form Settings** in the top menu to open the settings panel.
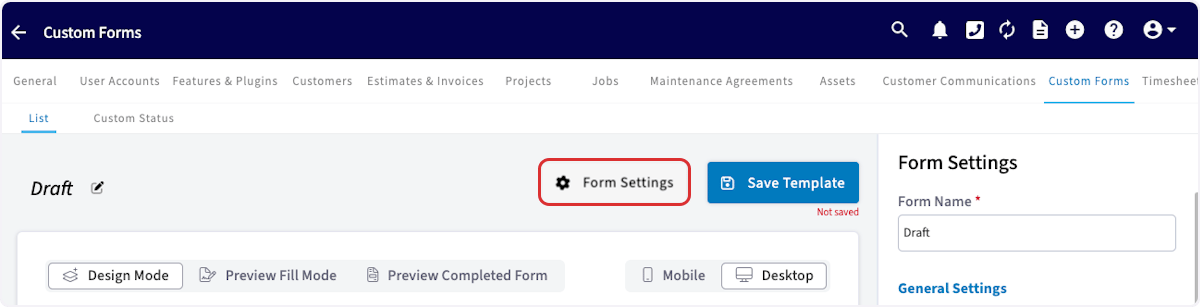 4. Name the form.
5. Set the field label and contents font sizes.
6. Choose which record types the form can attach to.
For a full breakdown of every setting available, see [Custom Form Settings Details](/jobs/custom-forms/settings).
### Start from an existing PDF
You can import a PDF or image file to use as the background of a custom form, then place fields on top of it. This is the route to take when your company already has a form that works well, or a form that has to keep a specific format for regulatory reasons.
1. In the form editor, select **Import PDF**.
4. Name the form.
5. Set the field label and contents font sizes.
6. Choose which record types the form can attach to.
For a full breakdown of every setting available, see [Custom Form Settings Details](/jobs/custom-forms/settings).
### Start from an existing PDF
You can import a PDF or image file to use as the background of a custom form, then place fields on top of it. This is the route to take when your company already has a form that works well, or a form that has to keep a specific format for regulatory reasons.
1. In the form editor, select **Import PDF**.
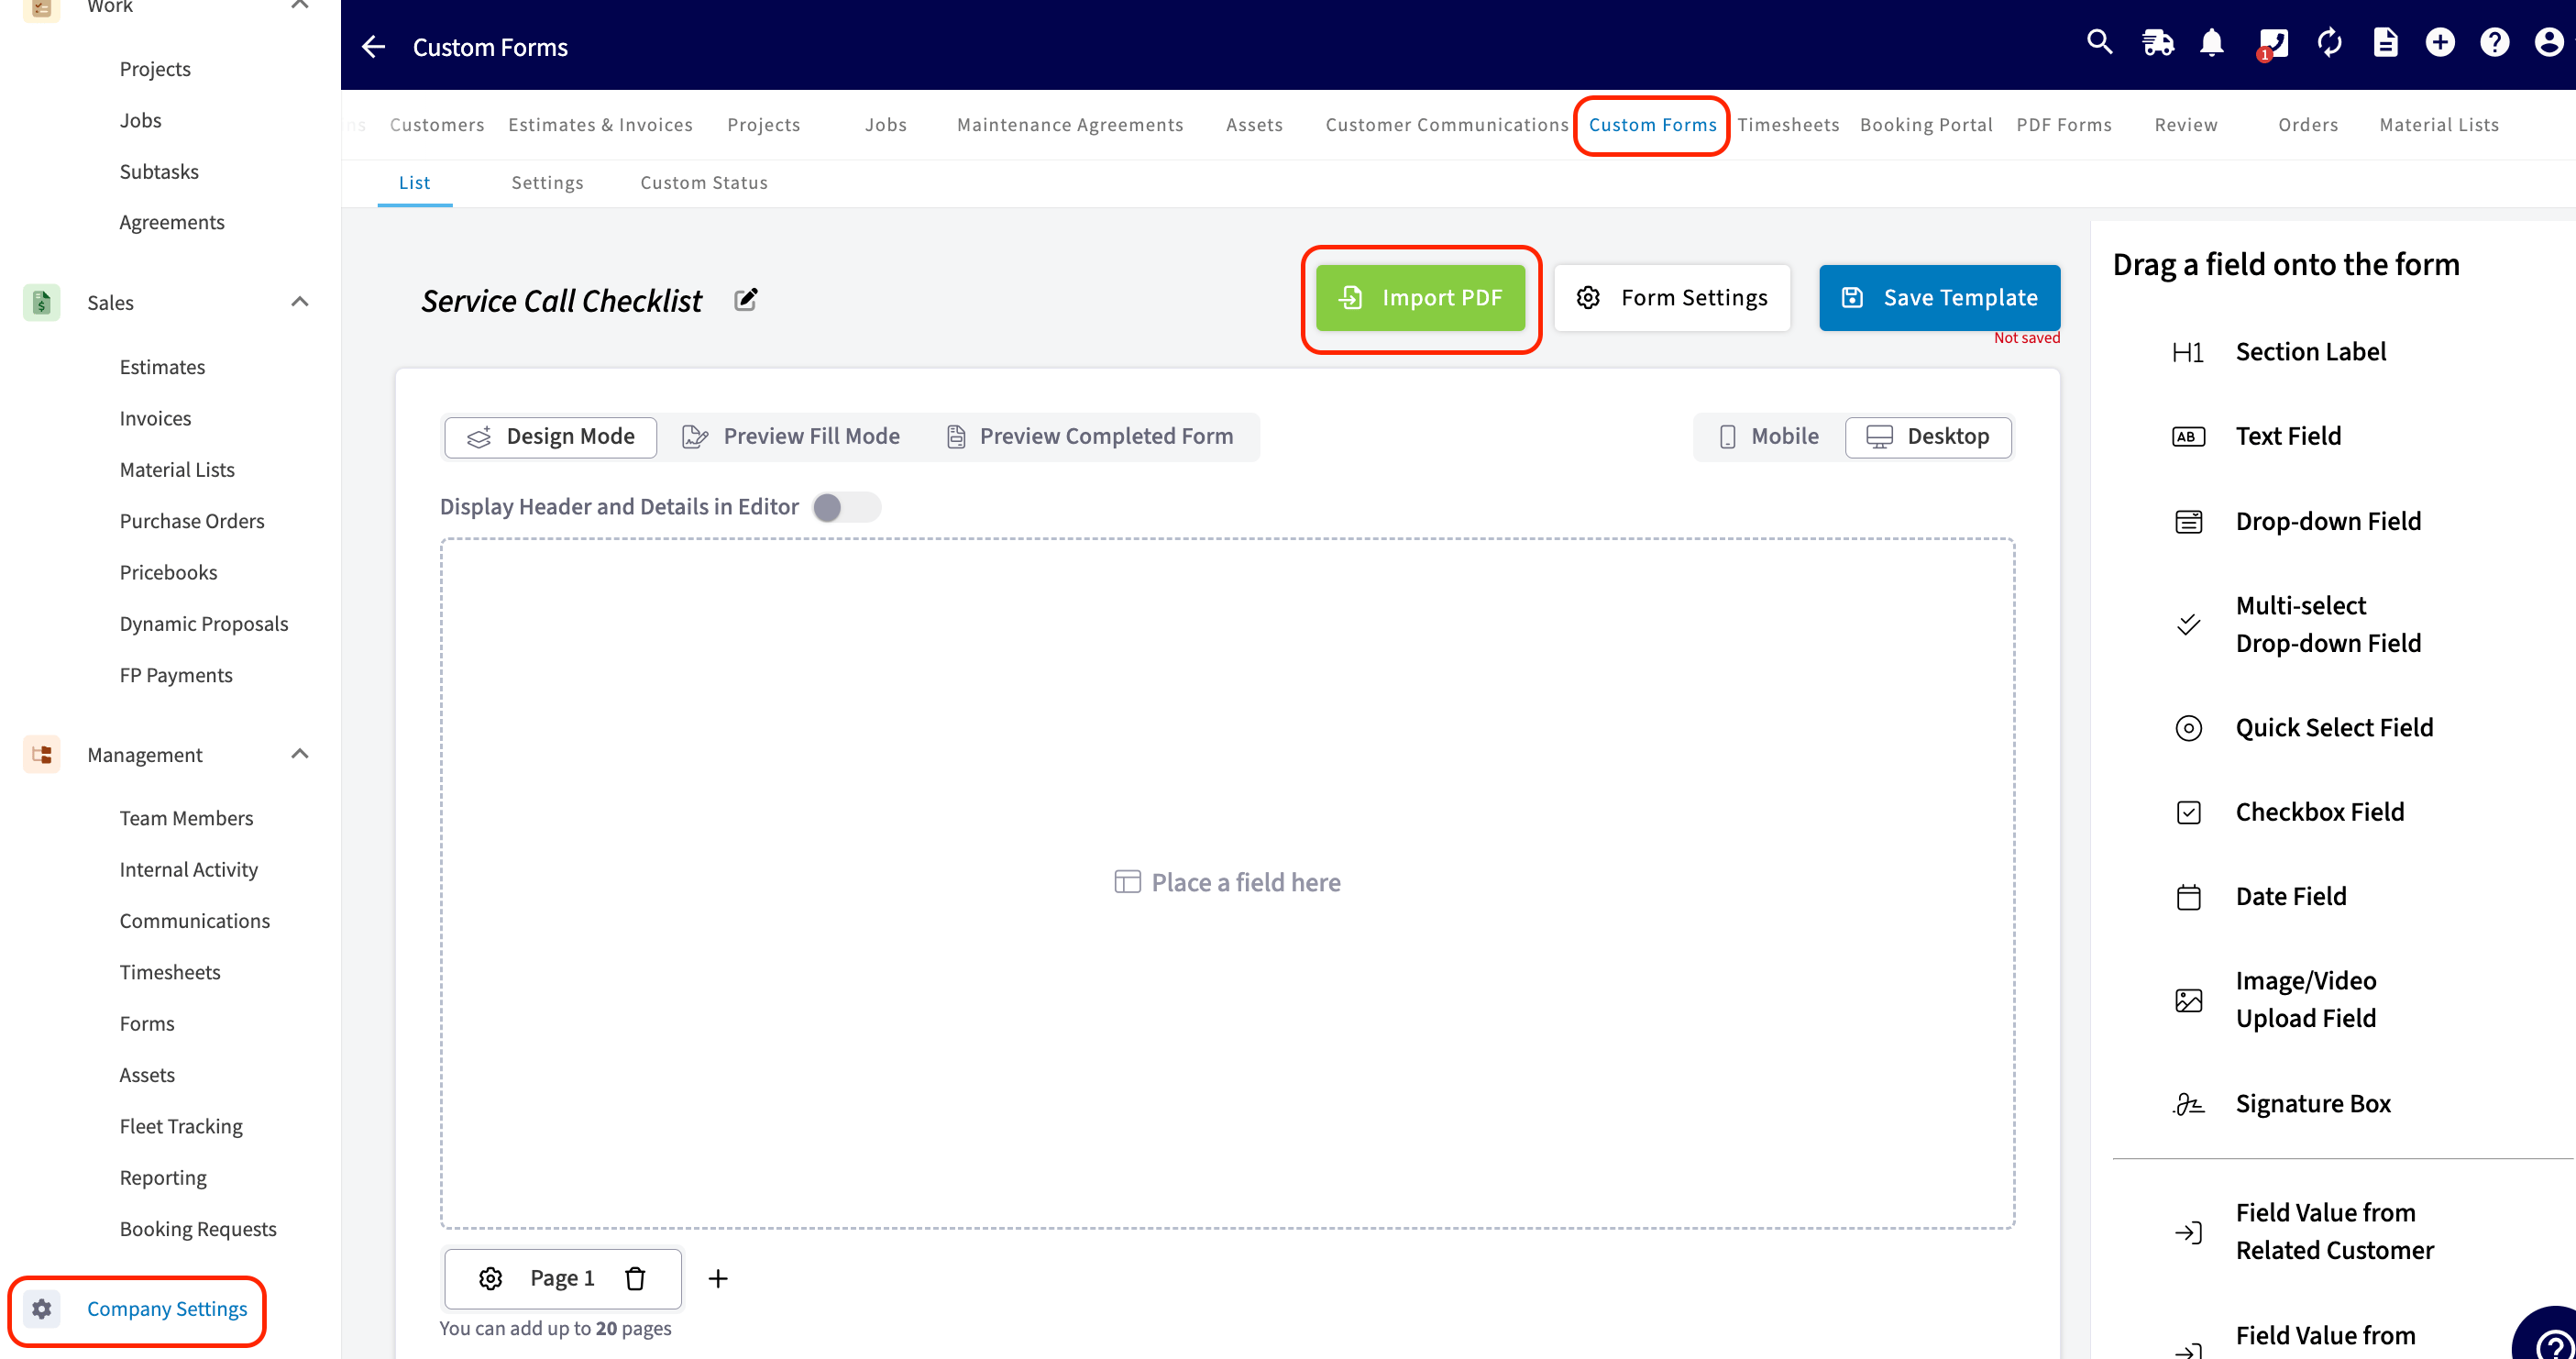 2. Choose **Replace** to swap out the pages currently open, or **Append** to add the imported pages to the form you already have open.
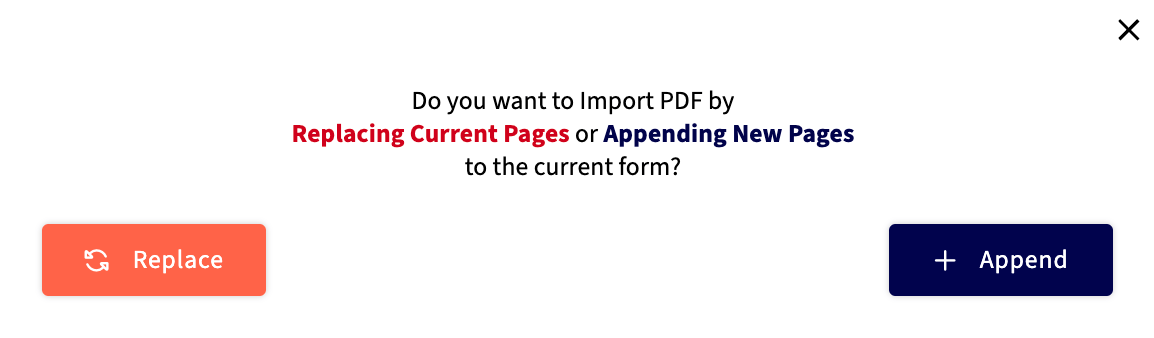 3. Add fields on top of the imported pages the same way you would on a blank form.
### Add and arrange fields
1. Close **Form Settings** by selecting it again, so the field menu is active.
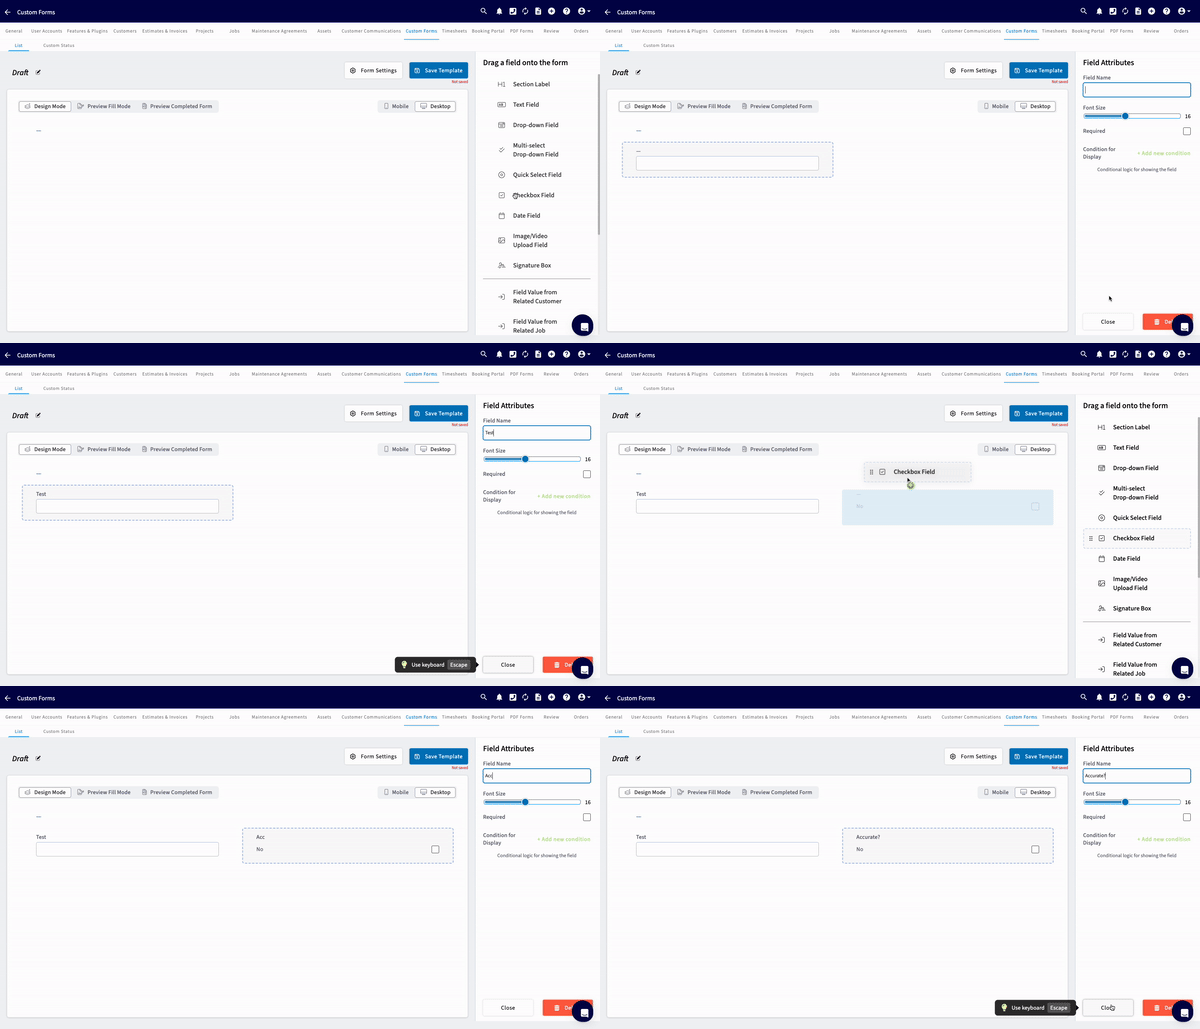
2. Drag a field from the right-side menu onto the form.
3. Position the field by dragging and stretching it where you want it on the page.
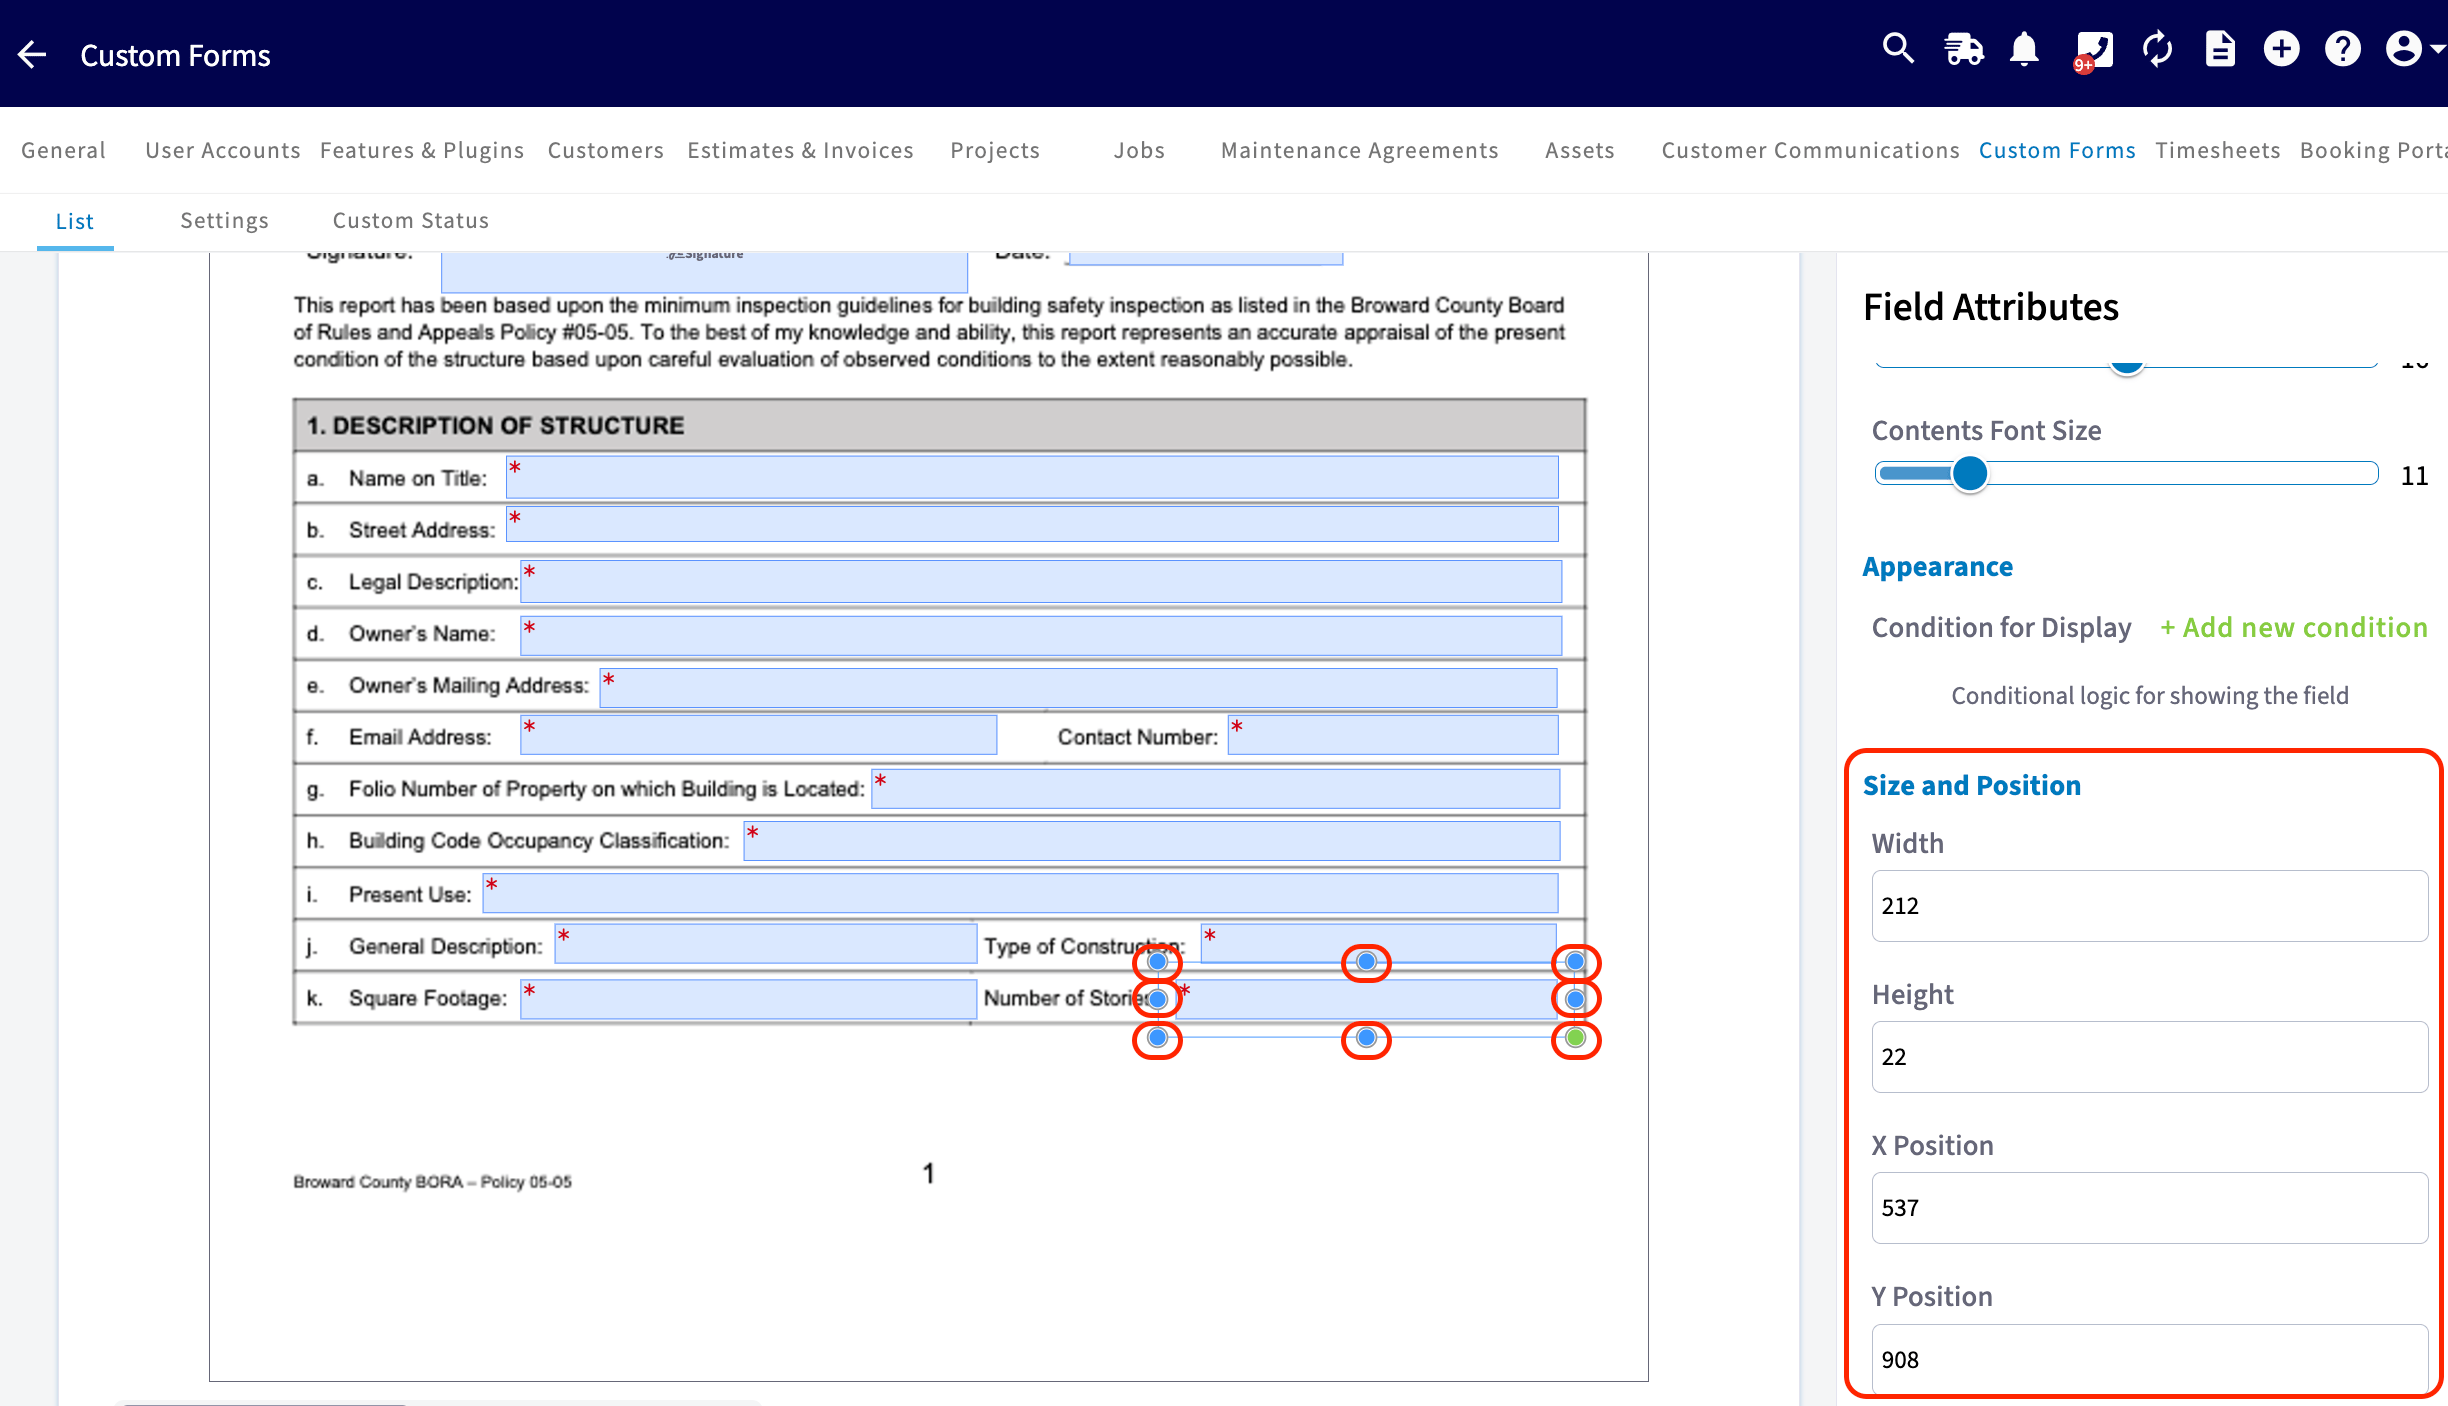
4. Set an exact size and placement, if you need one, under **Size and Position** in the field's attributes.
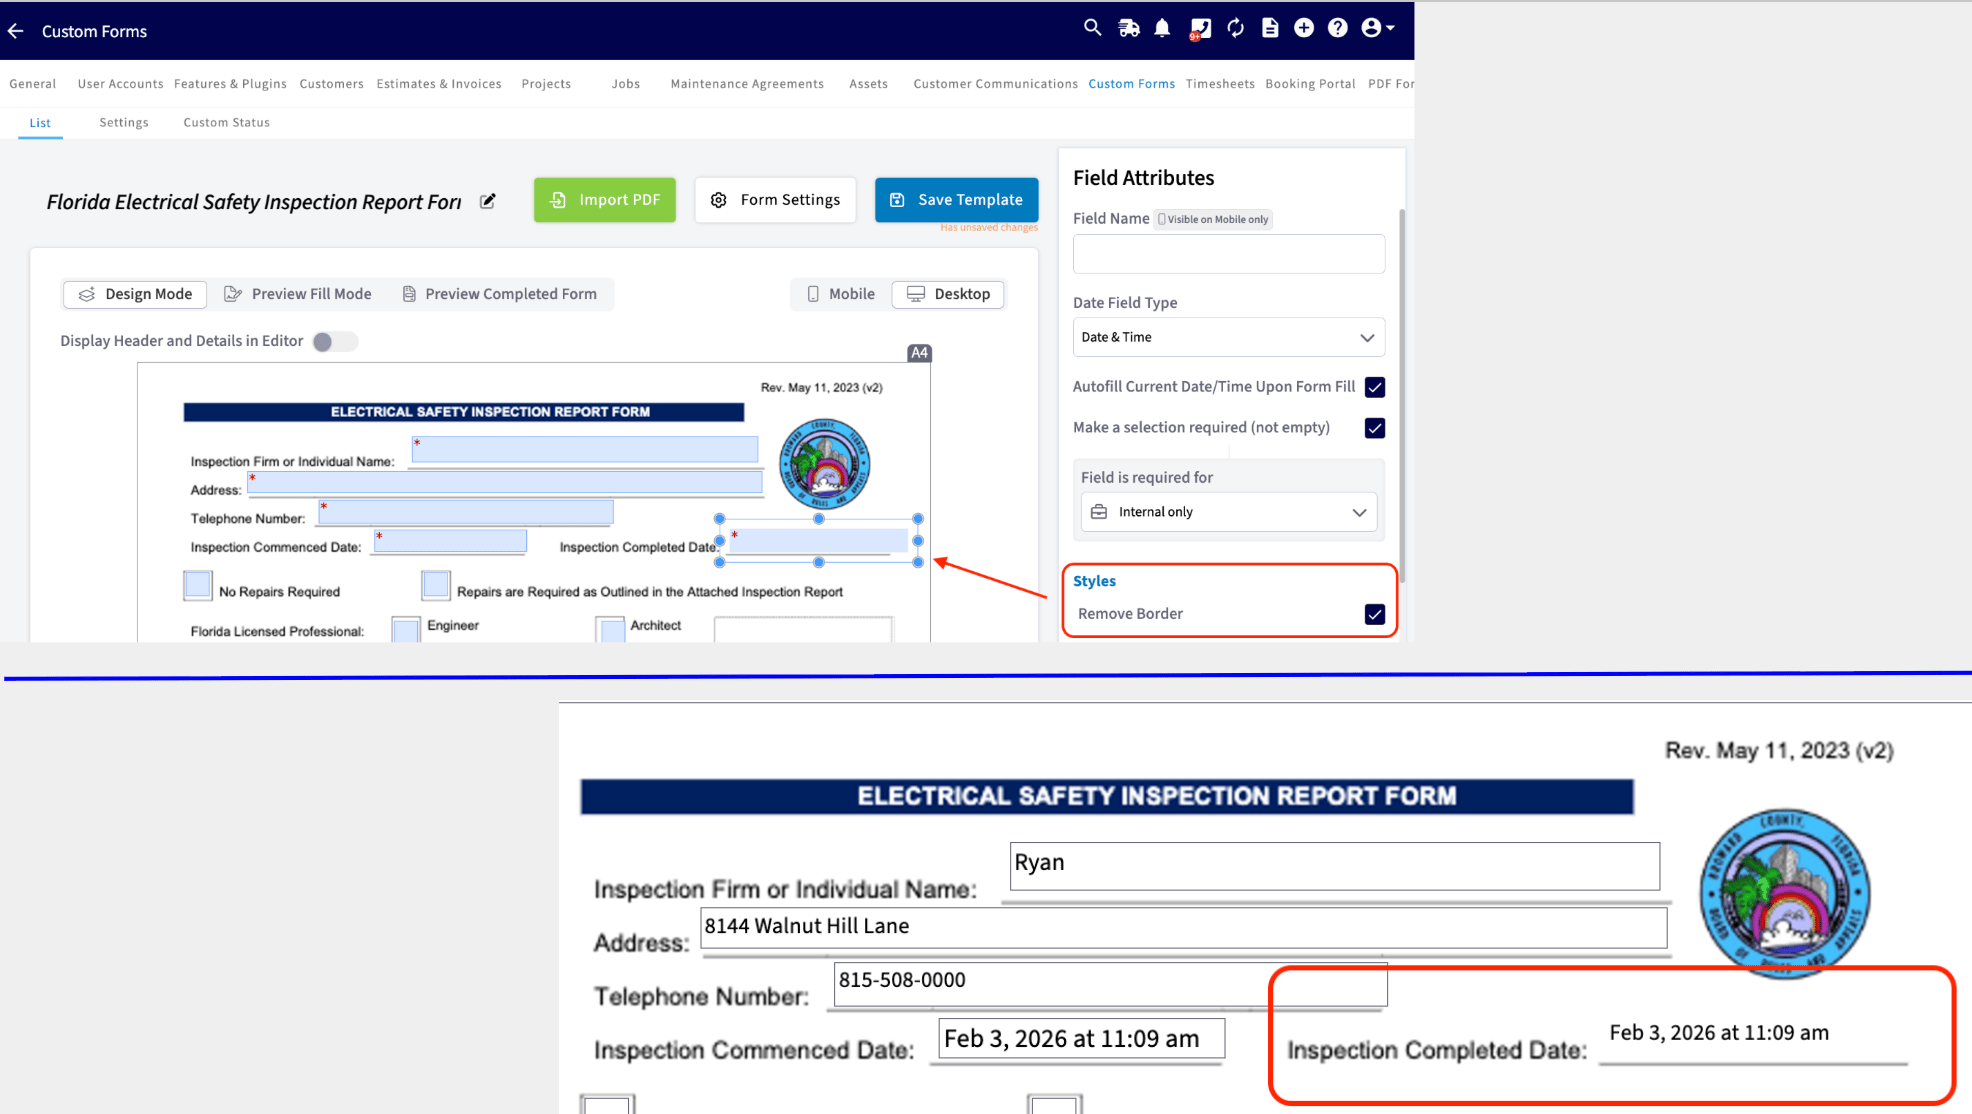
5. Check **Remove Border** under **Styles** so the entry appears without a box around it when your customer sees it.
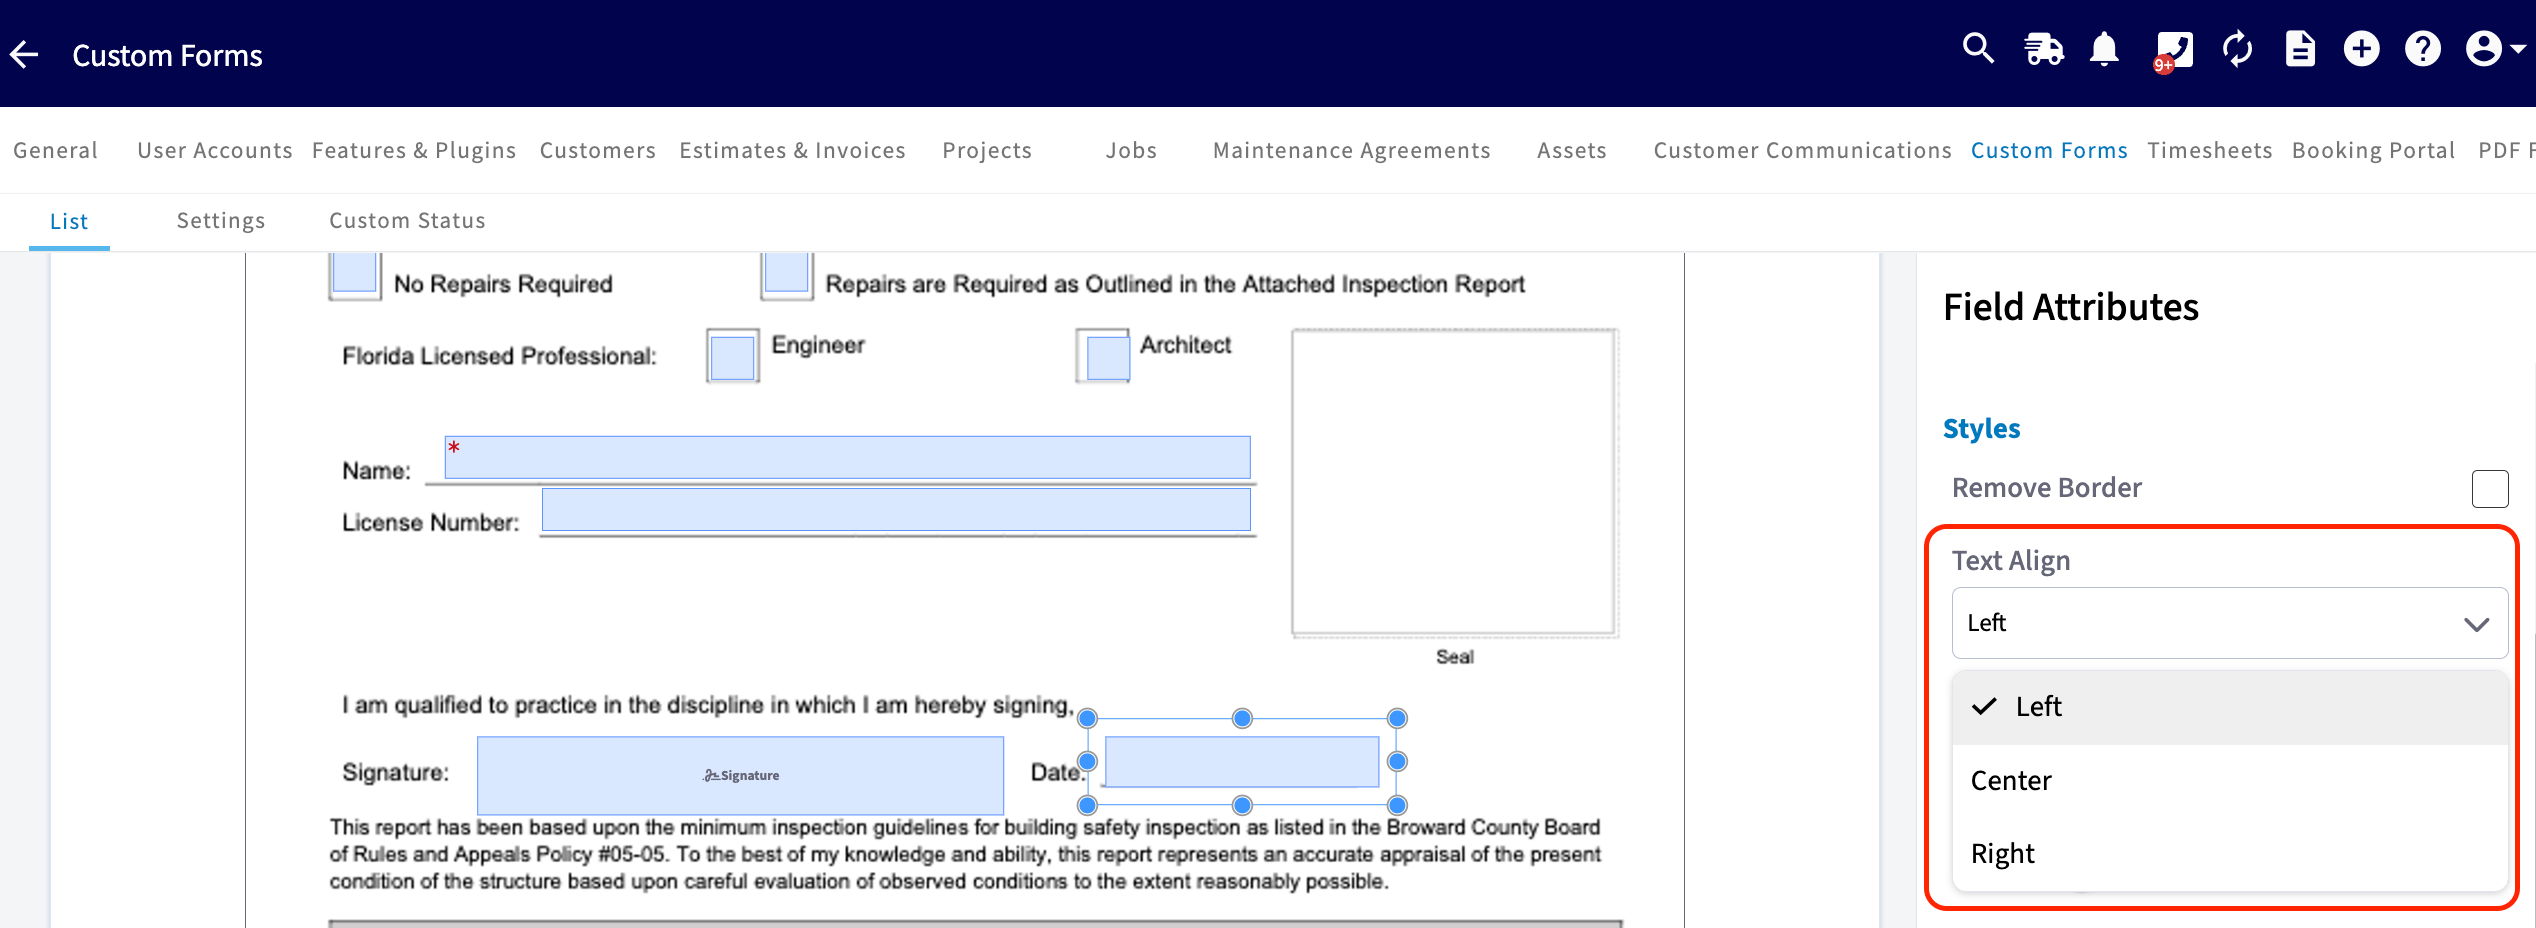
6. Set **Text Align** under **Styles** to **Left**, **Center**, or **Right**.
7. Remove a field by dragging it back to the right-side menu, by selecting the field and choosing **Actions > Delete**, or by selecting the field and pressing backspace.
8. Select **Save Template** to save the form.
3. Add fields on top of the imported pages the same way you would on a blank form.
### Add and arrange fields
1. Close **Form Settings** by selecting it again, so the field menu is active.
2. Drag a field from the right-side menu onto the form.
3. Position the field by dragging and stretching it where you want it on the page.
4. Set an exact size and placement, if you need one, under **Size and Position** in the field's attributes.
5. Check **Remove Border** under **Styles** so the entry appears without a box around it when your customer sees it.
6. Set **Text Align** under **Styles** to **Left**, **Center**, or **Right**.
7. Remove a field by dragging it back to the right-side menu, by selecting the field and choosing **Actions > Delete**, or by selecting the field and pressing backspace.
8. Select **Save Template** to save the form.
 Every field has a **Field Attributes** panel on the right. **Styles** is where **Remove Border** and **Text Align** live.
 **Size and Position** is where you enter the field's exact **Width**, **Height**, **X Position**, and **Y Position** on the page.
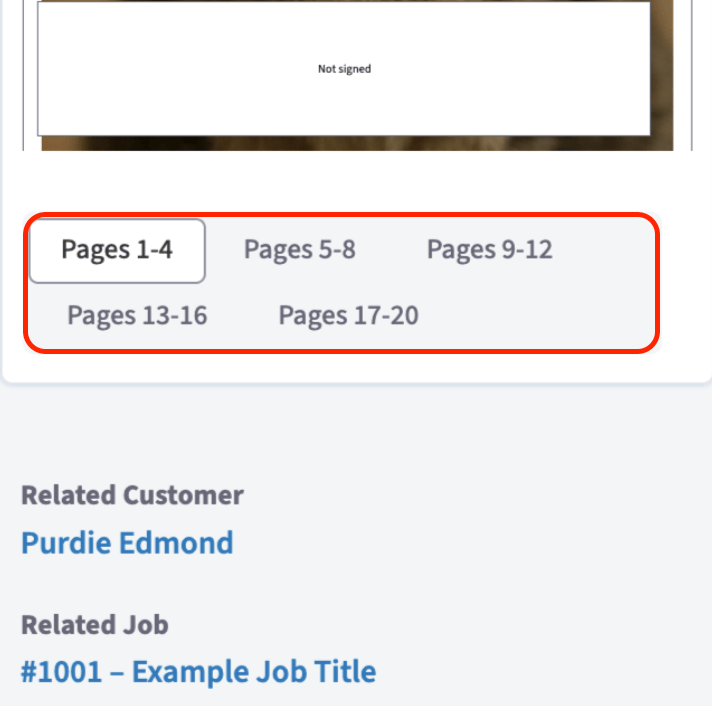
 A custom form can be up to 20 pages. Longer forms are paginated so every page loads, including pages that use a PDF background — the web app paginates every 10 pages, and the mobile app paginates every 4 pages.
 ### Set required fields
Mark a field as required for your employee and/or your customer by checking the box in that field's attributes. A **Field is required for** selector sets a field to be required internally only. Required fields make sure the details you can't lose — a signature, a photo, a serial number — get captured every time.
### Hide internal-only fields from customers
Select a field and check **Internally Visible Field Only** to keep it off customer-facing displays. The field stays visible to your team but doesn't appear to the customer when the form is sent to them, including on PDFs. You can designate internal PDFs for printing so those fields still appear on your team's copy, and hidden internal related-record custom field values cascade to custom forms.
### Set required fields
Mark a field as required for your employee and/or your customer by checking the box in that field's attributes. A **Field is required for** selector sets a field to be required internally only. Required fields make sure the details you can't lose — a signature, a photo, a serial number — get captured every time.
### Hide internal-only fields from customers
Select a field and check **Internally Visible Field Only** to keep it off customer-facing displays. The field stays visible to your team but doesn't appear to the customer when the form is sent to them, including on PDFs. You can designate internal PDFs for printing so those fields still appear on your team's copy, and hidden internal related-record custom field values cascade to custom forms.
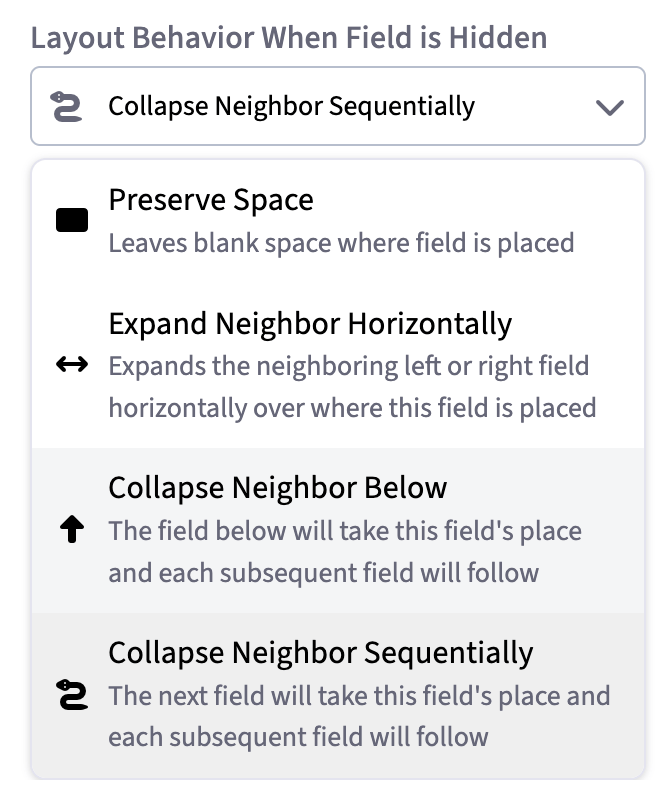
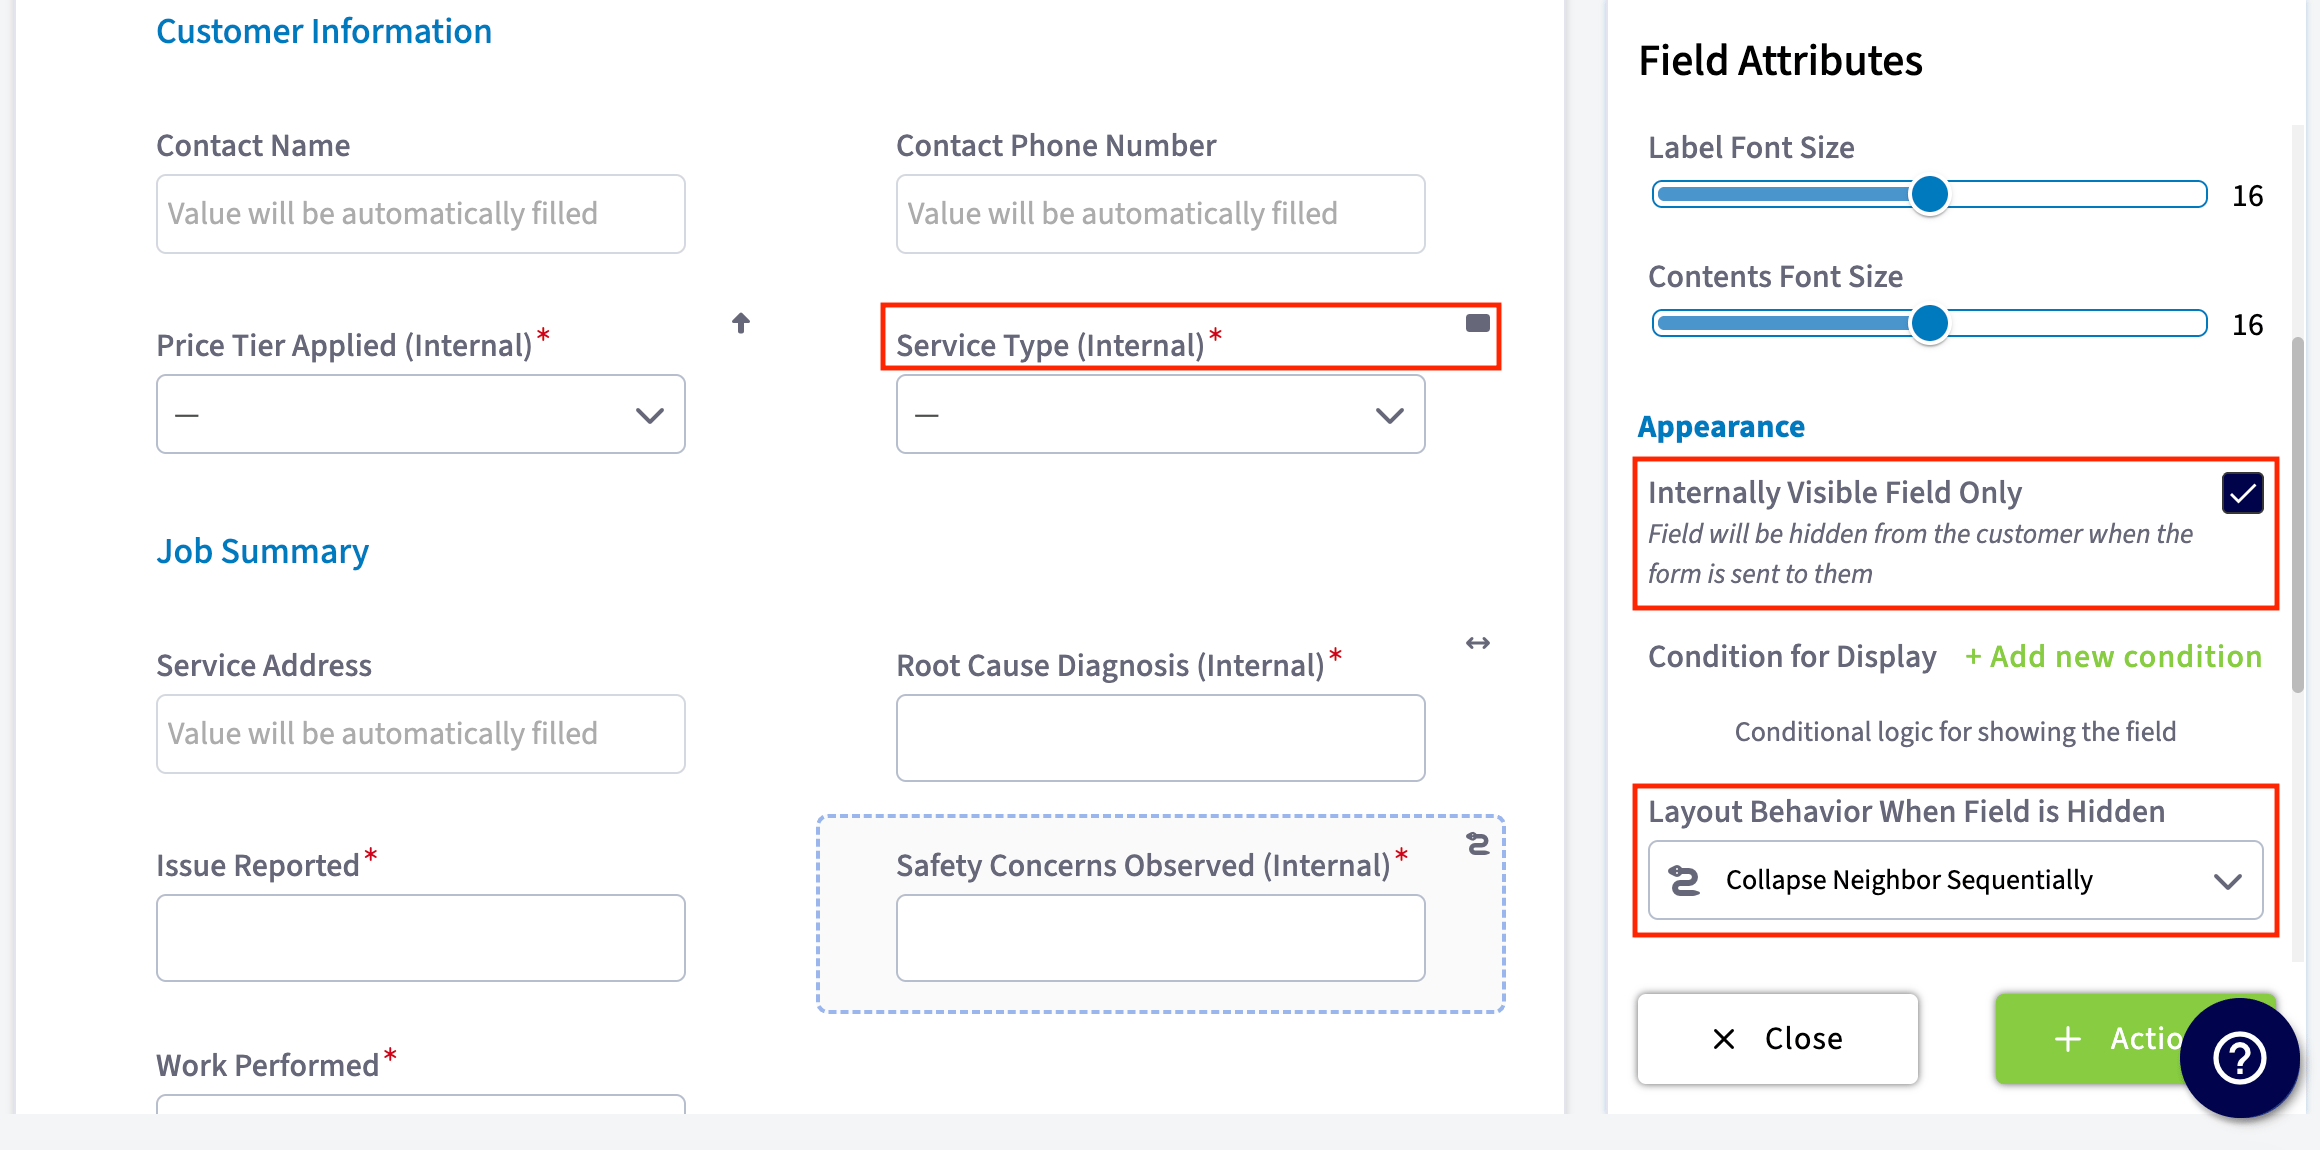 **Layout Behavior When Field is Hidden** controls what happens to the space a hidden field leaves behind:
| **Layout behavior** | **What it does** |
| ---------------------------------- | ----------------------------------------------------------------------------------------- |
| **Preserve Space** | Leaves blank space where the field is placed. |
| **Expand Neighbor Horizontally** | Expands the neighboring left or right field horizontally over where this field is placed. |
| **Collapse Neighbor Below** | The field below takes this field's place, and each subsequent field follows. |
| **Collapse Neighbor Sequentially** | The next field takes this field's place, and each subsequent field follows. |
**Layout Behavior When Field is Hidden** controls what happens to the space a hidden field leaves behind:
| **Layout behavior** | **What it does** |
| ---------------------------------- | ----------------------------------------------------------------------------------------- |
| **Preserve Space** | Leaves blank space where the field is placed. |
| **Expand Neighbor Horizontally** | Expands the neighboring left or right field horizontally over where this field is placed. |
| **Collapse Neighbor Below** | The field below takes this field's place, and each subsequent field follows. |
| **Collapse Neighbor Sequentially** | The next field takes this field's place, and each subsequent field follows. |
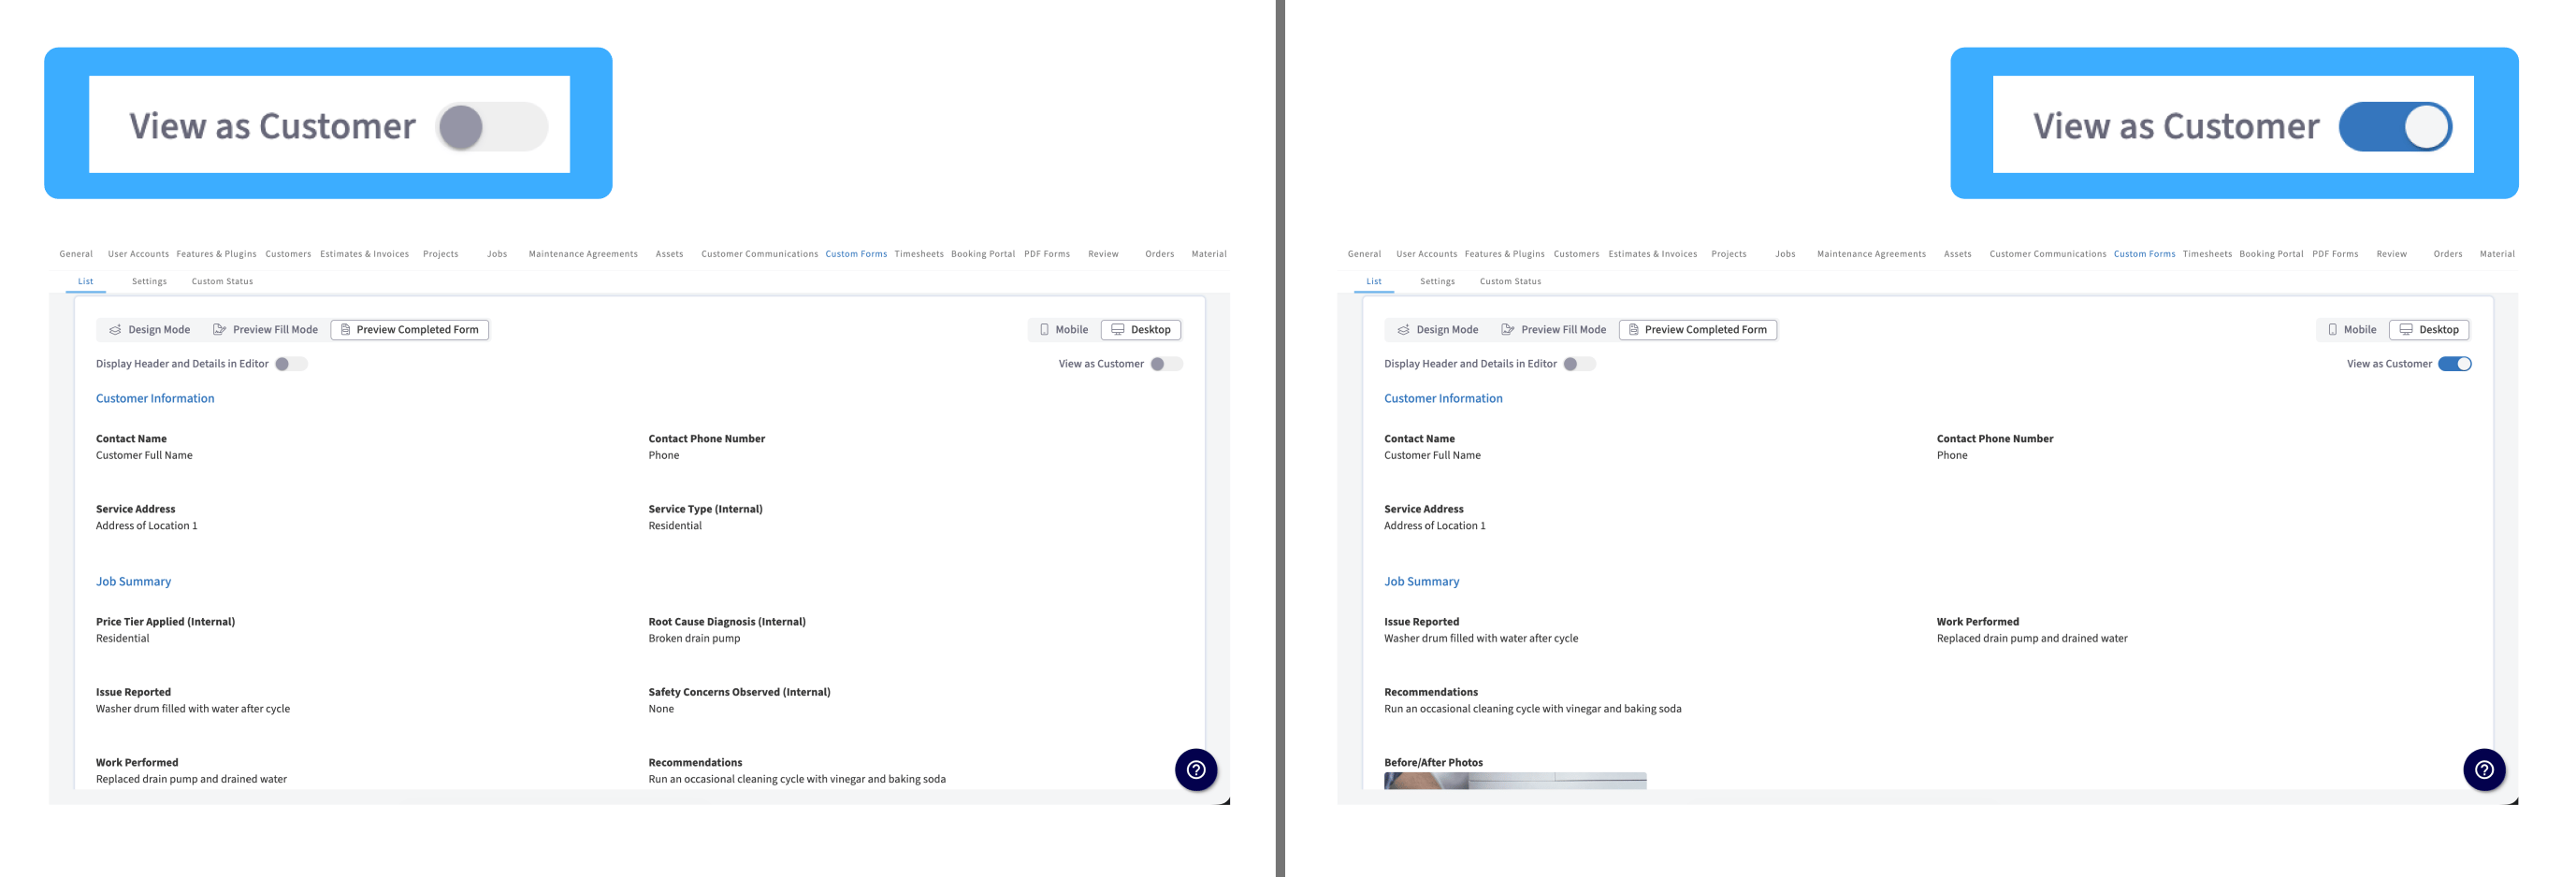
 Turn on **View as Customer** in the preview to see the form the way your customer will, with the internal fields hidden.
 ### Control who can edit fields
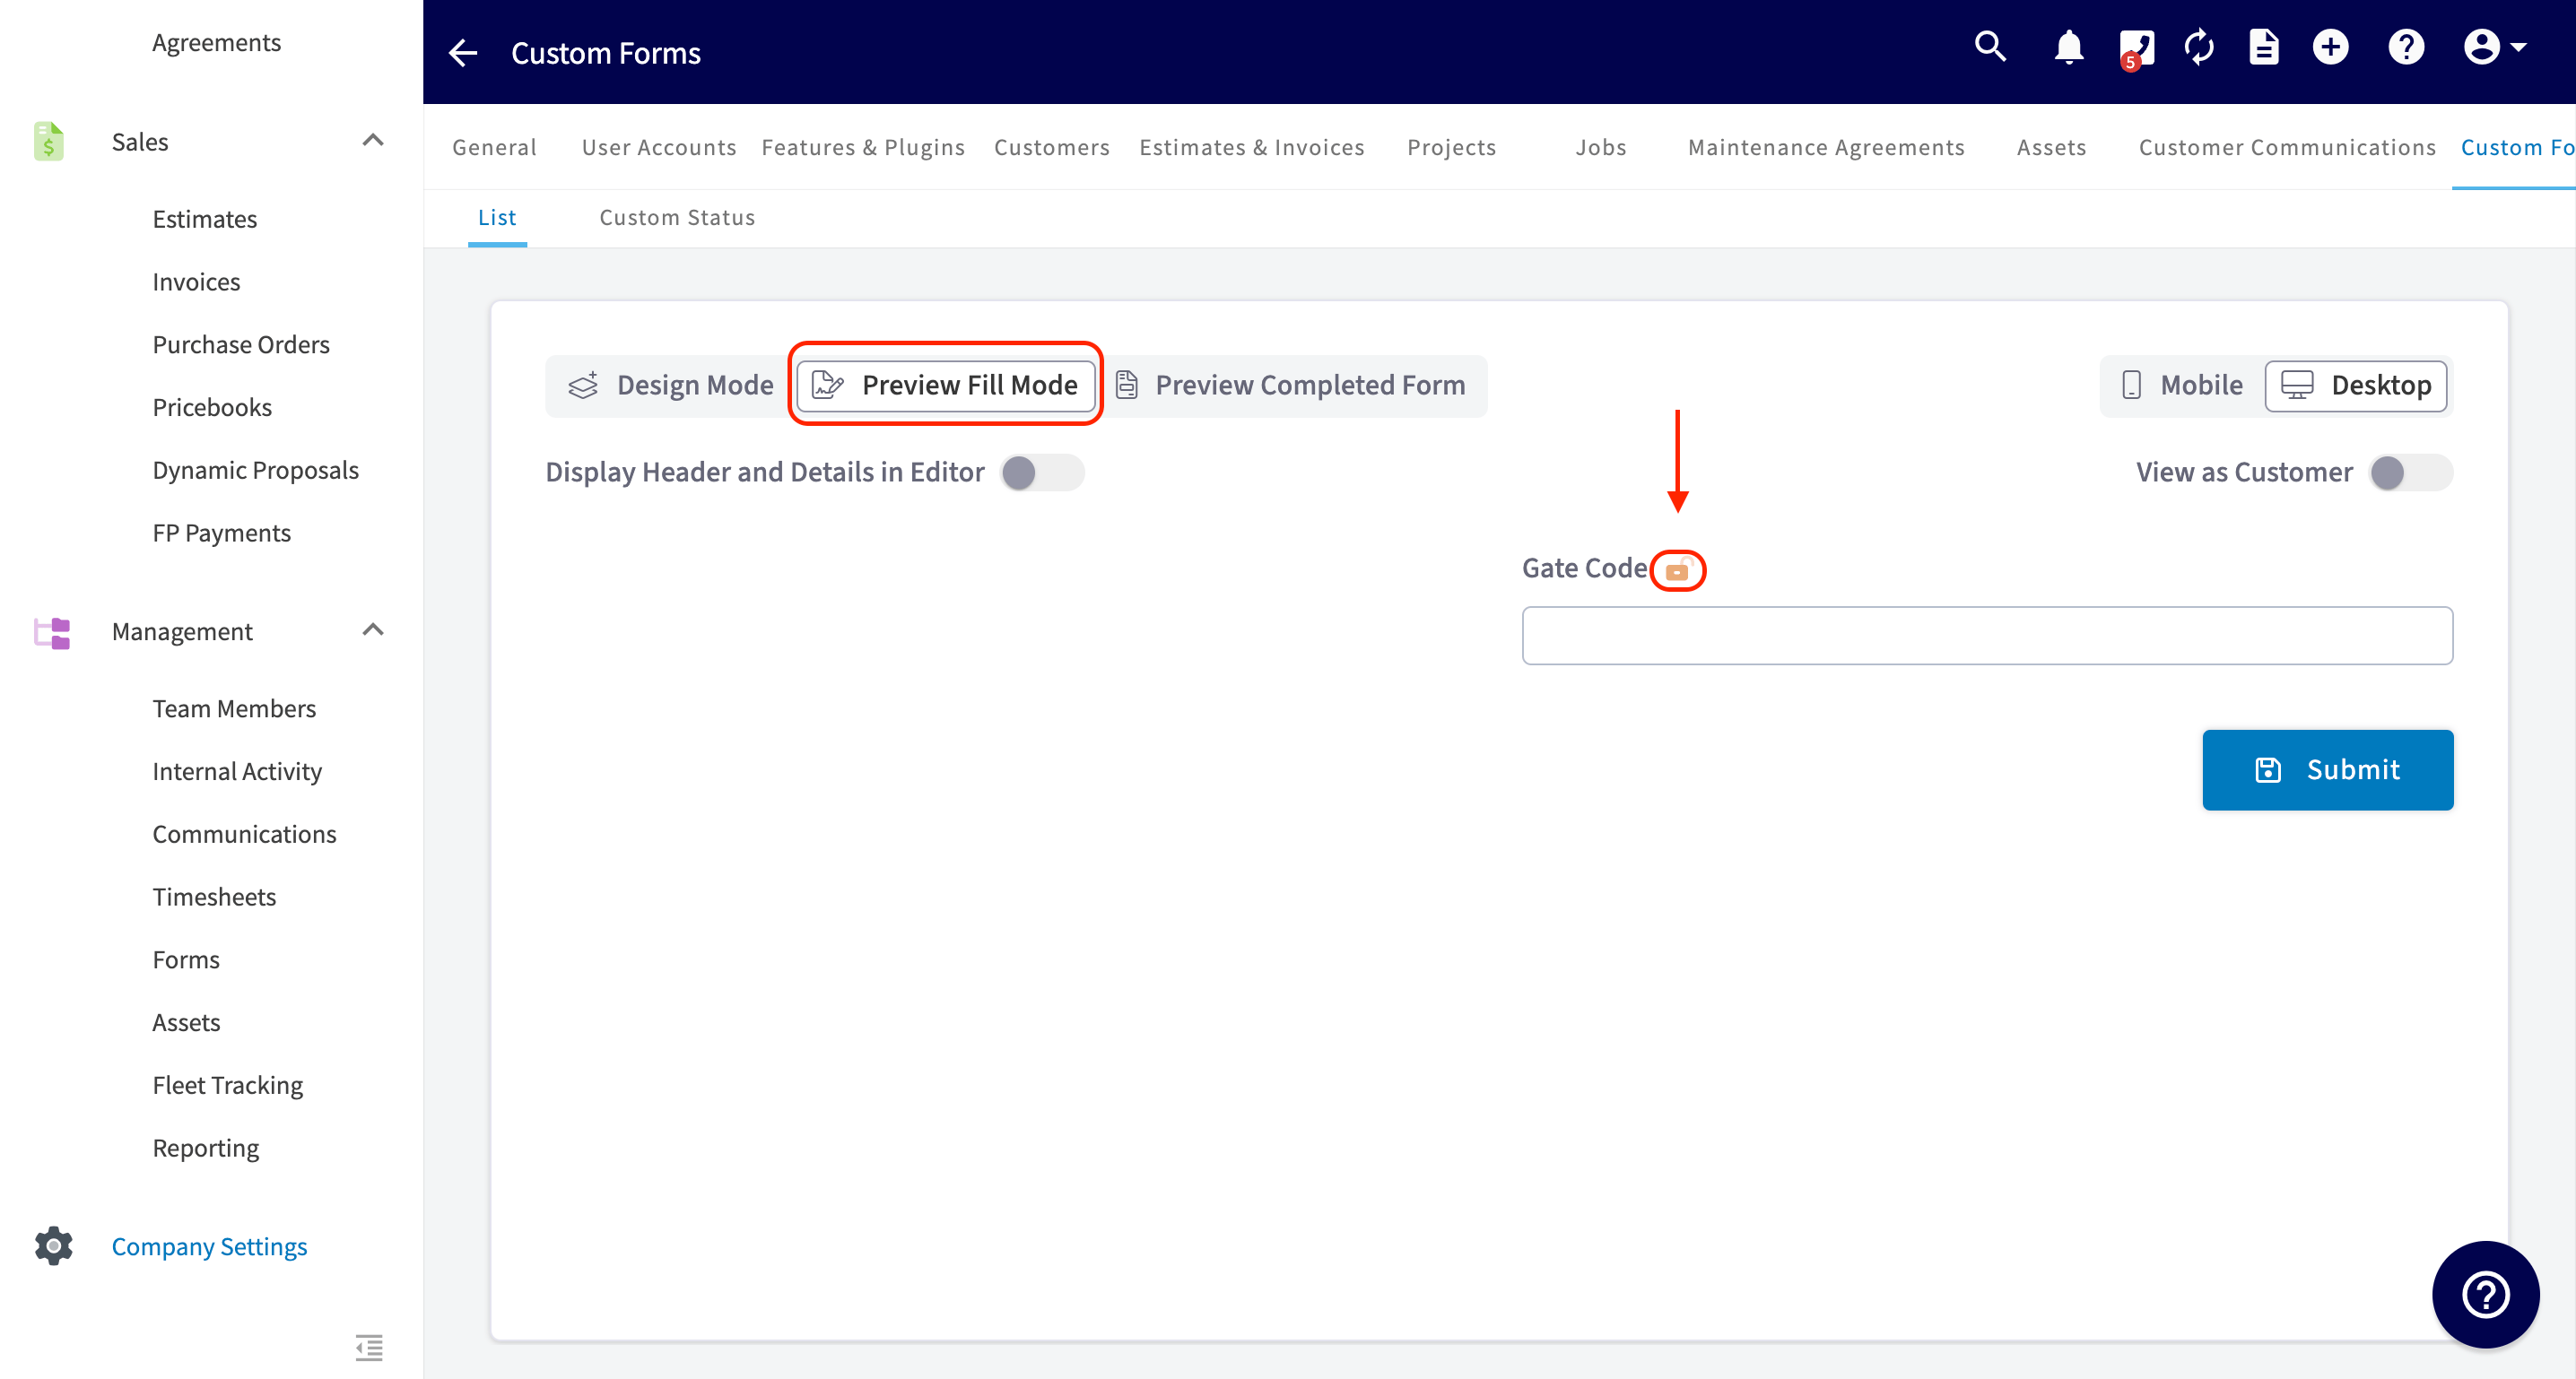
1. Switch from **Design Mode** to **Preview Fill Mode**.
2. Use the lock icon next to each field to grant or restrict edit access for your customer and/or your employee.
### Control who can edit fields
1. Switch from **Design Mode** to **Preview Fill Mode**.
2. Use the lock icon next to each field to grant or restrict edit access for your customer and/or your employee.
 ### Preview the form
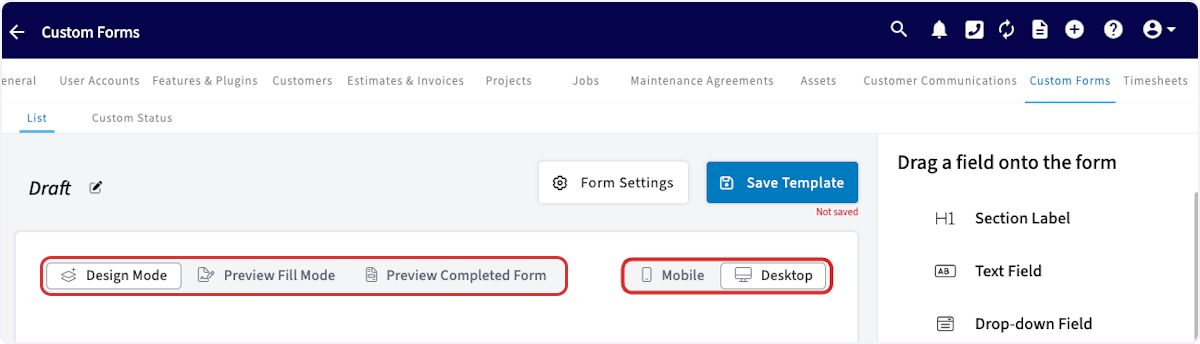
Use the mode selector to check your work before you put the form to use. You can preview any mode from a **Mobile** or **Desktop** perspective.
| **Mode** | **What it shows** |
| -------------------------- | ----------------------------------------------------------------------------------------- |
| **Design Mode** | Create and edit the form by dragging and dropping fields. |
| **Preview Fill Mode** | See the form as it appears while someone fills it out, and set which fields are editable. |
| **Preview Completed Form** | See how the form looks once every field has been filled. |
### Preview the form
Use the mode selector to check your work before you put the form to use. You can preview any mode from a **Mobile** or **Desktop** perspective.
| **Mode** | **What it shows** |
| -------------------------- | ----------------------------------------------------------------------------------------- |
| **Design Mode** | Create and edit the form by dragging and dropping fields. |
| **Preview Fill Mode** | See the form as it appears while someone fills it out, and set which fields are editable. |
| **Preview Completed Form** | See how the form looks once every field has been filled. |
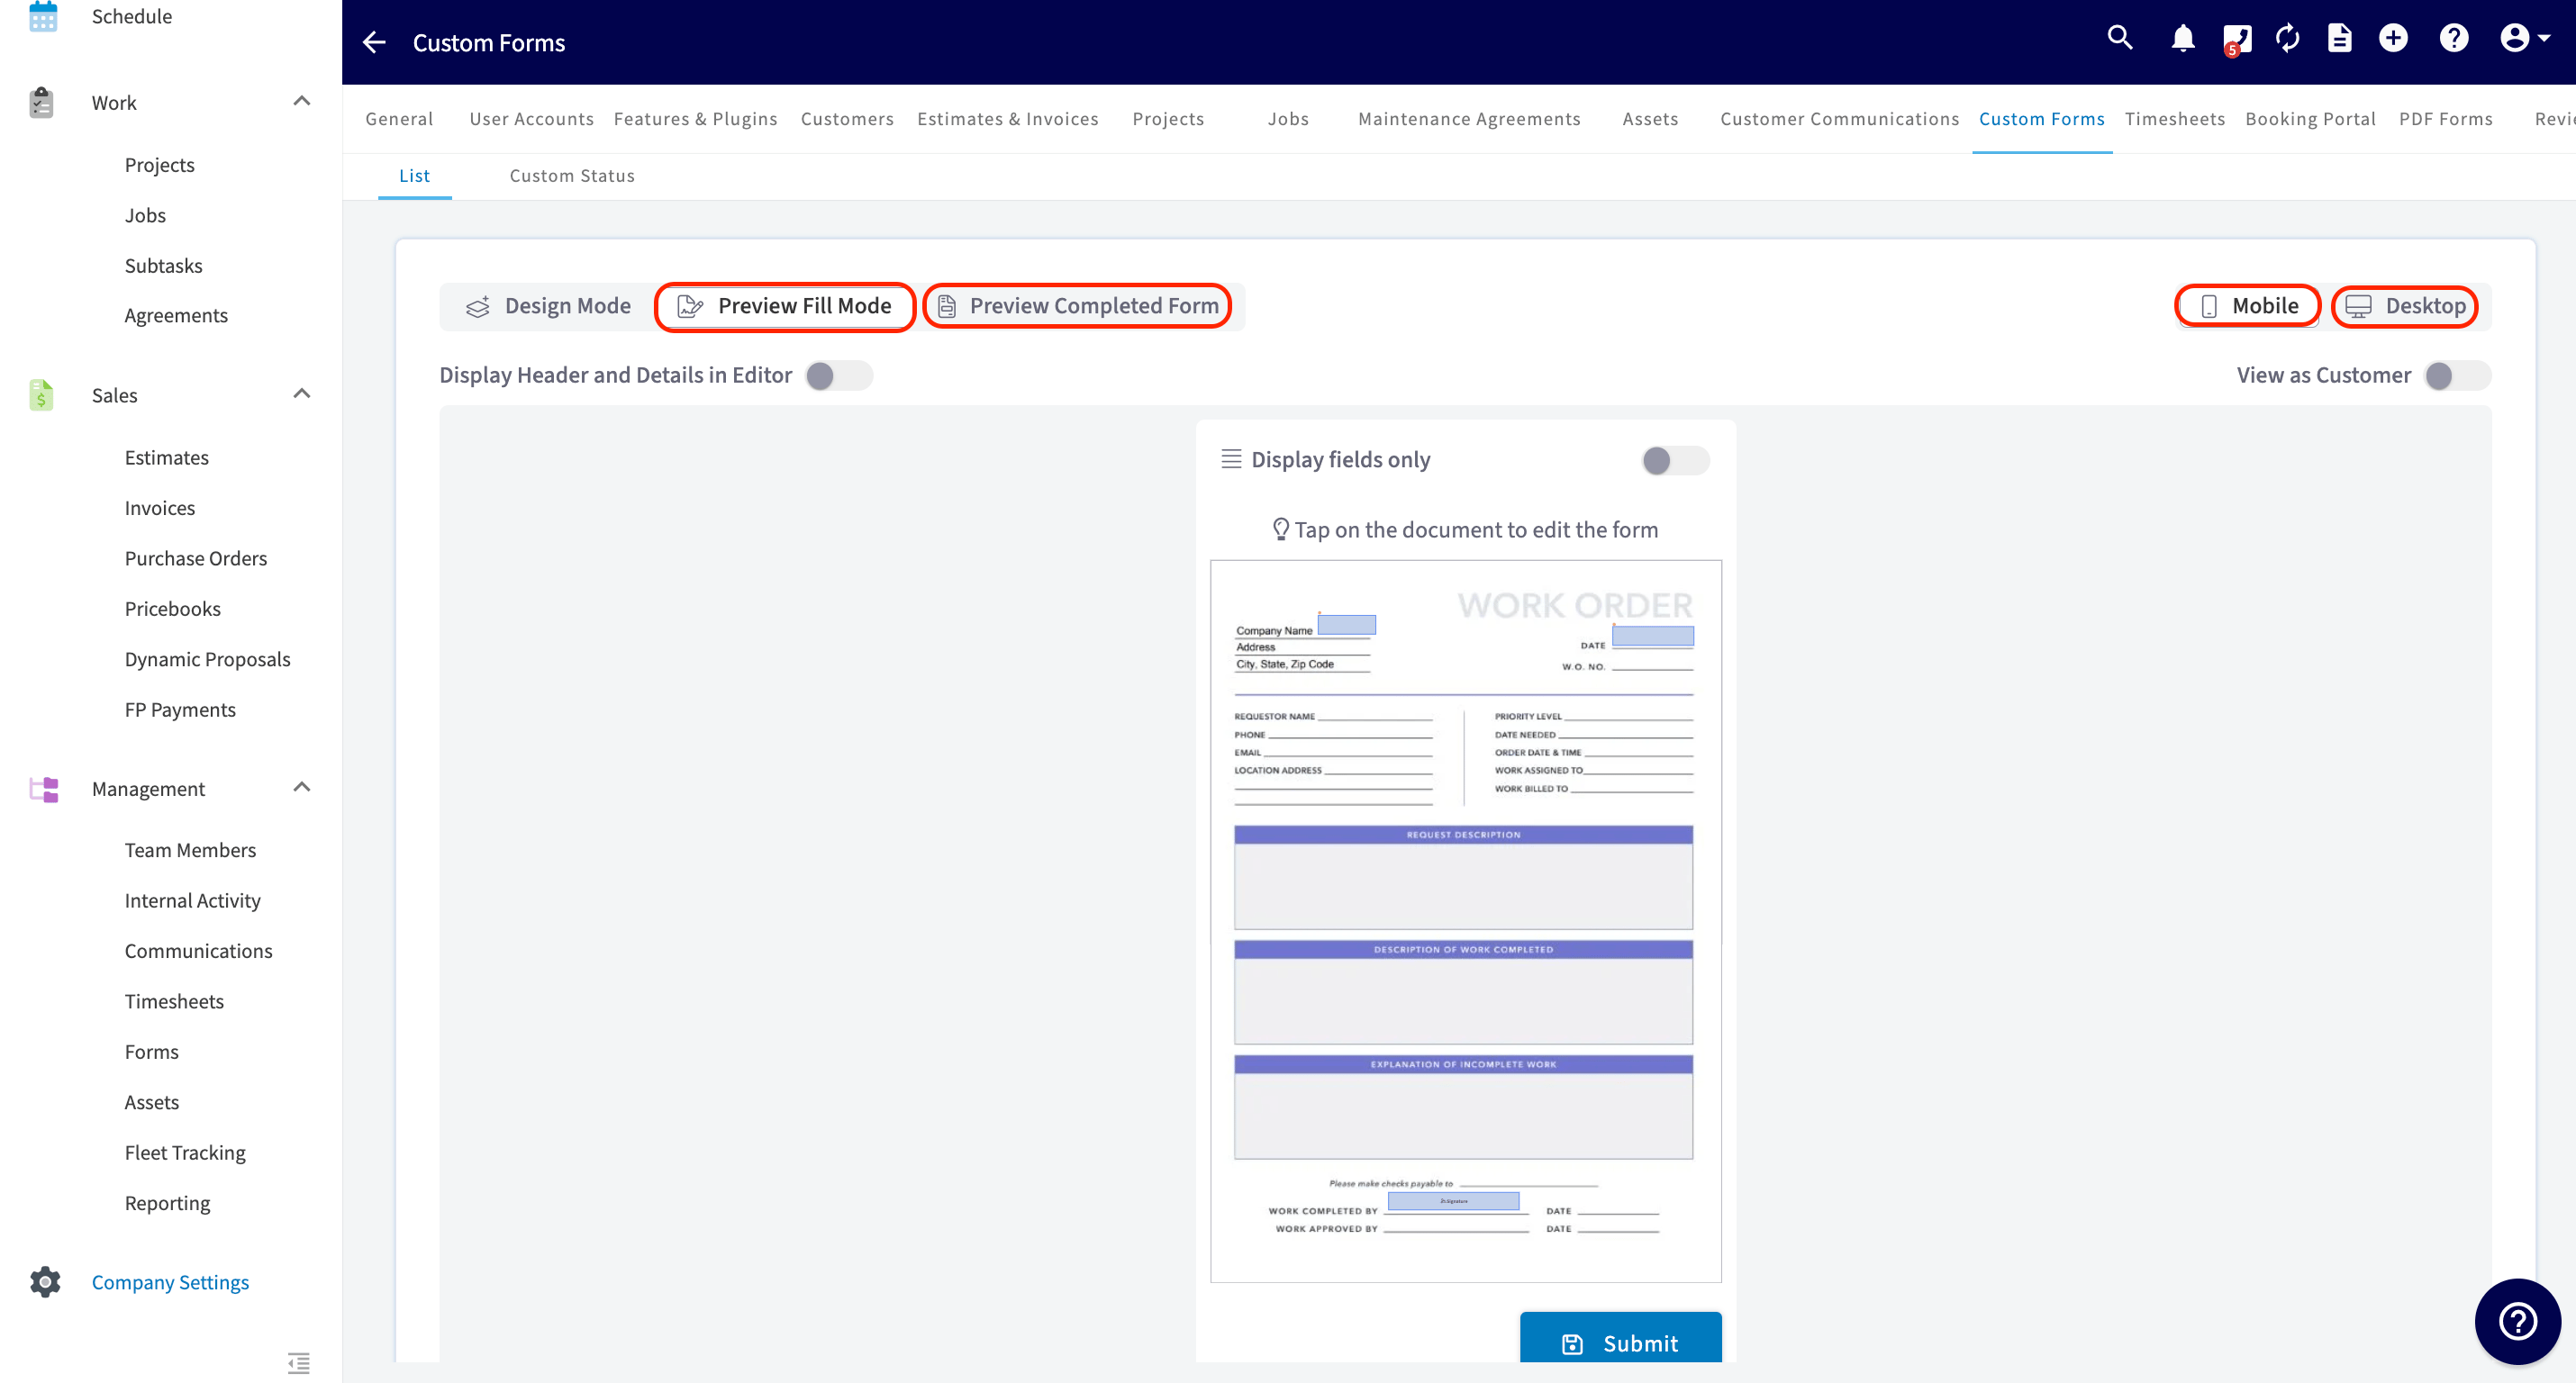
 A form built on a PDF background carries over to mobile. The person filling it out can work on the document at full size and zoom in and out, or turn on **Display fields only** to move through the fields one at a time.
 ## Use the form on a record
### Attach the form to a record
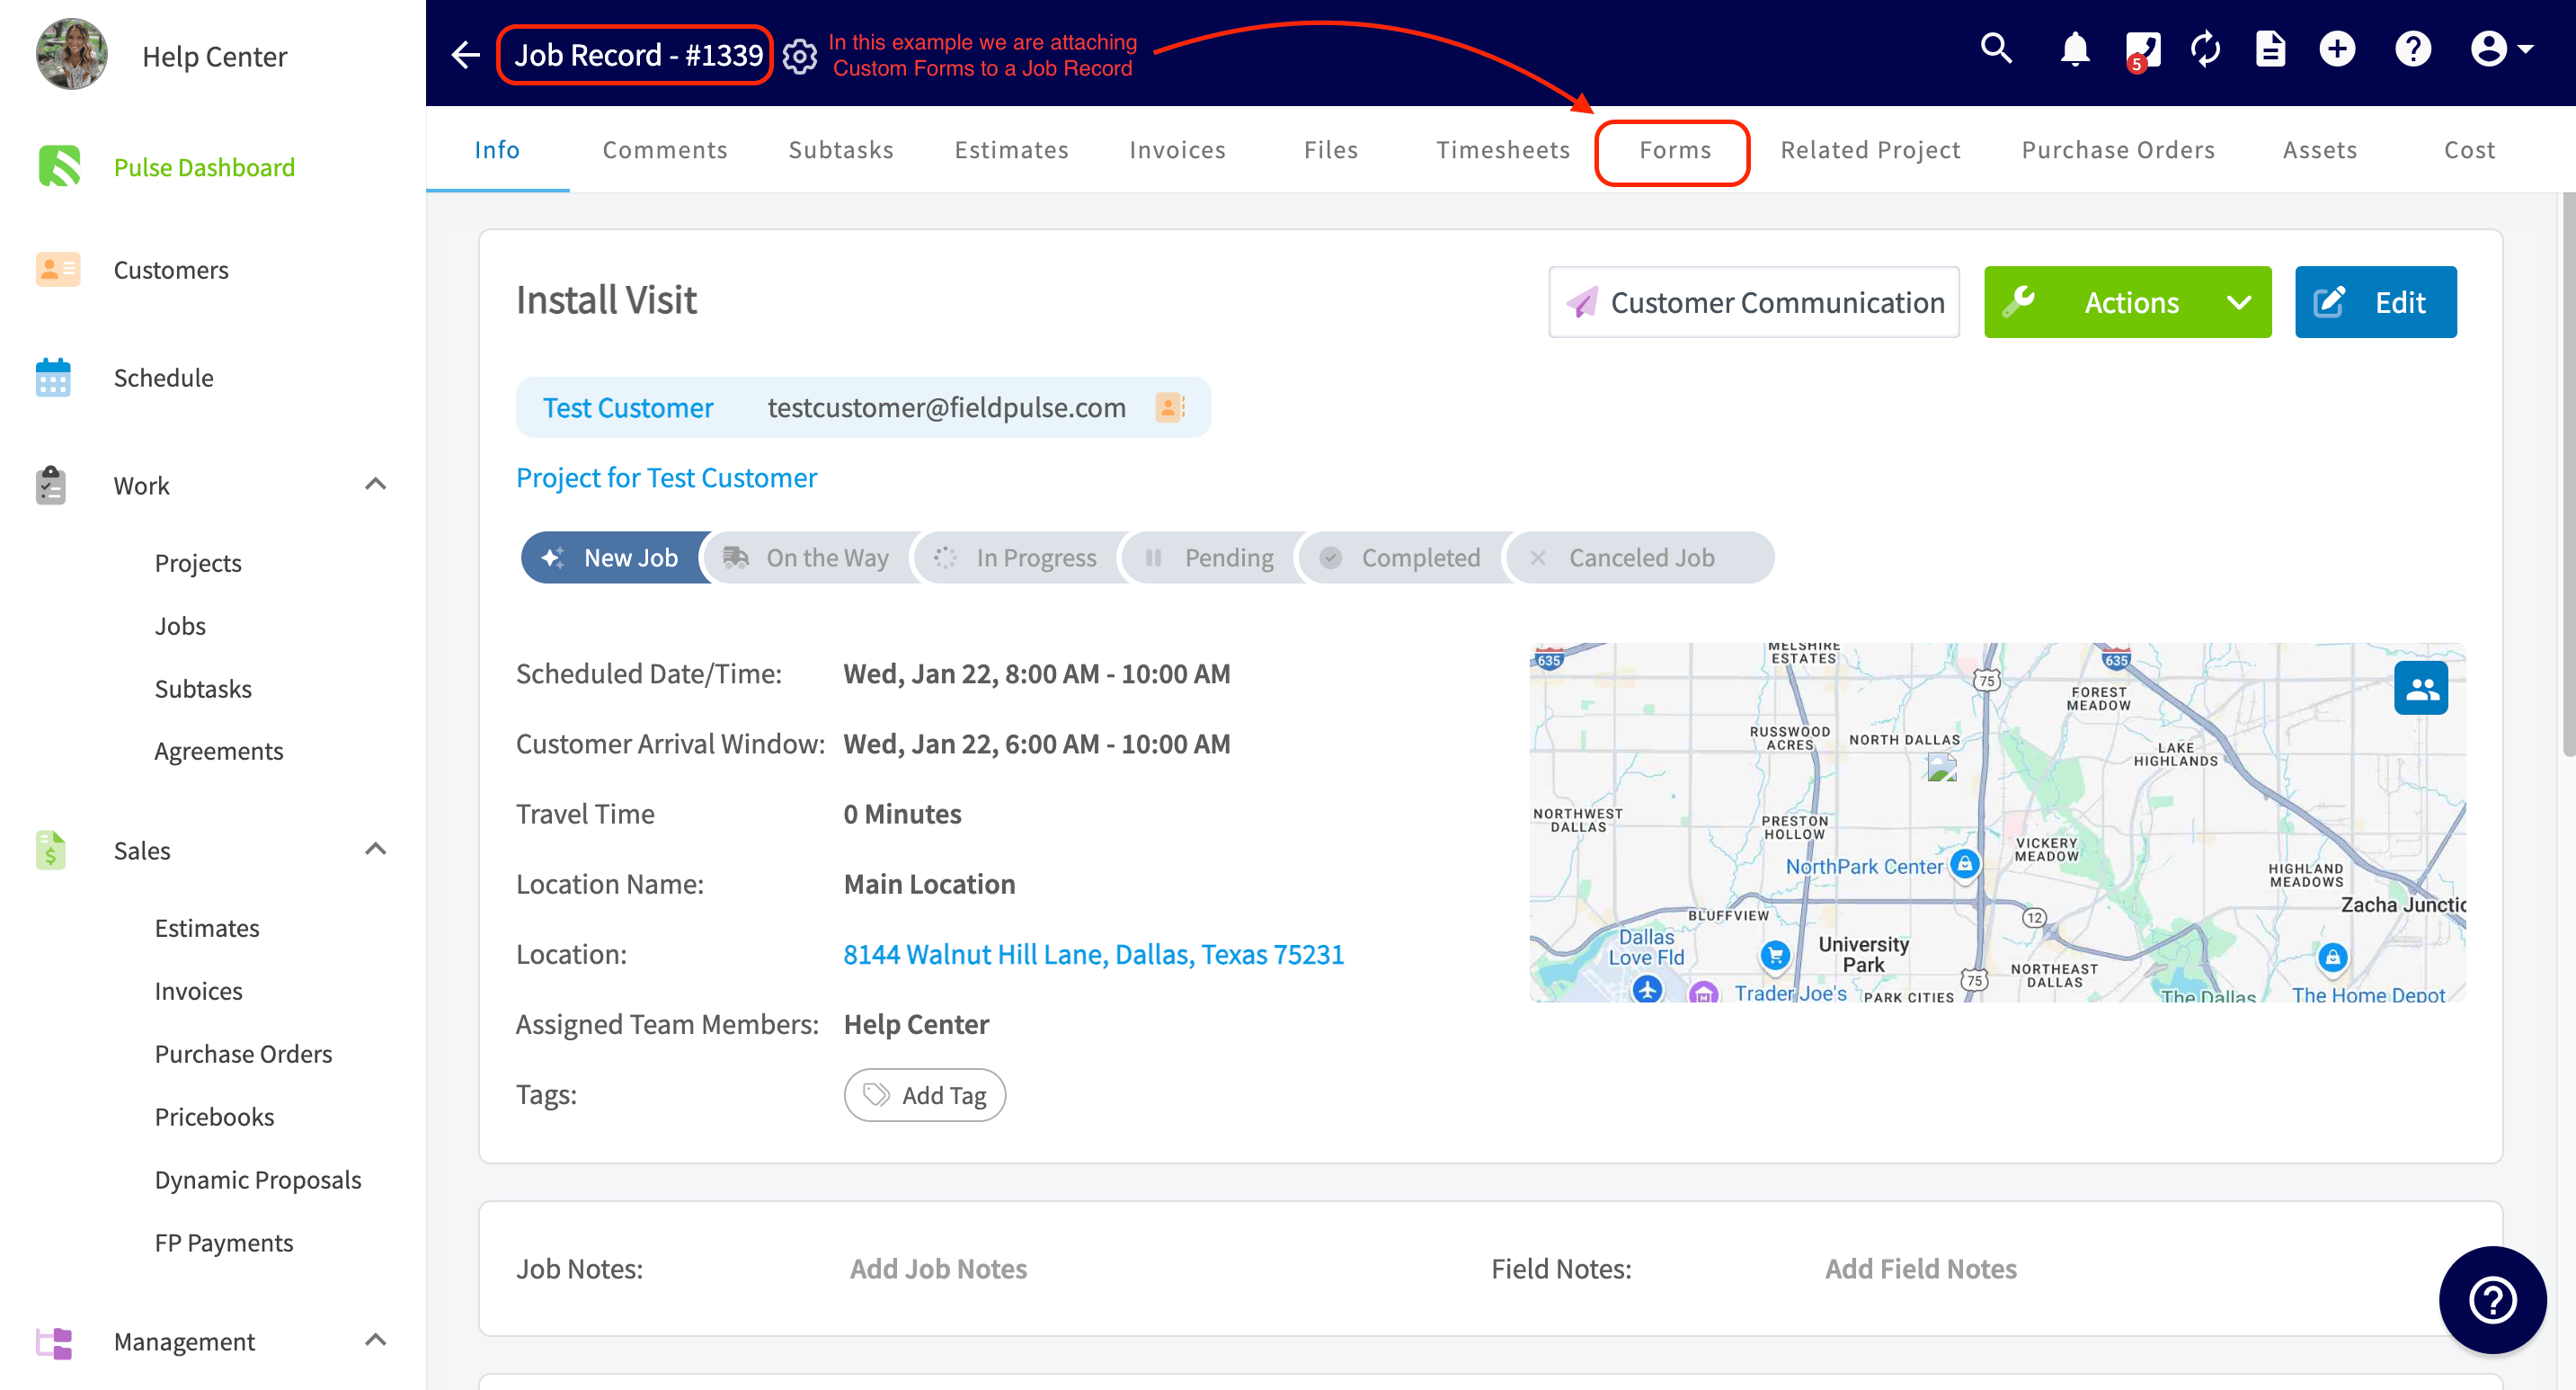
1. Open the record you want the form on — a customer, job, estimate, or invoice.
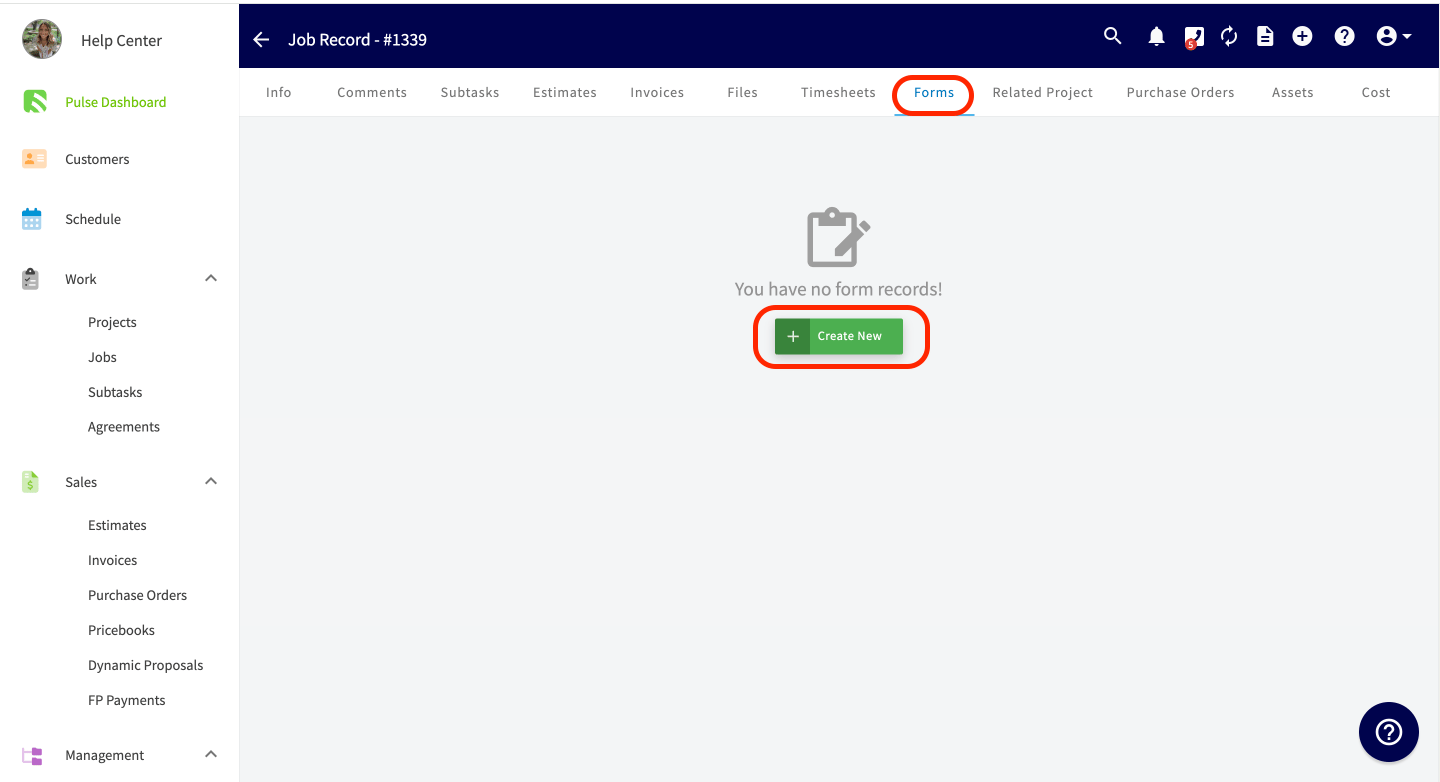
2. Select **Forms** from the top menu.
## Use the form on a record
### Attach the form to a record
1. Open the record you want the form on — a customer, job, estimate, or invoice.
2. Select **Forms** from the top menu.
 3. Select **Create New**.
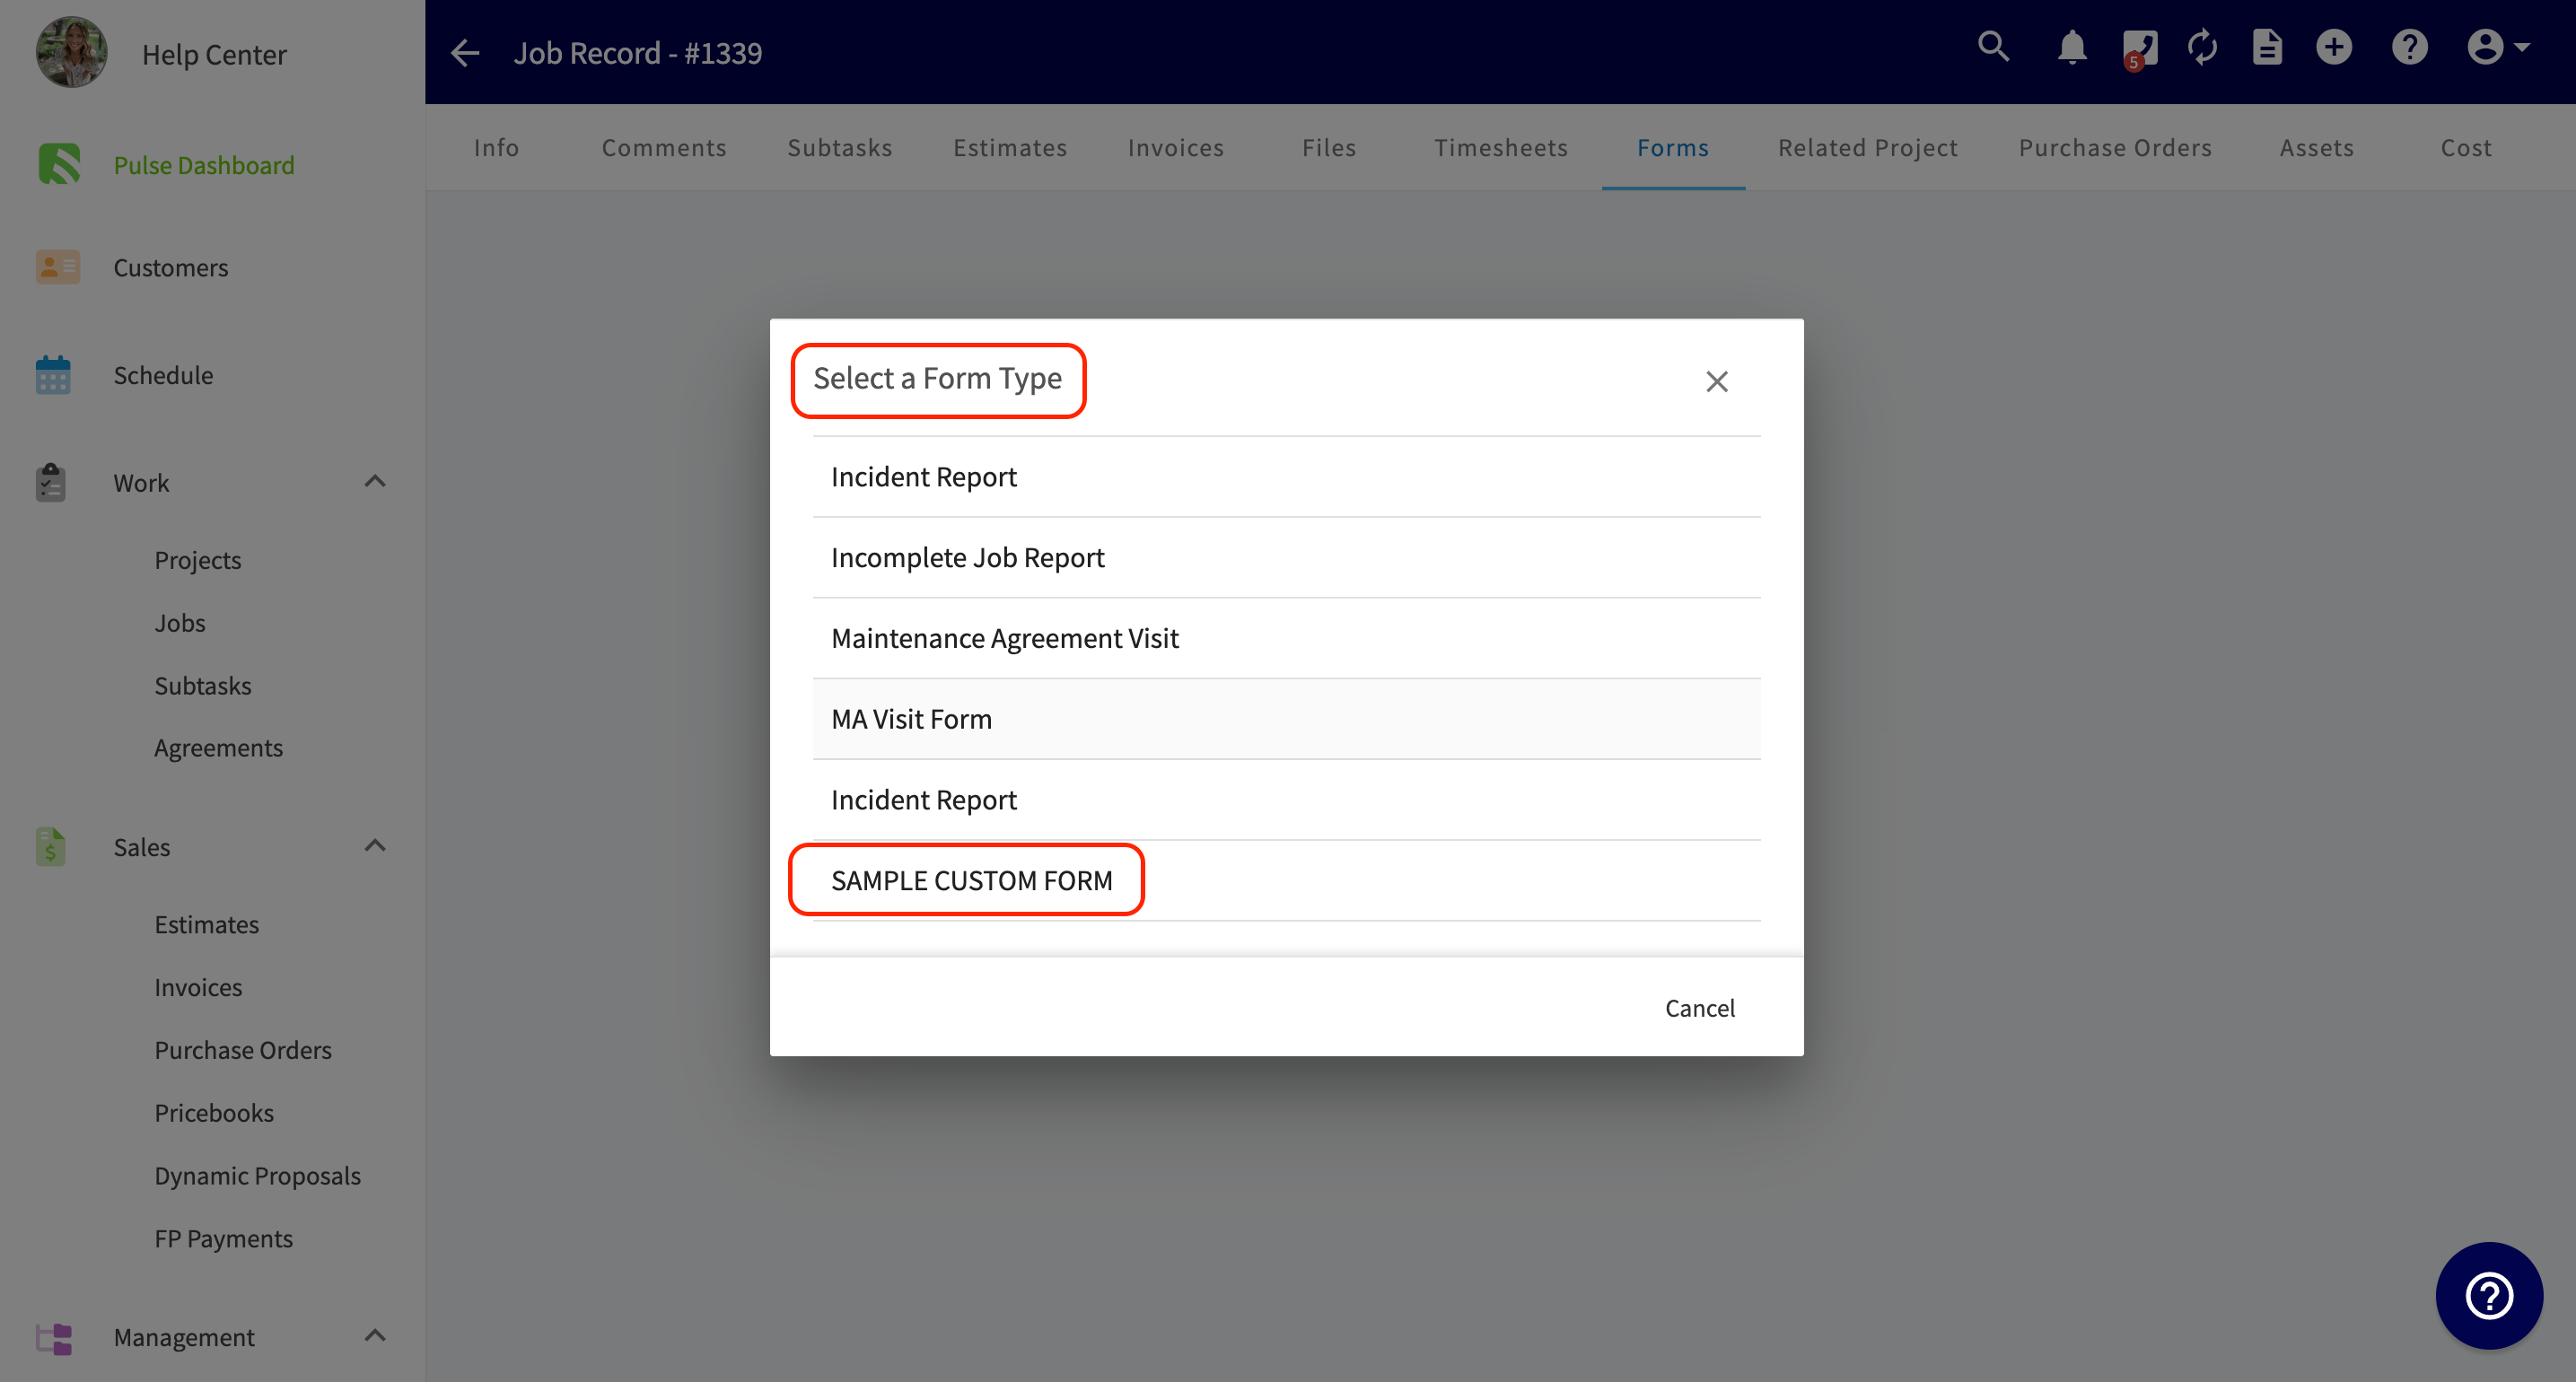
 4. Choose your form from the **Select a Form Type** list.
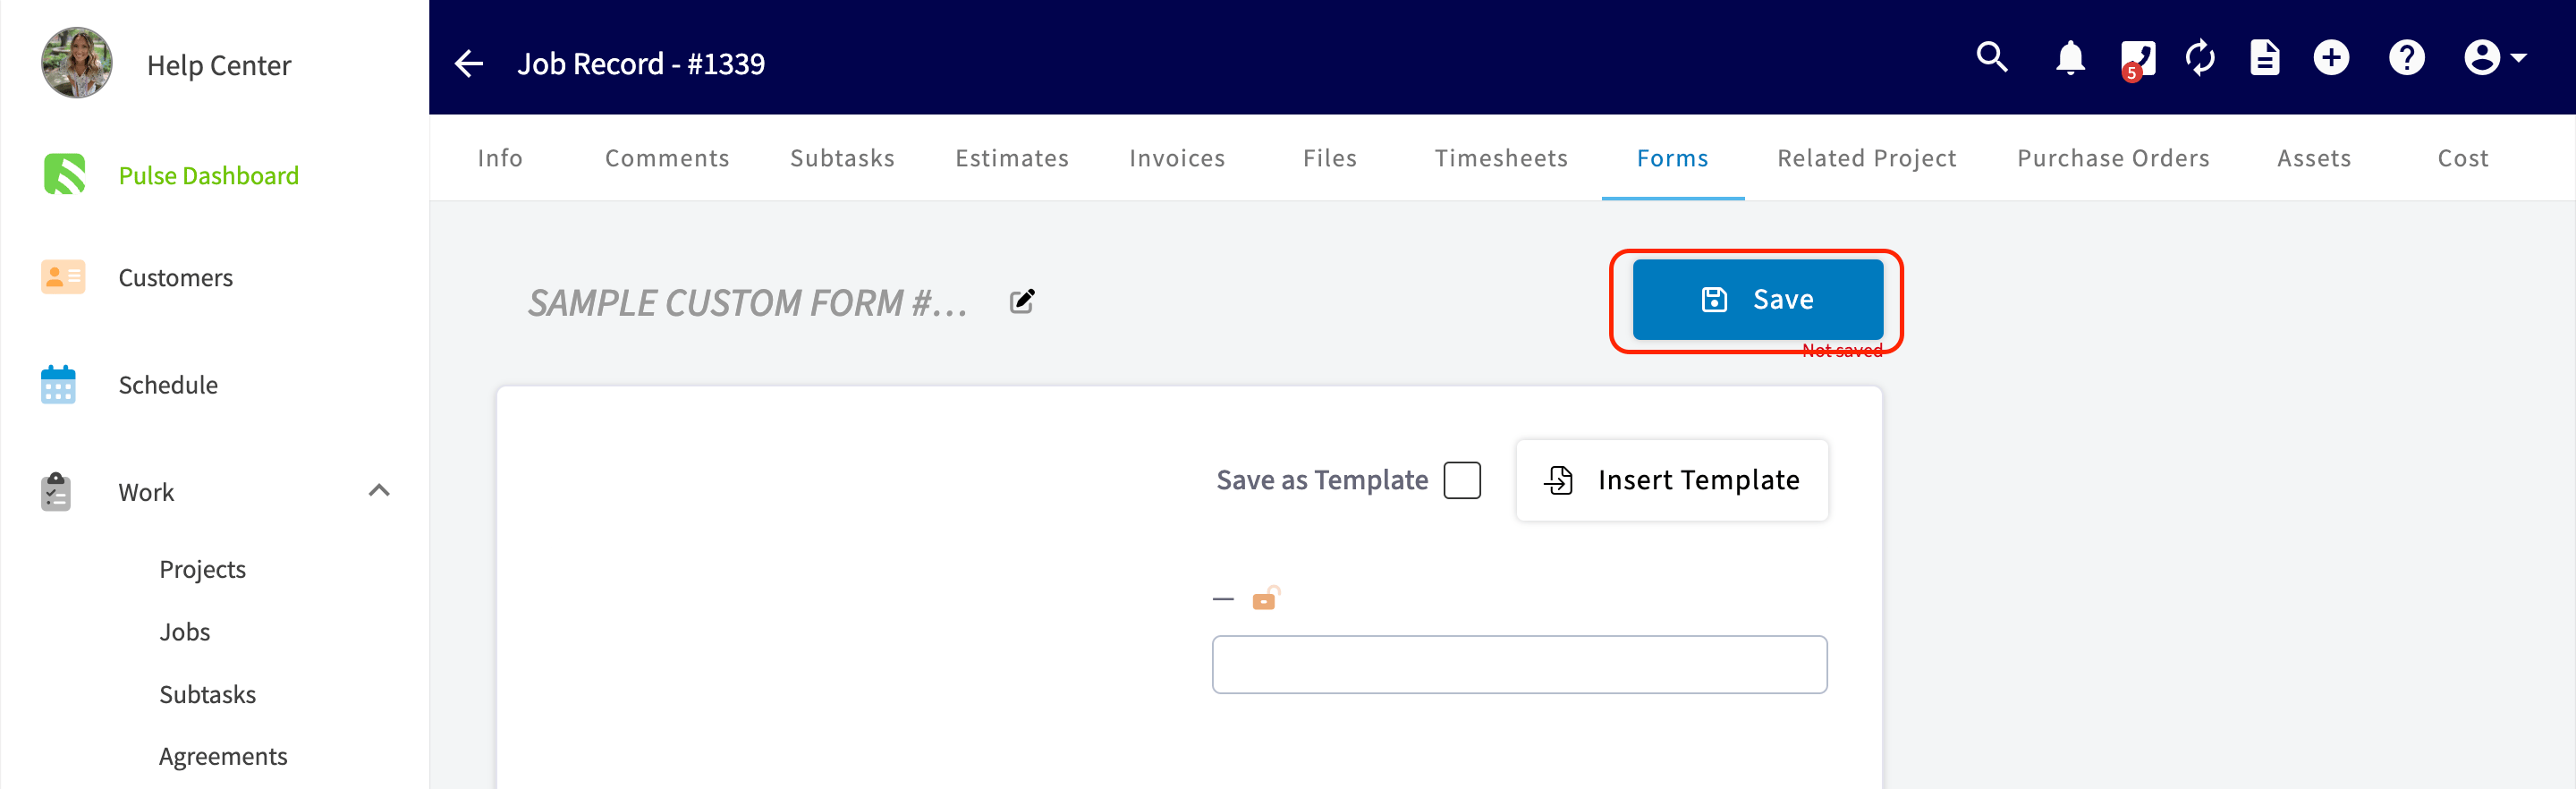
 5. Complete the form now, or select **Save** to save it to the record and finish it later.
 ### Open and manage an attached form
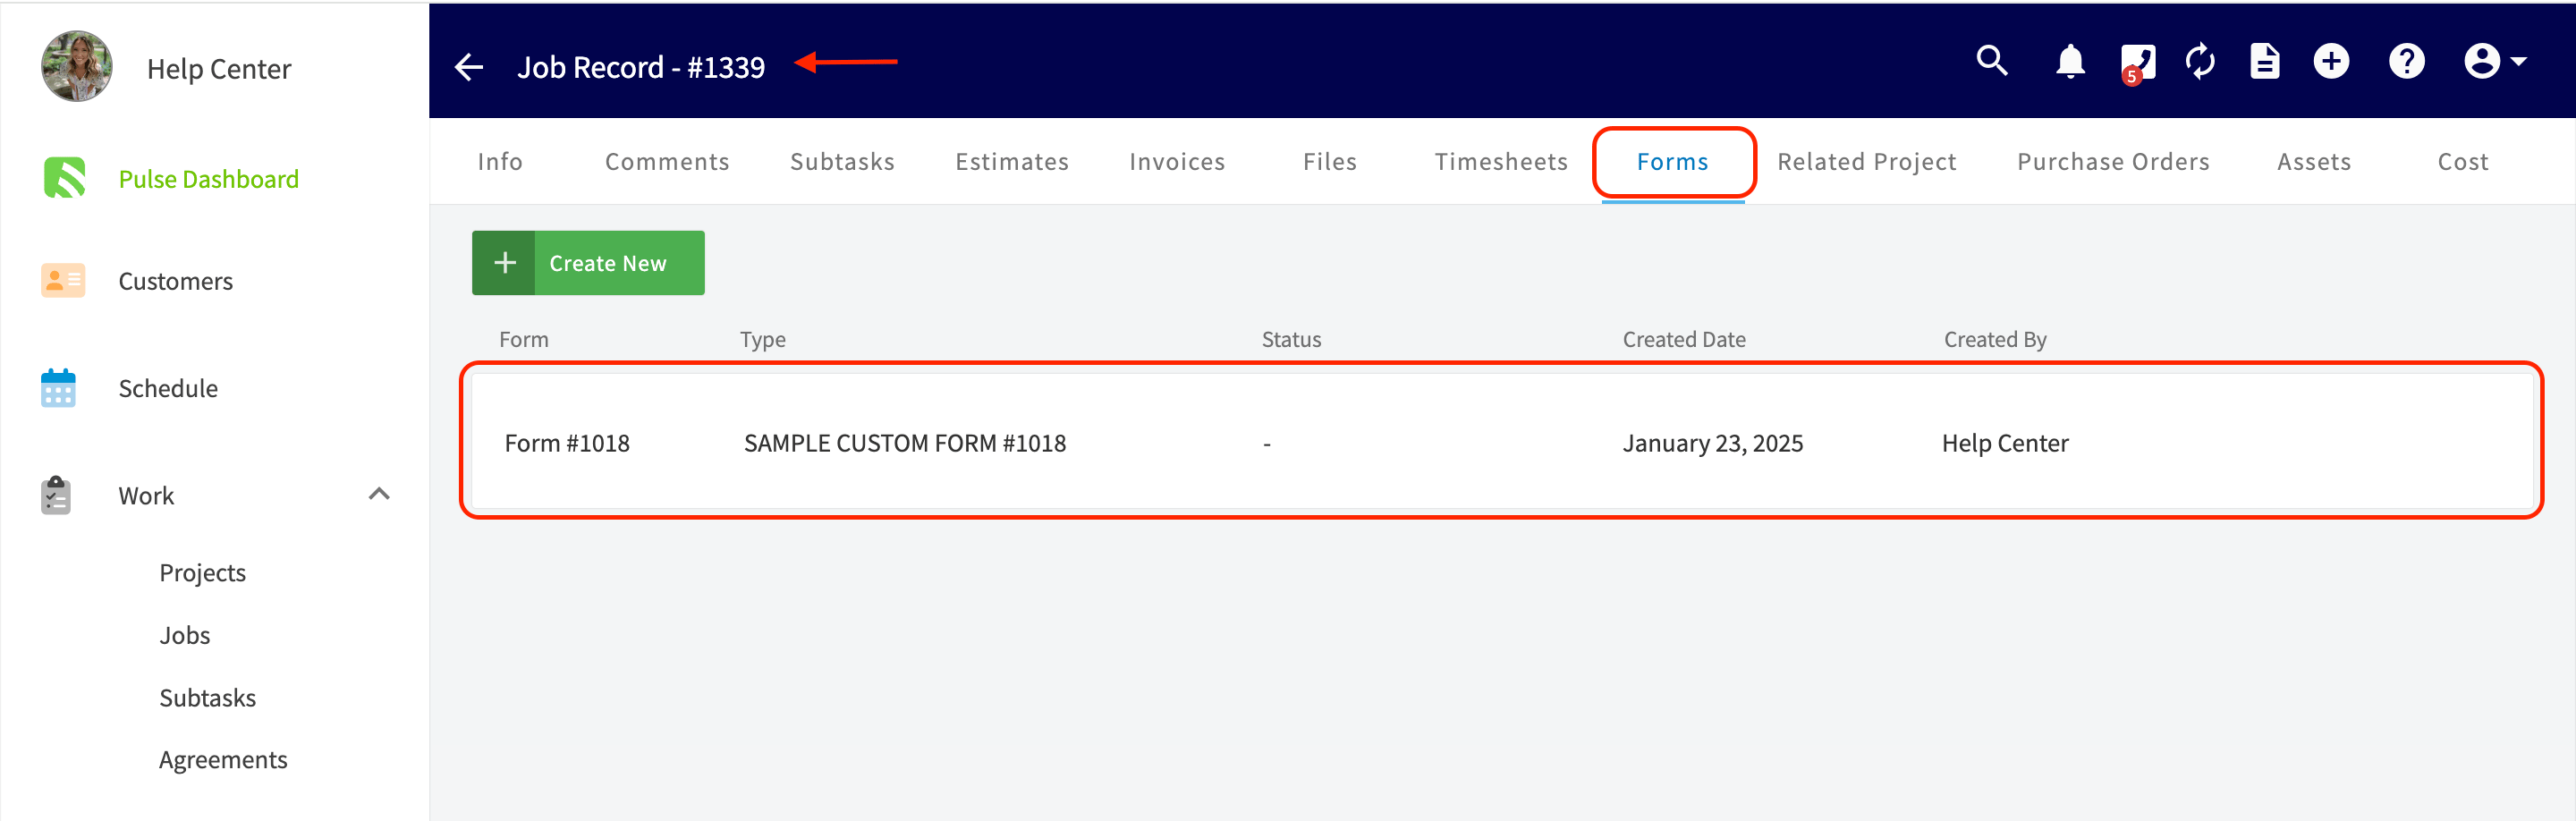
1. On the record, go to the **Forms** tab.
2. Select the form to open it.
### Open and manage an attached form
1. On the record, go to the **Forms** tab.
2. Select the form to open it.
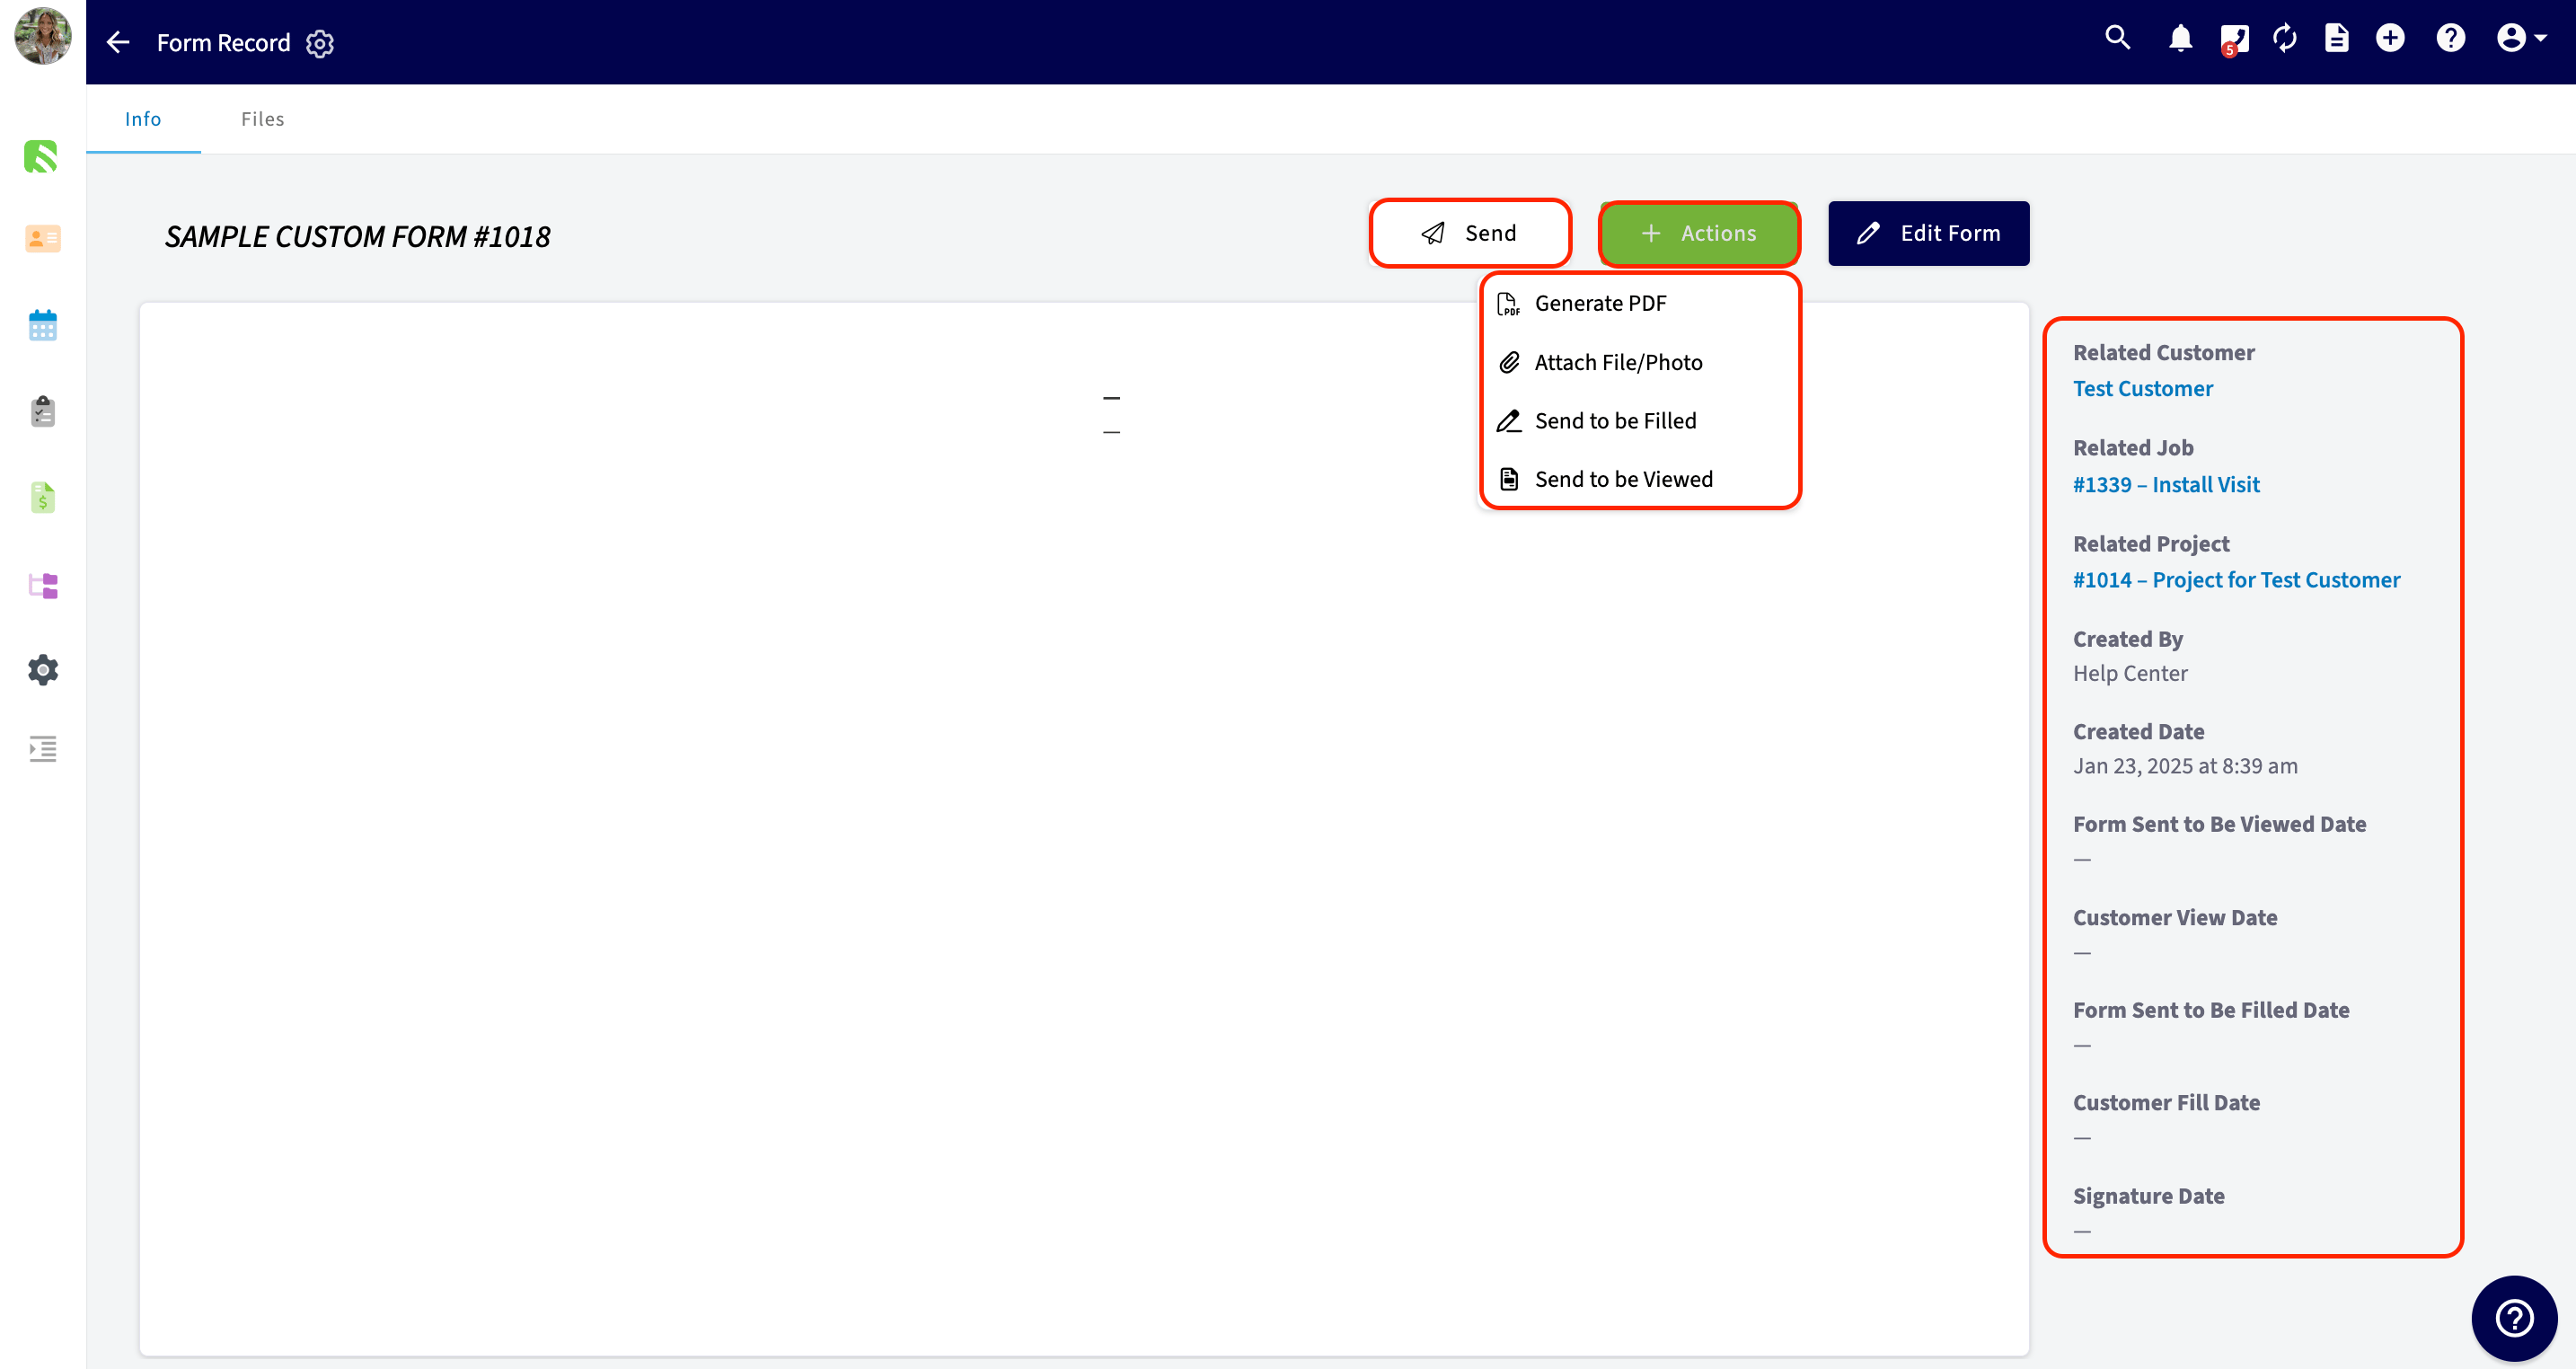
 From an open form you can generate a PDF, attach a file or photo, send the form to your customer to be filled, and send it to your customer to be viewed. The panel on the right shows the form's details — the related customer, job, and project, who created it, the created date, the date it was sent to be viewed, the customer view date, the date it was sent to be filled, the customer fill date, and the signature date.
 ## FAQs
### How do I get notified when a customer fills out or signs a form?
Set your recipients in **Company Settings > Customer Communications > Notification Settings**, where you can notify all admins, managers, individual team members, or specific email addresses. Email and SMS defaults for the form itself live in [Custom Form Settings Details](/jobs/custom-forms/settings).
### Can I put each form page on its own PDF page?
Yes. Go to **Company Settings > Custom Forms > Settings** and toggle on the option to display each form page on its own PDF page with page breaks, instead of having all pages flow continuously.
### Can my team open custom forms in Offline Mode?
Yes. Forms attached to job, project, and customer records can be opened and edited without a connection, and you choose which templates are available offline in each form's settings. See [Custom Forms Offline Mode Details](/jobs/custom-forms/offline-behavior).
### How do I make a field required?
Select the **Required** checkbox in the field's settings while you build or edit the form in **Company Settings** > **Custom Forms**. Your team cannot submit the form until every required field is filled in. The **Creating Without Filling Required Fields** permission controls who can save the form to a record with required fields still blank so those fields can be completed later — see [Custom Form Settings Details](/jobs/custom-forms/settings).
## Related articles
* [Custom Forms Overview](/jobs/custom-forms/overview)
* [Setting Up Custom Forms](/jobs/custom-forms/enabling)
* [Custom Form Field Types and Formulas Details](/jobs/custom-forms/field-types)
* [Custom Form Settings Details](/jobs/custom-forms/settings)
* [How to Use the PDF Form Filler](/jobs/custom-forms/pdf-form-filler)
* [How to Link Custom Forms to Jobs](/jobs/custom-forms/link-to-jobs)
* [Custom Forms Offline Mode Details](/jobs/custom-forms/offline-behavior)
* [How to Import and Export Custom Form Templates](/jobs/custom-forms/import-export)
Your form is ready when you can open a record, select **Forms > Create New**, and find your template in the **Select a Form Type** list.
## Related topics
- [Custom Forms Overview](/jobs/custom-forms/overview.md)
- [Custom Forms](/jobs/custom-forms/index.md)
- [How to Create Custom Forms Reports](/reporting/raw-data/custom-forms-reports.md)
- [Setting Up Custom Forms](/jobs/custom-forms/enabling.md)
## FAQs
### How do I get notified when a customer fills out or signs a form?
Set your recipients in **Company Settings > Customer Communications > Notification Settings**, where you can notify all admins, managers, individual team members, or specific email addresses. Email and SMS defaults for the form itself live in [Custom Form Settings Details](/jobs/custom-forms/settings).
### Can I put each form page on its own PDF page?
Yes. Go to **Company Settings > Custom Forms > Settings** and toggle on the option to display each form page on its own PDF page with page breaks, instead of having all pages flow continuously.
### Can my team open custom forms in Offline Mode?
Yes. Forms attached to job, project, and customer records can be opened and edited without a connection, and you choose which templates are available offline in each form's settings. See [Custom Forms Offline Mode Details](/jobs/custom-forms/offline-behavior).
### How do I make a field required?
Select the **Required** checkbox in the field's settings while you build or edit the form in **Company Settings** > **Custom Forms**. Your team cannot submit the form until every required field is filled in. The **Creating Without Filling Required Fields** permission controls who can save the form to a record with required fields still blank so those fields can be completed later — see [Custom Form Settings Details](/jobs/custom-forms/settings).
## Related articles
* [Custom Forms Overview](/jobs/custom-forms/overview)
* [Setting Up Custom Forms](/jobs/custom-forms/enabling)
* [Custom Form Field Types and Formulas Details](/jobs/custom-forms/field-types)
* [Custom Form Settings Details](/jobs/custom-forms/settings)
* [How to Use the PDF Form Filler](/jobs/custom-forms/pdf-form-filler)
* [How to Link Custom Forms to Jobs](/jobs/custom-forms/link-to-jobs)
* [Custom Forms Offline Mode Details](/jobs/custom-forms/offline-behavior)
* [How to Import and Export Custom Form Templates](/jobs/custom-forms/import-export)
Your form is ready when you can open a record, select **Forms > Create New**, and find your template in the **Select a Form Type** list.
## Related topics
- [Custom Forms Overview](/jobs/custom-forms/overview.md)
- [Custom Forms](/jobs/custom-forms/index.md)
- [How to Create Custom Forms Reports](/reporting/raw-data/custom-forms-reports.md)
- [Setting Up Custom Forms](/jobs/custom-forms/enabling.md)