> ## Documentation Index
> Fetch the complete documentation index at: https://help.fieldpulse.com/llms.txt
> Use this file to discover all available pages before exploring further.
# Setting Up Custom Forms
> Turn on Custom Forms from Company Settings in FieldPulse so your team can build checklists, inspection sheets, and forms to attach to jobs.
> **Who uses this:** Administrators only — enabling the feature happens in Company Settings, which only Administrators can reach. **Availability:** All regions. Custom Forms has to be enabled under **Company Settings** > **Features & Plugins** — contact FieldPulse for pricing.
[Custom Forms](https://www.fieldpulse.com/features/custom-forms) lets your team build the checklists, inspection sheets, and intake forms they already use, then attach them to [jobs](https://www.fieldpulse.com/features/job-management), estimates, invoices, and customers. The feature has to be enabled before anyone can build or attach a form, and an Administrator turns it on once for the whole account from Company Settings.
## Overview
Enabling Custom Forms is a one-time step an Administrator takes in **Company Settings** > **Features & Plugins**. Find the **Custom Forms** tile on that page and select **Enable**. Once the feature is on, **Custom Forms** appears in the top menu of Company Settings, and that is where you build and manage your form templates.
The **Custom Forms** tile reads **Contact us for pricing**, so contact the FieldPulse team for pricing before you turn the feature on.
## Before you begin
* You need Administrator access to FieldPulse. **Company Settings** is Administrator-only — see [User Roles and Permissions Details](/settings/users-teams/user-roles).
* Get pricing first. [Contact the FieldPulse team](https://www.fieldpulse.com/company/contact-us) at [support@fieldpulse.com](mailto:support@fieldpulse.com) or through the chat feature in the bottom-right corner of your screen.
## Step-by-step setup
1. In the left-hand menu, select **Company Settings**.
2. Select the **Features & Plugins** tab.
3. Find the **Custom Forms** tile and select **Enable**.
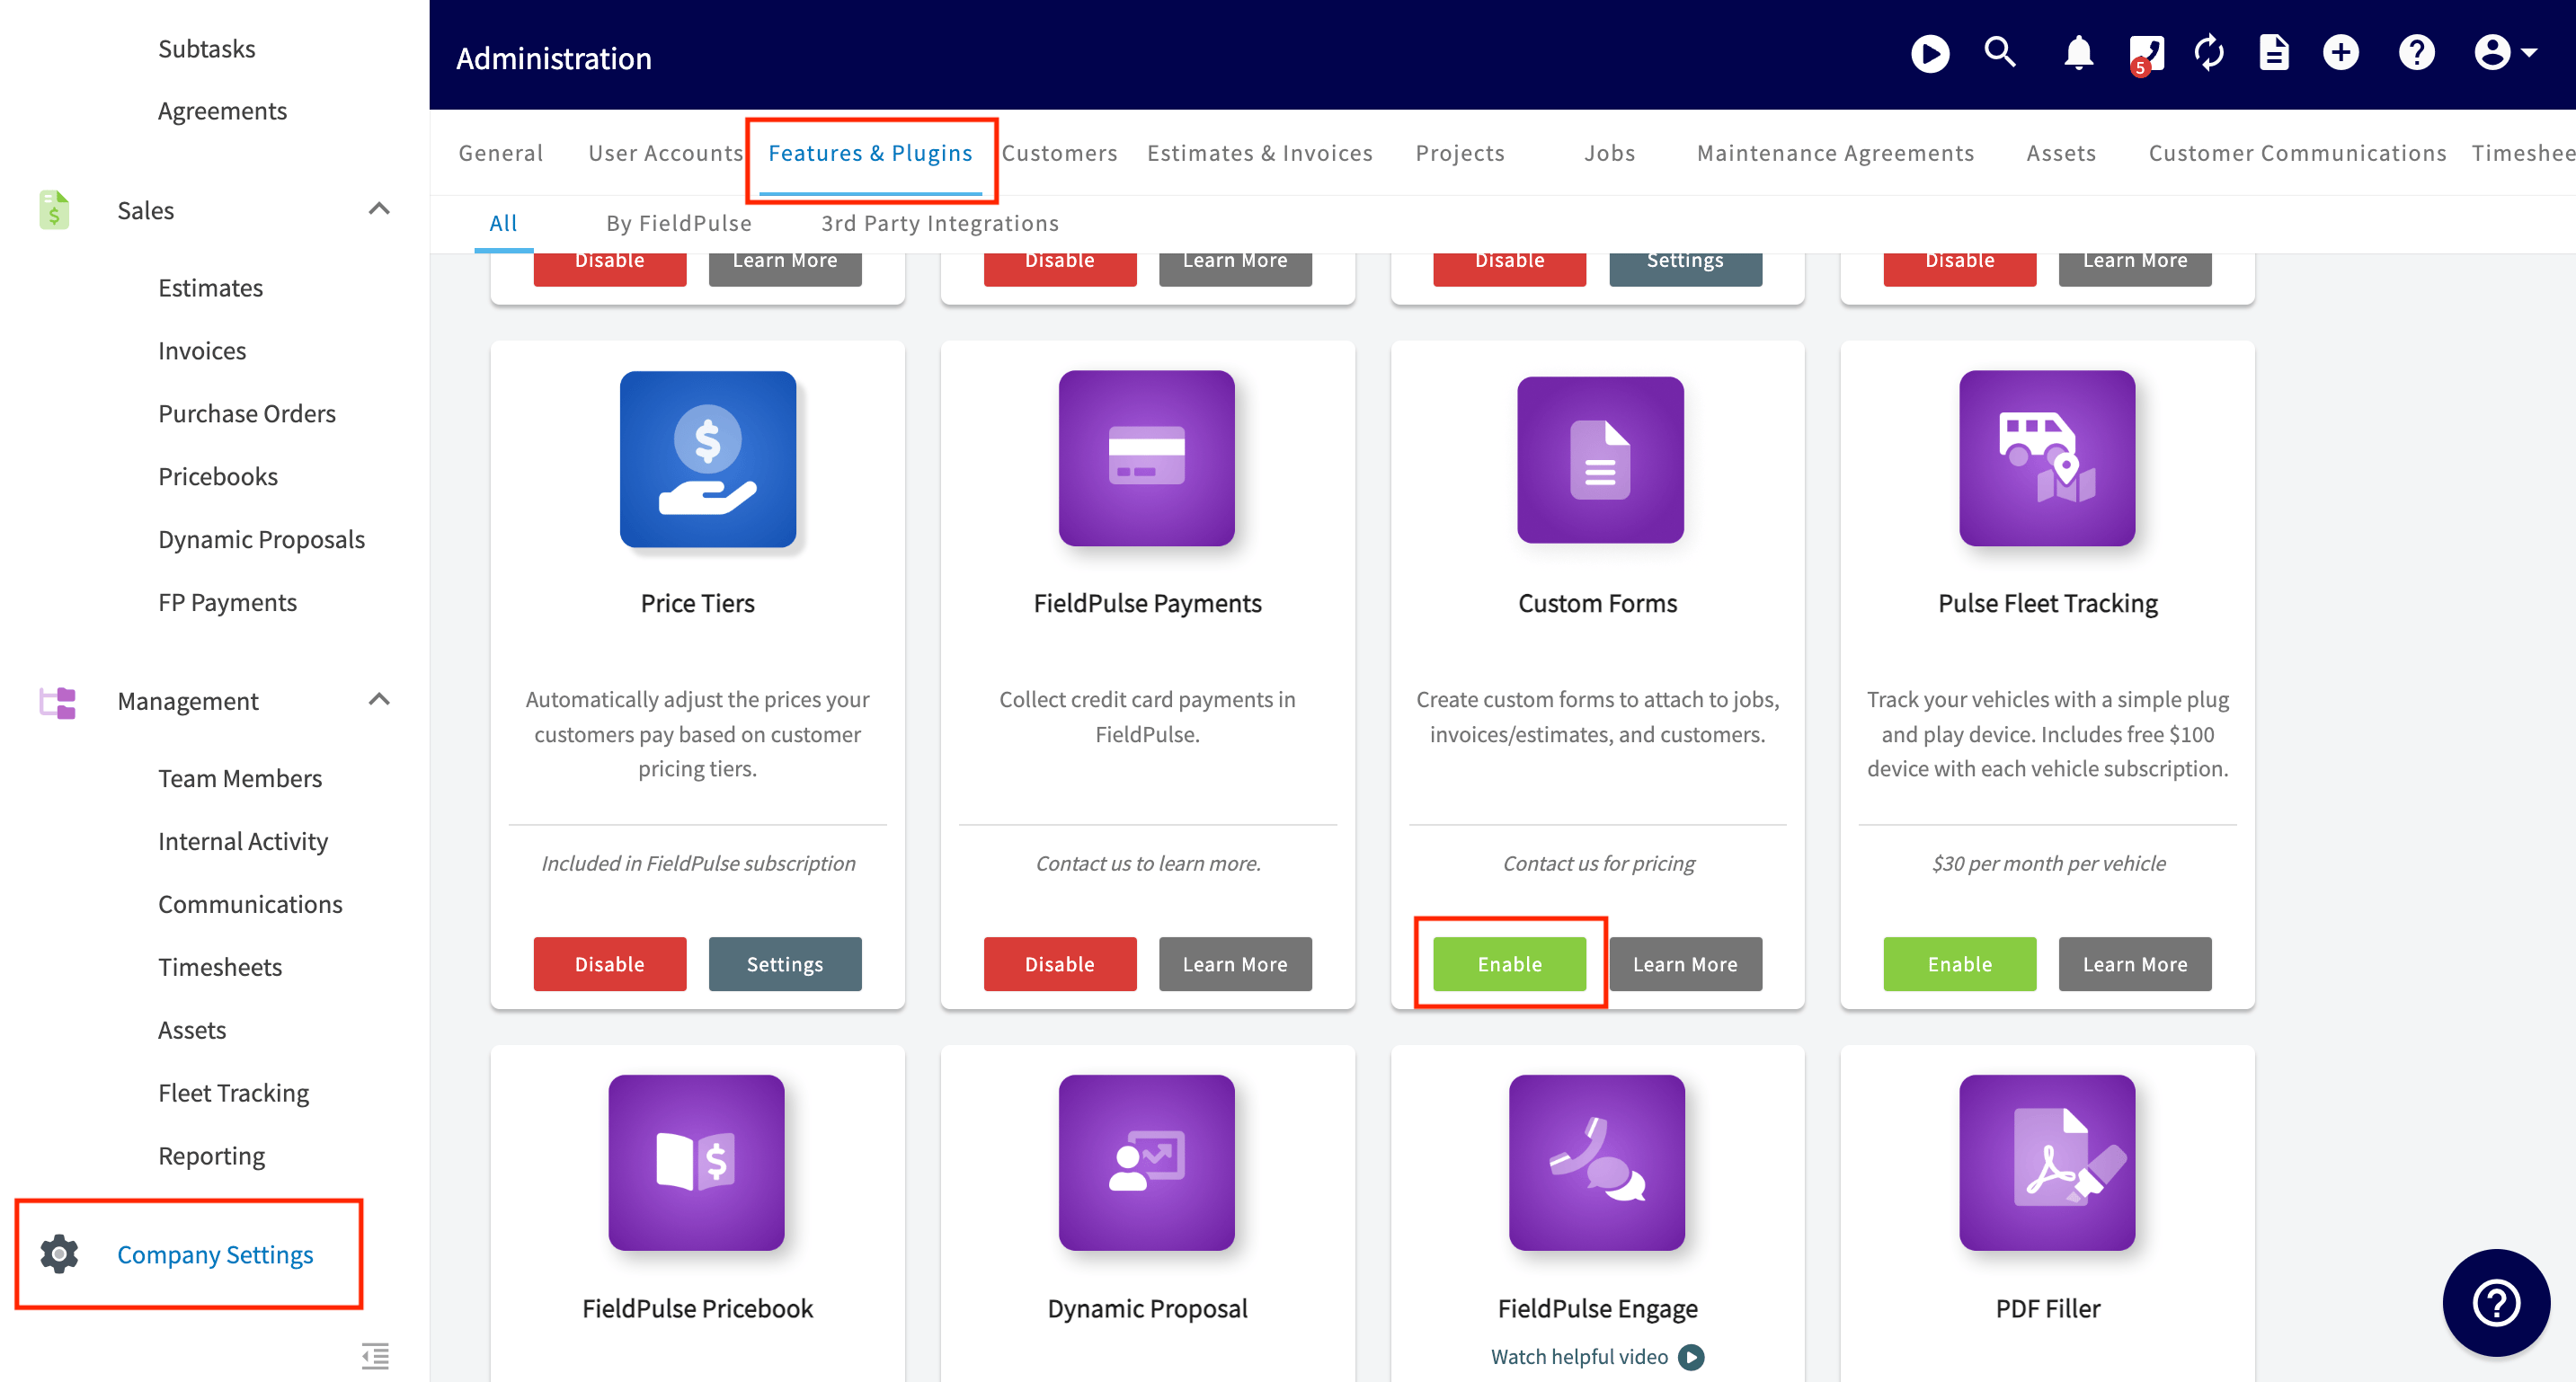 **Custom Forms** now appears in the top menu of Company Settings. Go to **Company Settings** > **Custom Forms** to see the forms you have already created, or select **Create New** to build your first one — see [How to Create a Custom Form](/jobs/custom-forms/create-a-form).
For a full breakdown of every setting available on a form, see [Custom Form Settings Details](/jobs/custom-forms/settings).
## Related articles
* [Custom Forms Overview](/jobs/custom-forms/overview)
* [How to Create a Custom Form](/jobs/custom-forms/create-a-form)
* [Custom Form Settings Details](/jobs/custom-forms/settings)
* [Custom Form Field Types and Formulas Details](/jobs/custom-forms/field-types)
* [How to Use the PDF Form Filler](/jobs/custom-forms/pdf-form-filler)
* [Custom Forms FAQs](/jobs/custom-forms/overview)
Your setup is working when **Custom Forms** shows up in the top menu of Company Settings and you can open it to create your first form.
## Related topics
- [Custom Forms Overview](/jobs/custom-forms/overview.md)
- [Custom Forms](/jobs/custom-forms/index.md)
- [Custom Form Settings Details](/jobs/custom-forms/settings.md)
- [How to Create a Custom Form](/jobs/custom-forms/create-a-form.md)
**Custom Forms** now appears in the top menu of Company Settings. Go to **Company Settings** > **Custom Forms** to see the forms you have already created, or select **Create New** to build your first one — see [How to Create a Custom Form](/jobs/custom-forms/create-a-form).
For a full breakdown of every setting available on a form, see [Custom Form Settings Details](/jobs/custom-forms/settings).
## Related articles
* [Custom Forms Overview](/jobs/custom-forms/overview)
* [How to Create a Custom Form](/jobs/custom-forms/create-a-form)
* [Custom Form Settings Details](/jobs/custom-forms/settings)
* [Custom Form Field Types and Formulas Details](/jobs/custom-forms/field-types)
* [How to Use the PDF Form Filler](/jobs/custom-forms/pdf-form-filler)
* [Custom Forms FAQs](/jobs/custom-forms/overview)
Your setup is working when **Custom Forms** shows up in the top menu of Company Settings and you can open it to create your first form.
## Related topics
- [Custom Forms Overview](/jobs/custom-forms/overview.md)
- [Custom Forms](/jobs/custom-forms/index.md)
- [Custom Form Settings Details](/jobs/custom-forms/settings.md)
- [How to Create a Custom Form](/jobs/custom-forms/create-a-form.md)