> ## Documentation Index
> Fetch the complete documentation index at: https://help.fieldpulse.com/llms.txt
> Use this file to discover all available pages before exploring further.
# How to Create a Job
> Book new work in FieldPulse from the web or mobile app, link the customer, assign your crew, and set a date so the job lands on the right schedule.
> **Who uses this:** Admins and Team Managers; Service Agents for their own jobs; not Limited Agents — gated by **Create & edit Jobs**. **Availability:** All regions.
A job is the record that ties a customer, your team, and a scheduled time together. Create one at your desk in the web app or in the field on the [mobile app](https://www.fieldpulse.com/features/mobile-app), and the same record carries the customer, the crew, the date, and every note about the work.
## Overview
Creating a [job](https://www.fieldpulse.com/features/job-management) follows the same path on web and mobile — link a customer, name the work, assign your team, set the date and time, then add the details the job needs. When you save, FieldPulse notifies the assigned team members and the job appears on their [schedules](https://www.fieldpulse.com/features/scheduling-and-dispatching).
## Before you begin
* Link a customer to every job. If the work has no customer to attach it to, create a task instead — see [How to Create a Task](/jobs/jobs-tasks/creating-a-task).
* To start a job from a saved layout instead of a blank form, build the layout first — see [Setting Up Job Templates](/jobs/jobs-tasks/creating-job-templates).
## On web
### Open a new job record
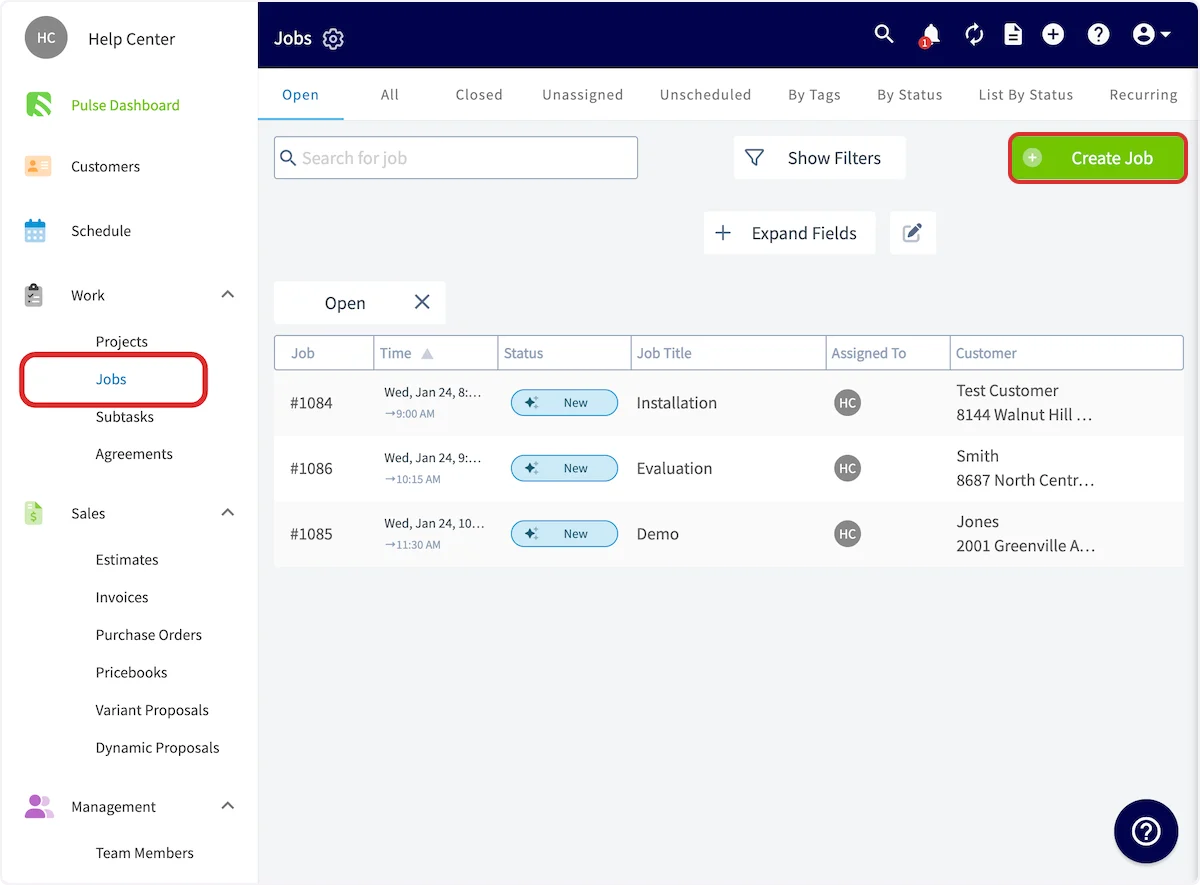
1. In the left menu, select **Work**, then **Jobs**.
2. Select **Create Job**.
3. To start from a saved layout, select **Import Template** at the top of the new job record. See [How to Use a Job Template](/jobs/jobs-tasks/using-job-templates).
 ### Link the customer and name the job
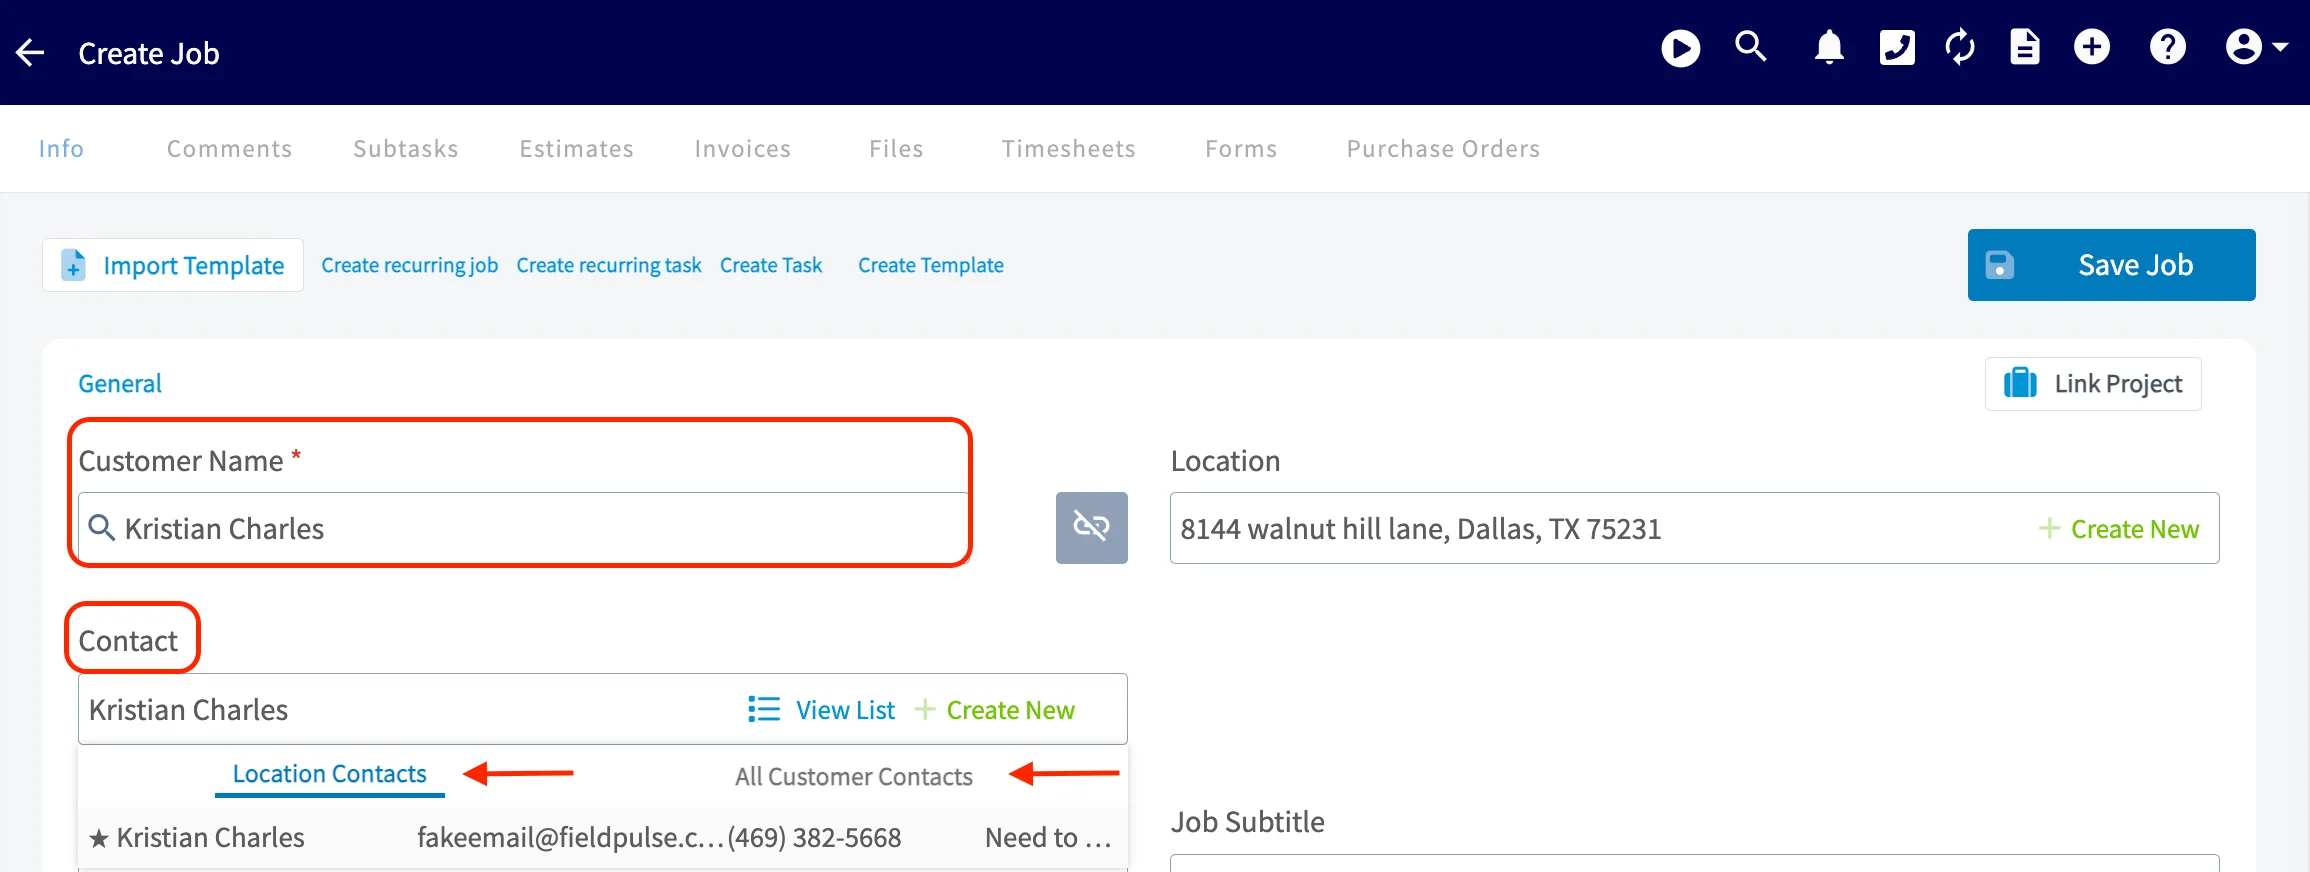
1. In **Customer Name**, select an existing customer or create a new one.
2. Pick the **Contact** for the work. The **Location Contacts** tab lists contacts tied to the location you are working at, and **All Customer Contacts** lists every contact on the linked customer.
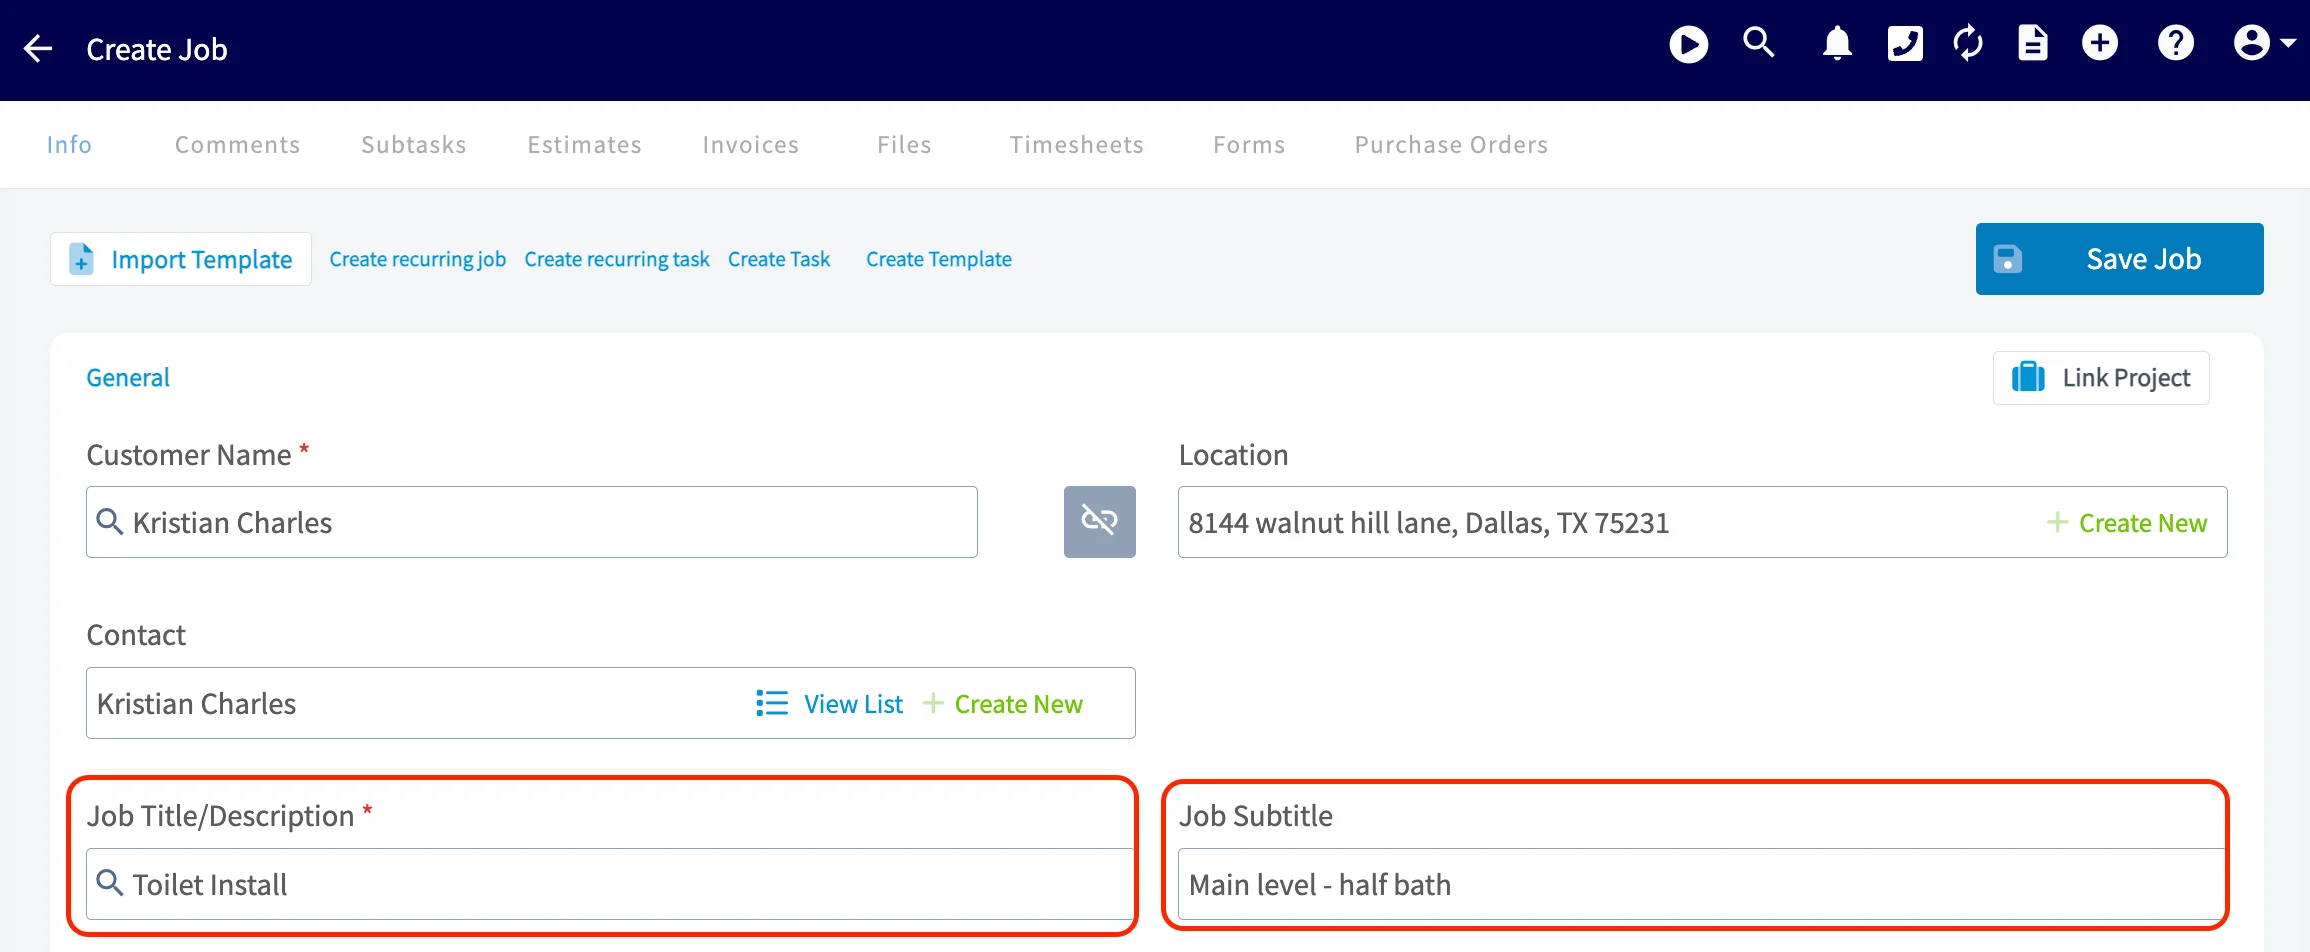
3. Enter a **Job Title/Description** that describes the work to be performed.
4. Add a **Job Subtitle** if the job needs one. The subtitle may not be greater than 150 characters.
### Link the customer and name the job
1. In **Customer Name**, select an existing customer or create a new one.
2. Pick the **Contact** for the work. The **Location Contacts** tab lists contacts tied to the location you are working at, and **All Customer Contacts** lists every contact on the linked customer.
3. Enter a **Job Title/Description** that describes the work to be performed.
4. Add a **Job Subtitle** if the job needs one. The subtitle may not be greater than 150 characters.
 ### Assign your team
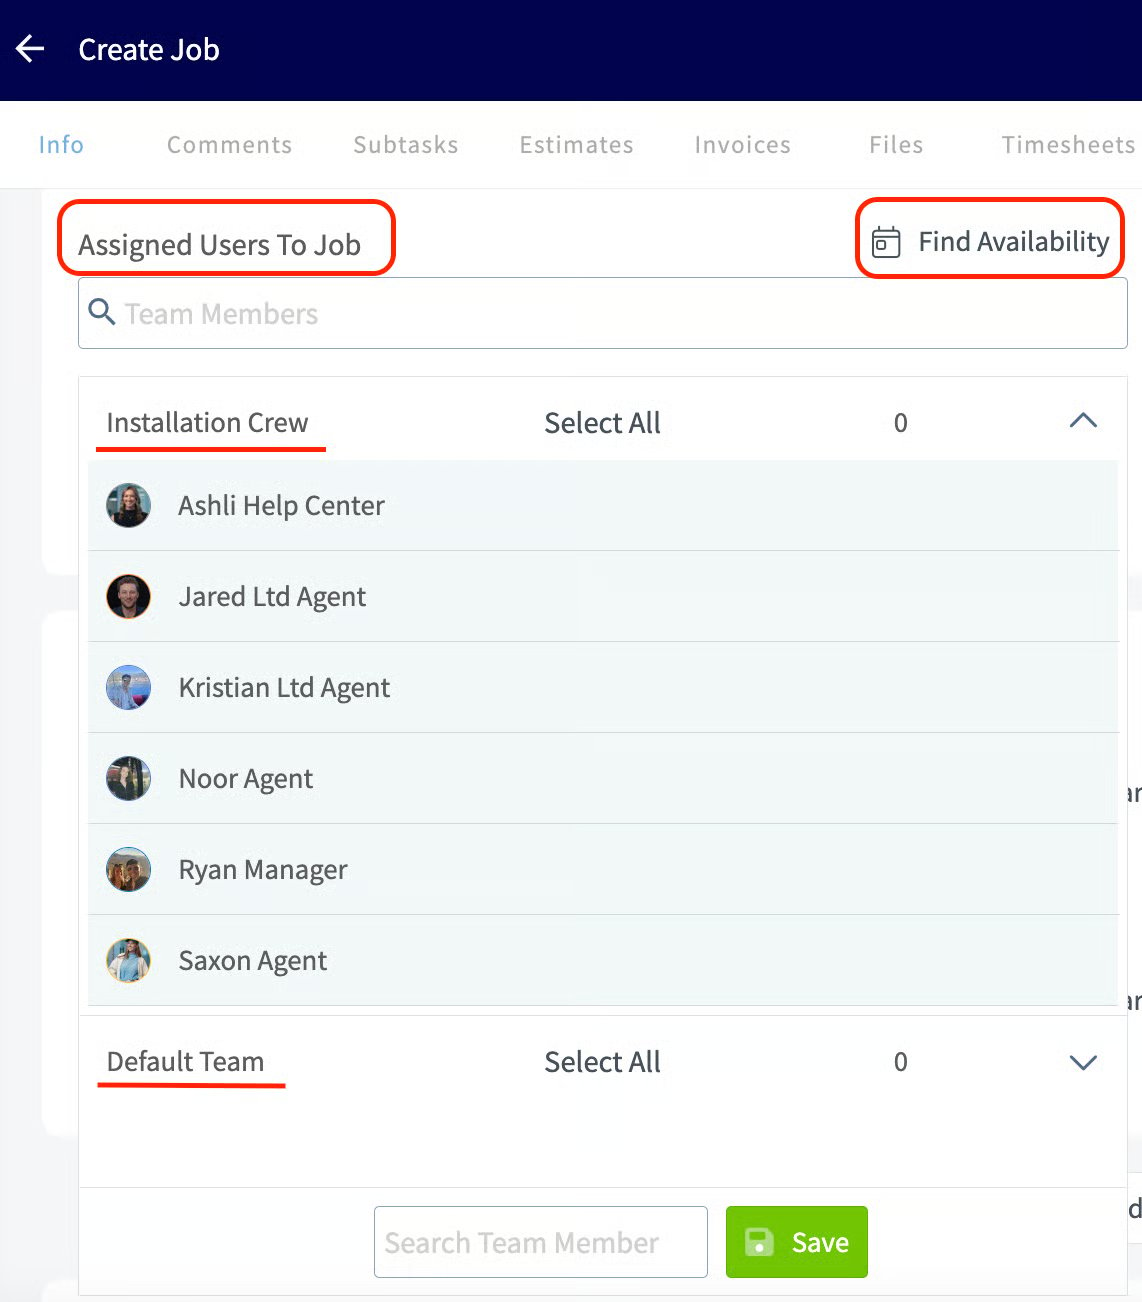
1. Select the **Assigned Users To Job** field and choose individual team members, several team members, or entire teams. Each team in the list has its own **Select All** option.
2. Select **Save** to add the selected people to the job.
Each technician's row in the dropdown shows their assigned tags — skills, certifications, and languages — so you can see who is qualified without leaving the dropdown. The search box matches by name **or** tag, so typing a skill like "hvac" surfaces every tech carrying that tag, with the matched tag highlighted on their row.
Select **Find Availability** and FieldPulse suggests time slots based on your scheduling requirements and shows which team members are available. See [How to Find Availability](/scheduling-dispatch/availability/finding-availability).
### Assign your team
1. Select the **Assigned Users To Job** field and choose individual team members, several team members, or entire teams. Each team in the list has its own **Select All** option.
2. Select **Save** to add the selected people to the job.
Each technician's row in the dropdown shows their assigned tags — skills, certifications, and languages — so you can see who is qualified without leaving the dropdown. The search box matches by name **or** tag, so typing a skill like "hvac" surfaces every tech carrying that tag, with the matched tag highlighted on their row.
Select **Find Availability** and FieldPulse suggests time slots based on your scheduling requirements and shows which team members are available. See [How to Find Availability](/scheduling-dispatch/availability/finding-availability).
 ### Add job tags
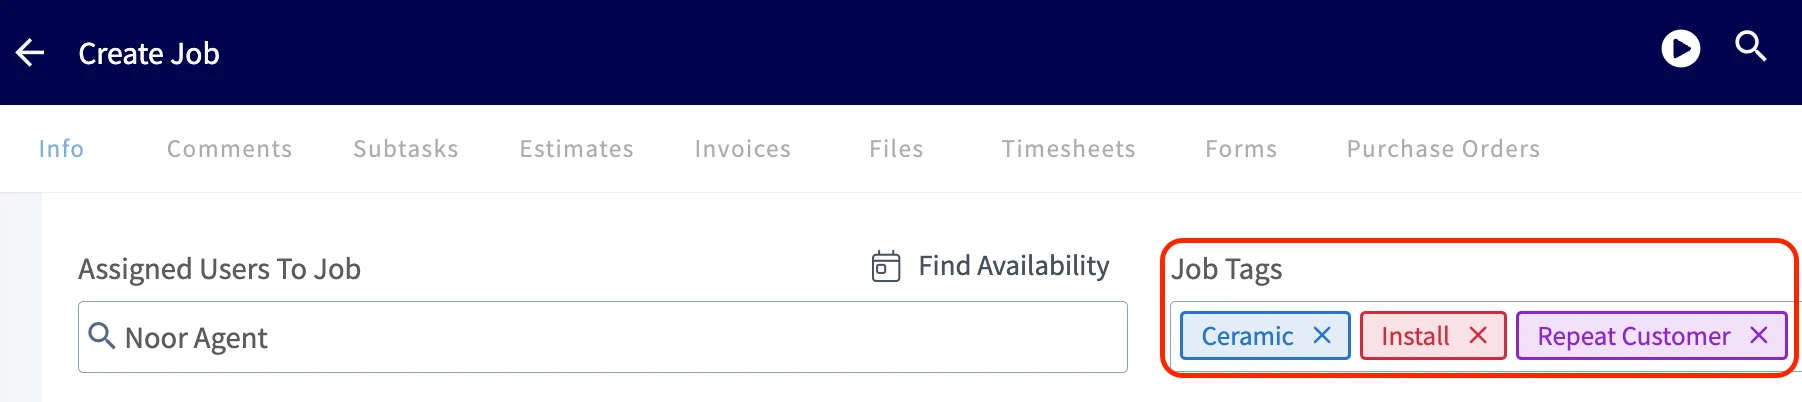
Add job tags to organize your jobs and color-code them so the schedule is easier to read at a glance. Use the **Job Tags** field to search for an existing tag, or type a new tag and press **Enter** to create it. See [How to Create Custom Tags for Jobs](/jobs/jobs-tasks/custom-tags).
### Add job tags
Add job tags to organize your jobs and color-code them so the schedule is easier to read at a glance. Use the **Job Tags** field to search for an existing tag, or type a new tag and press **Enter** to create it. See [How to Create Custom Tags for Jobs](/jobs/jobs-tasks/custom-tags).
 ### Choose a status workflow
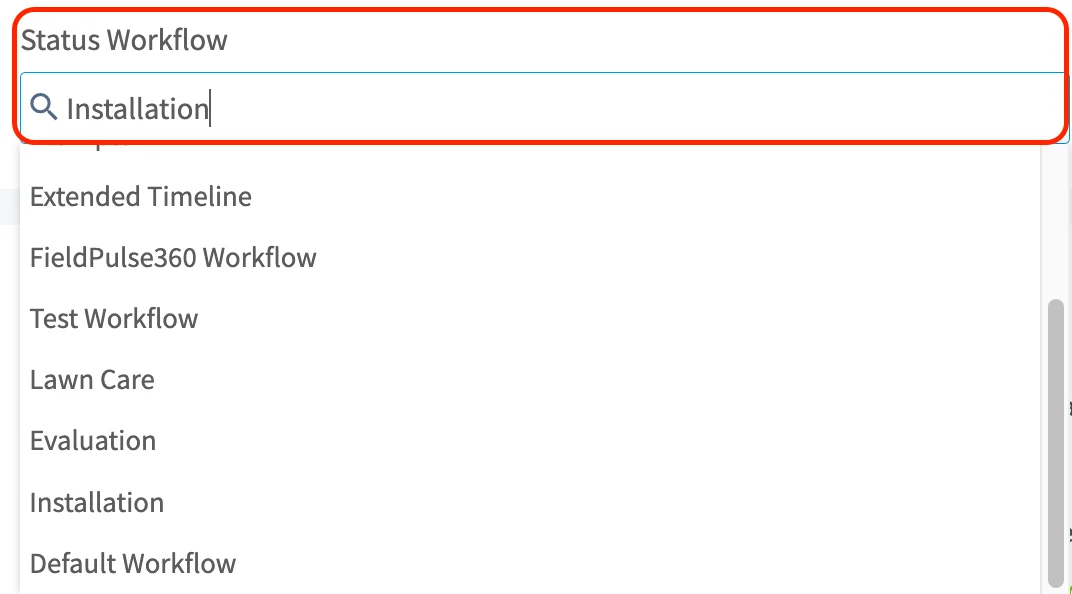
Select one of the custom status workflows you have created in **Company Settings** from the **Status Workflow** field. The field searches your saved workflows as you type. For help shaping a workflow around each service you offer, see [Workflow Design Overview](/jobs/workflows/designing-your-workflow).
### Choose a status workflow
Select one of the custom status workflows you have created in **Company Settings** from the **Status Workflow** field. The field searches your saved workflows as you type. For help shaping a workflow around each service you offer, see [Workflow Design Overview](/jobs/workflows/designing-your-workflow).
 ### Schedule the job
1. In the **Dates** section, set the **Date**, **Start Time**, and **End Time**. Select **Select Different End Date** if the job runs past one day.
2. Select **Find Availability** to open a chart view of your team's schedules and pick an open slot.
3. Check the **Check scheduling conflicts** result.
4. Set a **Customer Arrival Window** to tell the customer when to expect your team, and select **Insert Job Date/Time** to copy the job's own times into the window. See [Setting Up Customer Arrival Windows](/jobs/jobs-tasks/customer-arrival-window).
FieldPulse notifies you of scheduling conflicts when you select a date and time. To turn those notifications off, clear the scheduling conflicts checkbox — the setting carries over to future jobs.
An arrival window reduces the time customers spend waiting for service and can be used in customer communication templates.
### Schedule the job
1. In the **Dates** section, set the **Date**, **Start Time**, and **End Time**. Select **Select Different End Date** if the job runs past one day.
2. Select **Find Availability** to open a chart view of your team's schedules and pick an open slot.
3. Check the **Check scheduling conflicts** result.
4. Set a **Customer Arrival Window** to tell the customer when to expect your team, and select **Insert Job Date/Time** to copy the job's own times into the window. See [Setting Up Customer Arrival Windows](/jobs/jobs-tasks/customer-arrival-window).
FieldPulse notifies you of scheduling conflicts when you select a date and time. To turn those notifications off, clear the scheduling conflicts checkbox — the setting carries over to future jobs.
An arrival window reduces the time customers spend waiting for service and can be used in customer communication templates.

 To set working hours for multi-day jobs, see [Setting Up Working Hours for Multi-Day Jobs](/scheduling-dispatch/working-hours/multi-day-jobs).
### Add site visits
Select **Add Site Visit** for work that takes more than one trip. Each visit keeps its own date, team, and notes under the same job. See [How to Add Site Visits](/jobs/jobs-tasks/site-visits).
To set working hours for multi-day jobs, see [Setting Up Working Hours for Multi-Day Jobs](/scheduling-dispatch/working-hours/multi-day-jobs).
### Add site visits
Select **Add Site Visit** for work that takes more than one trip. Each visit keeps its own date, team, and notes under the same job. See [How to Add Site Visits](/jobs/jobs-tasks/site-visits).
 ### Add notes, files, and assets
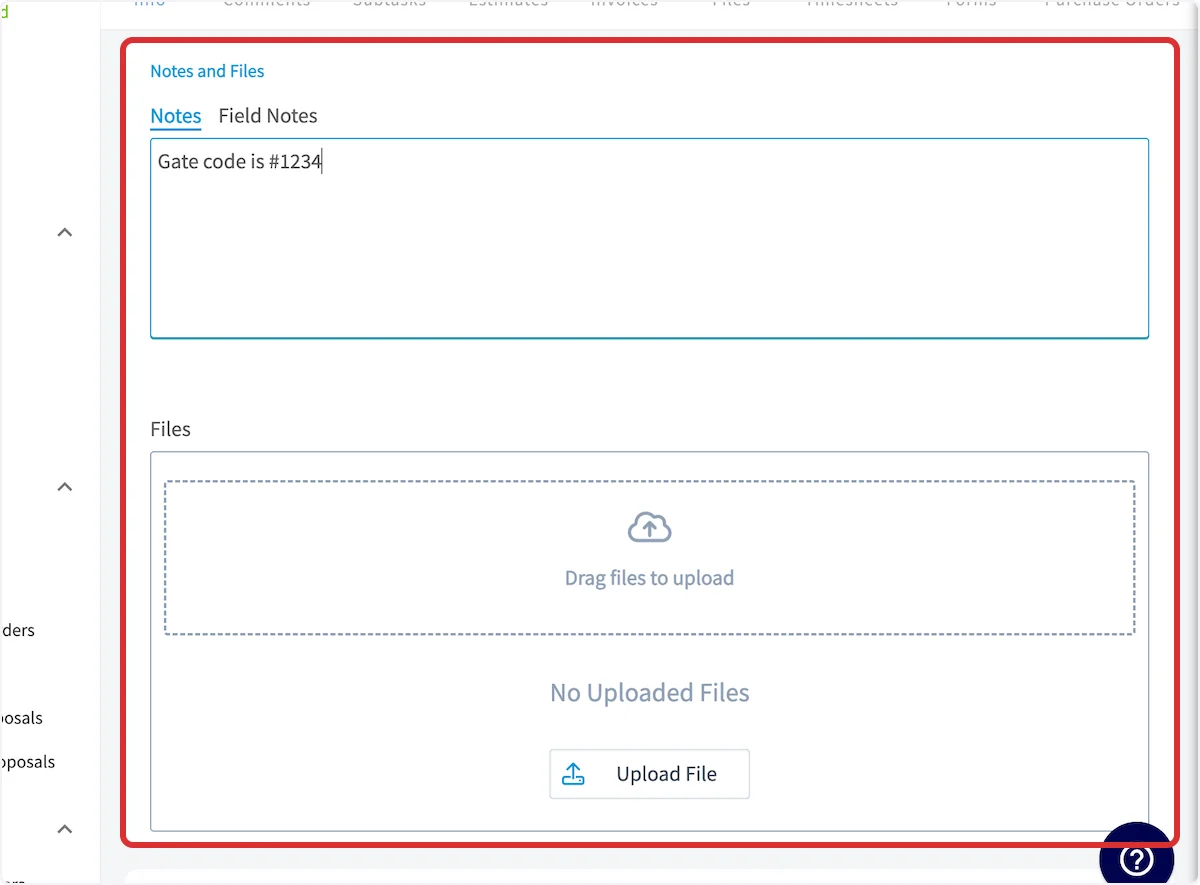
1. Enter anything the crew needs to know in the **Notes** field of the **Notes and Files** section.
2. Attach any important files by dragging them in or selecting **Upload File**.
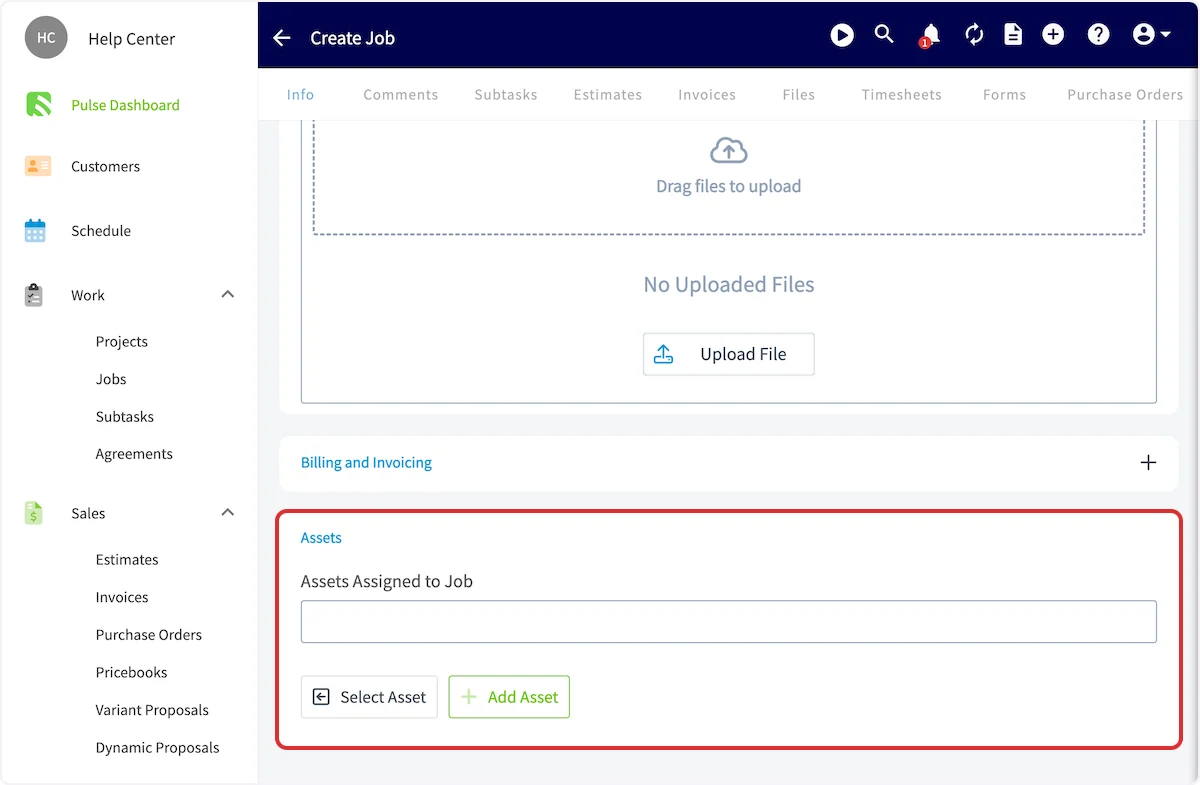
3. In the **Assets** section, select **Select Asset** to attach an existing asset to the job, or **Add Asset** to create a new one. See [How to Manage Assets](/jobs/assets/managing-assets).
Only administrators and managers can add Notes on a job record. The service agent adds **Field Notes** while working the job.
In the web app, every **Notes** field includes a **Fix this** button. Select it to send the field's current text to the Help & Support assistant and describe what you want done. Choose **Replace** to swap in the result, or **Add Below** to keep your original text and add the result underneath it. Nothing changes on the job record until you save it.
### Add notes, files, and assets
1. Enter anything the crew needs to know in the **Notes** field of the **Notes and Files** section.
2. Attach any important files by dragging them in or selecting **Upload File**.
3. In the **Assets** section, select **Select Asset** to attach an existing asset to the job, or **Add Asset** to create a new one. See [How to Manage Assets](/jobs/assets/managing-assets).
Only administrators and managers can add Notes on a job record. The service agent adds **Field Notes** while working the job.
In the web app, every **Notes** field includes a **Fix this** button. Select it to send the field's current text to the Help & Support assistant and describe what you want done. Choose **Replace** to swap in the result, or **Add Below** to keep your original text and add the result underneath it. Nothing changes on the job record until you save it.
 ### Save the job
Select **Save Job** once you have added all pertinent details. The assigned team members receive a notification of their newly assigned work and the job appears on their schedules.
### Save the job
Select **Save Job** once you have added all pertinent details. The assigned team members receive a notification of their newly assigned work and the job appears on their schedules.
 ## On mobile
You can start a job from four places in the mobile app — the Pulse Dashboard, the **Schedule** tab, the **Work** tab, and the **Customers** tab.
### Start from the Pulse Dashboard
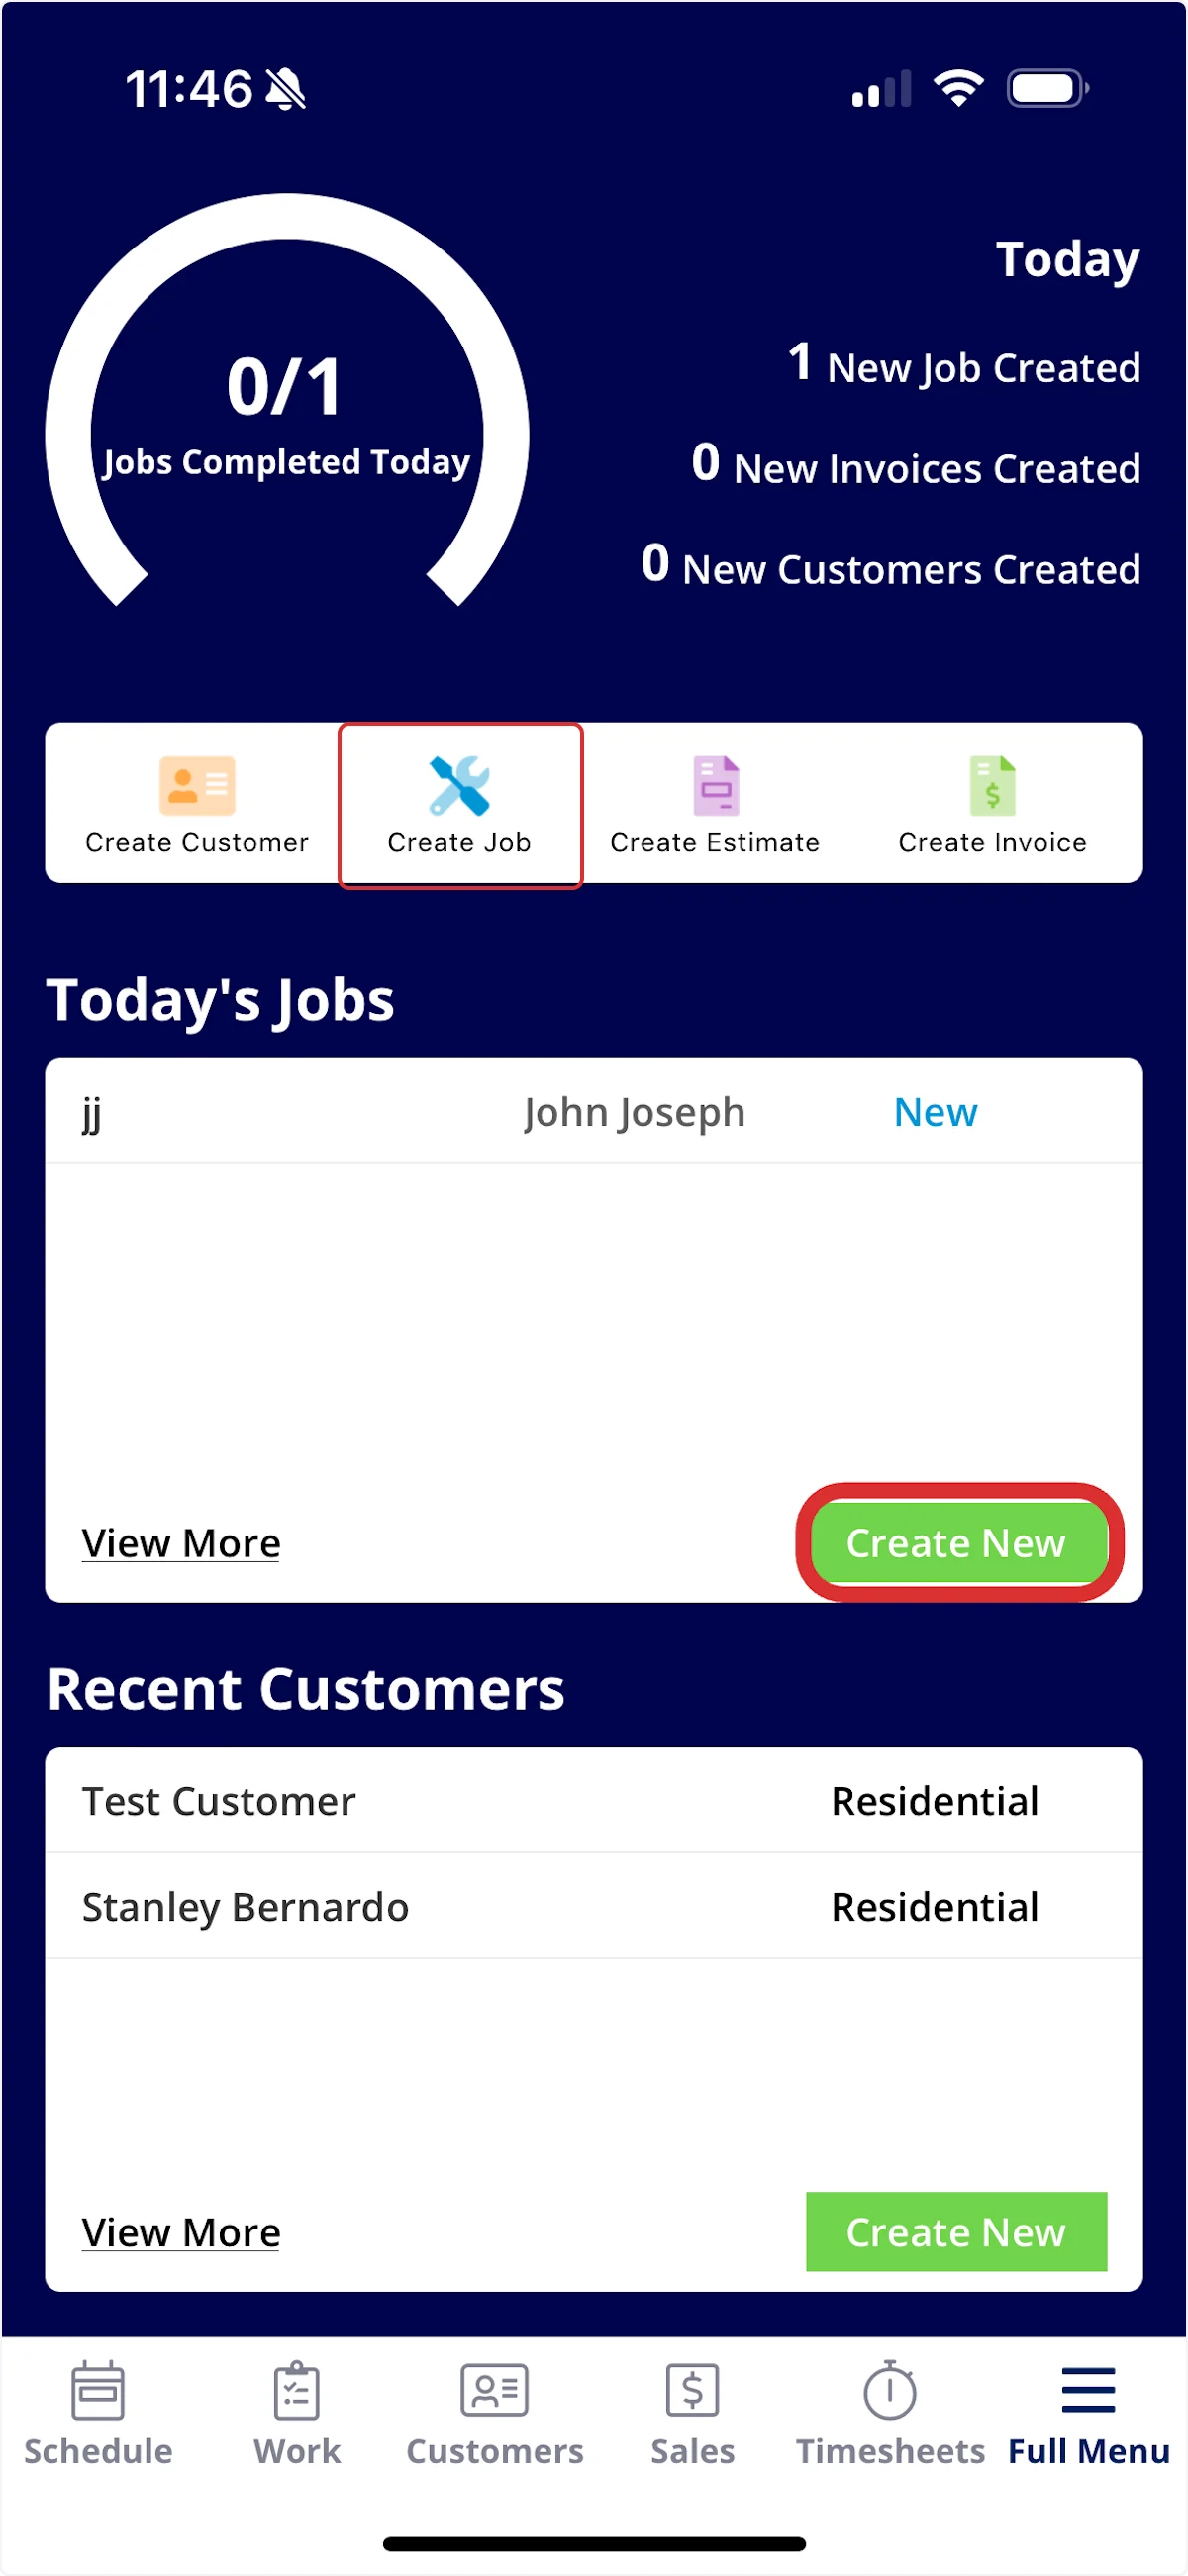
Select **Create Job** near the top of the Pulse Dashboard, or select **Create New** under **Today's Jobs**.
## On mobile
You can start a job from four places in the mobile app — the Pulse Dashboard, the **Schedule** tab, the **Work** tab, and the **Customers** tab.
### Start from the Pulse Dashboard
Select **Create Job** near the top of the Pulse Dashboard, or select **Create New** under **Today's Jobs**.
 ### Start from the Schedule tab
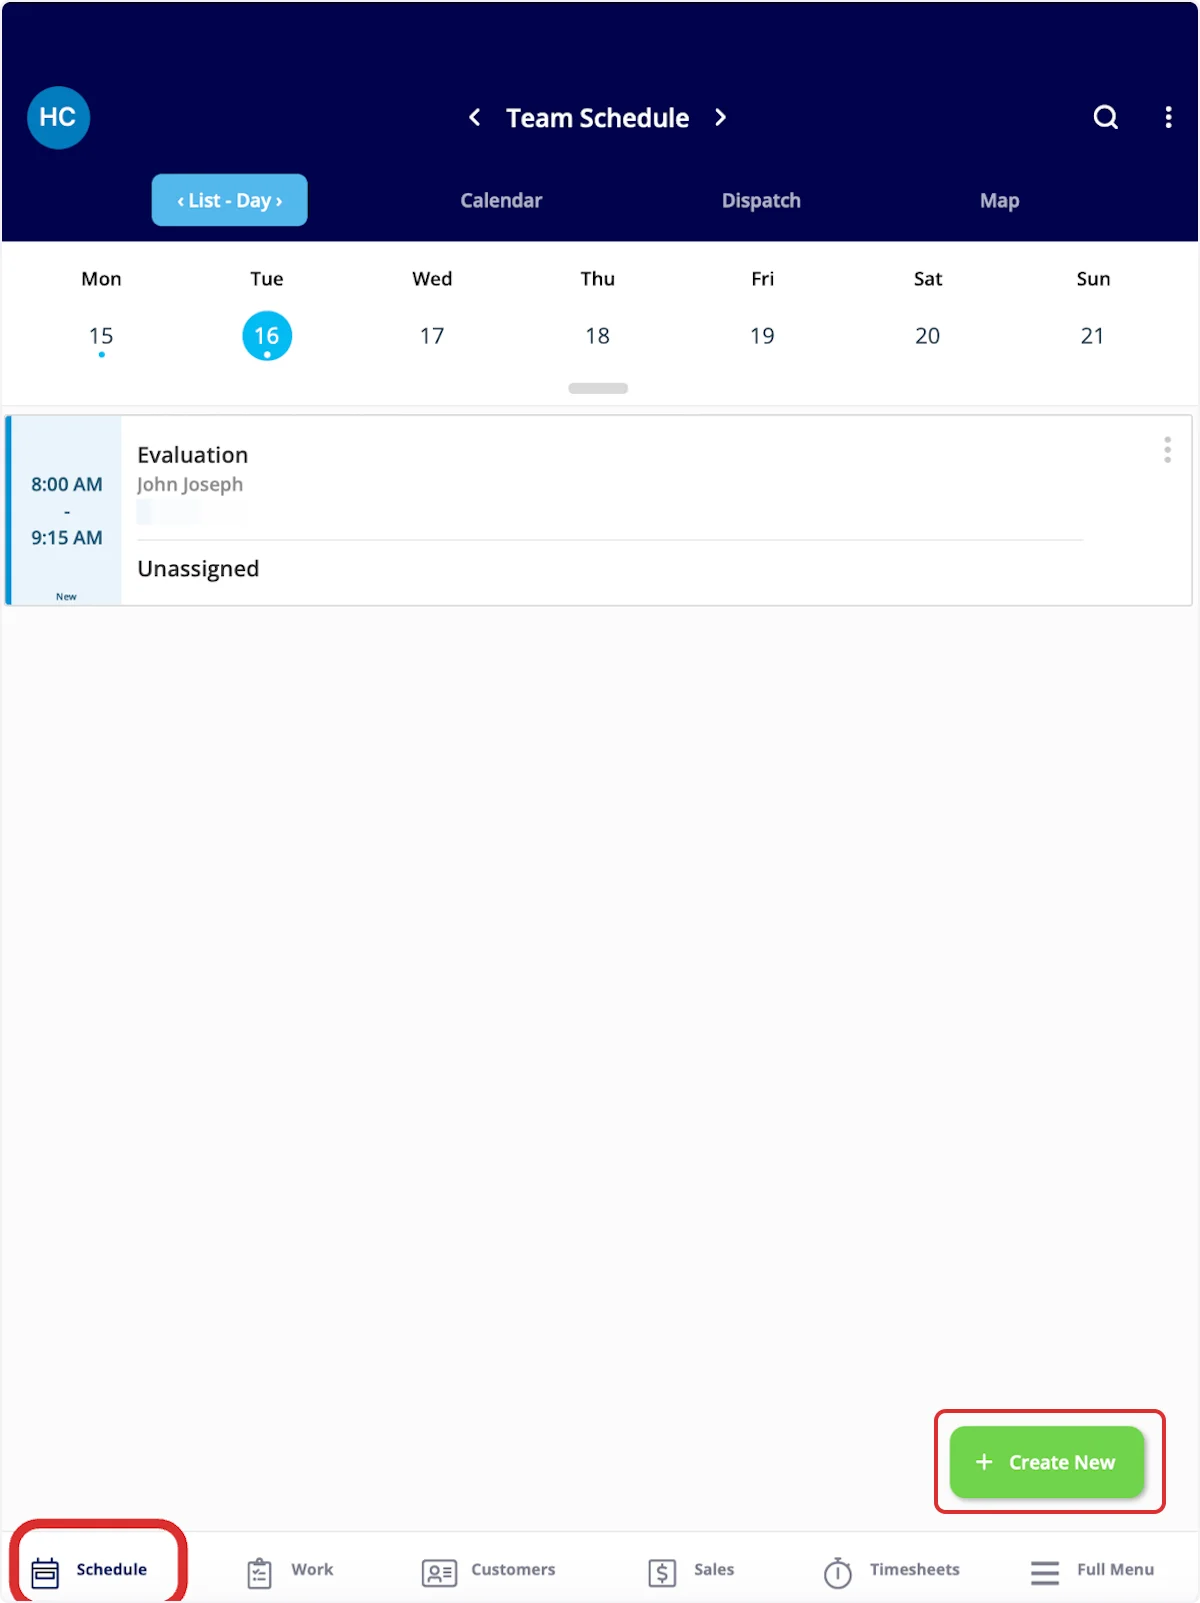
Select **Schedule** in the bottom menu, then select **Create New**.
### Start from the Schedule tab
Select **Schedule** in the bottom menu, then select **Create New**.
 ### Start from the Work tab
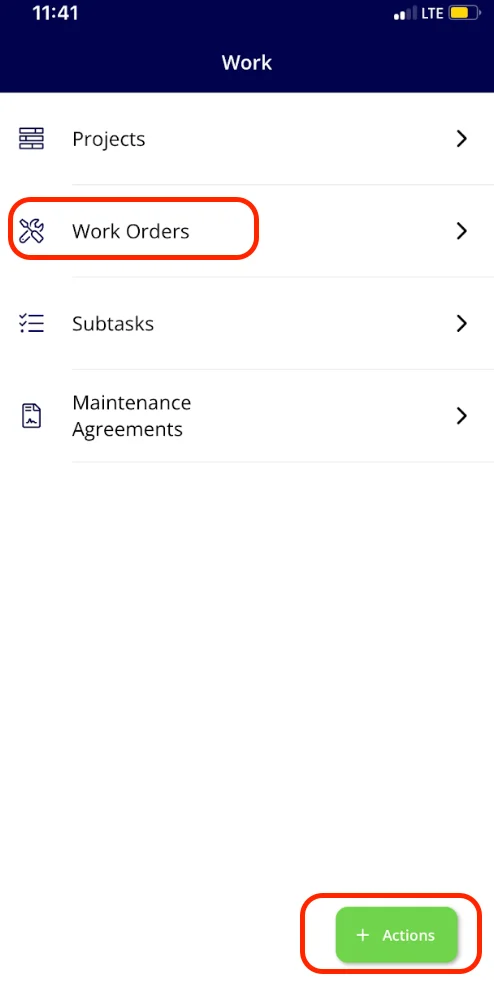
1. Select **Work** in the bottom menu.
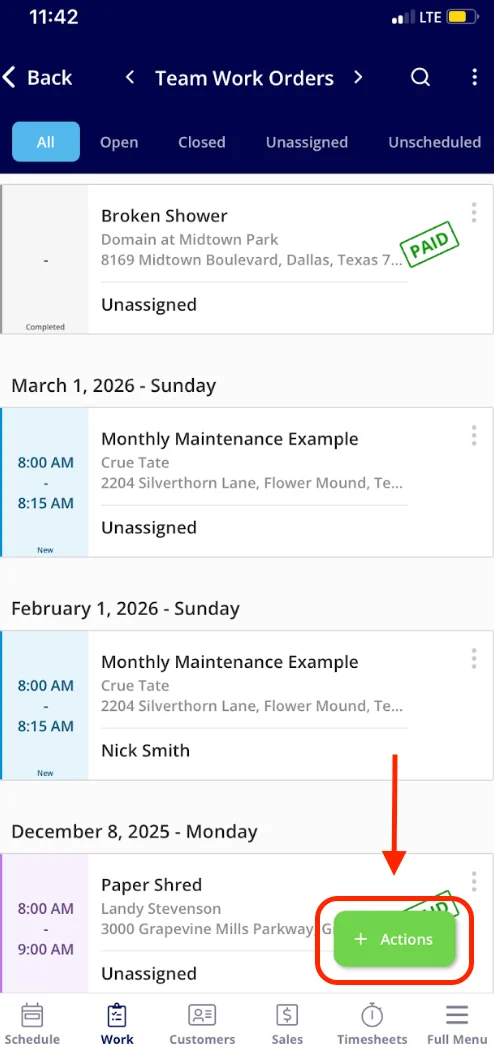
2. Select **Actions** for a menu of work-related actions that includes creating a job, or select **Work Orders** to see all of your jobs.
3. From the **Work Orders** list, select **Actions** to create a new job.
### Start from the Work tab
1. Select **Work** in the bottom menu.
2. Select **Actions** for a menu of work-related actions that includes creating a job, or select **Work Orders** to see all of your jobs.
3. From the **Work Orders** list, select **Actions** to create a new job.
 ### Start from the Customers tab
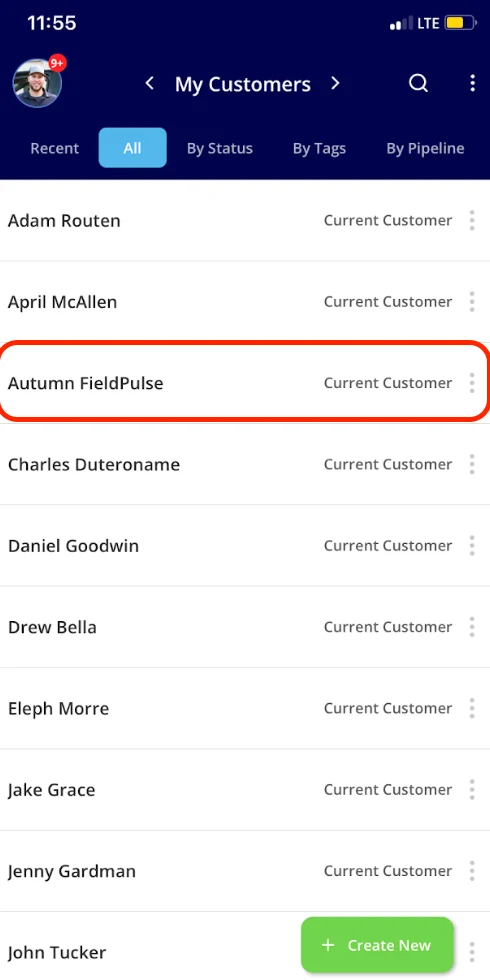
1. Select **Customers** in the bottom menu, then select the customer to open their record.
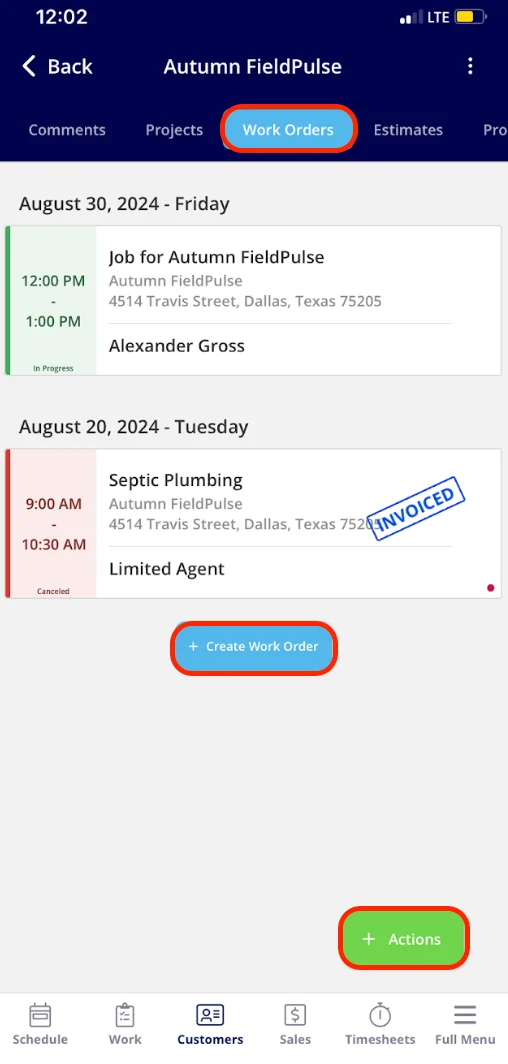
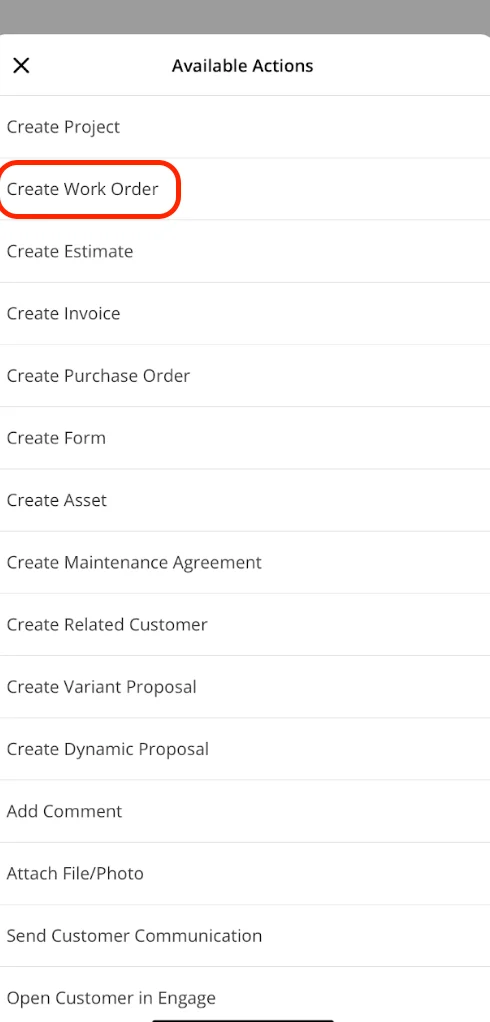
2. Select the **Work Orders** tab to see the customer's existing jobs, then select **Create Work Order**. Or select **Actions** for a menu of customer-related actions.
3. In **Available Actions**, select **Create Work Order**.
### Start from the Customers tab
1. Select **Customers** in the bottom menu, then select the customer to open their record.
2. Select the **Work Orders** tab to see the customer's existing jobs, then select **Create Work Order**. Or select **Actions** for a menu of customer-related actions.
3. In **Available Actions**, select **Create Work Order**.
 ### Fill in the job details
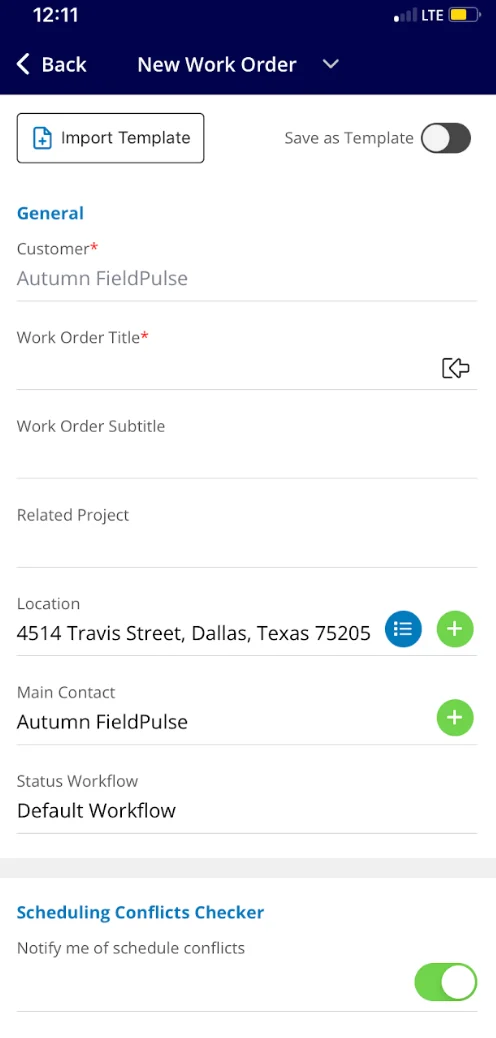
1. Attach the **Customer**. Use an existing customer or create a new one.
2. Enter the **Work Order Title**, and a **Work Order Subtitle** if the job needs one.
3. Set the **Location**, **Main Contact**, and **Status Workflow** for the job.
4. Use the **Notify me of schedule conflicts** toggle under **Scheduling Conflicts Checker** to turn conflict notifications on or off.
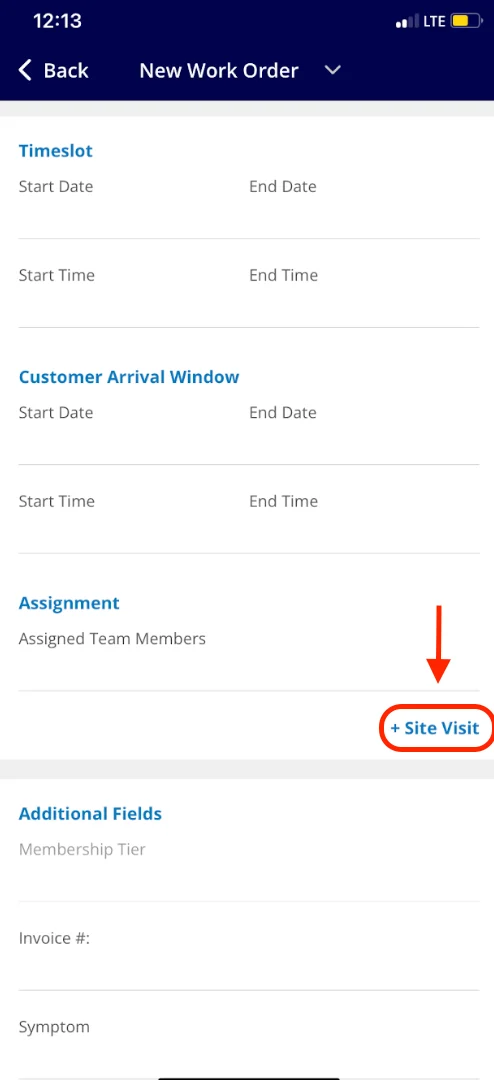
5. Set the **Timeslot** start and end dates and times, and the **Customer Arrival Window**.
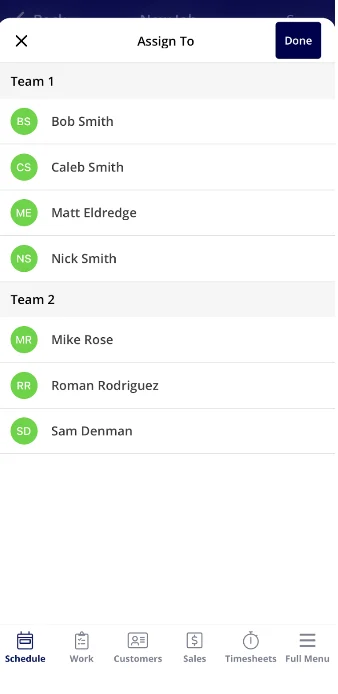
6. Under **Assignment**, select **Assigned Team Members** and choose the people or teams working the job from the **Assign To** list, then select **Done**.
7. Select **+ Site Visit** if the job needs another trip.
### Fill in the job details
1. Attach the **Customer**. Use an existing customer or create a new one.
2. Enter the **Work Order Title**, and a **Work Order Subtitle** if the job needs one.
3. Set the **Location**, **Main Contact**, and **Status Workflow** for the job.
4. Use the **Notify me of schedule conflicts** toggle under **Scheduling Conflicts Checker** to turn conflict notifications on or off.
5. Set the **Timeslot** start and end dates and times, and the **Customer Arrival Window**.
6. Under **Assignment**, select **Assigned Team Members** and choose the people or teams working the job from the **Assign To** list, then select **Done**.
7. Select **+ Site Visit** if the job needs another trip.
 ### Add custom fields, assets, notes, and tags
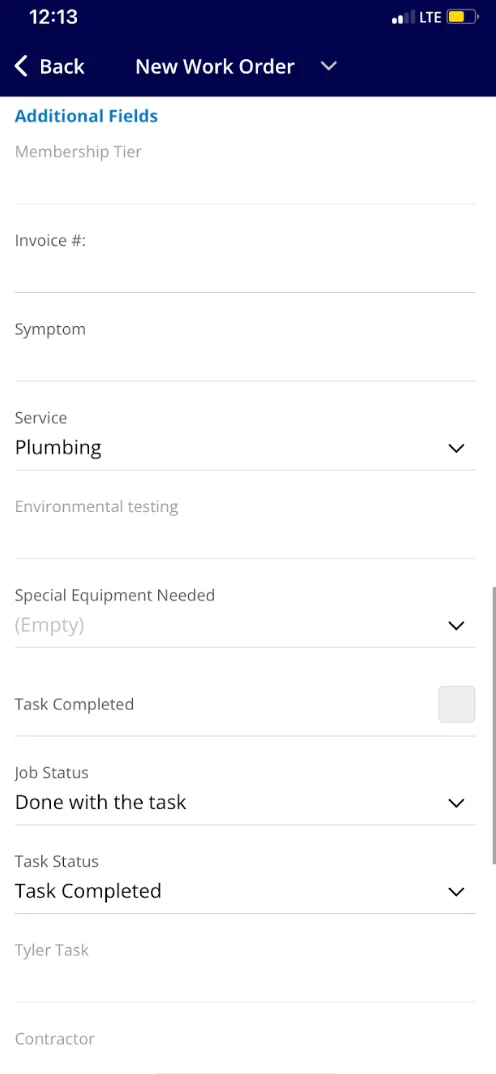
1. Fill in anything under **Additional Fields**. These are the custom fields your account has added to job records — see [Setting Up Custom Fields on Job Records](/jobs/jobs-tasks/custom-fields).
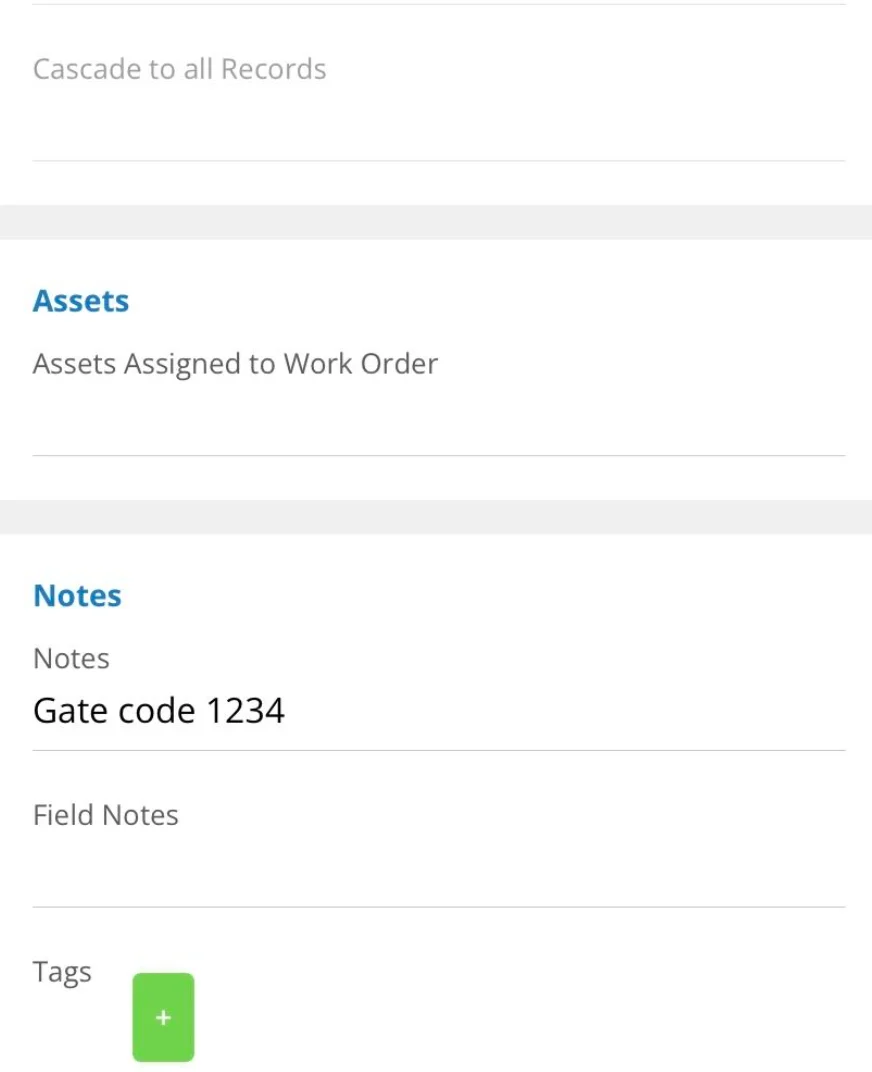
2. Attach equipment in **Assets Assigned to Work Order**.
3. Add **Notes** and **Field Notes**, then add **Tags** with the **+** button.
### Add custom fields, assets, notes, and tags
1. Fill in anything under **Additional Fields**. These are the custom fields your account has added to job records — see [Setting Up Custom Fields on Job Records](/jobs/jobs-tasks/custom-fields).
2. Attach equipment in **Assets Assigned to Work Order**.
3. Add **Notes** and **Field Notes**, then add **Tags** with the **+** button.
 ### Save the job
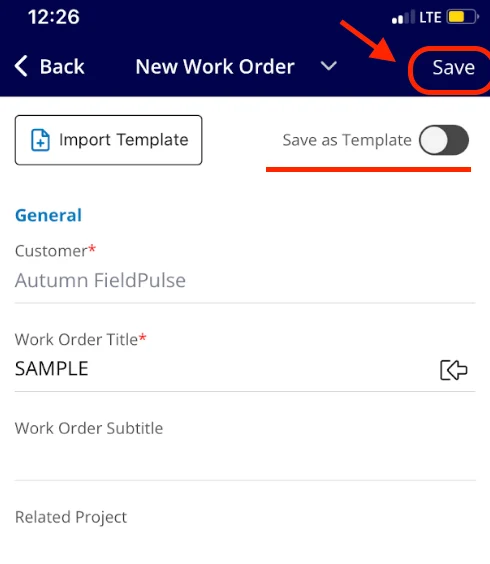
1. Fill in every required field. The **Save** button appears in the top right once the required fields are complete.
2. To reuse this job's setup later, turn on the **Save as Template** toggle before saving.
3. Select **Save**.
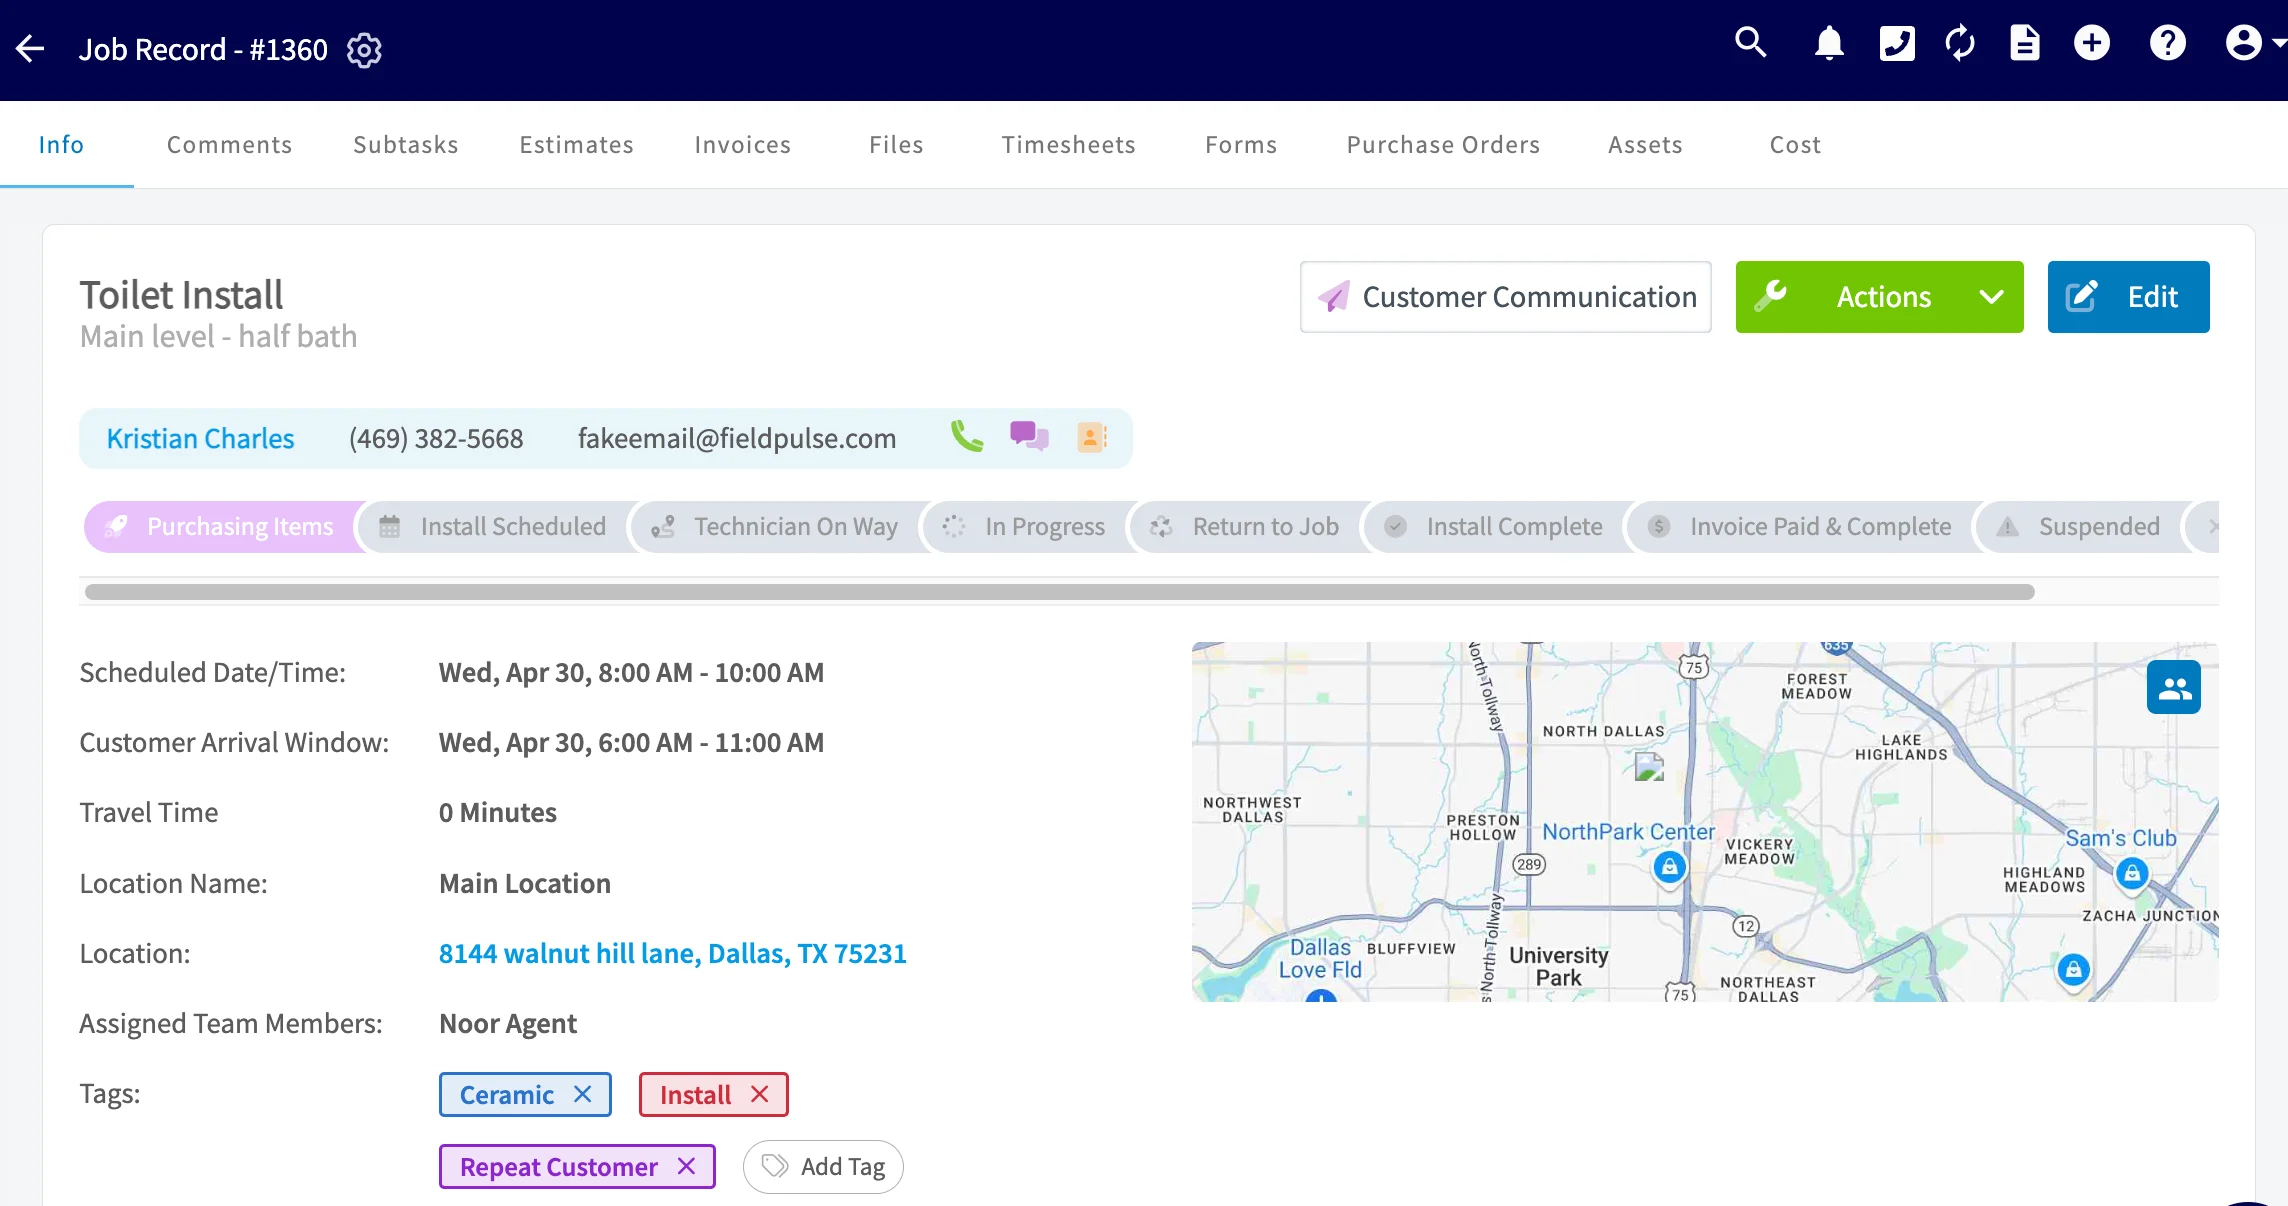
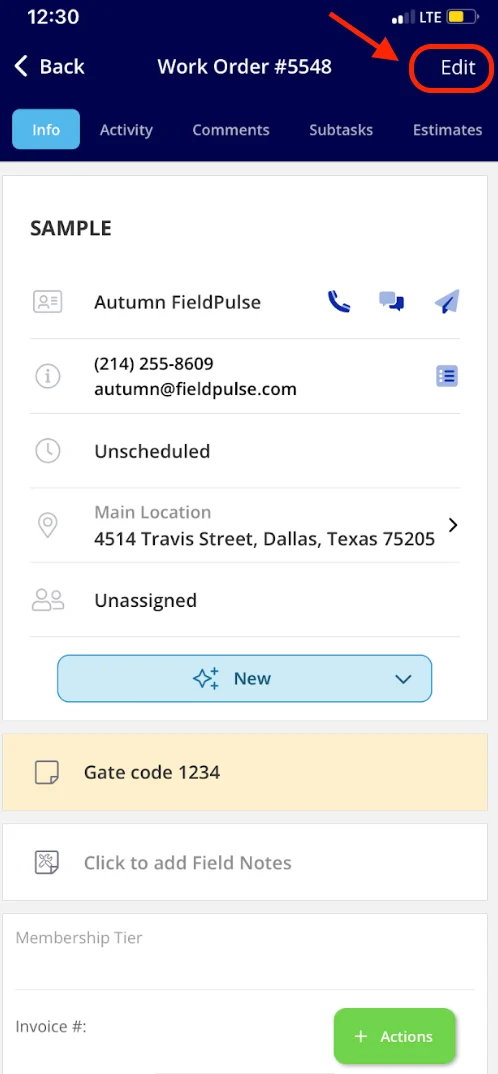
After saving, the full job record appears. Select **Edit** in the top right to change the job later, and open the **Schedule** tab in the bottom menu to see the new job on the calendar.
### Save the job
1. Fill in every required field. The **Save** button appears in the top right once the required fields are complete.
2. To reuse this job's setup later, turn on the **Save as Template** toggle before saving.
3. Select **Save**.
After saving, the full job record appears. Select **Edit** in the top right to change the job later, and open the **Schedule** tab in the bottom menu to see the new job on the calendar.
 ## FAQs
### Can I change the next job number?
Yes. Go to **Company Settings** > **Jobs** > **General** and set the field titled **Next Job #**. After you save, the next job created uses that number and the numbering auto-increments from there.
### How do I delete a job or work order?
FieldPulse does not support permanently deleting a job, and there are two ways to get one out of your active view. Archive the job to keep the record for reporting but hide it from your active job list — filter for **Is Archived** jobs under **Search & Filter** to find it again. Or move the job to the **Canceled** status, part of the default status workflow, to keep it visible in reports as a distinct outcome.
## Still need help?
Reach the [FieldPulse support team](https://www.fieldpulse.com/company/contact-us) at [support@fieldpulse.com](mailto:support@fieldpulse.com) or through the chat feature in the bottom-right corner of your screen.
## Related articles
* [How to Create a Task](/jobs/jobs-tasks/creating-a-task)
* [How to Create Recurring Jobs](/jobs/jobs-tasks/recurring-jobs)
* [How to Complete a Job in the Field](/jobs/jobs-tasks/completing-a-job)
* [How to Use a Job Template](/jobs/jobs-tasks/using-job-templates)
* [How to Add Site Visits](/jobs/jobs-tasks/site-visits)
* [Setting Up Customer Arrival Windows](/jobs/jobs-tasks/customer-arrival-window)
Your job is created when it saves without a required-field warning, the assigned team members get their notification, and the work shows on the right schedule with the customer, the arrival window, and the crew already attached.
## Related topics
- [How to Create a Maintenance Agreement](/jobs/assets/maintenance-agreements.md)
- [How to Create Job Reports](/reporting/raw-data/job-reports.md)
- [How to Create Recurring Jobs](/jobs/jobs-tasks/recurring-jobs.md)
- [How to Create a Task](/jobs/jobs-tasks/creating-a-task.md)
## FAQs
### Can I change the next job number?
Yes. Go to **Company Settings** > **Jobs** > **General** and set the field titled **Next Job #**. After you save, the next job created uses that number and the numbering auto-increments from there.
### How do I delete a job or work order?
FieldPulse does not support permanently deleting a job, and there are two ways to get one out of your active view. Archive the job to keep the record for reporting but hide it from your active job list — filter for **Is Archived** jobs under **Search & Filter** to find it again. Or move the job to the **Canceled** status, part of the default status workflow, to keep it visible in reports as a distinct outcome.
## Still need help?
Reach the [FieldPulse support team](https://www.fieldpulse.com/company/contact-us) at [support@fieldpulse.com](mailto:support@fieldpulse.com) or through the chat feature in the bottom-right corner of your screen.
## Related articles
* [How to Create a Task](/jobs/jobs-tasks/creating-a-task)
* [How to Create Recurring Jobs](/jobs/jobs-tasks/recurring-jobs)
* [How to Complete a Job in the Field](/jobs/jobs-tasks/completing-a-job)
* [How to Use a Job Template](/jobs/jobs-tasks/using-job-templates)
* [How to Add Site Visits](/jobs/jobs-tasks/site-visits)
* [Setting Up Customer Arrival Windows](/jobs/jobs-tasks/customer-arrival-window)
Your job is created when it saves without a required-field warning, the assigned team members get their notification, and the work shows on the right schedule with the customer, the arrival window, and the crew already attached.
## Related topics
- [How to Create a Maintenance Agreement](/jobs/assets/maintenance-agreements.md)
- [How to Create Job Reports](/reporting/raw-data/job-reports.md)
- [How to Create Recurring Jobs](/jobs/jobs-tasks/recurring-jobs.md)
- [How to Create a Task](/jobs/jobs-tasks/creating-a-task.md)