> ## Documentation Index
> Fetch the complete documentation index at: https://help.fieldpulse.com/llms.txt
> Use this file to discover all available pages before exploring further.
# Setting Up Job Templates
> Build a reusable job template in FieldPulse so every repeat work type starts with the right details, scheduling rules, forms, and materials.
> **Who uses this:** You build a job template from the Create Job screen. The FieldPulse user roles matrix lists **Create & edit Jobs** as Yes for Admin and Team Manager, own jobs only for Service Agent, and No for Limited Agent. **Availability:** All regions · web app and mobile app.
When the same kind of work comes up again and again, a job template saves that setup once so every new [job](https://www.fieldpulse.com/features/job-management) of that type opens prefilled. You build the template one time, and your team stops rebuilding the same job by hand for every visit.
## Overview
A job template is a saved record that FieldPulse uses to pre-fill new jobs, so a new job is ready in one click. The template holds the parts of the work that stay the same from one visit to the next — the job title and subtitle, assigned users, job tags, notes and files, the location, the scheduling parameters, the [custom forms](https://www.fieldpulse.com/features/custom-forms) your team fills out, and the material list for that work type.
On the web app you create a template from the **Create Job** screen and manage it from the **Templates** tab of the **Jobs** page. In the mobile app you save a job you are already creating as a template, and you find your saved templates under **Work** > **Templates**.
Starting a new job from a saved template is covered in [How to Use a Job Template](/jobs/jobs-tasks/using-job-templates).
## Before you begin
* Create the custom forms you want the template to carry. Custom forms are built in **Company Settings** — see [How to Create a Custom Form](/jobs/custom-forms/create-a-form).
* Decide which work types repeat often enough to be worth saving as a template.
* Have the scheduling rules for that work type ready — how many team members it takes, how long it blocks on the calendar, how much lead time it needs, and which skills qualify someone to work it.
## Step-by-step setup
### 1. Open the Create Job screen
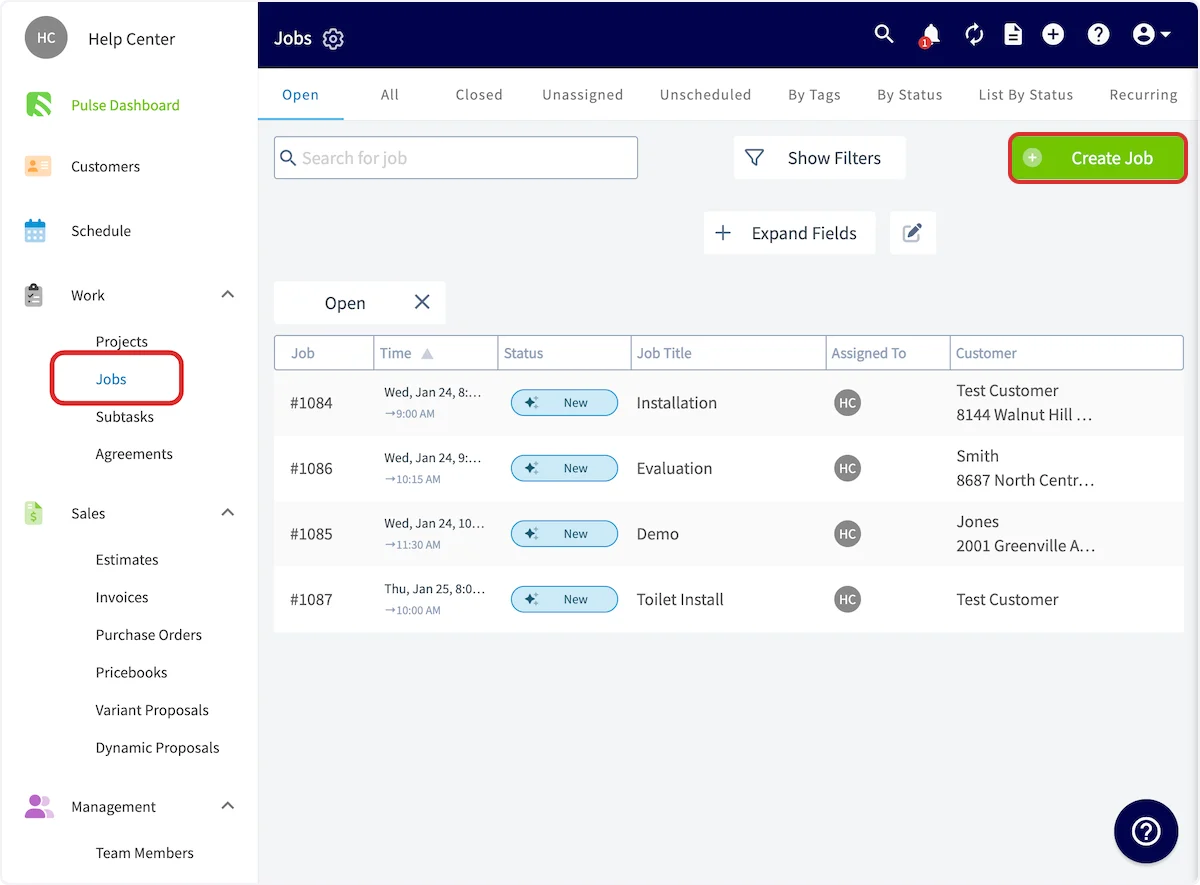
1. Go to **Jobs** in the left-side menu.
2. Select **Create Job**.
 ### 2. Switch to Create Template
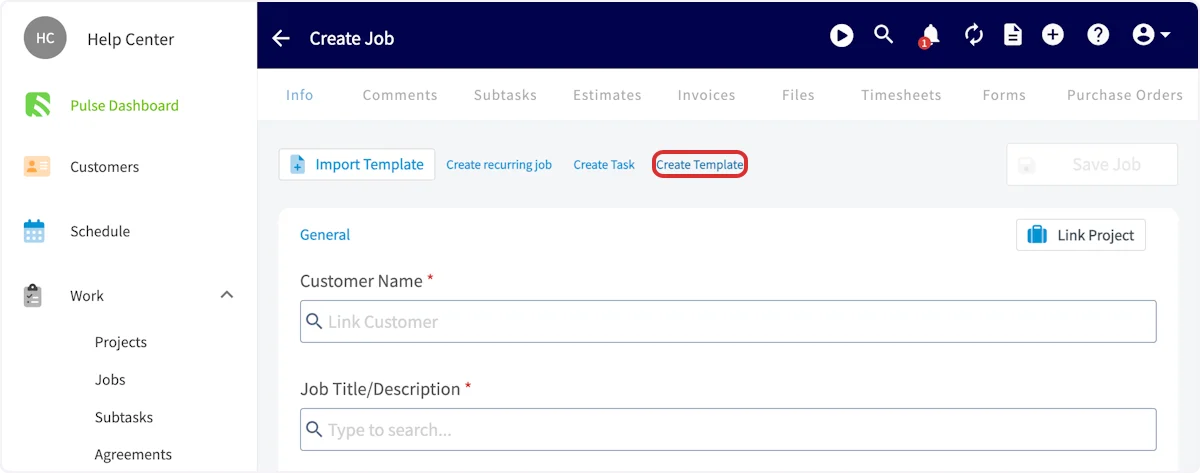
Instead of entering your job details as normal, select **Create Template** in the row of actions above the job form.
### 2. Switch to Create Template
Instead of entering your job details as normal, select **Create Template** in the row of actions above the job form.
 ### 3. Enter the template details
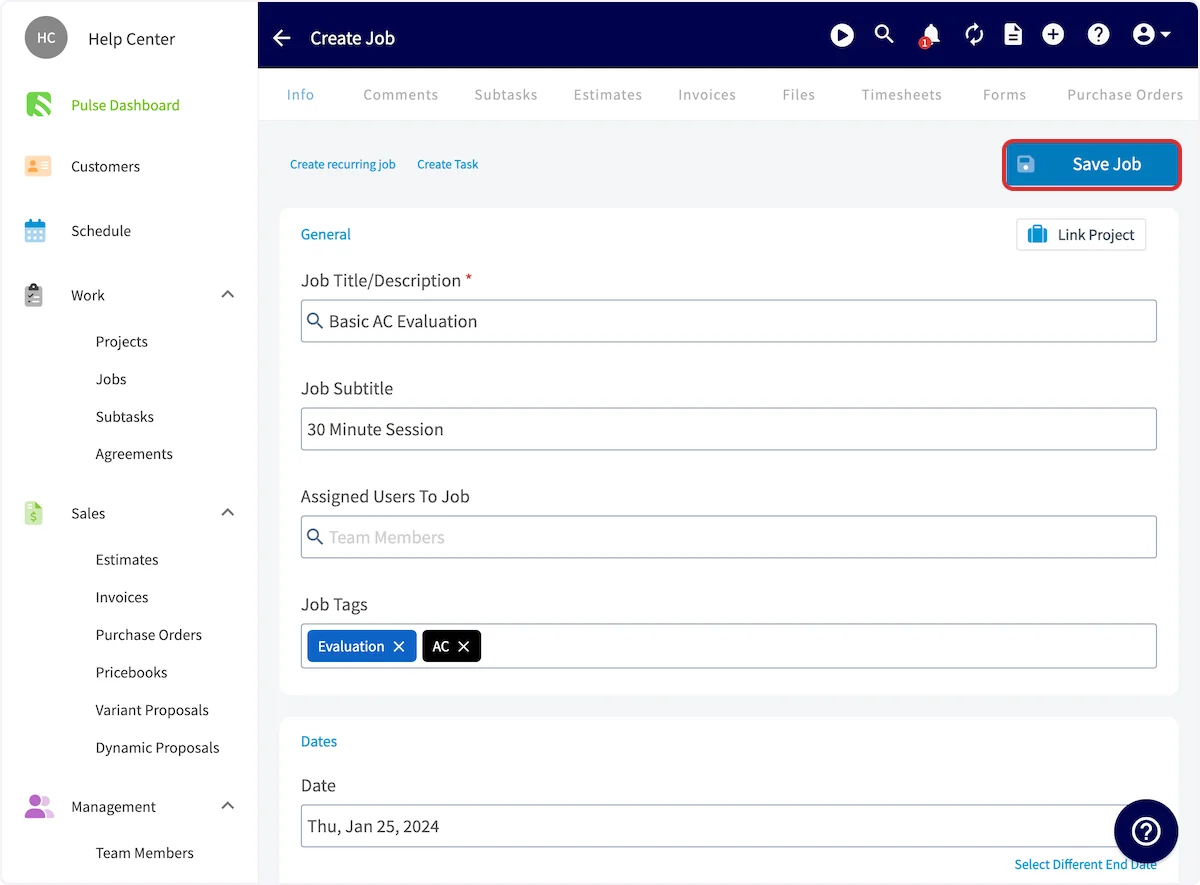
1. Enter a **Job Title/Description**. This is the only required field on a template.
2. Add a **Job Subtitle**, **Assigned Users To Job**, **Job Tags**, notes, and files if you want them on every job built from this template.
3. Set the **Location**. Enter an address only when the work always happens at the same place — in most cases you leave this blank so the customer's address is inserted automatically instead. You can also enter location coordinates in Decimal Degrees (for example, `34.0522, -118.2437`) or Degrees, Minutes, Seconds (for example, `34°03'08"N, 118°14'37"W`).
4. Select **Save Job**.
### 3. Enter the template details
1. Enter a **Job Title/Description**. This is the only required field on a template.
2. Add a **Job Subtitle**, **Assigned Users To Job**, **Job Tags**, notes, and files if you want them on every job built from this template.
3. Set the **Location**. Enter an address only when the work always happens at the same place — in most cases you leave this blank so the customer's address is inserted automatically instead. You can also enter location coordinates in Decimal Degrees (for example, `34.0522, -118.2437`) or Degrees, Minutes, Seconds (for example, `34°03'08"N, 118°14'37"W`).
4. Select **Save Job**.
 ### 4. Add the scheduling parameters
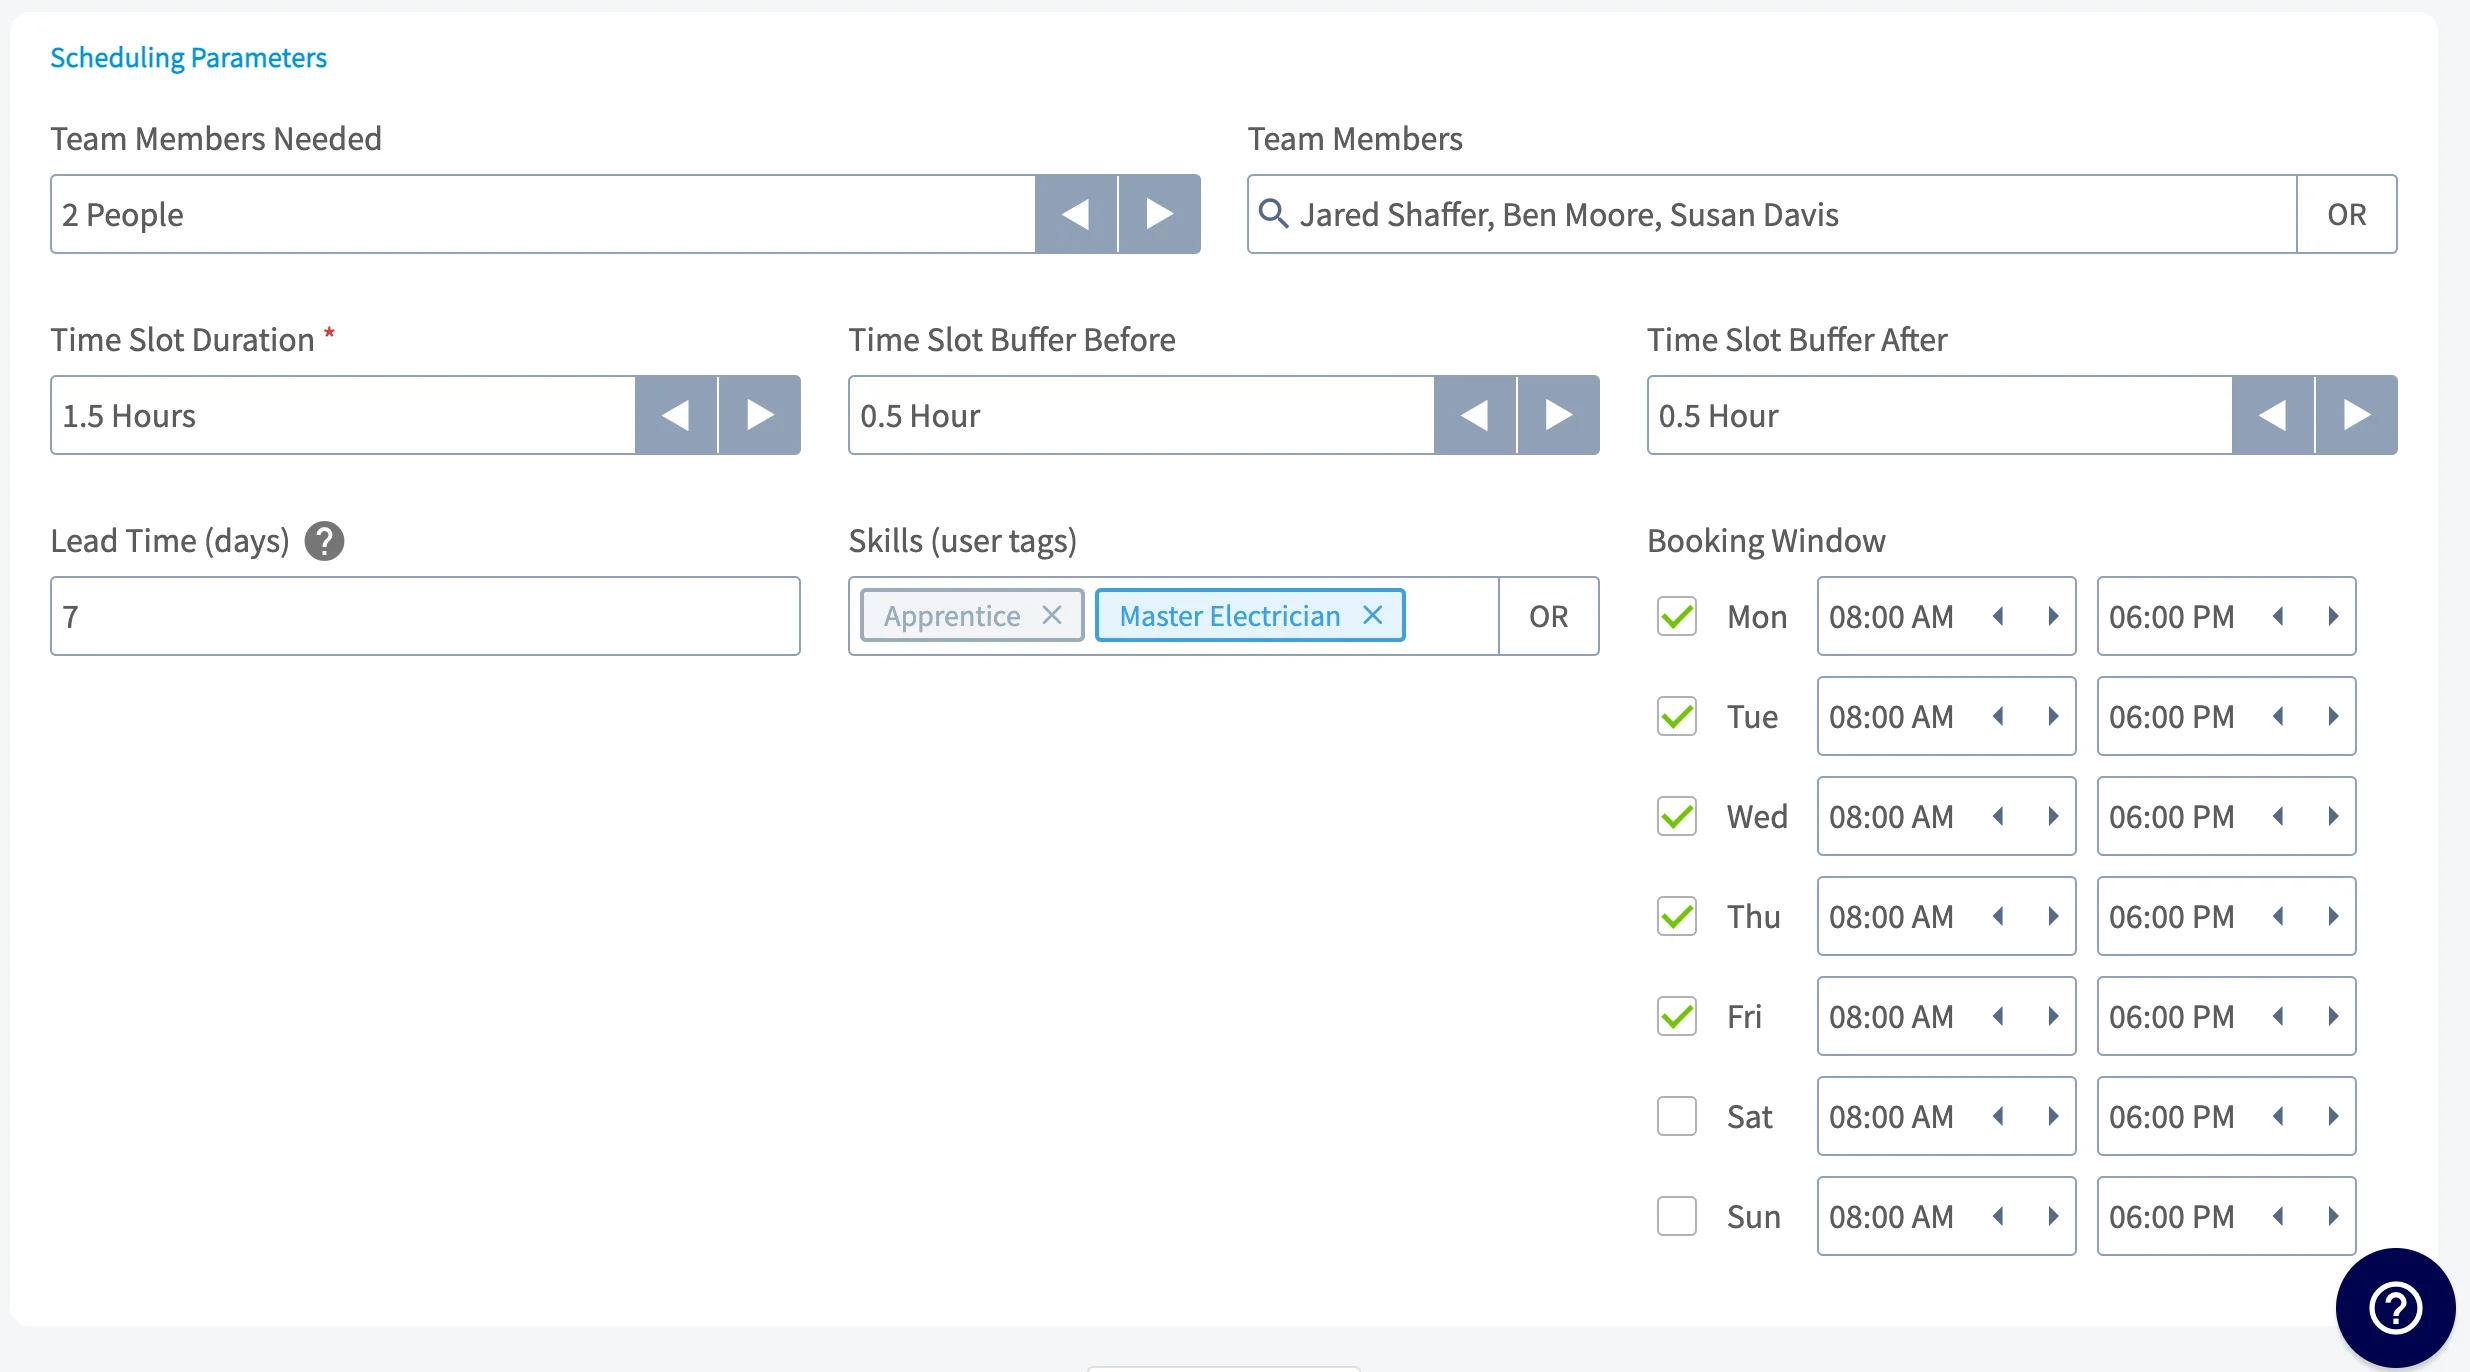
Scheduling parameters are optional, and they make scheduling from the template faster. When you schedule a new job created from this template, [How to Find Availability](/scheduling-dispatch/availability/finding-availability) takes these parameters into consideration. Each one is described in the Settings reference below.
### 4. Add the scheduling parameters
Scheduling parameters are optional, and they make scheduling from the template faster. When you schedule a new job created from this template, [How to Find Availability](/scheduling-dispatch/availability/finding-availability) takes these parameters into consideration. Each one is described in the Settings reference below.
 ### 5. Attach custom forms
A job template can include pre-designed custom forms that you have created or imported, so your team gathers the same information on every job of that type. Custom forms on job templates work on the web app and on the mobile app.
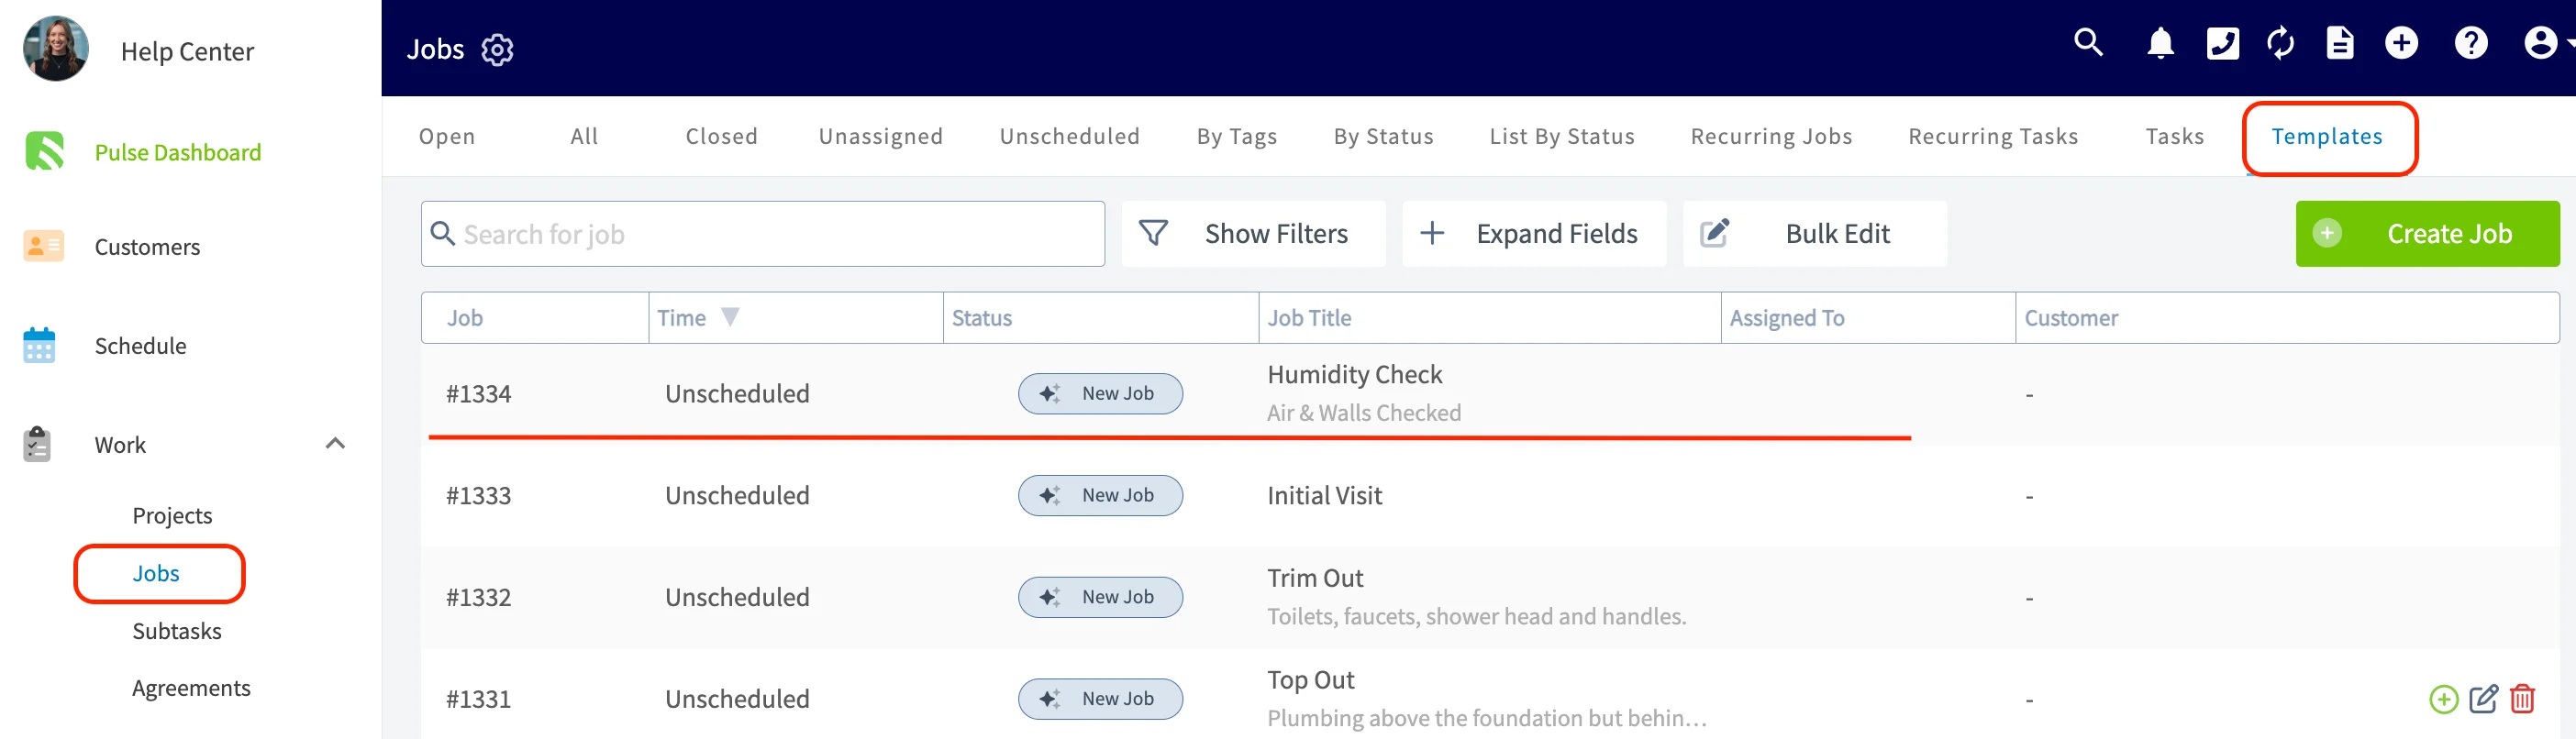
1. Select **Jobs** under the **Work** tab, open the **Templates** tab, and select the template you want to add a form to.
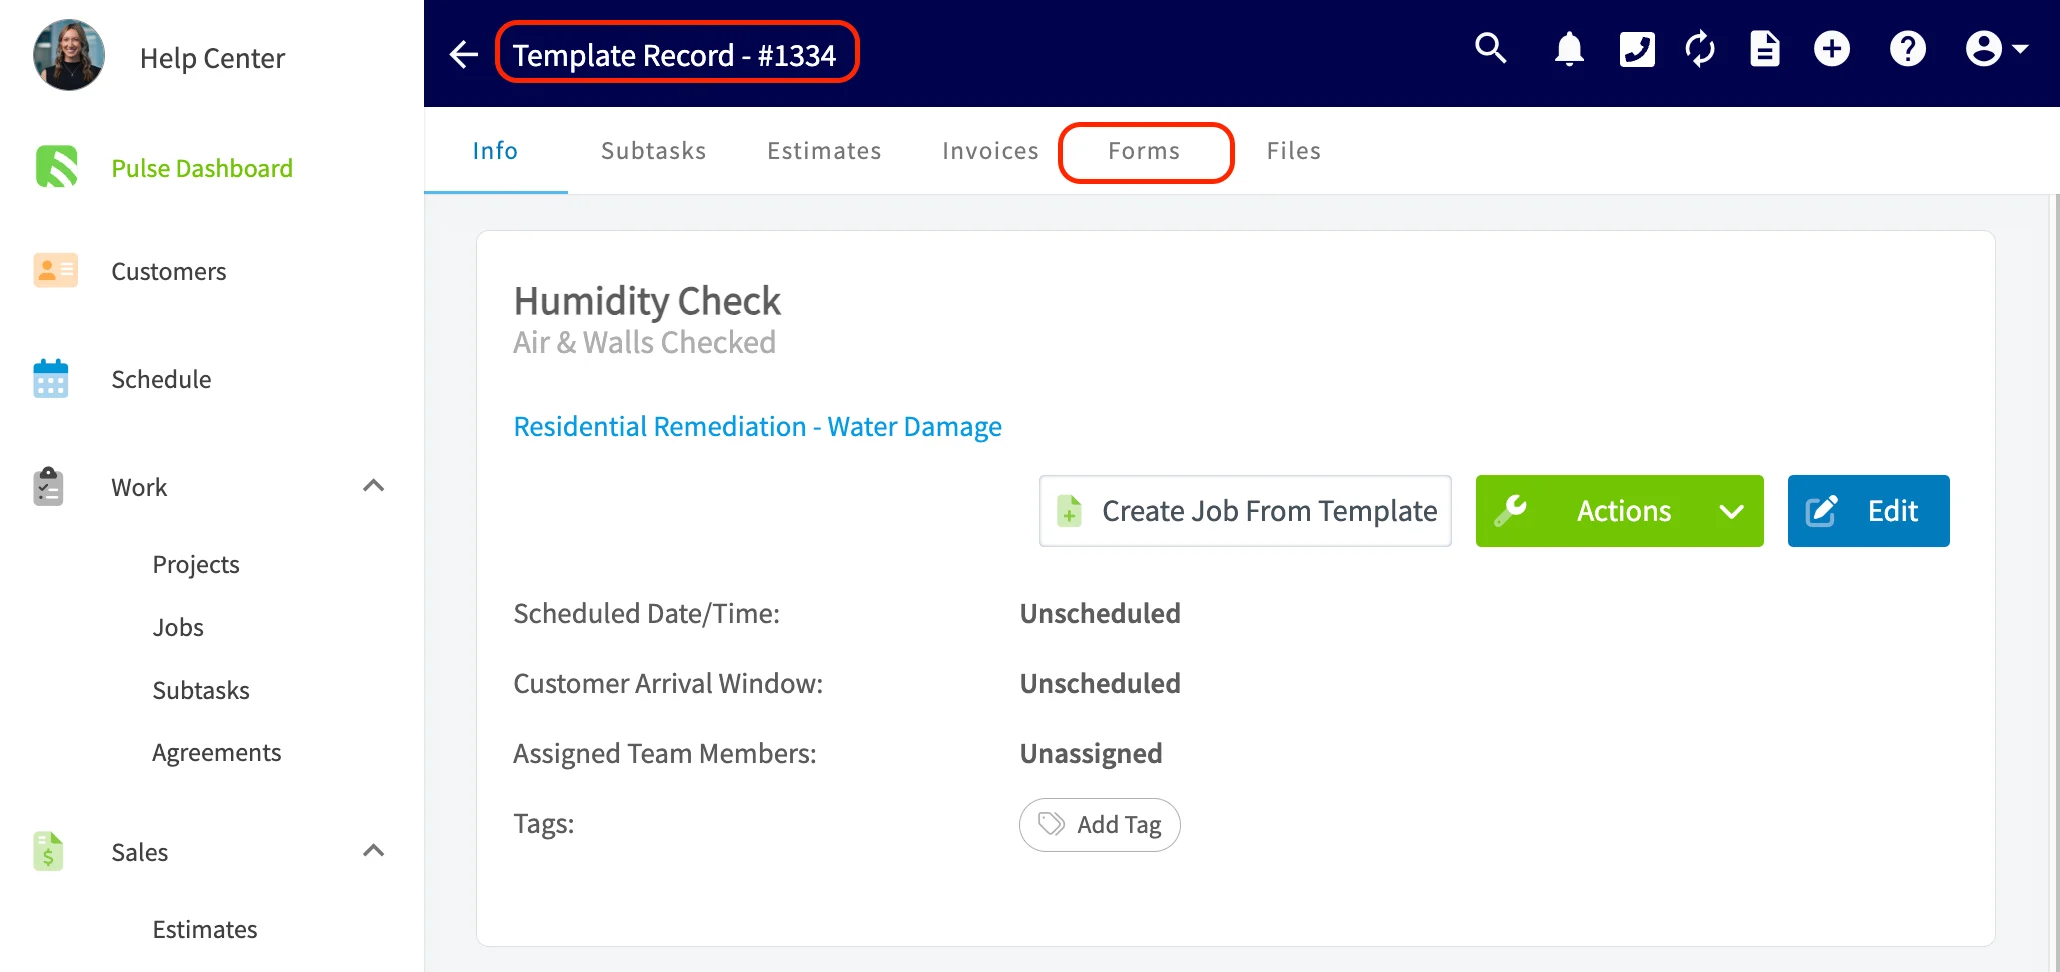
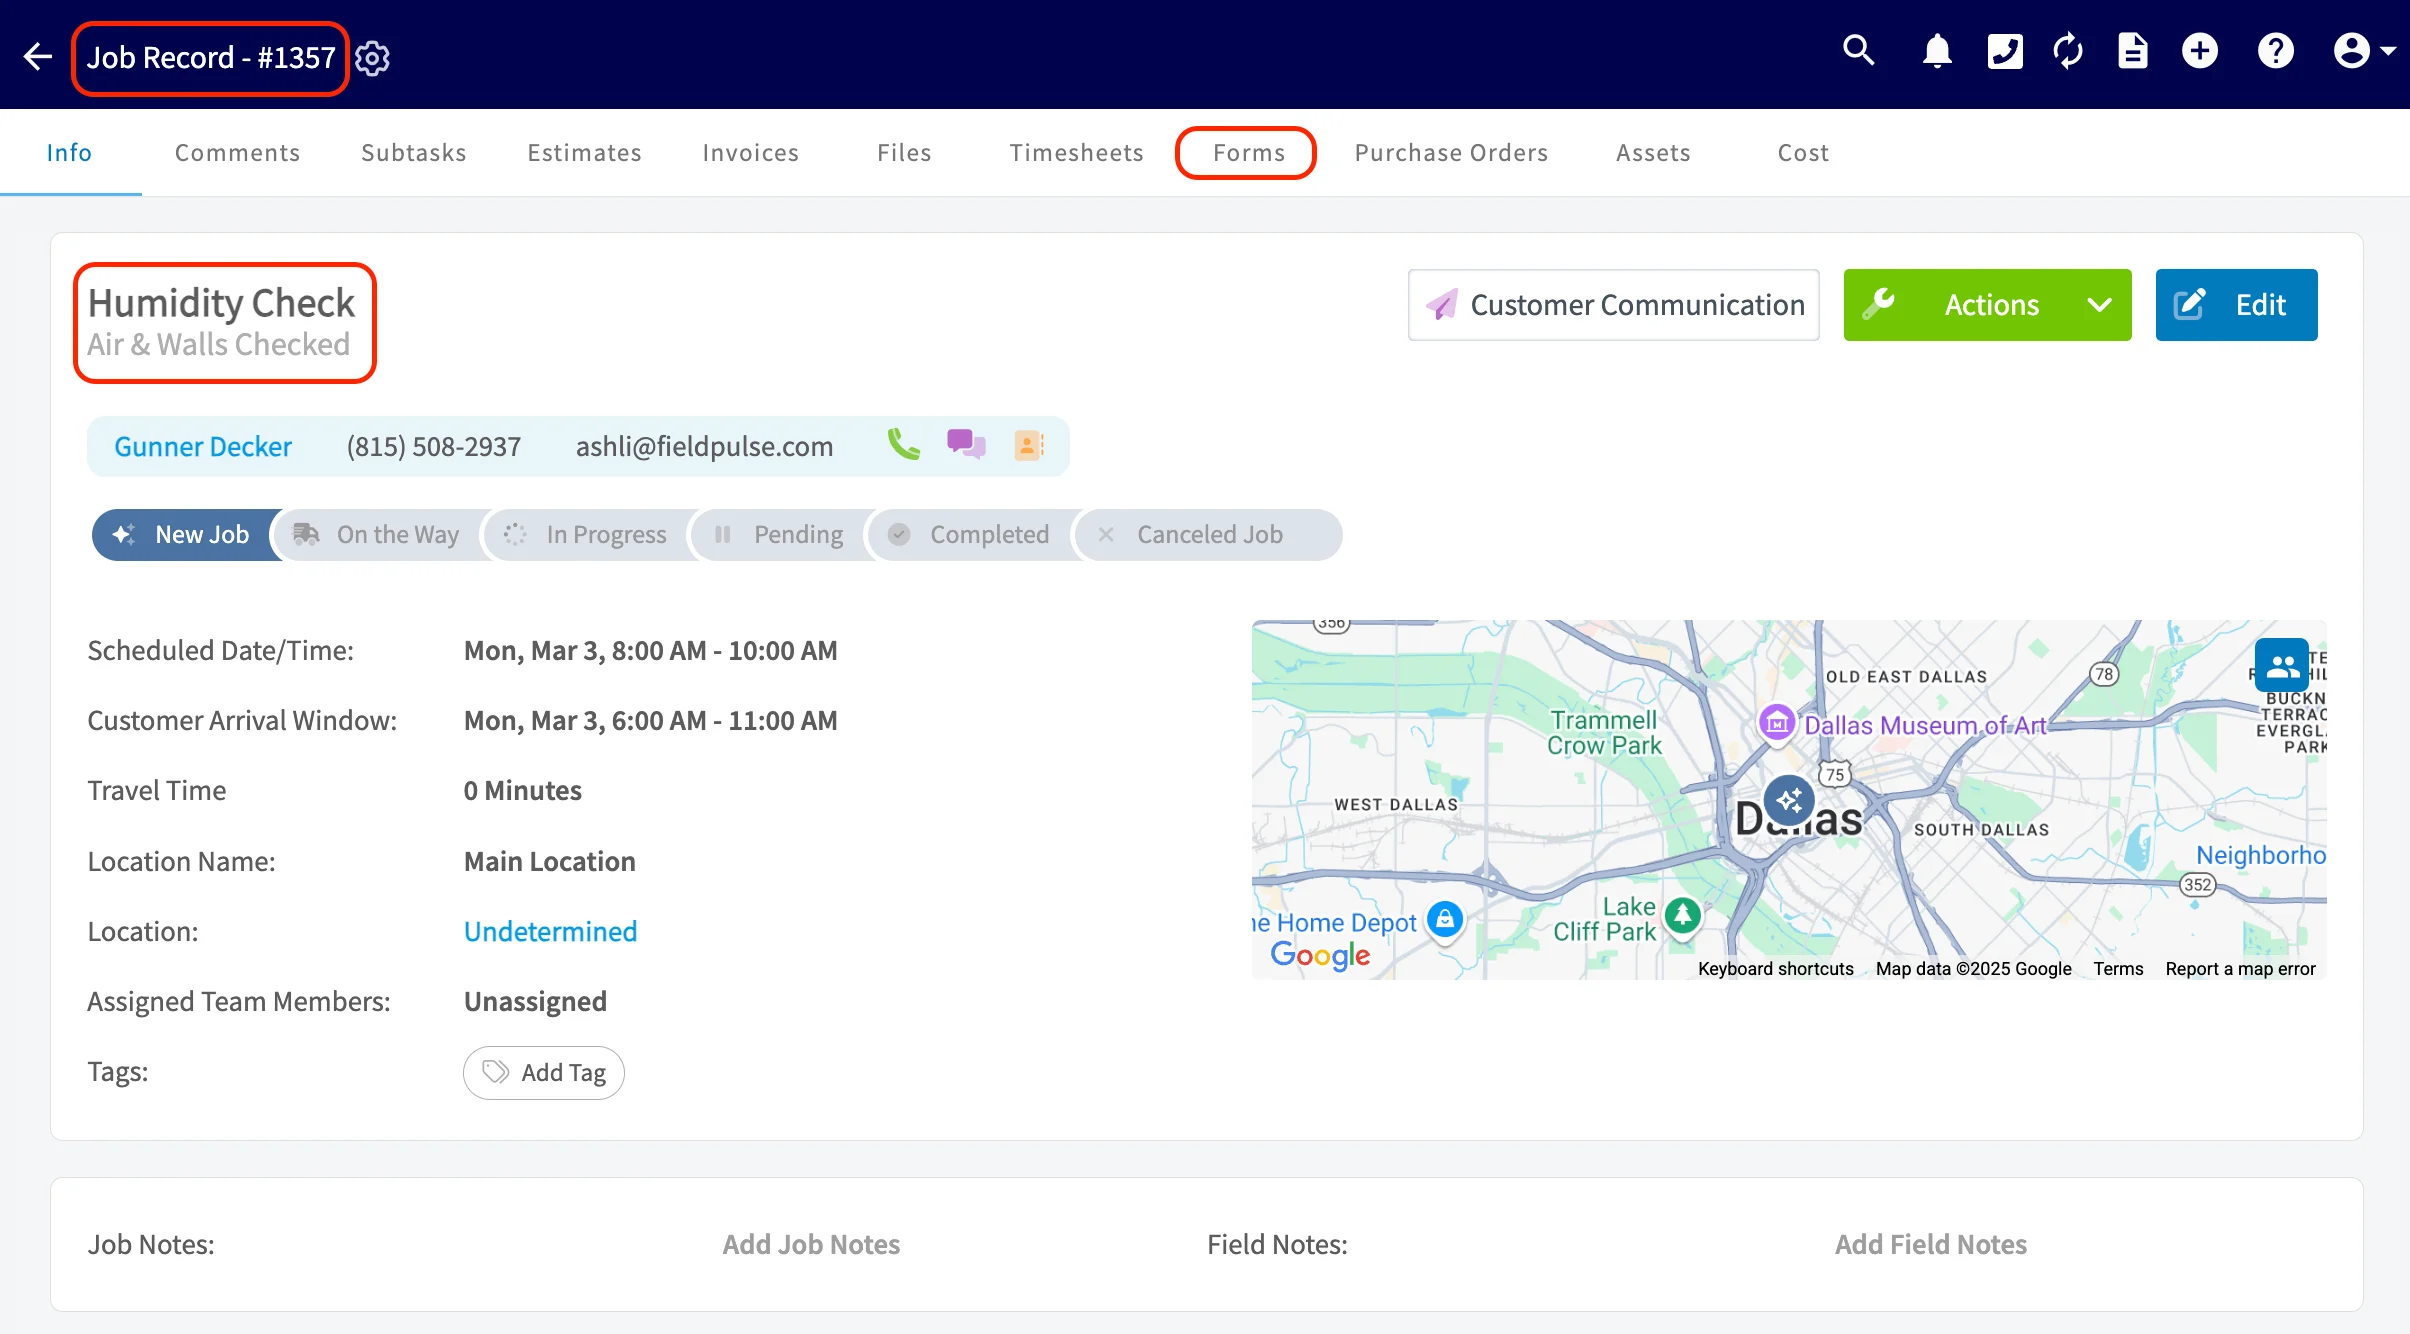
2. On the template record, select the **Forms** tab in the top menu.
### 5. Attach custom forms
A job template can include pre-designed custom forms that you have created or imported, so your team gathers the same information on every job of that type. Custom forms on job templates work on the web app and on the mobile app.
1. Select **Jobs** under the **Work** tab, open the **Templates** tab, and select the template you want to add a form to.
2. On the template record, select the **Forms** tab in the top menu.
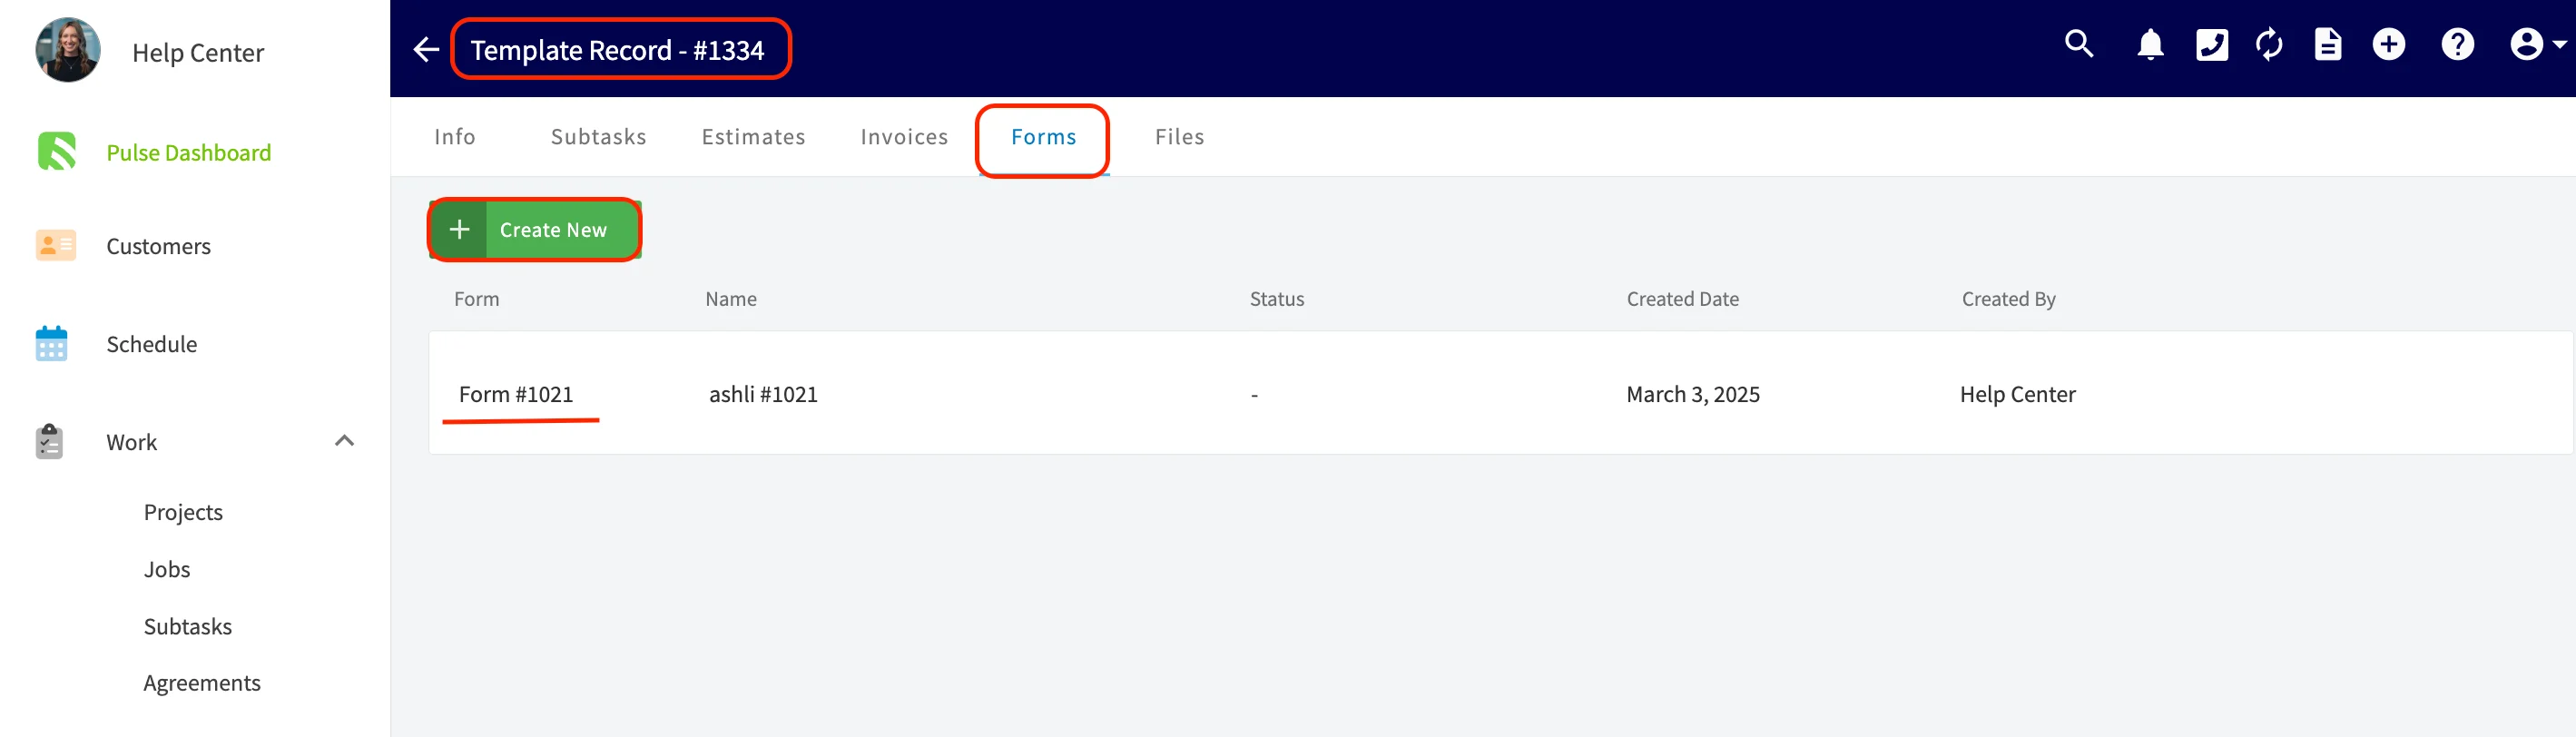
 3. Select the green **Create New** button. You can select it again later to attach more than one custom form to the same template.
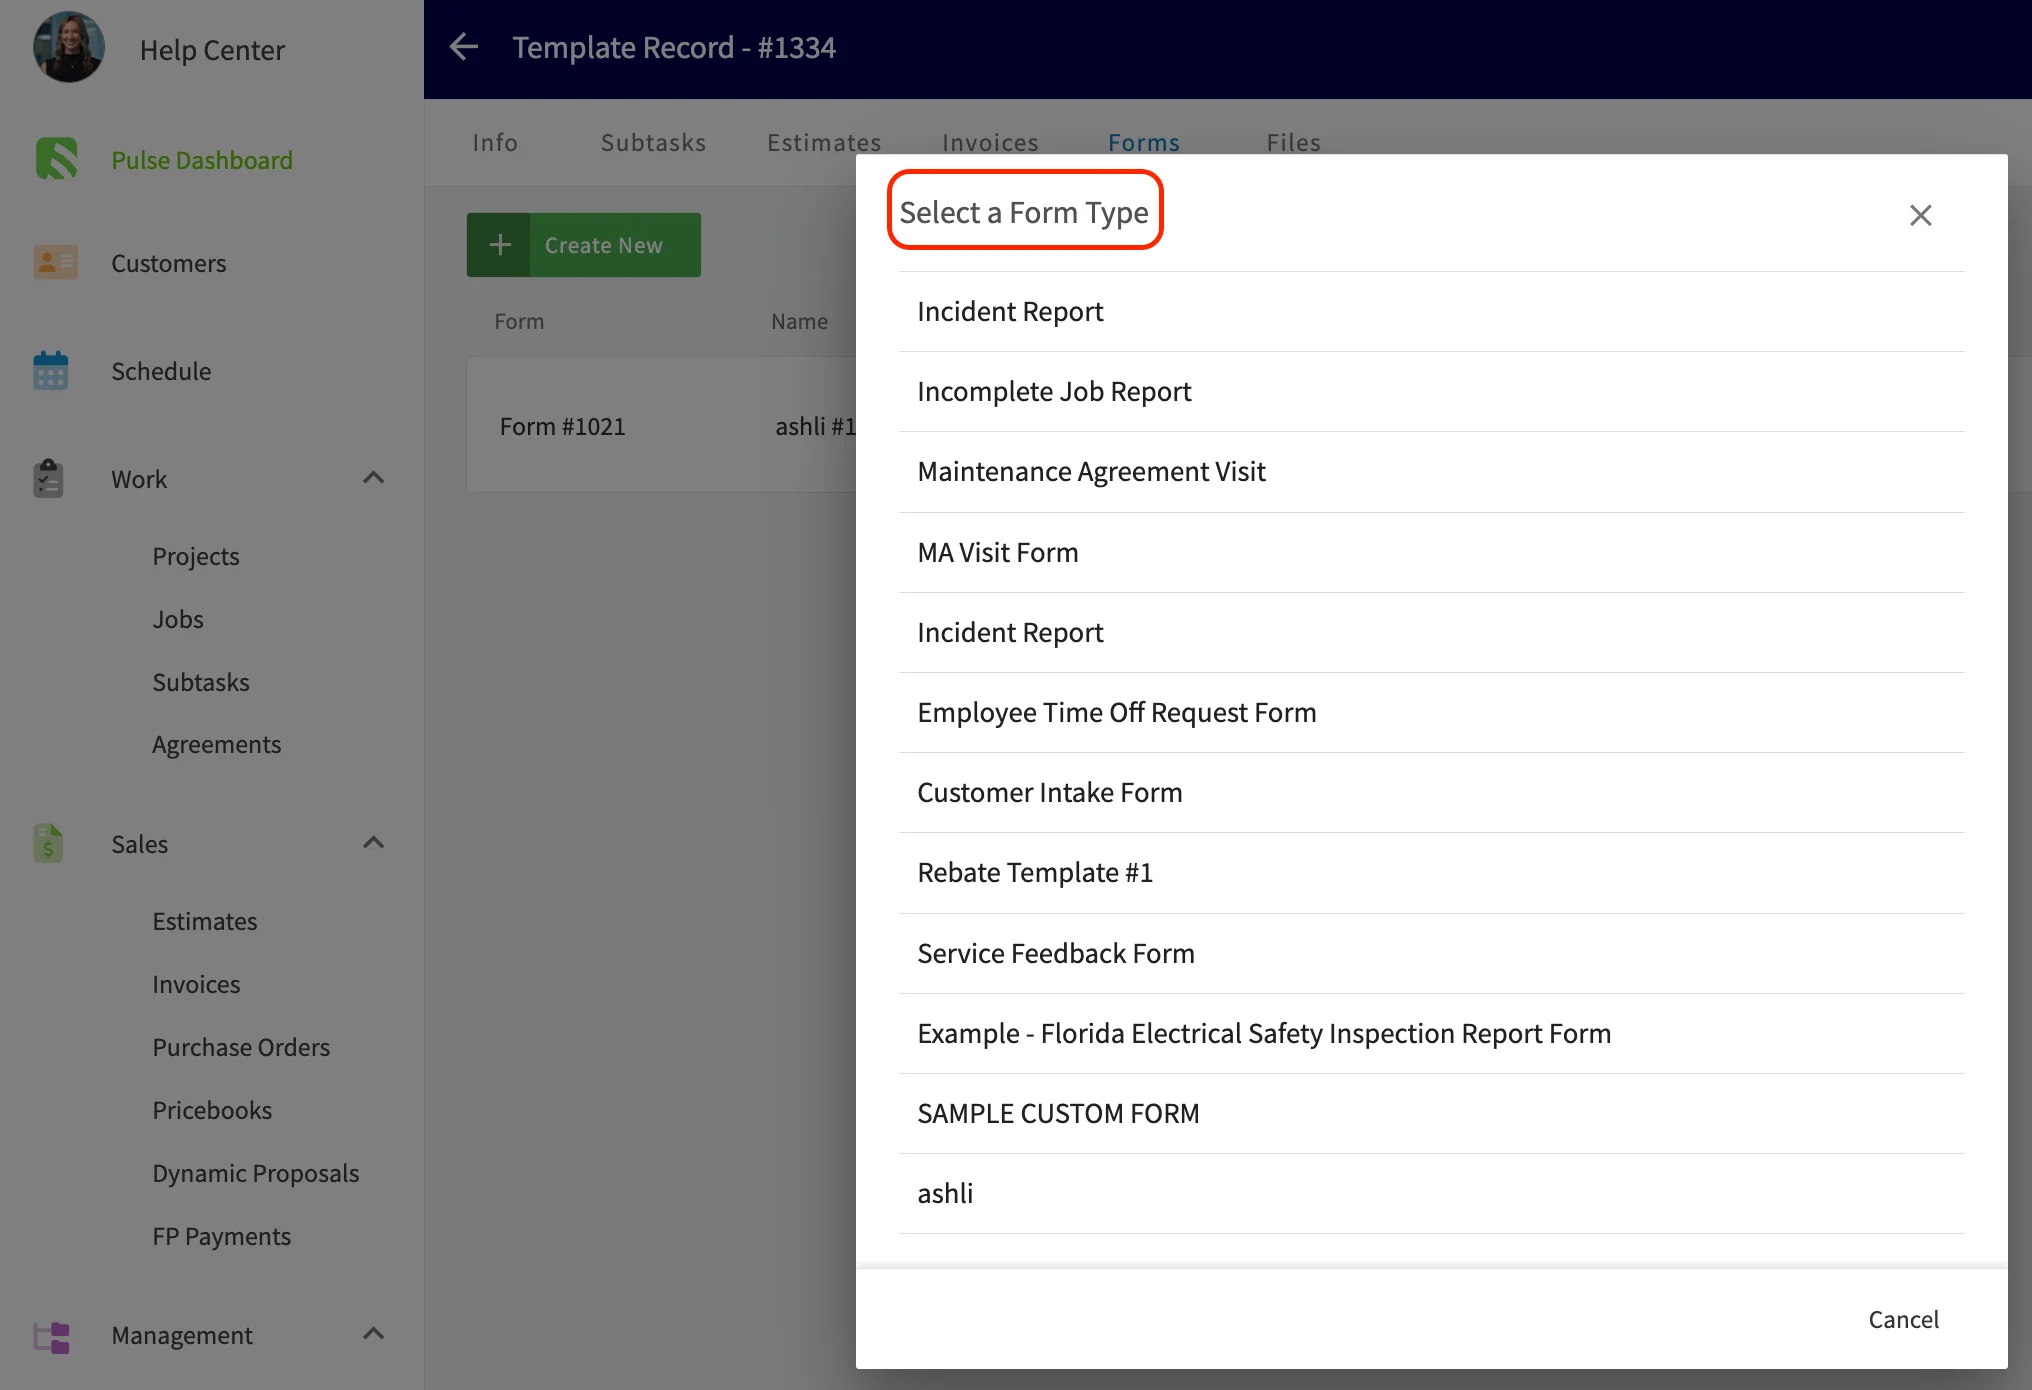
4. Choose the form you want to attach from the **Select a Form Type** list.
3. Select the green **Create New** button. You can select it again later to attach more than one custom form to the same template.
4. Choose the form you want to attach from the **Select a Form Type** list.
 5. Select the blue **Save** button on the form.
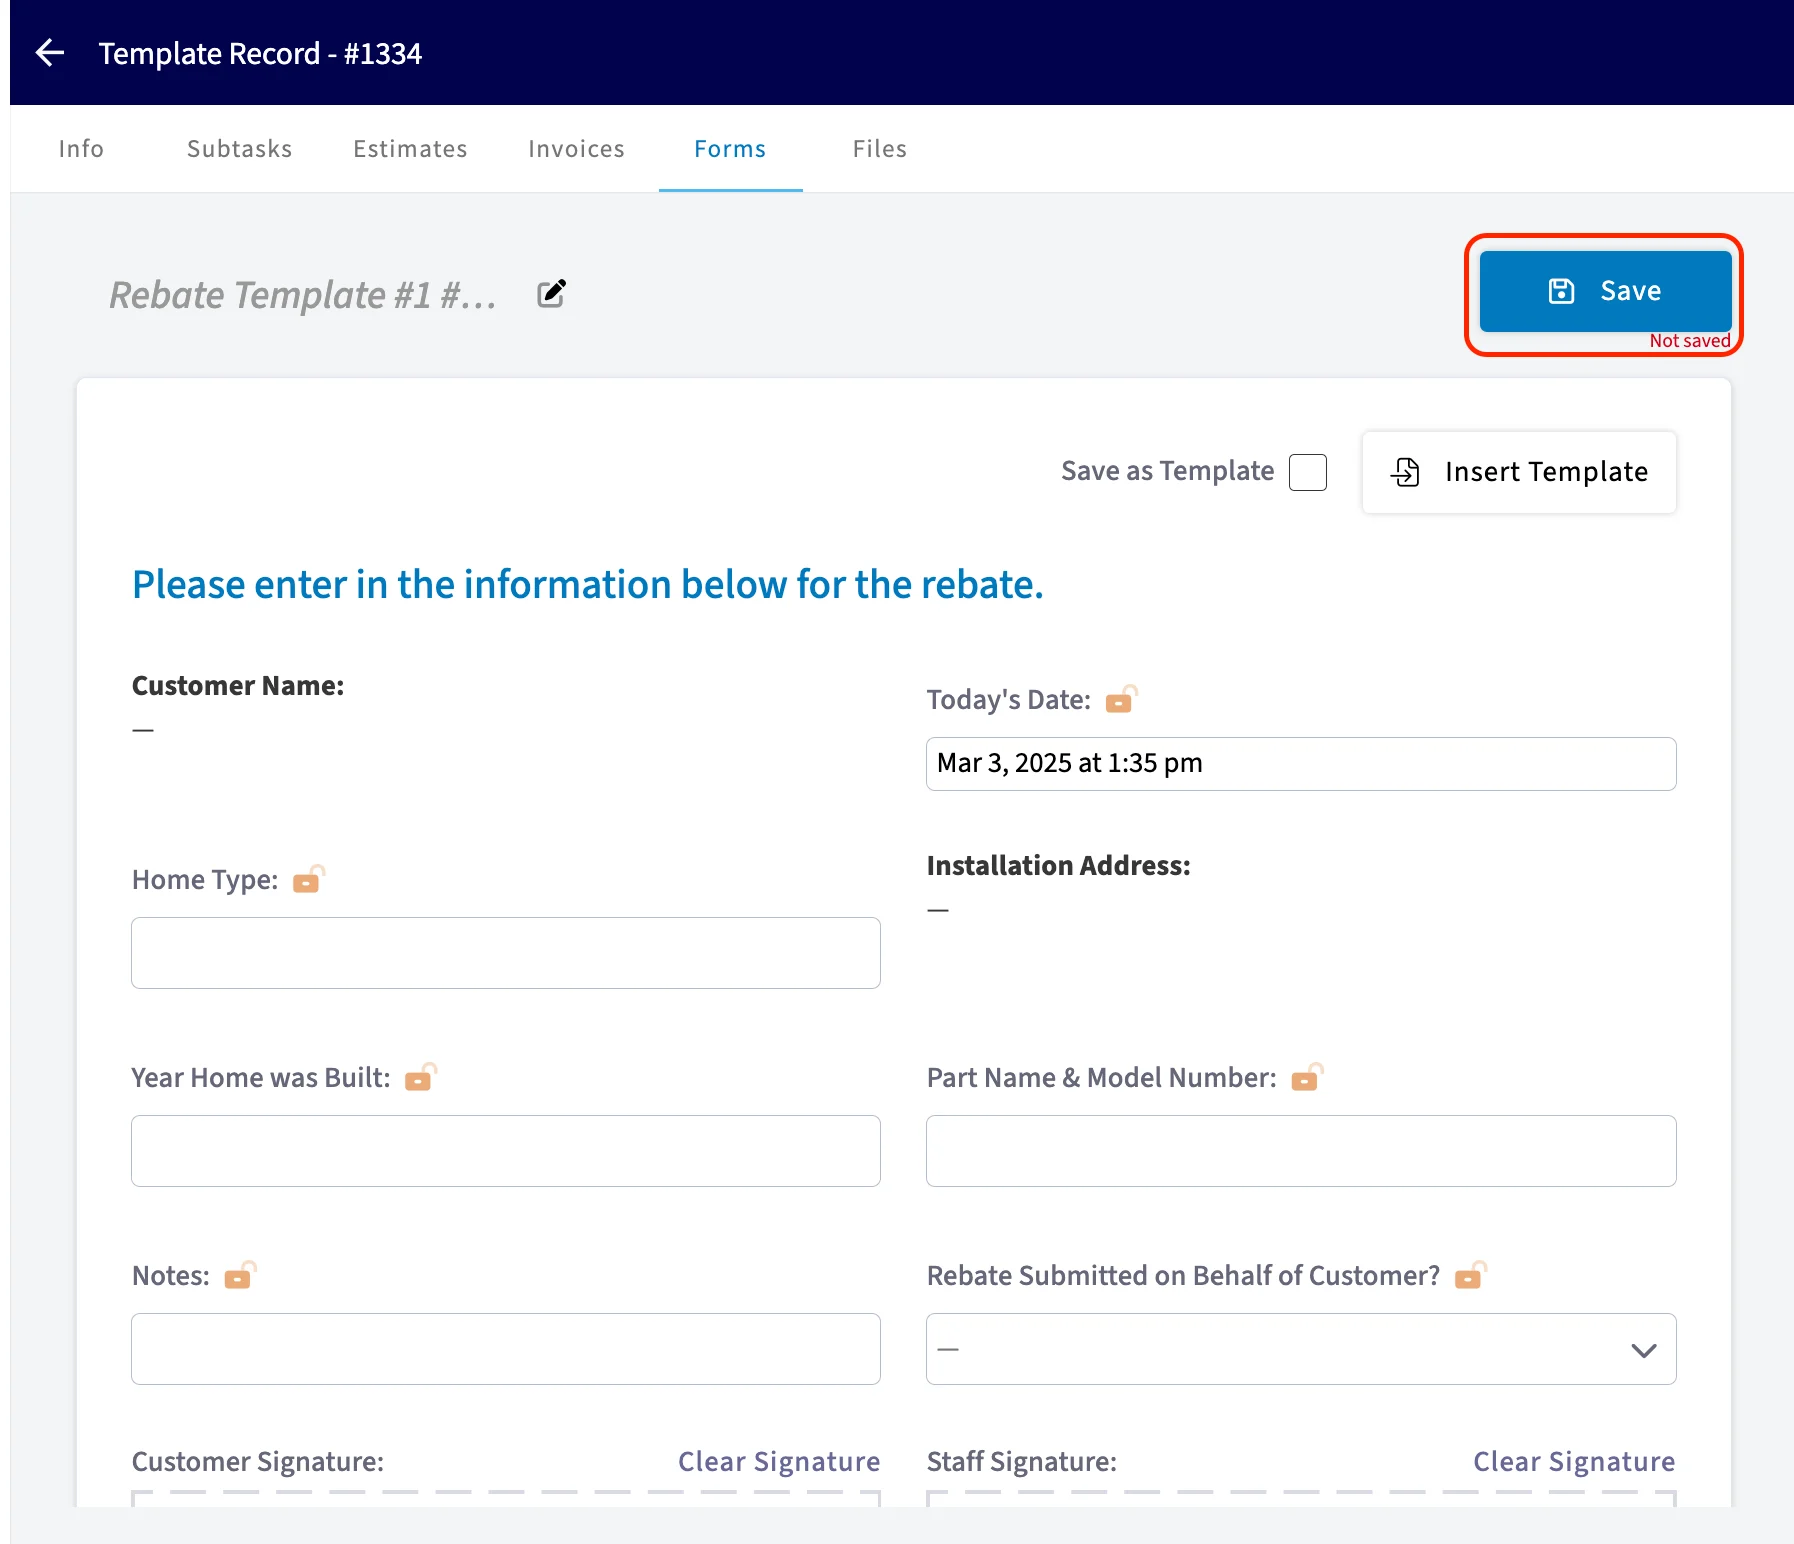
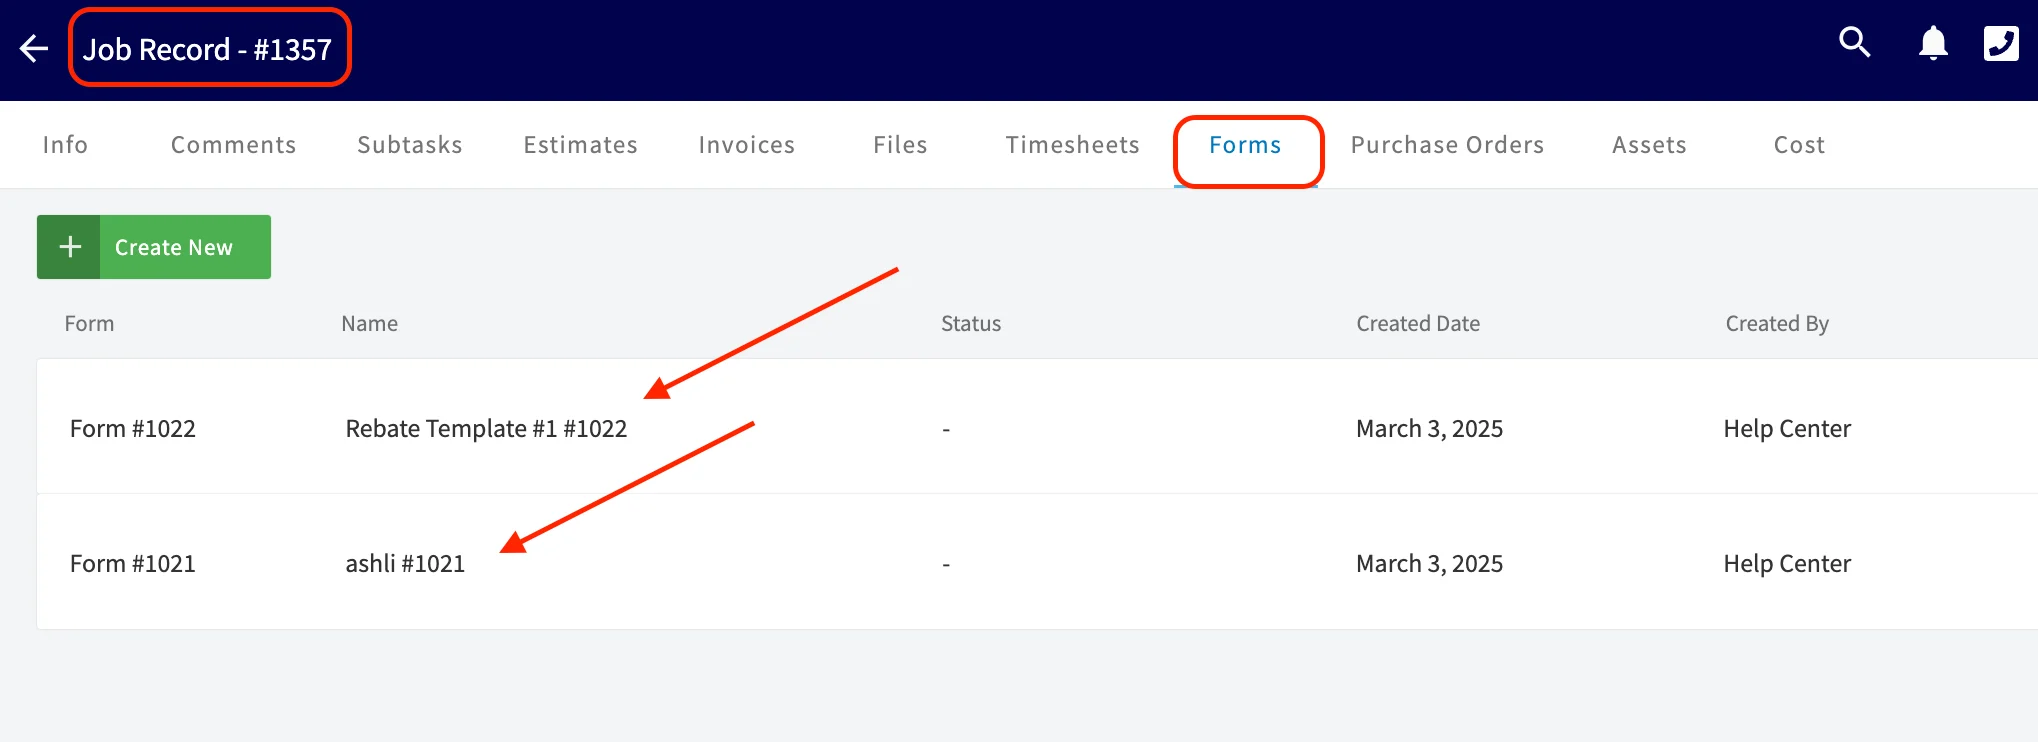
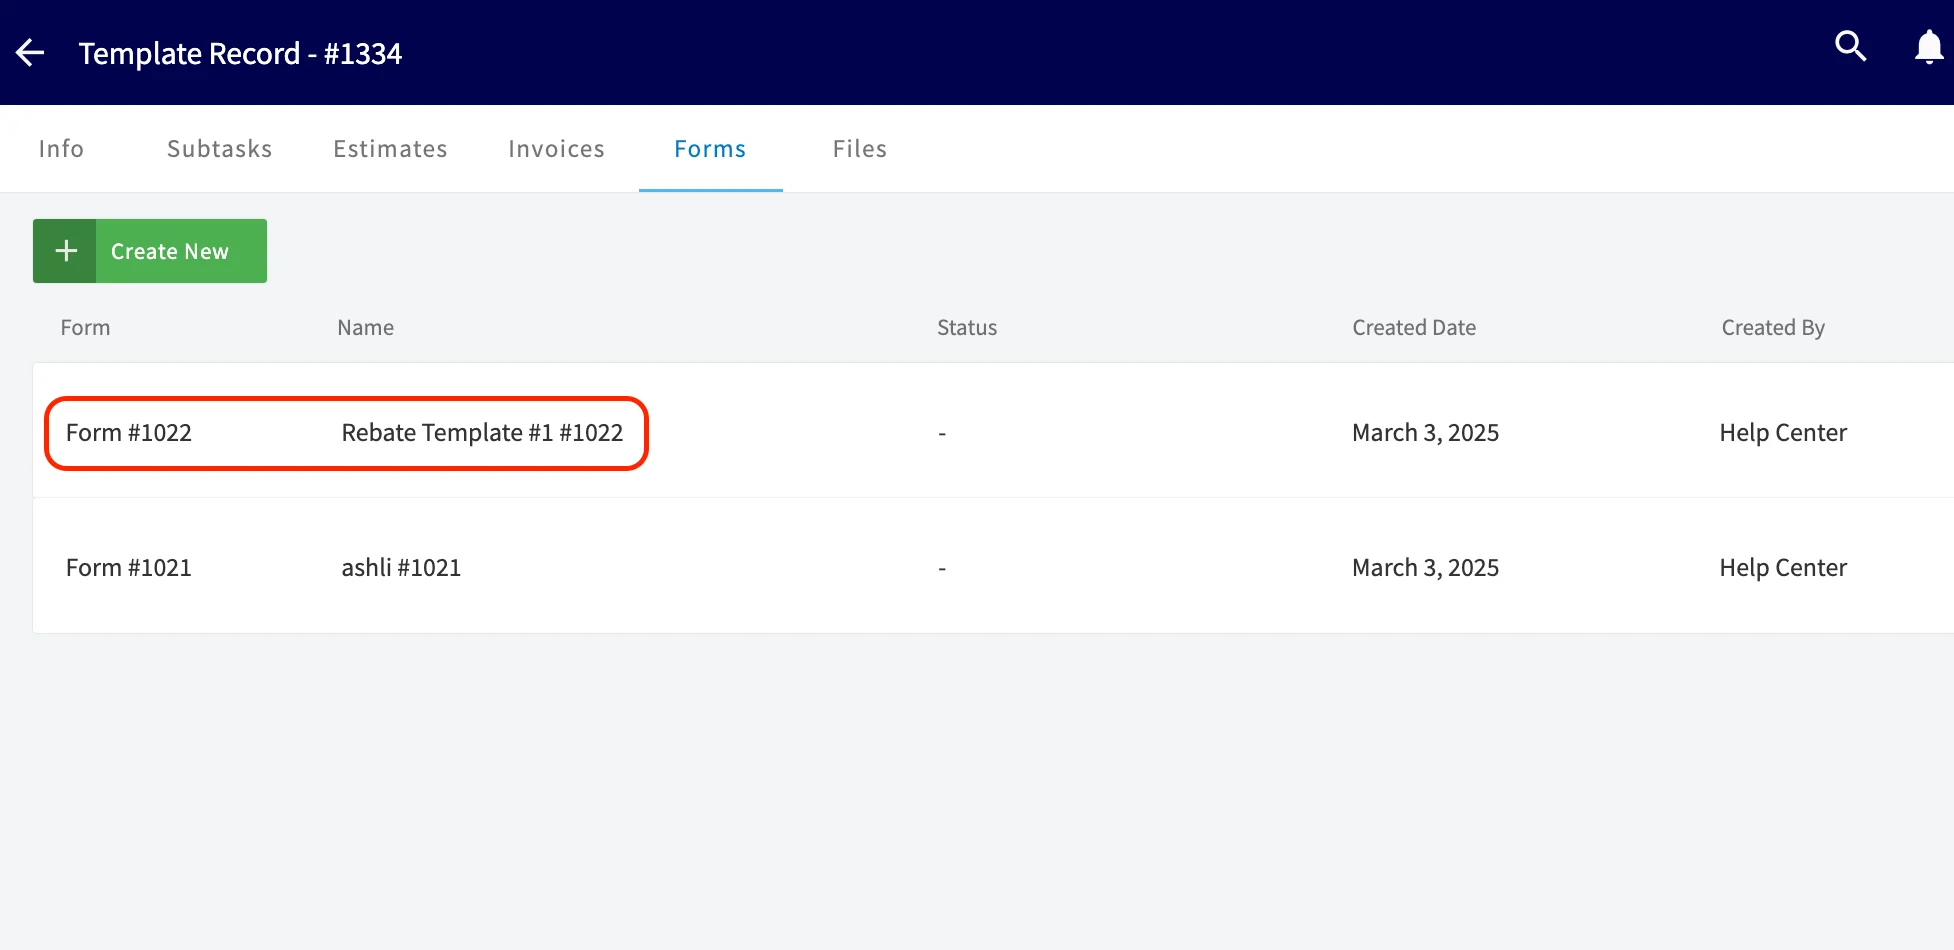 The form is now attached to the job template and is available to be filled out every time a job is created from that template.
 ### 6. Add a material list
Material lists work on a job template the same way they work on an estimate or an invoice, so you can standardize the materials a common job needs.
1. From the template record, select the **Material Lists** tab next to the **Subtasks** tab.
2. Add materials to the list the same way you would on an estimate or invoice, then save.
### 6. Add a material list
Material lists work on a job template the same way they work on an estimate or an invoice, so you can standardize the materials a common job needs.
1. From the template record, select the **Material Lists** tab next to the **Subtasks** tab.
2. Add materials to the list the same way you would on an estimate or invoice, then save.
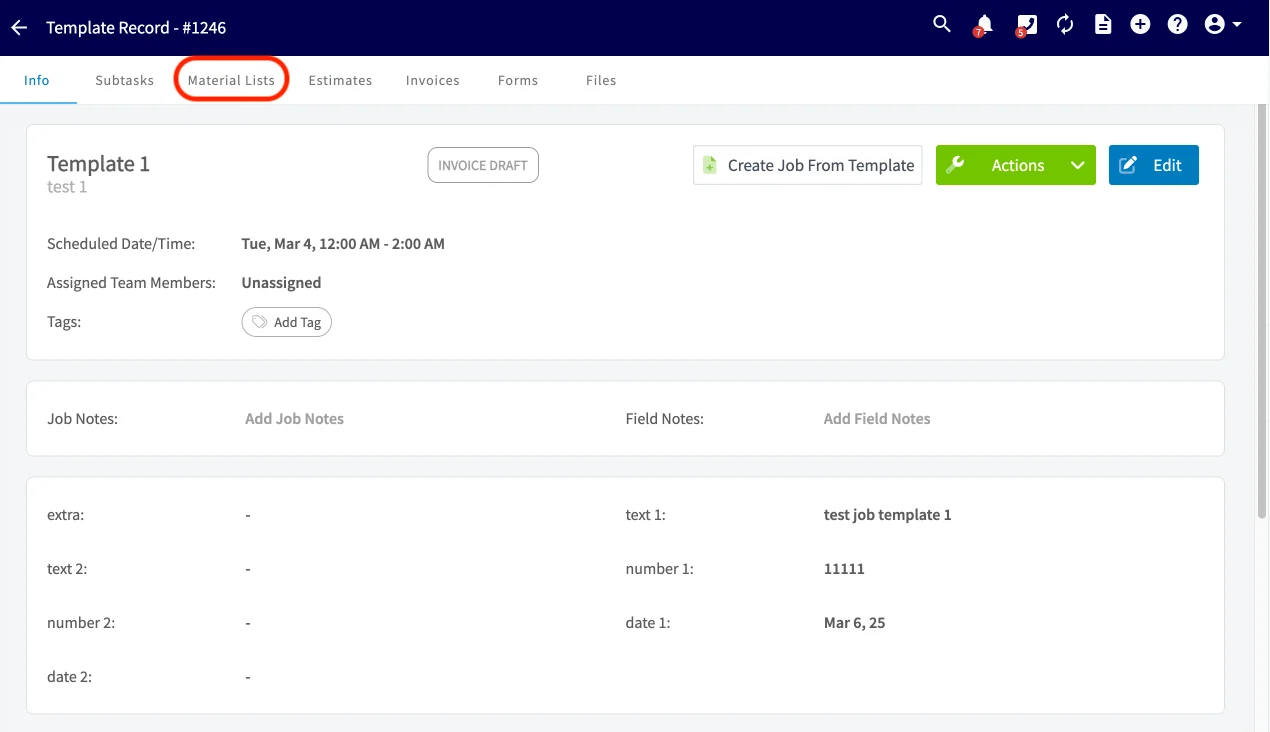 Once saved, those materials are automatically included in any new job created from this template.
## Edit or delete a template
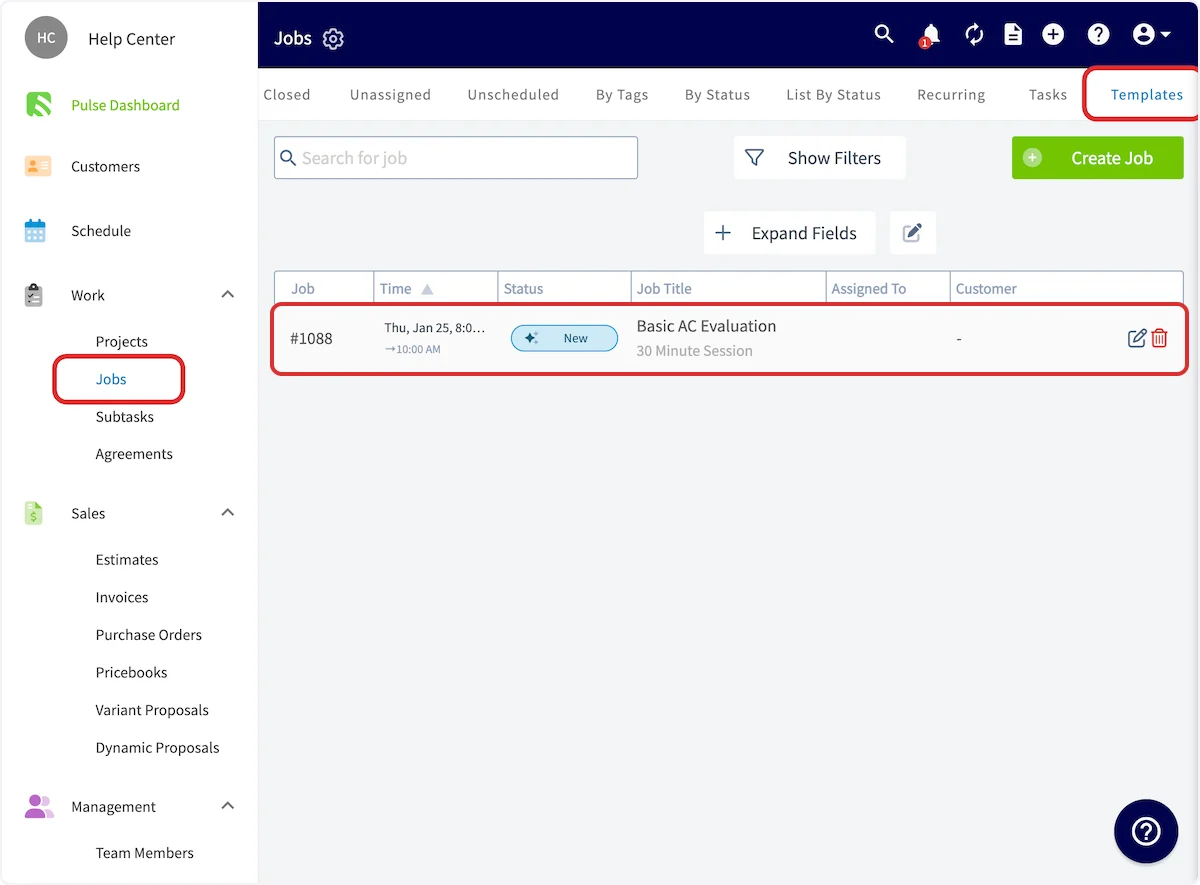
1. Go to **Jobs**, then open the **Templates** tab.
2. Select the pencil icon on the template row to edit it, or the trash icon to delete it.
Once saved, those materials are automatically included in any new job created from this template.
## Edit or delete a template
1. Go to **Jobs**, then open the **Templates** tab.
2. Select the pencil icon on the template row to edit it, or the trash icon to delete it.
 ## On mobile
### Save a job as a template
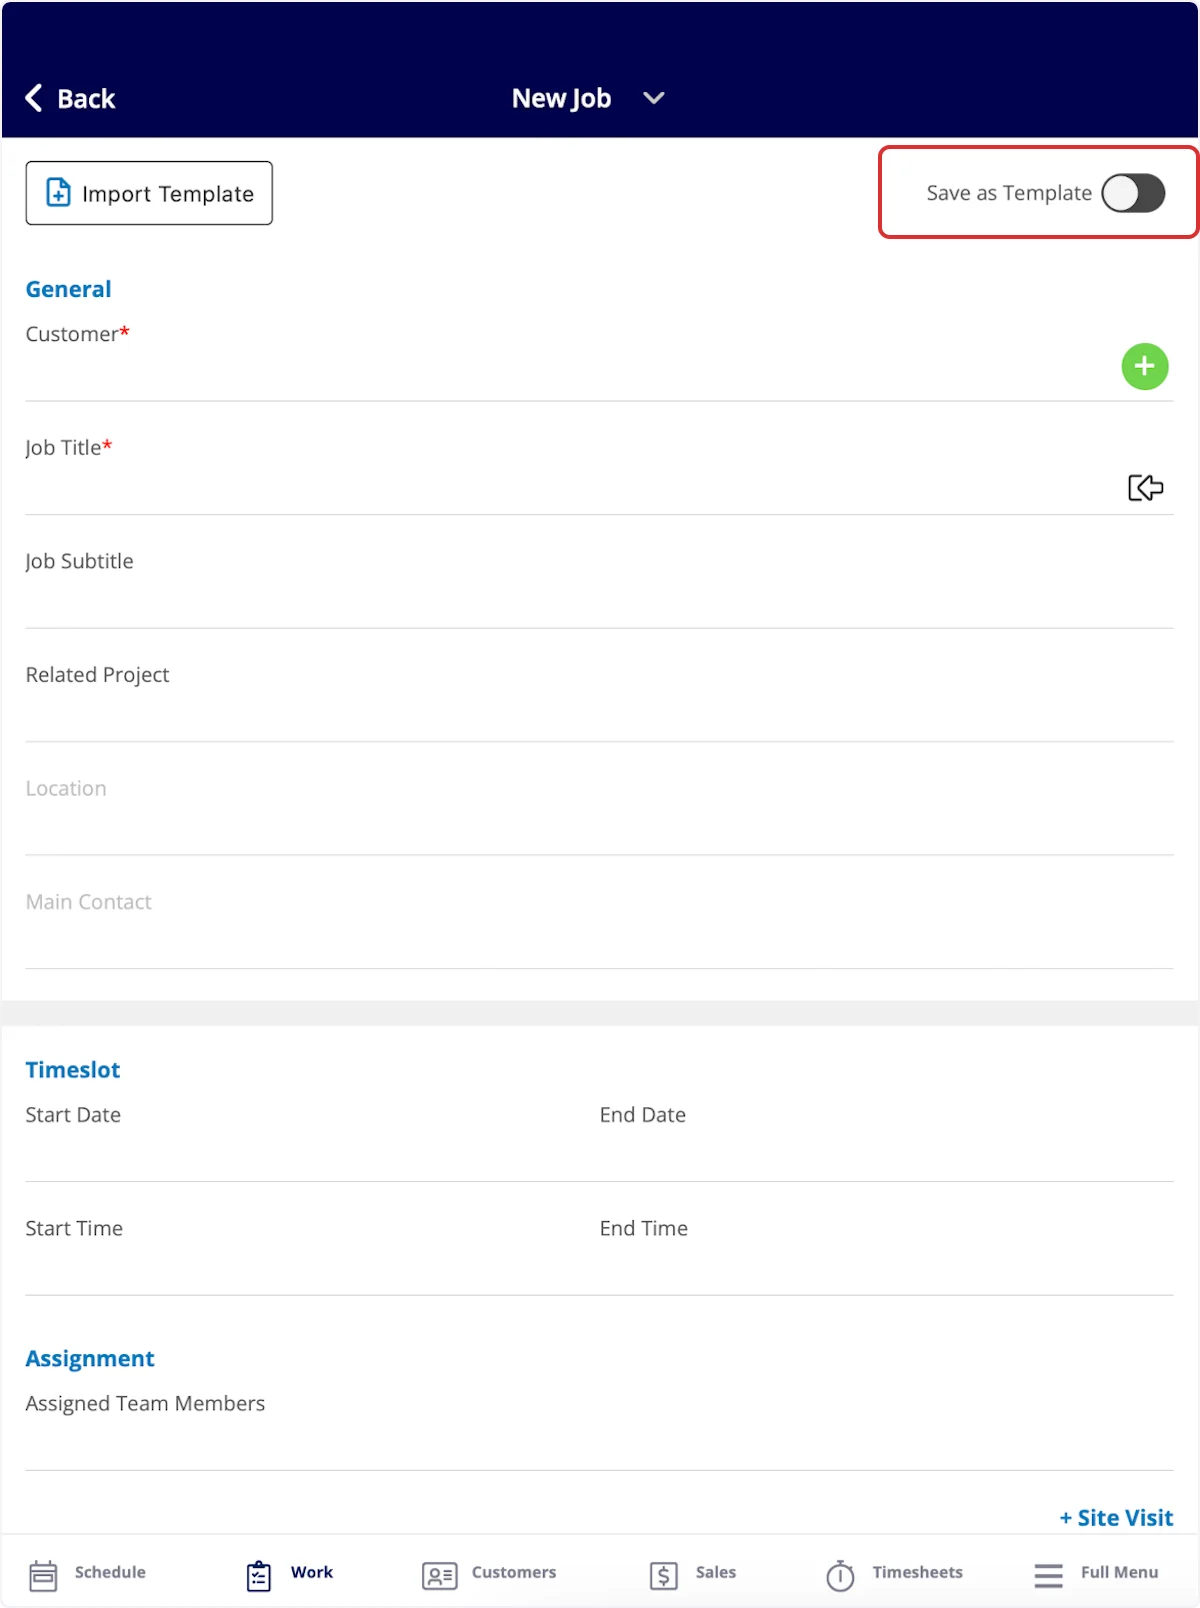
While you are creating a new job in the mobile app, toggle on **Save as Template** in the top-right corner. The details you enter for that job are saved as a template for future use.
## On mobile
### Save a job as a template
While you are creating a new job in the mobile app, toggle on **Save as Template** in the top-right corner. The details you enter for that job are saved as a template for future use.
 ### View all your templates
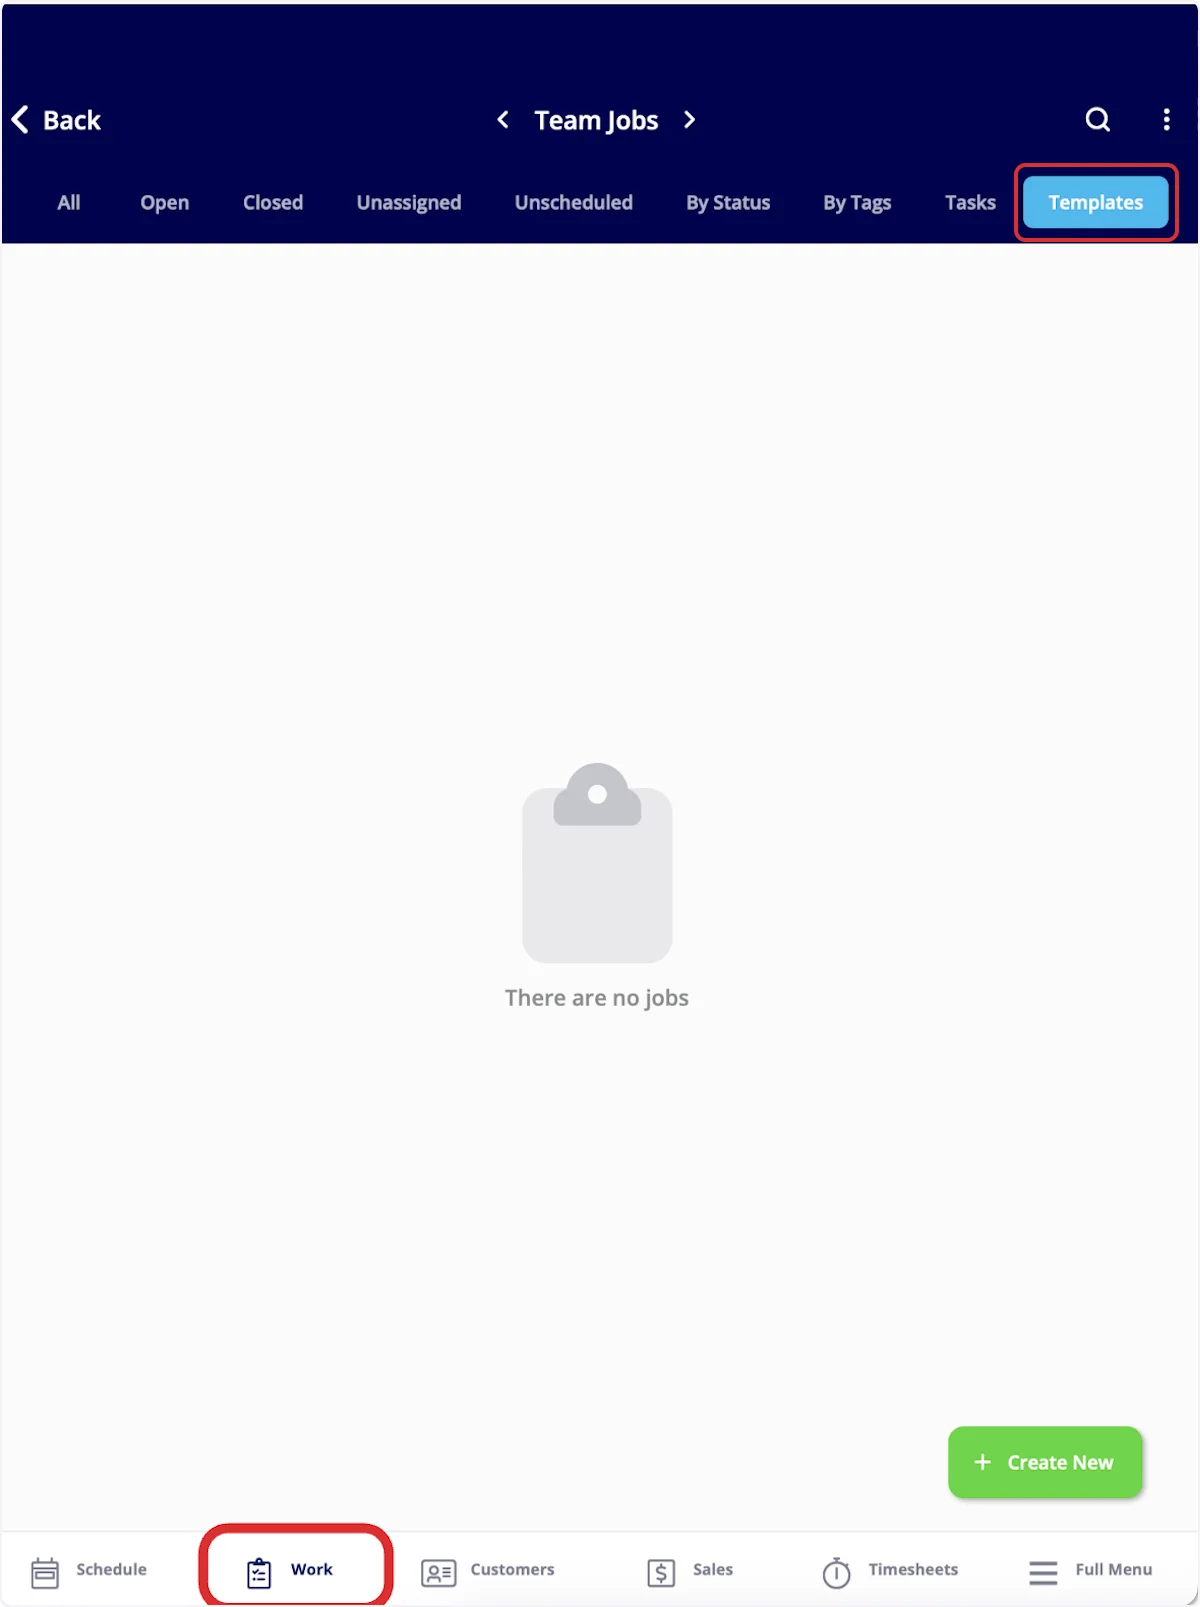
Select the **Work** tab in the bottom menu, then select **Templates**.
### View all your templates
Select the **Work** tab in the bottom menu, then select **Templates**.
 ## Settings reference
Scheduling parameters on a job template:
| **Parameter** | **What it controls** |
| ----------------------- | ----------------------------------------------------------------------------------------------------------------------------------------------------------------------------------------------------------------------------------- |
| **Team Members Needed** | How many people the job takes. FieldPulse requires at least one team member per job by default. Set 2 people required, and FieldPulse identifies time slots that are available for different combinations of two of your employees. |
| **Team Members** | The specific team members who are eligible to work this job. |
| **Time Slot Duration** | The amount of time the job blocks off on your users' calendars. |
| **Time Slot Buffers** | An optional amount of time that has to be available on your employees' calendars before and after the job. This is helpful for taking drive time between multiple jobs into account. |
| **Lead Time** | The minimum amount of time required before the job can be scheduled. |
| **Skills** | User tags that specify skills and other information to qualify specific users for working the job. |
| **Booking Window** | The specific hours on each day of the week when the job is available. |
## FAQs
### Do folders set up on a job template carry over to jobs created from it?
Yes. Folders created on job templates populate into the jobs that are created from those templates.
## Related articles
* [How to Use a Job Template](/jobs/jobs-tasks/using-job-templates)
* [How to Create a Job](/jobs/jobs-tasks/creating-a-job)
* [How to Use Subtasks](/jobs/jobs-tasks/subtasks)
* [How to Create a Custom Form](/jobs/custom-forms/create-a-form)
* [Material Lists Overview](/inventory-materials/material-lists/material-lists)
* [How to Find Availability](/scheduling-dispatch/availability/finding-availability)
Your template is ready when it appears on the **Templates** tab of the **Jobs** page with its details, scheduling parameters, forms, and material list saved in one place — next, see [How to Use a Job Template](/jobs/jobs-tasks/using-job-templates) to start a job from it.
## Related topics
- [How to Create a Maintenance Agreement](/jobs/assets/maintenance-agreements.md)
- [How to Create a Job](/jobs/jobs-tasks/creating-a-job.md)
- [How to Use a Job Template](/jobs/jobs-tasks/using-job-templates.md)
- [Setting Up ClearPath Status Action Flows](/jobs/workflows/clearpath/status-action-flows.md)
## Settings reference
Scheduling parameters on a job template:
| **Parameter** | **What it controls** |
| ----------------------- | ----------------------------------------------------------------------------------------------------------------------------------------------------------------------------------------------------------------------------------- |
| **Team Members Needed** | How many people the job takes. FieldPulse requires at least one team member per job by default. Set 2 people required, and FieldPulse identifies time slots that are available for different combinations of two of your employees. |
| **Team Members** | The specific team members who are eligible to work this job. |
| **Time Slot Duration** | The amount of time the job blocks off on your users' calendars. |
| **Time Slot Buffers** | An optional amount of time that has to be available on your employees' calendars before and after the job. This is helpful for taking drive time between multiple jobs into account. |
| **Lead Time** | The minimum amount of time required before the job can be scheduled. |
| **Skills** | User tags that specify skills and other information to qualify specific users for working the job. |
| **Booking Window** | The specific hours on each day of the week when the job is available. |
## FAQs
### Do folders set up on a job template carry over to jobs created from it?
Yes. Folders created on job templates populate into the jobs that are created from those templates.
## Related articles
* [How to Use a Job Template](/jobs/jobs-tasks/using-job-templates)
* [How to Create a Job](/jobs/jobs-tasks/creating-a-job)
* [How to Use Subtasks](/jobs/jobs-tasks/subtasks)
* [How to Create a Custom Form](/jobs/custom-forms/create-a-form)
* [Material Lists Overview](/inventory-materials/material-lists/material-lists)
* [How to Find Availability](/scheduling-dispatch/availability/finding-availability)
Your template is ready when it appears on the **Templates** tab of the **Jobs** page with its details, scheduling parameters, forms, and material list saved in one place — next, see [How to Use a Job Template](/jobs/jobs-tasks/using-job-templates) to start a job from it.
## Related topics
- [How to Create a Maintenance Agreement](/jobs/assets/maintenance-agreements.md)
- [How to Create a Job](/jobs/jobs-tasks/creating-a-job.md)
- [How to Use a Job Template](/jobs/jobs-tasks/using-job-templates.md)
- [Setting Up ClearPath Status Action Flows](/jobs/workflows/clearpath/status-action-flows.md)