> ## Documentation Index
> Fetch the complete documentation index at: https://help.fieldpulse.com/llms.txt
> Use this file to discover all available pages before exploring further.
# How to Create Dynamic Job Reports
> Build a customer-facing link or PDF from one FieldPulse job or several, hide the details you don't want shown, and email it with a signature request.
> **Who uses this:** Admins, Team Managers, and Service Agents generate a job report from a job record — on web or in the FieldPulse mobile app — and email it to the customer; Limited Agents cannot. Service Agent access is set in **Company Settings** > **Jobs** > **General** > **Job Report Visibility**. **Availability:** All regions.
After the work is finished, the customer wants a clean record of what happened, not your internal notes. A dynamic job report turns what your team already recorded in [job management](https://www.fieldpulse.com/features/job-management) into a report you send as a link, a PDF, or both, and you decide which details appear before it goes out.
## Overview
A dynamic job report is a customer-facing summary built from a job record's own data. You open the report from the job, preview it as a **Dynamic URL** or a **PDF**, turn individual details on or off in **Display Settings**, then email it to the customer. One report can cover a single job, or several jobs selected from a customer record and combined into one document. You can create a report on web and in the FieldPulse mobile app.
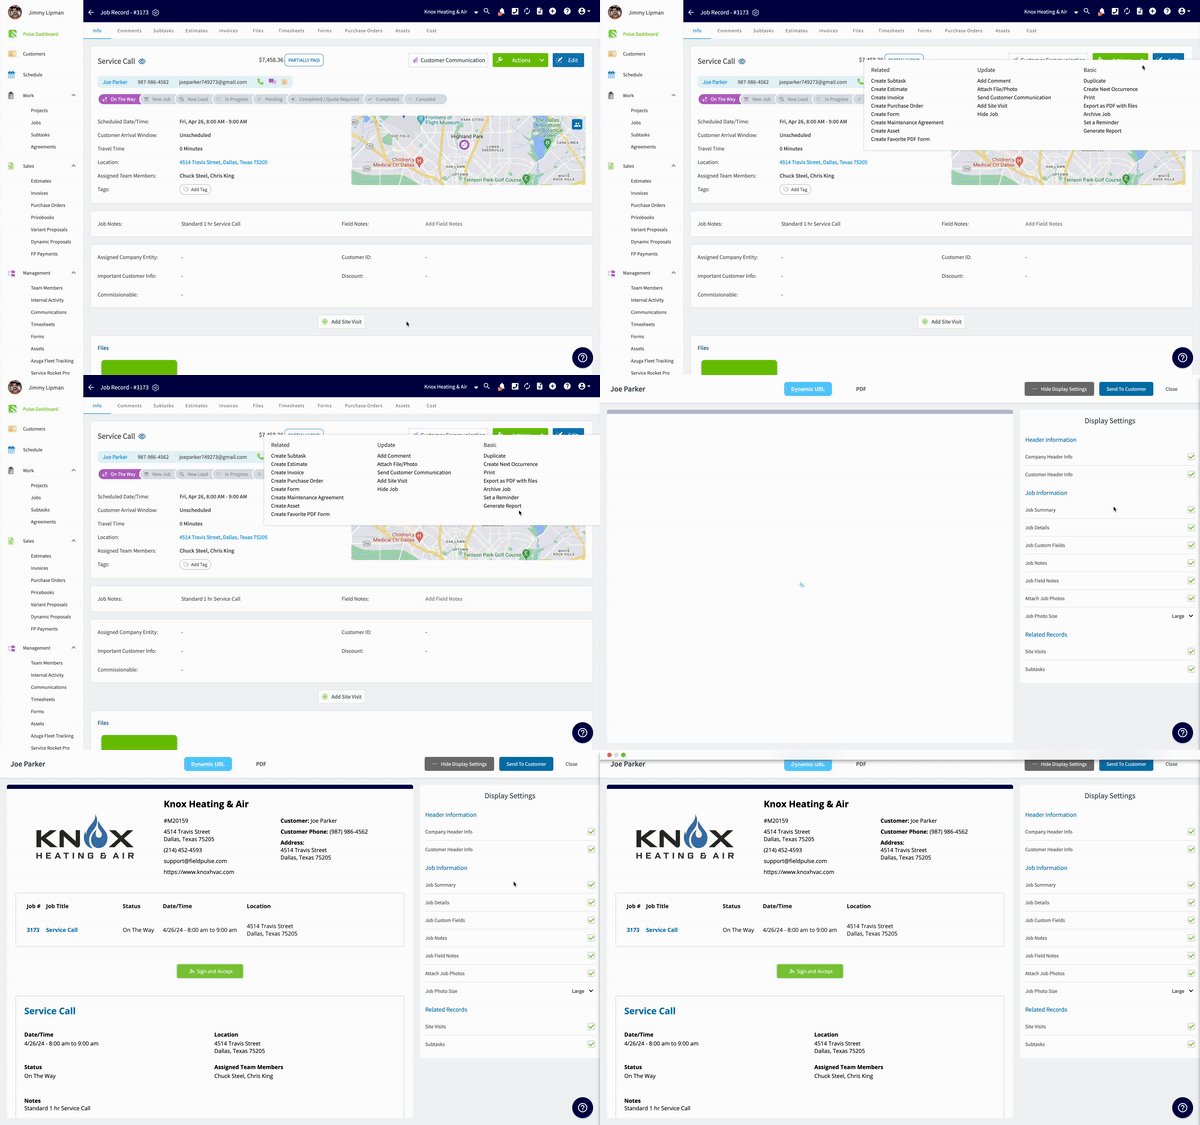 ### What you can show or hide
**Display Settings** controls what the customer sees. Select or deselect each detail before you send the report.
| Display settings group | Details you can show or hide |
| ---------------------- | ------------------------------------------------------------------------------------------ |
| Header Information | Company Header Info, Customer Header Info |
| Job Information | Job Summary, Job Details, Job Custom Fields, Job Notes, Job Field Notes, Attach Job Photos |
| Related Records | Site Visits, Subtasks |
The **Job Information** group also holds **Job Photo Size**, which is a dropdown rather than a show-or-hide setting — it sets the size of the job photos in the report.
Display settings apply to the individual report you are working on, not to any other job report.
## Before you begin
* Create the job you want to report on. FieldPulse builds the report from the job record, so the record has to exist first — see [How to Create a Job](/jobs/jobs-tasks/creating-a-job).
* To combine several jobs into one report, start from the customer record those jobs belong to. You select the jobs from that customer's **Jobs** tab.
## On web
### Create a report from one job
1. Open the job record you want to report on.
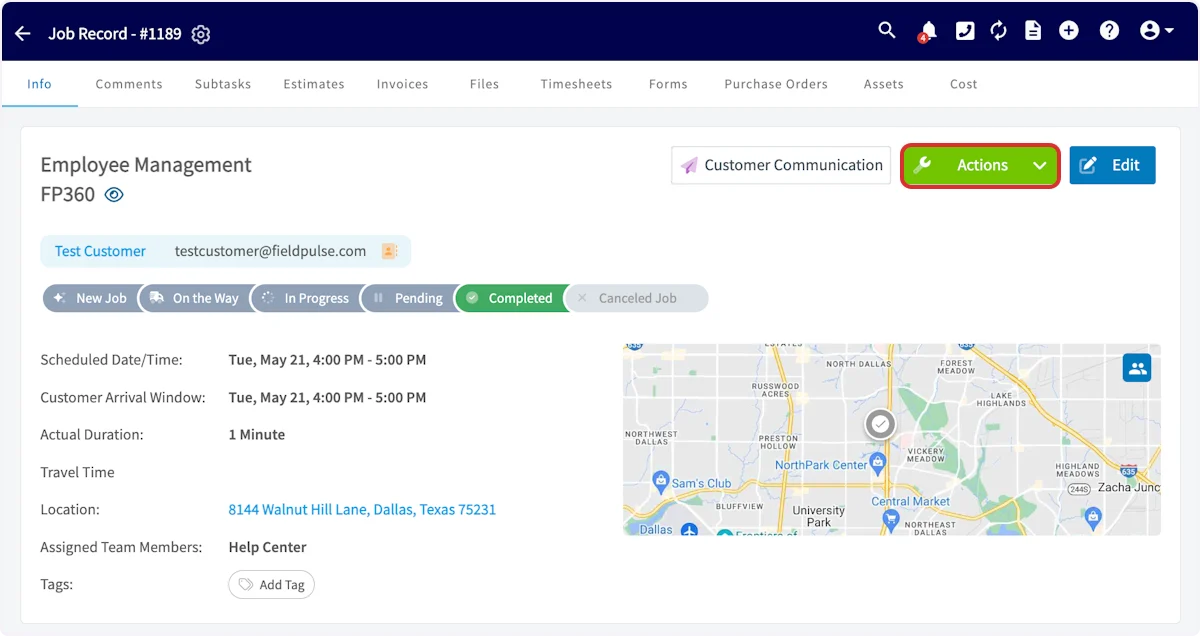
2. Select **Actions**, then select **Generate Report**.
### What you can show or hide
**Display Settings** controls what the customer sees. Select or deselect each detail before you send the report.
| Display settings group | Details you can show or hide |
| ---------------------- | ------------------------------------------------------------------------------------------ |
| Header Information | Company Header Info, Customer Header Info |
| Job Information | Job Summary, Job Details, Job Custom Fields, Job Notes, Job Field Notes, Attach Job Photos |
| Related Records | Site Visits, Subtasks |
The **Job Information** group also holds **Job Photo Size**, which is a dropdown rather than a show-or-hide setting — it sets the size of the job photos in the report.
Display settings apply to the individual report you are working on, not to any other job report.
## Before you begin
* Create the job you want to report on. FieldPulse builds the report from the job record, so the record has to exist first — see [How to Create a Job](/jobs/jobs-tasks/creating-a-job).
* To combine several jobs into one report, start from the customer record those jobs belong to. You select the jobs from that customer's **Jobs** tab.
## On web
### Create a report from one job
1. Open the job record you want to report on.
2. Select **Actions**, then select **Generate Report**.
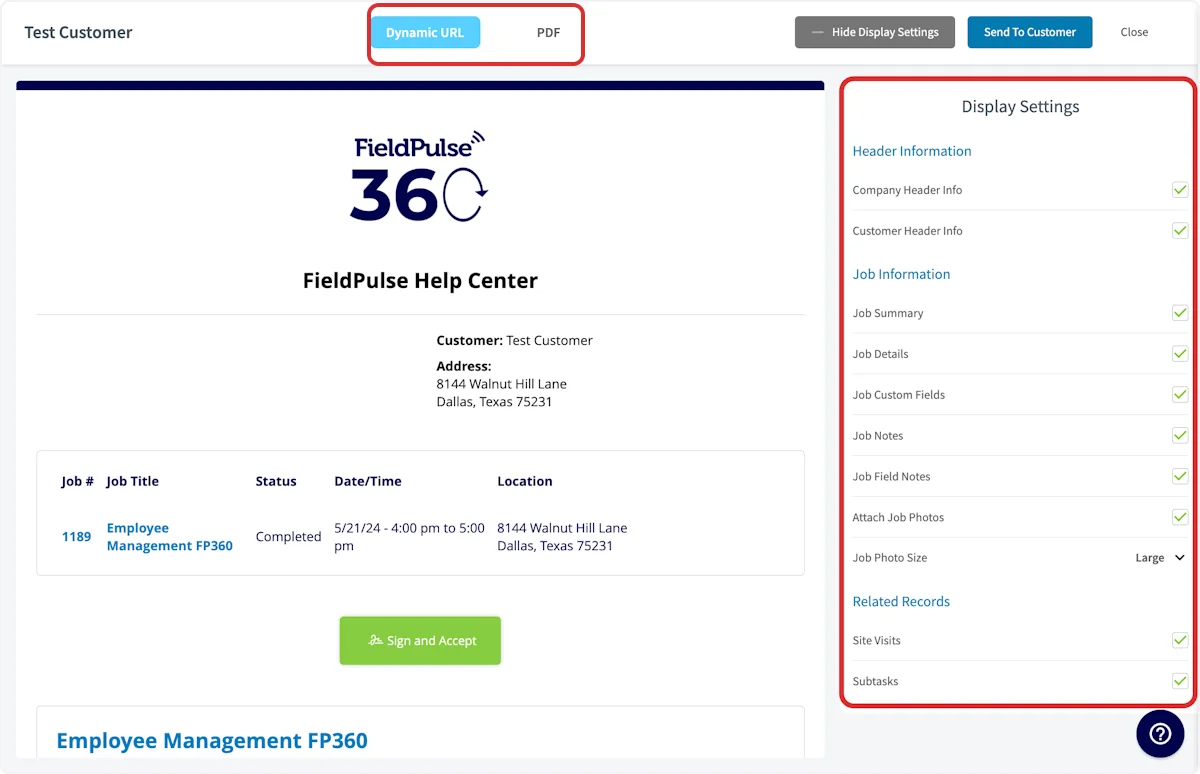
 3. Select **Dynamic URL** or **PDF** at the top of the preview to see the report in that format.
4. Use the **Display Settings** panel on the right to select or deselect the details you want the customer to see.
3. Select **Dynamic URL** or **PDF** at the top of the preview to see the report in that format.
4. Use the **Display Settings** panel on the right to select or deselect the details you want the customer to see.
 ### Send the report to the customer
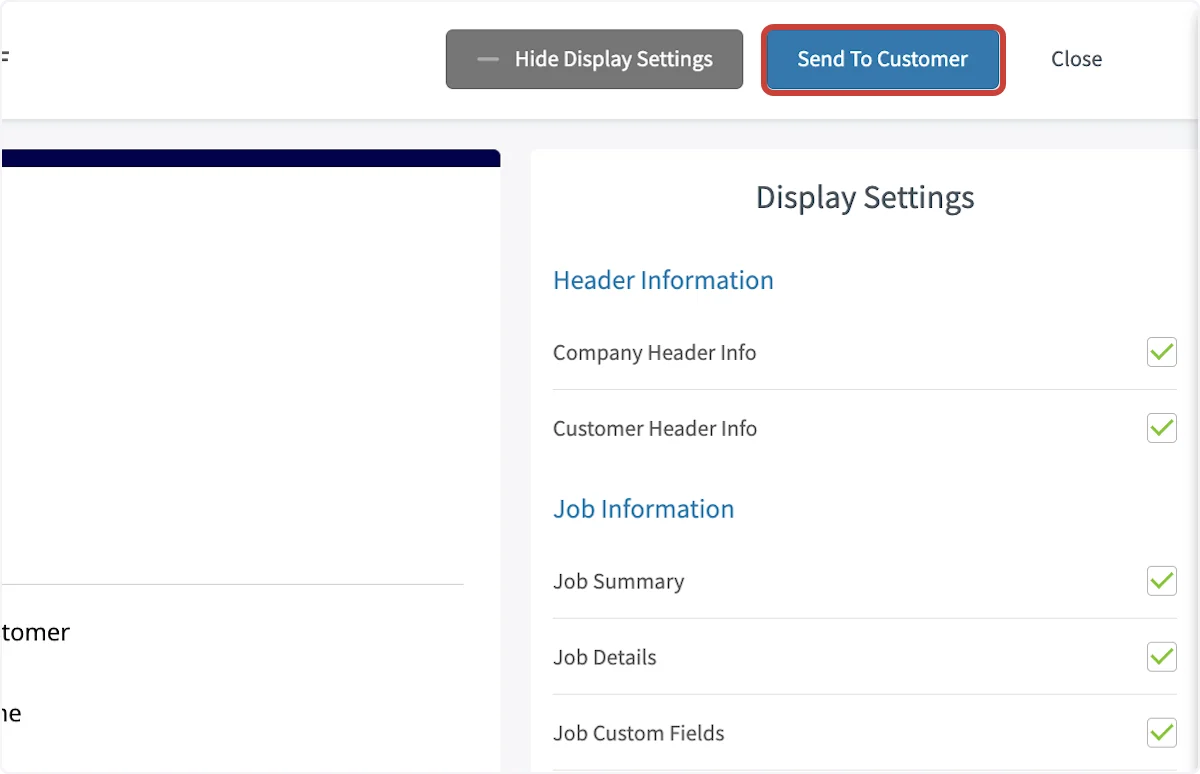
1. Select **Send To Customer** at the top of the preview.
### Send the report to the customer
1. Select **Send To Customer** at the top of the preview.
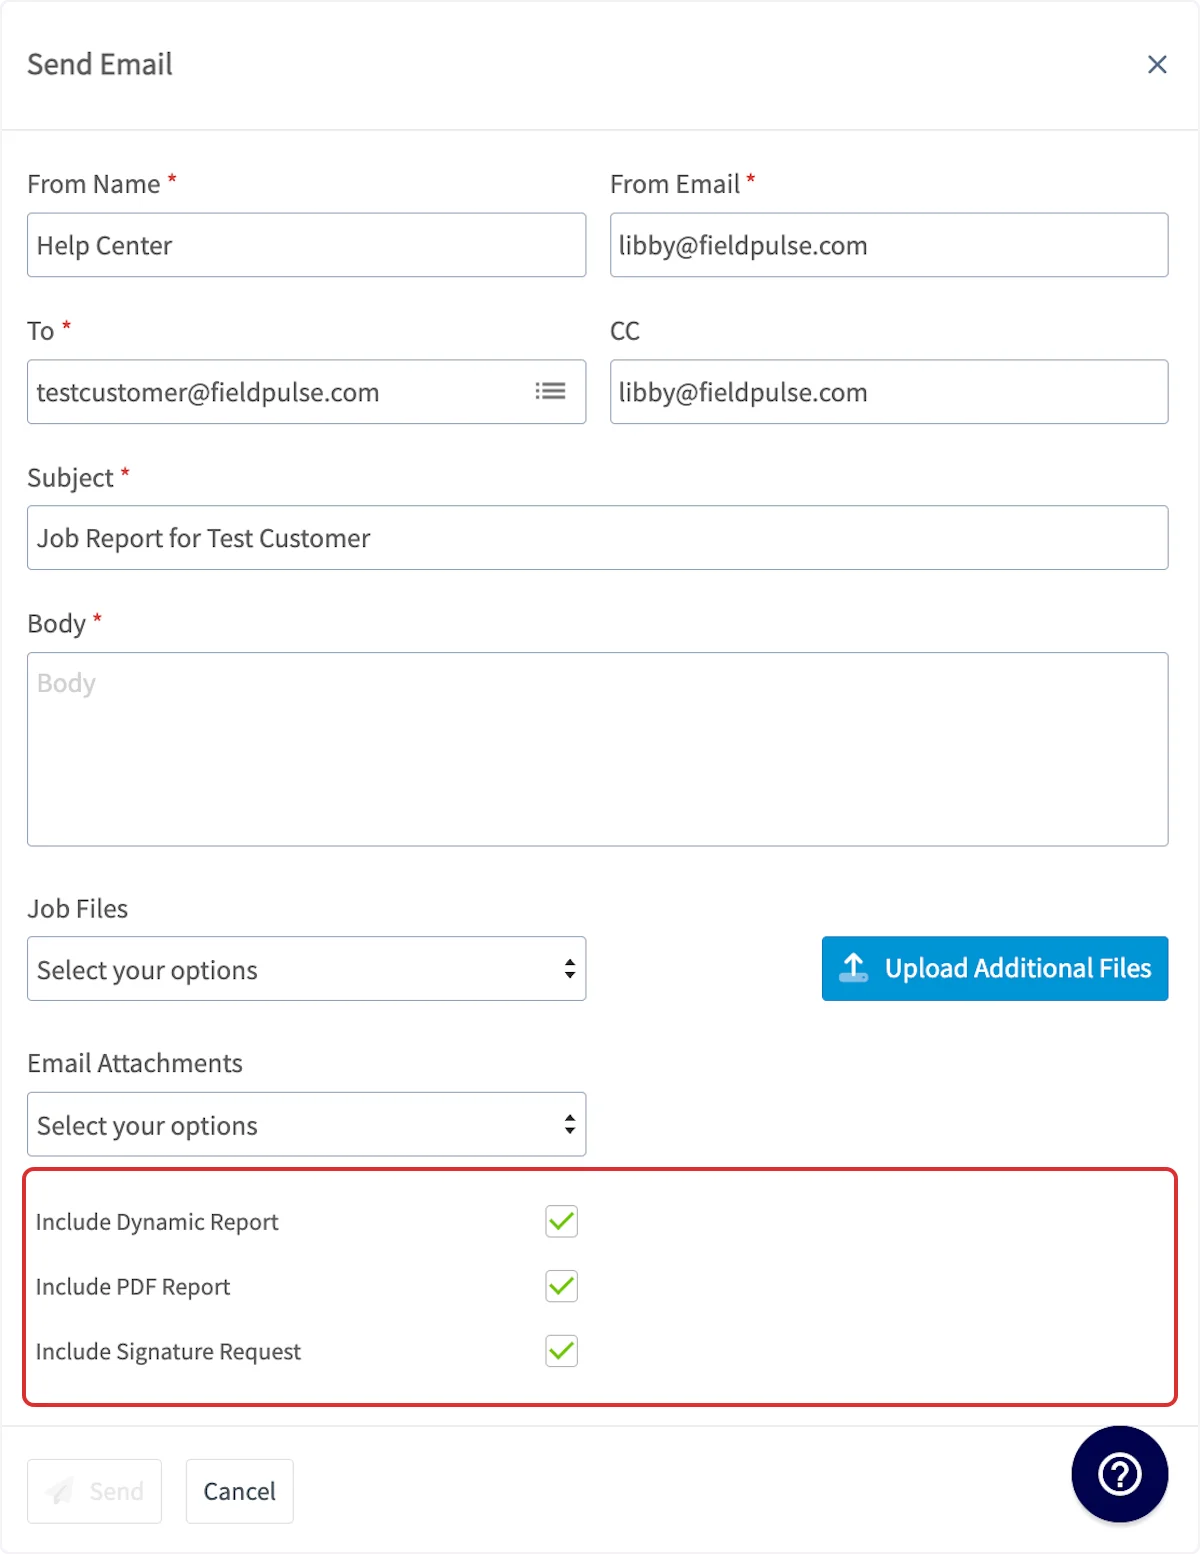
 2. Set the **From Name** and **From Email** the message goes out under.
3. Enter the customer's address in **To**, and add anyone else in **CC**.
4. Write the **Subject** and the **Body**.
5. Attach any files the customer needs — choose from **Job Files**, add new ones with **Upload Additional Files**, or pick from **Email Attachments**.
6. Select **Include Dynamic Report**, **Include PDF Report**, and **Include Signature Request** to set what the email carries.
7. Select **Send**.
2. Set the **From Name** and **From Email** the message goes out under.
3. Enter the customer's address in **To**, and add anyone else in **CC**.
4. Write the **Subject** and the **Body**.
5. Attach any files the customer needs — choose from **Job Files**, add new ones with **Upload Additional Files**, or pick from **Email Attachments**.
6. Select **Include Dynamic Report**, **Include PDF Report**, and **Include Signature Request** to set what the email carries.
7. Select **Send**.
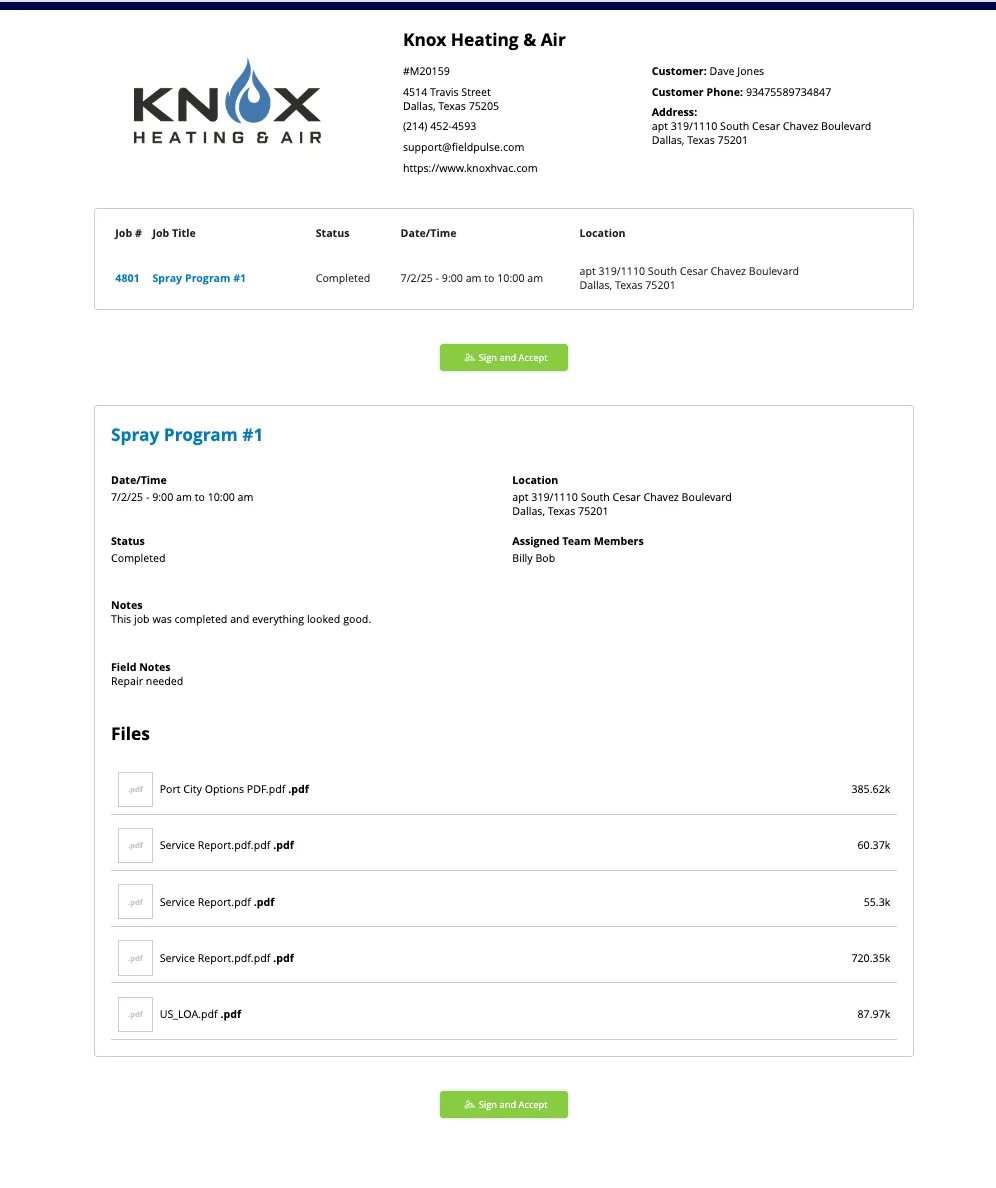
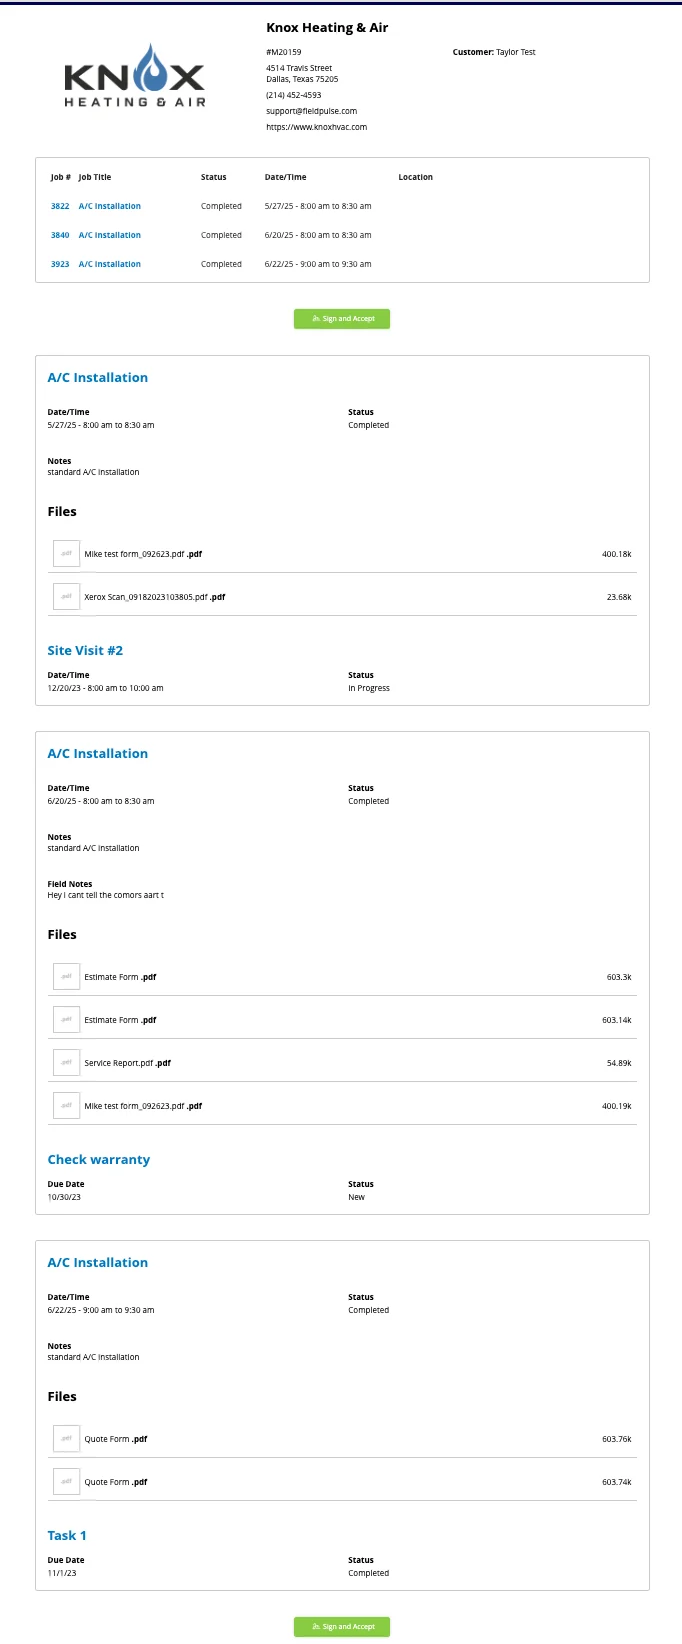
 This is what a report sent with a signature request looks like to the customer — the company header, the job summary line, the job notes, field notes, and attached files, with a **Sign and Accept** button above and below the job details.
 ### Combine several jobs into one report
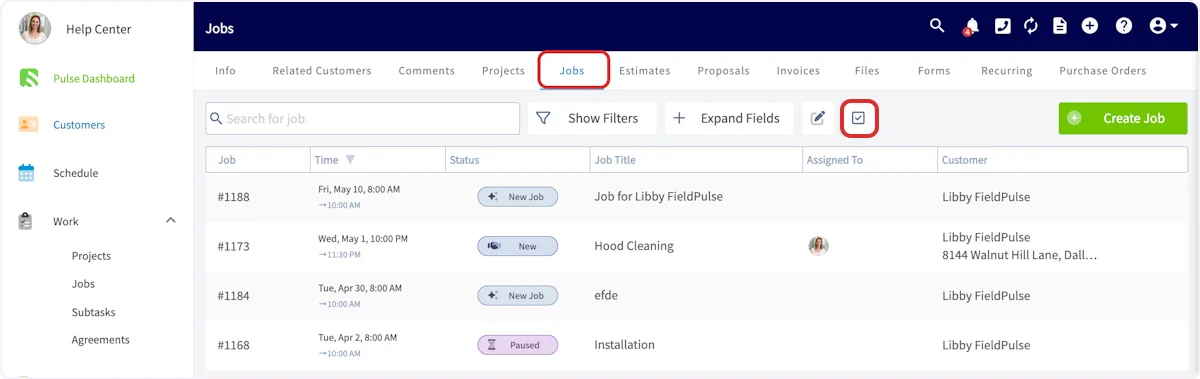
1. Open the customer record for the jobs you want to combine, then select the **Jobs** tab.
2. Select the checkbox icon in the toolbar above the job list.
### Combine several jobs into one report
1. Open the customer record for the jobs you want to combine, then select the **Jobs** tab.
2. Select the checkbox icon in the toolbar above the job list.
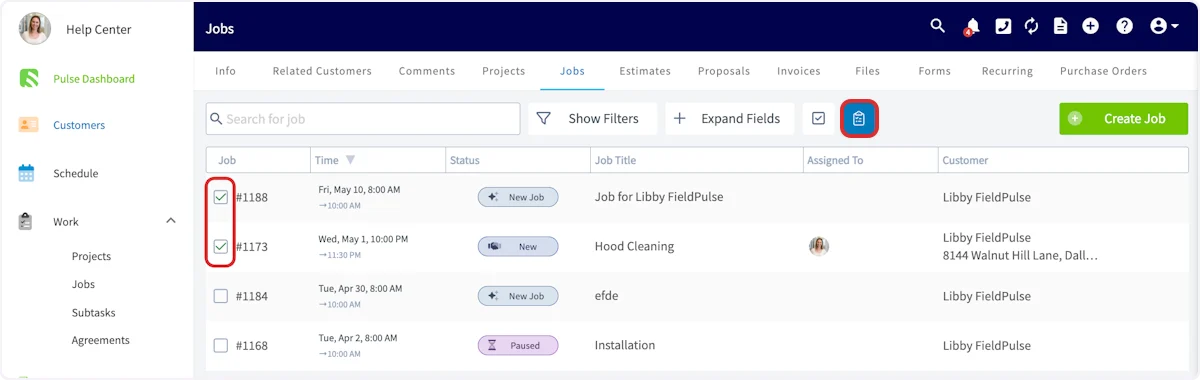
 3. Check every job you want in the report.
4. Select the clipboard icon to generate the combined report.
3. Check every job you want in the report.
4. Select the clipboard icon to generate the combined report.
 5. Use **Display Settings** to select the details the customer sees.
6. Select **Send To Customer** and fill in the email the same way you would for a single job.
The combined report lists each job in turn, with its own date, status, notes, and attached files.
5. Use **Display Settings** to select the details the customer sees.
6. Select **Send To Customer** and fill in the email the same way you would for a single job.
The combined report lists each job in turn, with its own date, status, notes, and attached files.
 ## On mobile
### Create the report
1. Open the job record and select **Generate Report**. You can also select **Actions**, then **Generate Report**.
## On mobile
### Create the report
1. Open the job record and select **Generate Report**. You can also select **Actions**, then **Generate Report**.
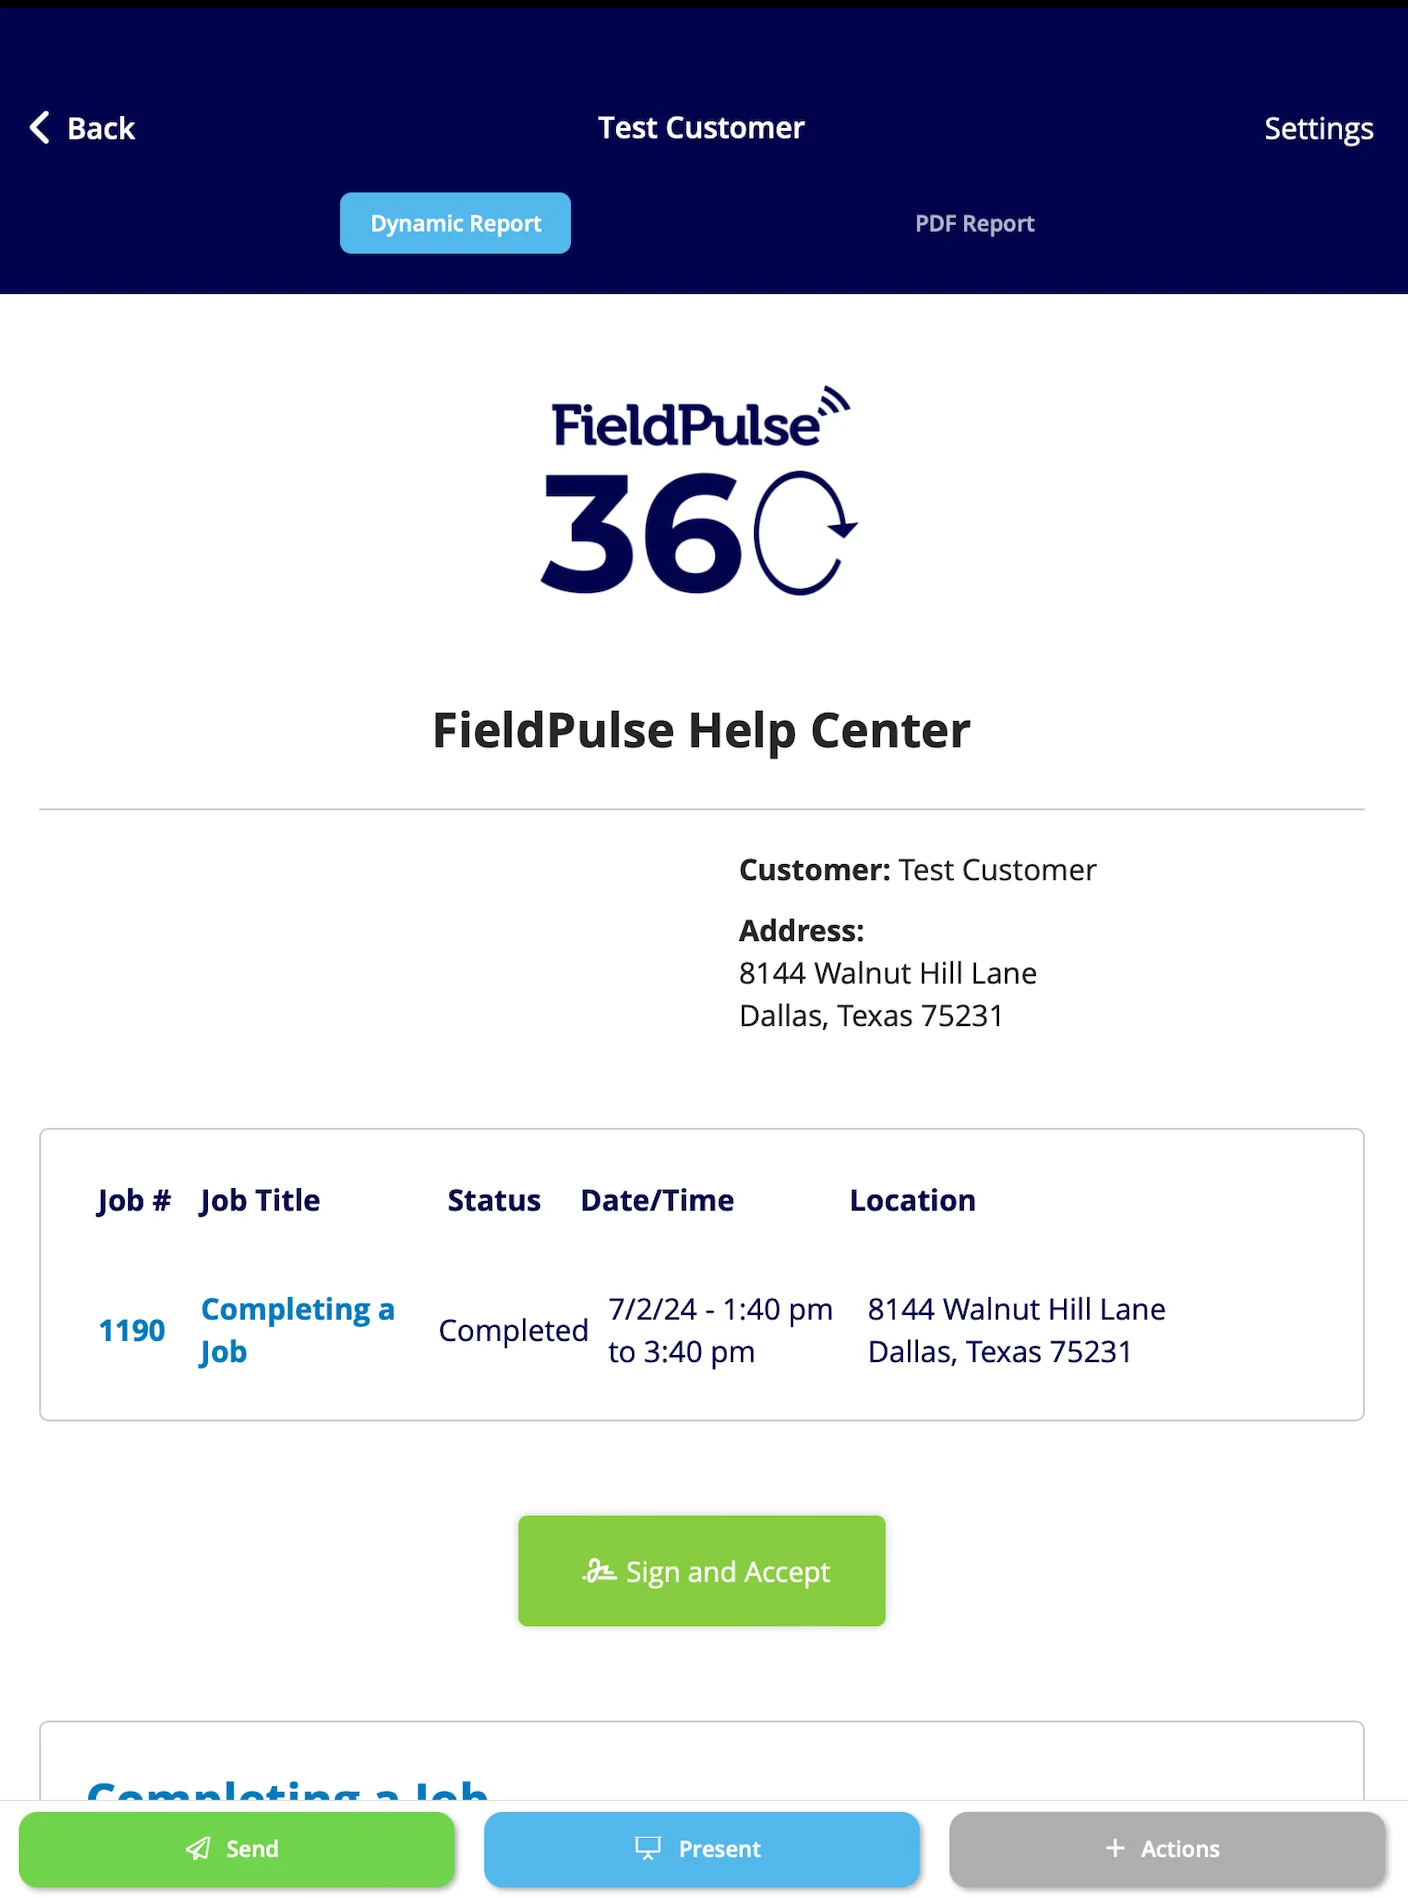
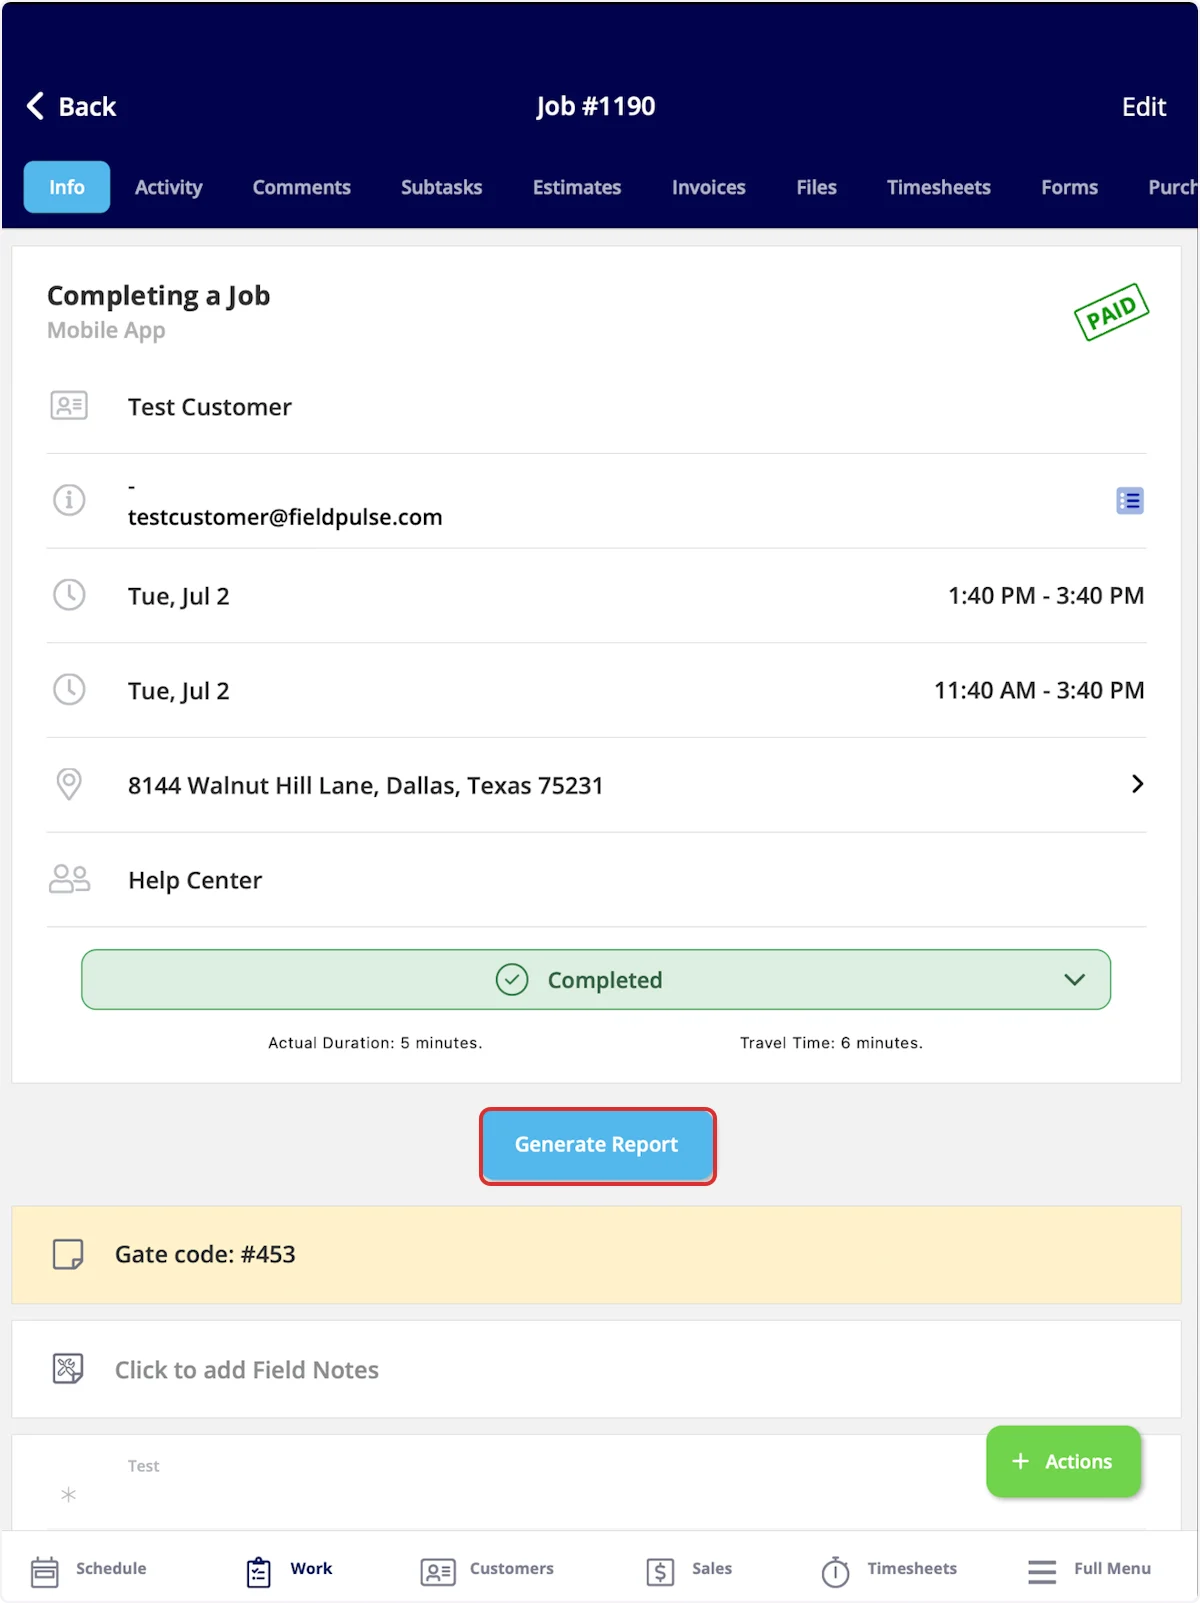 2. Select **Dynamic Report** or **PDF Report** at the top of the preview to see the report in that format.
3. Select **Settings** in the top right to select or deselect the details you want the customer to see.
2. Select **Dynamic Report** or **PDF Report** at the top of the preview to see the report in that format.
3. Select **Settings** in the top right to select or deselect the details you want the customer to see.
 ### Send the report
1. Select **Send** at the bottom of the preview.
2. Set who the email goes to, then write the subject and the body.
3. Attach any files the customer needs.
4. Choose whether to include the **Dynamic Report**, the **PDF Report**, and a **Signature Request**, then send the email.
## Related articles
* [How to Create a Job](/jobs/jobs-tasks/creating-a-job)
* [How to Complete a Job in the Field](/jobs/jobs-tasks/completing-a-job)
* [How to Manage Files](/jobs/jobs-tasks/file-management)
* [How to Create Custom Tags for Jobs](/jobs/jobs-tasks/custom-tags)
Your report is working when the customer opens a clean summary of the work that shows only the details you selected, and you sent it from the job record without rebuilding it by hand.
## Related topics
- [How to Create Custom Tags for Jobs](/jobs/jobs-tasks/custom-tags.md)
- [How to Use Comments](/jobs/jobs-tasks/comments.md)
- [How to Manage Files](/jobs/jobs-tasks/file-management.md)
- [How to Create Job Reports](/reporting/raw-data/job-reports.md)
### Send the report
1. Select **Send** at the bottom of the preview.
2. Set who the email goes to, then write the subject and the body.
3. Attach any files the customer needs.
4. Choose whether to include the **Dynamic Report**, the **PDF Report**, and a **Signature Request**, then send the email.
## Related articles
* [How to Create a Job](/jobs/jobs-tasks/creating-a-job)
* [How to Complete a Job in the Field](/jobs/jobs-tasks/completing-a-job)
* [How to Manage Files](/jobs/jobs-tasks/file-management)
* [How to Create Custom Tags for Jobs](/jobs/jobs-tasks/custom-tags)
Your report is working when the customer opens a clean summary of the work that shows only the details you selected, and you sent it from the job record without rebuilding it by hand.
## Related topics
- [How to Create Custom Tags for Jobs](/jobs/jobs-tasks/custom-tags.md)
- [How to Use Comments](/jobs/jobs-tasks/comments.md)
- [How to Manage Files](/jobs/jobs-tasks/file-management.md)
- [How to Create Job Reports](/reporting/raw-data/job-reports.md)