> ## Documentation Index
> Fetch the complete documentation index at: https://help.fieldpulse.com/llms.txt
> Use this file to discover all available pages before exploring further.
# Project Management Overview
> Group a multi-week install in FieldPulse into one Project that holds its jobs, subtasks, estimates, staged invoices, files, and timesheets.
> **Who uses this:** An Administrator turns Project Management on in Company Settings; each Project is then assigned to a team, and comments on a Project are visible to every member of that team. **Availability:** All regions. Project Management is included in the FieldPulse subscription — the Project Management card in Company Settings > Features & Plugins lists it as included — and is turned on per account.
Some work does not fit inside a single job. A multi-week install, a scope that bills in stages, an engagement that spans several trips and several invoices — track that as one [job](https://www.fieldpulse.com/features/job-management) and the details start slipping. A Project holds all of it in one place: every job, subtask, [estimate and invoice](https://www.fieldpulse.com/features/estimates-and-invoices), file, and timesheet tied to the same long-running engagement.
## Overview
A Project is a long-term record that groups related work under one customer. Where a job covers a single unit of work, a Project covers the whole engagement — the jobs, subtasks, estimates, invoices, files, and timesheets that add up to one large or multi-week effort.
Jobs can span multiple days on their own, so reach for a Project when the work carries complex assignments across a longer period, or needs more than one invoice before it is finished. For a side-by-side comparison of the three work records, see [Projects vs. Jobs vs. Site Visits Details](/jobs/projects/projects-vs-jobs-vs-site-visits).
## How it works
A Project sits above your jobs and collects everything attached to the same scope of work.
* **Every Project belongs to a customer.** The project record carries a name, description, location, start and end date, status, completion percentage, and an assigned team.
* **Status tracks the stage, and completion percentage tracks progress.** A Project follows a **Status Workflow**, and its **Status** reflects the stage the work is at — Opportunity, Accepted, Planning, In Progress, and Pending are the statuses shown in the project views. The completion percentage is a slider you move as the work advances.
* **Jobs and subtasks are created underneath the Project.** Each one is scheduled, assigned, and tracked on its own while staying attached to the Project.
* **Estimates, invoices, purchase orders, files, comments, and timesheets attach to the Project record** through the tabs across the top of the record.
* **Job Notes on the Project insert automatically into related jobs**, so a crew opening a job started from the Project sees the same context.
* **Any record linked to a Project can open the rest of them.** A job, estimate, invoice, purchase order, or file tied to a Project shows a **Related Project** tab that lists everything else on that Project.
## Before you begin
* **Project Management is turned on per account.** An Administrator opens **Company Settings**, selects **Features & Plugins**, finds **Project Management**, and selects **Enable**. **Projects** then appears under **Work** in the left menu.
* Once Project Management is on, a **Projects** area also appears in Company Settings, where you can add your own fields to project records — see [Setting Up Custom Fields on Project Records](/jobs/projects/custom-fields).
## On web
### Finding your Projects
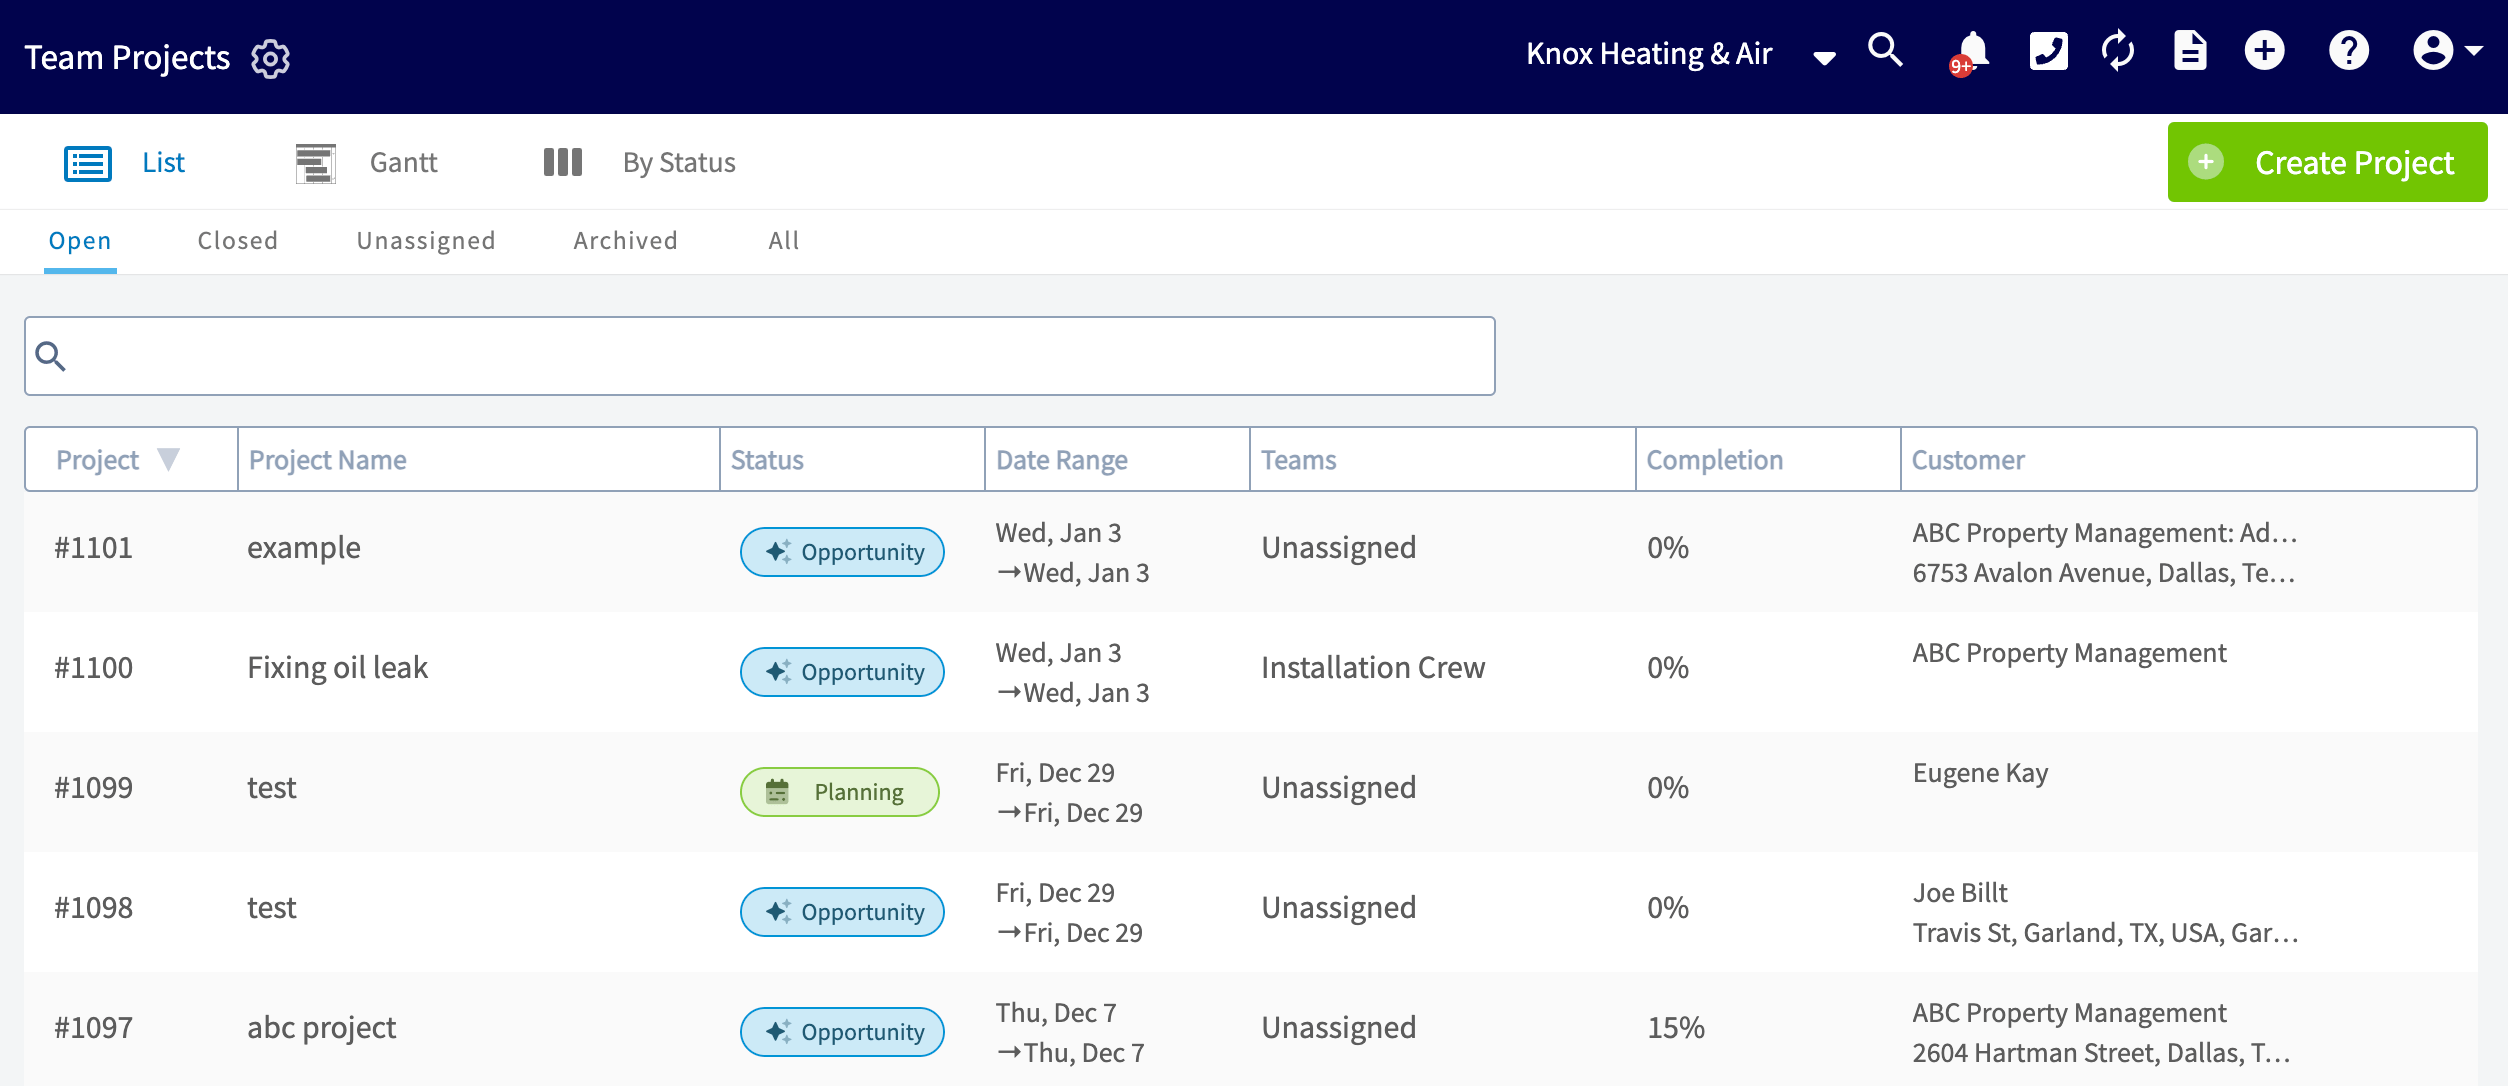
Projects live under **Work** in the left menu. The **Projects** page opens in **List** view, which shows each project's number, name, status, date range, assigned teams, completion percentage, and customer.
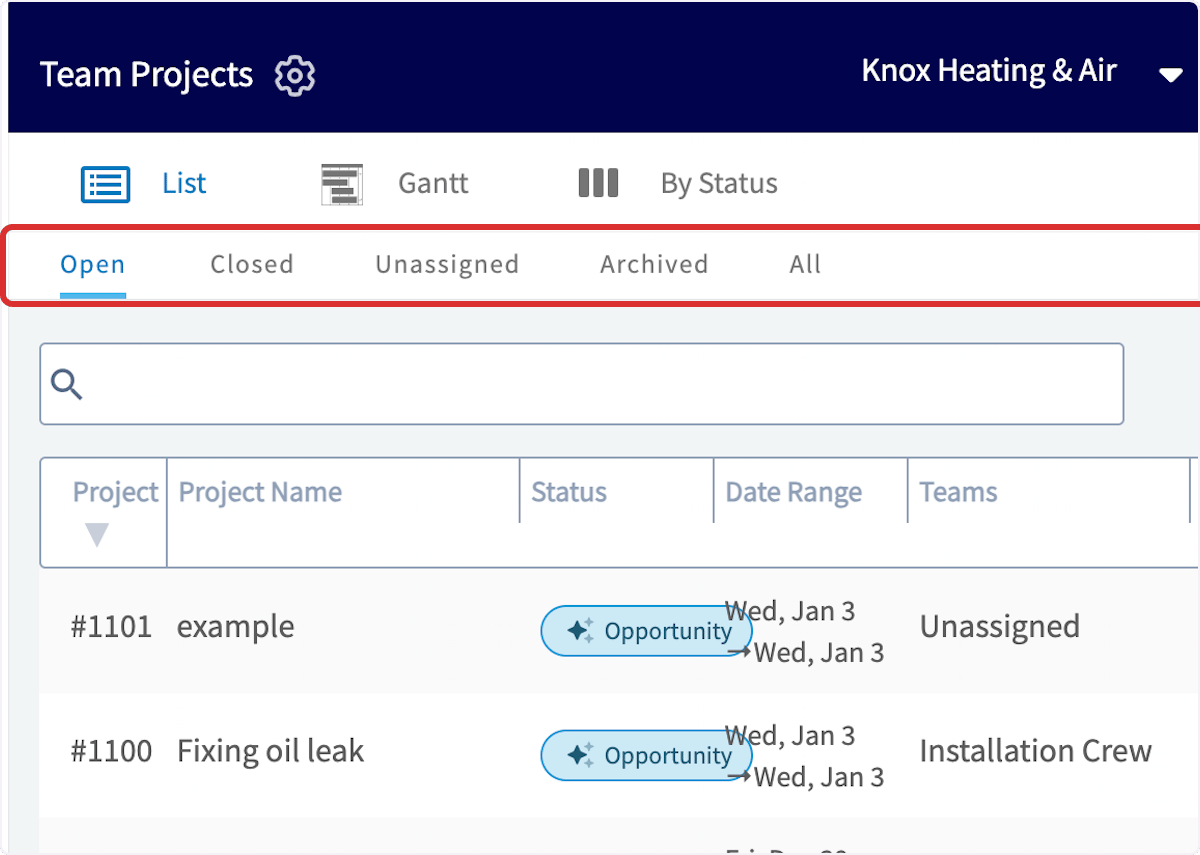
 Use the **Open**, **Closed**, **Unassigned**, **Archived**, and **All** tabs to sort your projects by status and to spot the ones no team has picked up yet.
 ### Gantt view
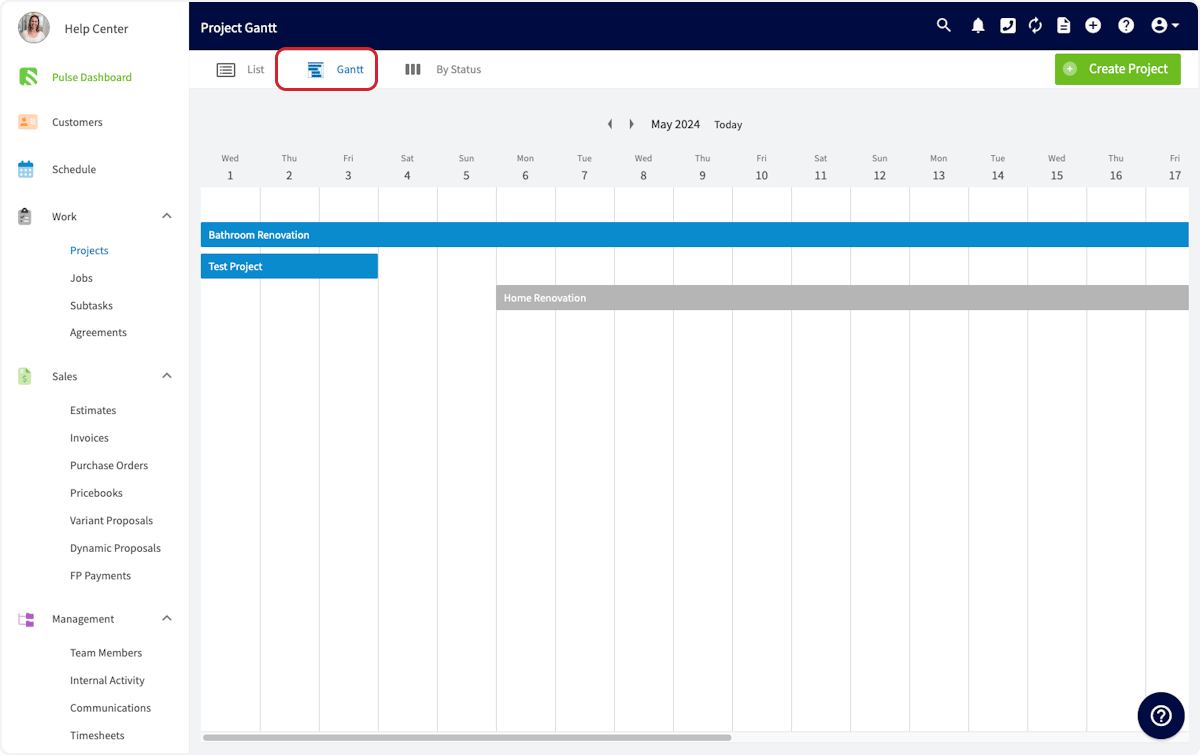
The **Gantt** tab organizes your projects by date so you can see the month at a glance. Hover over any project bar to show that project's details.
### Gantt view
The **Gantt** tab organizes your projects by date so you can see the month at a glance. Hover over any project bar to show that project's details.
 ### By Status view
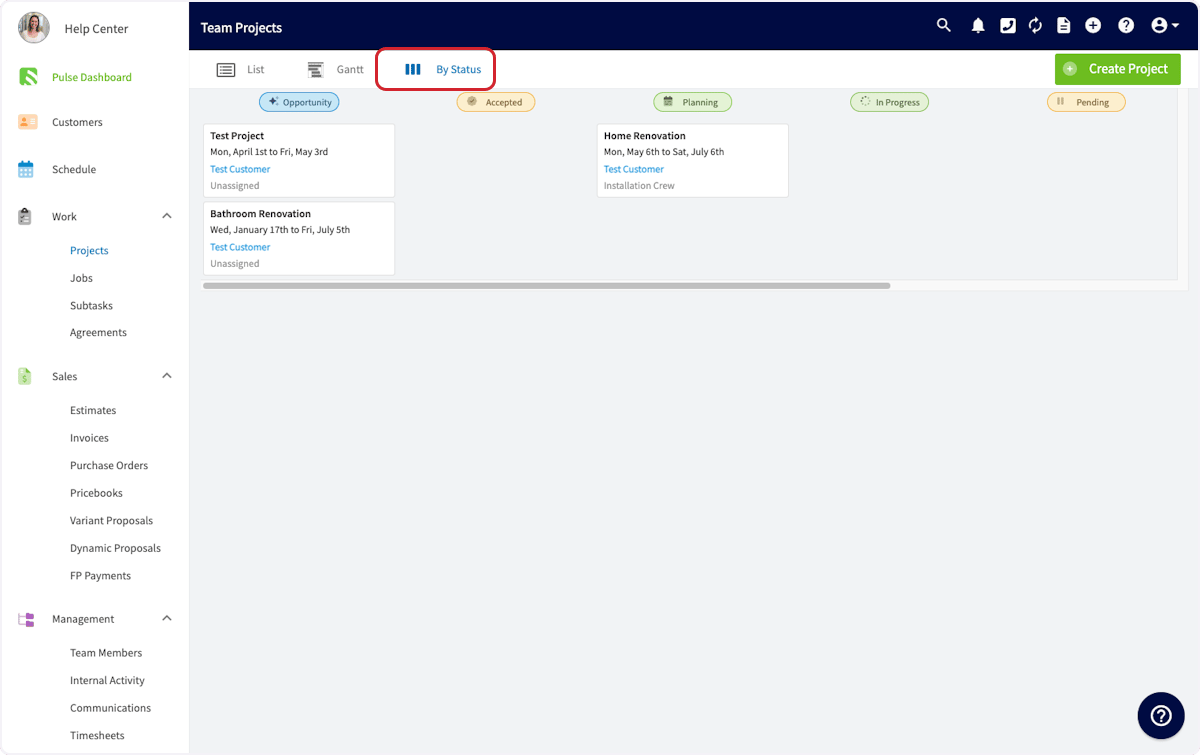
The **By Status** tab groups your projects into columns by the status each one is in.
### By Status view
The **By Status** tab groups your projects into columns by the status each one is in.
 ### Creating a Project from scratch
1. Select **Create Project**.
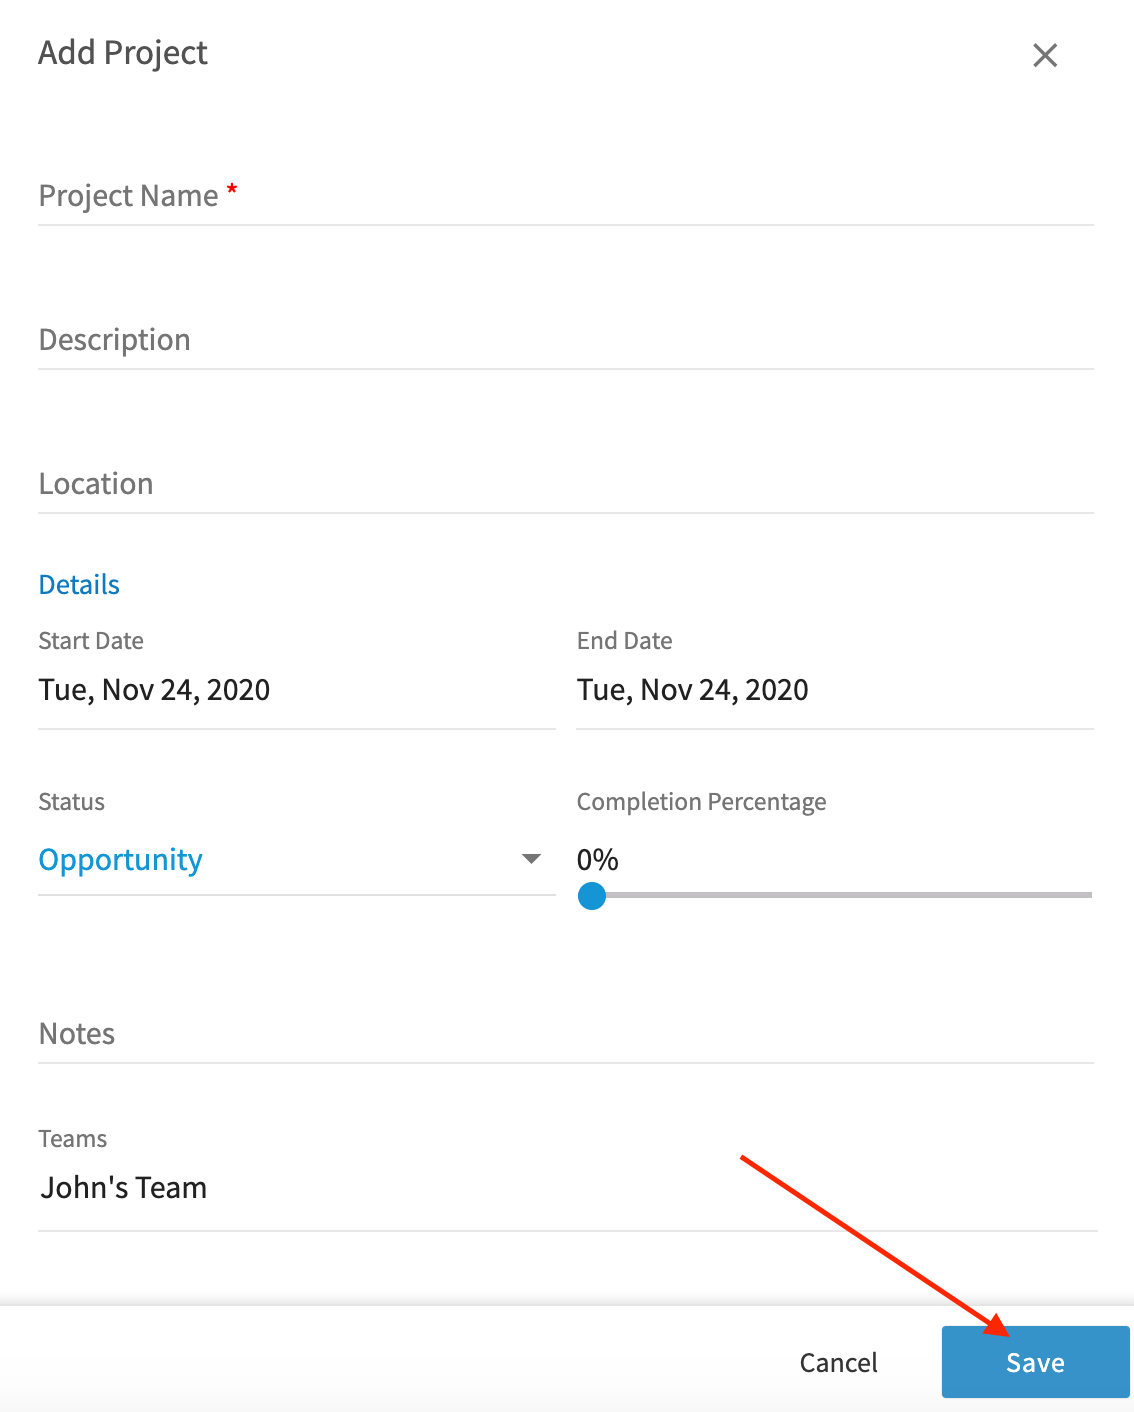
2. In the **Add Project** window, select the **Customer**, enter a **Project Name** and **Description**, and choose the **Start Date** and **End Date**. The location is pulled from the customer's information automatically, or you can enter coordinates in Decimal Degrees (for example, `34.0522, -118.2437`) or Degrees, Minutes, Seconds (for example, `34°03'08"N, 118°14'37"W`).
### Creating a Project from scratch
1. Select **Create Project**.
2. In the **Add Project** window, select the **Customer**, enter a **Project Name** and **Description**, and choose the **Start Date** and **End Date**. The location is pulled from the customer's information automatically, or you can enter coordinates in Decimal Degrees (for example, `34.0522, -118.2437`) or Degrees, Minutes, Seconds (for example, `34°03'08"N, 118°14'37"W`).
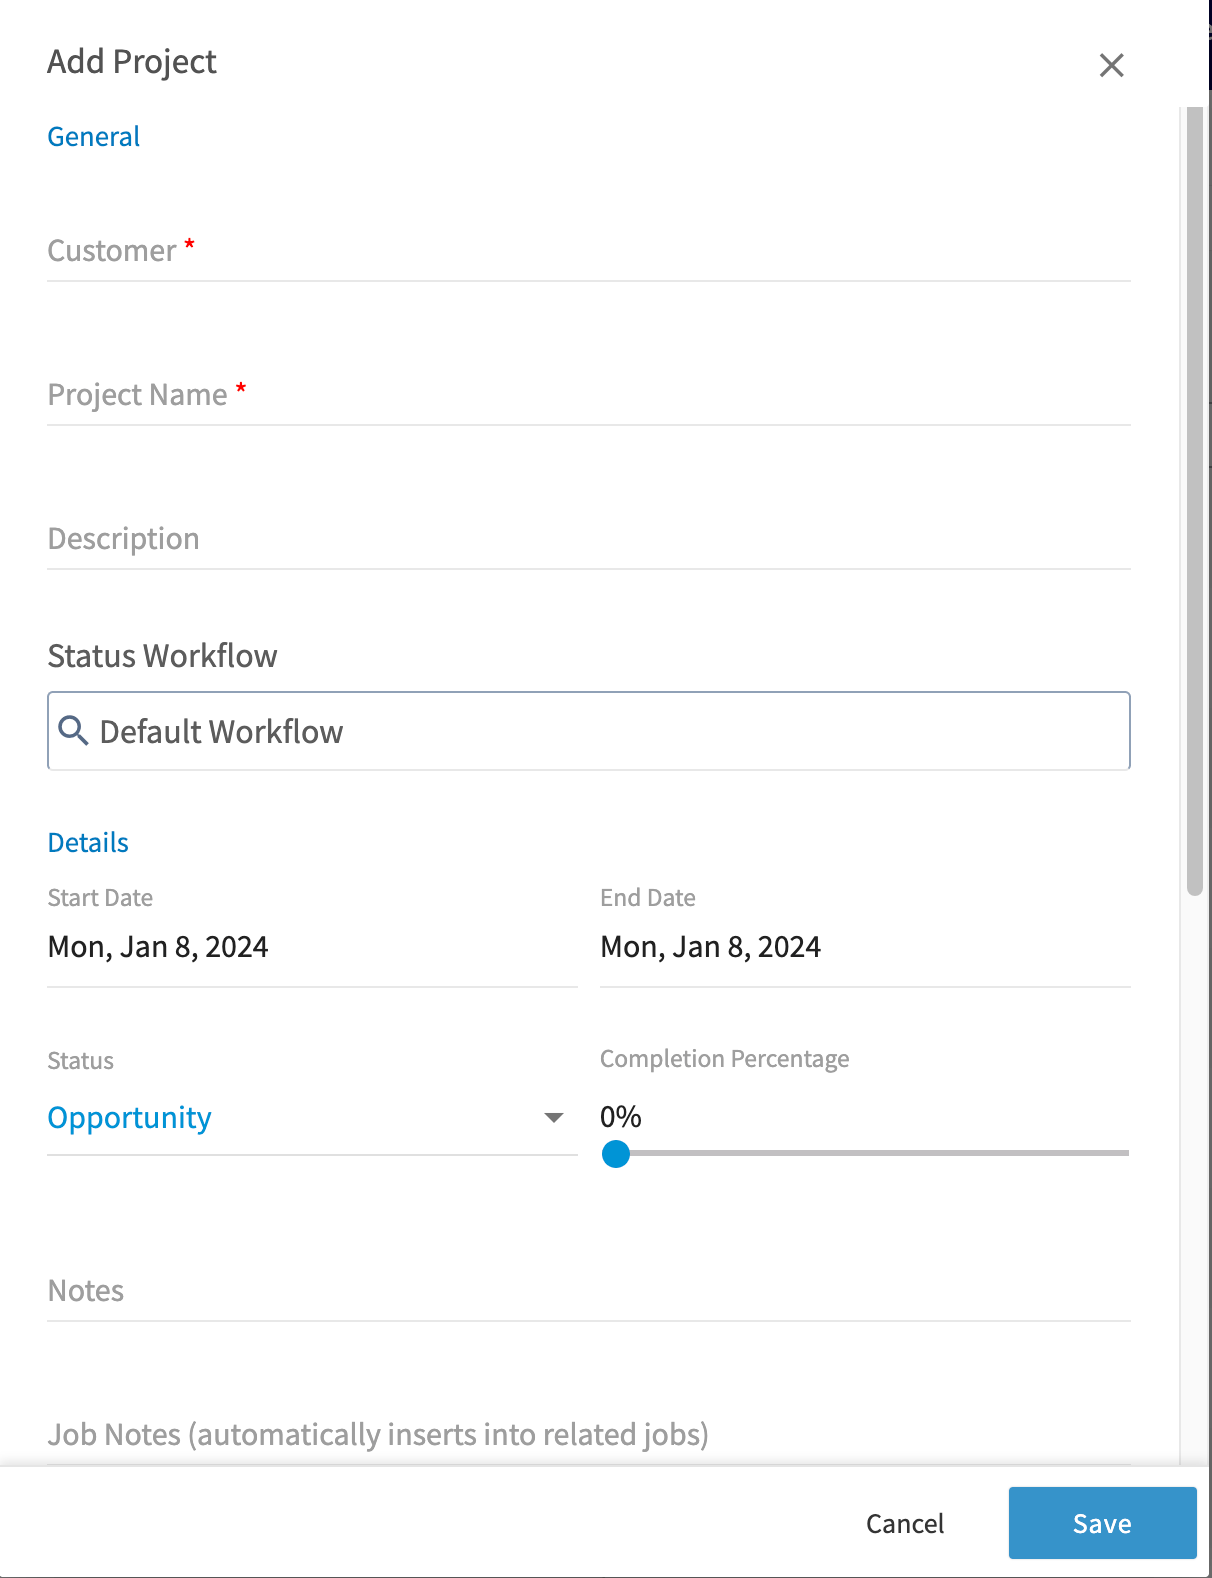 3. Set **Status** to the stage the project is at. You can update it as the project progresses.
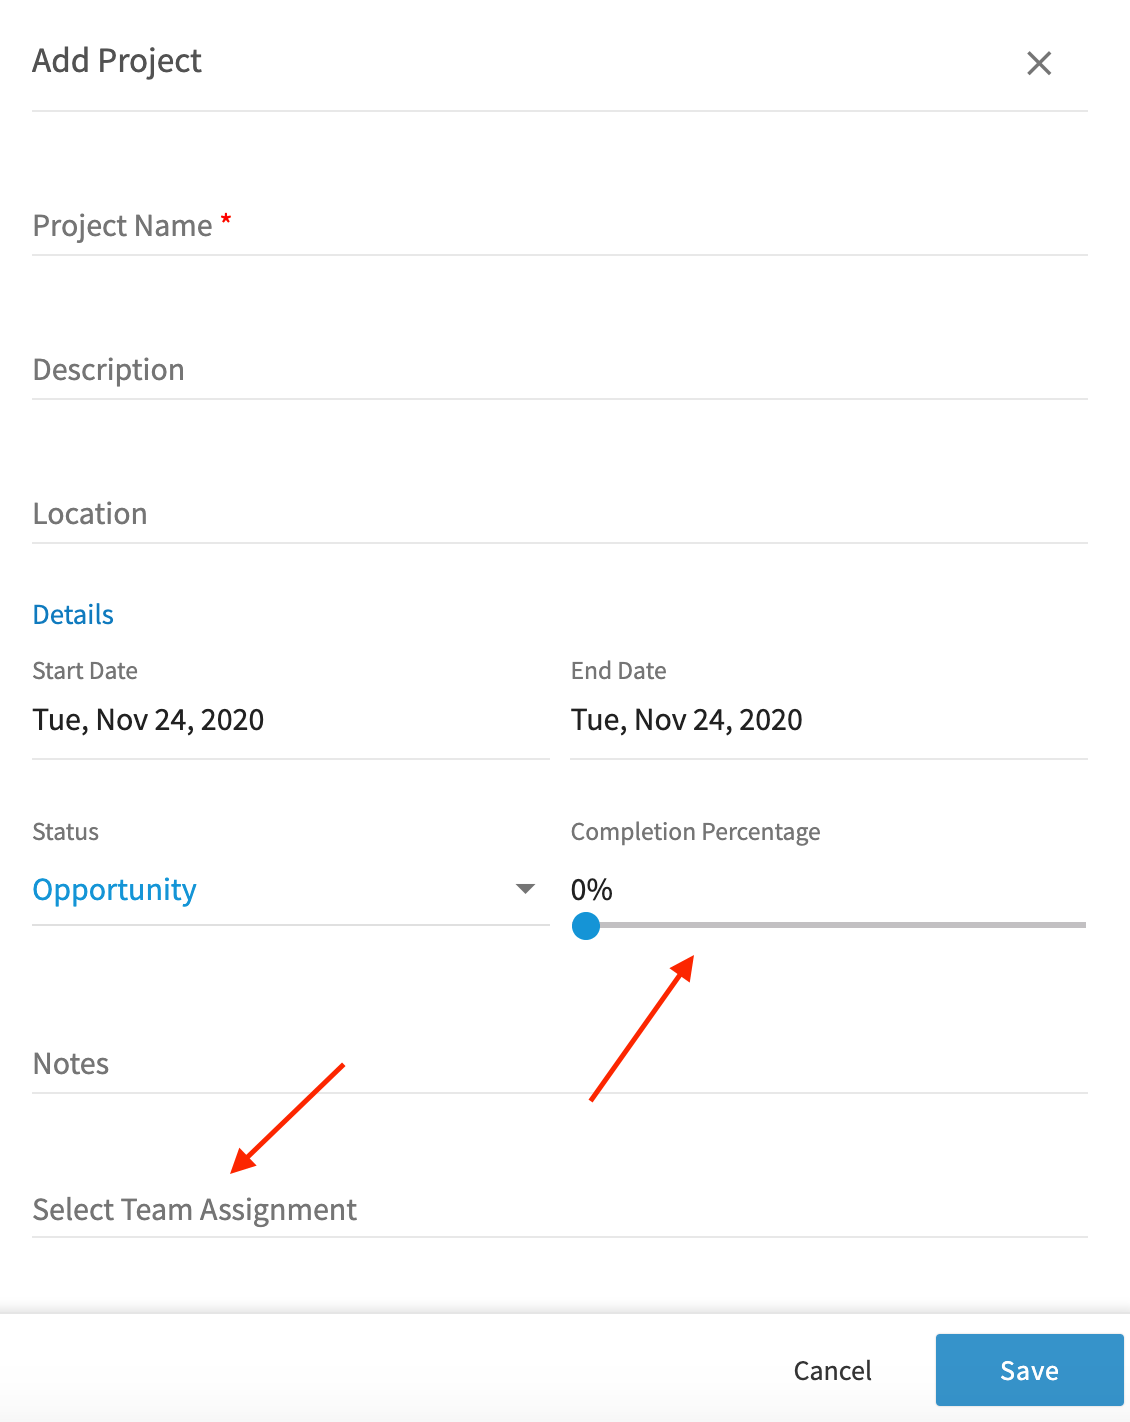
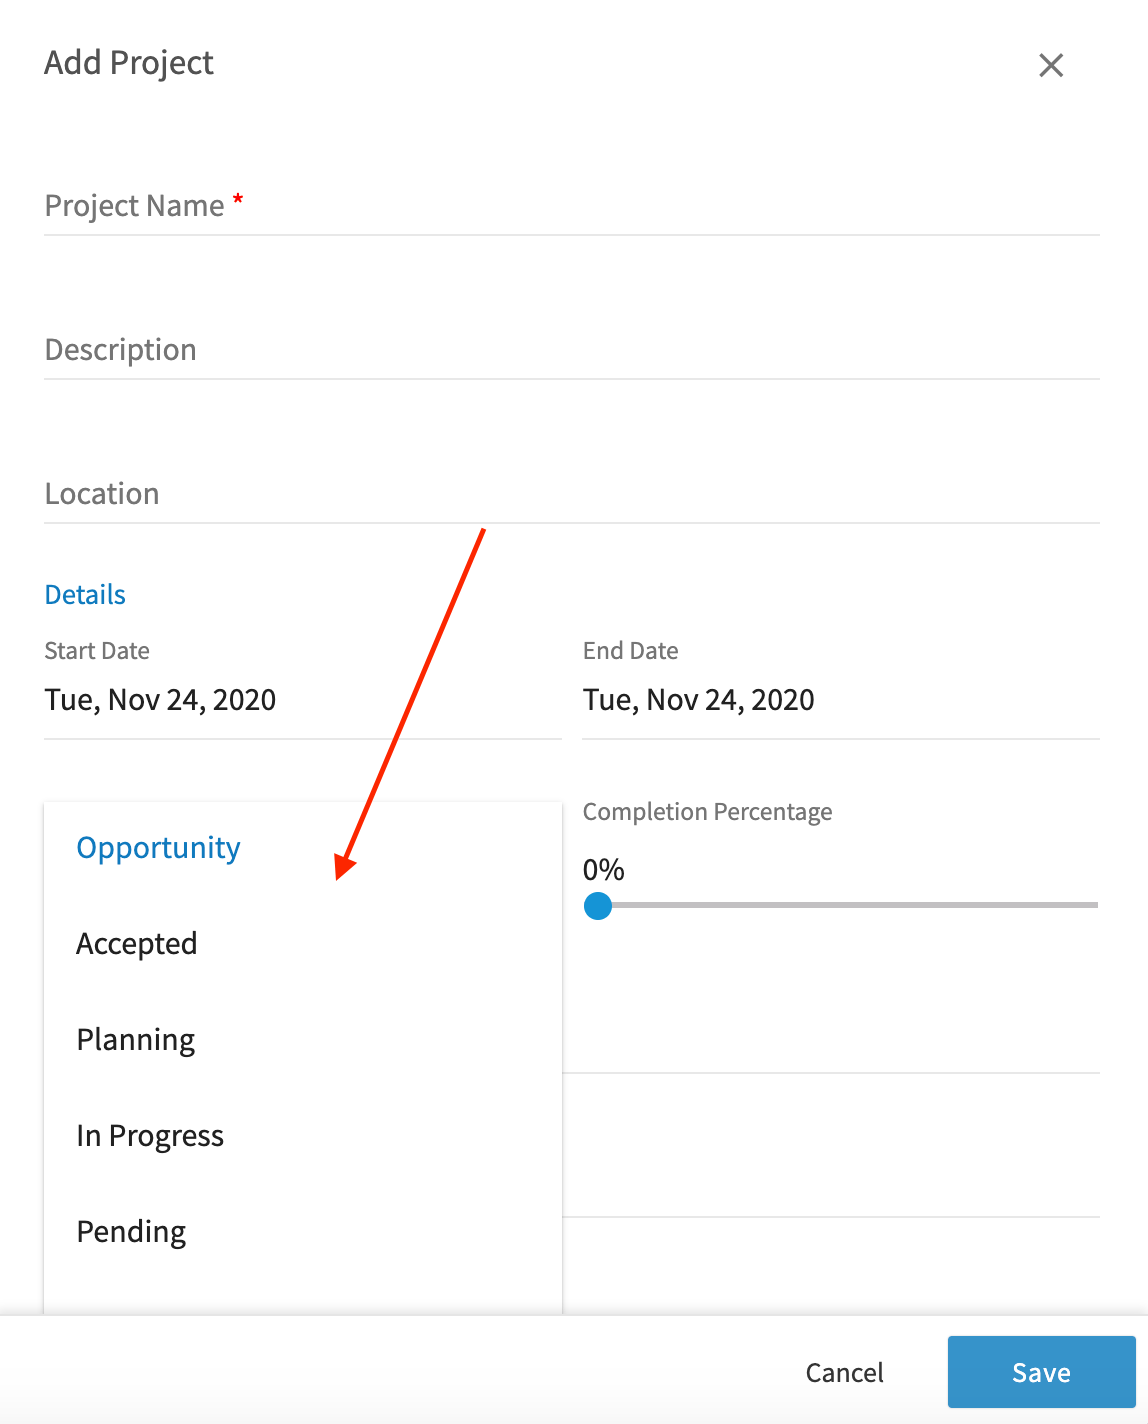 4. Move the **Completion Percentage** slider to your current level of completion, then select **Select Team Assignment**.
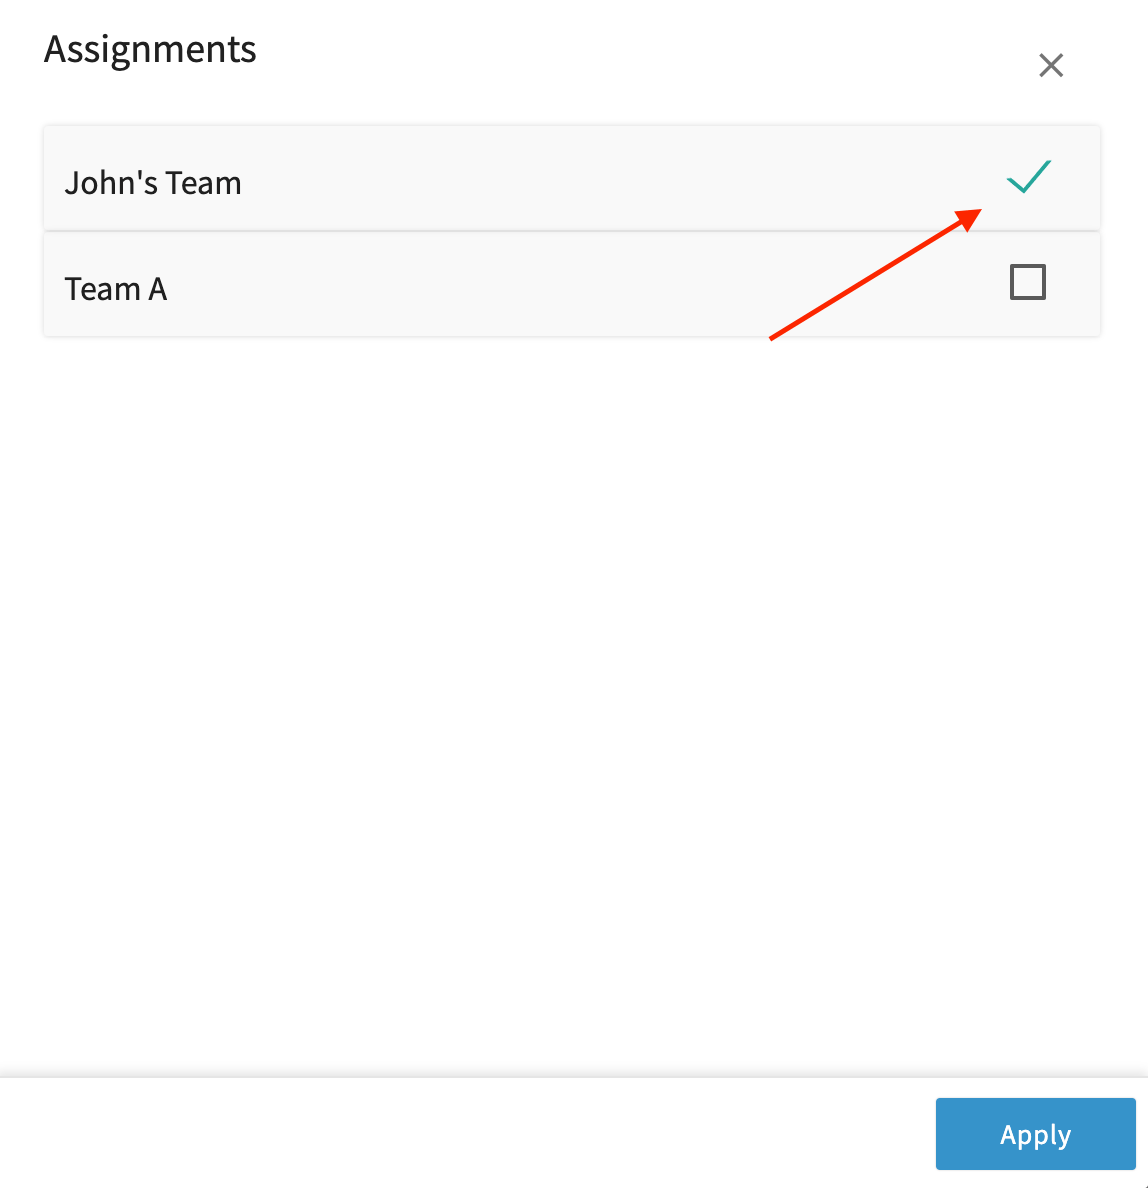
 5. Choose a team in the **Assignments** window, then select **Apply**. See [How to Create a Team](/settings/users-teams/creating-a-team) if you have not built your teams yet.
 6. Select **Save**.
 ### Creating a Project from a job
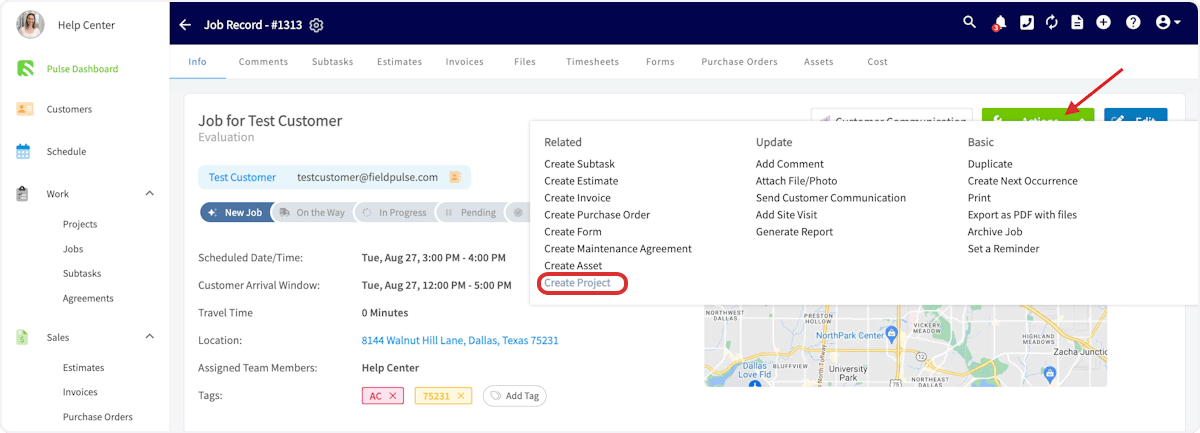
Start a Project from an existing job record to keep everything connected. This works well when a small job, an evaluation, or an estimate visit turns into a larger project. On the job record, select **Actions**, then **Create Project**, and fill in the project details the same way.
### Creating a Project from a job
Start a Project from an existing job record to keep everything connected. This works well when a small job, an evaluation, or an estimate visit turns into a larger project. On the job record, select **Actions**, then **Create Project**, and fill in the project details the same way.
 ### Creating a Project from a template
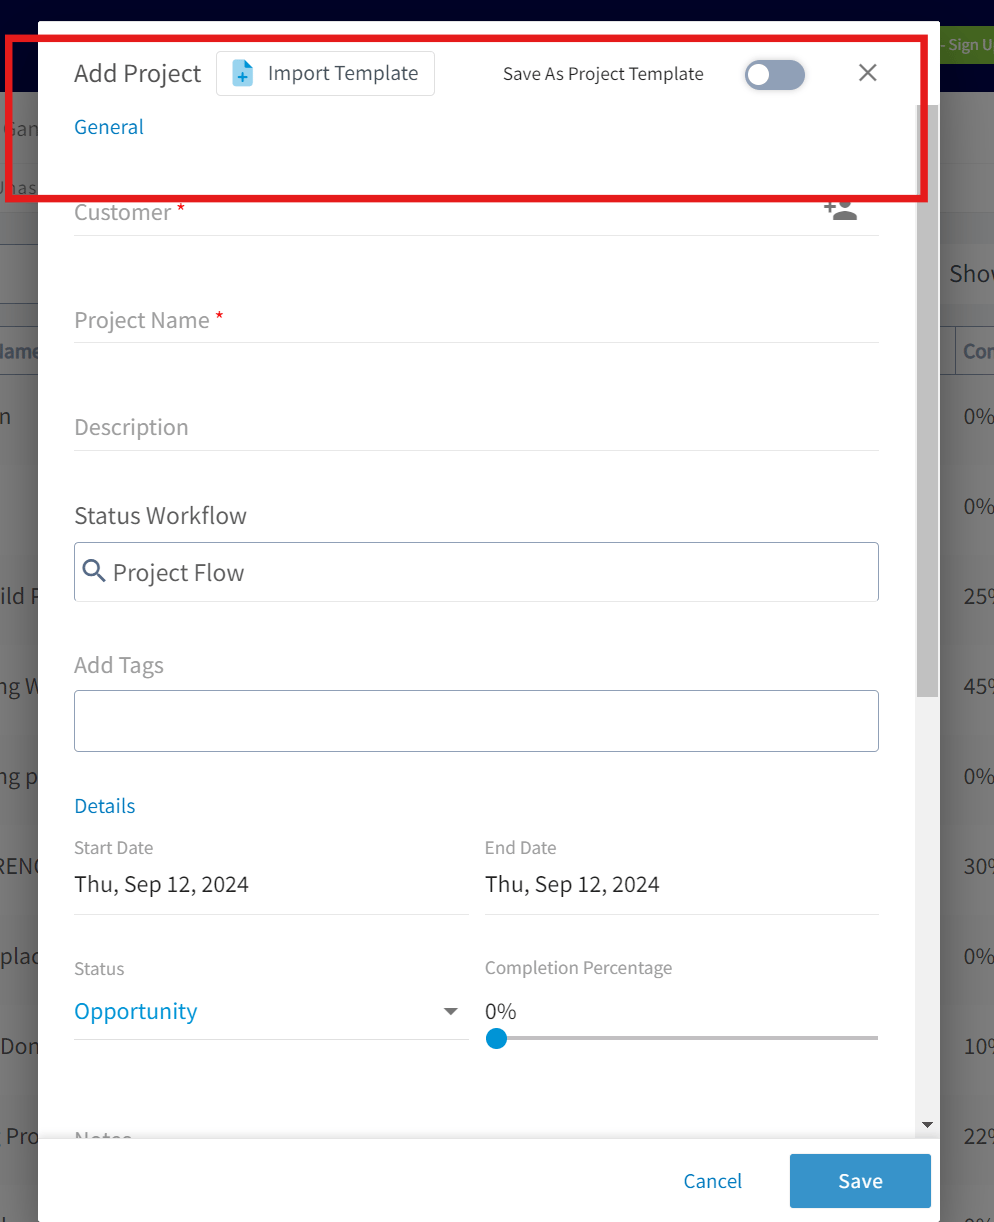
A project template saves the sub-records you build for every project of a given type — subtasks, estimates, and invoices — so a new project starts with them already attached. Turn on **Save As Project Template** while filling out your project details to save what you are building, or select **Import Template** to start from a template you already have.
### Creating a Project from a template
A project template saves the sub-records you build for every project of a given type — subtasks, estimates, and invoices — so a new project starts with them already attached. Turn on **Save As Project Template** while filling out your project details to save what you are building, or select **Import Template** to start from a template you already have.
 Project templates can include job templates inside them. Any preset jobs you have built as job templates can be nested in a project template, so your standard set of jobs is ready whenever you create a project from that template. See [Setting Up Job Templates](/jobs/jobs-tasks/creating-job-templates).
### Working in the Project record
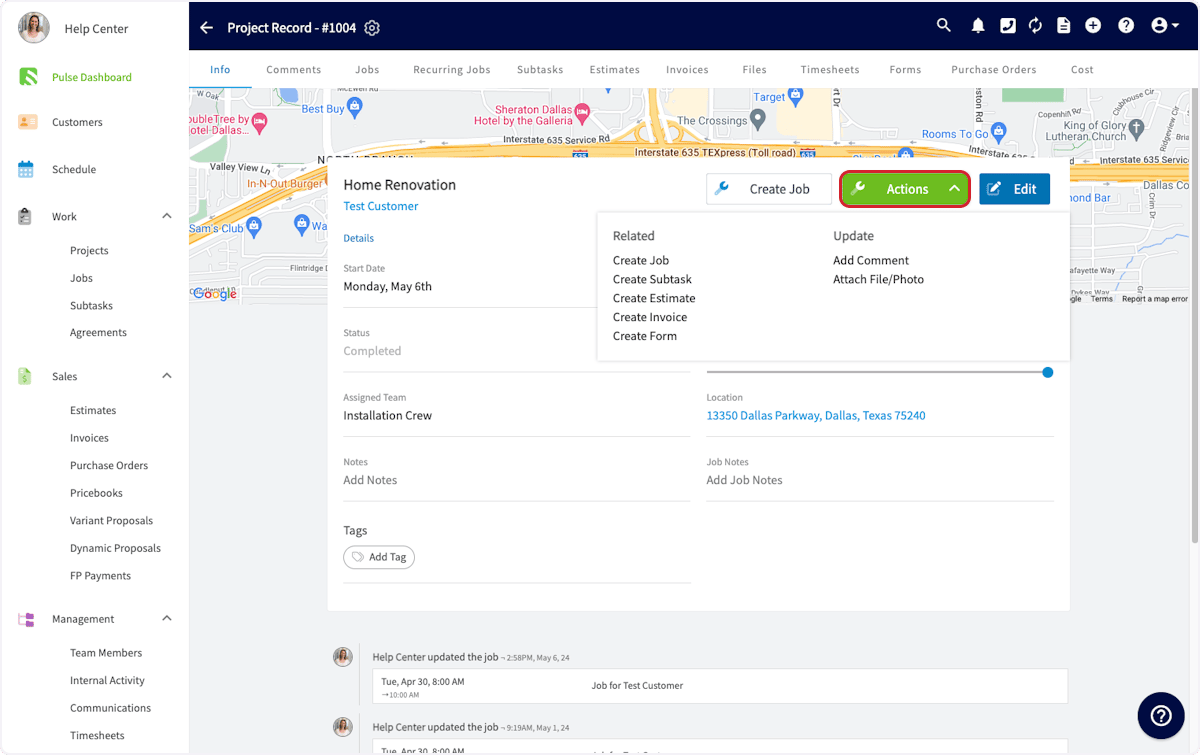
After you save, FieldPulse opens the project record. From there you can view and edit every detail you entered, add comments, add jobs or subtasks, create estimates and invoices, attach files, and track employee timesheets. Select **Actions** for those options, or use the tabs across the top of the project record.
Project templates can include job templates inside them. Any preset jobs you have built as job templates can be nested in a project template, so your standard set of jobs is ready whenever you create a project from that template. See [Setting Up Job Templates](/jobs/jobs-tasks/creating-job-templates).
### Working in the Project record
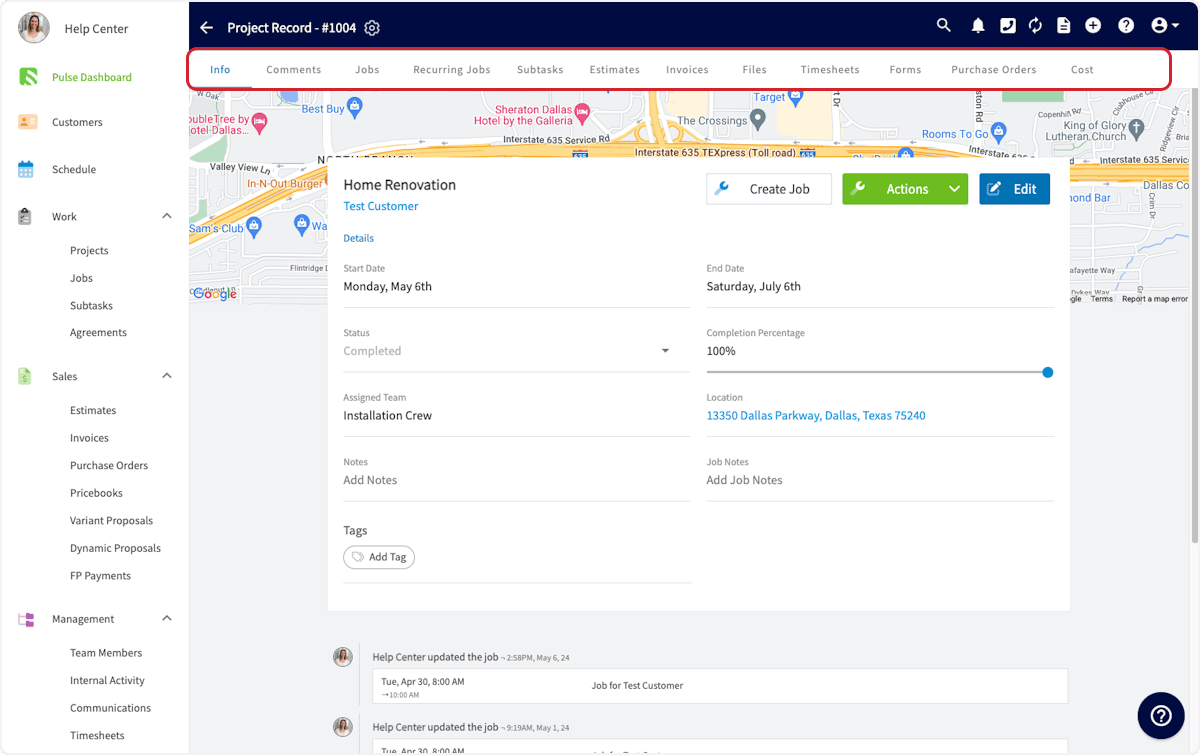
After you save, FieldPulse opens the project record. From there you can view and edit every detail you entered, add comments, add jobs or subtasks, create estimates and invoices, attach files, and track employee timesheets. Select **Actions** for those options, or use the tabs across the top of the project record.
 ### Adding jobs to a Project
Open the **Jobs** tab on the project record and select **Create Job** to set up the first job for this project.
### Adding jobs to a Project
Open the **Jobs** tab on the project record and select **Create Job** to set up the first job for this project.
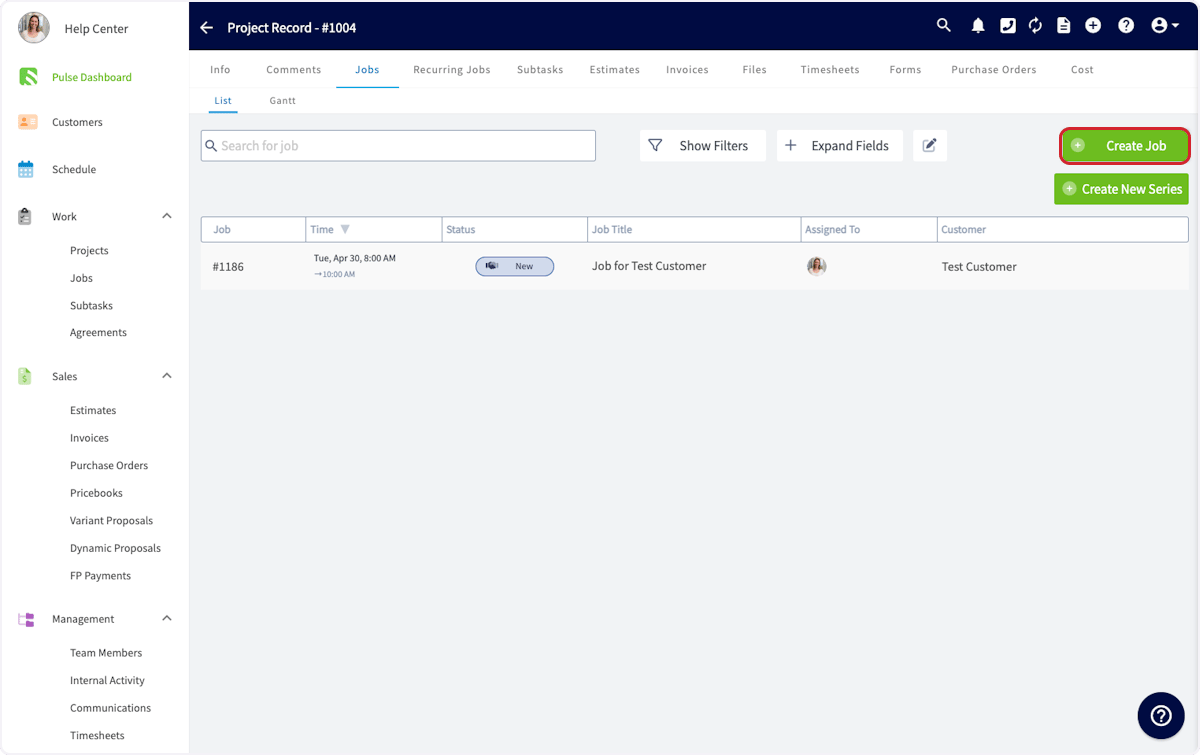 You can also create the job from **Jobs** in the left menu when you are not already in the project record. Link it to the related project as you create it.
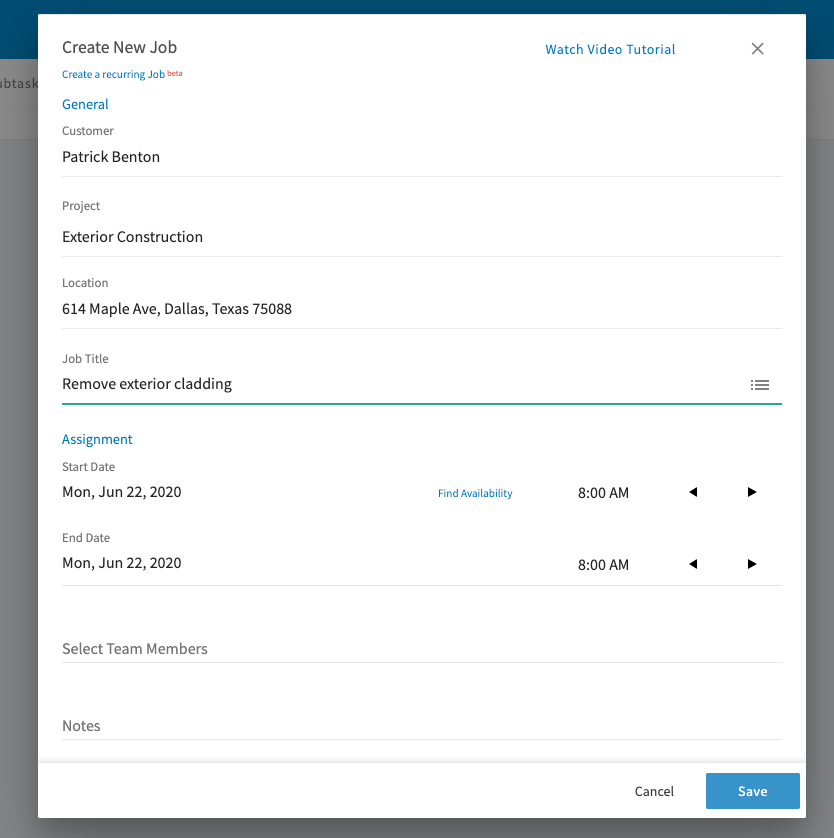
The **Create New Job** window opens with the project, customer, and location already filled in, and you can assign the job to any team member on the team assigned to the project. See [How to Create a Job](/jobs/jobs-tasks/creating-a-job) for the rest of the fields. Select **Save** and the job appears in the project's jobs list. Repeat for every job the project needs.
You can also create the job from **Jobs** in the left menu when you are not already in the project record. Link it to the related project as you create it.
The **Create New Job** window opens with the project, customer, and location already filled in, and you can assign the job to any team member on the team assigned to the project. See [How to Create a Job](/jobs/jobs-tasks/creating-a-job) for the rest of the fields. Select **Save** and the job appears in the project's jobs list. Repeat for every job the project needs.
 ### Adding comments and files
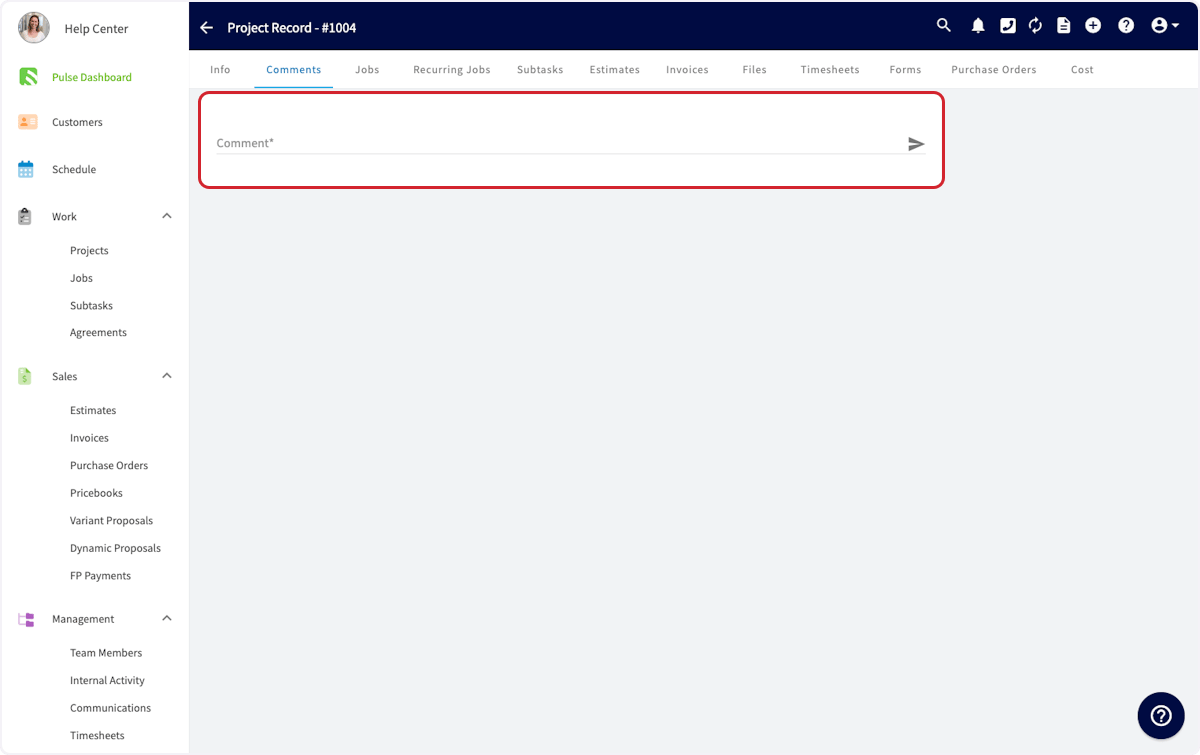
Team members are notified automatically as jobs are added to the project. To leave the team a note of your own, open the **Comments** tab, write your comment, and select the send arrow. Every member of the team assigned to the project can see it.
### Adding comments and files
Team members are notified automatically as jobs are added to the project. To leave the team a note of your own, open the **Comments** tab, write your comment, and select the send arrow. Every member of the team assigned to the project can see it.
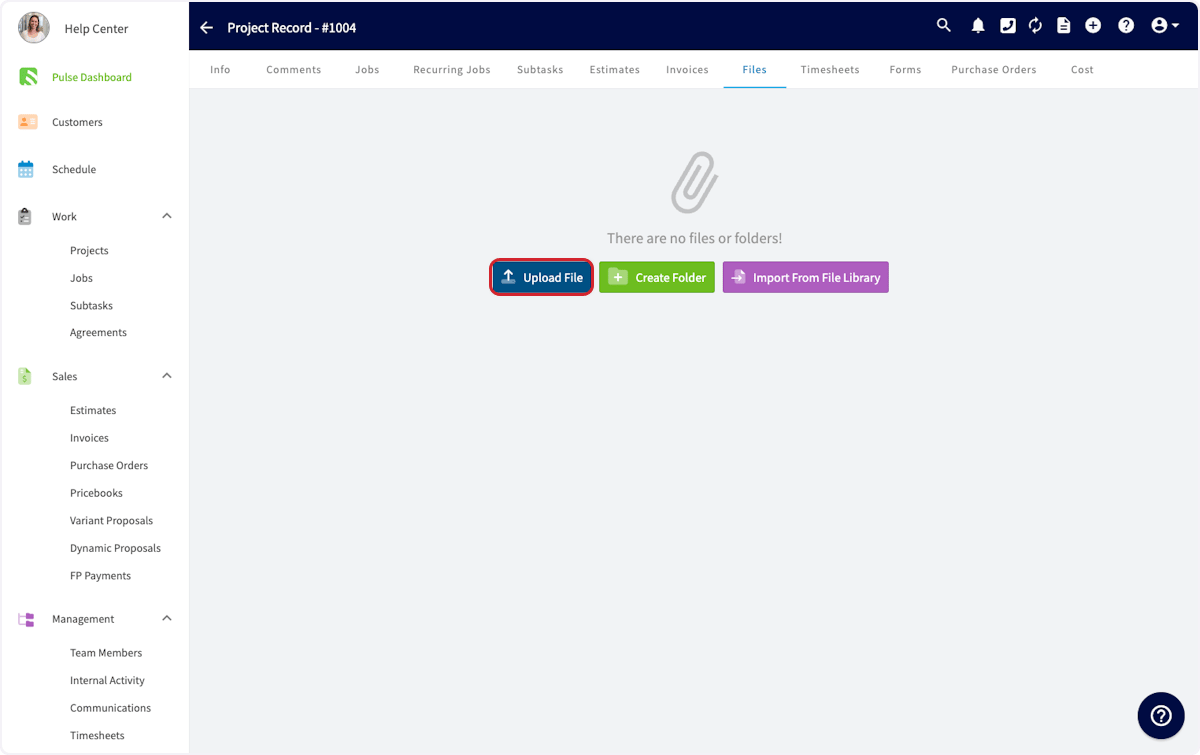
 Attach files to the project on the **Files** tab — photos you want to share with your team, or PDF documents such as the service manual for a piece of equipment. Select **Upload File**, **Create Folder**, or **Import From File Library**.
 ### Using the Related Project tab
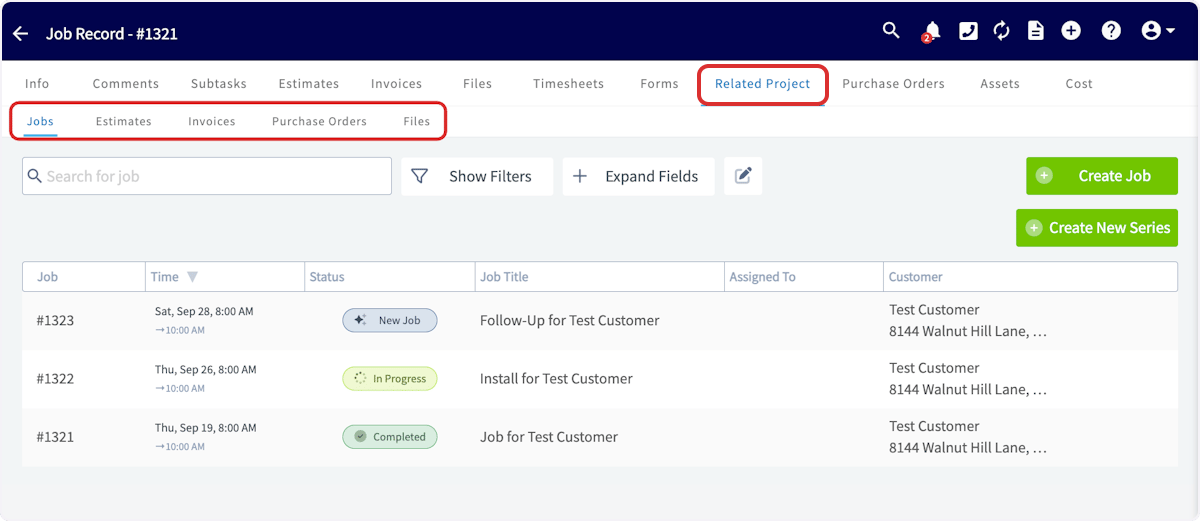
Any record linked to a project shows a **Related Project** tab at the top of the screen. Open it to reach everything else tied to the same project — jobs, estimates, invoices, purchase orders, and files — without leaving the record you are on. Teams often use it to reference files from an earlier job while working the project's next job.
### Using the Related Project tab
Any record linked to a project shows a **Related Project** tab at the top of the screen. Open it to reach everything else tied to the same project — jobs, estimates, invoices, purchase orders, and files — without leaving the record you are on. Teams often use it to reference files from an earlier job while working the project's next job.
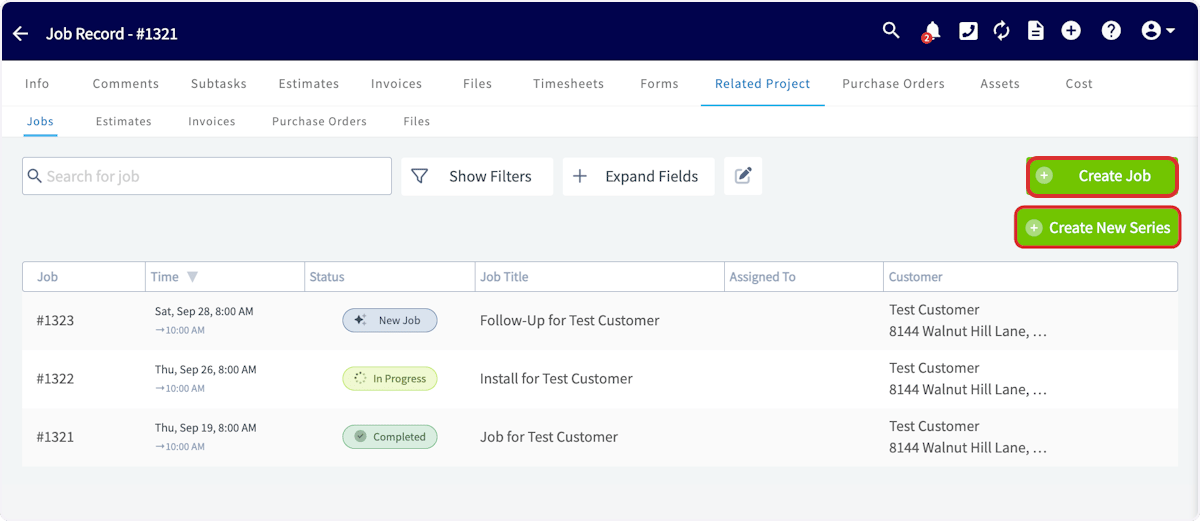
 You can also create any of those records from this tab and have them link to the project automatically, using the create buttons above the list.
 ### Completing a Project
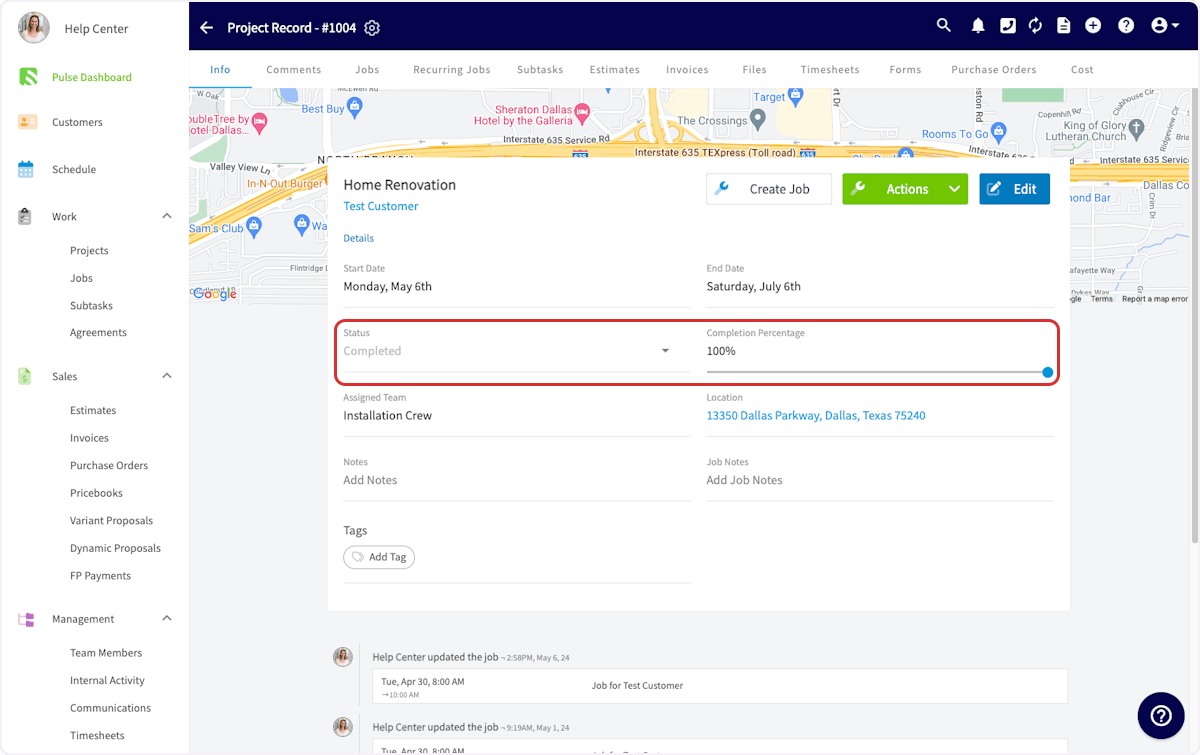
When the work is finished, open the **Info** tab on the project record, change **Status** to **Complete**, and move the completion percentage to 100%.
### Completing a Project
When the work is finished, open the **Info** tab on the project record, change **Status** to **Complete**, and move the completion percentage to 100%.
 ## On mobile
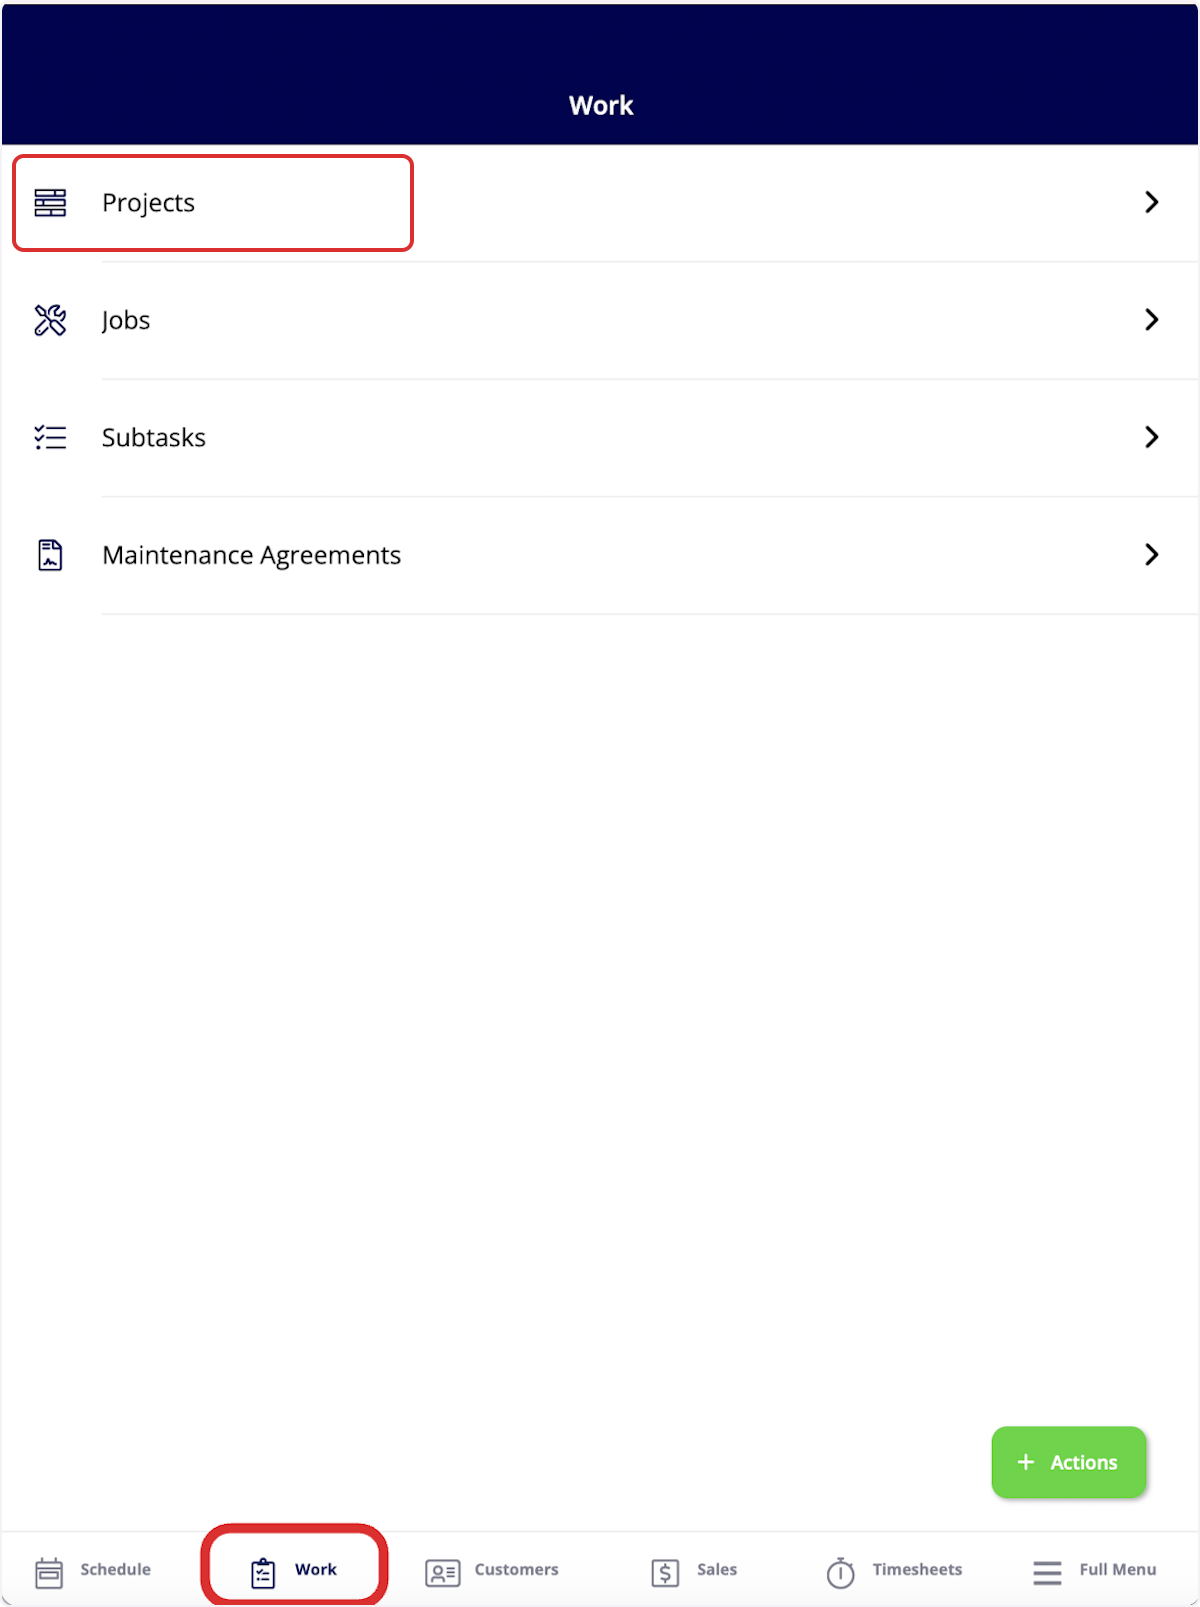
Open the **Work** tab in the bottom menu, then select **Projects**.
## On mobile
Open the **Work** tab in the bottom menu, then select **Projects**.
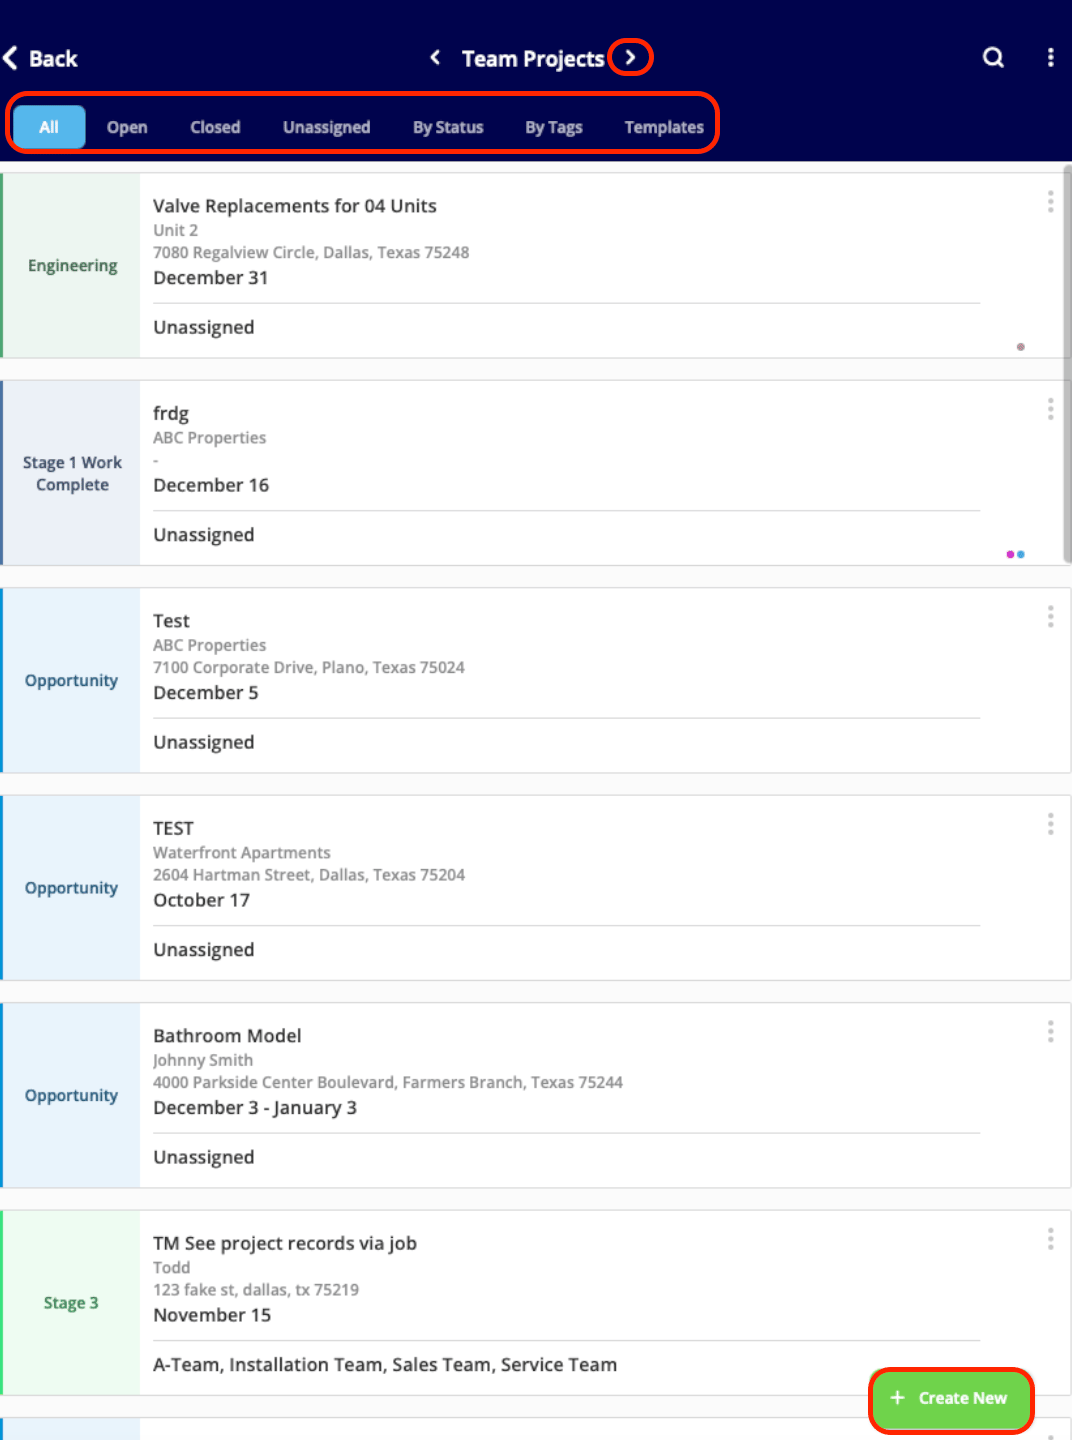
 Organize the list with the tabs at the top of the screen — **All**, **Open**, **Closed**, **Unassigned**, **By Status**, **By Tags**, and **Templates** — and use the arrows beside the title to sort between **Team Projects** and **My Projects**. Select **Create New** to start a project.
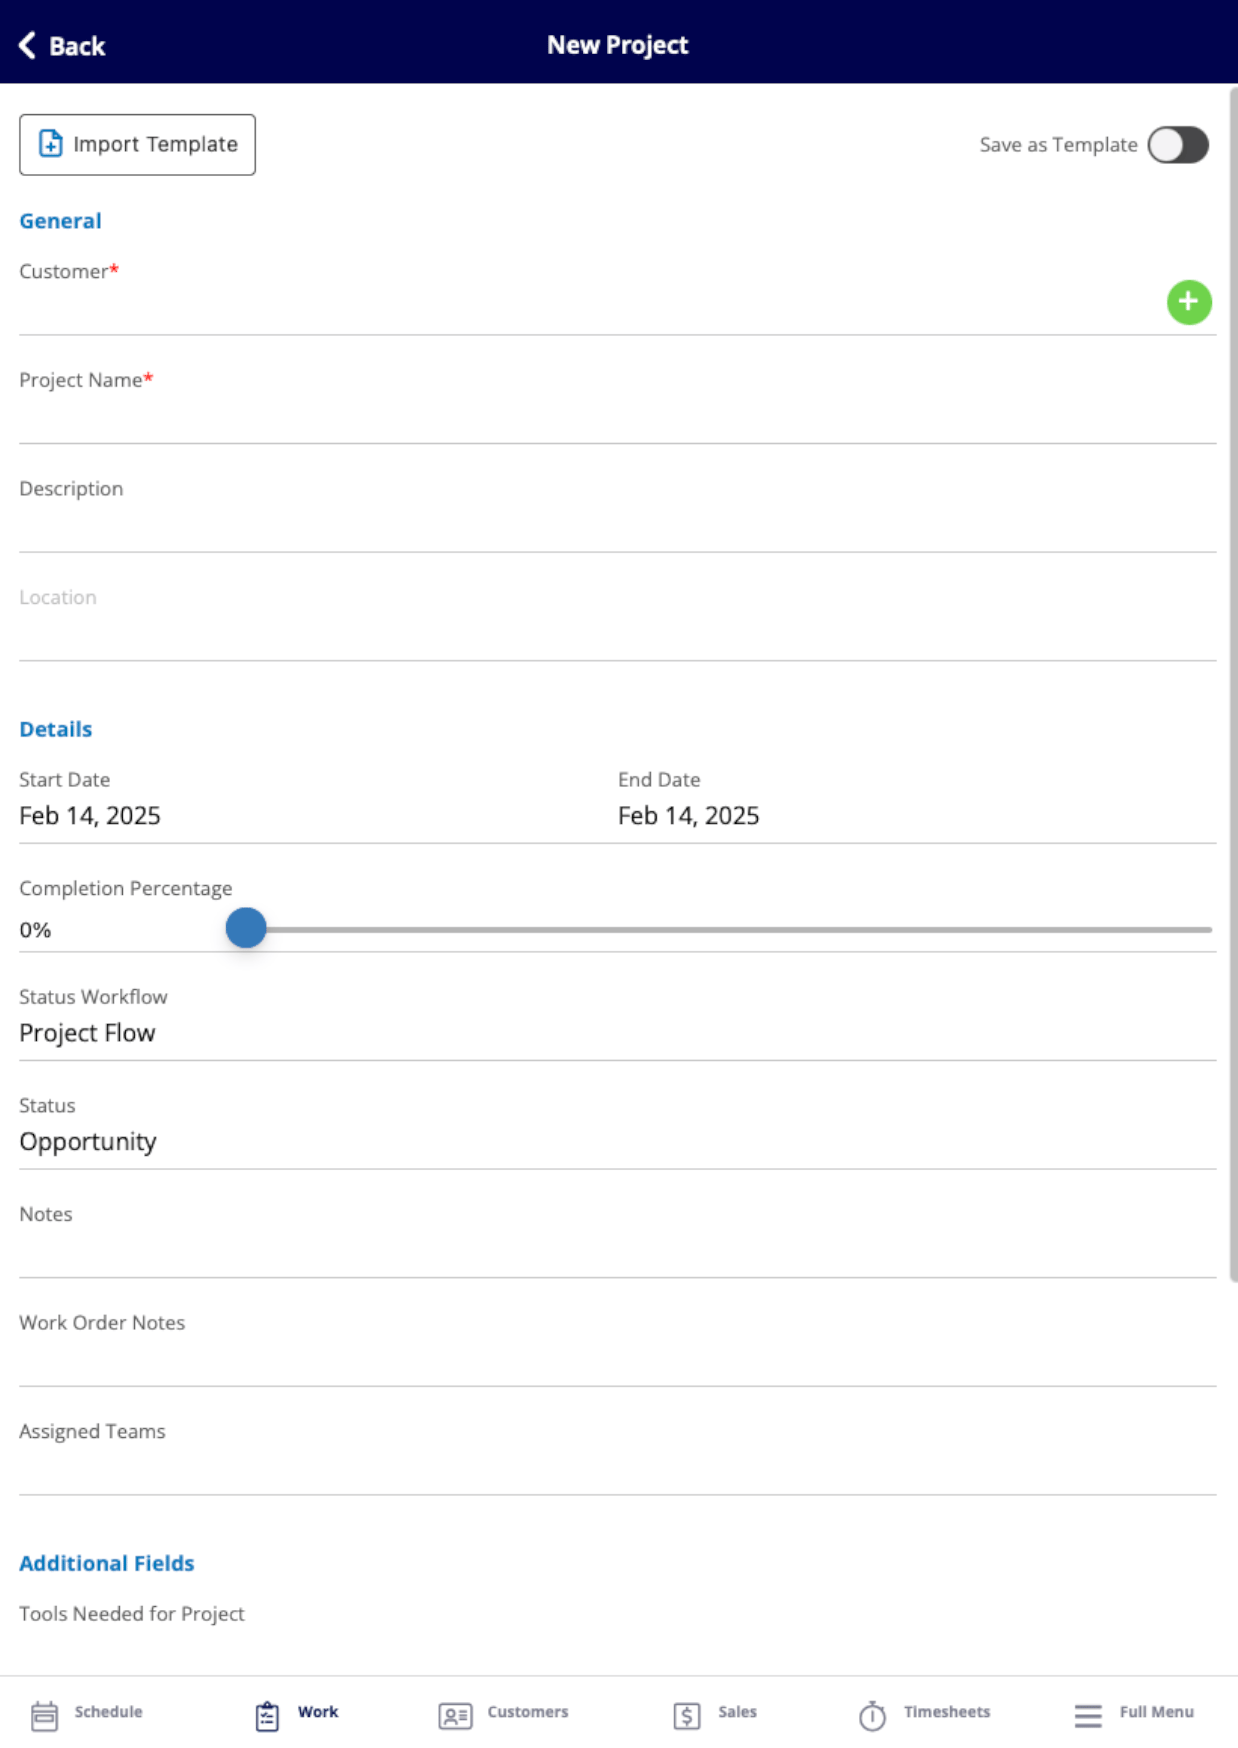
 Fill in the details of your project — customer, name, description, location, start and end date, completion percentage, status workflow, status, notes, and assigned teams — then save. **Import Template** and **Save as Template** sit at the top of the form.
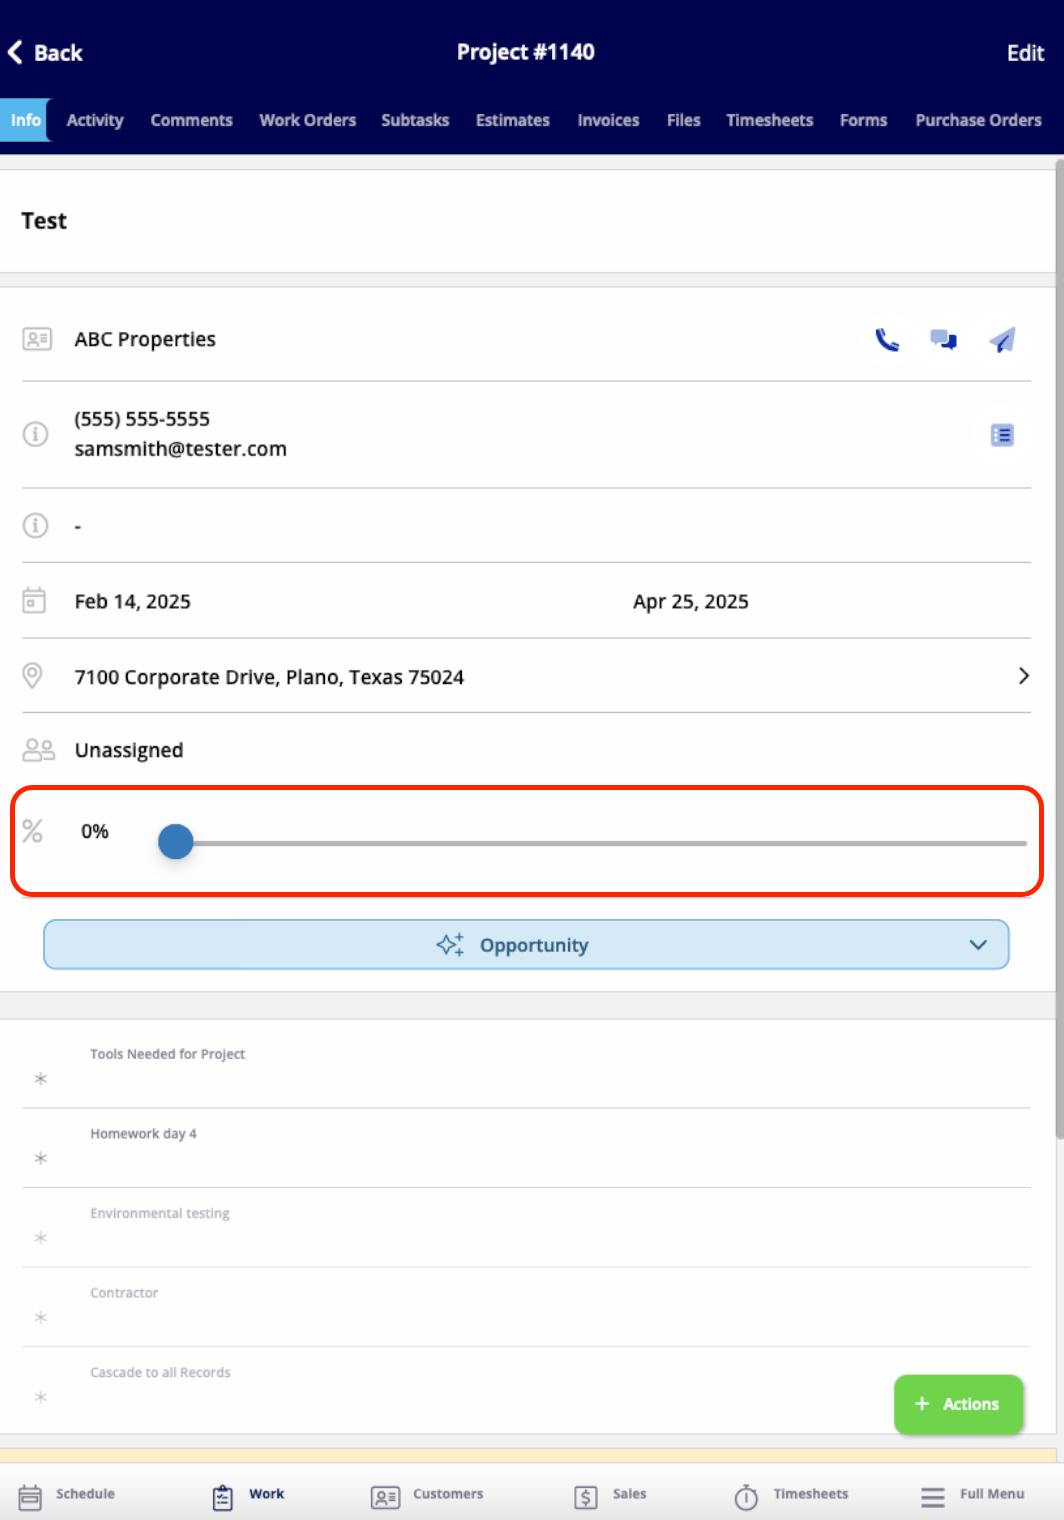
 The project record opens once you save. Change the project status and move the completion percentage slider to track your progress. From this record you can also view and edit the details you entered, add comments, add jobs or subtasks, create estimates and invoices, attach files, and track employee timesheets — select **Actions**, or use the tabs across the top of the screen.
 ## FAQs
### If I delete a Project, does it delete or archive the jobs under it?
No. The jobs stay in FieldPulse and remain accessible on their own.
## Related articles
* [Projects vs. Jobs vs. Site Visits Details](/jobs/projects/projects-vs-jobs-vs-site-visits)
* [Setting Up Custom Fields on Project Records](/jobs/projects/custom-fields)
* [How to Create a Job](/jobs/jobs-tasks/creating-a-job)
* [Setting Up Job Templates](/jobs/jobs-tasks/creating-job-templates)
* [How to Use Subtasks](/jobs/jobs-tasks/subtasks)
* [How to Create a Team](/settings/users-teams/creating-a-team)
* [How to Use Employee Timesheets](/jobs/timesheets/employee-timesheets)
* [How to Create Project Reports](/reporting/raw-data/project-reports)
* [Jobs & Projects Offline Mode Details](/jobs/jobs-tasks/offline-behavior)
## Related topics
- [Projects](/jobs/projects/index.md)
- [Jobs & Projects Offline Mode Details](/jobs/jobs-tasks/offline-behavior.md)
- [Projects vs. Jobs vs. Site Visits Details](/jobs/projects/projects-vs-jobs-vs-site-visits.md)
- [How to Create Project Reports](/reporting/raw-data/project-reports.md)
## FAQs
### If I delete a Project, does it delete or archive the jobs under it?
No. The jobs stay in FieldPulse and remain accessible on their own.
## Related articles
* [Projects vs. Jobs vs. Site Visits Details](/jobs/projects/projects-vs-jobs-vs-site-visits)
* [Setting Up Custom Fields on Project Records](/jobs/projects/custom-fields)
* [How to Create a Job](/jobs/jobs-tasks/creating-a-job)
* [Setting Up Job Templates](/jobs/jobs-tasks/creating-job-templates)
* [How to Use Subtasks](/jobs/jobs-tasks/subtasks)
* [How to Create a Team](/settings/users-teams/creating-a-team)
* [How to Use Employee Timesheets](/jobs/timesheets/employee-timesheets)
* [How to Create Project Reports](/reporting/raw-data/project-reports)
* [Jobs & Projects Offline Mode Details](/jobs/jobs-tasks/offline-behavior)
## Related topics
- [Projects](/jobs/projects/index.md)
- [Jobs & Projects Offline Mode Details](/jobs/jobs-tasks/offline-behavior.md)
- [Projects vs. Jobs vs. Site Visits Details](/jobs/projects/projects-vs-jobs-vs-site-visits.md)
- [How to Create Project Reports](/reporting/raw-data/project-reports.md)