> ## Documentation Index
> Fetch the complete documentation index at: https://help.fieldpulse.com/llms.txt
> Use this file to discover all available pages before exploring further.
# How to Import Customers
> Move an existing customer base into FieldPulse in bulk with the Mass Customer Import template, or add customers straight from your phone's contacts.
> **Who uses this:** Anyone importing an existing customer list into FieldPulse. **Availability:** All regions. Self-import is included with your subscription at no extra cost.
Importing customers brings an existing [customer base](https://www.fieldpulse.com/features/customer-management) into FieldPulse in bulk instead of adding records one at a time. Export your customers from your old system to Excel, Google Sheets, or CSV, drop them into the Mass Customer Import template, and upload the file.
## Overview
You import customers from **Company Settings** > **Customers** > **Import Customers**. FieldPulse gives you a template to fill in, flags any errors or missing required fields when you verify the file, and imports the clean records. You can also bulk-import additional contacts and locations onto a customer record, and — on the [FieldPulse mobile app](https://www.fieldpulse.com/features/mobile-app) — add customers straight from your phone's contacts.
## Before you begin
* Have your existing customer data ready in a spreadsheet (Excel, Google Sheets, or CSV) so you can copy it into the template.
* If you don't have Excel, use Google Sheets instead — see [How to Self-Import Data With Google Sheets](/settings/data/self-import-google-sheets).
## On web
### Import your customer list
1. Go to **Company Settings**, then select the **Customers** tab.
2. Select **Import Customers**, then select **Download** to download the **Mass Customer Import** template.
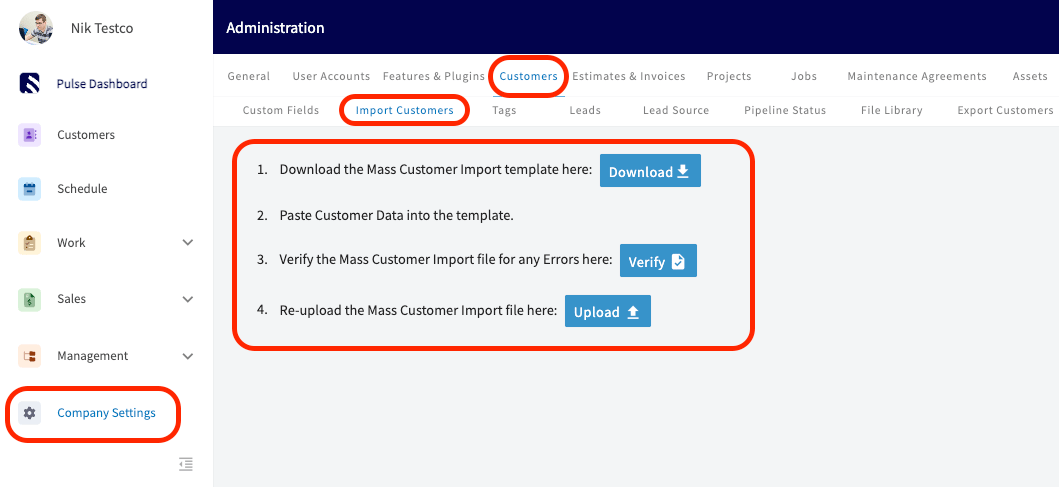 3. Fill in the template with your customer data. Keep the column headers and structure exactly as they are so the importer can read your data — do not rearrange or rename columns.
4. Select **Verify**. FieldPulse checks every record and flags any errors or missing required fields in red, with a running count of valid and invalid records in the top-right corner.
3. Fill in the template with your customer data. Keep the column headers and structure exactly as they are so the importer can read your data — do not rearrange or rename columns.
4. Select **Verify**. FieldPulse checks every record and flags any errors or missing required fields in red, with a running count of valid and invalid records in the top-right corner.
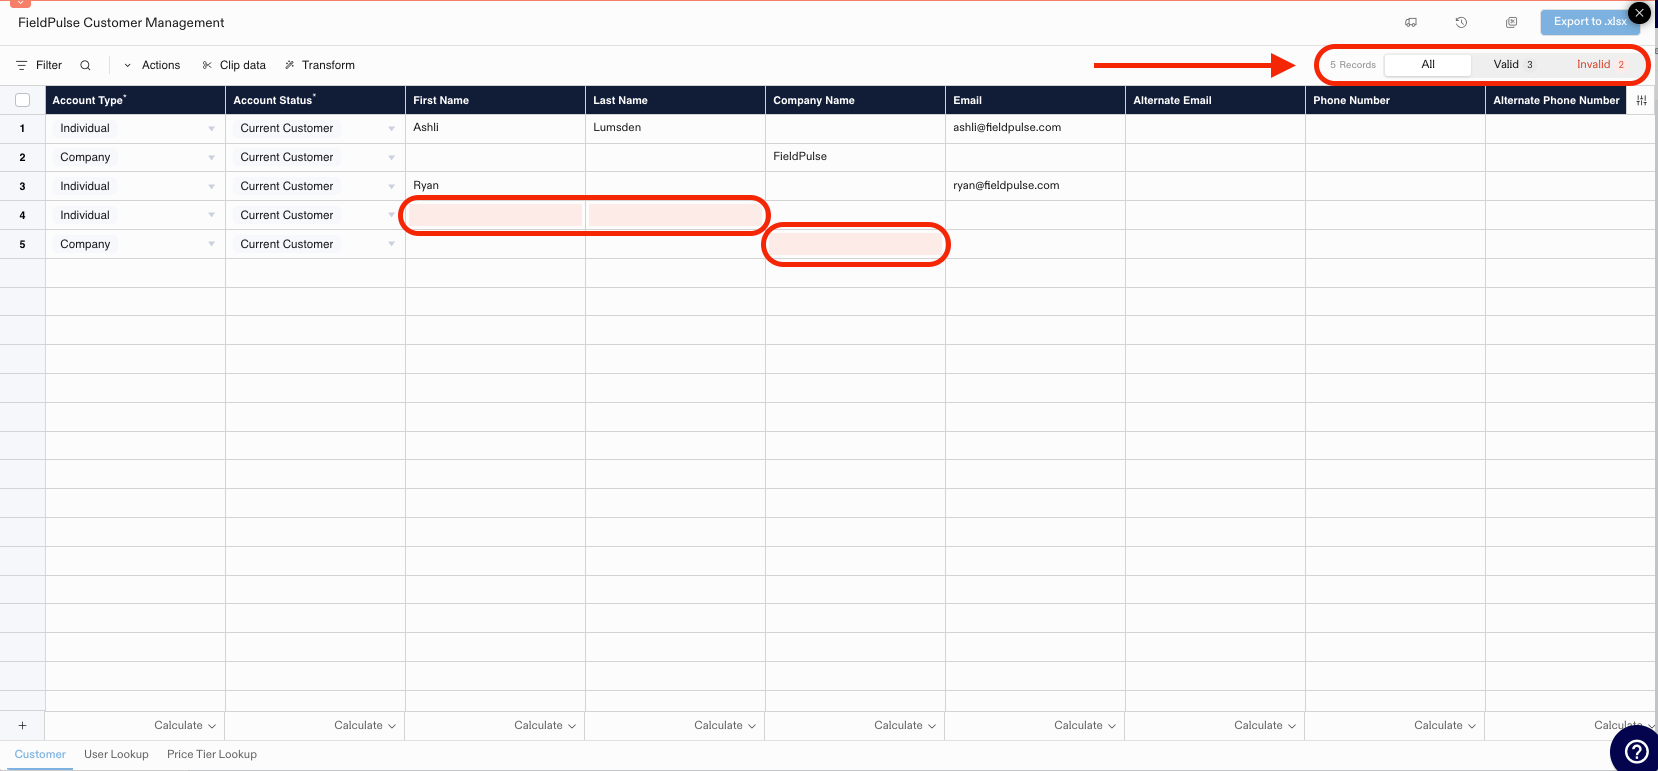 5. Fix the flagged fields until every record shows as **Valid**, then select **Export to .xlsx**.
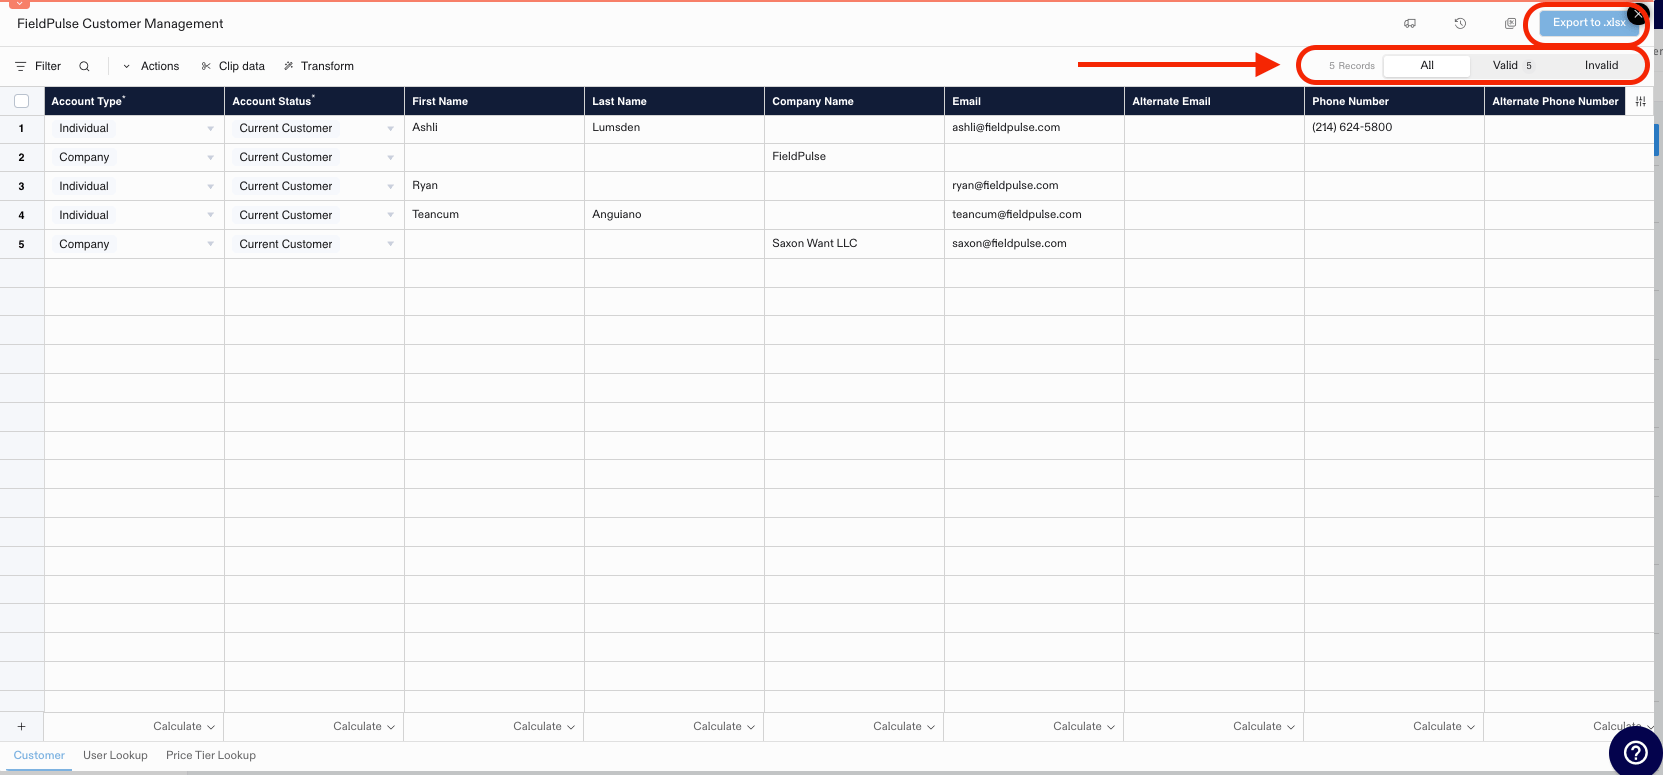 6. Re-upload the verified file with the **Upload** button to finish the import.
Verifying before you import means you catch bad data once, up front — instead of troubleshooting failed records across several reimports.
Want to click through the process first? Open [the interactive customer import demo](https://app.storylane.io/share/1i8my1c09qbk) to explore the customer import feature step by step.
### Import additional contacts
You can bulk-import additional contacts directly onto a customer record.
1. On the customer record, scroll to the **Additional Contacts** section and select **Import Contacts**.
6. Re-upload the verified file with the **Upload** button to finish the import.
Verifying before you import means you catch bad data once, up front — instead of troubleshooting failed records across several reimports.
Want to click through the process first? Open [the interactive customer import demo](https://app.storylane.io/share/1i8my1c09qbk) to explore the customer import feature step by step.
### Import additional contacts
You can bulk-import additional contacts directly onto a customer record.
1. On the customer record, scroll to the **Additional Contacts** section and select **Import Contacts**.
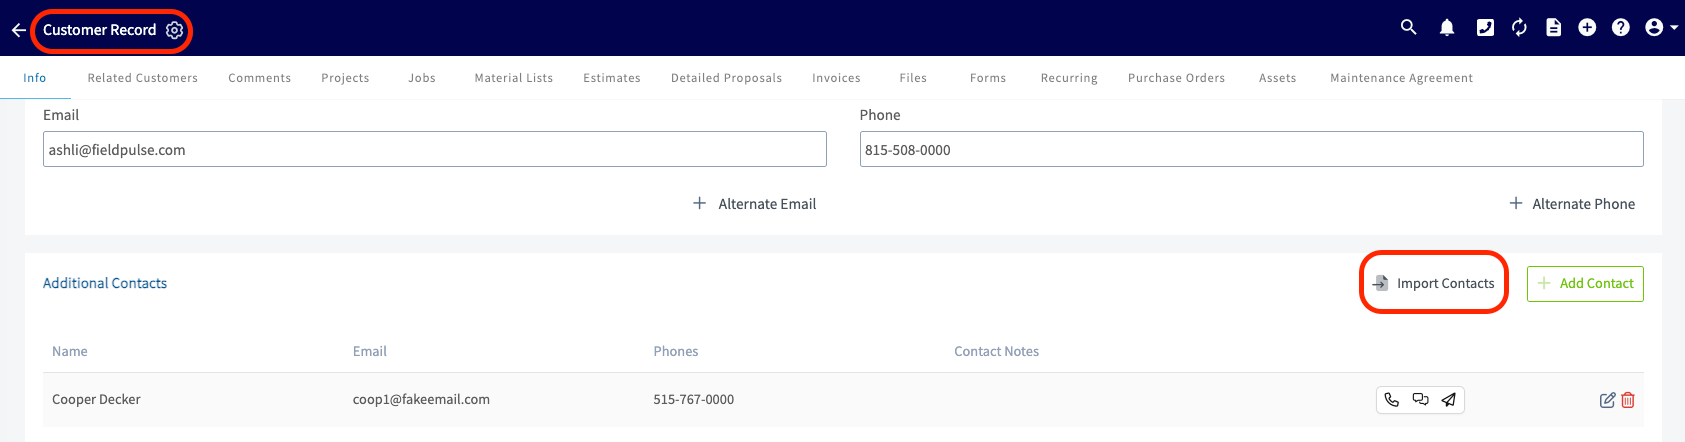 2. In the **Import Customer Contacts** pop-up, select **Download Template** to download the contacts import template.
 3. Fill in the template without changing its structure. If you don't have Excel, fill it in with Google Sheets — see [How to Self-Import Data With Google Sheets](/settings/data/self-import-google-sheets).
4. Select the blue **Import** button to upload the completed template.
3. Fill in the template without changing its structure. If you don't have Excel, fill it in with Google Sheets — see [How to Self-Import Data With Google Sheets](/settings/data/self-import-google-sheets).
4. Select the blue **Import** button to upload the completed template.
 ### Import additional locations
You can bulk-import additional locations onto a customer record the same way.
1. On the customer record, scroll to the **Additional Locations** section and select **Import Locations**.
### Import additional locations
You can bulk-import additional locations onto a customer record the same way.
1. On the customer record, scroll to the **Additional Locations** section and select **Import Locations**.
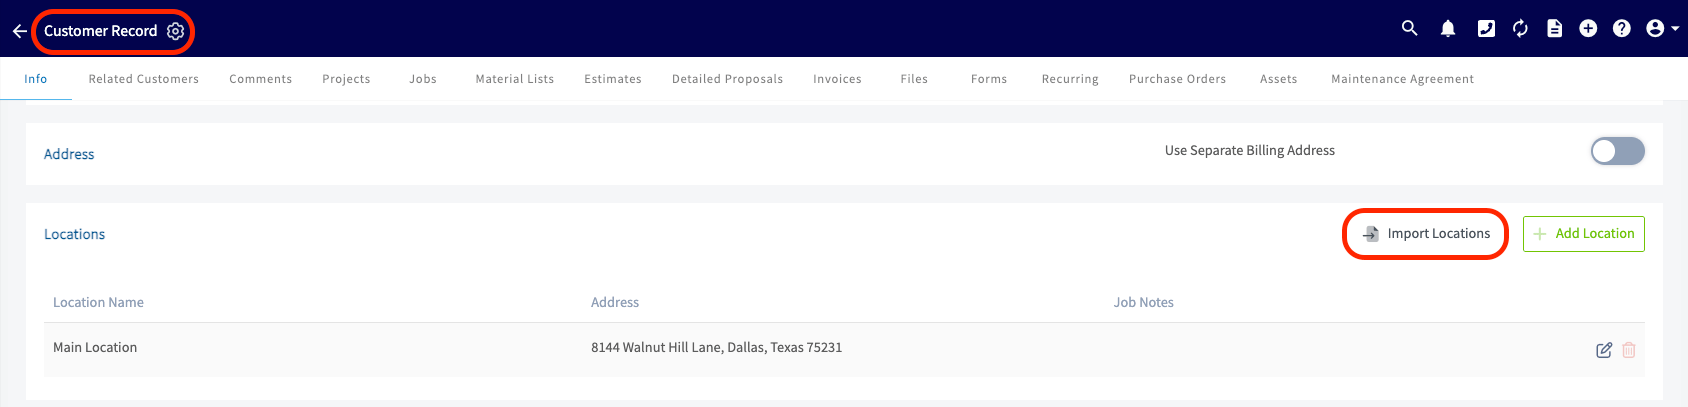 2. In the **Import Customer Locations** pop-up, select **Download Template** to download the locations import template.
 3. Fill in the template without changing its structure. If you don't have Excel, fill it in with Google Sheets — see [How to Self-Import Data With Google Sheets](/settings/data/self-import-google-sheets).
4. Select the blue **Import** button to upload the completed template.
3. Fill in the template without changing its structure. If you don't have Excel, fill it in with Google Sheets — see [How to Self-Import Data With Google Sheets](/settings/data/self-import-google-sheets).
4. Select the blue **Import** button to upload the completed template.
 ### Bulk import contacts and locations across many customers
To add contacts or locations to many customers at once, import them from Company Settings instead of opening one customer record at a time.
1. Go to **Company Settings**, then select the **Customers** tab.
2. Select **Import Customers**, then scroll to the **Customer Contacts** or **Customer Locations** import block.
3. Select **Download** to download the import template.
4. Fill in the template. Keep its structure exactly as it is.
5. In each row, enter either the **Existing Customer ID** or the **Existing Customer Email** so FieldPulse knows which customer the contact or location belongs to. You only need one of the two.
6. Upload your completed file into step 3 on the import screen, then select **Verify**. FieldPulse checks each row and flags:
* Blank or missing required fields
* Invalid characters or symbols
* Duplicate entries within the file
* An Existing Customer ID or Email that doesn't match a customer in your account
7. Correct any flagged rows, then download the corrected file.
8. Upload the corrected file into step 4 on the import screen, then select **Import**. FieldPulse adds each row as a contact or location on its matching customer.
## On mobile
### Import from phone contacts
On the FieldPulse mobile app, you can add customers straight from your phone's contacts:
1. Open the **Customer List** and tap the **three dots** in the top-right corner.
### Bulk import contacts and locations across many customers
To add contacts or locations to many customers at once, import them from Company Settings instead of opening one customer record at a time.
1. Go to **Company Settings**, then select the **Customers** tab.
2. Select **Import Customers**, then scroll to the **Customer Contacts** or **Customer Locations** import block.
3. Select **Download** to download the import template.
4. Fill in the template. Keep its structure exactly as it is.
5. In each row, enter either the **Existing Customer ID** or the **Existing Customer Email** so FieldPulse knows which customer the contact or location belongs to. You only need one of the two.
6. Upload your completed file into step 3 on the import screen, then select **Verify**. FieldPulse checks each row and flags:
* Blank or missing required fields
* Invalid characters or symbols
* Duplicate entries within the file
* An Existing Customer ID or Email that doesn't match a customer in your account
7. Correct any flagged rows, then download the corrected file.
8. Upload the corrected file into step 4 on the import screen, then select **Import**. FieldPulse adds each row as a contact or location on its matching customer.
## On mobile
### Import from phone contacts
On the FieldPulse mobile app, you can add customers straight from your phone's contacts:
1. Open the **Customer List** and tap the **three dots** in the top-right corner.
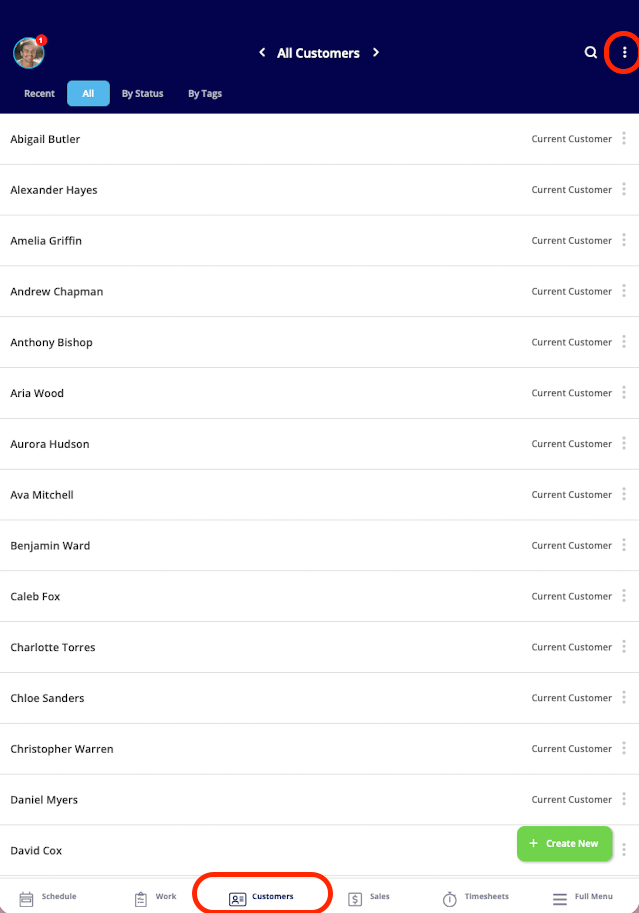 2. Select **Import from Contacts**.
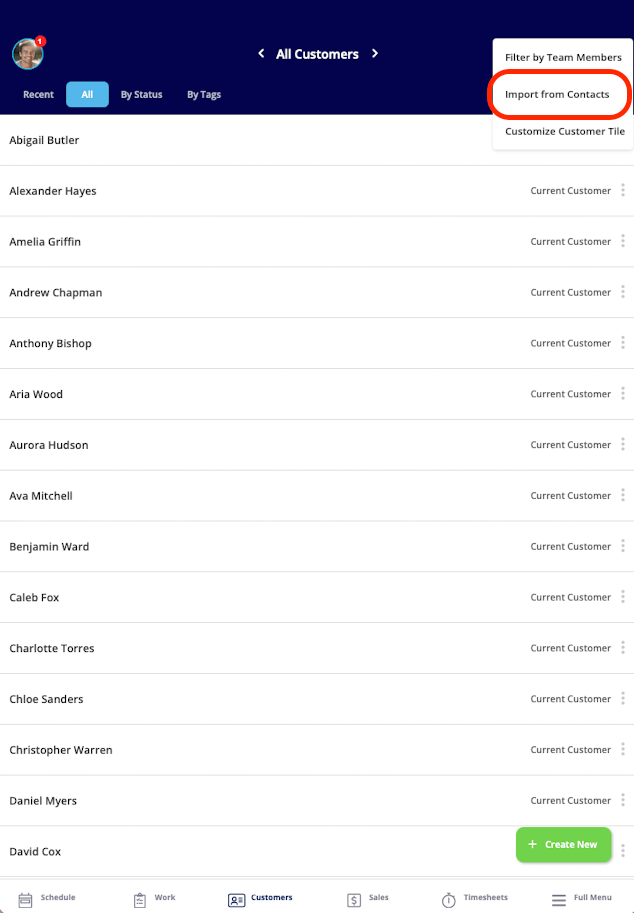 3. Use the search bar to find contacts by name.
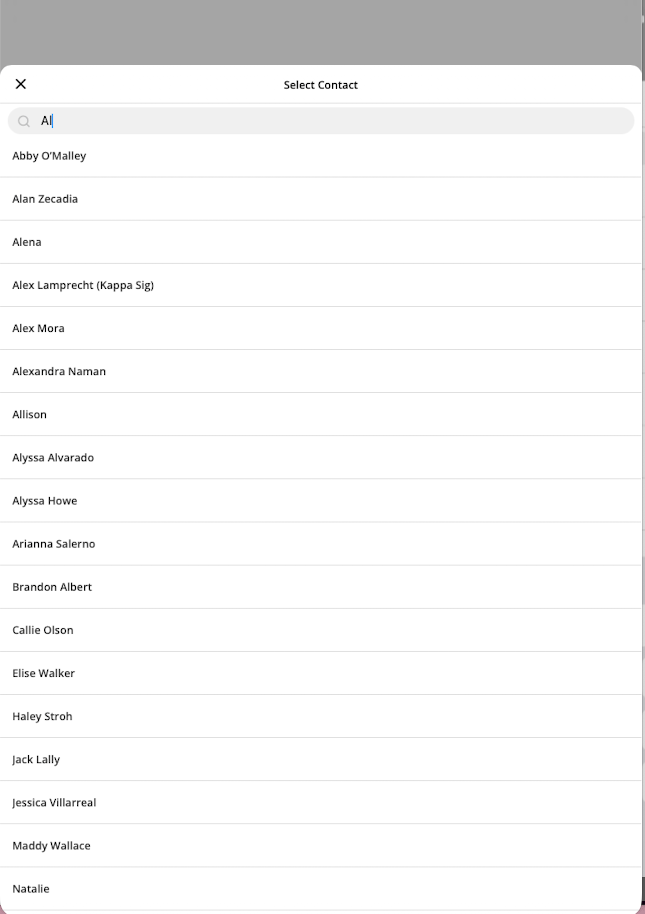 4. Select the contacts you want to bring into FieldPulse — they appear in your Customer List.
## Related articles
* [How to Import Data into FieldPulse](/settings/data/importing-data)
* [How to Create a Customer](/customers/managing-customers/creating-a-customer)
* [How to Self-Import Data With Google Sheets](/settings/data/self-import-google-sheets)
* [How to Export Customers](/settings/data/exporting-customers)
Your customer import is done when every record in the template shows as **Valid**, you've exported the verified file, and re-uploaded it with the **Upload** button — your full customer base now lives in FieldPulse, ready to attach to jobs, estimates, and invoices.
## Related topics
- [How to Import Jobs](/settings/data/importing-jobs.md)
- [Data Import & Export](/settings/data/index.md)
- [How to Use Mass Import for Custom Fields](/settings/data/mass-import-custom-fields.md)
- [How to Import Data into FieldPulse](/settings/data/importing-data.md)
4. Select the contacts you want to bring into FieldPulse — they appear in your Customer List.
## Related articles
* [How to Import Data into FieldPulse](/settings/data/importing-data)
* [How to Create a Customer](/customers/managing-customers/creating-a-customer)
* [How to Self-Import Data With Google Sheets](/settings/data/self-import-google-sheets)
* [How to Export Customers](/settings/data/exporting-customers)
Your customer import is done when every record in the template shows as **Valid**, you've exported the verified file, and re-uploaded it with the **Upload** button — your full customer base now lives in FieldPulse, ready to attach to jobs, estimates, and invoices.
## Related topics
- [How to Import Jobs](/settings/data/importing-jobs.md)
- [Data Import & Export](/settings/data/index.md)
- [How to Use Mass Import for Custom Fields](/settings/data/mass-import-custom-fields.md)
- [How to Import Data into FieldPulse](/settings/data/importing-data.md)