> ## Documentation Index
> Fetch the complete documentation index at: https://help.fieldpulse.com/llms.txt
> Use this file to discover all available pages before exploring further.
# Serialized Inventory
> Assign a unique serial number to each unit so you always know which specific item landed on which job, invoice, or estimate, and where it lives now.
Serialized Inventory is a powerful tool that allows for accurate tracking of individual items or equipment in your inventory by assigning unique serial numbers. Unlike generic quantity tracking, Serialized Inventory ensures detailed monitoring and traceability for each specific item, enhancing accuracy and accountability in your inventory management.
***
# Importing Your Serialized Inventory
You can easily import your serialized inventory items into FieldPulse for use when creating Estimates and Invoices by utilizing our mass import tool. Click [the serialized inventory import guide](/using-fieldpulse/data-imports-exports/importing-serialized-inventory) to learn how!
***
# Creating Serialized Inventory
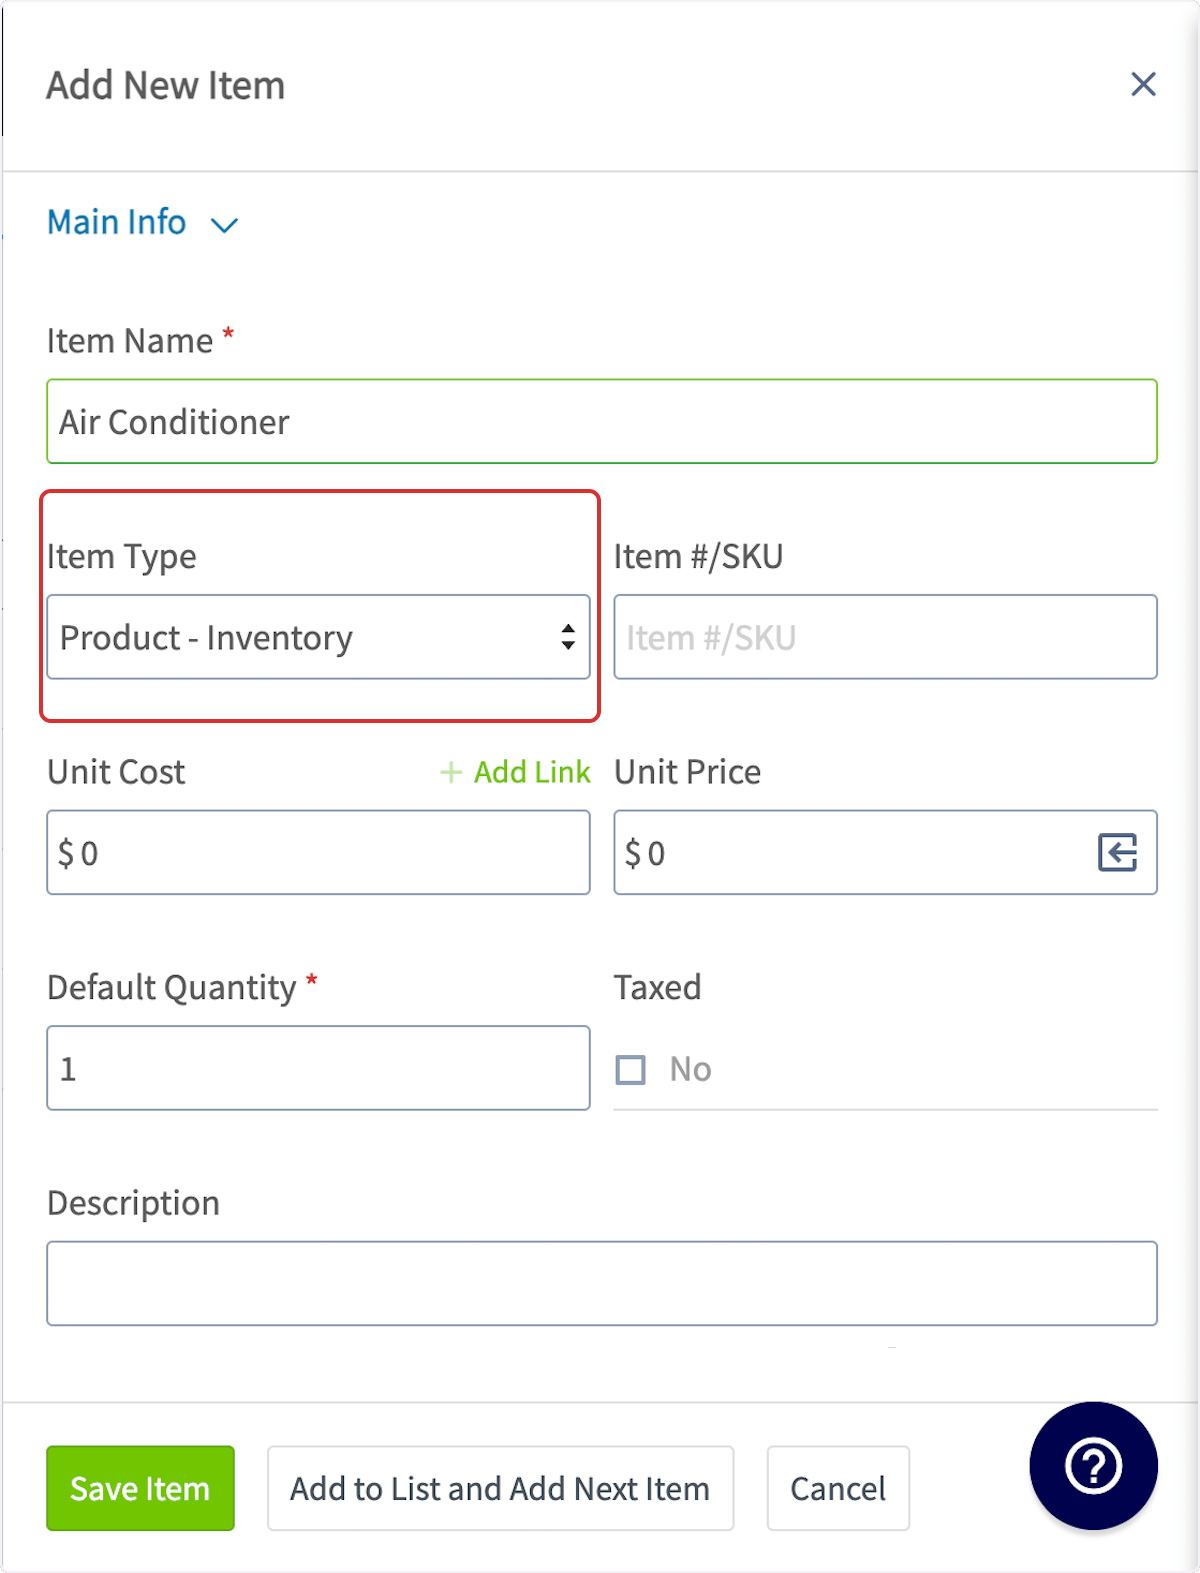
As a reminder, Serialized Inventory can only be applied to line items marked as *Product - Inventory*, **not** *Services* or *Products - Non Inventory*.
To get started, create a new line item or edit an existing one. Be sure that the Item Type is ***Product - Inventory***.
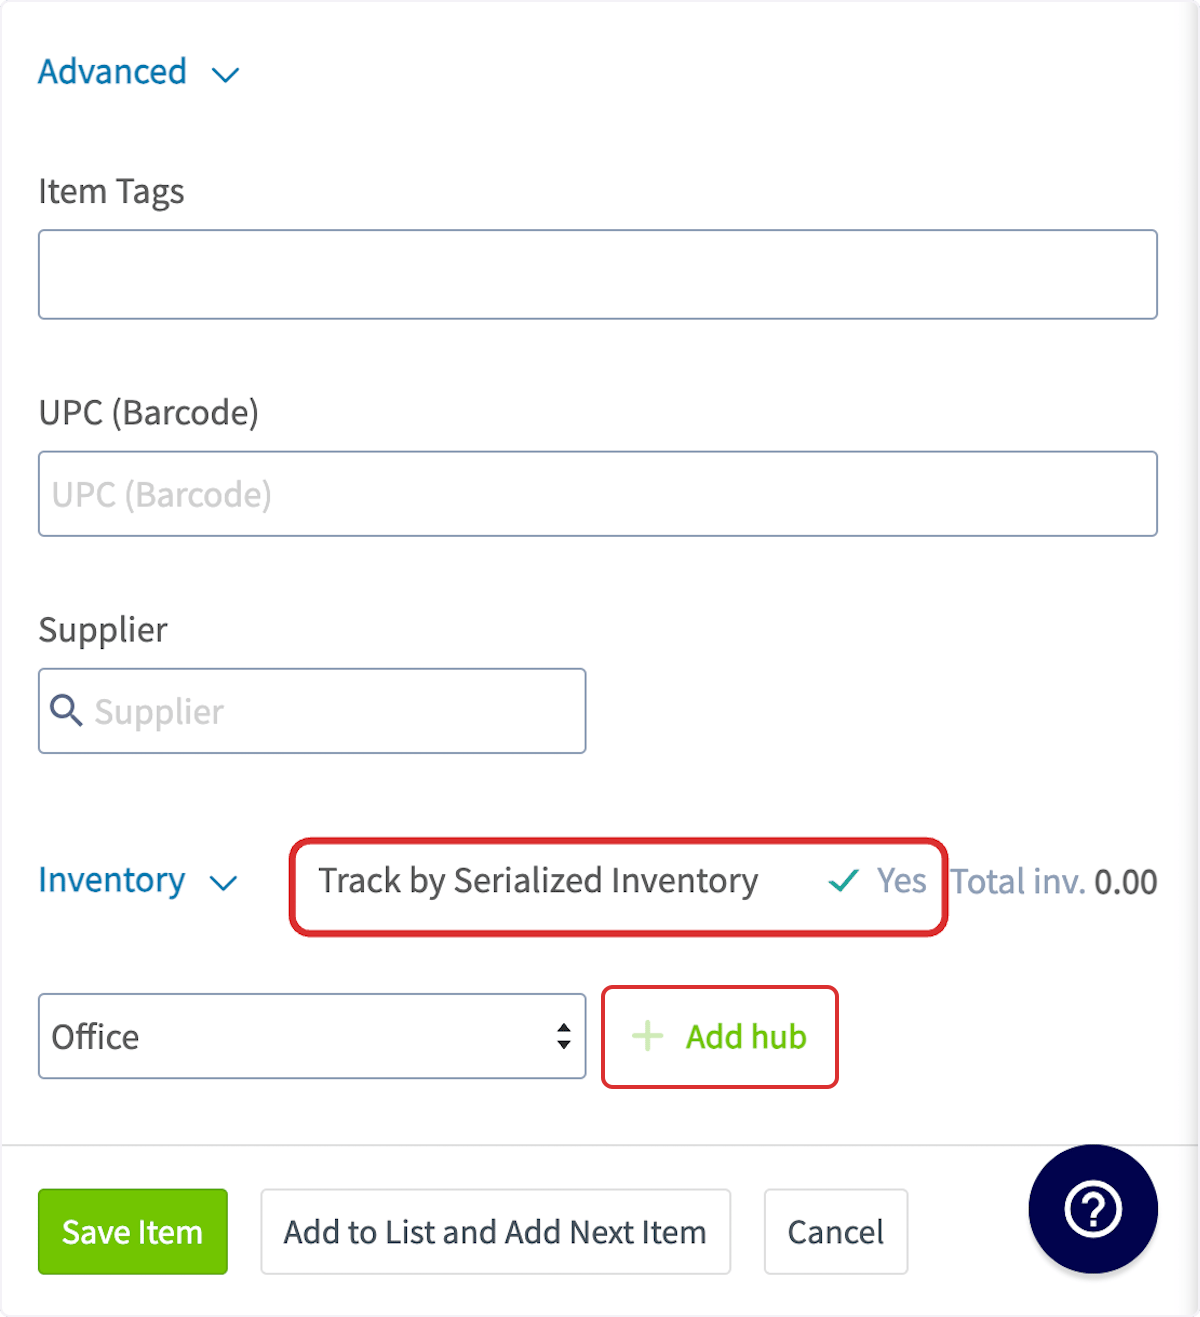
 From here, then scroll down to *Inventory* and toggle on *Track by Serialized Inventory*. Next, you'll need to add hubs. You can use a single hub or multiple hubs based on your needs.
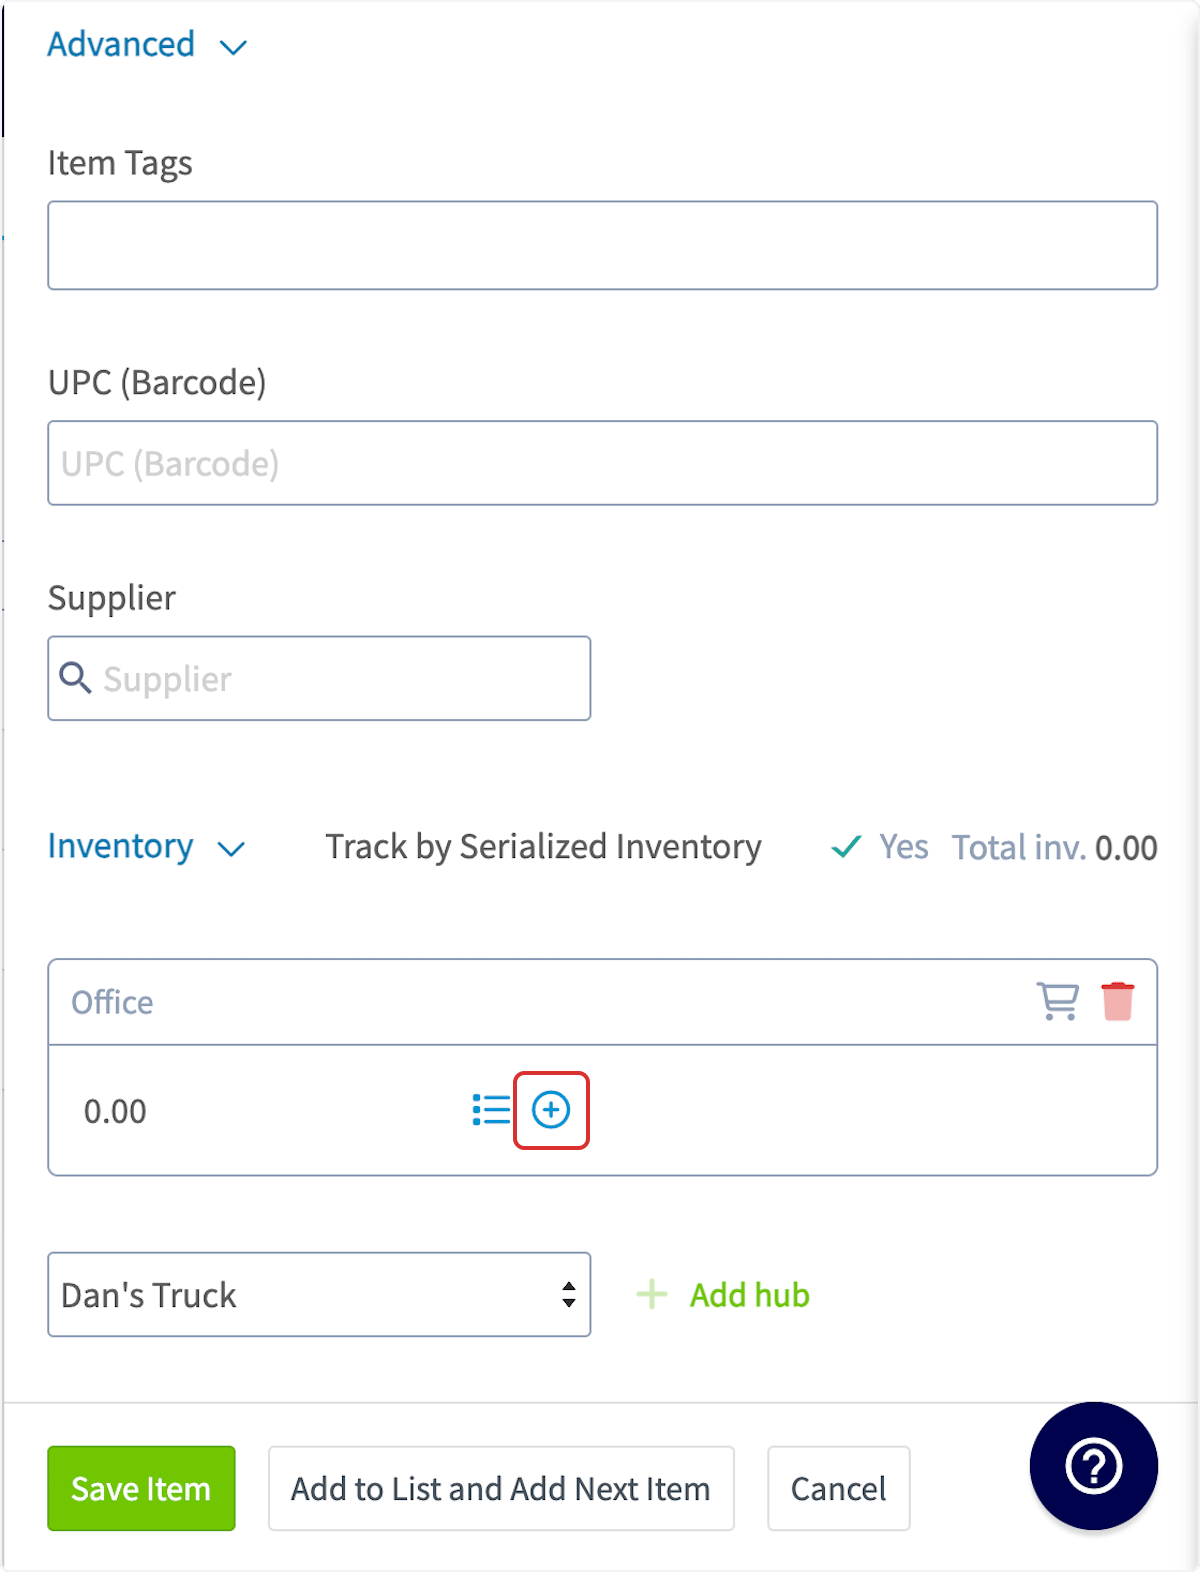
 To enter the details for your serialized inventory, select the plus icon next to the name of the hub where the item is located.
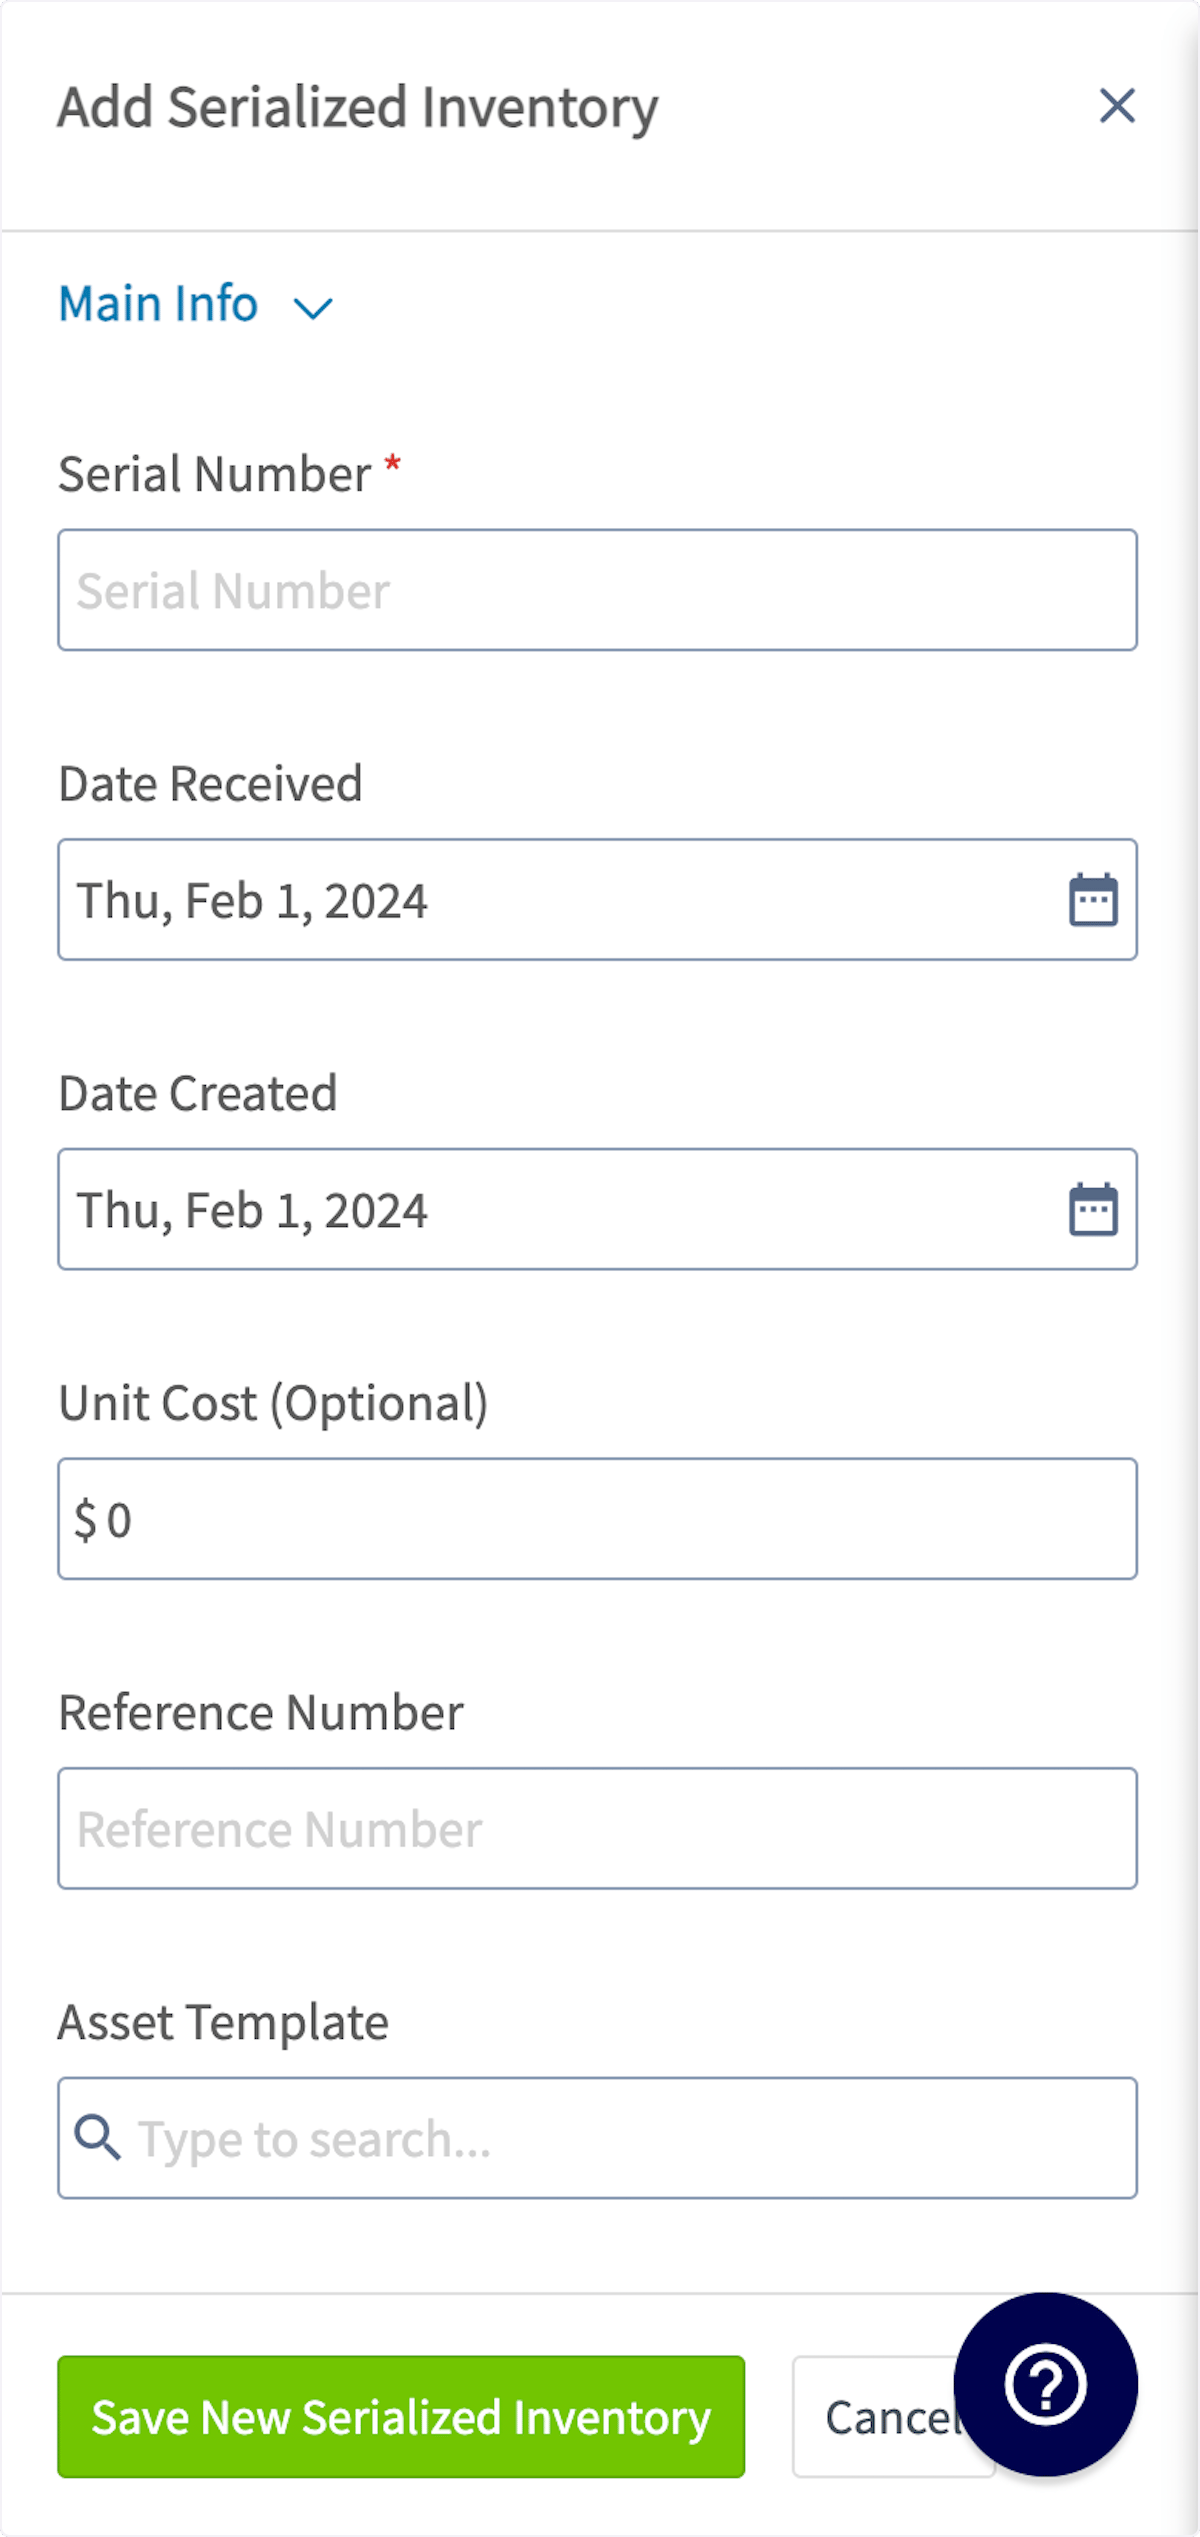
 Now you will enter the pertinent details for the item. The serial number is required, but you can also add the date received, unit cost, reference number, or attach an asset template. After adding the details, press *Save New Serialized Inventory*.
 If you have more than one item, repeat the process by selecting the plus icon again and entering the next serial number. Be sure to press *Save* at the end to save your changes.
If you need to move around your serialized inventory, FieldPulse gives you the option to bulk transfer it to other hubs. Click [the bulk transfer guide](/using-fieldpulse/item-list-inventory/bulk-transfer-serialized-inventory) to learn more.
***
# Adding Serialized Inventory to Invoices
To add serialized inventory to an invoice, begin by creating a new invoice, then selecting *Add Item*.
If you have more than one item, repeat the process by selecting the plus icon again and entering the next serial number. Be sure to press *Save* at the end to save your changes.
If you need to move around your serialized inventory, FieldPulse gives you the option to bulk transfer it to other hubs. Click [the bulk transfer guide](/using-fieldpulse/item-list-inventory/bulk-transfer-serialized-inventory) to learn more.
***
# Adding Serialized Inventory to Invoices
To add serialized inventory to an invoice, begin by creating a new invoice, then selecting *Add Item*.
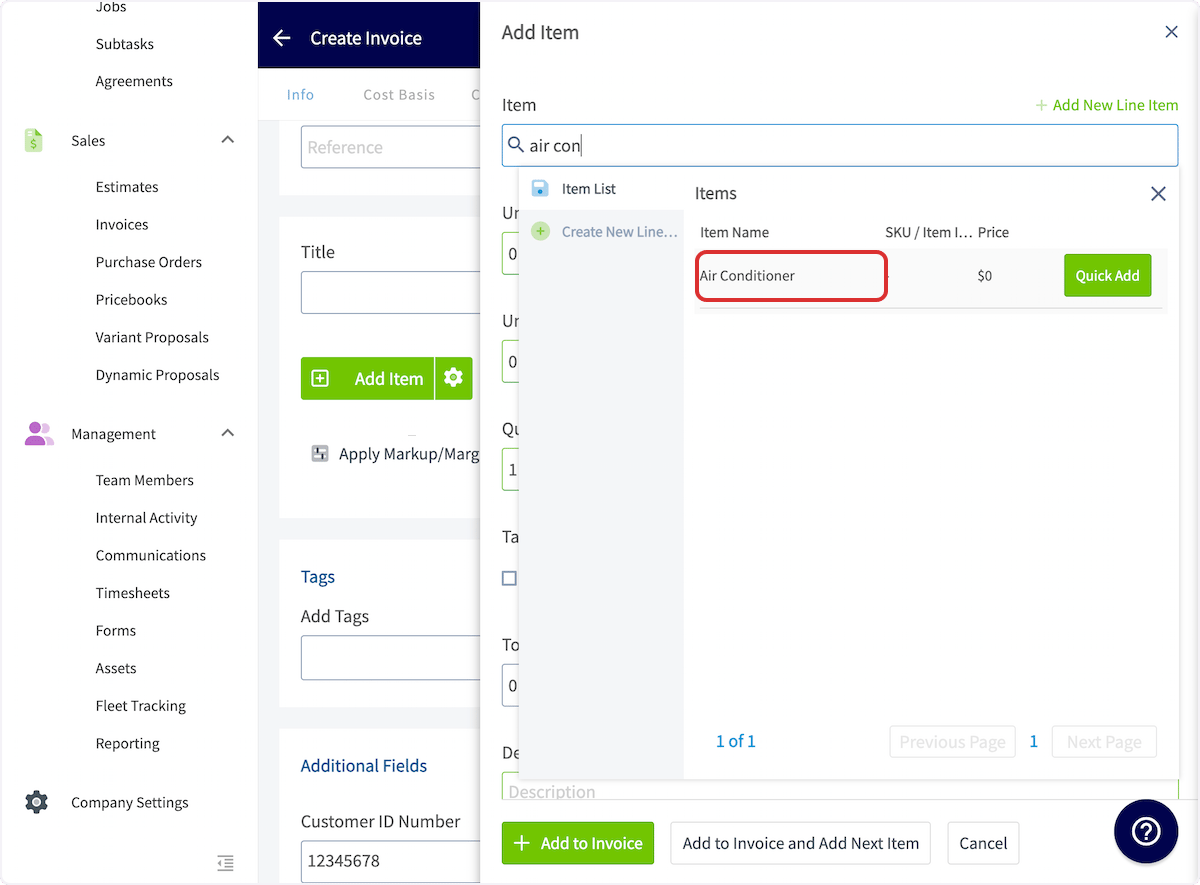
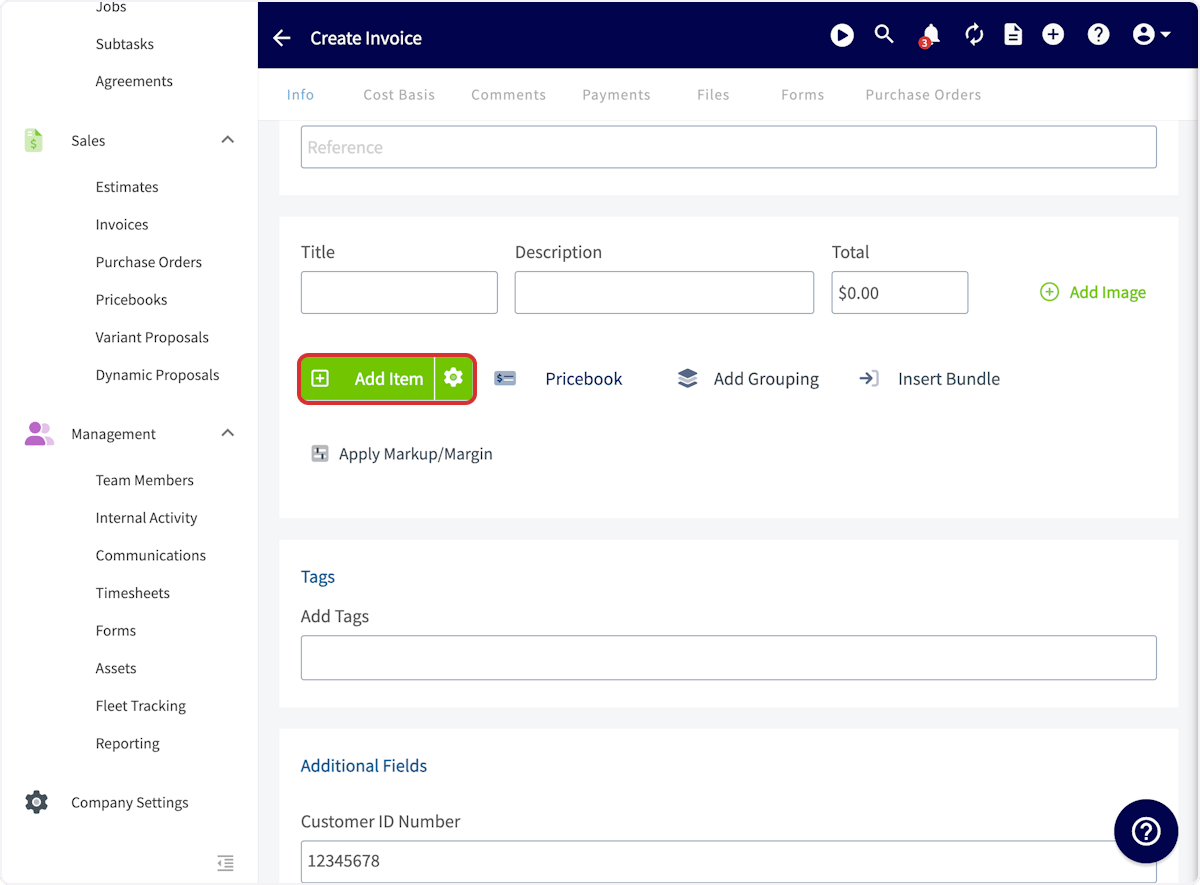 Search for and click on the applicable inventory item.
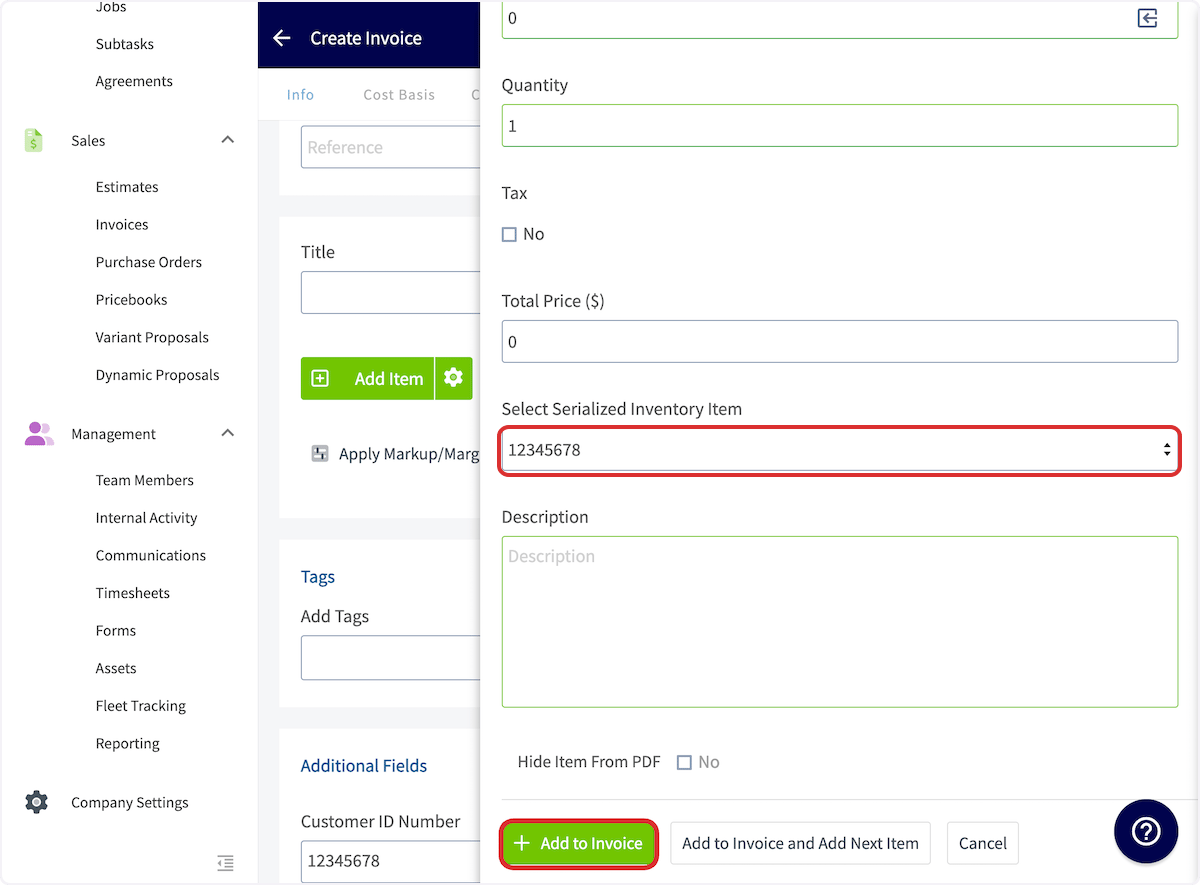
 Scroll down to the *Select Serialized Inventory Item* field and select the serial number of the item you used on the job. Once you select the appropriate serial number, select *Add to Invoice*.
 Once the invoice has been paid, that serial number will be removed from your inventory.
***
# Creating an Asset from a Serialized Inventory Item
After adding a serialized inventory item to an invoice, you can create an asset record directly from the invoice without navigating away.
1. Open the invoice that contains the serialized inventory item.
2. Scroll down to the serialized item you need to create an asset from.
3. Click "Create Asset" next to the line item to generate an asset record directly from that serialized item.
Once the invoice has been paid, that serial number will be removed from your inventory.
***
# Creating an Asset from a Serialized Inventory Item
After adding a serialized inventory item to an invoice, you can create an asset record directly from the invoice without navigating away.
1. Open the invoice that contains the serialized inventory item.
2. Scroll down to the serialized item you need to create an asset from.
3. Click "Create Asset" next to the line item to generate an asset record directly from that serialized item.
 ***
# Video Tutorial
***
**Have additional questions?**
*Contact us at [support@fieldpulse.com](mailto:support@fieldpulse.com) or use the chat feature in the bottom right corner of your screen.*
***
# Video Tutorial
***
**Have additional questions?**
*Contact us at [support@fieldpulse.com](mailto:support@fieldpulse.com) or use the chat feature in the bottom right corner of your screen.*