> ## Documentation Index
> Fetch the complete documentation index at: https://help.fieldpulse.com/llms.txt
> Use this file to discover all available pages before exploring further.
# Custom Fields on Purchase Orders
> In the fast-paced world of project management and procurement, having the right tools at your disposal can make all the difference. FieldPulse now allows…
In the fast-paced world of project management and procurement, having the right tools at your disposal can make all the difference. FieldPulse now allows users to add custom fields to purchase order line items, enhancing the way you track and manage all of your orders moving forward.
## What Are Custom Fields on Purchase Orders?
Custom fields are additional data points that you can add to your purchase order line items. This functionality allows you to track specific information that is relevant to your business needs, ultimately improving your efficiency in managing purchase orders and related projects. The beauty of this feature is its flexibility; there are **no limitations** on the number of custom fields you can create and utilize on your purchase orders. You also have the freedom to decide whether or not you would like these custom fields you have setup to be viewable on all purchase order PDF's, job reports, estimates, invoices, and asset reports sent to your customers and/or suppliers with a simple toggle on/off. ***Note: These line item custom fields are strictly internal and will not sync to Quickbooks.***
## Dynamic Applications for Custom Fields in Your Purchase Orders
* **Item Status:** Track the status of each item in your order, such as "Not Arrived," "Dispatched," "Arrived," or "Returned."
* **Expected Arrival Date:** Keep your team informed about when items are expected to arrive. This is especially useful when multiple items have different delivery dates.
* **Item Condition:** After receiving items, team members can check their condition and note any damages, ensuring that you can address issues promptly.
* **Related Job:** While you can relate an entire purchase order to a job, this feature allows you to associate specific line items with particular jobs or projects.
* **Return Toggle On/Off Options:** Easily indicate items that need to be returned and begin the process of reordering.
***
# Enabling Custom Fields on Purchase Orders
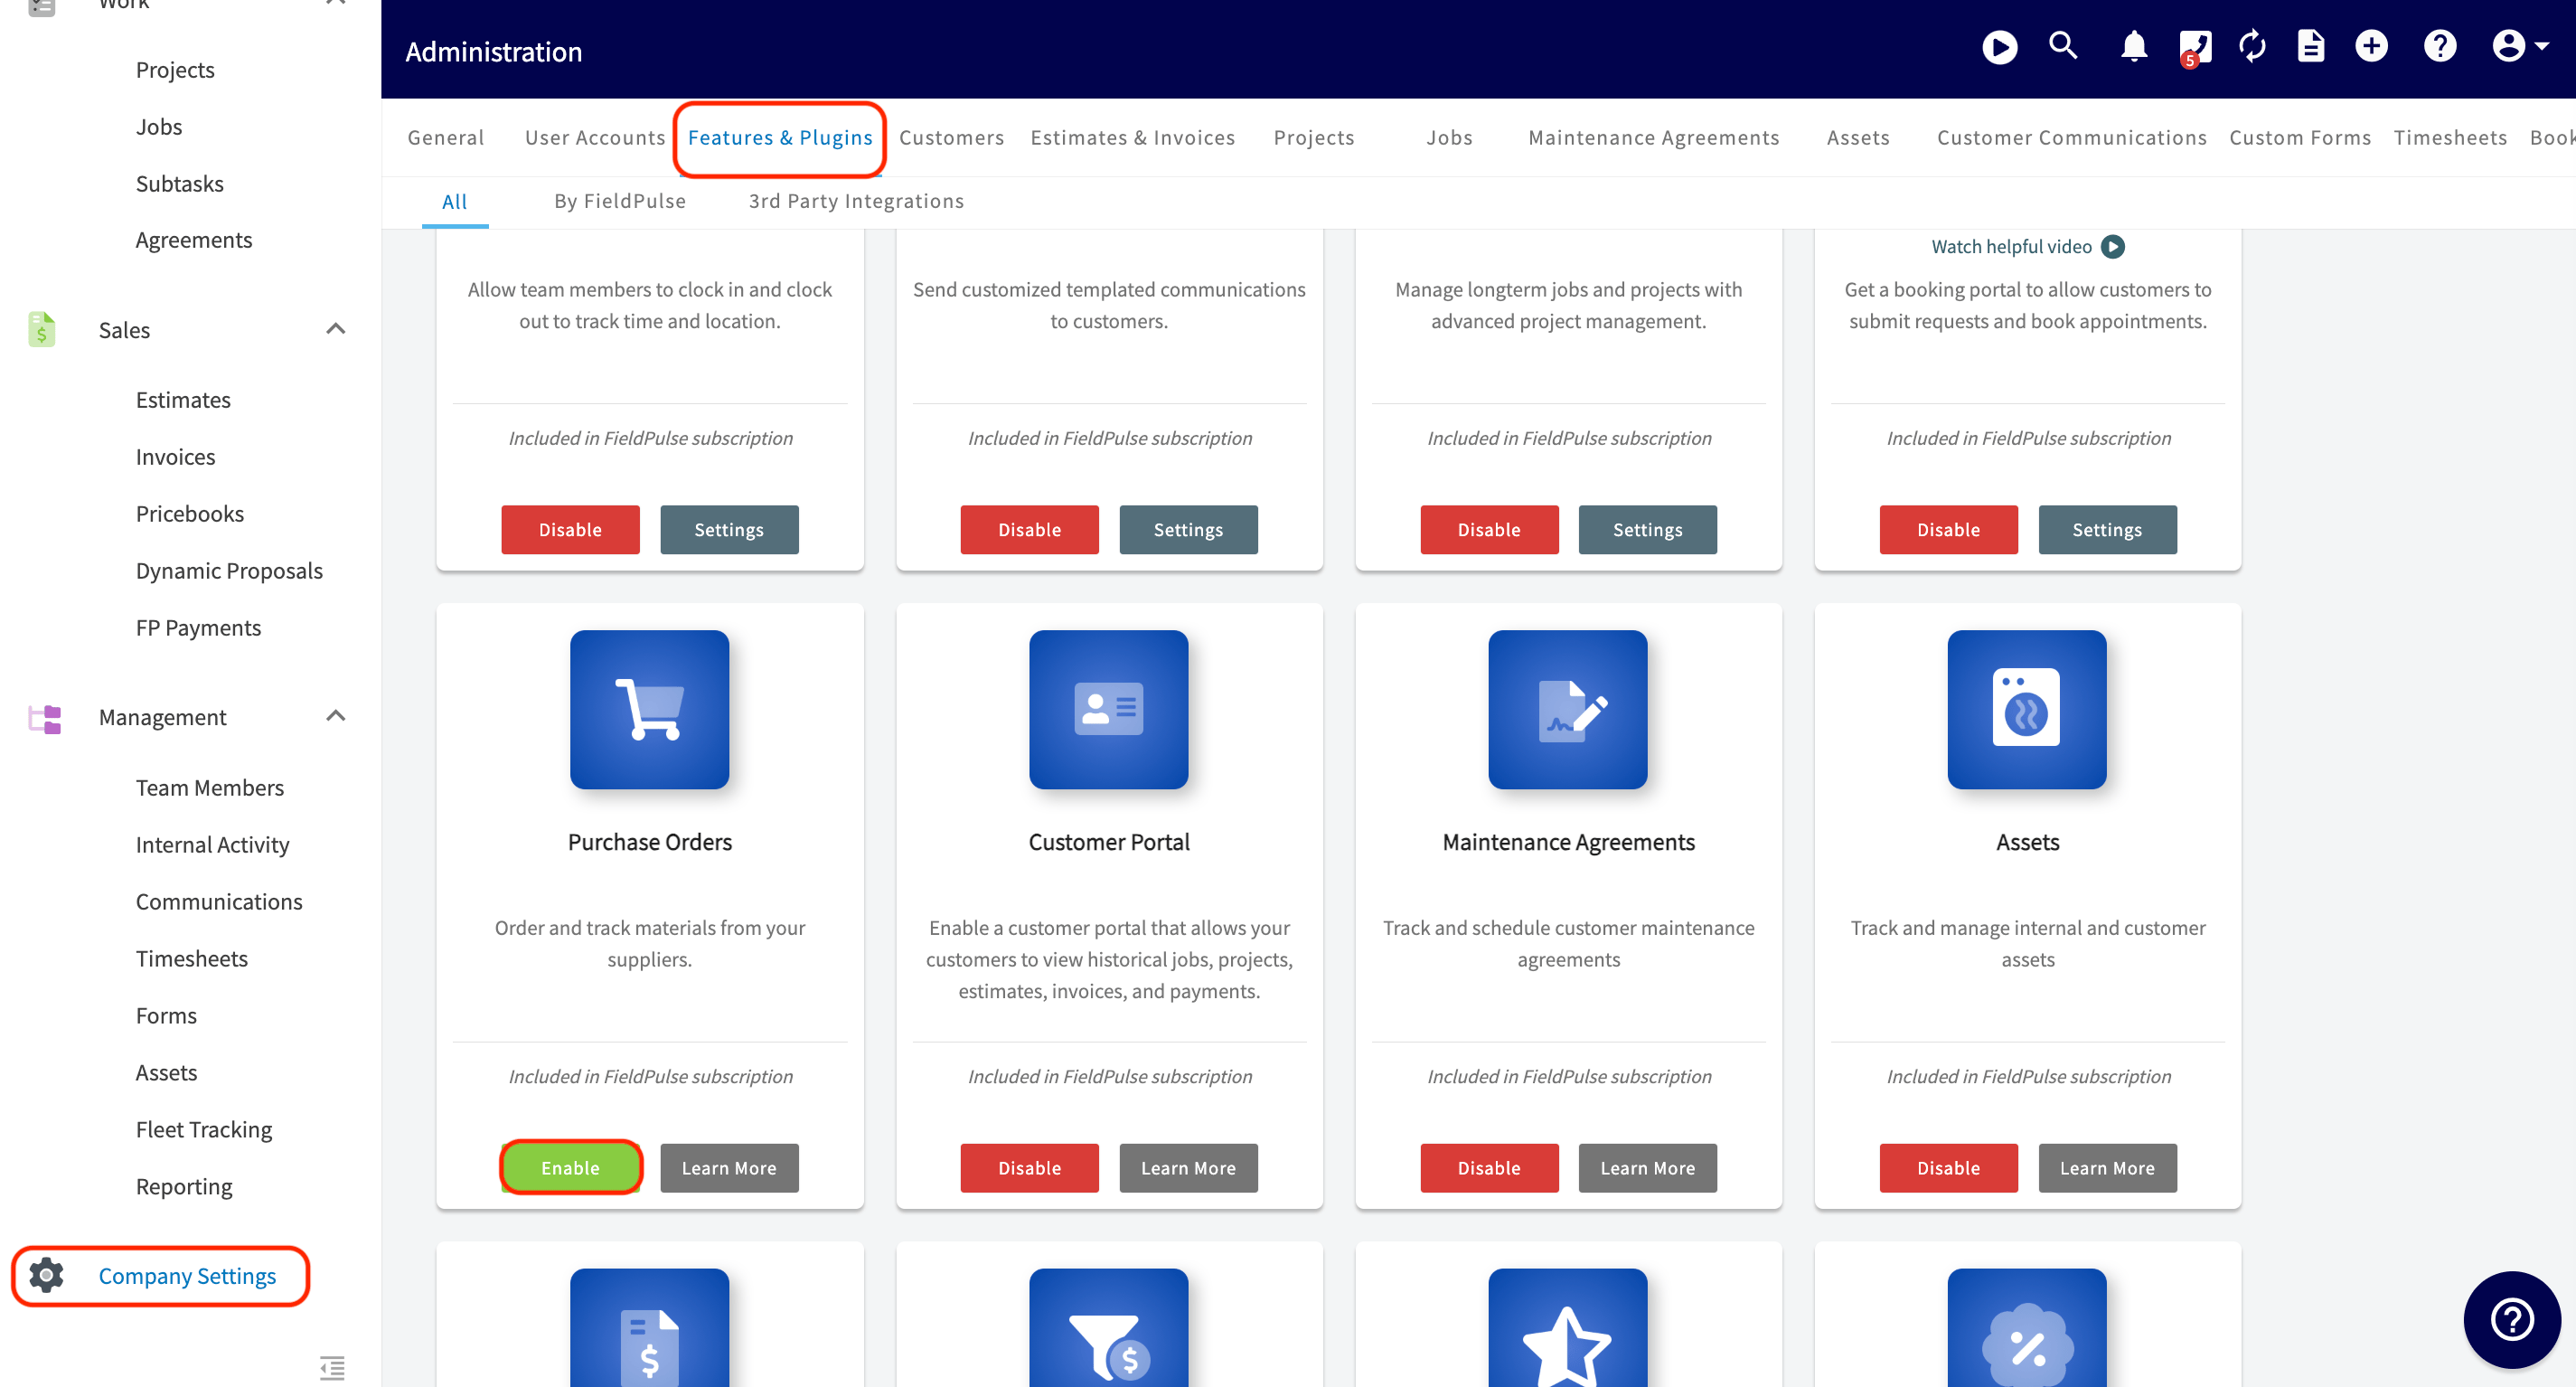
To begin using Purchase Orders, you'll first need to enable it. Start by clicking on *Company Settings* and selecting *Features & Plugins.* Navigate to *Purchase Orders* and select *Enable*. Now you're ready to begin ordering and tracking materials from your suppliers as well as creating custom fields for your line items.
 ***
# Creating a Custom Field for a Line Item
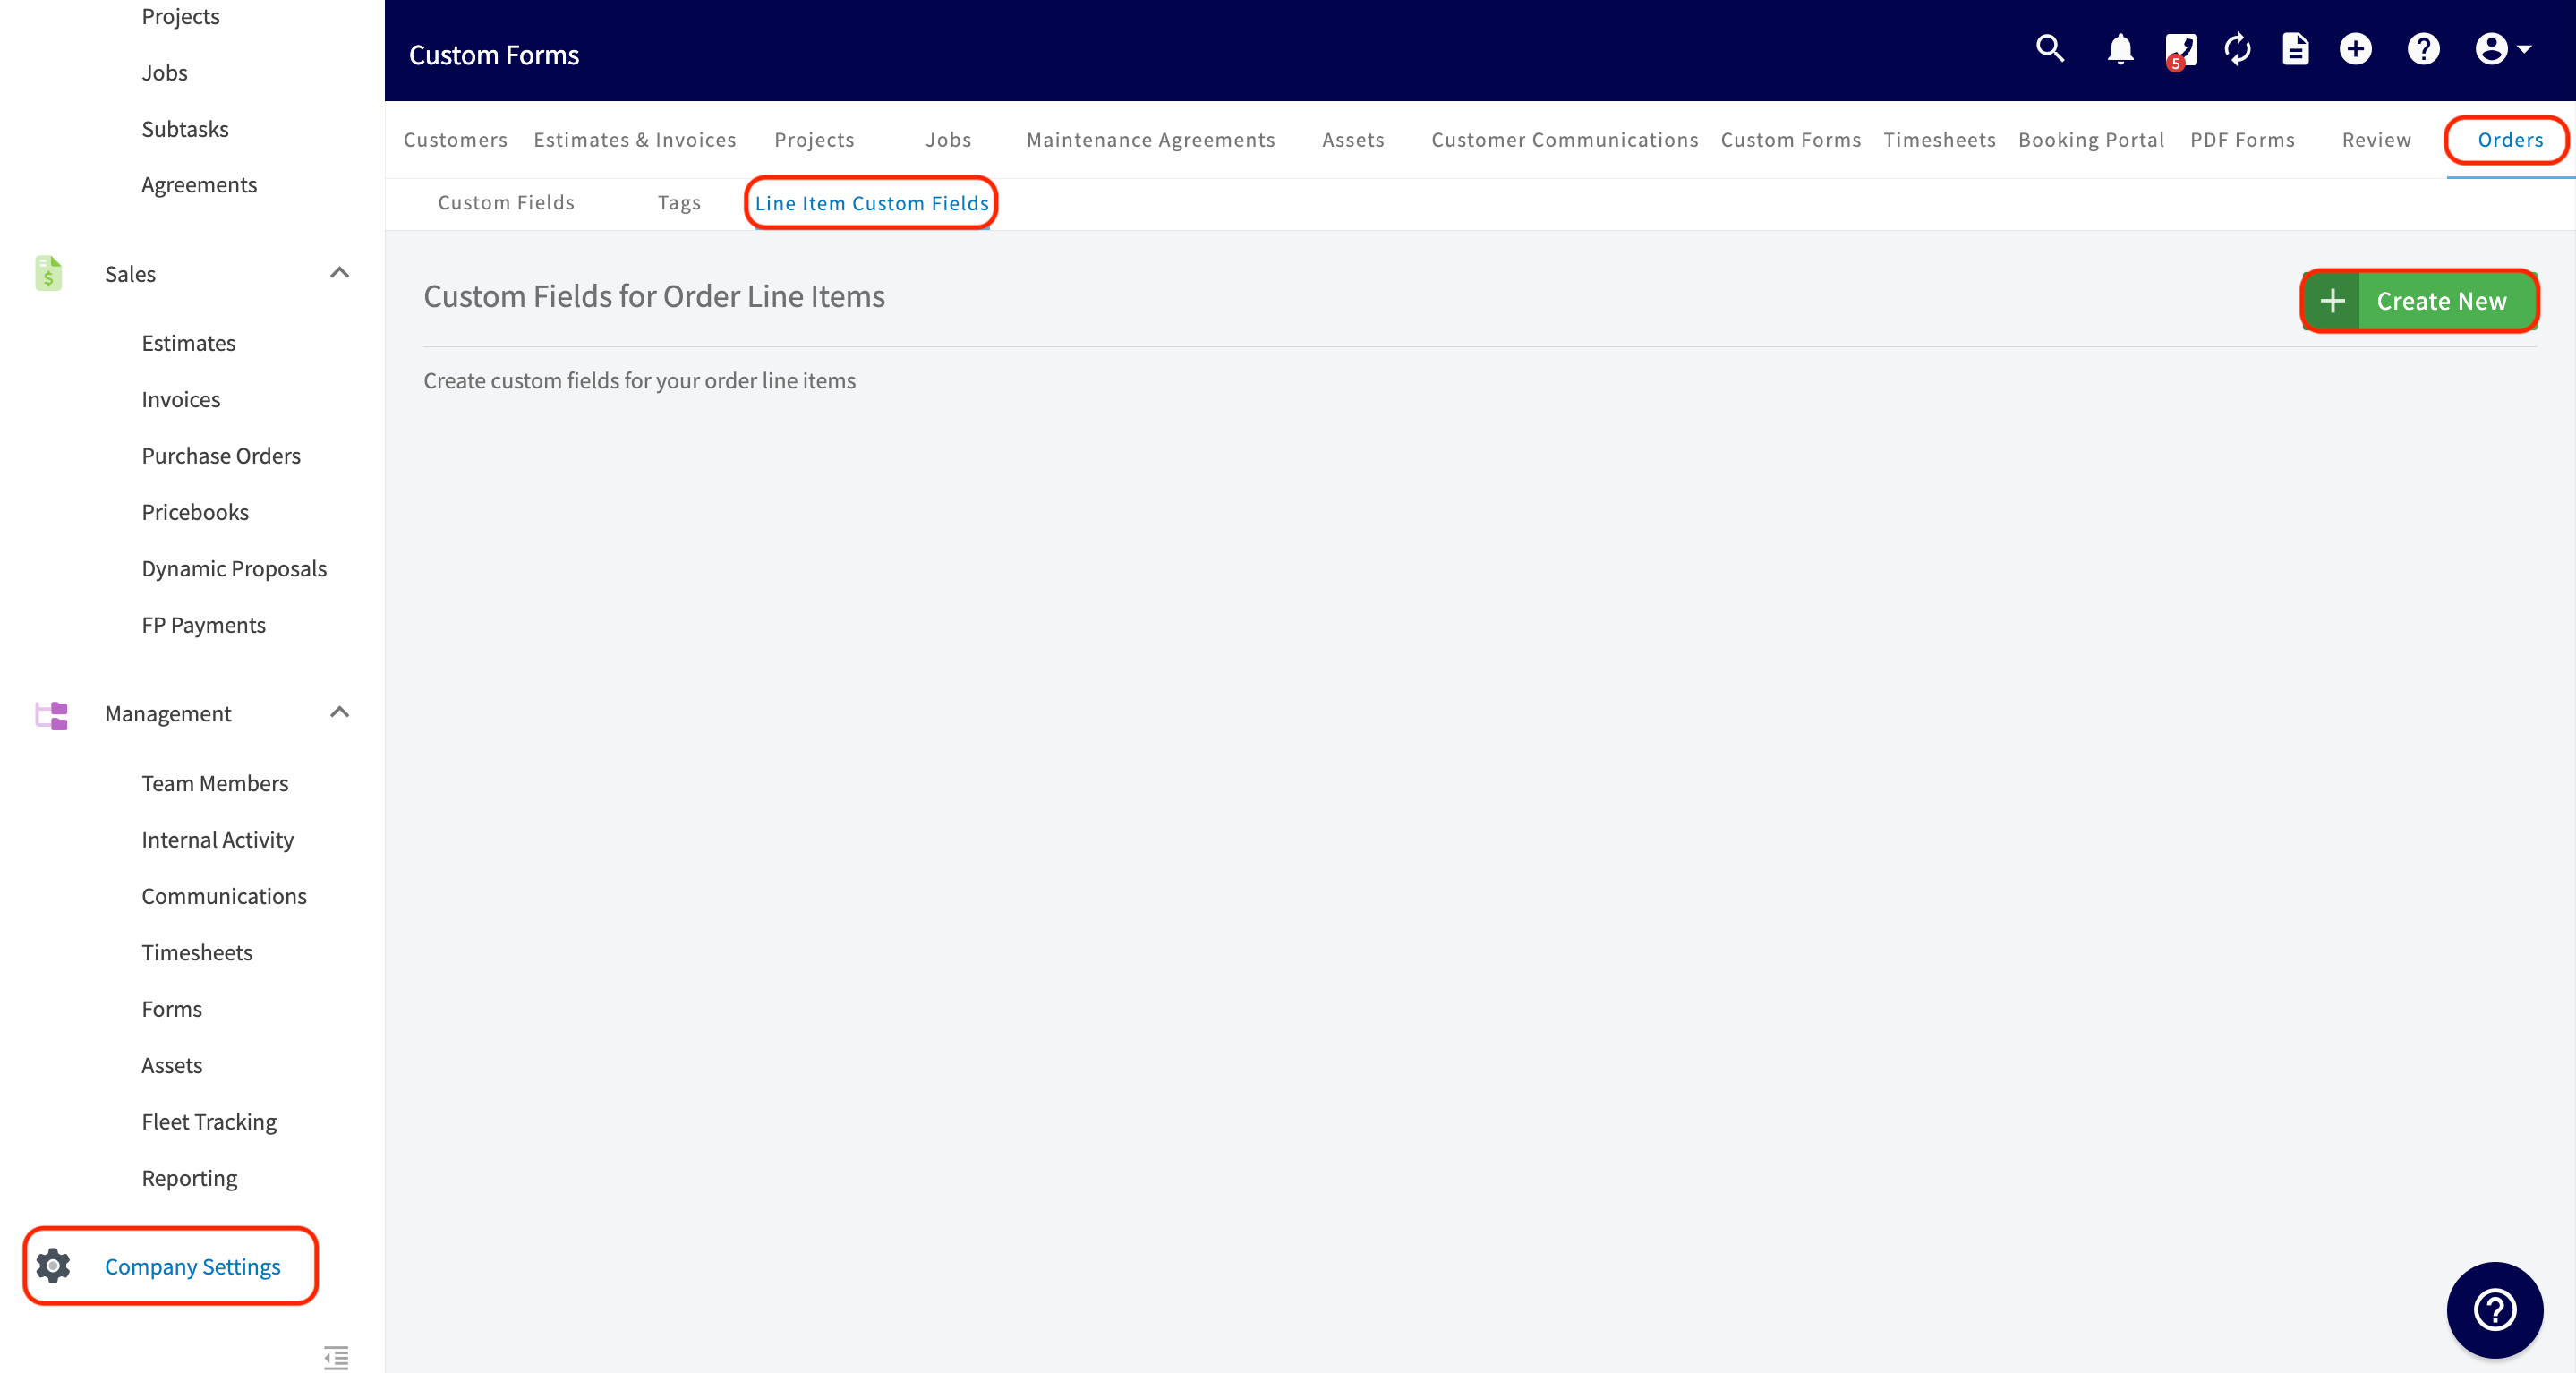
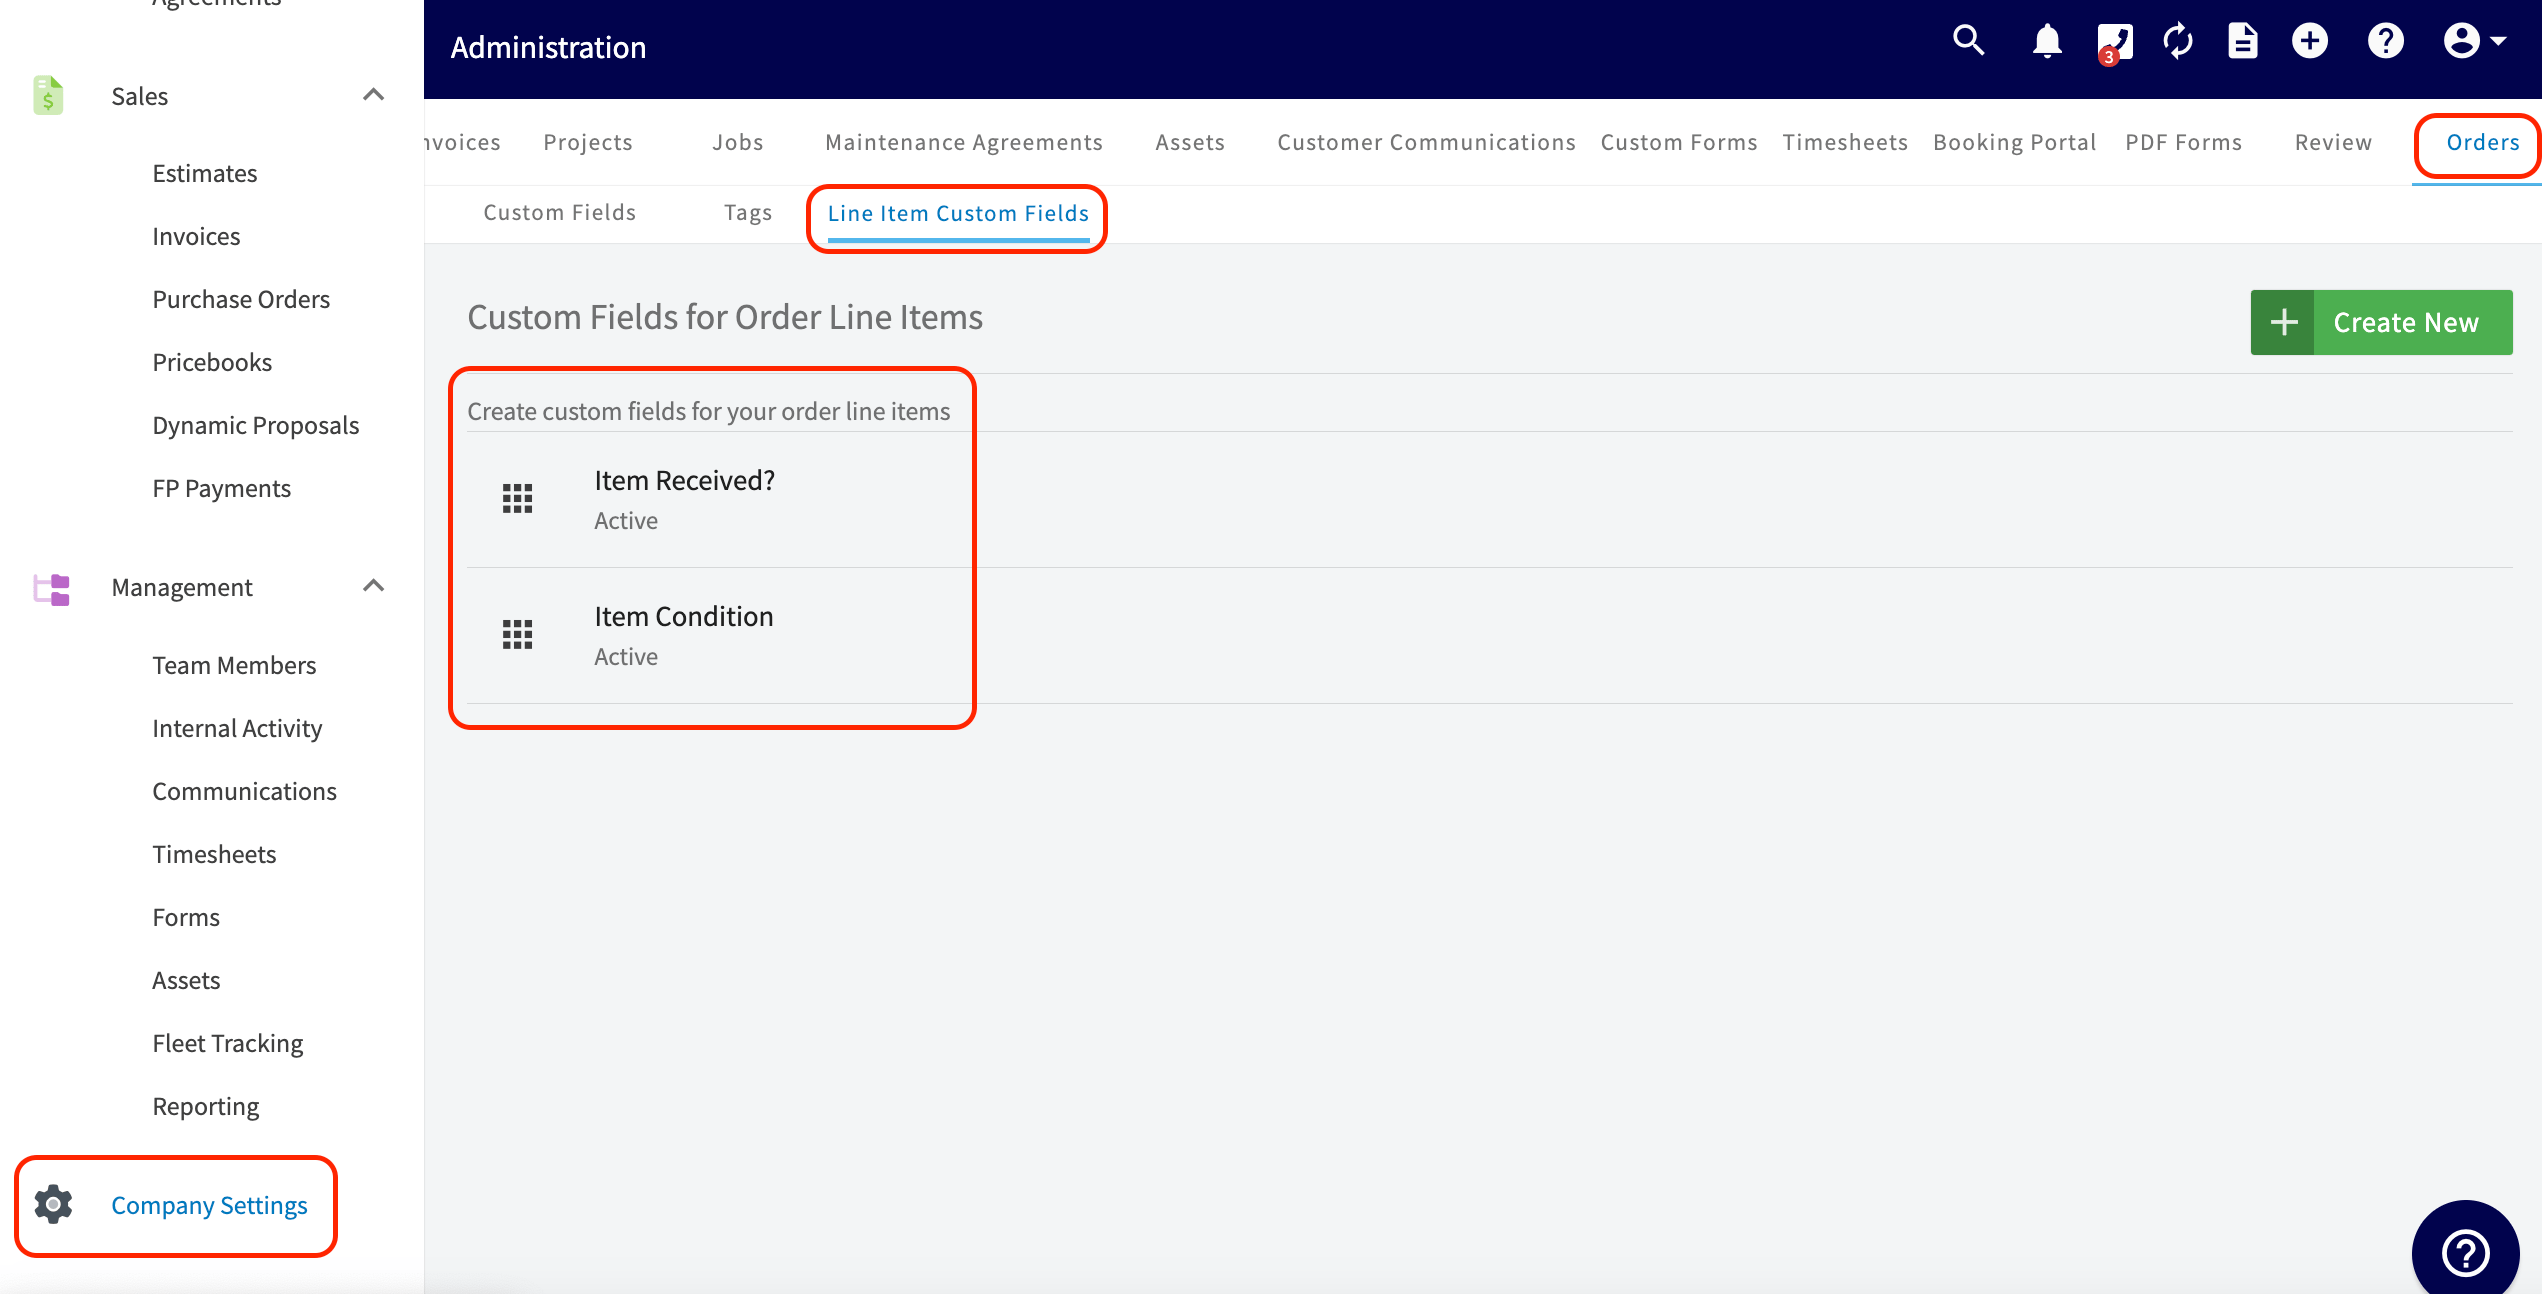
To get started, click on the *Company Settings* from the left side menu. From here, scroll from the menu up at the time to find the *Orders* tab and click on it. When on the *Orders* tab, click on the *Line Items Custom Fields*. Here you can select *Create New* to get started.
***
# Creating a Custom Field for a Line Item
To get started, click on the *Company Settings* from the left side menu. From here, scroll from the menu up at the time to find the *Orders* tab and click on it. When on the *Orders* tab, click on the *Line Items Custom Fields*. Here you can select *Create New* to get started.
 You can now begin creating your custom field for your line item! Note that the only required field to fill out here is the *Name* of the custom field you are creating.
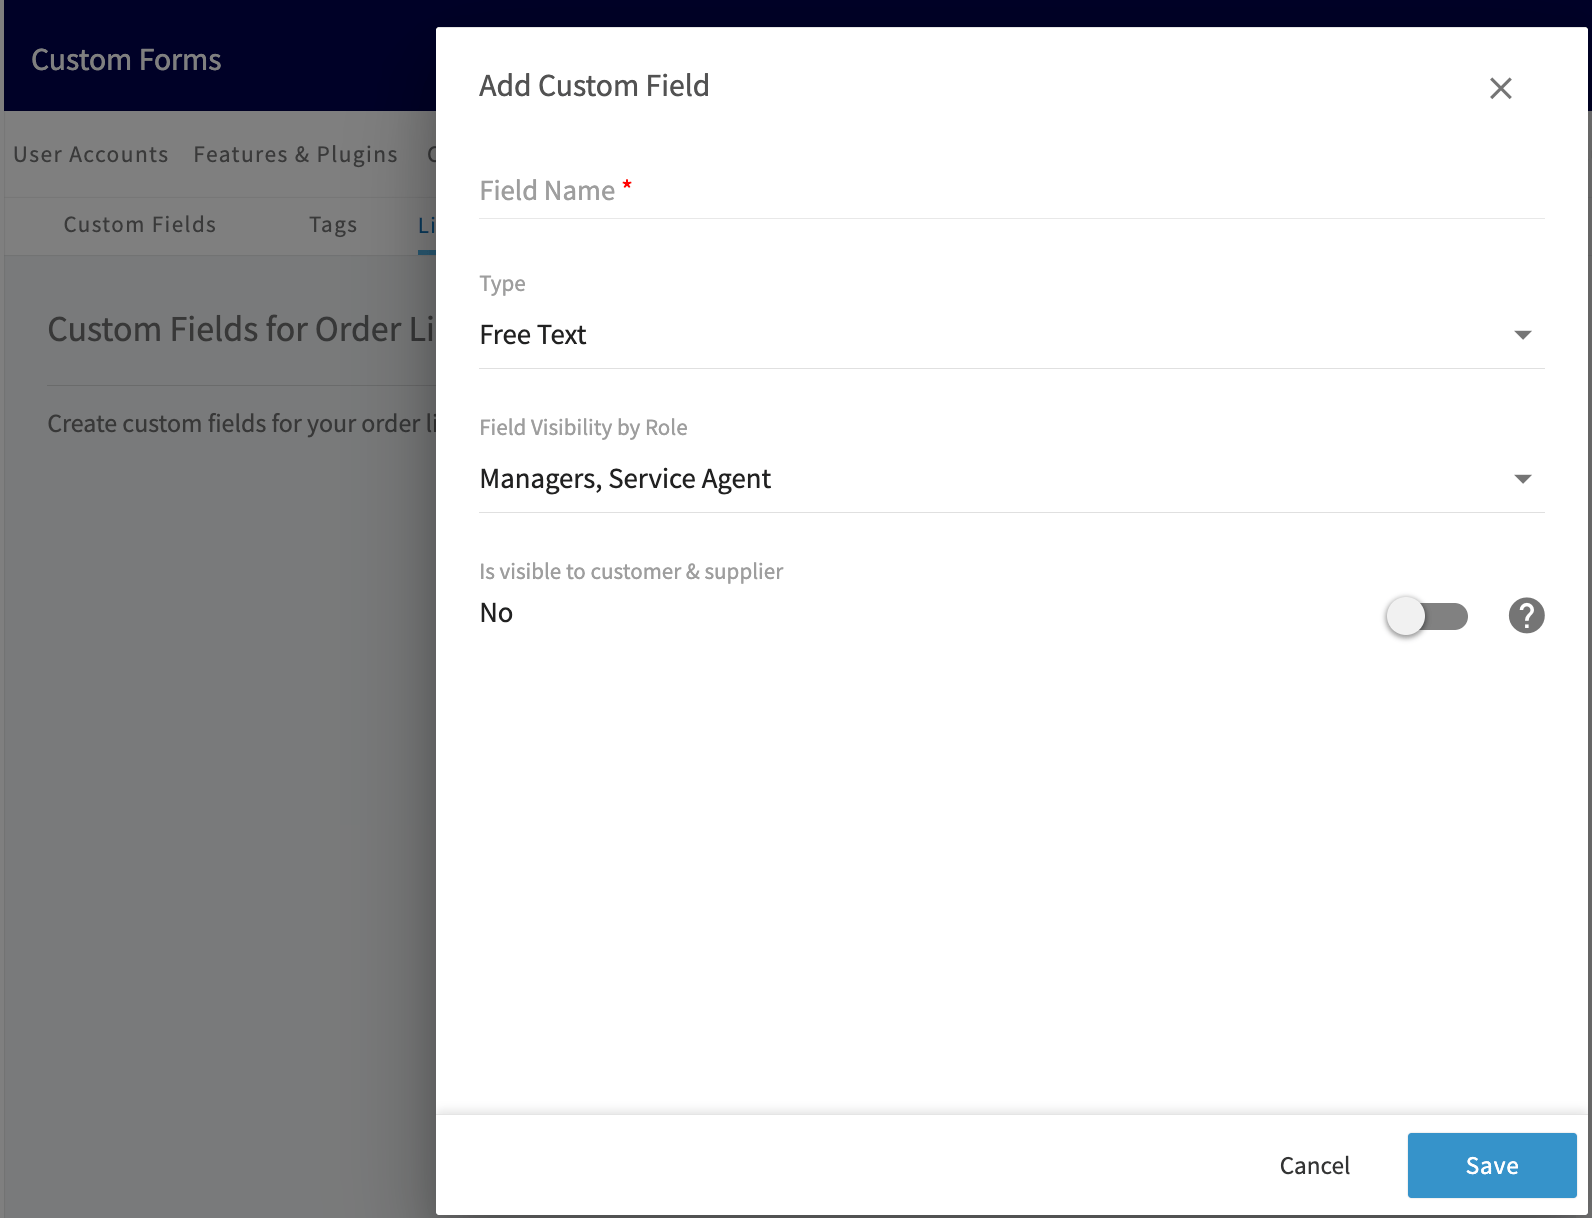 * **Type:** Here you will have a menu of items to choose from. Your choices are as follows:
* **Free text:** Here you have the option to add "free text", allowing you to type freely in your own words.
* **Number:** By selecting this, you can easily indicate the number or quantity for this line item.
* **Date:** This option allows you to easily autofill the date in by clicking on the small calendar icon.
* **Checkbox:** This option will produce a toggle button. This will be toggled on/off depending on what the custom field is that you created.
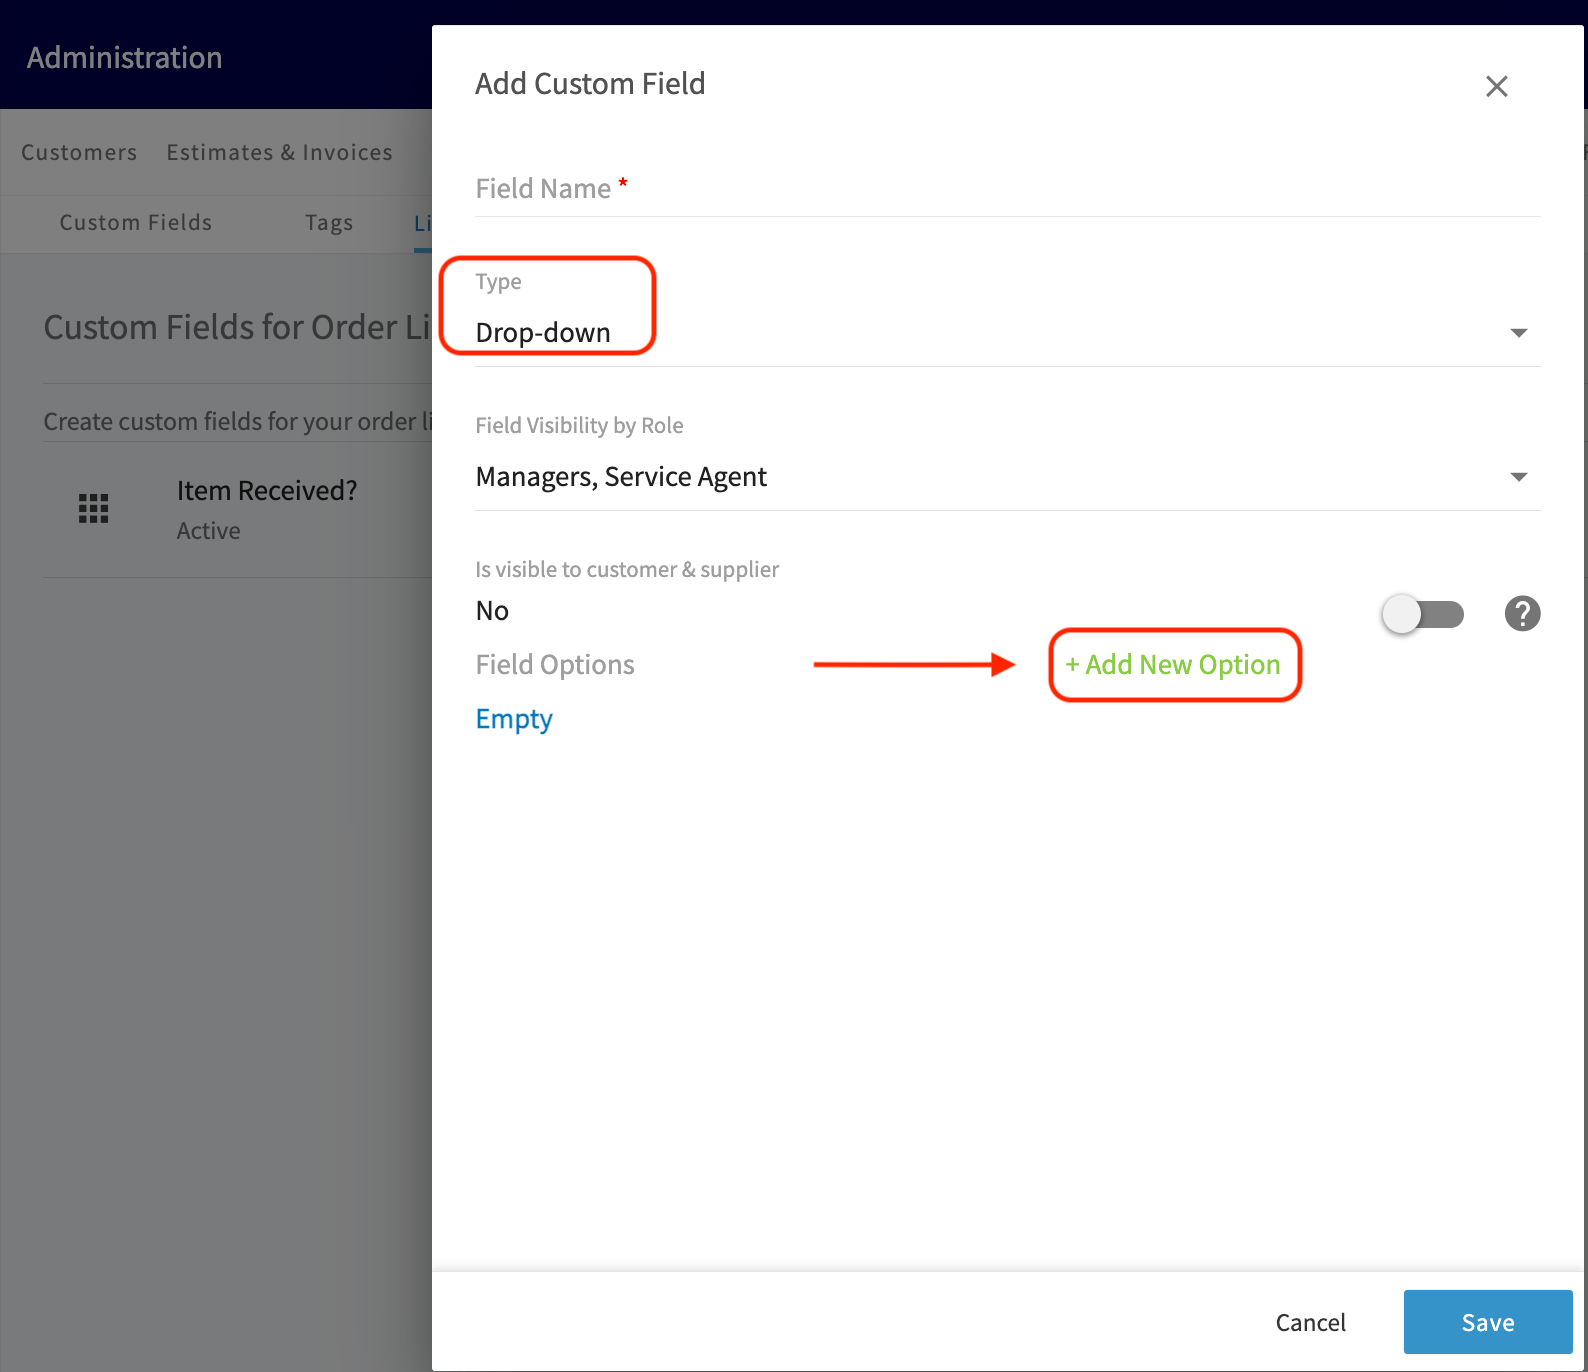
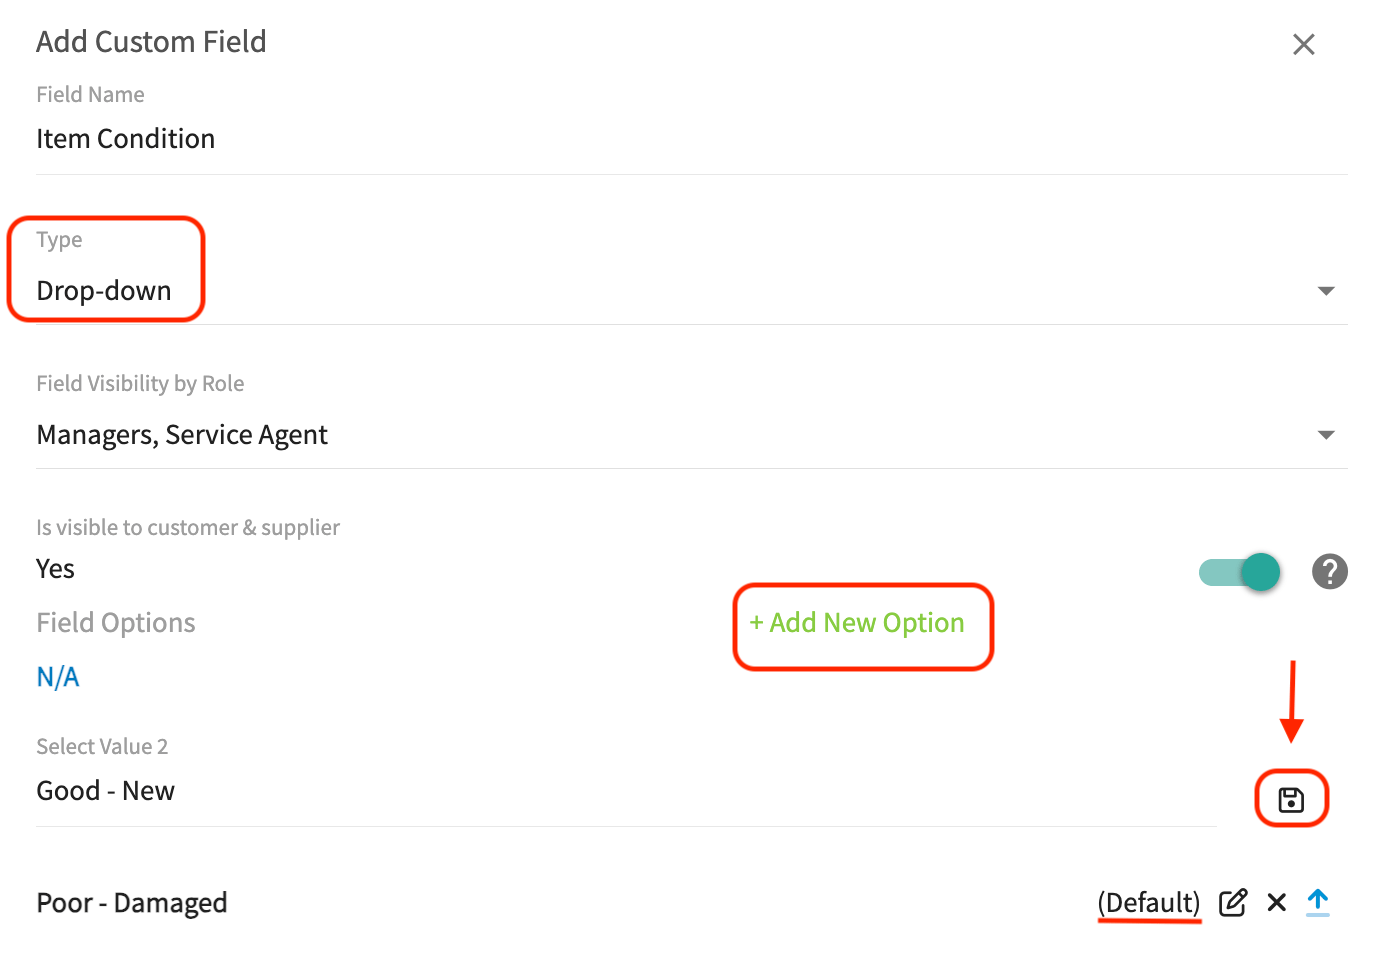
* **Drop Down:** Upon selecting this option, you will be asked to *Add New Field Options* (see the first picture below) and edit them. After assigning a name to each option, ensure that you click on the *save* icon (see second picture below). You also have the ability to decide which option is your *Default* option. The Default option will appear in blue colored text. The *Default* option will be assigned to all items on your item list until it is edited by a user with permissions. By adding all of the options here, when on your purchase order, you will then select a single option from a dropdown list.
* **Type:** Here you will have a menu of items to choose from. Your choices are as follows:
* **Free text:** Here you have the option to add "free text", allowing you to type freely in your own words.
* **Number:** By selecting this, you can easily indicate the number or quantity for this line item.
* **Date:** This option allows you to easily autofill the date in by clicking on the small calendar icon.
* **Checkbox:** This option will produce a toggle button. This will be toggled on/off depending on what the custom field is that you created.
* **Drop Down:** Upon selecting this option, you will be asked to *Add New Field Options* (see the first picture below) and edit them. After assigning a name to each option, ensure that you click on the *save* icon (see second picture below). You also have the ability to decide which option is your *Default* option. The Default option will appear in blue colored text. The *Default* option will be assigned to all items on your item list until it is edited by a user with permissions. By adding all of the options here, when on your purchase order, you will then select a single option from a dropdown list.
 * **Field Visibility by Role:** Who on your team has access to this custom field? You have the power to select whether this is for service agents, team managers, and/or administration. Simply check or uncheck next to each team member.
* **Is Visible to Customer & Supplier:** This toggle can be on/off based on your preference. **If the toggle is on**, these custom fields you have setup will be viewable by your customers and suppliers on all purchase order PDF's, job reports, estimates, invoices, and asset reports.
***
# Viewing Line Item Custom Fields on a Purchase Order
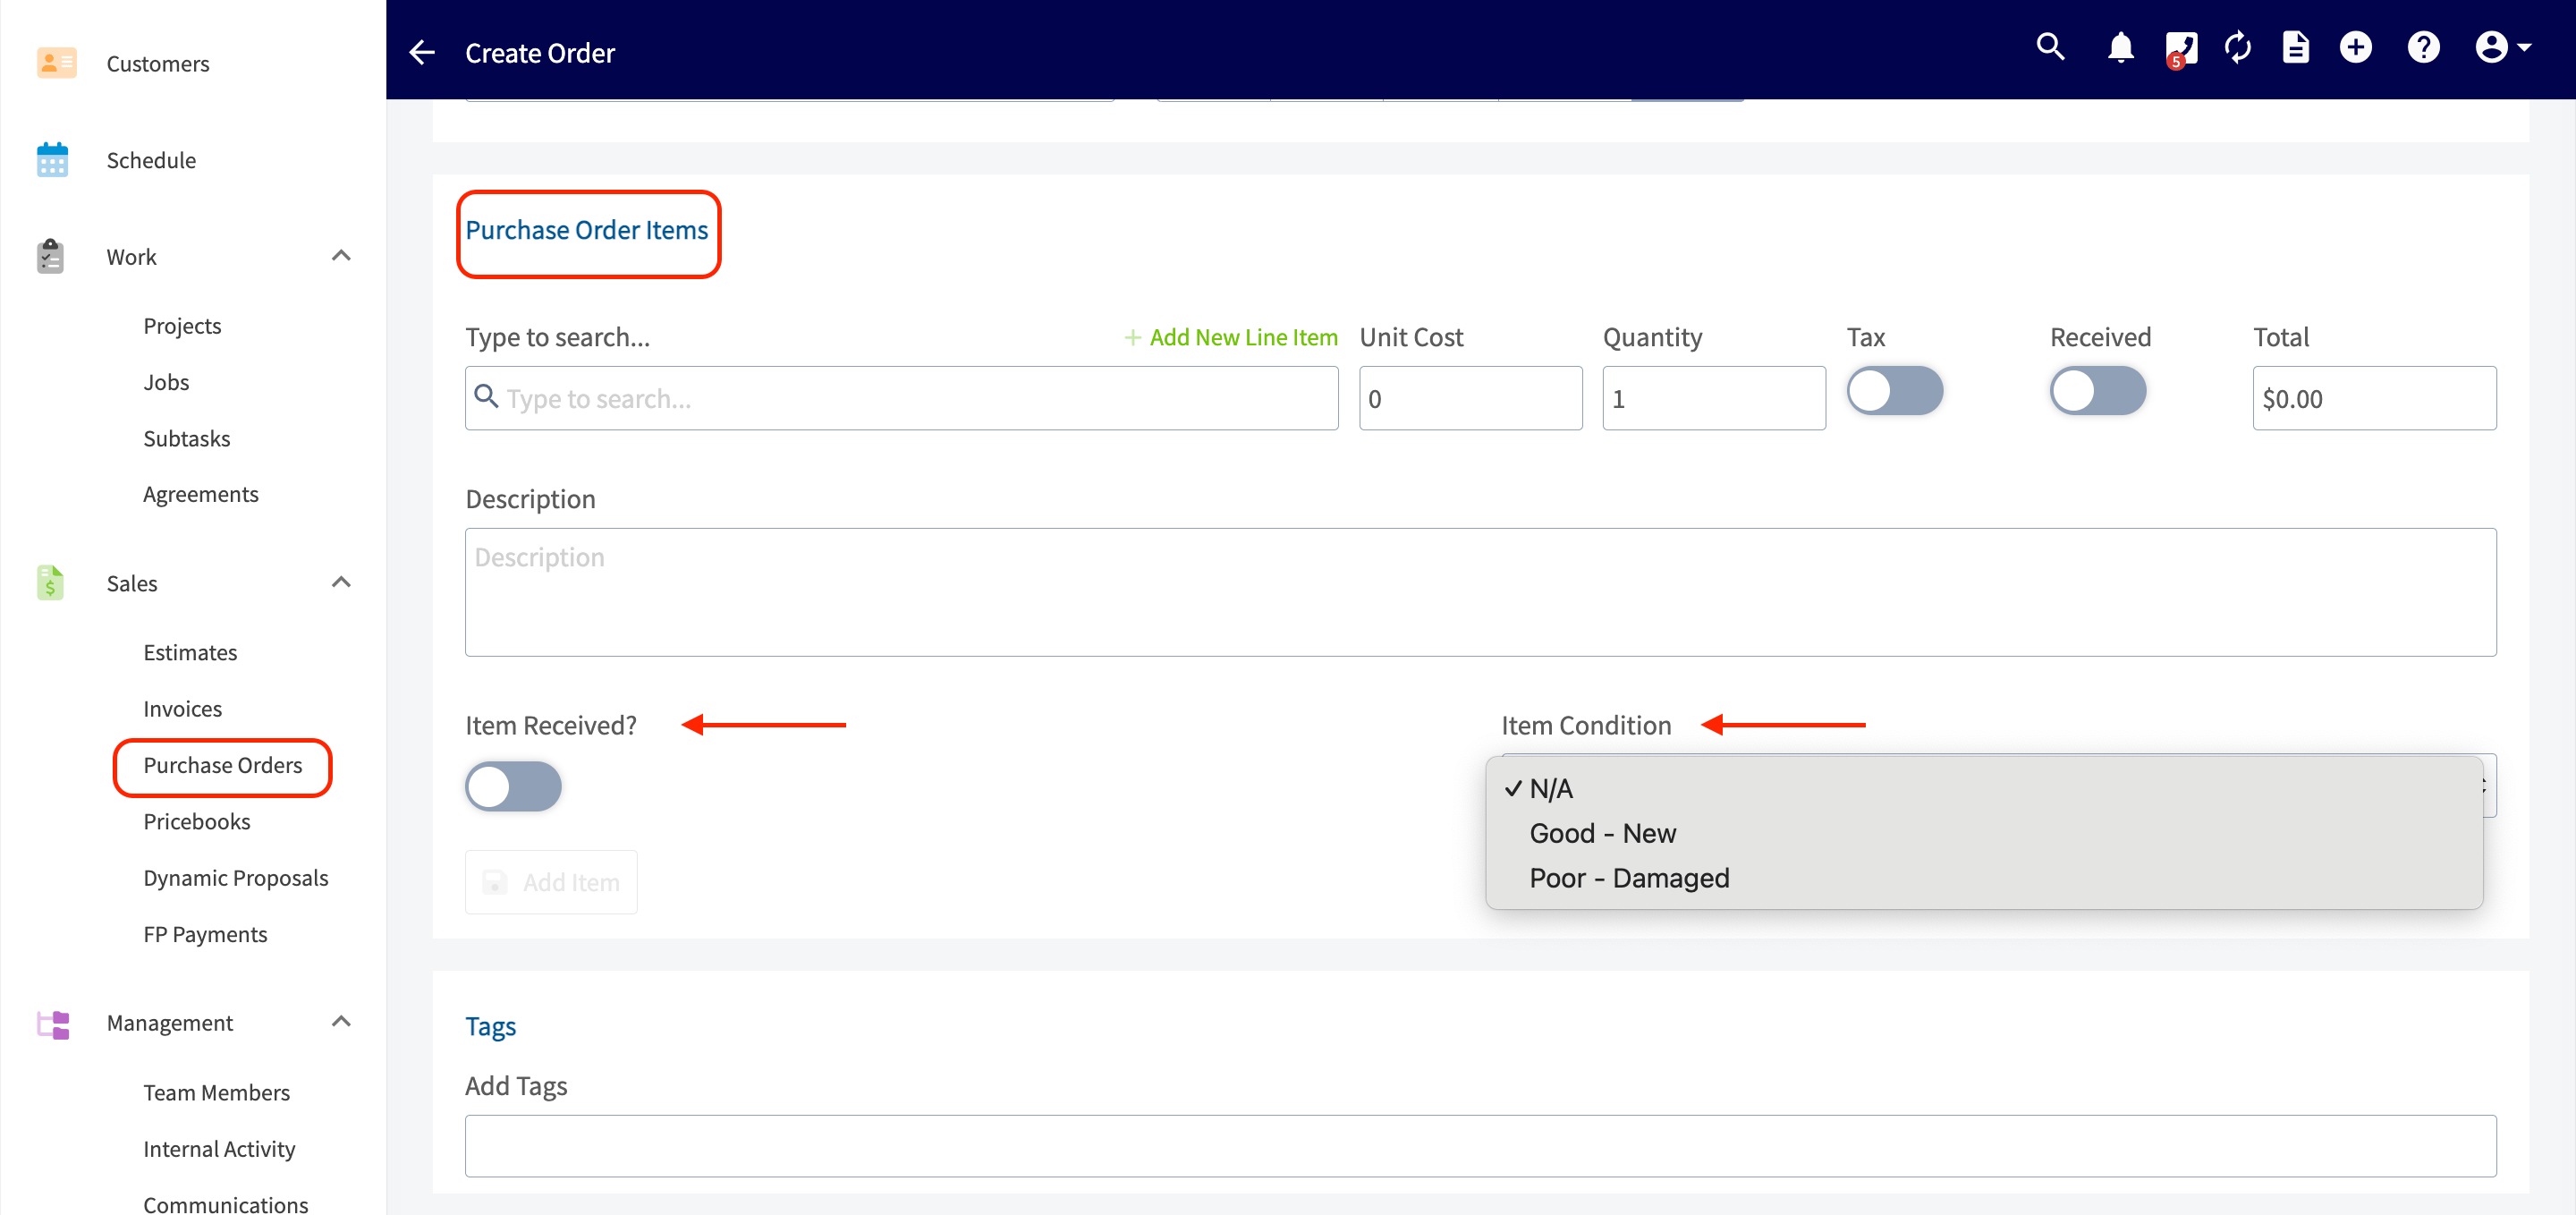
Begin by clicking on the *Purchase Orders* tab from the menu on the left side of your screen. When creating a new purchase order, you can see that the line item custom fields that we set up a located under the *Purchase Order Items* heading. In the example picture below, you can see the two line items I created (Item Received? & Item Condition) are viewable and editable here.
* **Field Visibility by Role:** Who on your team has access to this custom field? You have the power to select whether this is for service agents, team managers, and/or administration. Simply check or uncheck next to each team member.
* **Is Visible to Customer & Supplier:** This toggle can be on/off based on your preference. **If the toggle is on**, these custom fields you have setup will be viewable by your customers and suppliers on all purchase order PDF's, job reports, estimates, invoices, and asset reports.
***
# Viewing Line Item Custom Fields on a Purchase Order
Begin by clicking on the *Purchase Orders* tab from the menu on the left side of your screen. When creating a new purchase order, you can see that the line item custom fields that we set up a located under the *Purchase Order Items* heading. In the example picture below, you can see the two line items I created (Item Received? & Item Condition) are viewable and editable here.
 ***
# Updating Line Item Custom Fields on a Purchase Order
***
# Reporting on Line Item Custom Fields
Let's first review the line item custom fields that we created within *Company Settings*. In the example below, you will see we created two: *Item Received?* and *Item Condition*.
***
# Updating Line Item Custom Fields on a Purchase Order
***
# Reporting on Line Item Custom Fields
Let's first review the line item custom fields that we created within *Company Settings*. In the example below, you will see we created two: *Item Received?* and *Item Condition*.
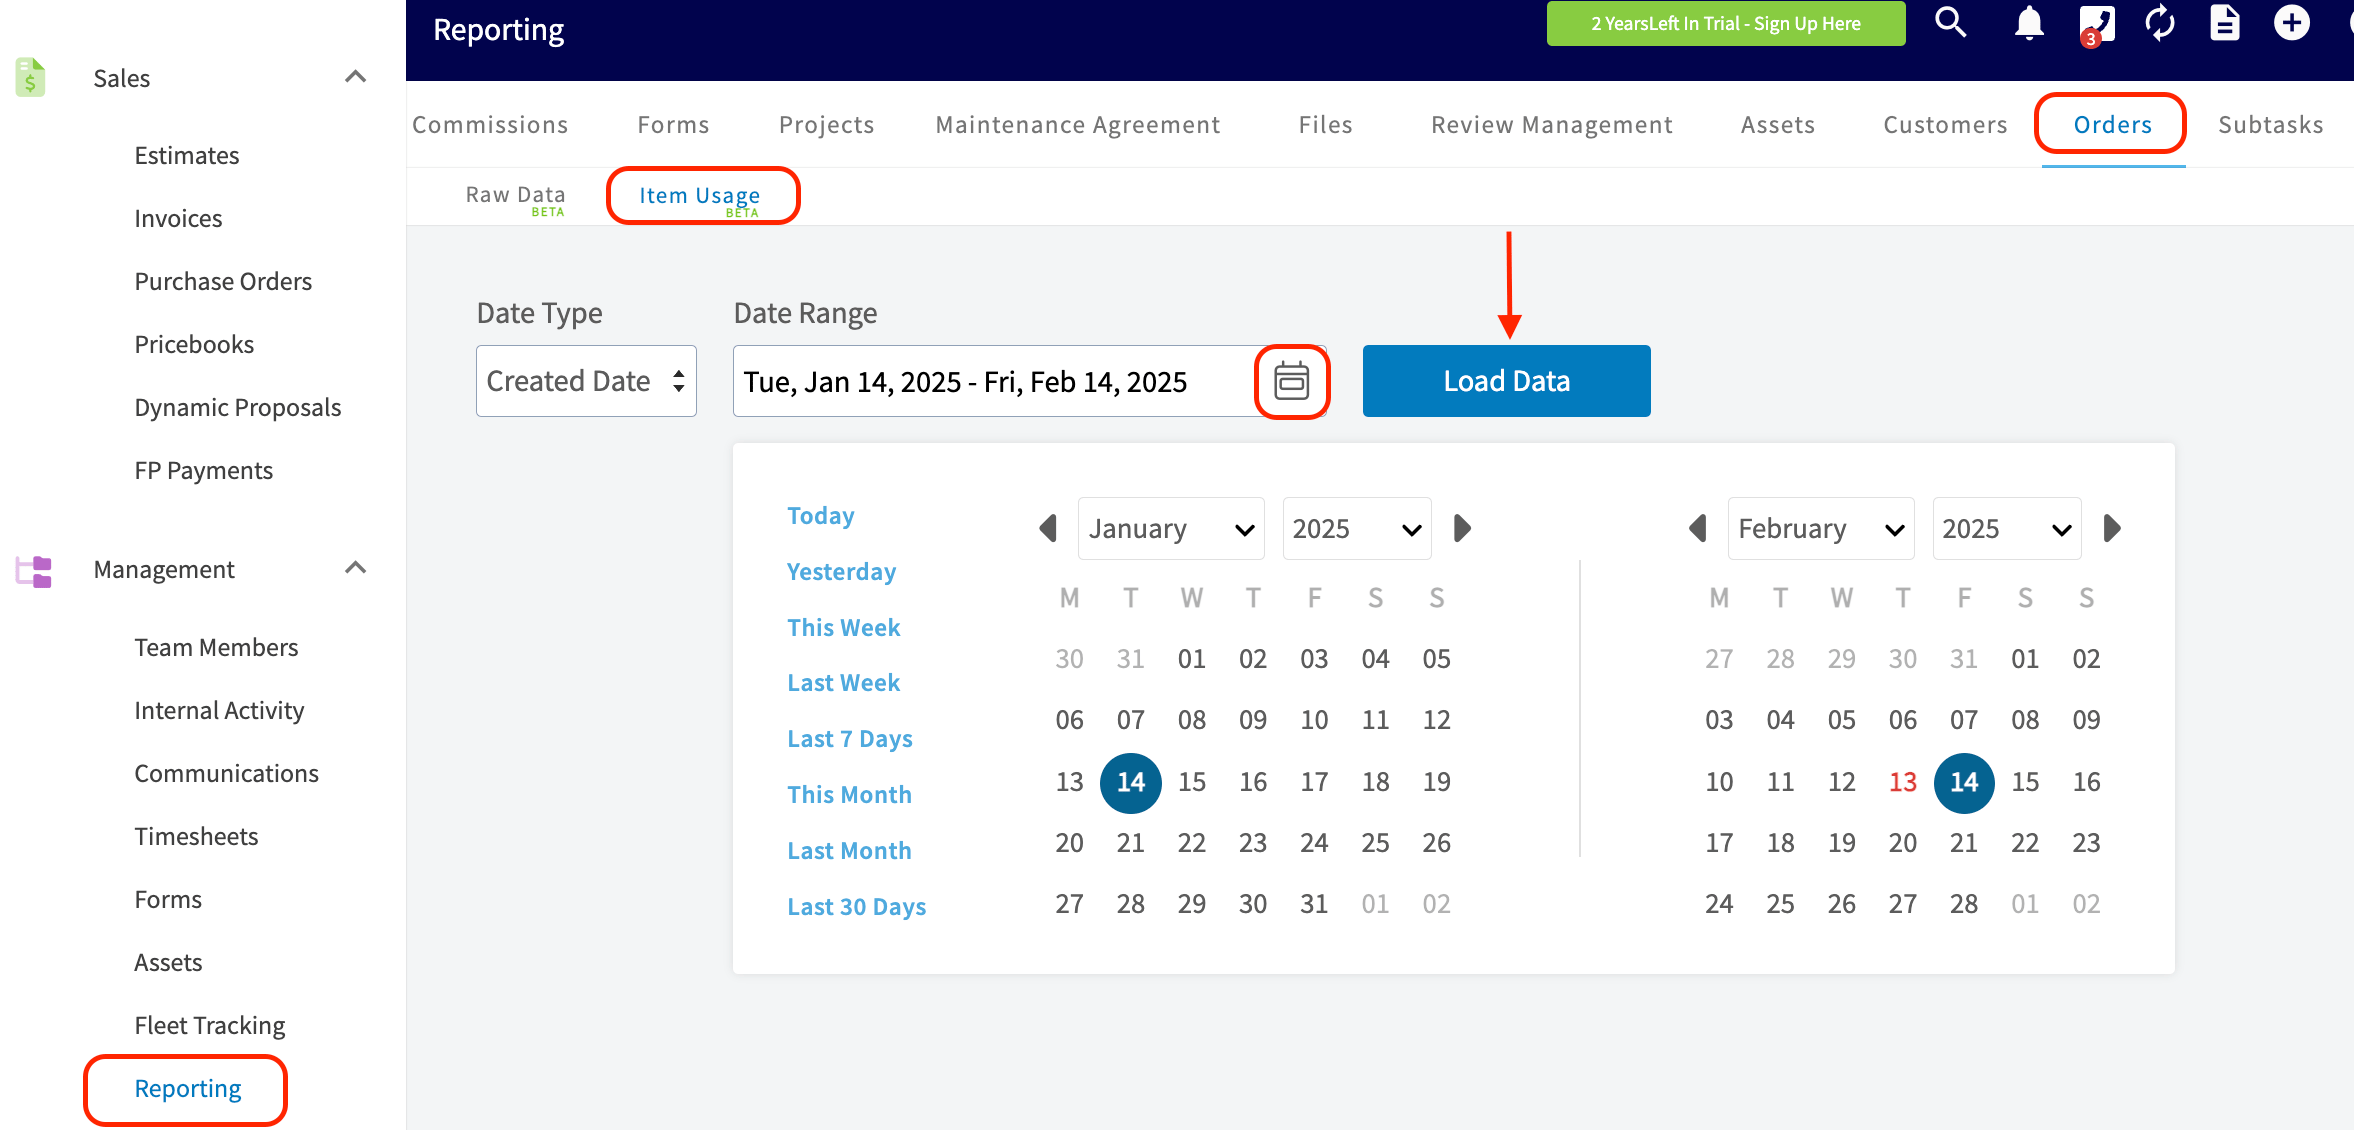
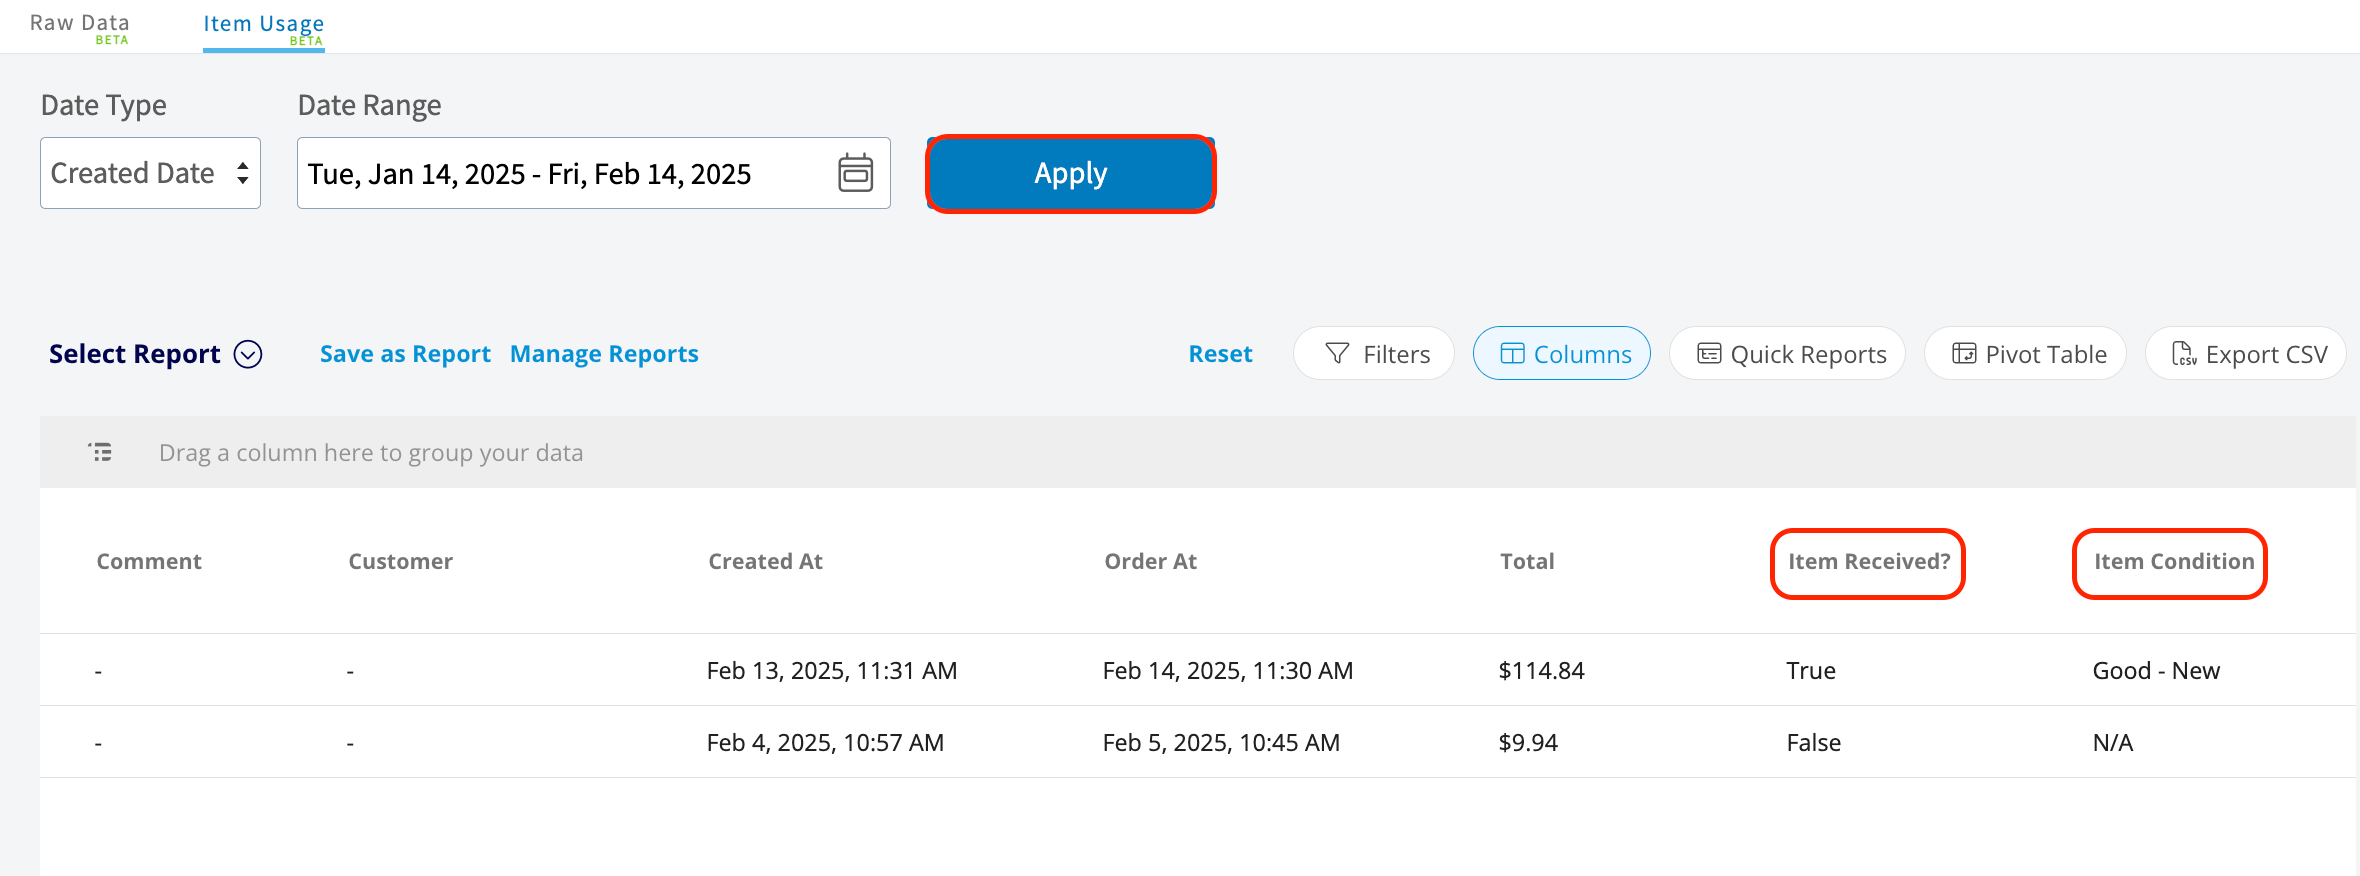
 To run a report, first go to the *Reporting* tab on the menu on the left hand side of your screen. From here, you will need to scroll over on the menu bar at the top of your screen to locate the *Orders* tab. Then, select *Item Usage* and select your desired date range before pressing the *Load Data* button.
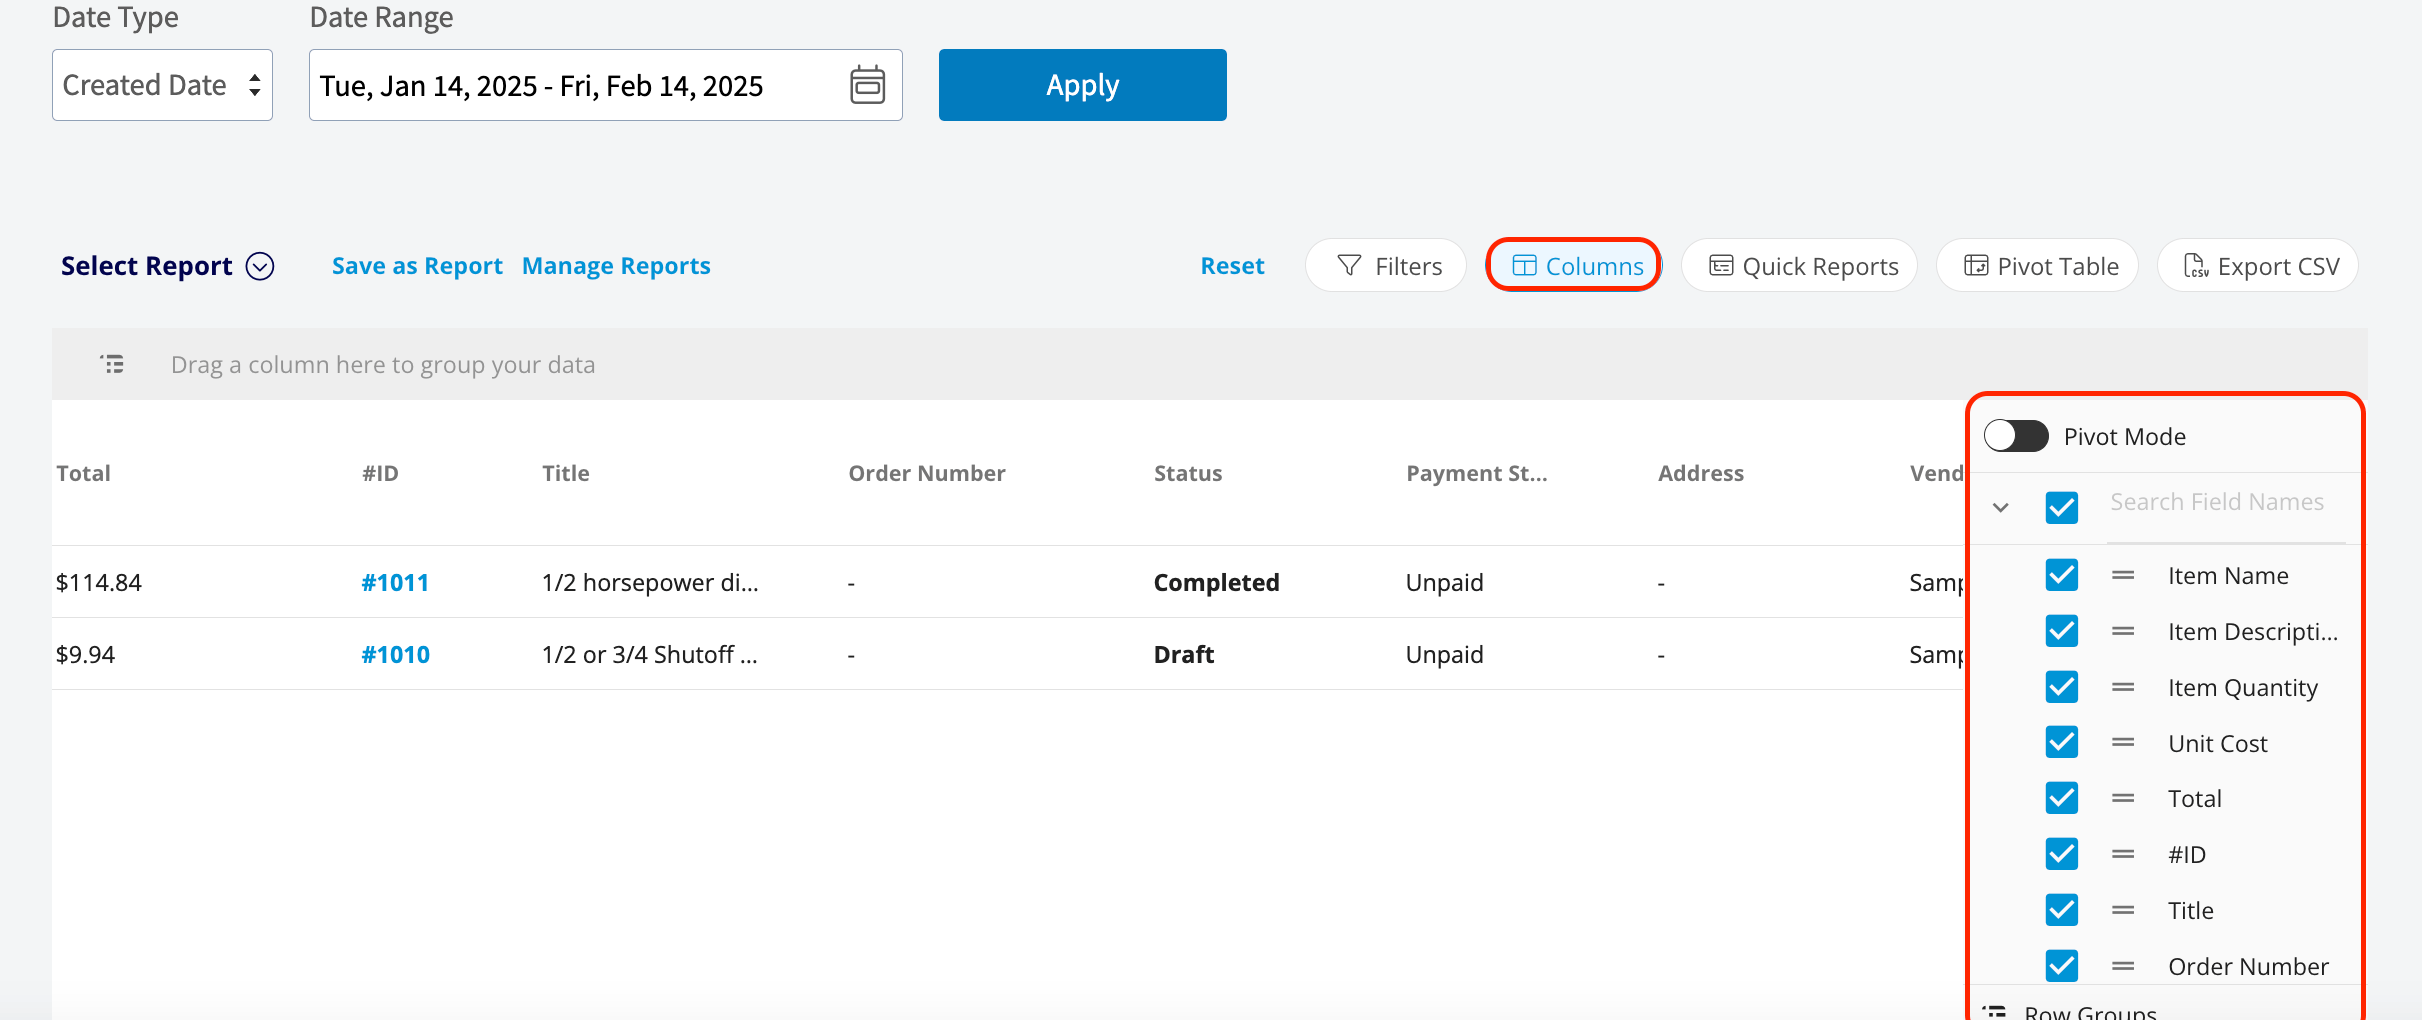
 Upon loading the data, use the *Columns* to customize your report to your liking. Feel free to check or uncheck each box depending on what you are reporting on. Here is where you can check or uncheck the boxes for the purchase order line item custom fields we created.
 After clicking on the blue *Apply* button, your custom report will be created. You will see here that the two custom fields I created for my purchase order line items are visible.
 ***
# Step-by-Step Video Tutorial of Line Item Custom Fields
***
**Have additional questions?**
*Contact us at [support@fieldpulse.com](mailto:support@fieldpulse.com) or use the chat feature in the bottom right corner of your screen.*
***
# Step-by-Step Video Tutorial of Line Item Custom Fields
***
**Have additional questions?**
*Contact us at [support@fieldpulse.com](mailto:support@fieldpulse.com) or use the chat feature in the bottom right corner of your screen.*