> ## Documentation Index
> Fetch the complete documentation index at: https://help.fieldpulse.com/llms.txt
> Use this file to discover all available pages before exploring further.
# Purchase Orders
> Enable purchase orders, then create and email supplier POs, replenish stock, and roll several POs into one customer estimate or invoice.
# Overview
Purchase Orders lets you generate POs for suppliers, send them by email, track inventory replenishment, and even combine multiple POs into a single estimate or invoice for your customer.
***
# Prerequisites
Before you can use Purchase Orders, make sure the following is in place:
* Purchase Orders are enabled in your account
***
# On Web: Admin Experience
## Enabling Purchase Orders
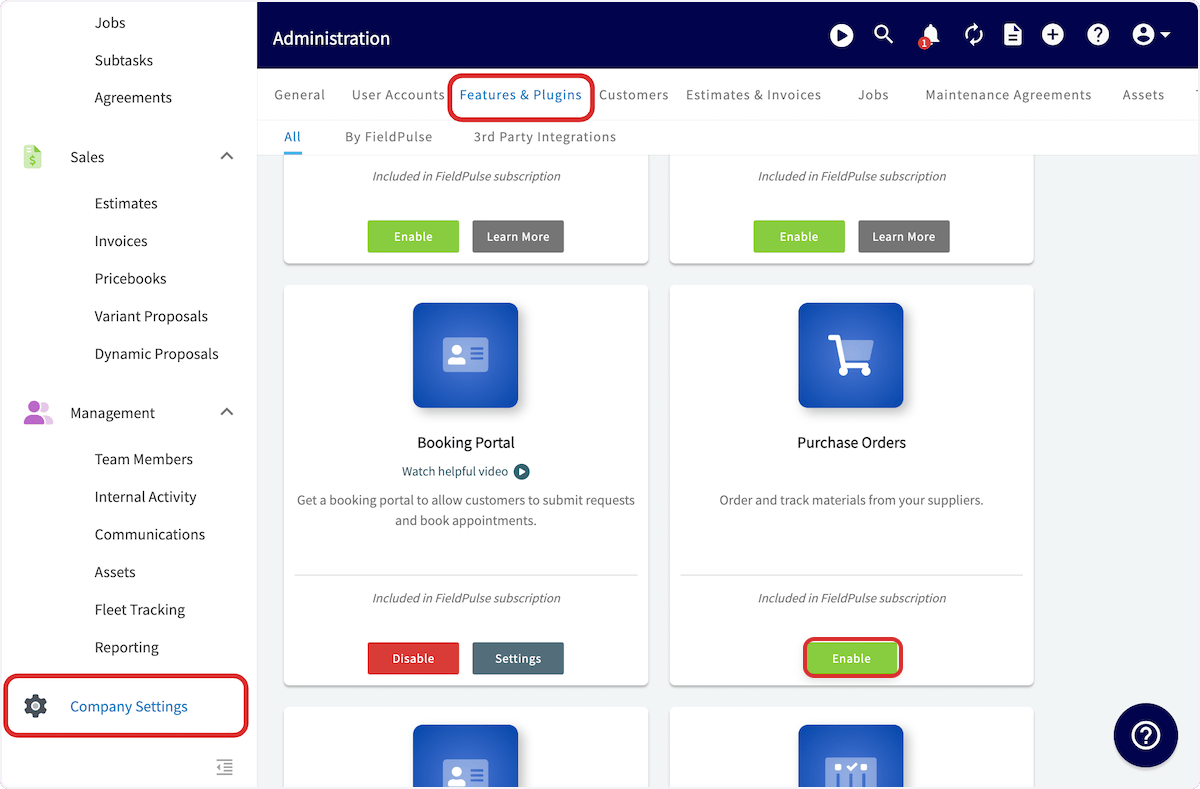
To begin using Purchase Orders, you'll first need to enable it. Start by clicking on *Company Settings* and selecting *Features & Plugins.* Navigate to *Purchase Orders* and select *Enable*. Now you're ready to begin ordering and tracking materials from your suppliers!
 ## Purchase Order Default Settings
We’re making the Purchase Order (PO) process faster and easier by letting you set default values for key fields like delivery address and contact name. This means less time spent on manual adjustments and fewer chances for mistakes.
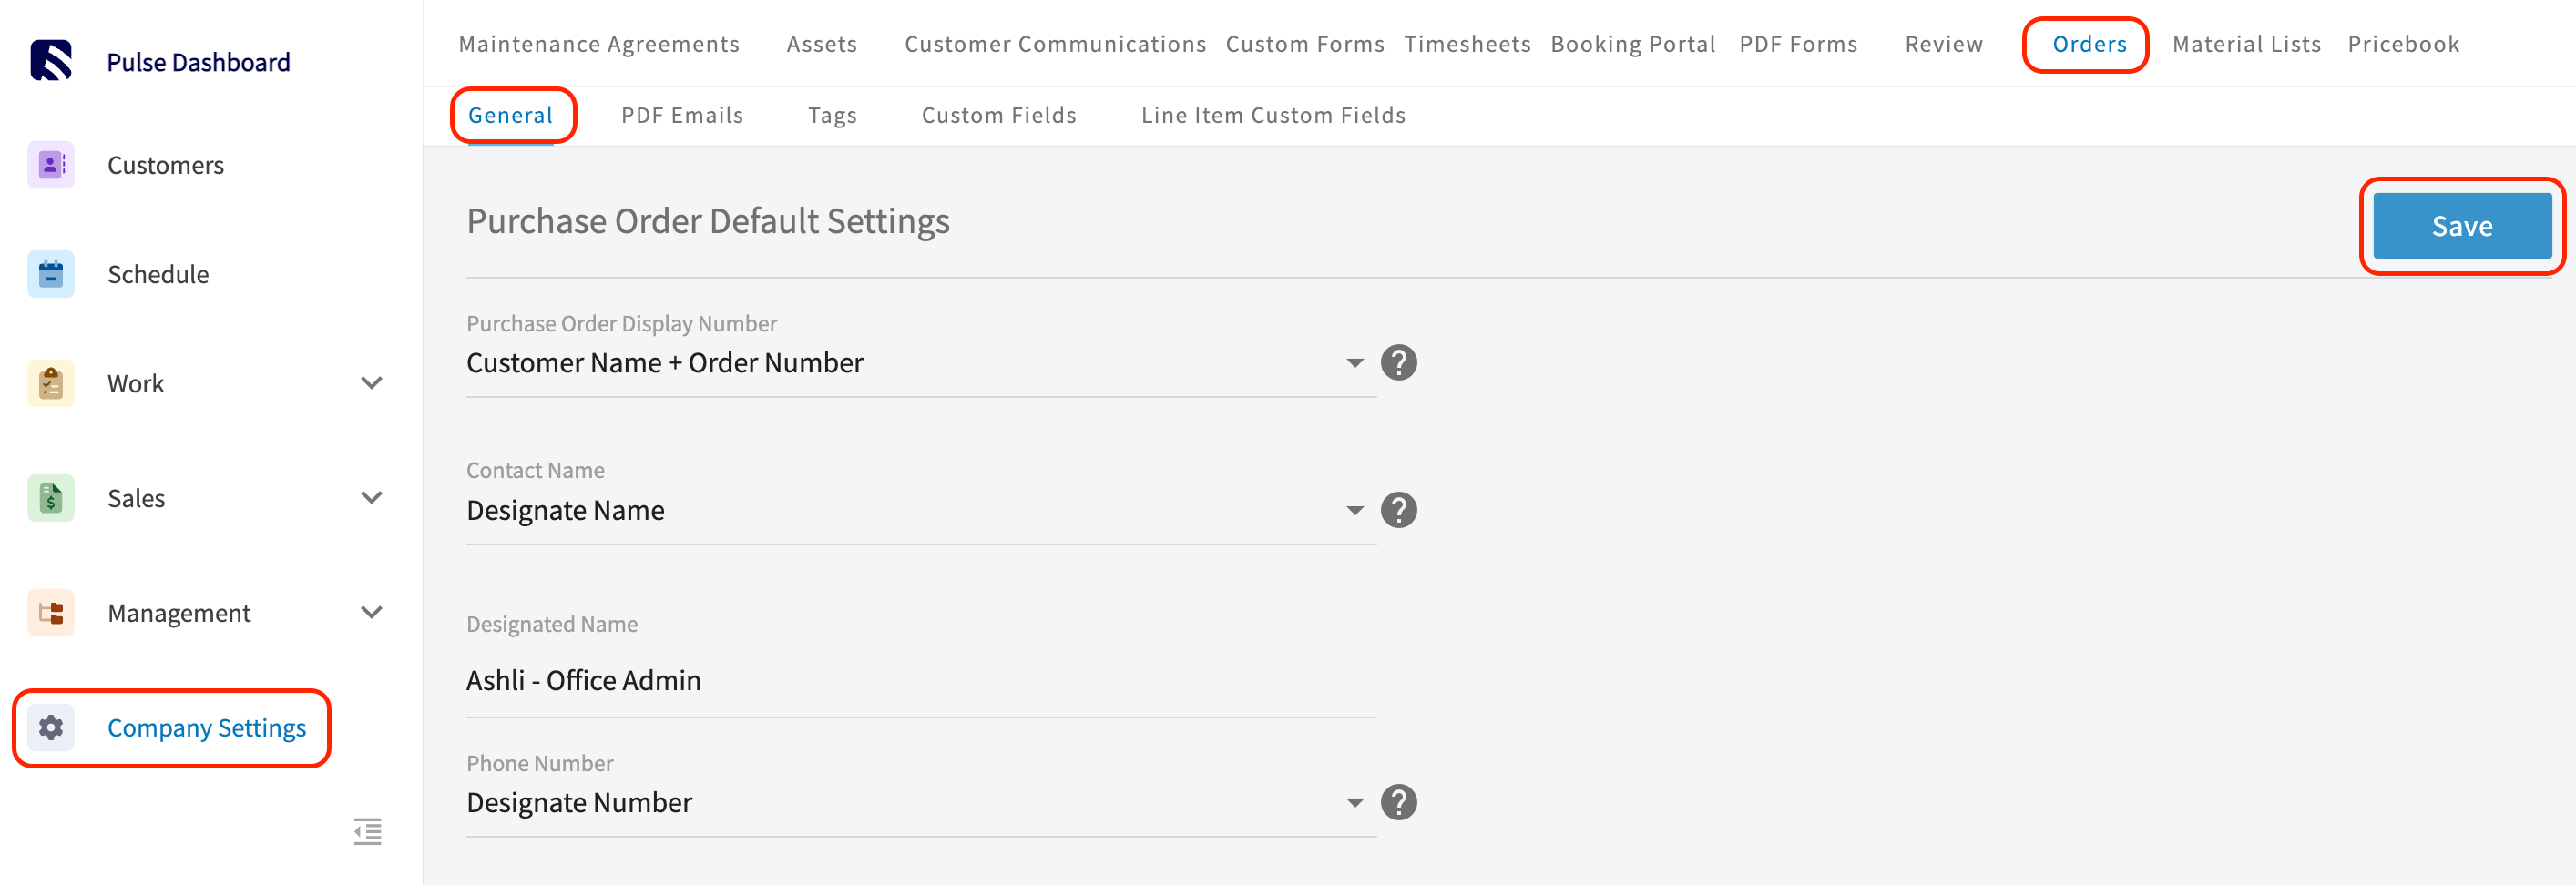
To get started, navigate to *Company Settings* > *Orders* tab > *General* subtab.
## Purchase Order Default Settings
We’re making the Purchase Order (PO) process faster and easier by letting you set default values for key fields like delivery address and contact name. This means less time spent on manual adjustments and fewer chances for mistakes.
To get started, navigate to *Company Settings* > *Orders* tab > *General* subtab.
 ### Default Settings
**Purchase Order Display Number:** Choose between the following options:
* Order Number
* Customer Name + Order Number
* Project Title + Order Number
* Job Title + Order Number
* Job Number (Display number = Purchase Order's related Job Number)
Your selection here will customize how your Purchase Order Number will appear on your Purchase Order **PDF only**.
**Contact Name:** Choose between the following options:
* **Assigned Team Member:** The name of the team member creating the Purchase Order record will appear.
* **Company Name:** The name of your business will appear.
* **Designate Name:** Use free text to enter in any name you want to appear.
Your selection here will customize how your Contact Name will appear on your Purchase Order **PDF only**.
**Phone Number:** Choose between the following options:
* **Assigned Team Member:** The phone number associated with the team member creating the Purchase Order record will appear.
* **Designate Number:** Use free text to enter in any number you want to appear.
Your selection here will automatically fill in the *Phone Number* field when creating new Purchase Order records. This will be the default setting moving forward, but it can still be adjusted when creating or editing any Purchase Order.
**Contact Email:** Choose between the following options:
* **Assigned Team Member:** The email address associated with the team member creating the Purchase Order record will appear.
* **Designate Number:** Use free text to enter in any email address you want to appear.
Your selection here will automatically fill in the *Email* field when creating new Purchase Order records. This will be the default setting moving forward, but it can still be adjusted when creating or editing any Purchase Order.
**Delivery Address:** Choose between the following options:
* **Blank:** FieldPulse will automatically leave this field blank.
* **Related Record Location Address:** FieldPulse will automatically insert the address from the record linked to this Purchase Order (Customer, Job, Project, Estimate, Invoice record).
* **Company Address:** The address of your business will automatically populate here.
* **Specify Address:** Use free text to enter in any delivery address you want to appear.
Your selection here will automatically fill in the *Delivery Address* field when creating new Purchase Order records. This will be the default setting moving forward, but it can still be adjusted when creating or editing any Purchase Order.
**Display Customer on Order PDF:** Decide between two options:
* **If toggle is on:** The name of your customer will appear on your Purchase Order PDF.
* **If toggle is off:** The name of your customer will not appear on your Purchase Order PDF.
**Enable Purchase Order Creation Based on Item Vendors:** Decide between two options:
* **If toggle is on:** Purchase Orders will be automatically created for your Line Items that have a Supplier associated with them.
* **If toggle is off:** No Purchase Orders will be automatically created for you Line Items.
## PDF Email Defaults for Your Purchase Orders
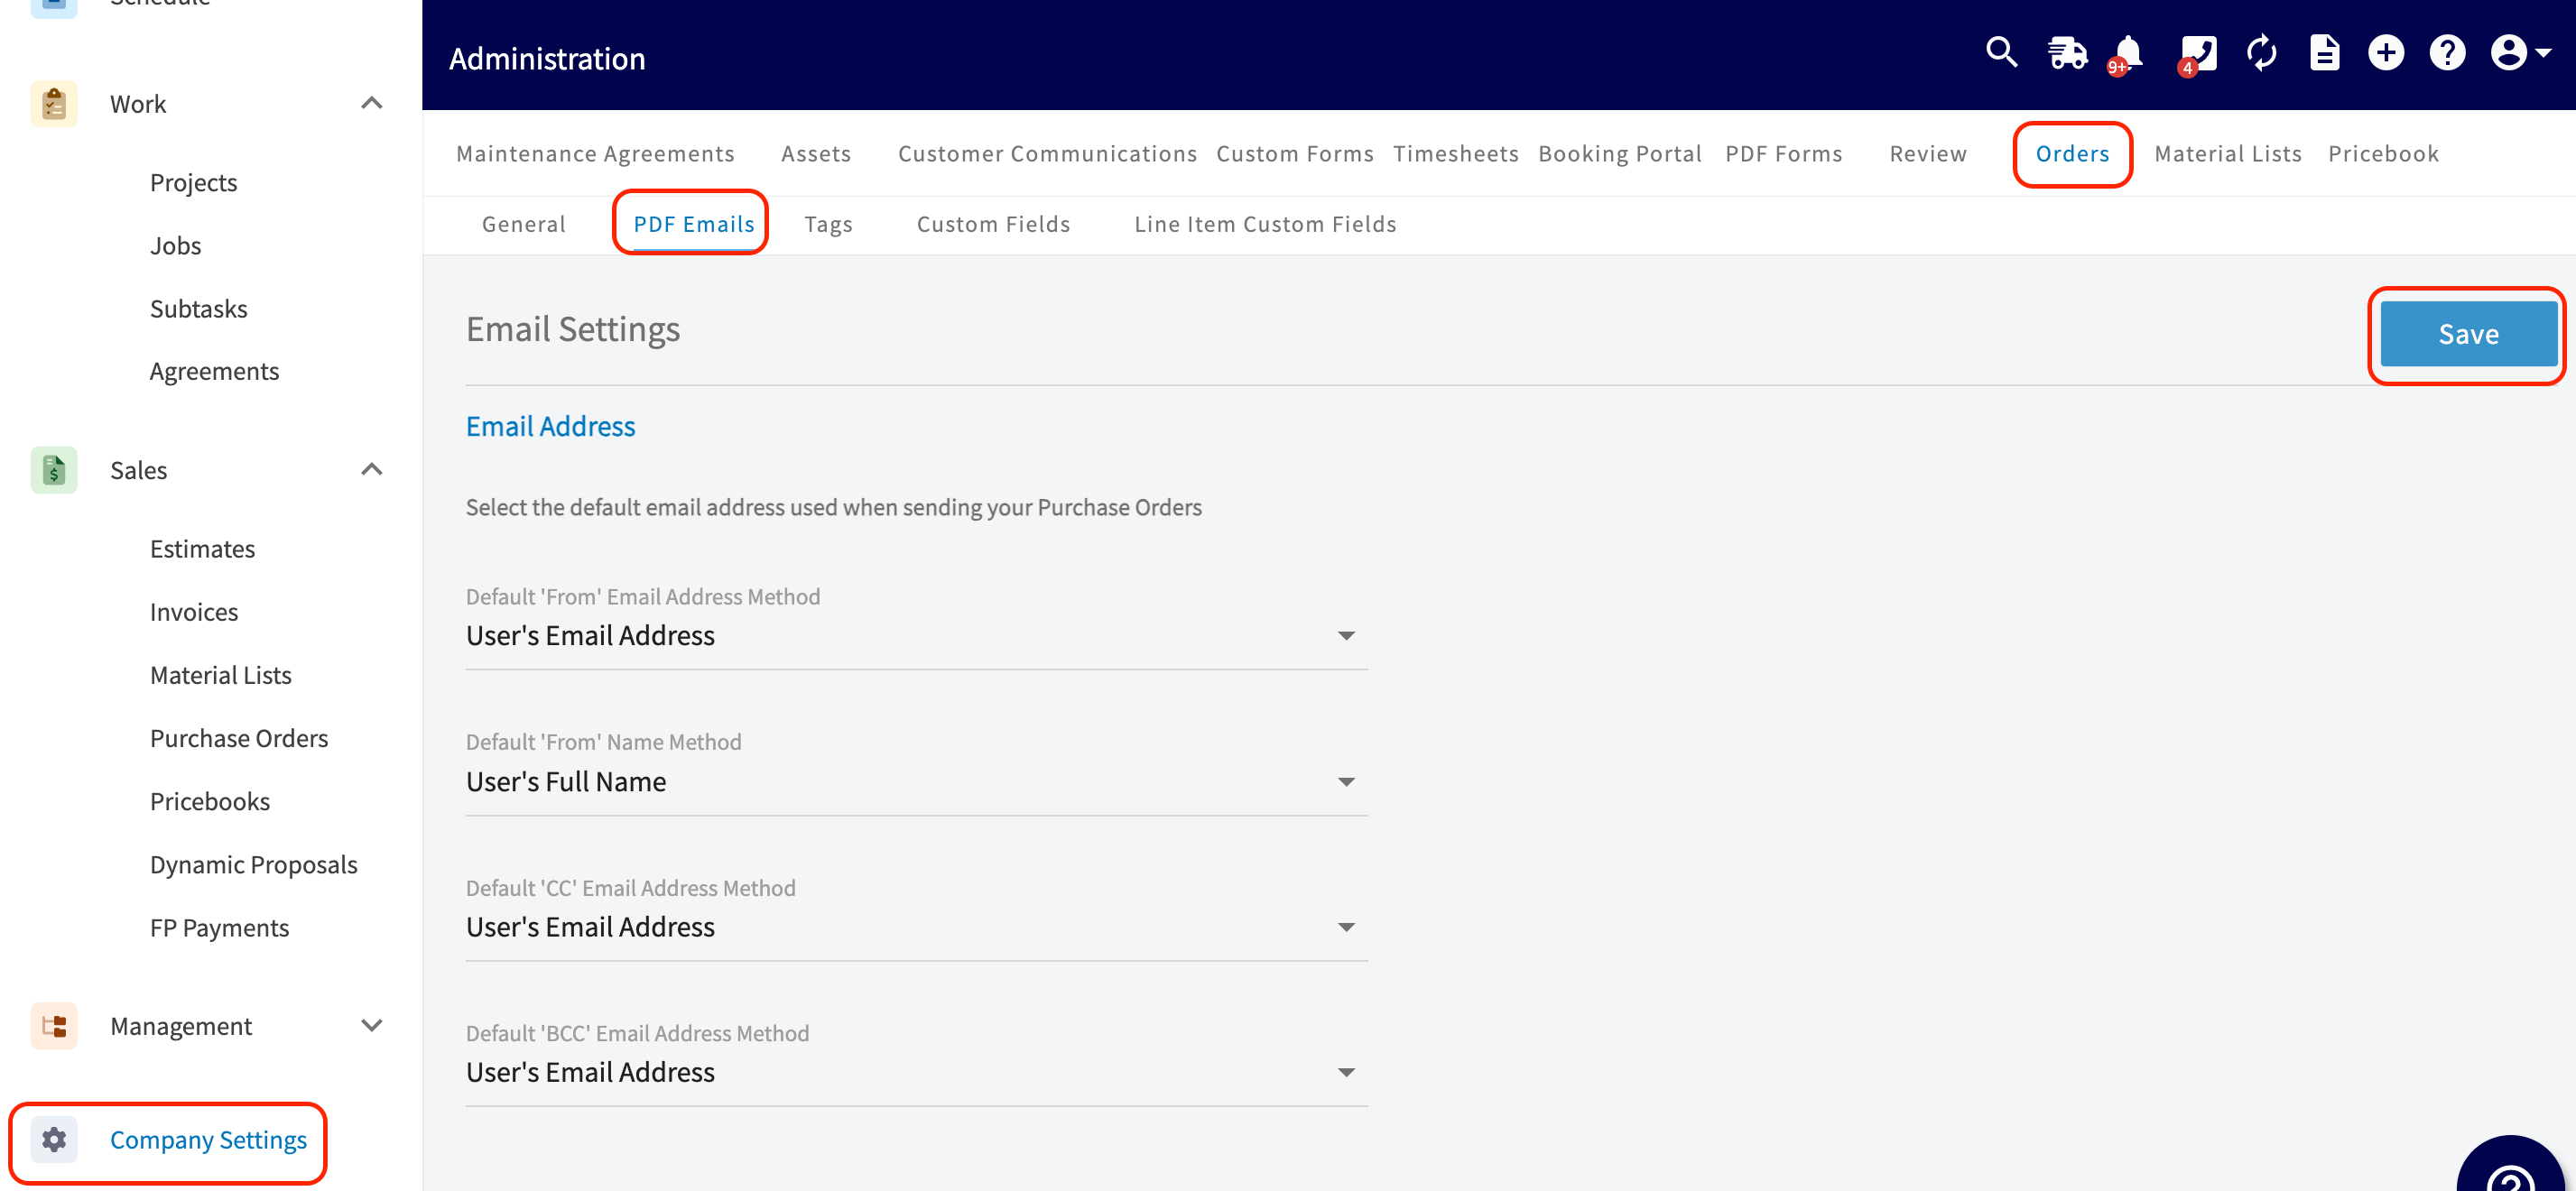
You can select the default email address(s) that you want used when sending out your Purchase Order records.
### Default Settings
**Purchase Order Display Number:** Choose between the following options:
* Order Number
* Customer Name + Order Number
* Project Title + Order Number
* Job Title + Order Number
* Job Number (Display number = Purchase Order's related Job Number)
Your selection here will customize how your Purchase Order Number will appear on your Purchase Order **PDF only**.
**Contact Name:** Choose between the following options:
* **Assigned Team Member:** The name of the team member creating the Purchase Order record will appear.
* **Company Name:** The name of your business will appear.
* **Designate Name:** Use free text to enter in any name you want to appear.
Your selection here will customize how your Contact Name will appear on your Purchase Order **PDF only**.
**Phone Number:** Choose between the following options:
* **Assigned Team Member:** The phone number associated with the team member creating the Purchase Order record will appear.
* **Designate Number:** Use free text to enter in any number you want to appear.
Your selection here will automatically fill in the *Phone Number* field when creating new Purchase Order records. This will be the default setting moving forward, but it can still be adjusted when creating or editing any Purchase Order.
**Contact Email:** Choose between the following options:
* **Assigned Team Member:** The email address associated with the team member creating the Purchase Order record will appear.
* **Designate Number:** Use free text to enter in any email address you want to appear.
Your selection here will automatically fill in the *Email* field when creating new Purchase Order records. This will be the default setting moving forward, but it can still be adjusted when creating or editing any Purchase Order.
**Delivery Address:** Choose between the following options:
* **Blank:** FieldPulse will automatically leave this field blank.
* **Related Record Location Address:** FieldPulse will automatically insert the address from the record linked to this Purchase Order (Customer, Job, Project, Estimate, Invoice record).
* **Company Address:** The address of your business will automatically populate here.
* **Specify Address:** Use free text to enter in any delivery address you want to appear.
Your selection here will automatically fill in the *Delivery Address* field when creating new Purchase Order records. This will be the default setting moving forward, but it can still be adjusted when creating or editing any Purchase Order.
**Display Customer on Order PDF:** Decide between two options:
* **If toggle is on:** The name of your customer will appear on your Purchase Order PDF.
* **If toggle is off:** The name of your customer will not appear on your Purchase Order PDF.
**Enable Purchase Order Creation Based on Item Vendors:** Decide between two options:
* **If toggle is on:** Purchase Orders will be automatically created for your Line Items that have a Supplier associated with them.
* **If toggle is off:** No Purchase Orders will be automatically created for you Line Items.
## PDF Email Defaults for Your Purchase Orders
You can select the default email address(s) that you want used when sending out your Purchase Order records.
 ## Creating a Purchase Order
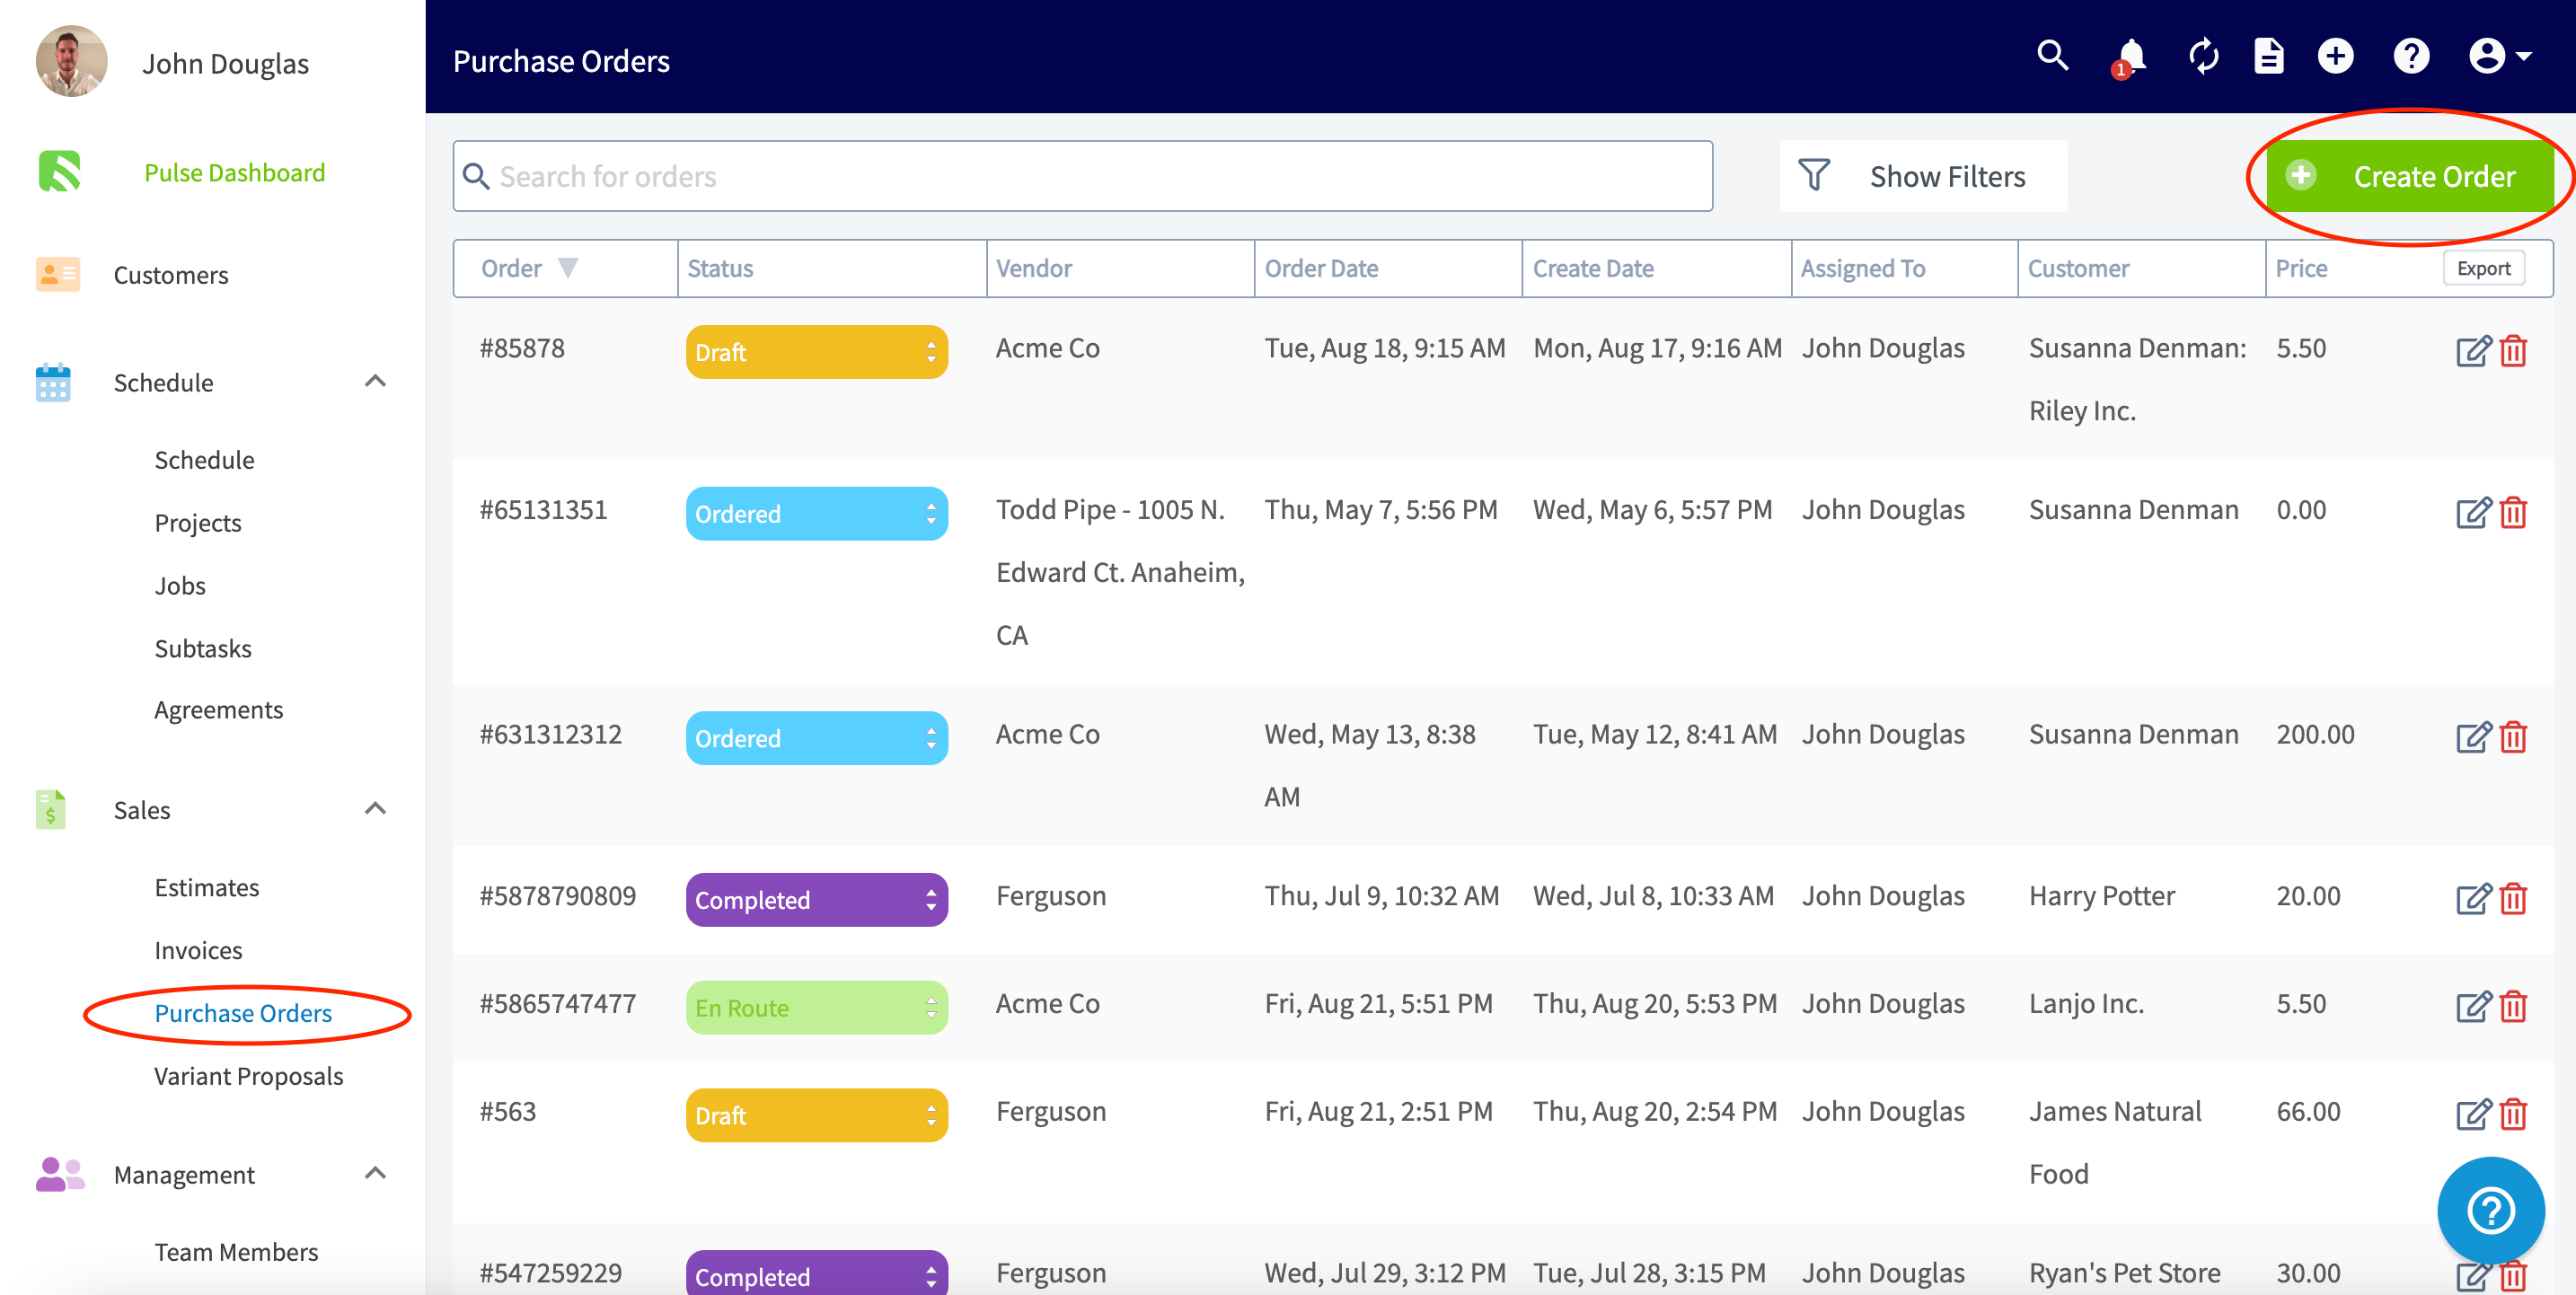
To get started, click on the *Purchase Orders* tab in the left side menu. Once on the *Purchase Orders* page, click the *Create Order* button.
## Creating a Purchase Order
To get started, click on the *Purchase Orders* tab in the left side menu. Once on the *Purchase Orders* page, click the *Create Order* button.
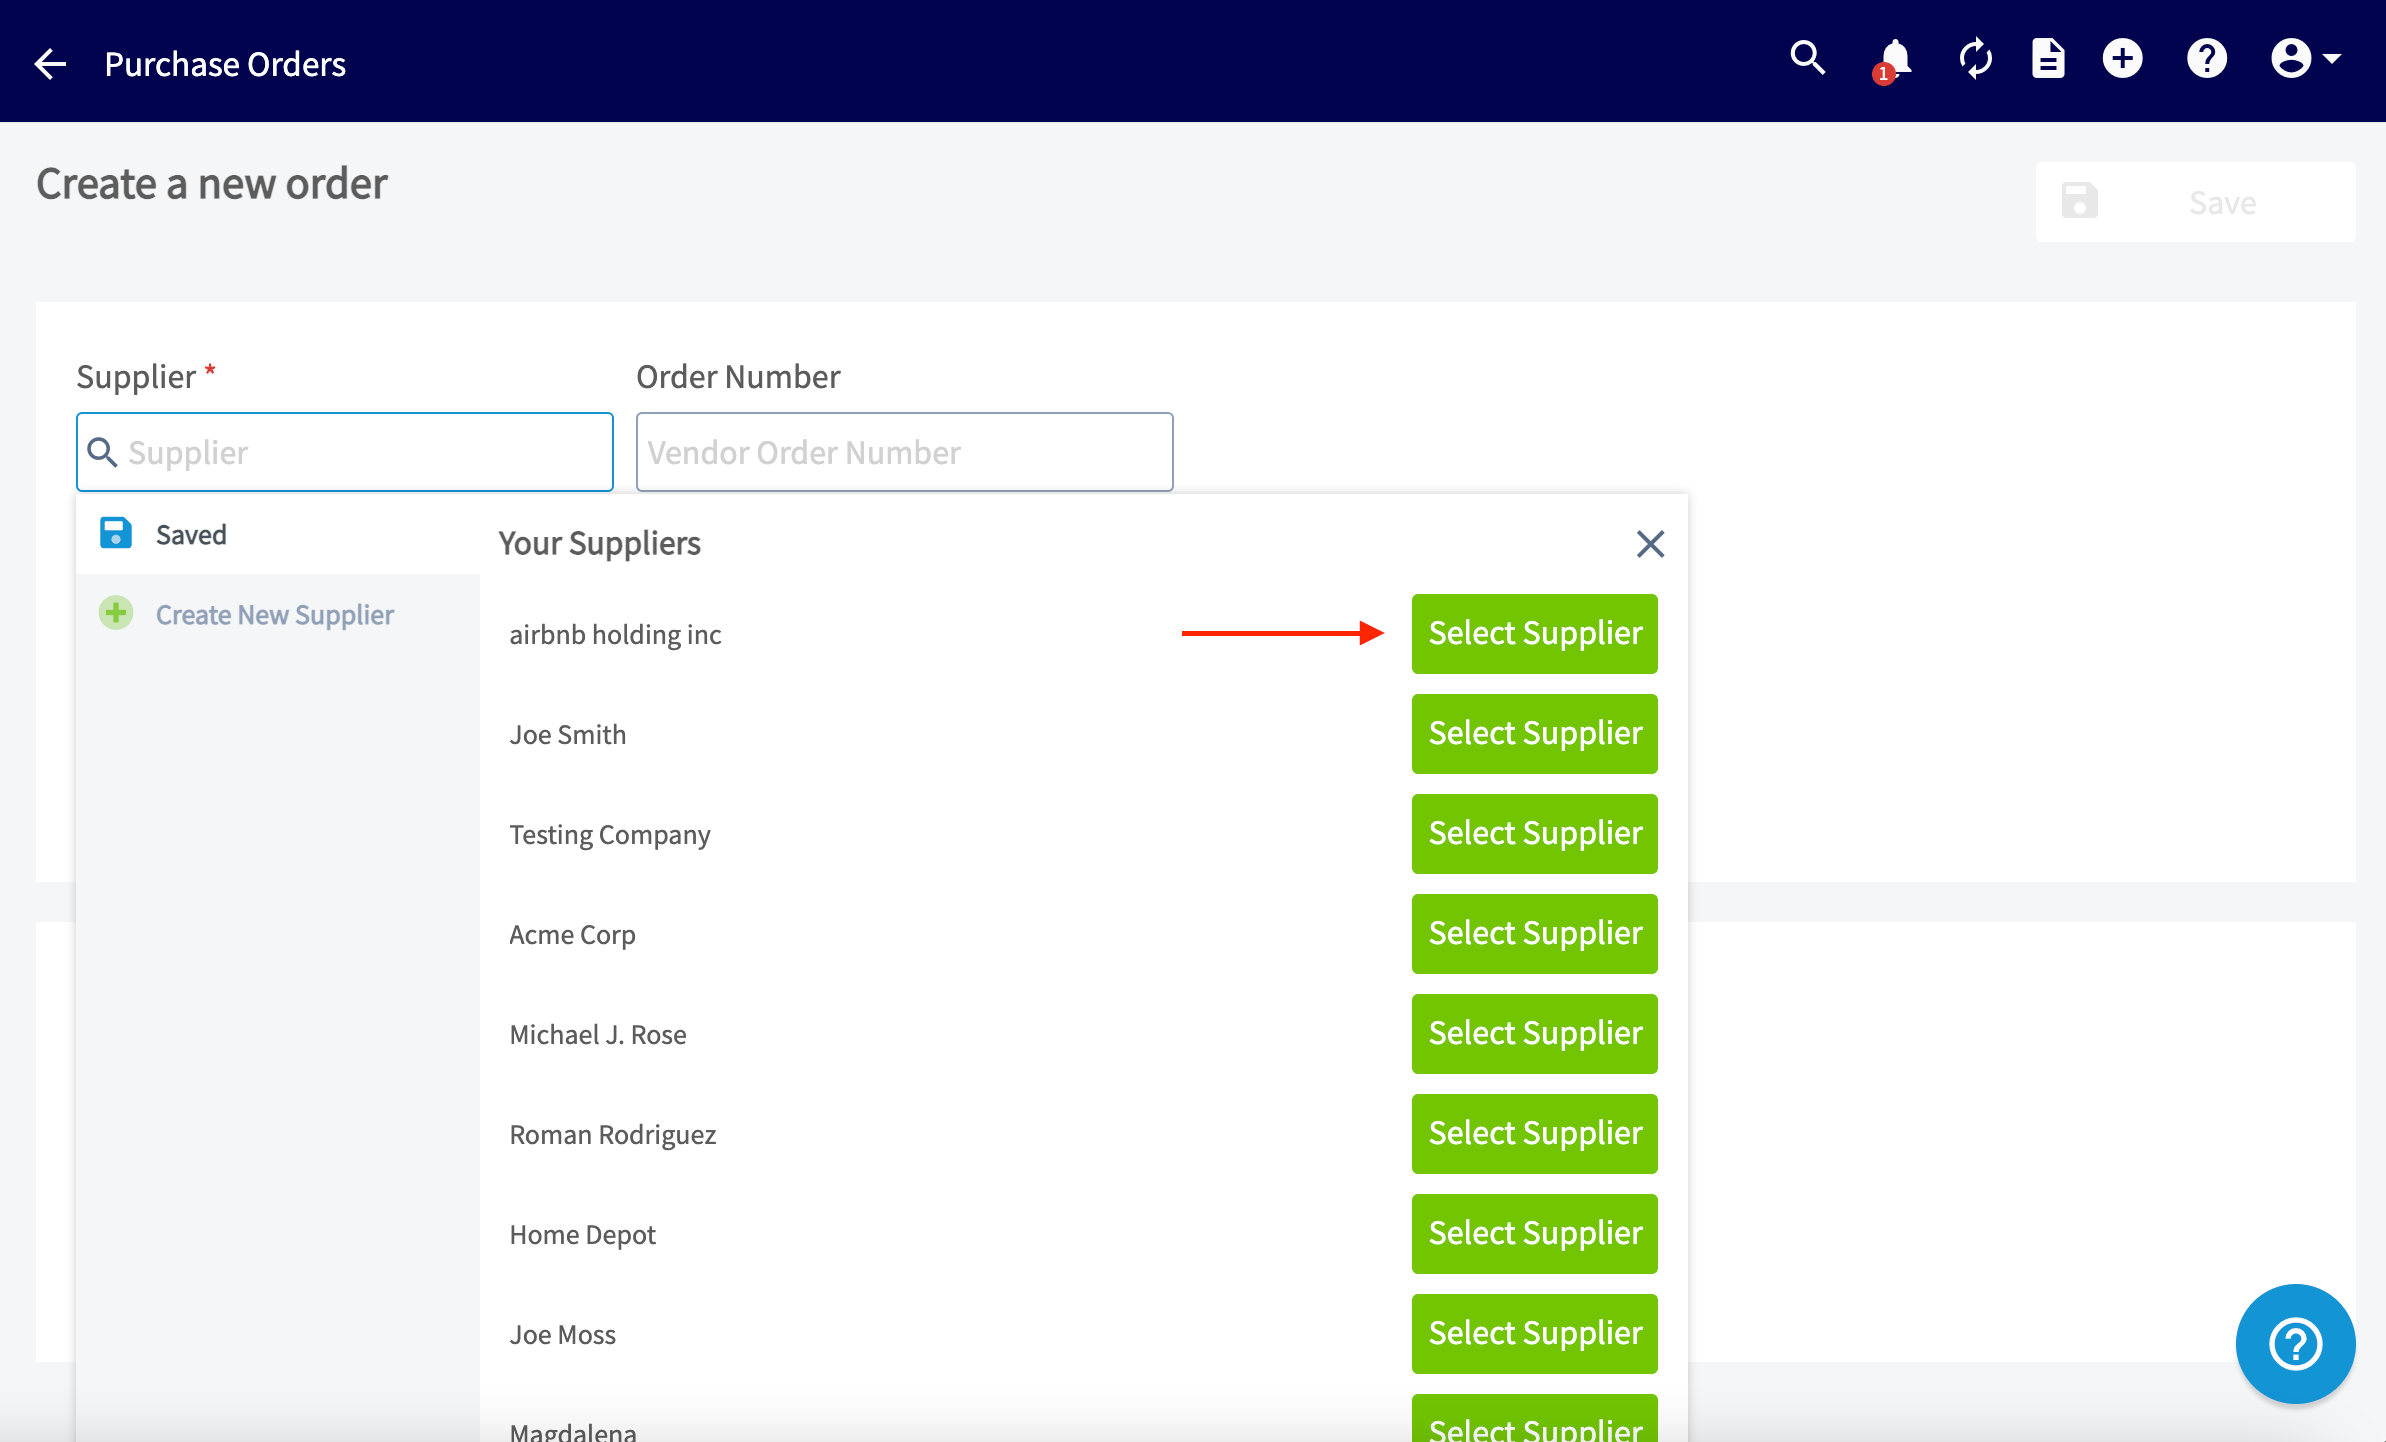
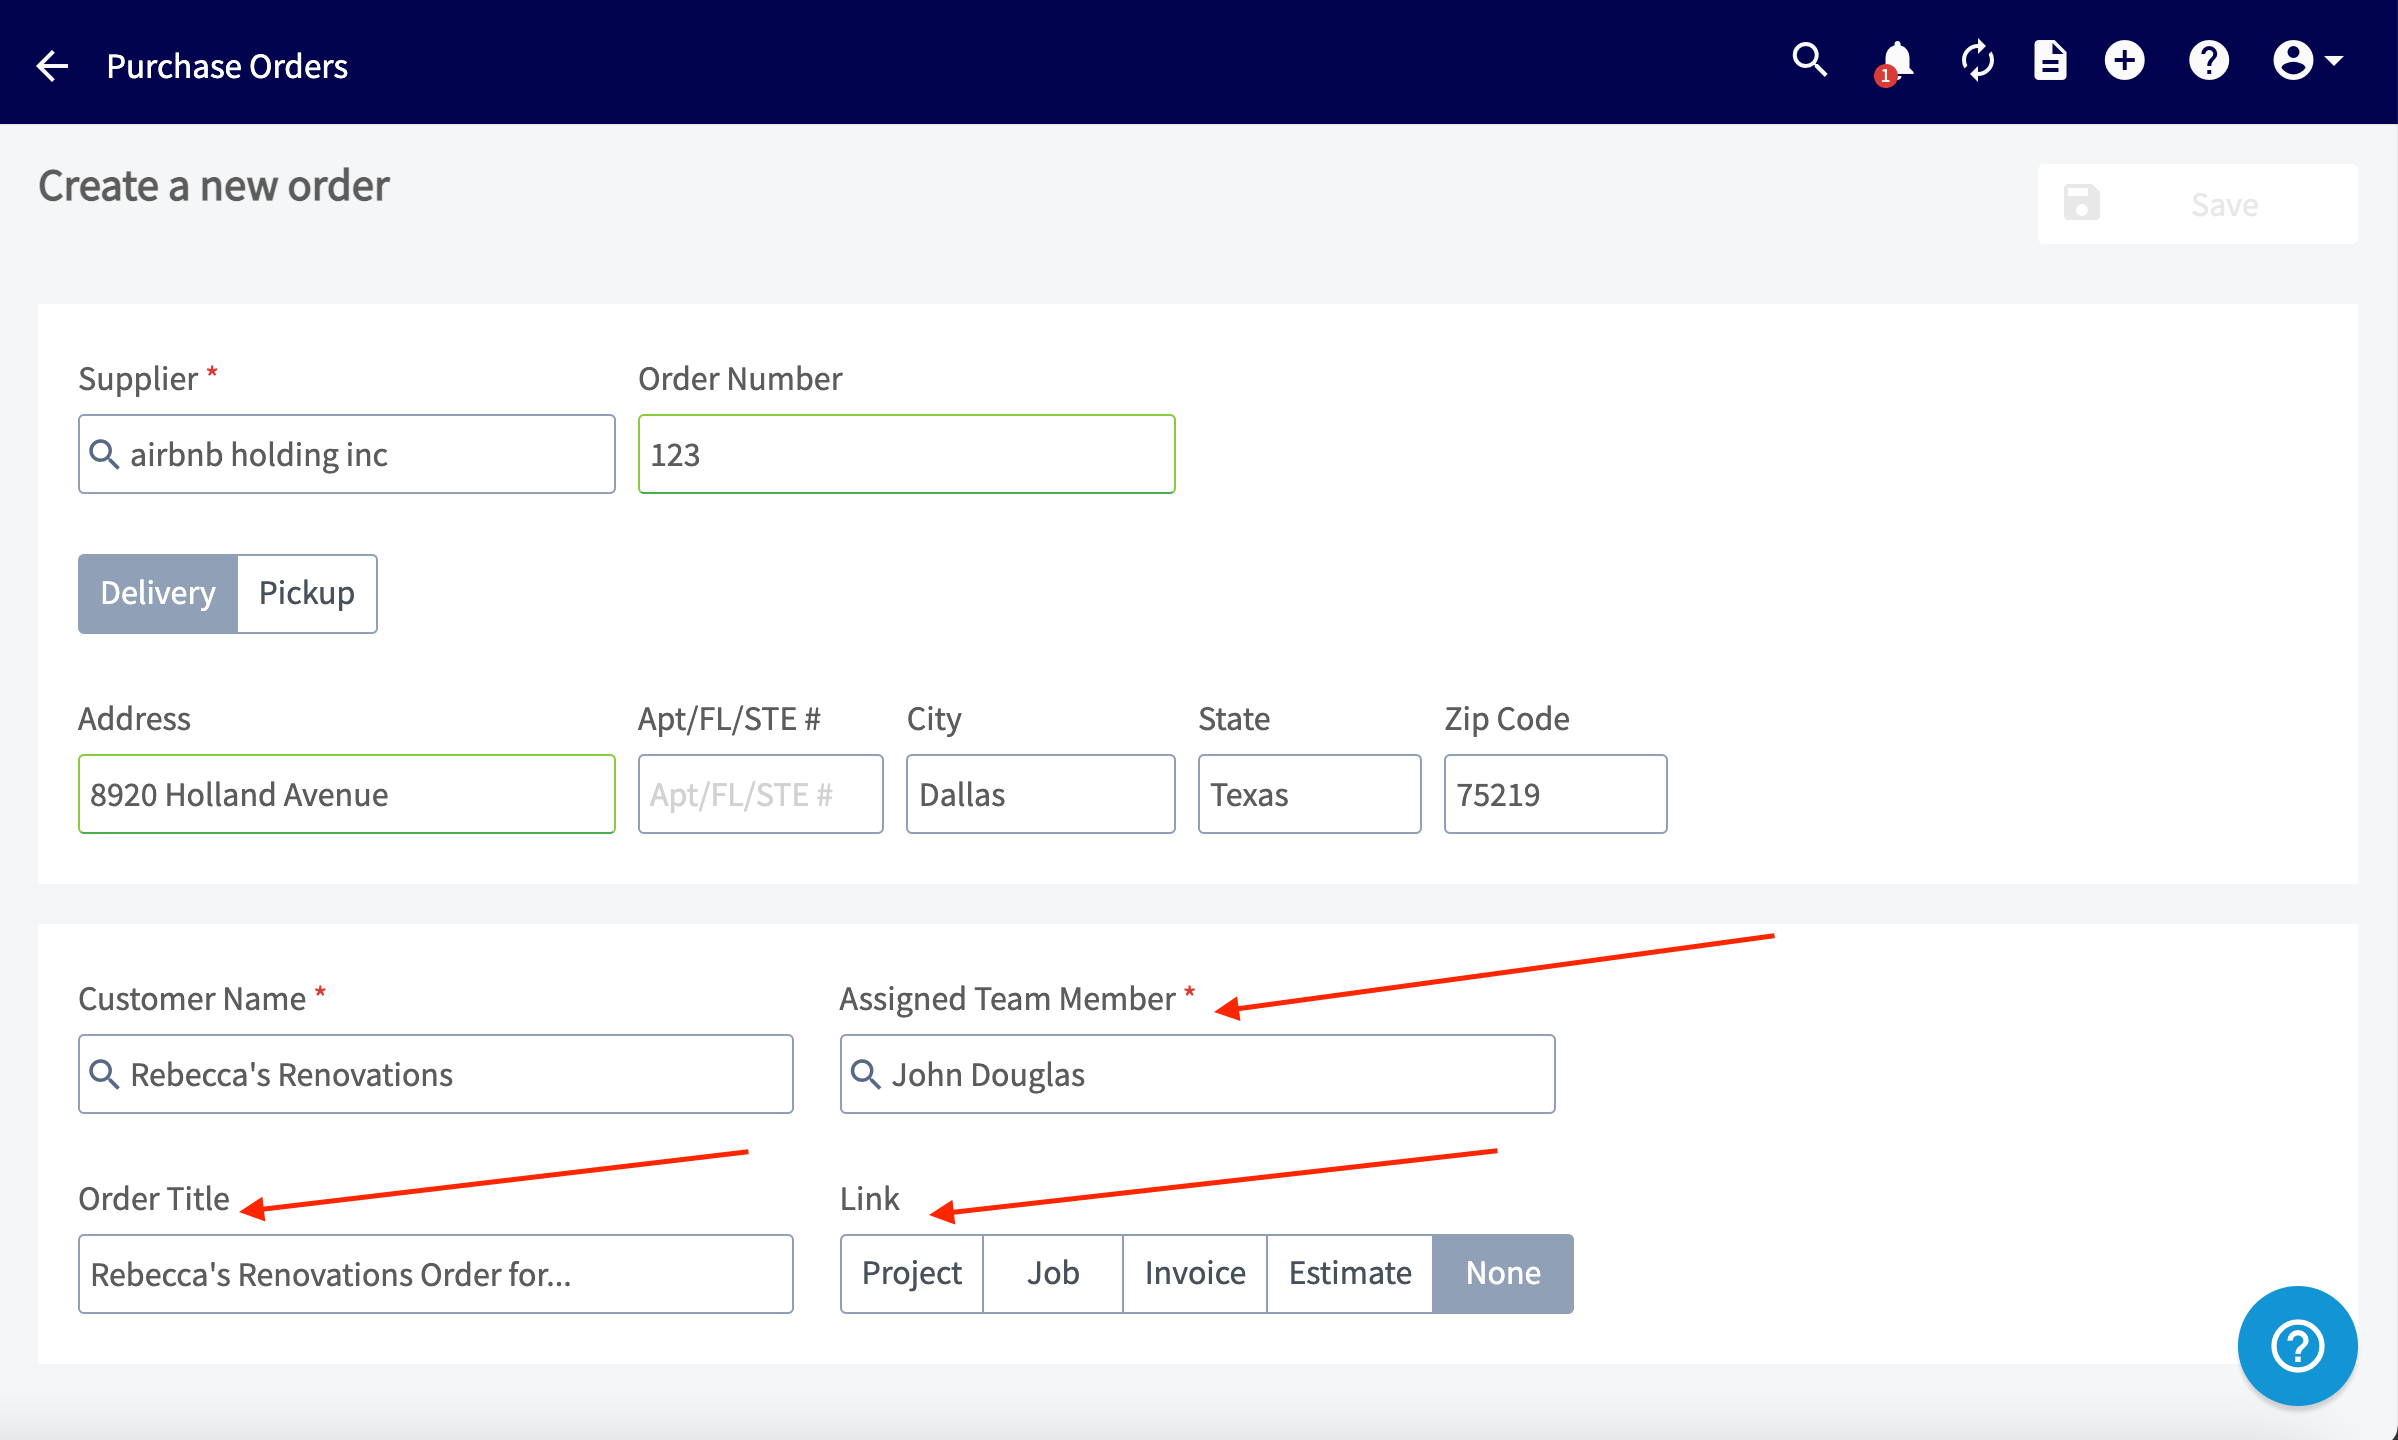
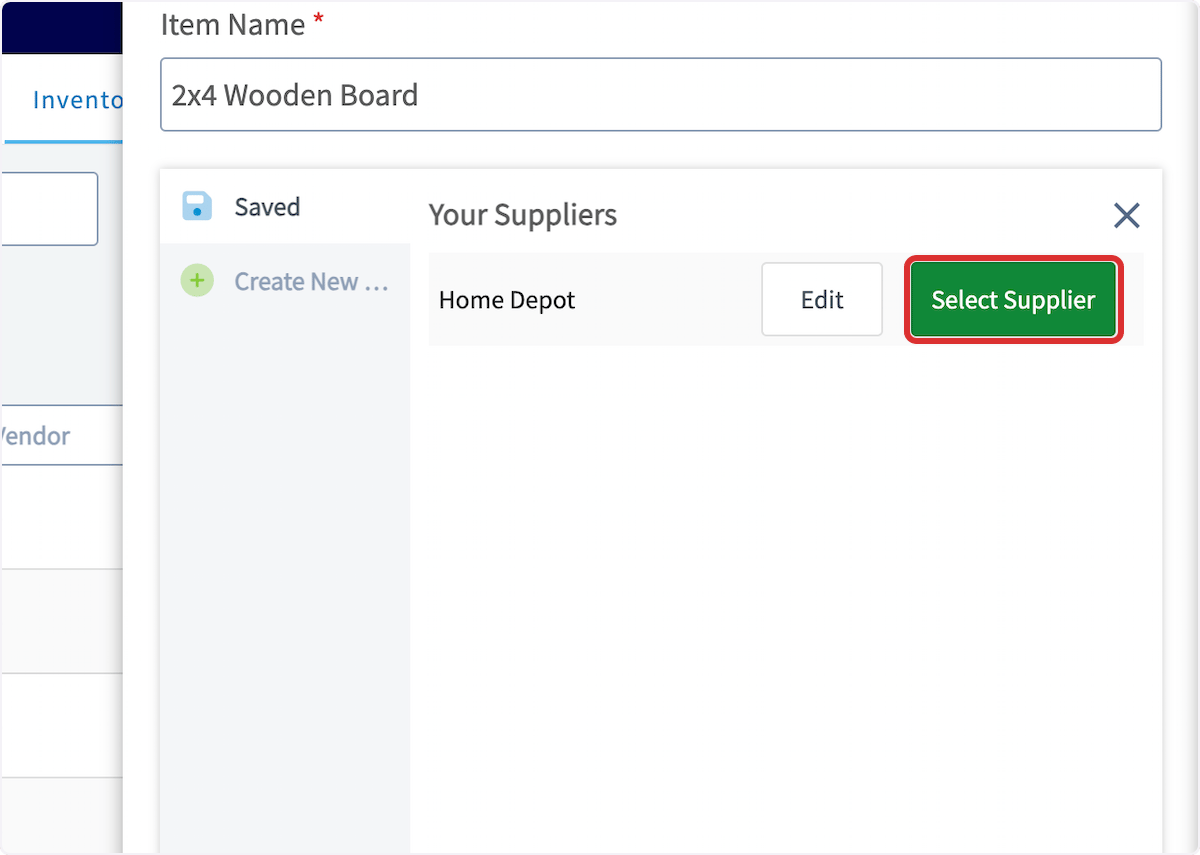
 On the next page you'll start by adding a supplier. Click in the supplier search box and you'll see a list of your saved suppliers. Identify the supplier you want to use and click *Select Supplier*.
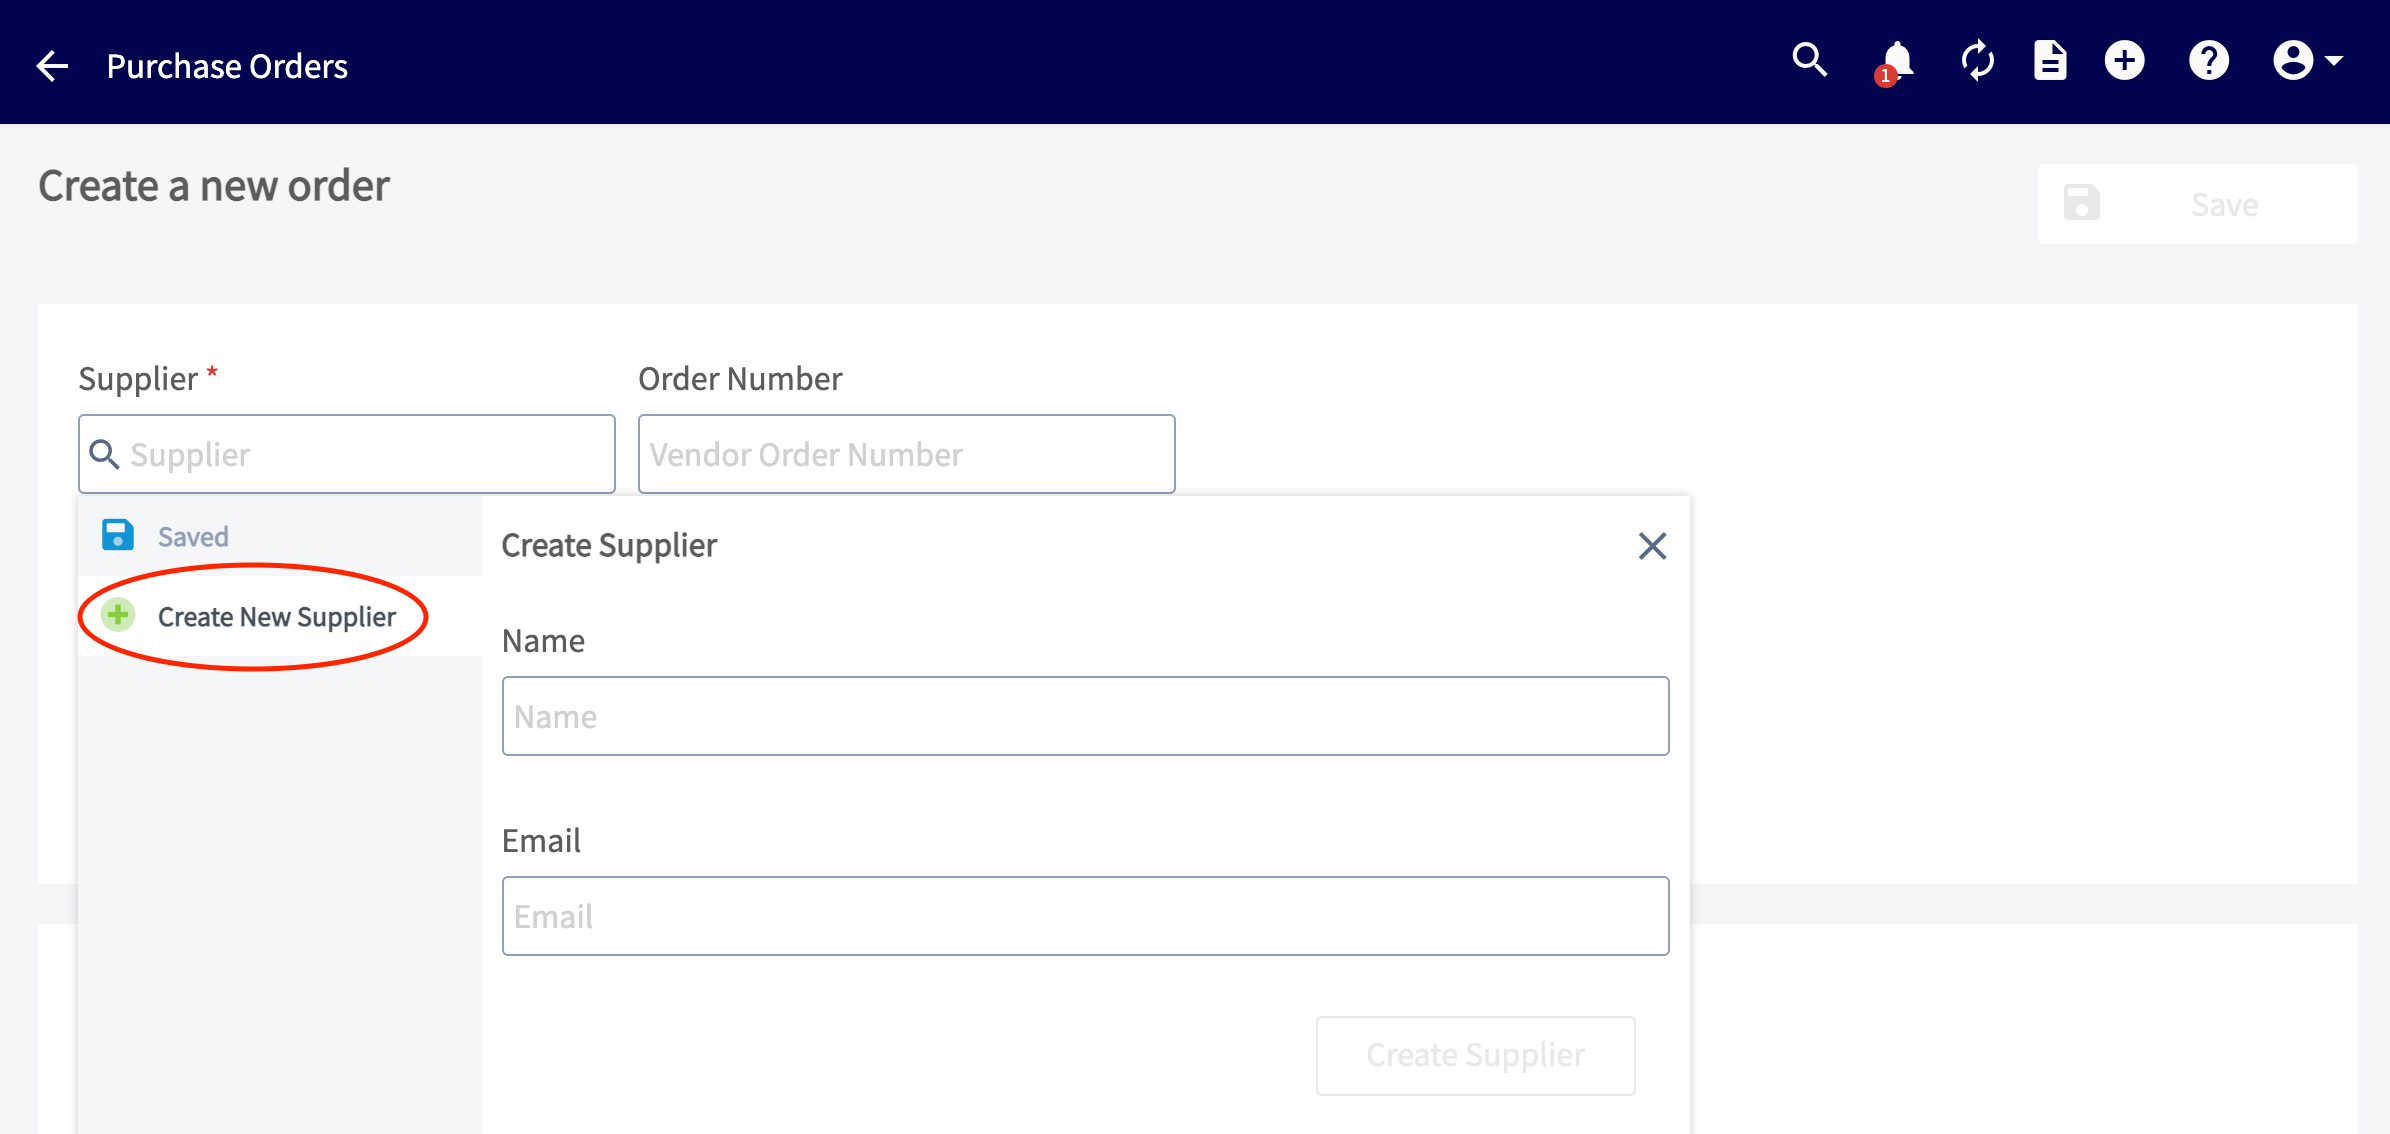
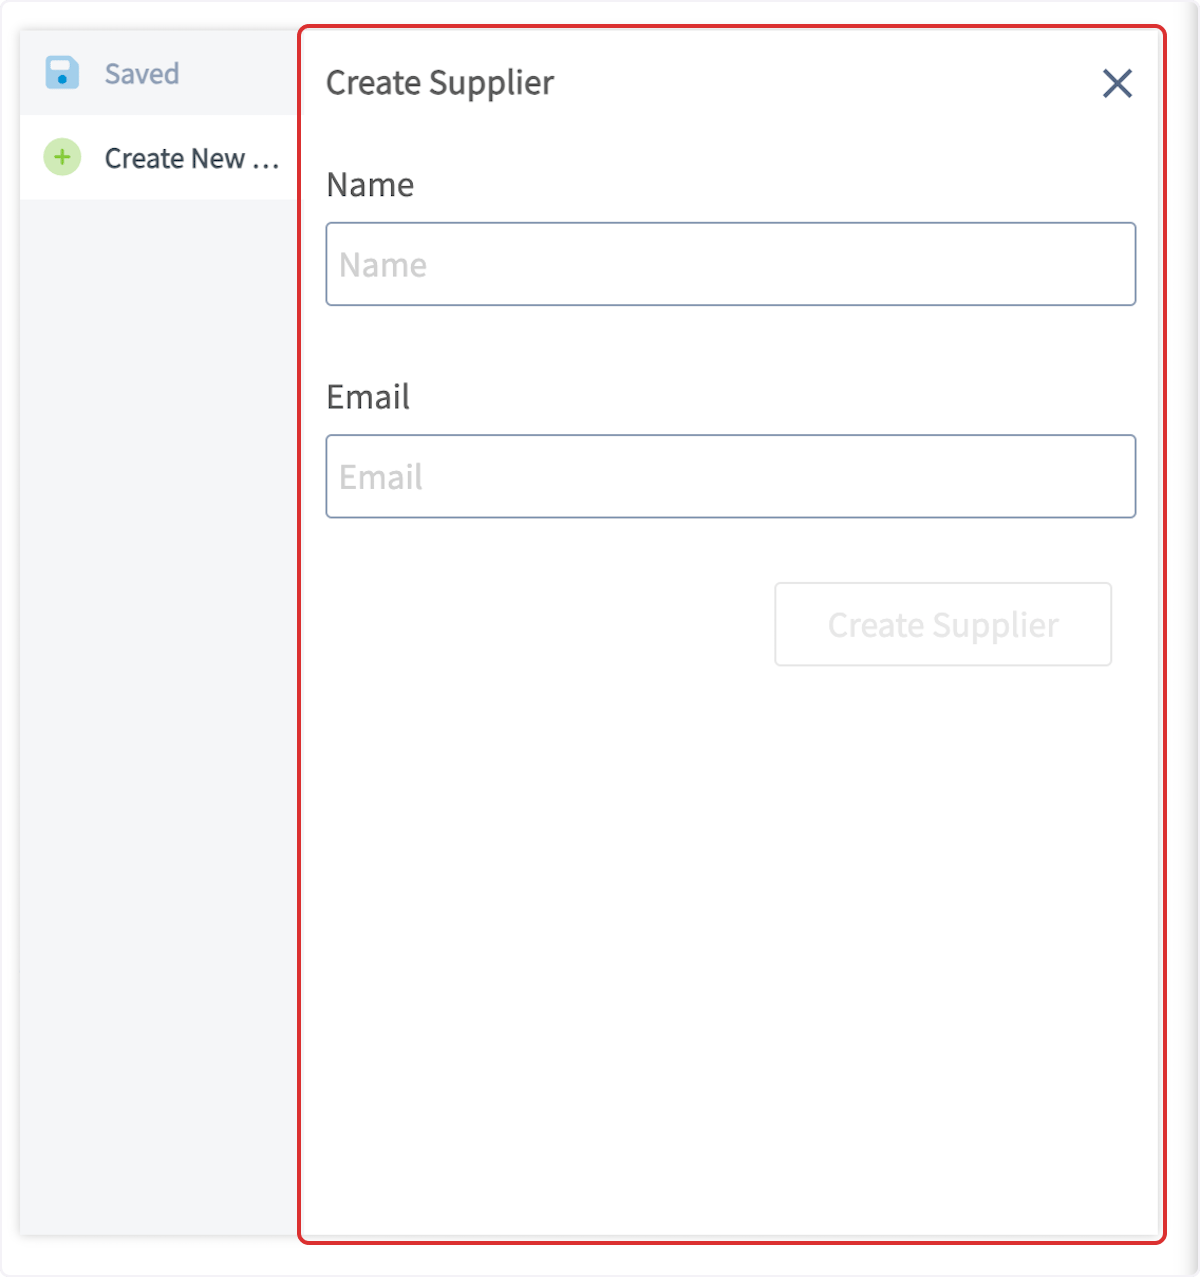
 If the supplier you want to use does not already exist, create one by clicking *Create New Supplier*, add the supplier's name and email, then click *Create Supplier*.
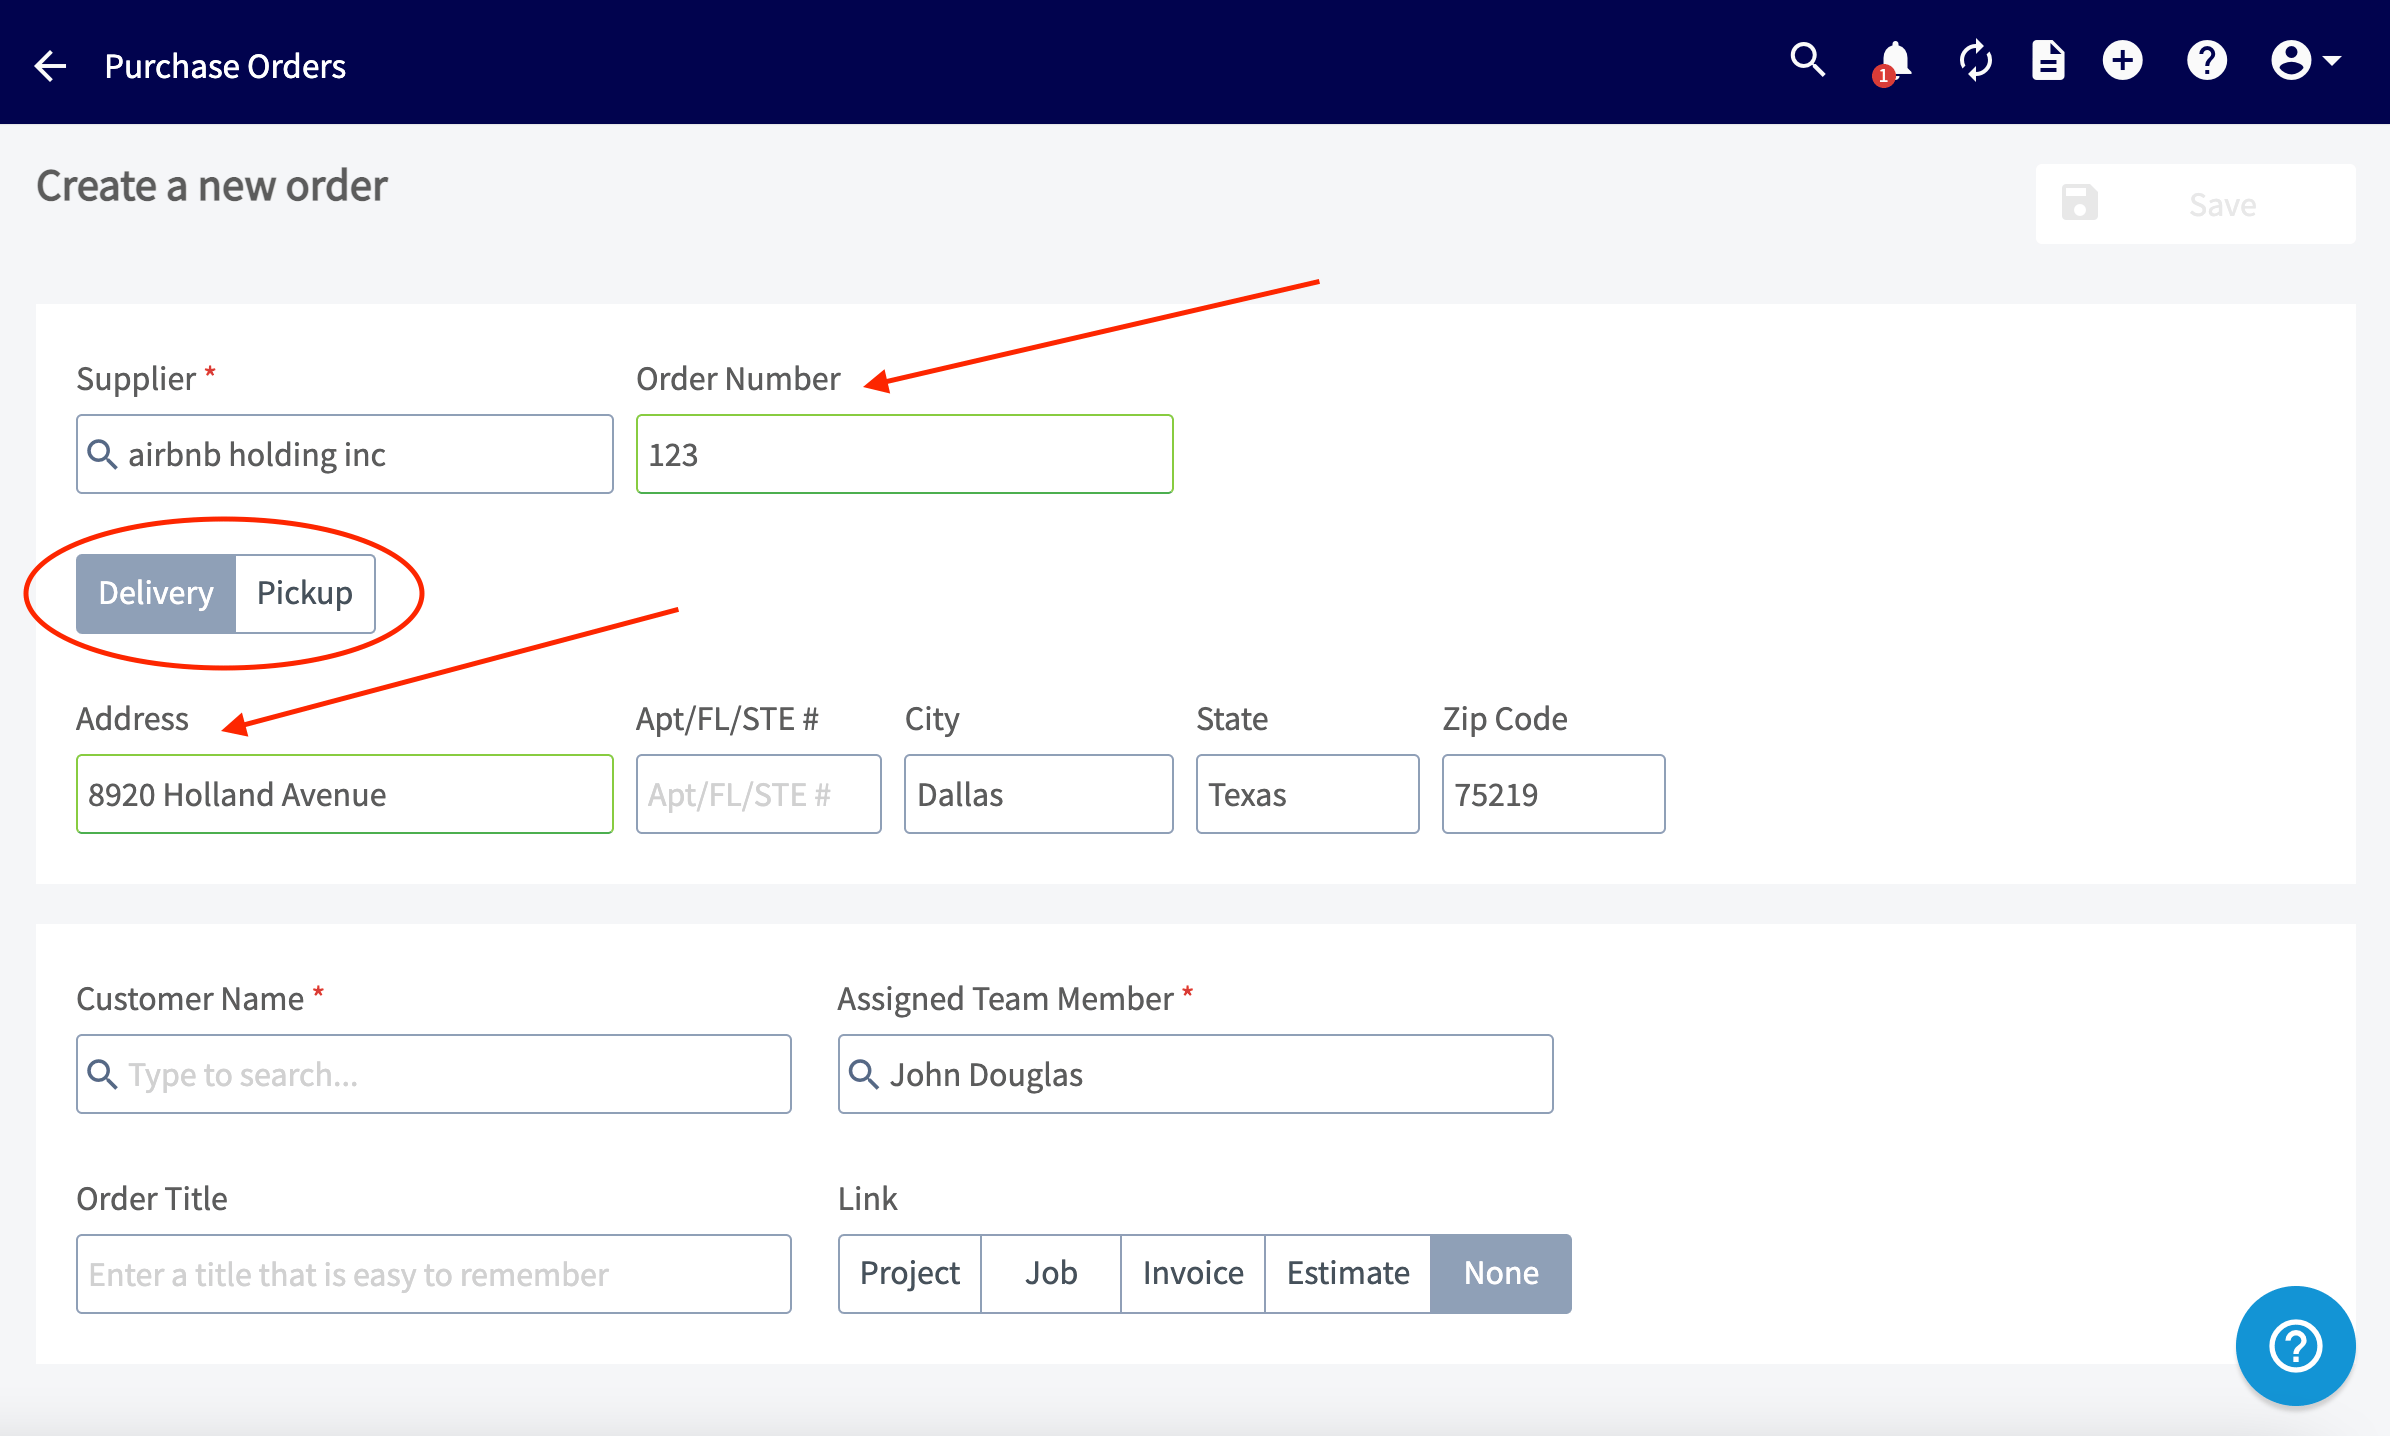
 Once you've added or selected the supplier, you'll enter the vendor order number, select pick-up or delivery, and enter the pick-up or delivery address.
The *Expected Delivery Date* must be at least 2 hours from the current time. If you select a date/time sooner than that, FieldPulse won't let you save the Purchase Order until it's adjusted.
Once you've added or selected the supplier, you'll enter the vendor order number, select pick-up or delivery, and enter the pick-up or delivery address.
The *Expected Delivery Date* must be at least 2 hours from the current time. If you select a date/time sooner than that, FieldPulse won't let you save the Purchase Order until it's adjusted.
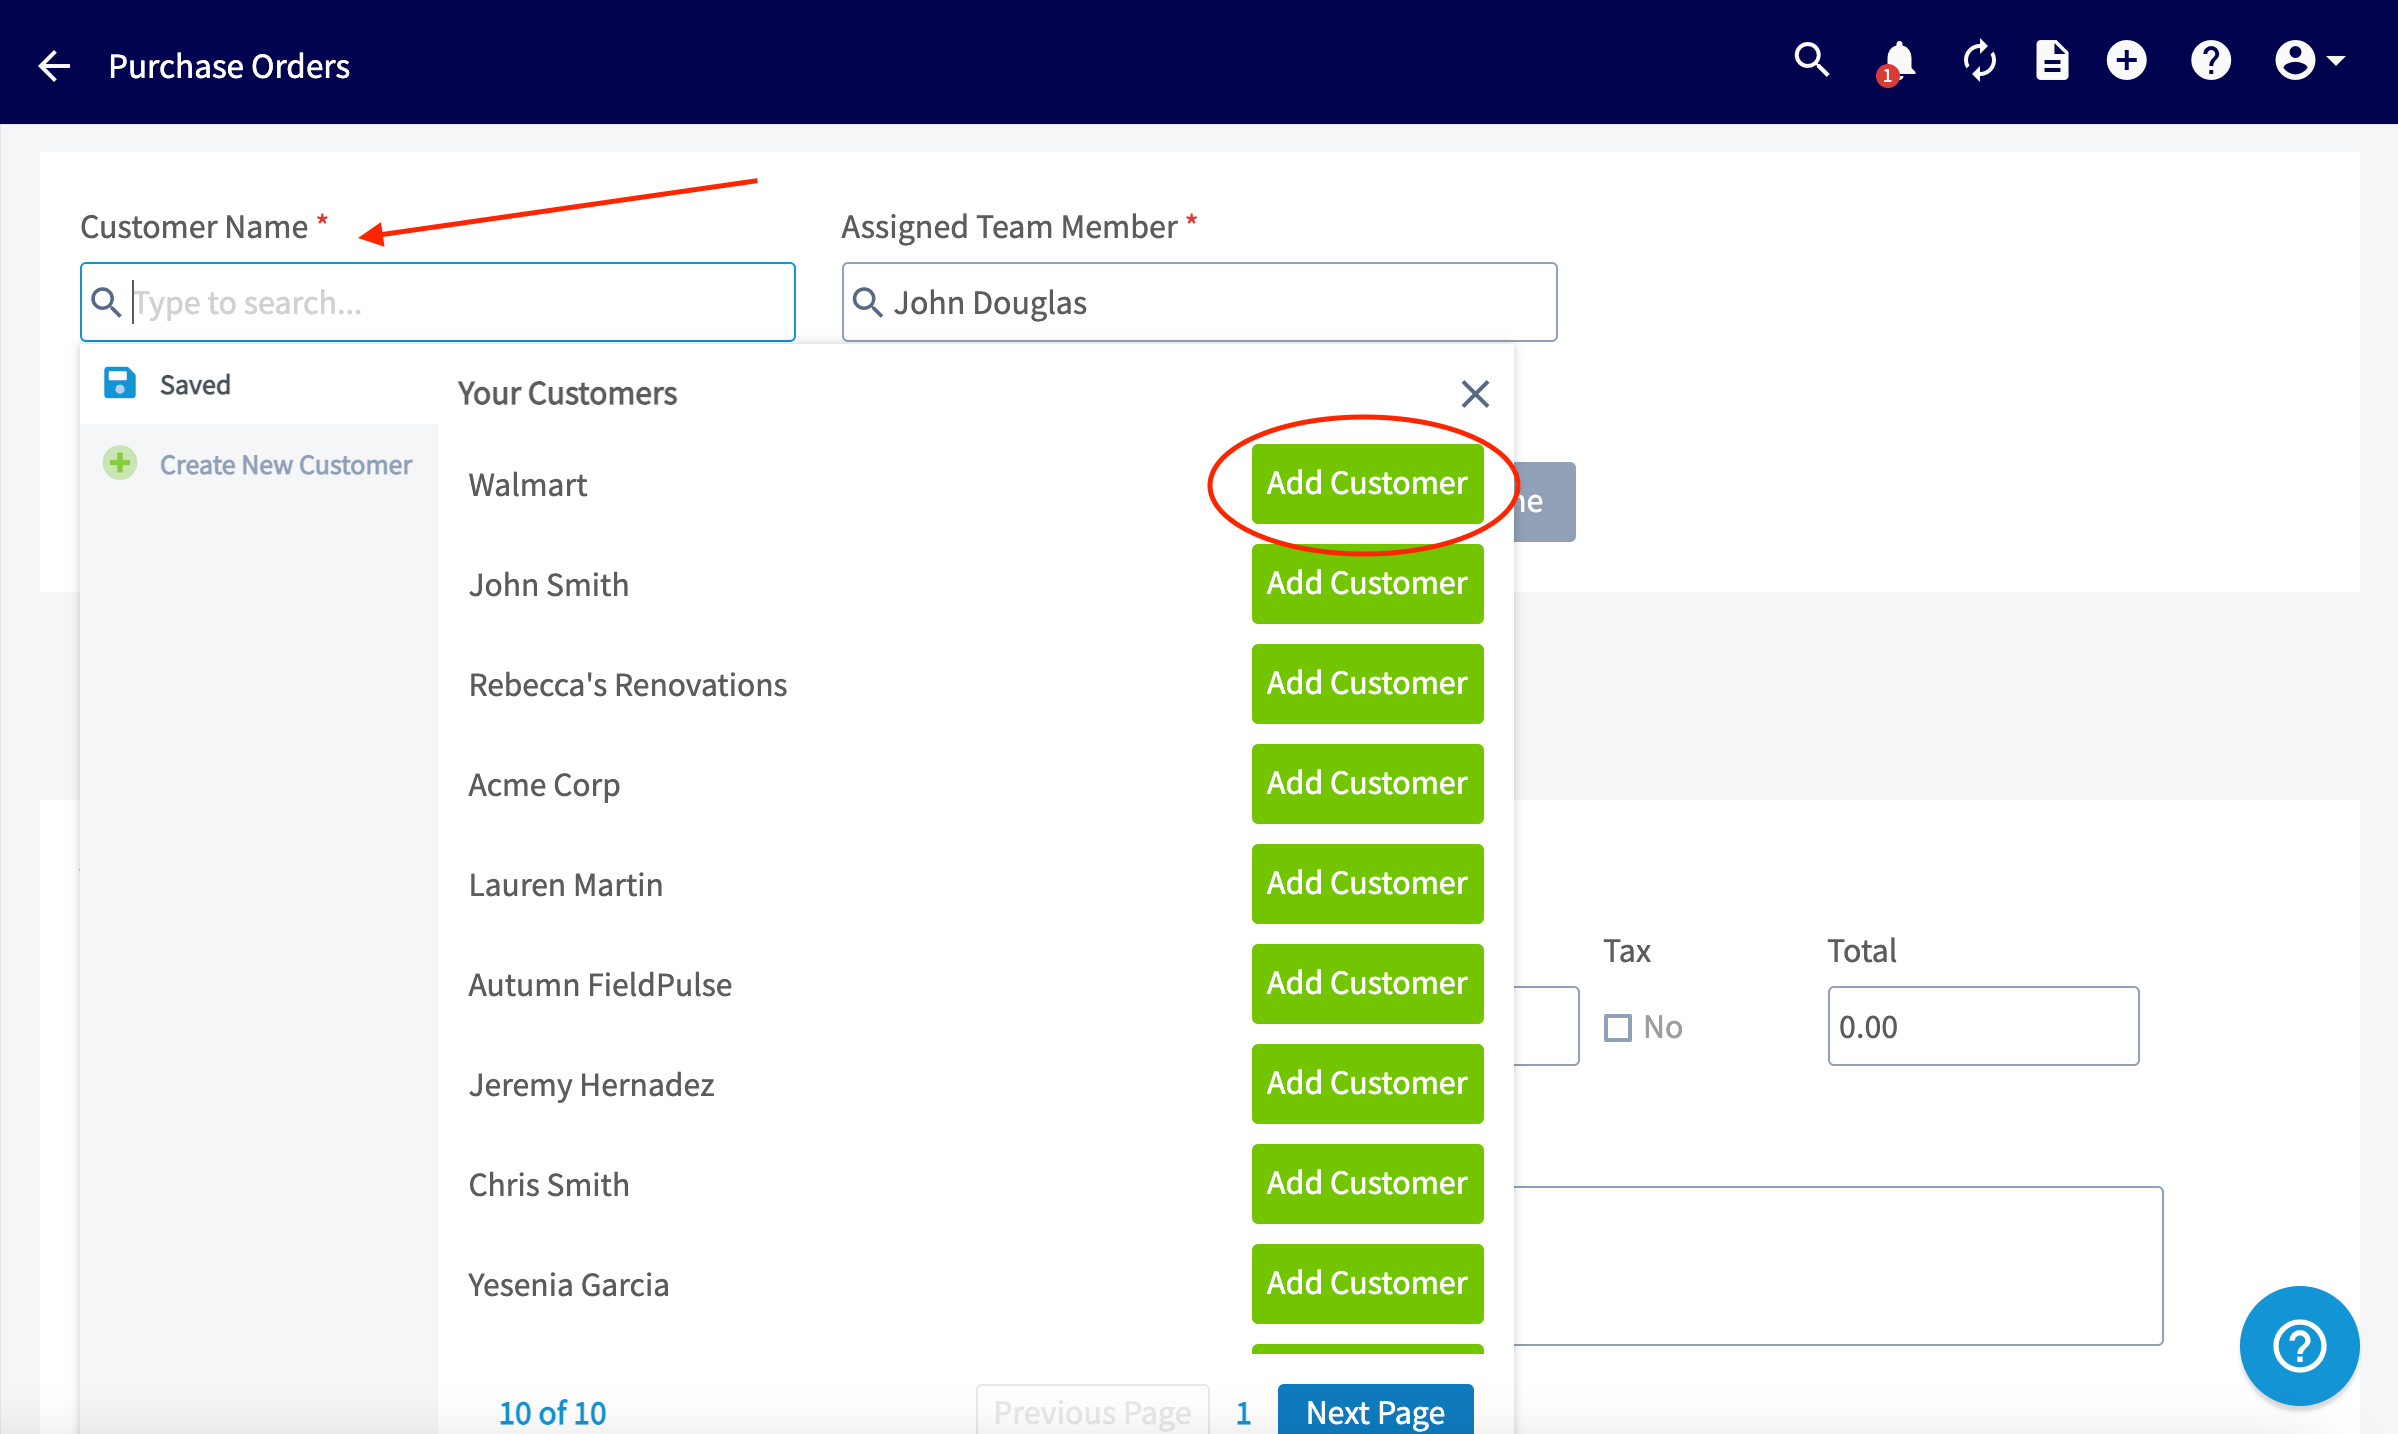
 Next you'll enter the customer name for the order. Click in the *Customer Name* field and choose an existing customer or click *Create New Customer* to build a new one.
 Once you've added a customer, you will enter the Assigned Team Member *(**Note:** it will default to the Purchase Order creator)* and order title. You can choose to link the purchase order to an existing Project, Job, Invoice, or Estimate, or create it as a standalone by selecting *None*.
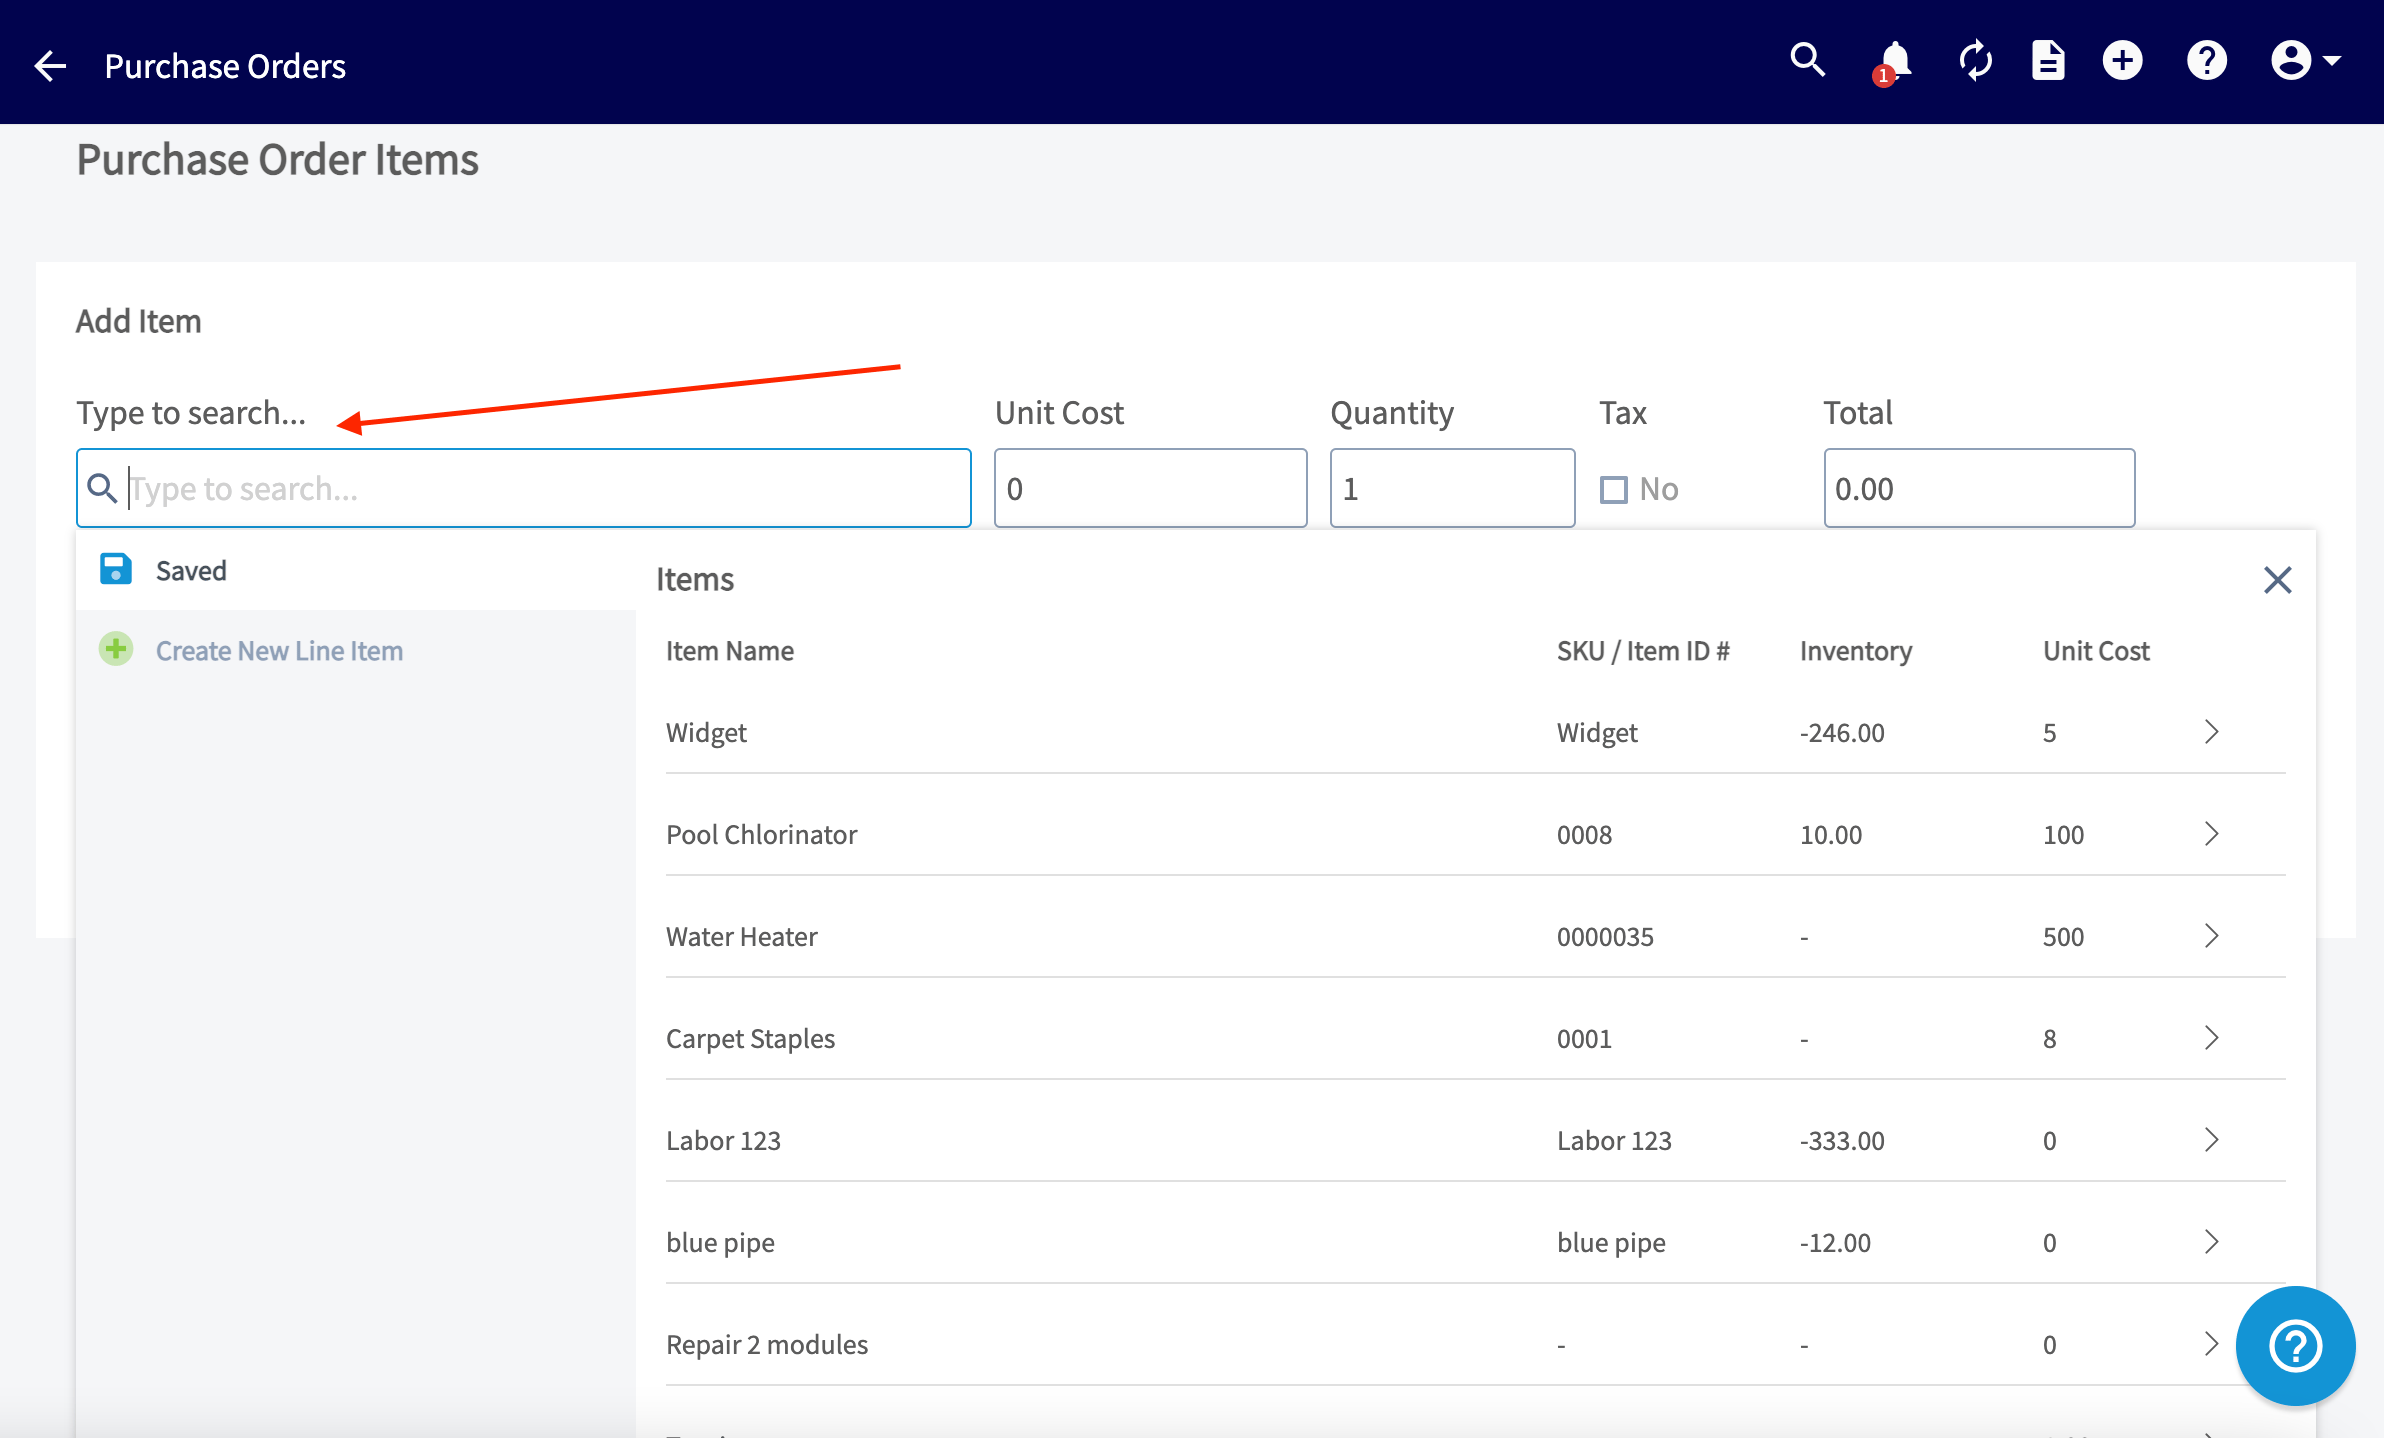
 Next we'll start adding items to the purchase order. To add existing invoice items to this purchase order, click the item search bar to add them. If you are adding an item that is not already in the system, click *Create New Line Item*.
 Once you have added a line item, you can repeat the process for any additional items you want to add to your purchase order.
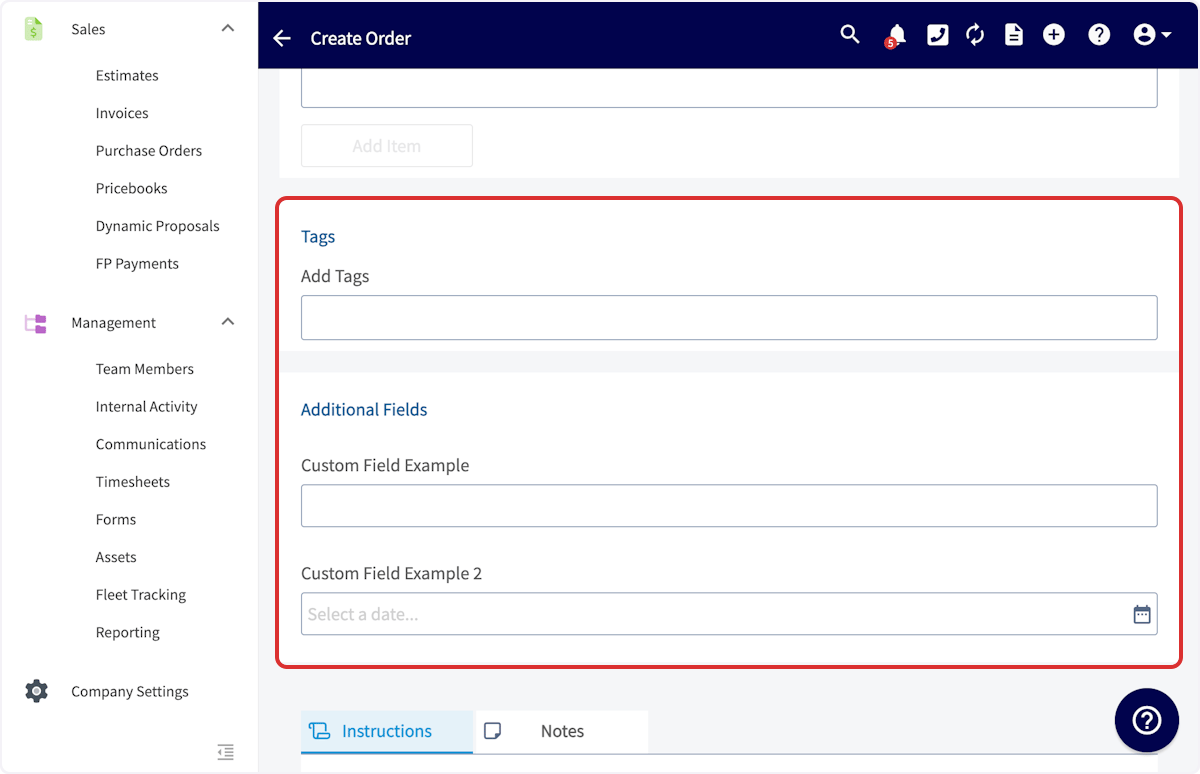
You can type in a custom tag to add a new tag into the system. Click *Enter* after each tag you'd like to use. You can also customize the color of your new tag! You can also select from a previously used tag in the tags list. Any tags you add will also appear alongside the purchase order details on the purchase order list view.
Additionally complete any purchase order custom fields under *Additional Fields*. *(**Note:** To create or edit custom fields on purchase orders, navigate to Company Settings > Orders > Custom Fields.)*
Once you have added a line item, you can repeat the process for any additional items you want to add to your purchase order.
You can type in a custom tag to add a new tag into the system. Click *Enter* after each tag you'd like to use. You can also customize the color of your new tag! You can also select from a previously used tag in the tags list. Any tags you add will also appear alongside the purchase order details on the purchase order list view.
Additionally complete any purchase order custom fields under *Additional Fields*. *(**Note:** To create or edit custom fields on purchase orders, navigate to Company Settings > Orders > Custom Fields.)*
 Lastly, you can enter instructions or notes at the bottom of the page.
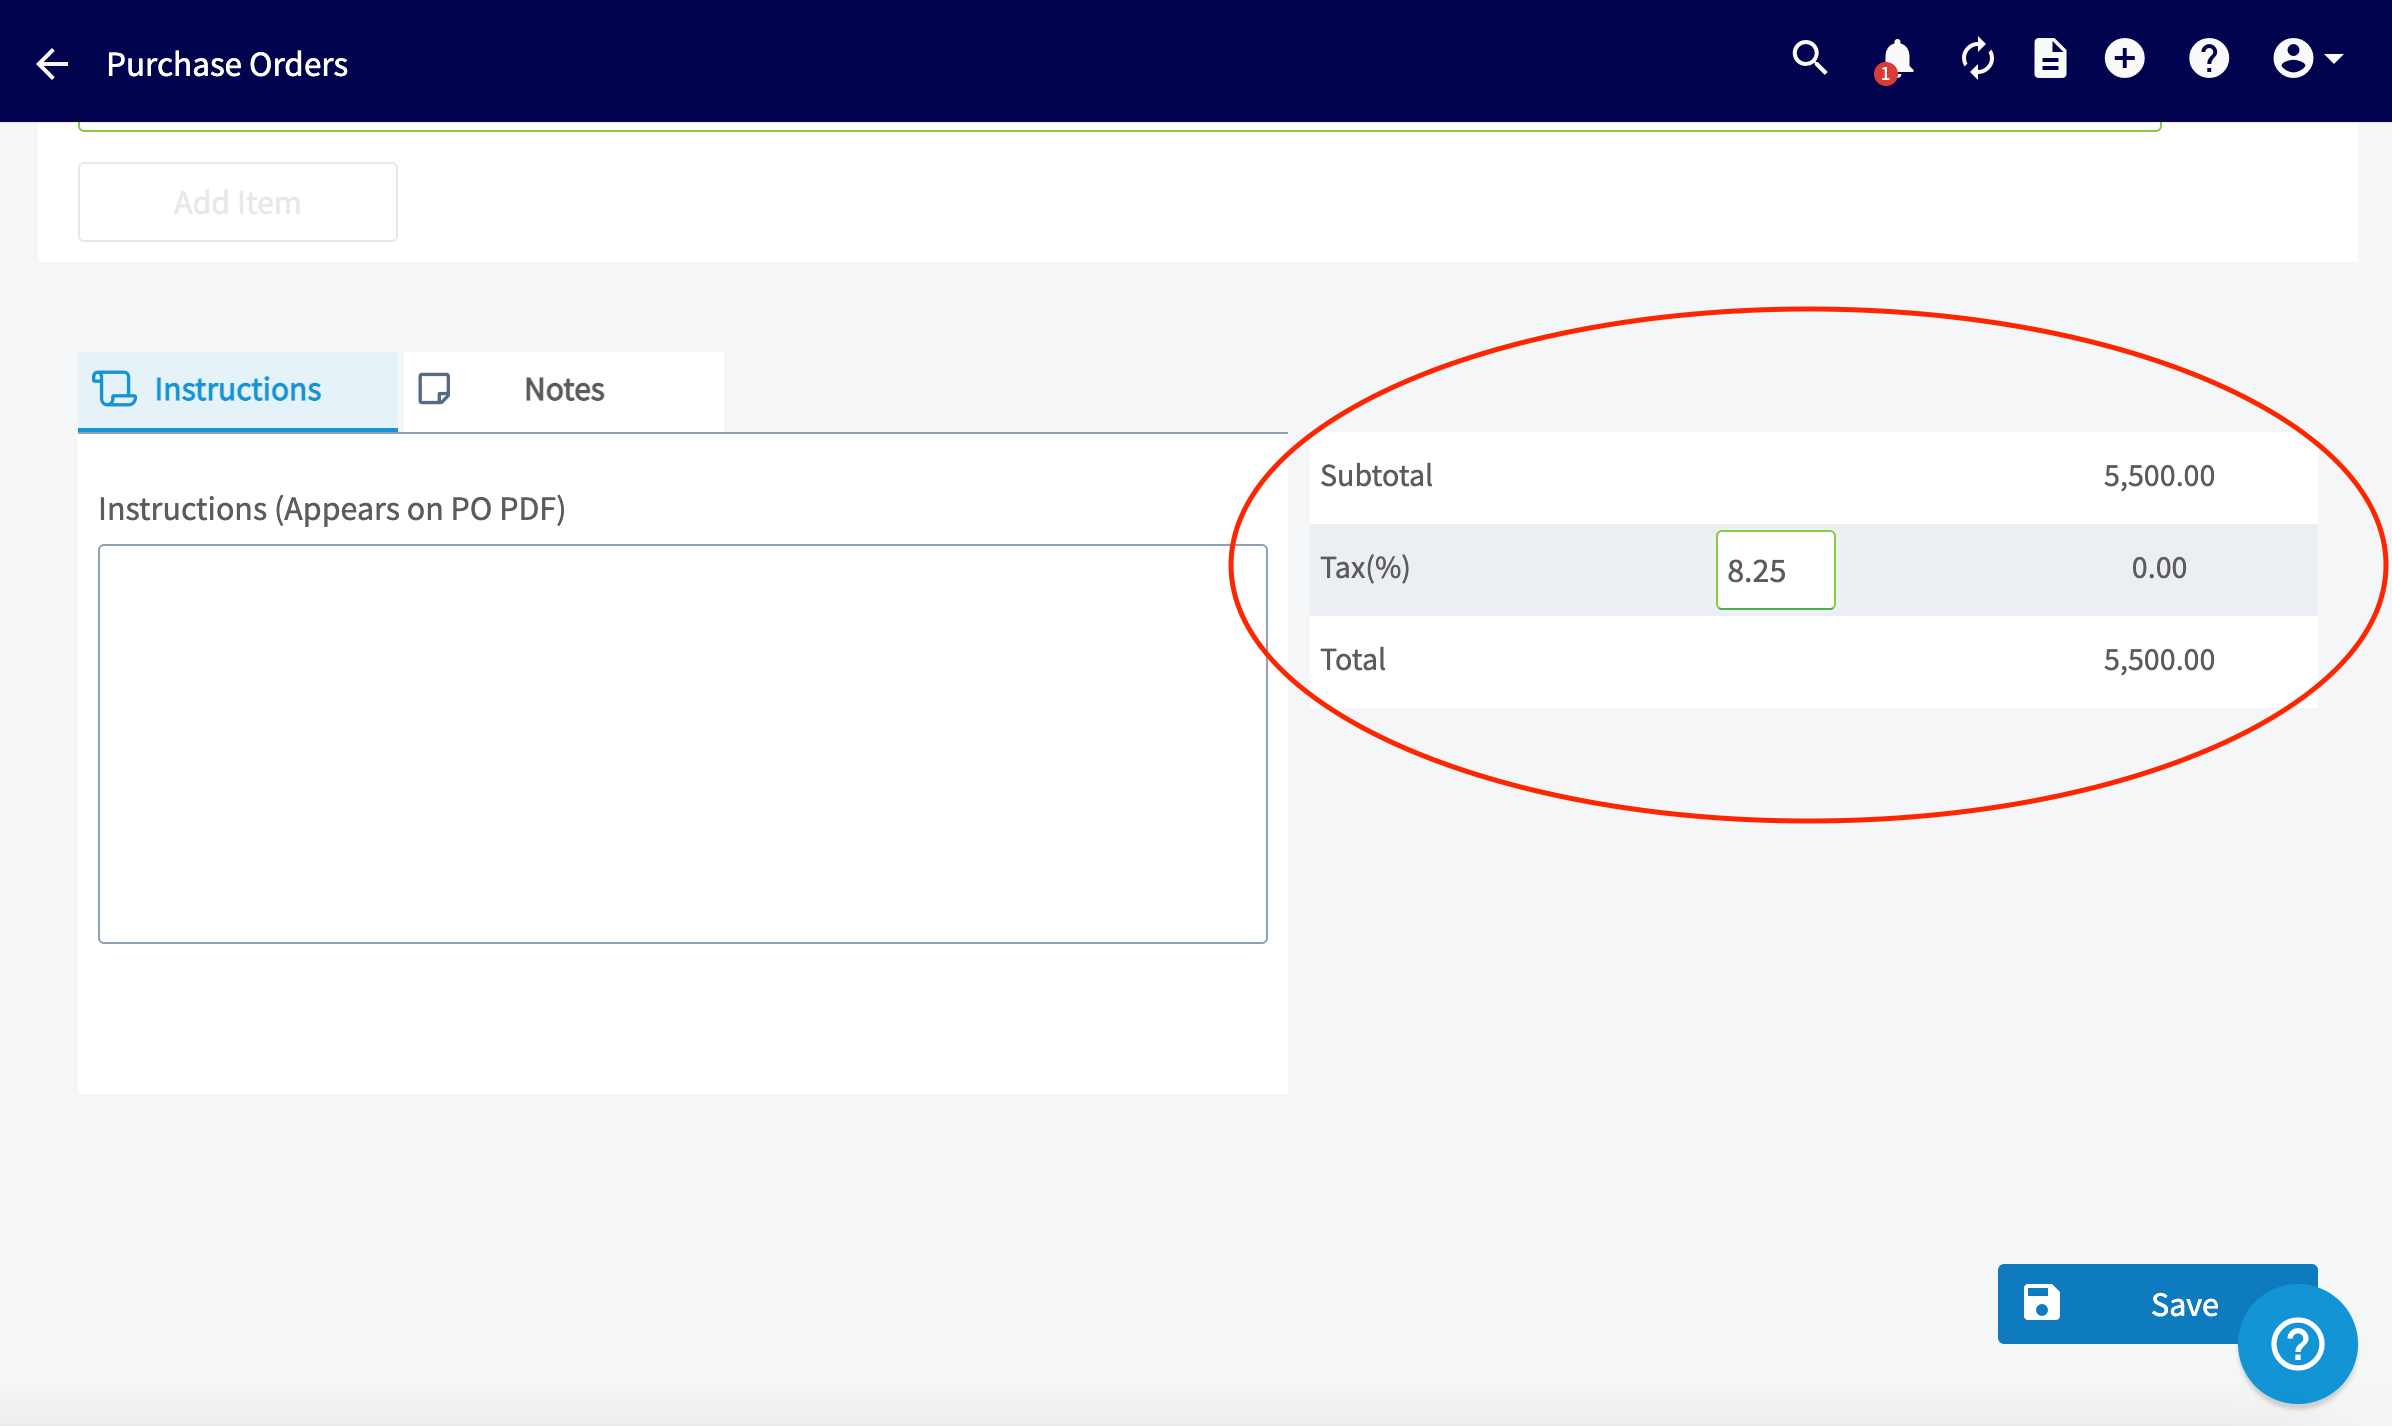
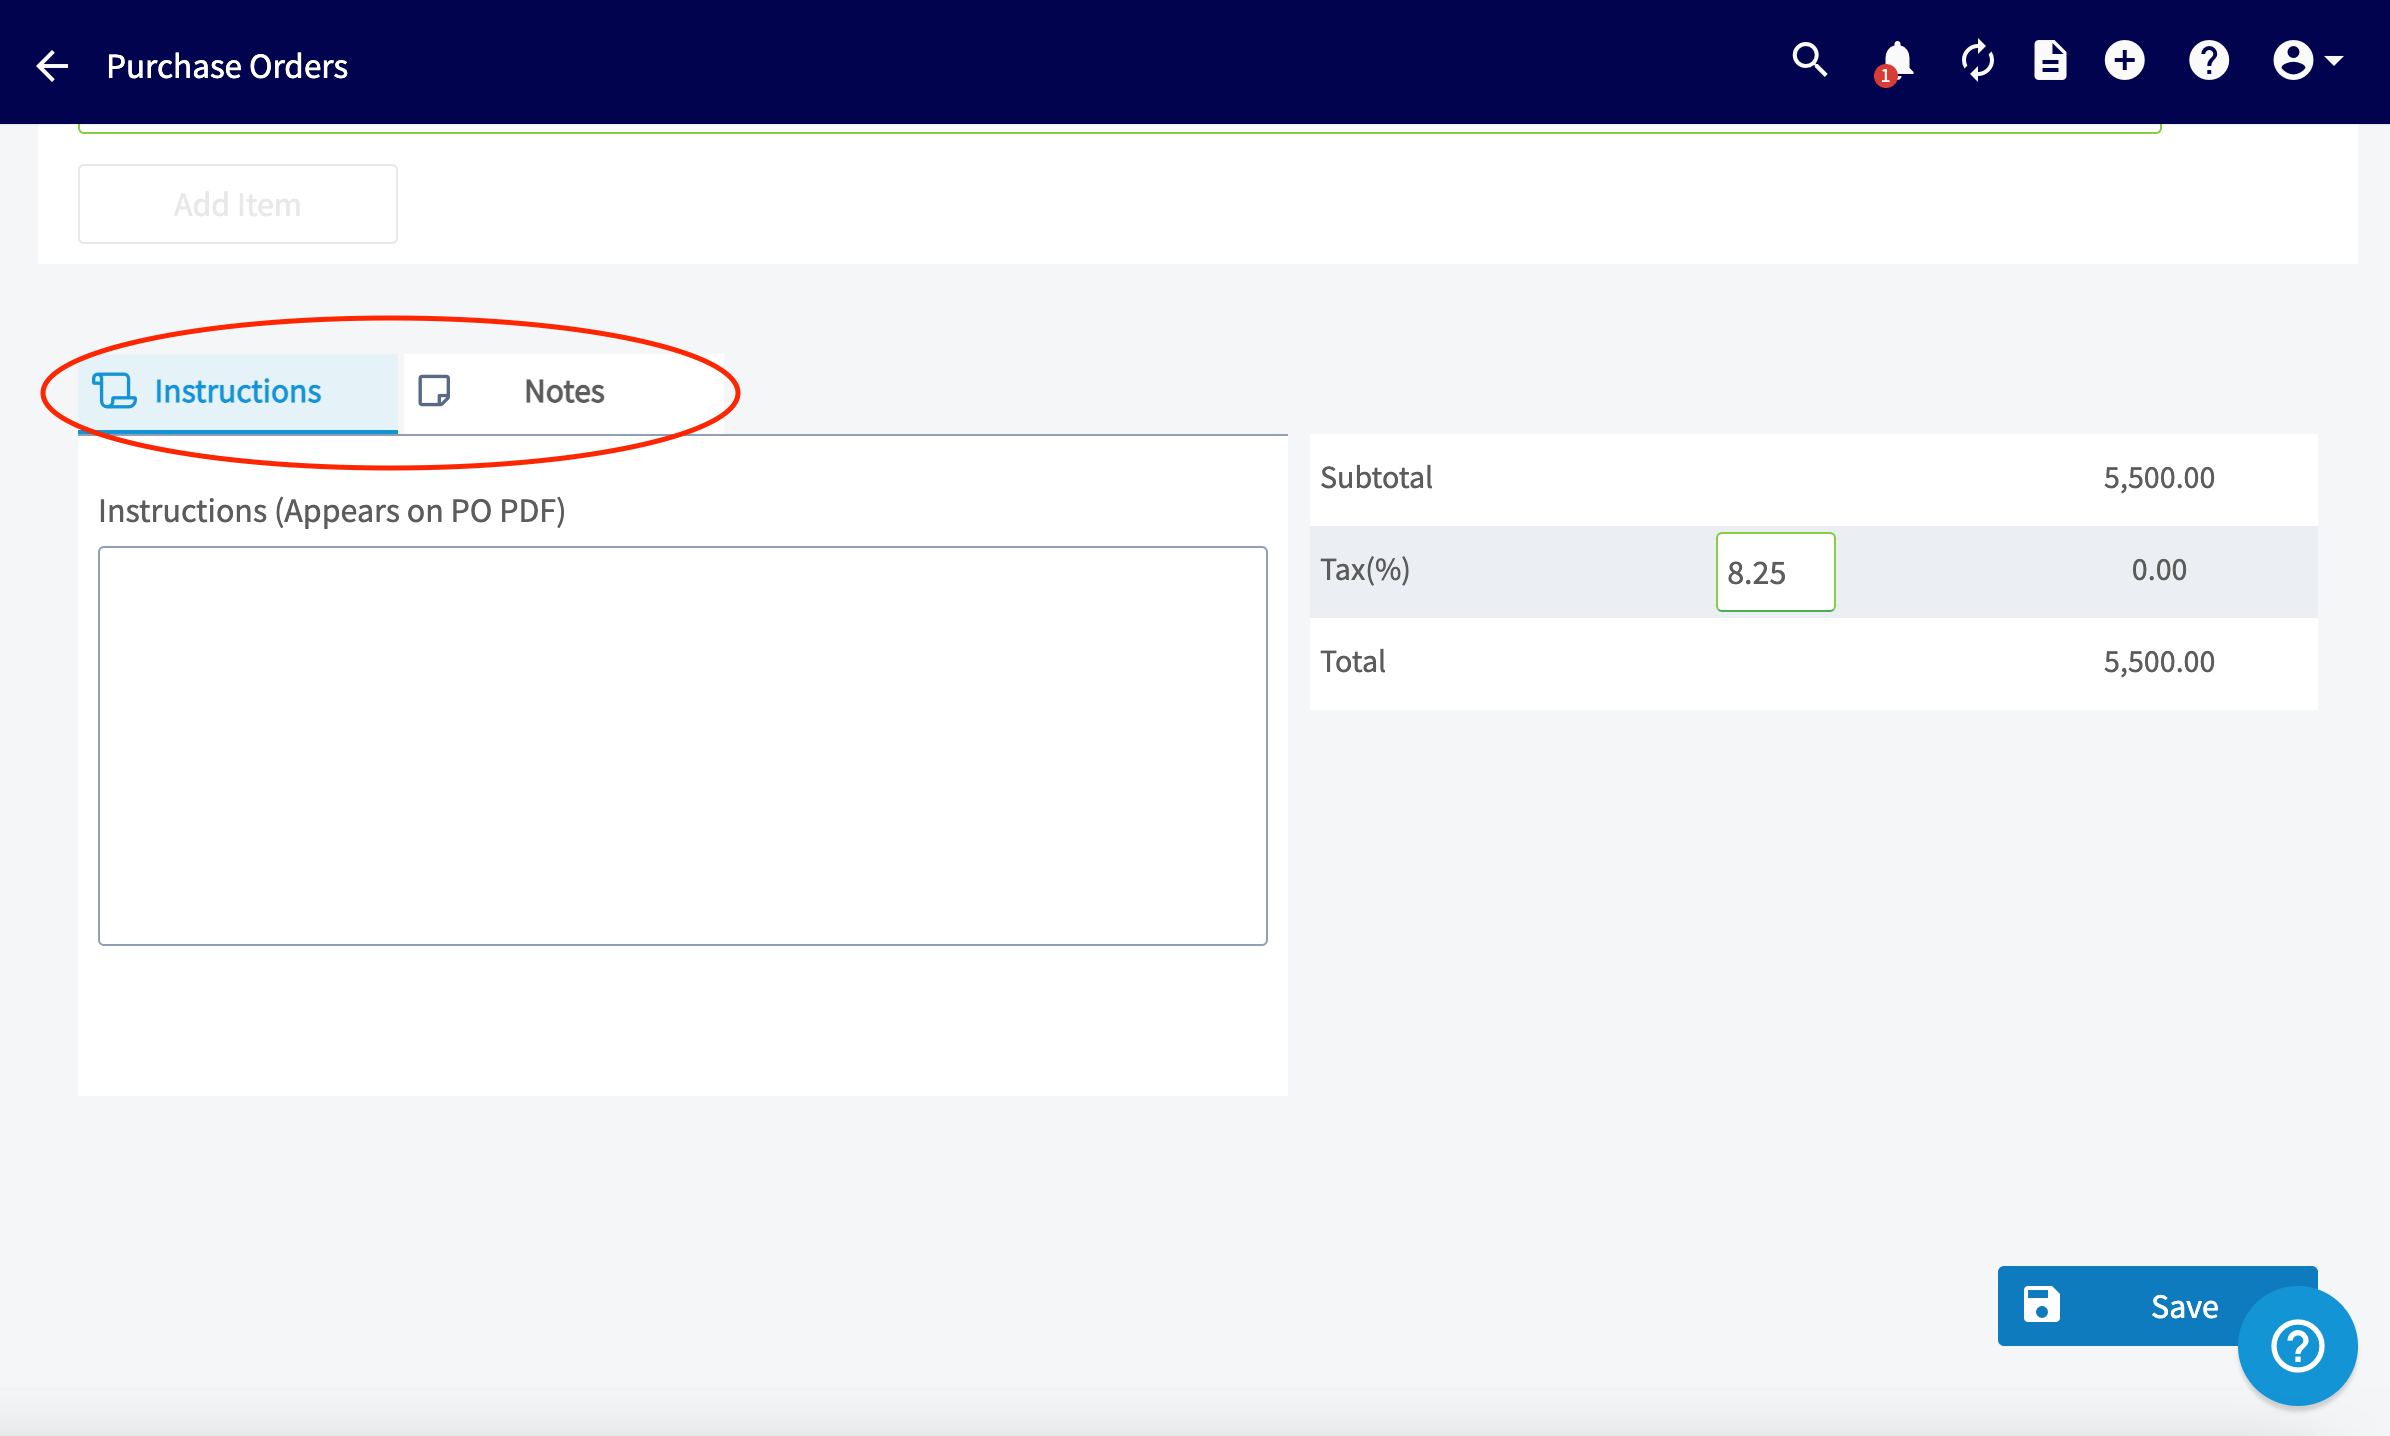 Review the subtotal and total, and adjust the tax rate (if necessary) on the right hand side. If everything looks good, press *Save.*
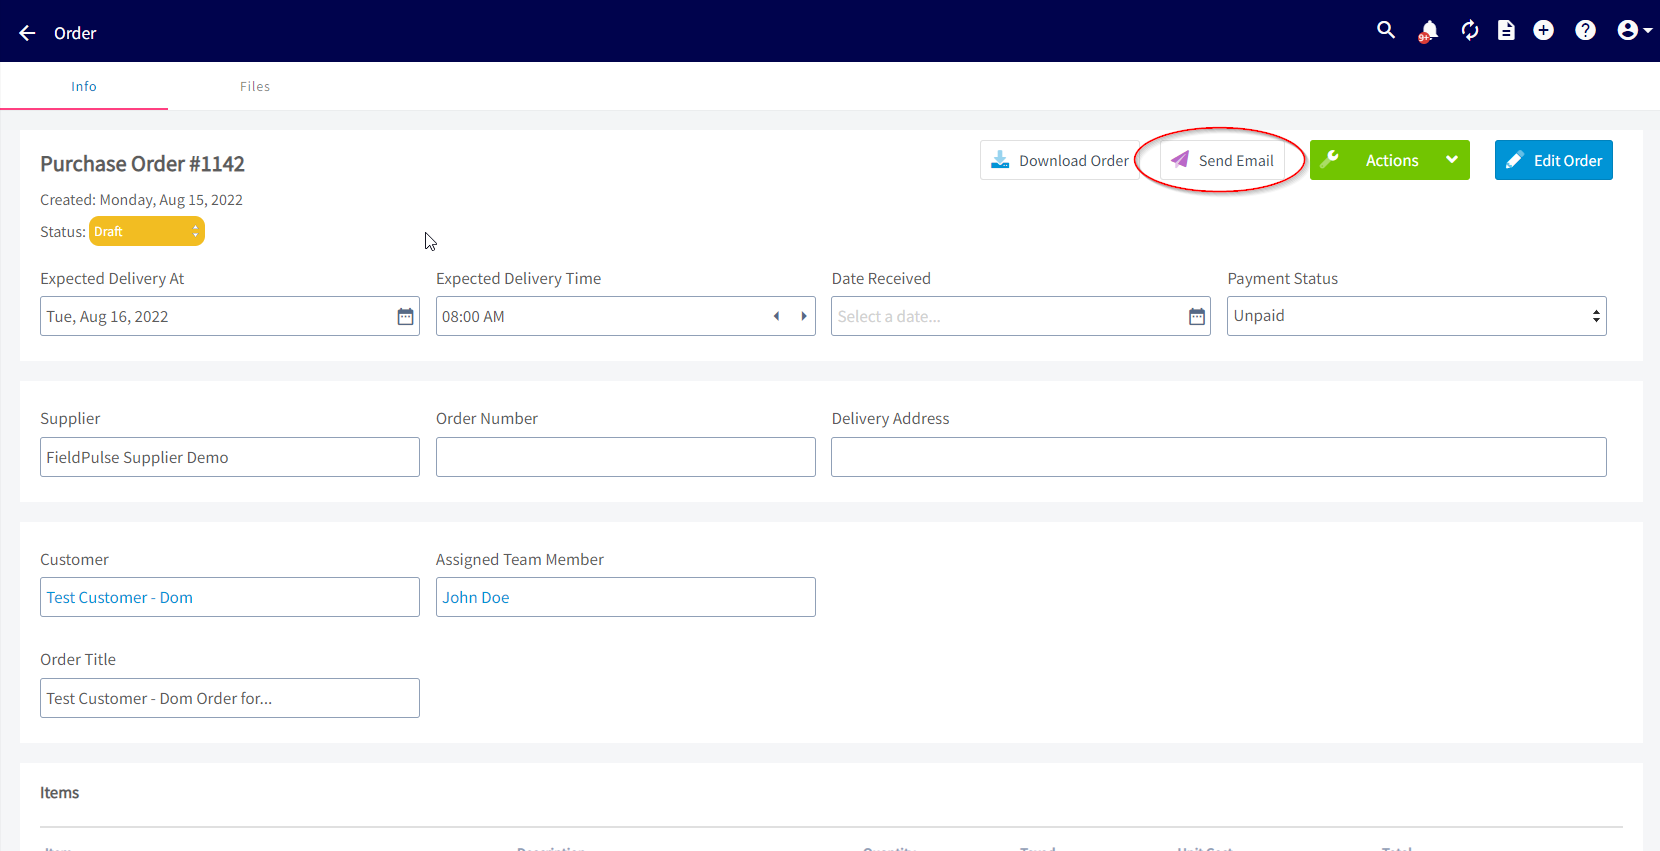
 On the next page you'll be able to review the details and edit the order. When you're ready to send the purchase order to your supplier, click *Send Email*.
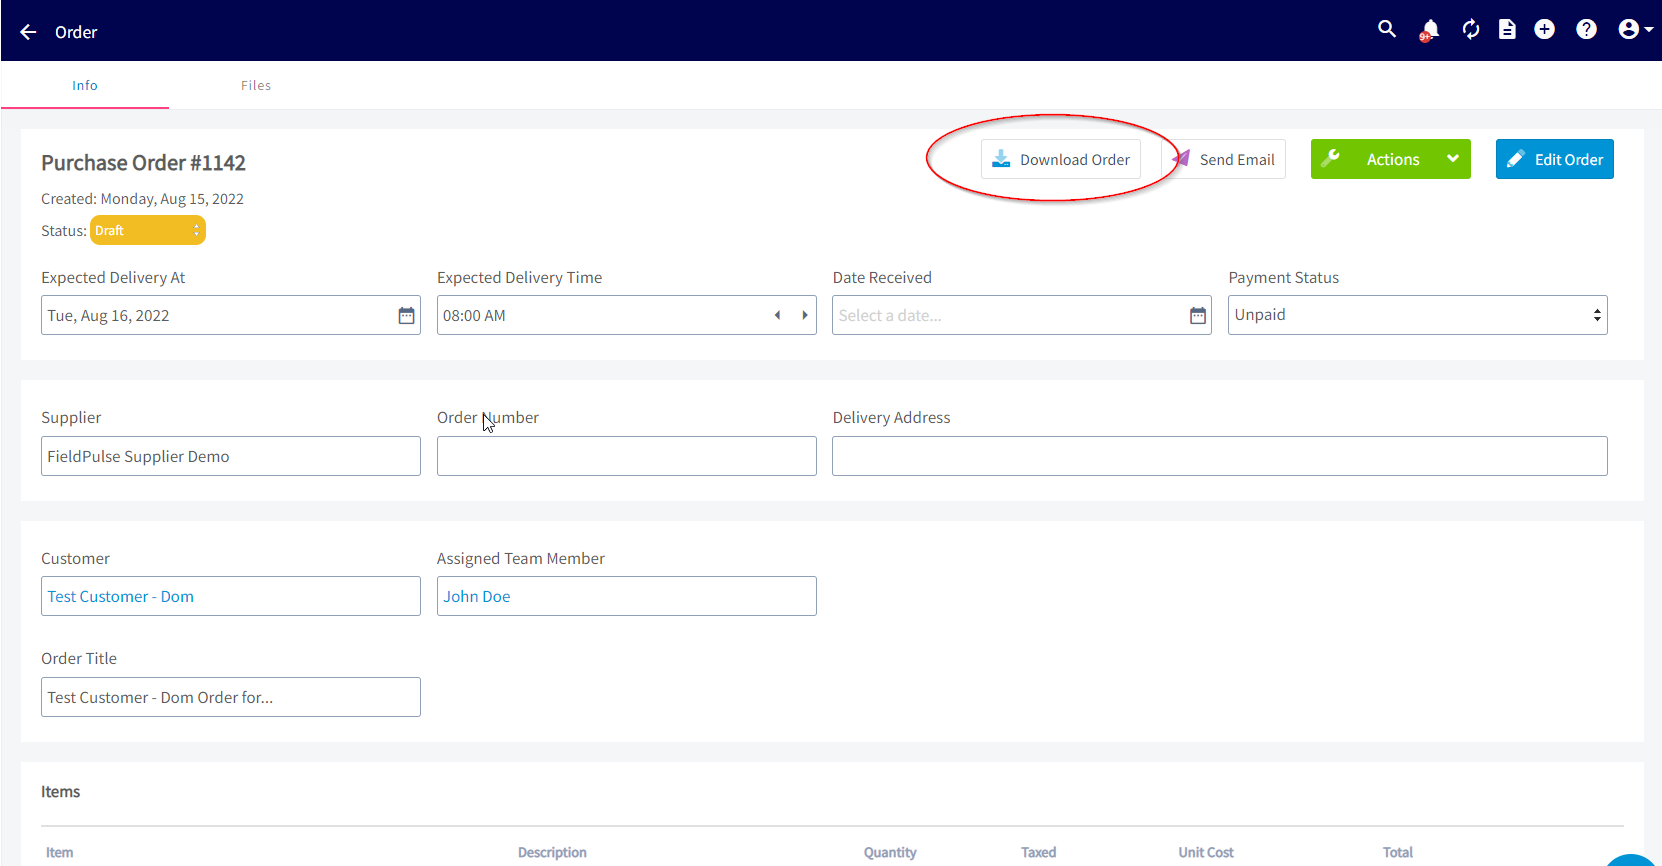
 Once the purchase order has been sent, you can save it as a PDF by clicking *Download Order*.
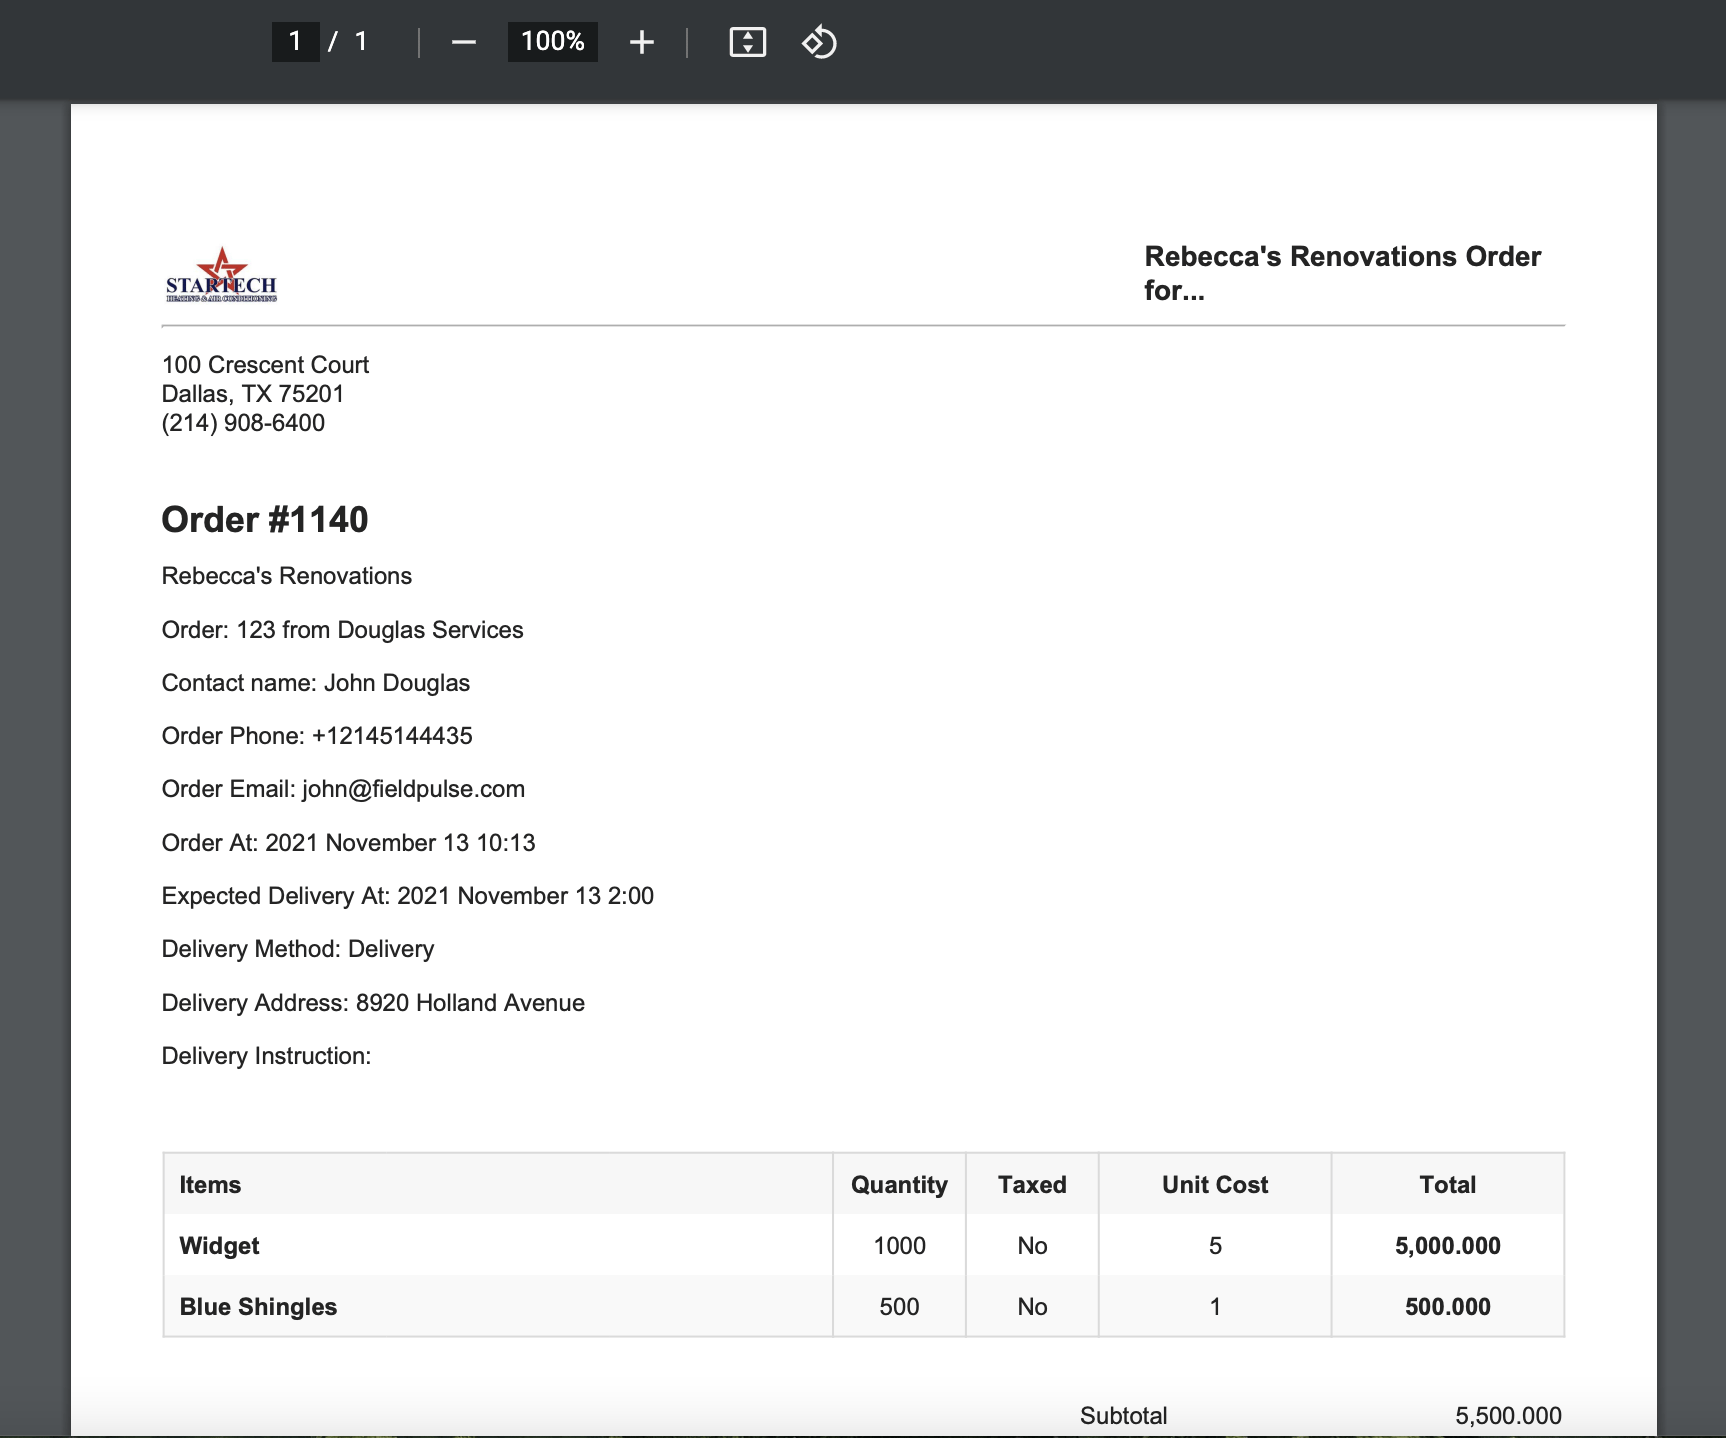
 This will open the PDF in your browser where you can download it to your computer.
 ## Creating Automatic Purchase Orders
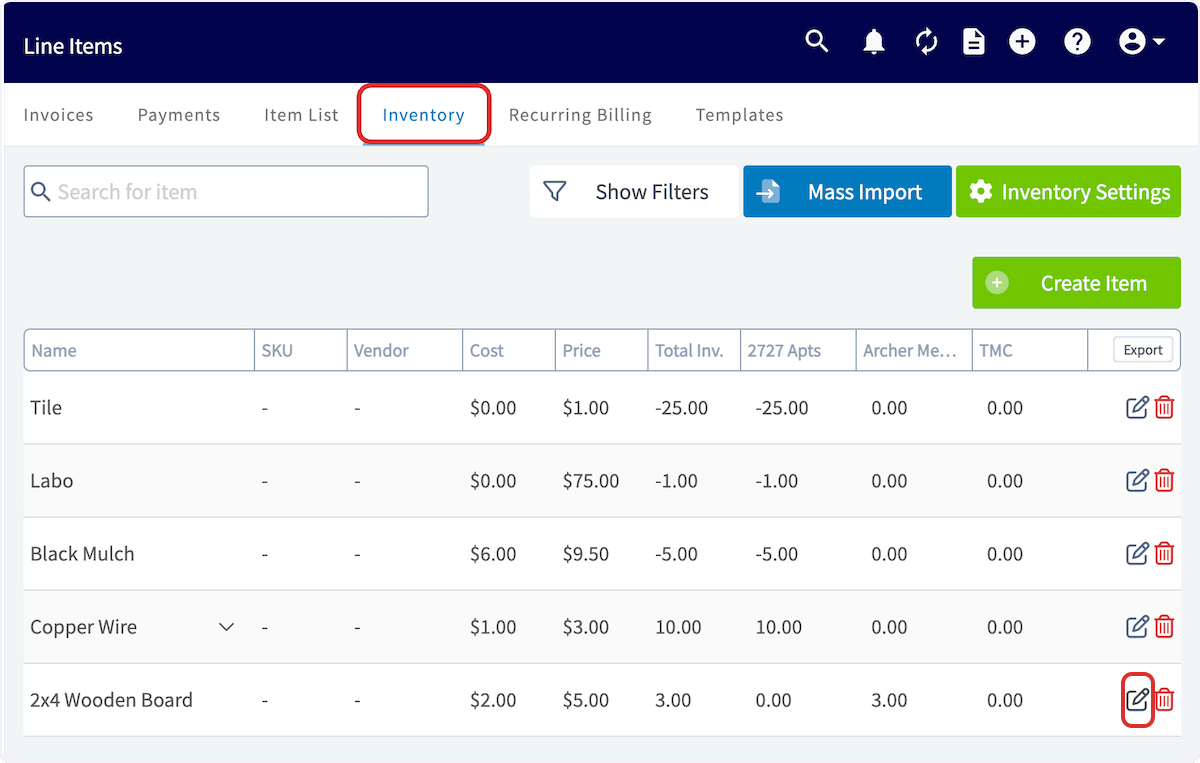
To automatically replenish items using purchase orders, begin by selecting *Invoices* from the left-side menu and clicking on *Inventory*. Select the pencil icon next to the inventory item you want to set up automatic purchase orders for.
## Creating Automatic Purchase Orders
To automatically replenish items using purchase orders, begin by selecting *Invoices* from the left-side menu and clicking on *Inventory*. Select the pencil icon next to the inventory item you want to set up automatic purchase orders for.
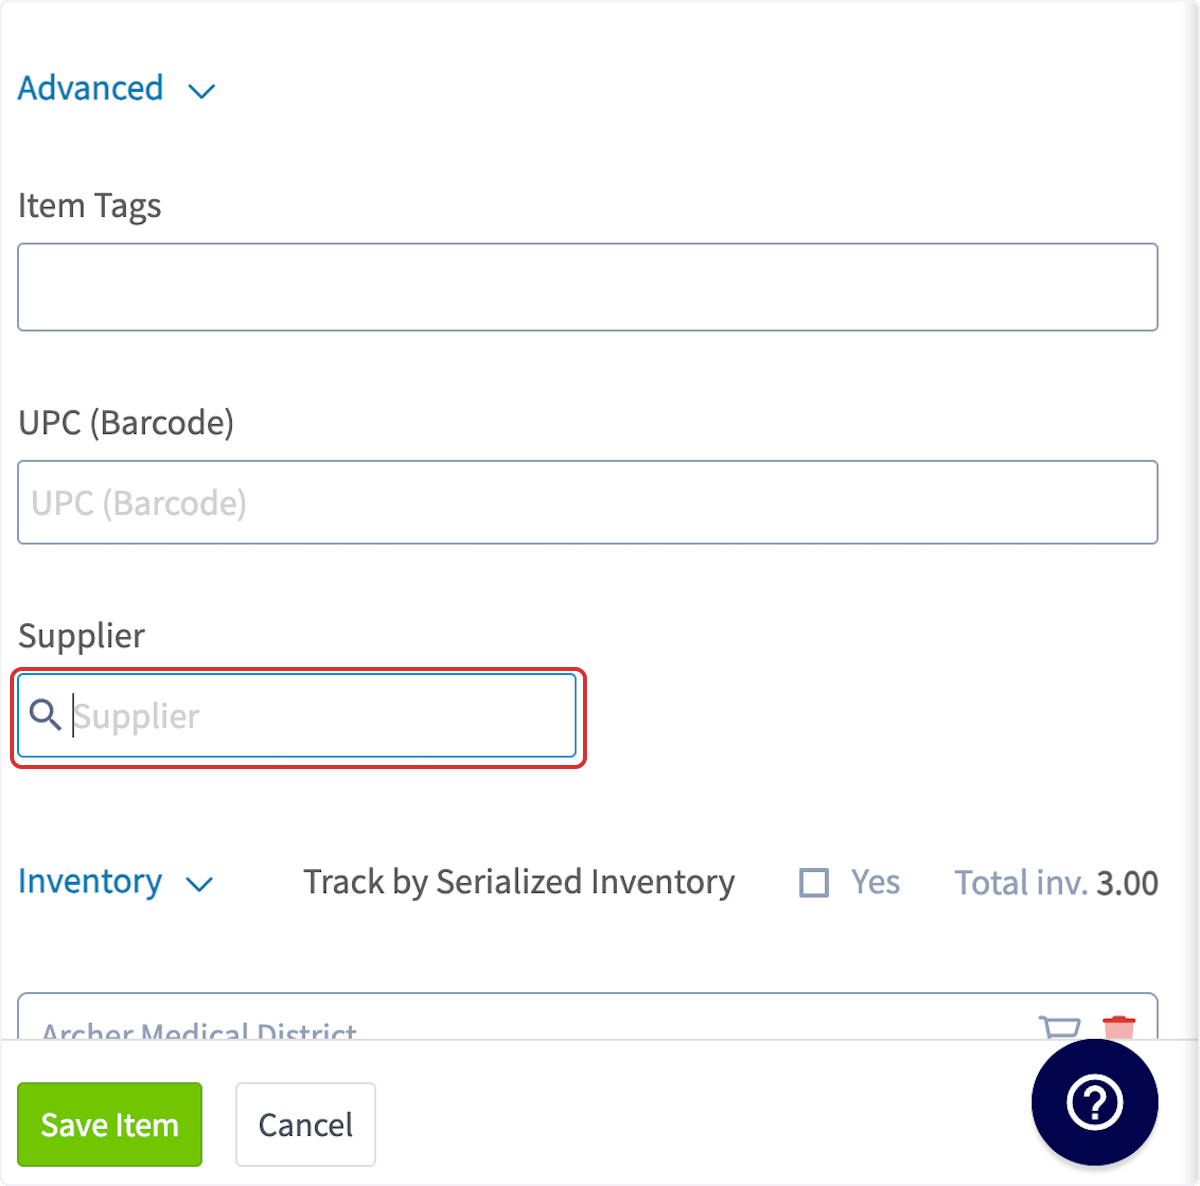
 To begin, click on *Supplier*. You can create a new supplier, or add an existing one.
 Creating a new supplier looks like this:
 Selecting an existing supplier looks like this:
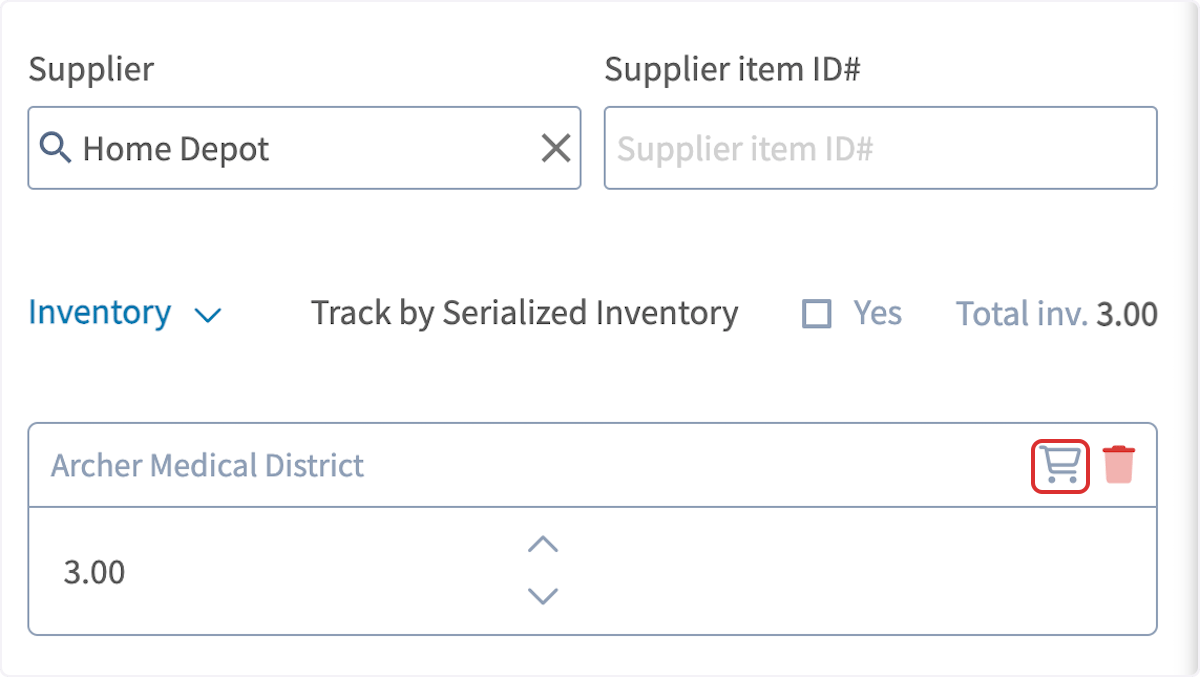
 After selecting your supplier, click on the shopping cart icon to enable automatic replenishment. *(**Note**: if you have multiple hubs, you will need to repeat this process for each hub.)*
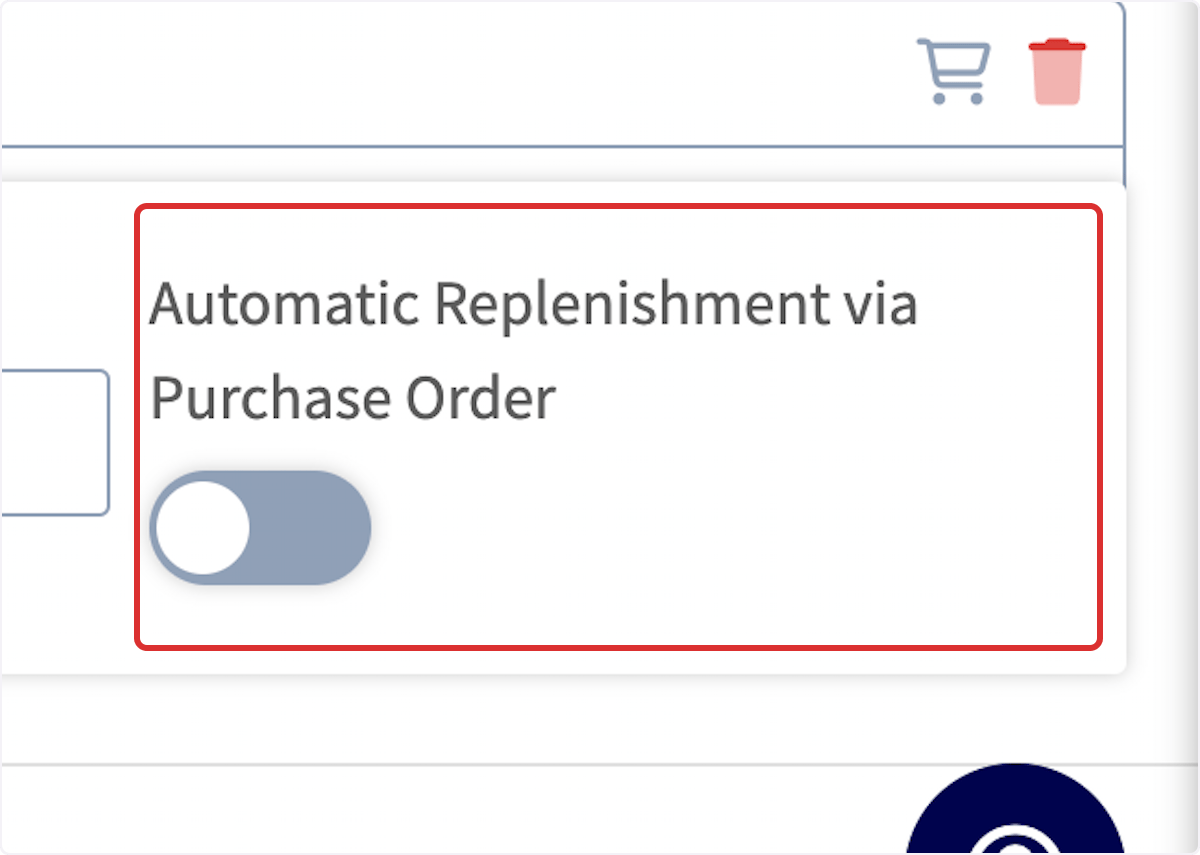
 Toggle on the *Automatic Replenishment via Purchase Order* button.
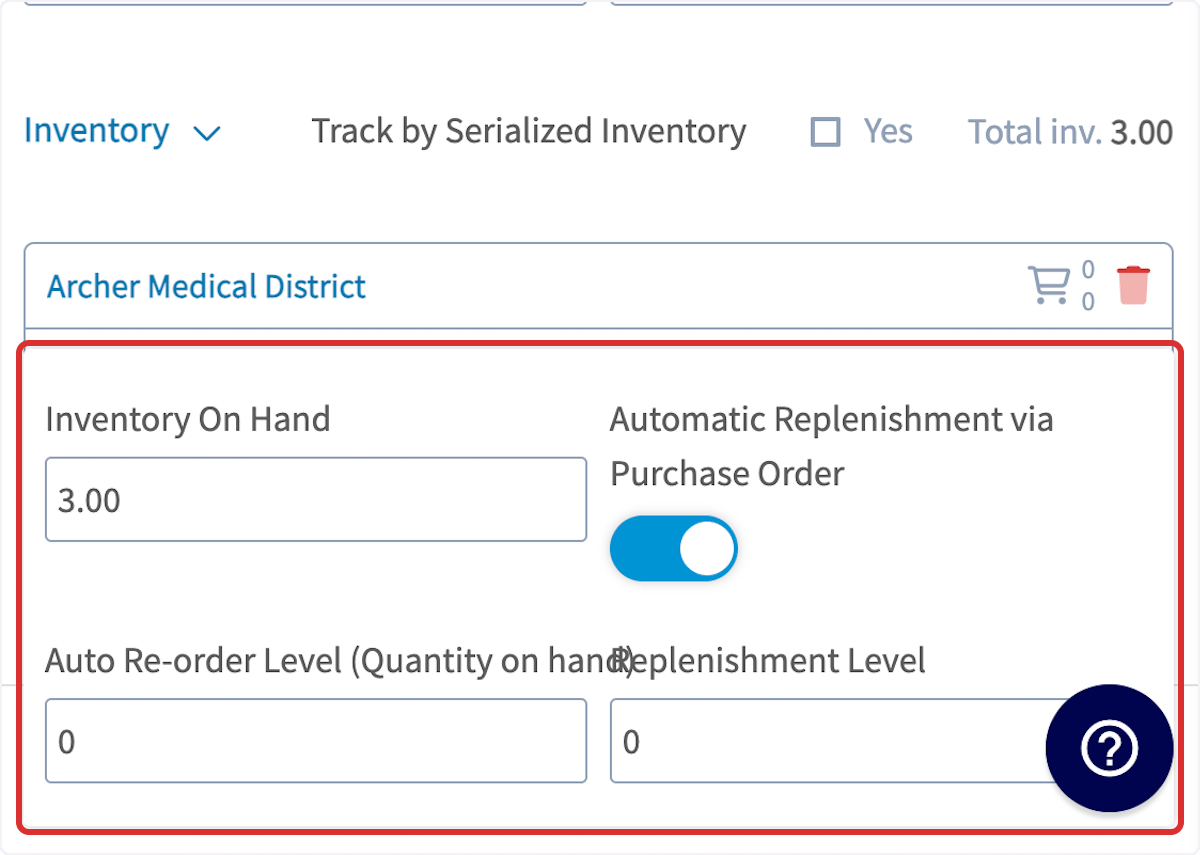
 It will now display your current level of inventory in that hub (or overall inventory if hubs are not enabled).
**Auto Re-order Level (Quantity On Hand)**: When your *Inventory On Hand* quantity reaches this number, an automatic replenishment purchase order will be initiated.
**Replenishment Level**: Your automatic replenishment purchase order will be initiated to reach this new *Inventory On Hand* quantity.
It will now display your current level of inventory in that hub (or overall inventory if hubs are not enabled).
**Auto Re-order Level (Quantity On Hand)**: When your *Inventory On Hand* quantity reaches this number, an automatic replenishment purchase order will be initiated.
**Replenishment Level**: Your automatic replenishment purchase order will be initiated to reach this new *Inventory On Hand* quantity.
 *Example*
**Inventory On Hand:** 4 Units
**Auto Re-Order Level:** 5 Units
**Replenishment Level:** 12 Units
Because the **Auto Re-Order Level** is set at 5 units and the **Inventory On Hand** has fallen below 5 units, a Purchase Order will automatically be placed to achieve the **Replenishment Level** of 12 units.
Your hub's inventory will auto-update once the purchase order status is marked as *Received* or *Completed*.
## Automatic Deduction
Once an invoice status is *Invoiced*, the inventory listed on the invoice will automatically be deducted from the hub of the user who finalizes the invoice.
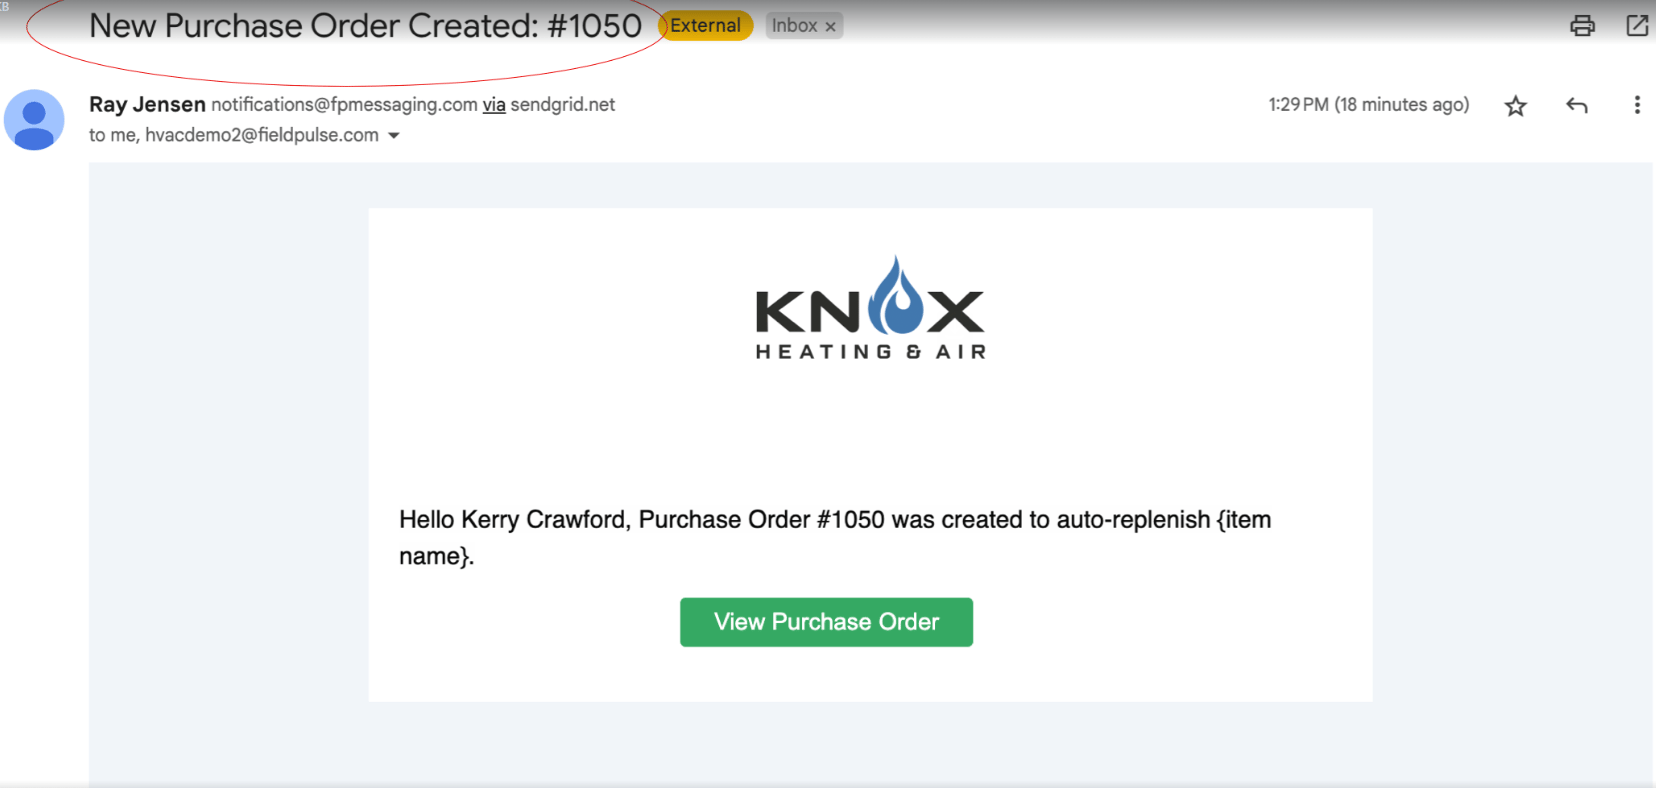
## Auto Replenishment Order Notification
When a Purchase Order (PO) is created through auto-replenishment, admins can now receive a real-time notification via:
✅ Email
✅ In-app notification
✅ Optional push notification
🔗 Email Enhancements: The email includes a direct link to view the newly created PO, so you can act quickly and efficiently.
Set up via profile icon top right> my settings
*Example*
**Inventory On Hand:** 4 Units
**Auto Re-Order Level:** 5 Units
**Replenishment Level:** 12 Units
Because the **Auto Re-Order Level** is set at 5 units and the **Inventory On Hand** has fallen below 5 units, a Purchase Order will automatically be placed to achieve the **Replenishment Level** of 12 units.
Your hub's inventory will auto-update once the purchase order status is marked as *Received* or *Completed*.
## Automatic Deduction
Once an invoice status is *Invoiced*, the inventory listed on the invoice will automatically be deducted from the hub of the user who finalizes the invoice.
## Auto Replenishment Order Notification
When a Purchase Order (PO) is created through auto-replenishment, admins can now receive a real-time notification via:
✅ Email
✅ In-app notification
✅ Optional push notification
🔗 Email Enhancements: The email includes a direct link to view the newly created PO, so you can act quickly and efficiently.
Set up via profile icon top right> my settings

 ## Combine your Purchase Orders \[& Reece Australia - Supplier Invoices] seamlessly into a single estimate or invoice
You can now pull in multiple purchase orders (*and supplier invoices if your an Australia ReecemaX user)* directly into your estimates and invoices!
This feature allows you to bundle all your orders into a single, organized invoice to send to your customers. Here's how to try it out:
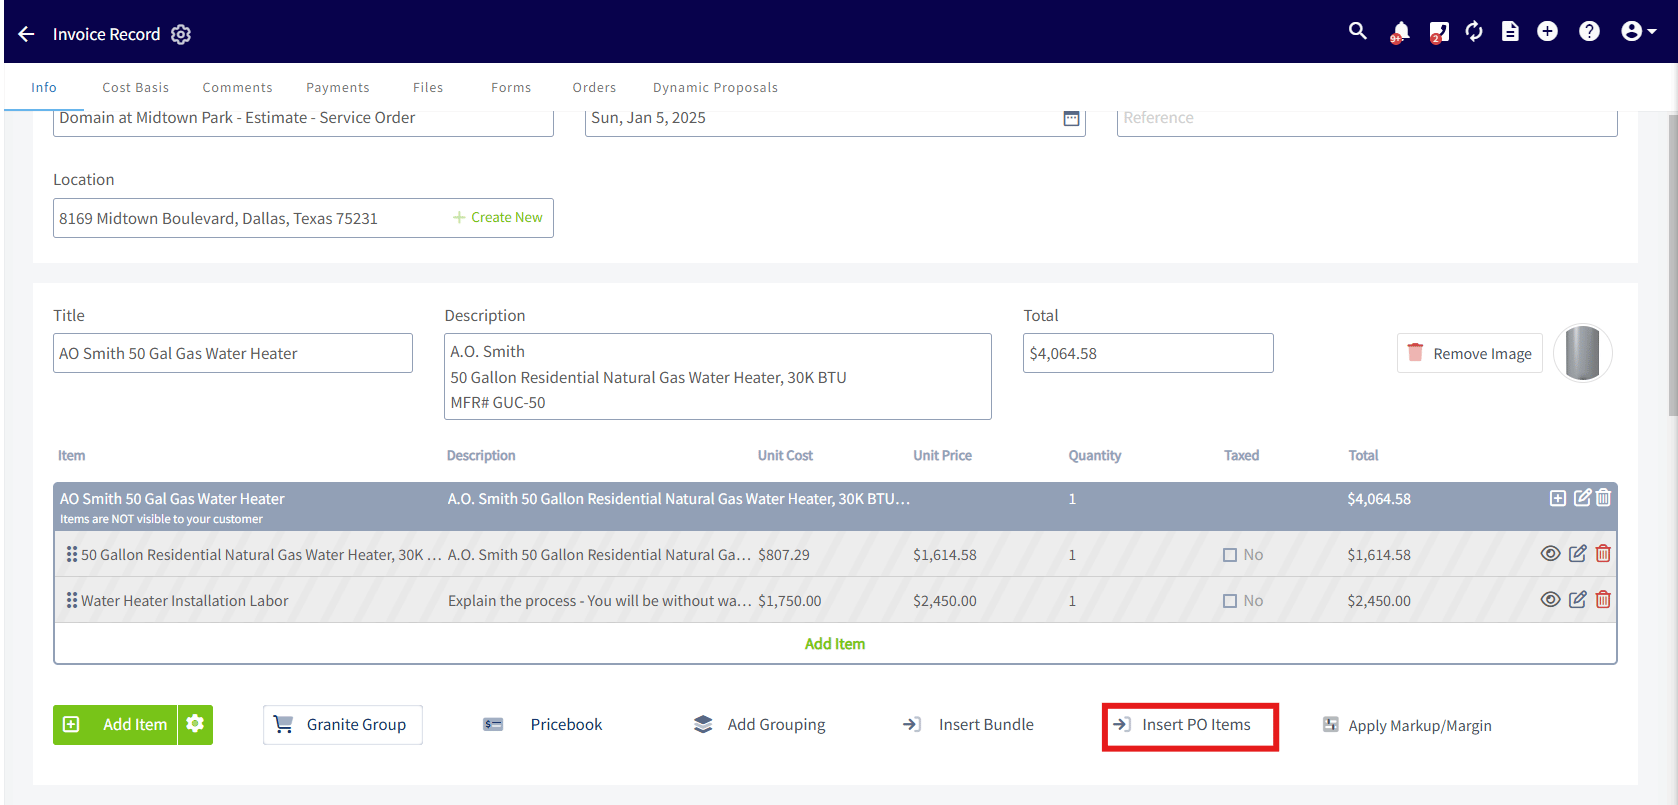
1. While in Edit Mode on an estimate or invoice, select Insert PO Items.
## Combine your Purchase Orders \[& Reece Australia - Supplier Invoices] seamlessly into a single estimate or invoice
You can now pull in multiple purchase orders (*and supplier invoices if your an Australia ReecemaX user)* directly into your estimates and invoices!
This feature allows you to bundle all your orders into a single, organized invoice to send to your customers. Here's how to try it out:
1. While in Edit Mode on an estimate or invoice, select Insert PO Items.
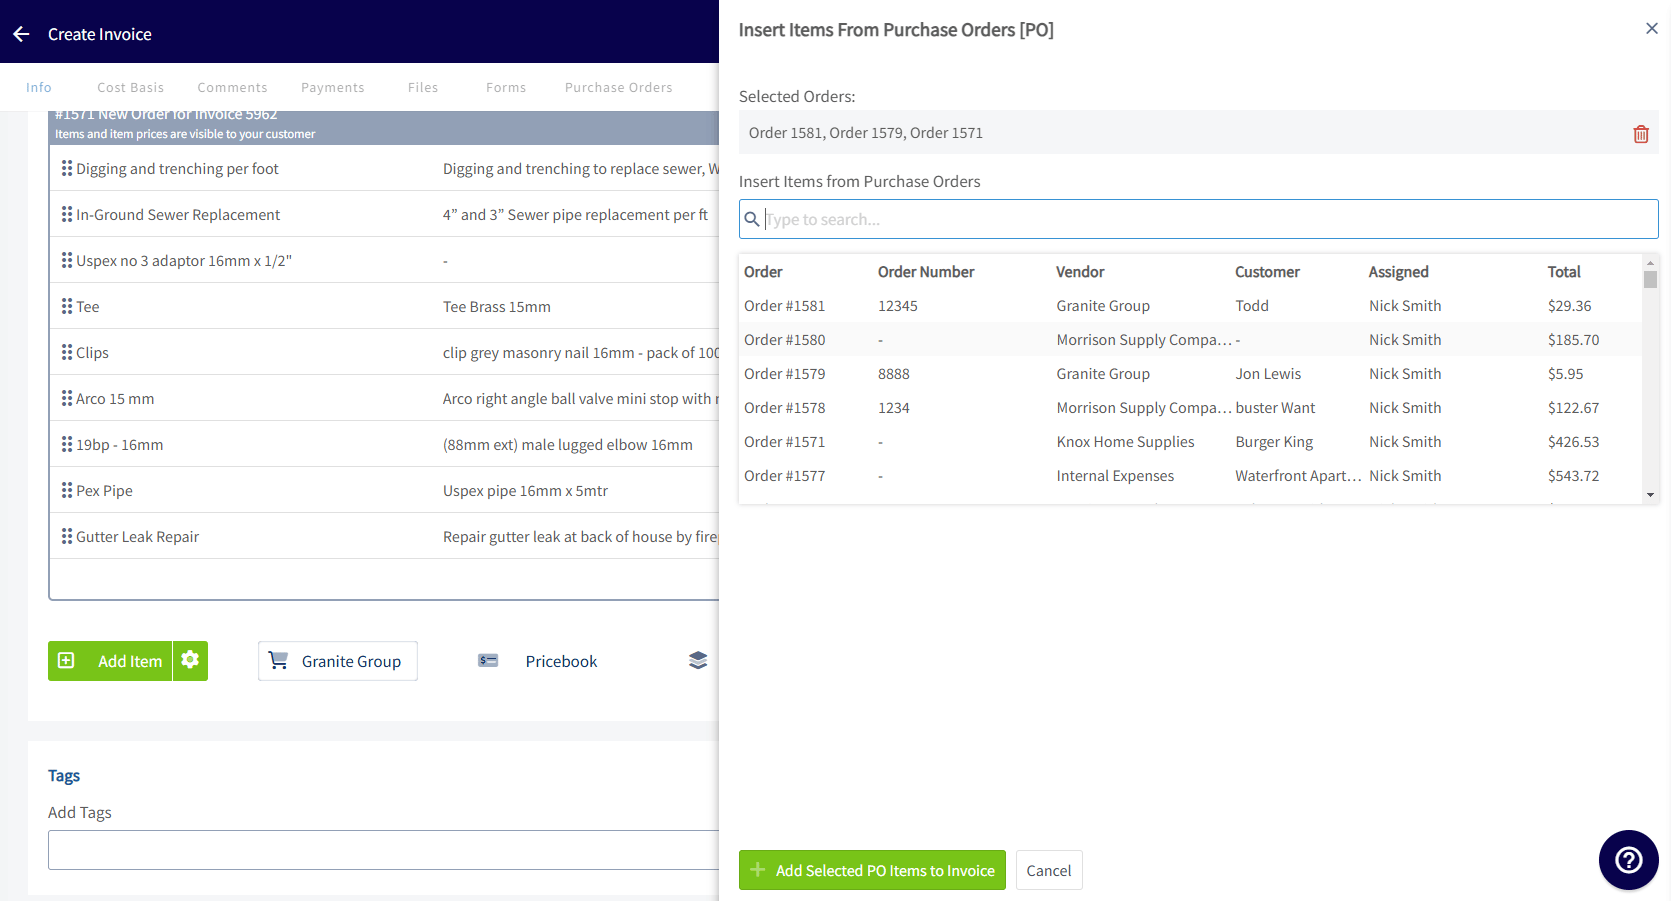
 2. Search for your PO using any of these attributes: Connected Customer, PO Number, Order Title, Connected Estimate or Invoice Number/Title, Connected Job or Project Number/Title.
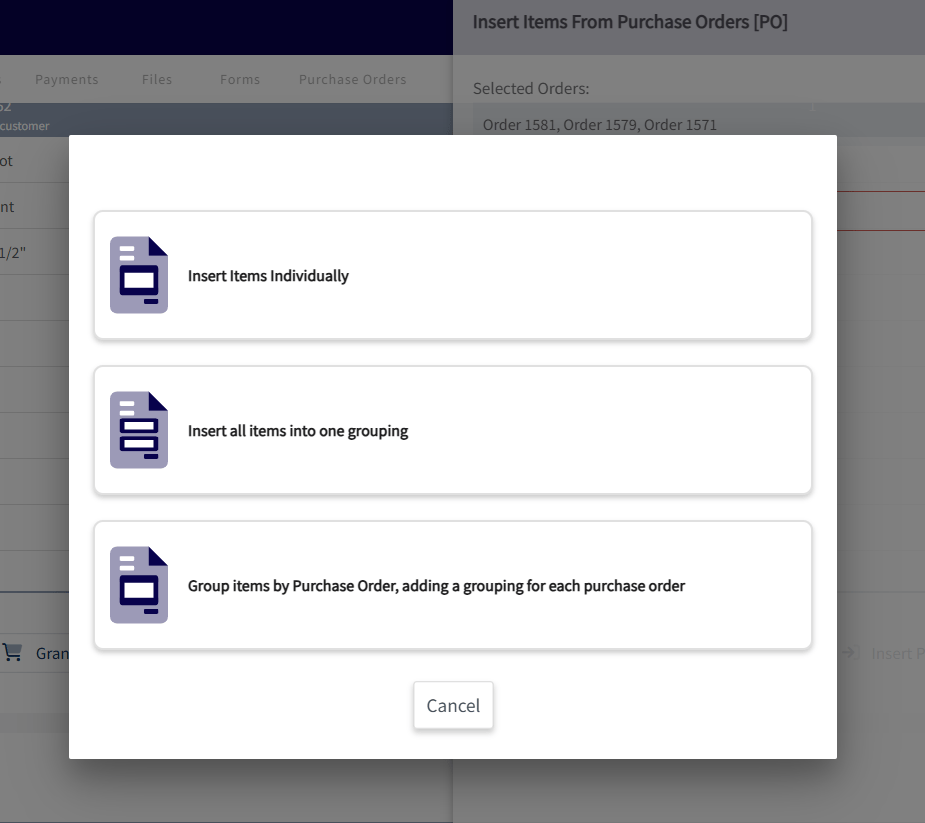
 3. Select your PO, then choose your desired item layout: One big grouping, A grouping per PO, or Individual items.
 ***
# Print Receiving Labels
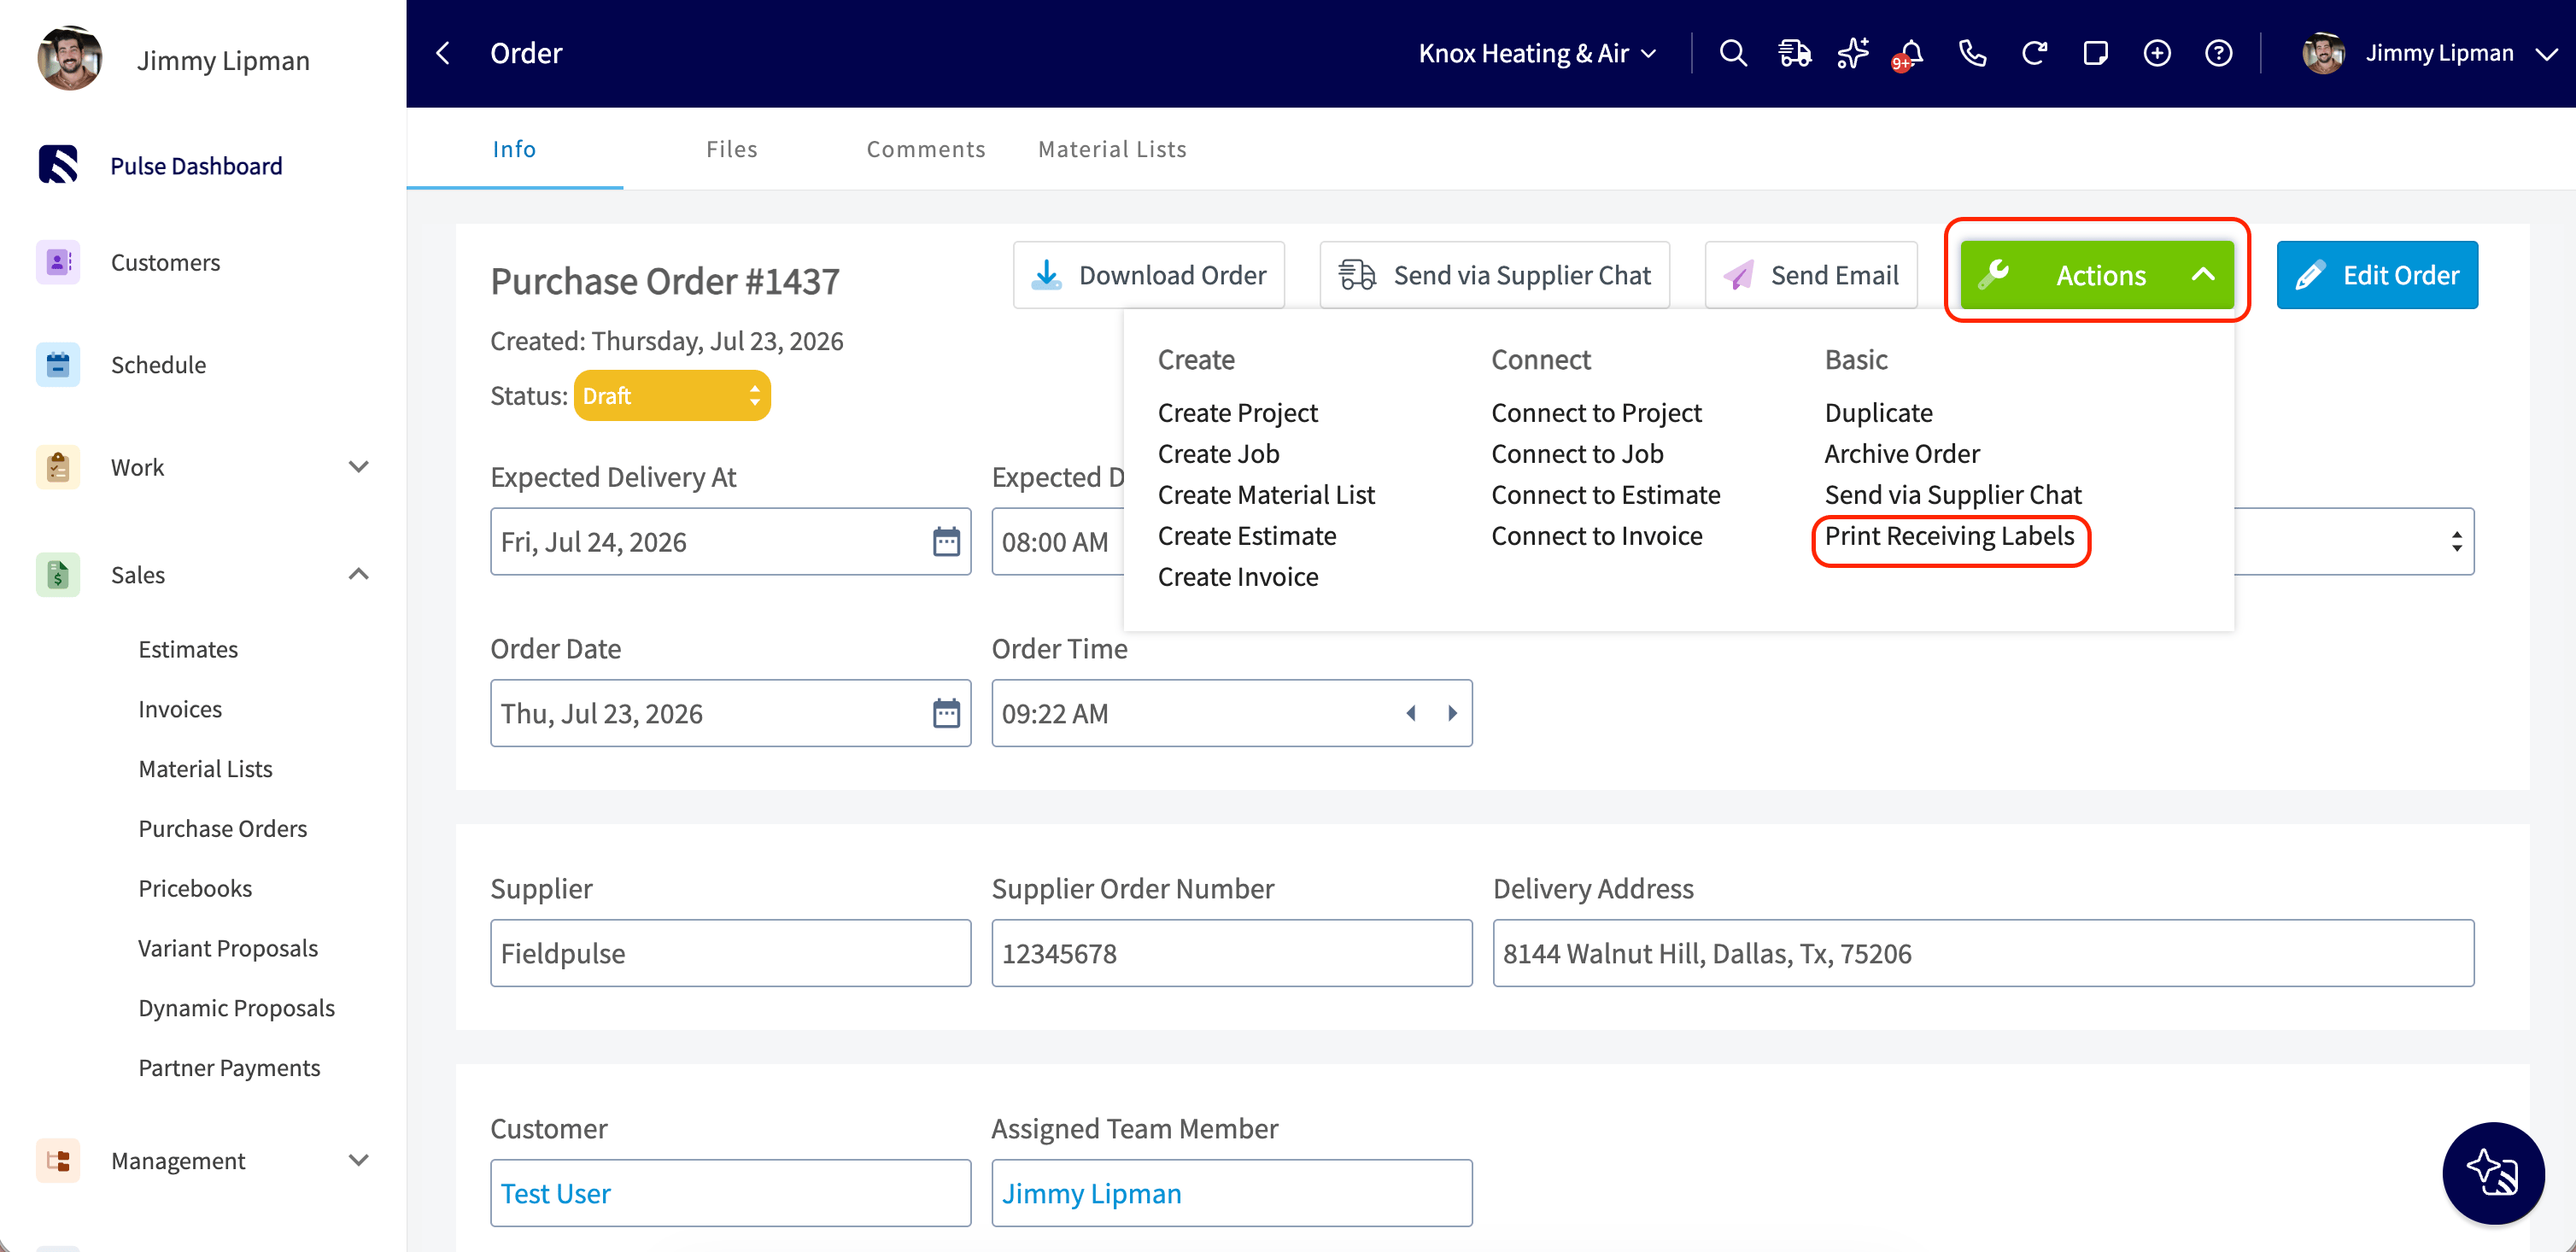
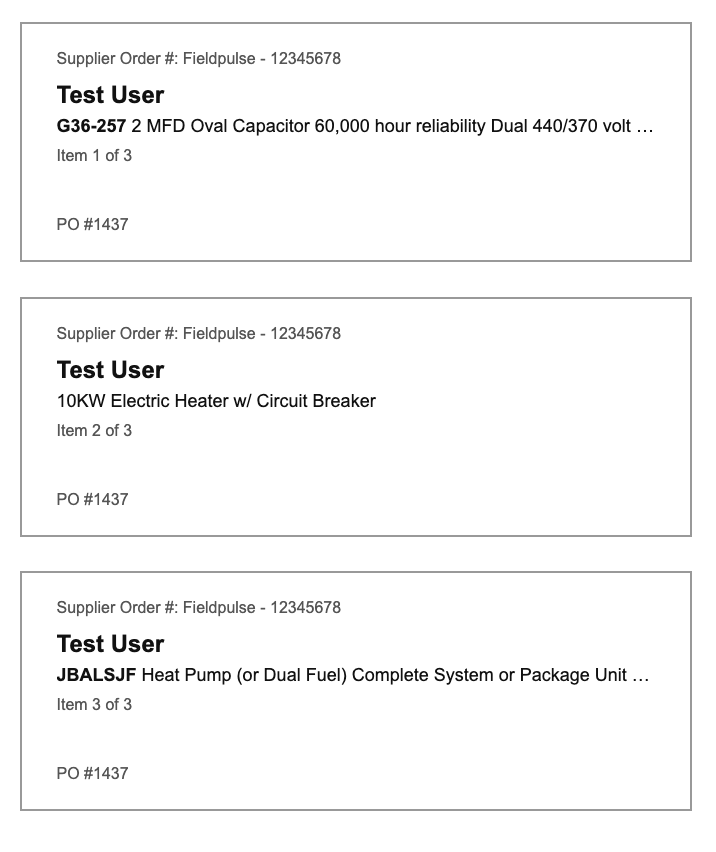
When parts arrive, mark each line item's *Received* toggle on as it comes in. Once you're ready, open the *Actions* menu on the Purchase Order and select *Print Receiving Labels* to print one routing label per received line item.
***
# Print Receiving Labels
When parts arrive, mark each line item's *Received* toggle on as it comes in. Once you're ready, open the *Actions* menu on the Purchase Order and select *Print Receiving Labels* to print one routing label per received line item.
 Each label automatically includes:
* Part Number
* Description
* Quantity
* PO #
* Supplier Order #
* Received Date
If the Purchase Order is linked to a Job, the label also includes:
* Job #
* Customer Name
* Job Location
* Assigned Tech
* Equipment
So you can stick it straight on the box and hand it to the right tech. If no Job is linked (for example, a stock part), those fields are simply left off.
Clicking Print Receiving Labels opens your browser's print dialog, where you can choose your printer and label size; this works whether you're printing to a thermal label printer or a standard sheet printer.
Each label automatically includes:
* Part Number
* Description
* Quantity
* PO #
* Supplier Order #
* Received Date
If the Purchase Order is linked to a Job, the label also includes:
* Job #
* Customer Name
* Job Location
* Assigned Tech
* Equipment
So you can stick it straight on the box and hand it to the right tech. If no Job is linked (for example, a stock part), those fields are simply left off.
Clicking Print Receiving Labels opens your browser's print dialog, where you can choose your printer and label size; this works whether you're printing to a thermal label printer or a standard sheet printer.
 ***
# On Mobile: Field Experience
## Creating a Purchase Orders
You can create and send purchase orders on the web app or mobile app!
To learn more about purchase orders, [the purchase orders guide](/using-fieldpulse/purchase-orders/purchase-orders).
To begin, select the *Sales* tab at the bottom of the screen, then click on *Purchase Orders*.
***
# On Mobile: Field Experience
## Creating a Purchase Orders
You can create and send purchase orders on the web app or mobile app!
To learn more about purchase orders, [the purchase orders guide](/using-fieldpulse/purchase-orders/purchase-orders).
To begin, select the *Sales* tab at the bottom of the screen, then click on *Purchase Orders*.
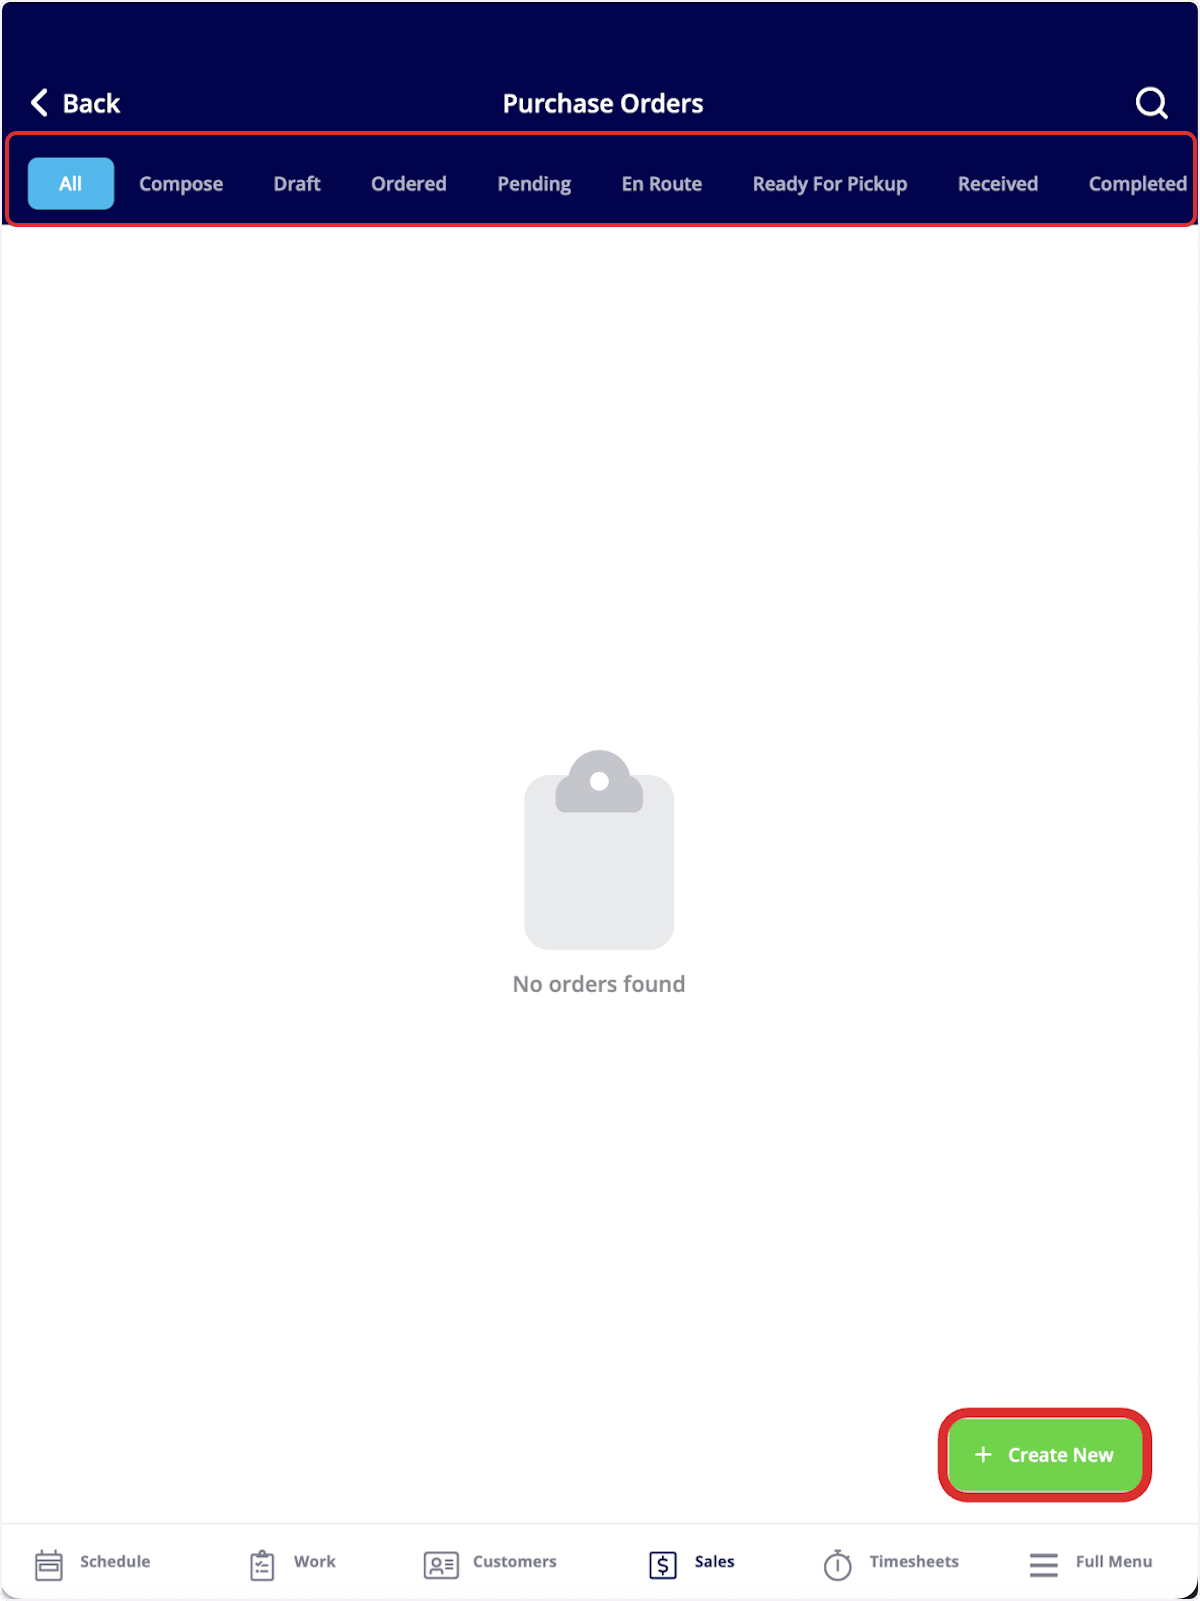
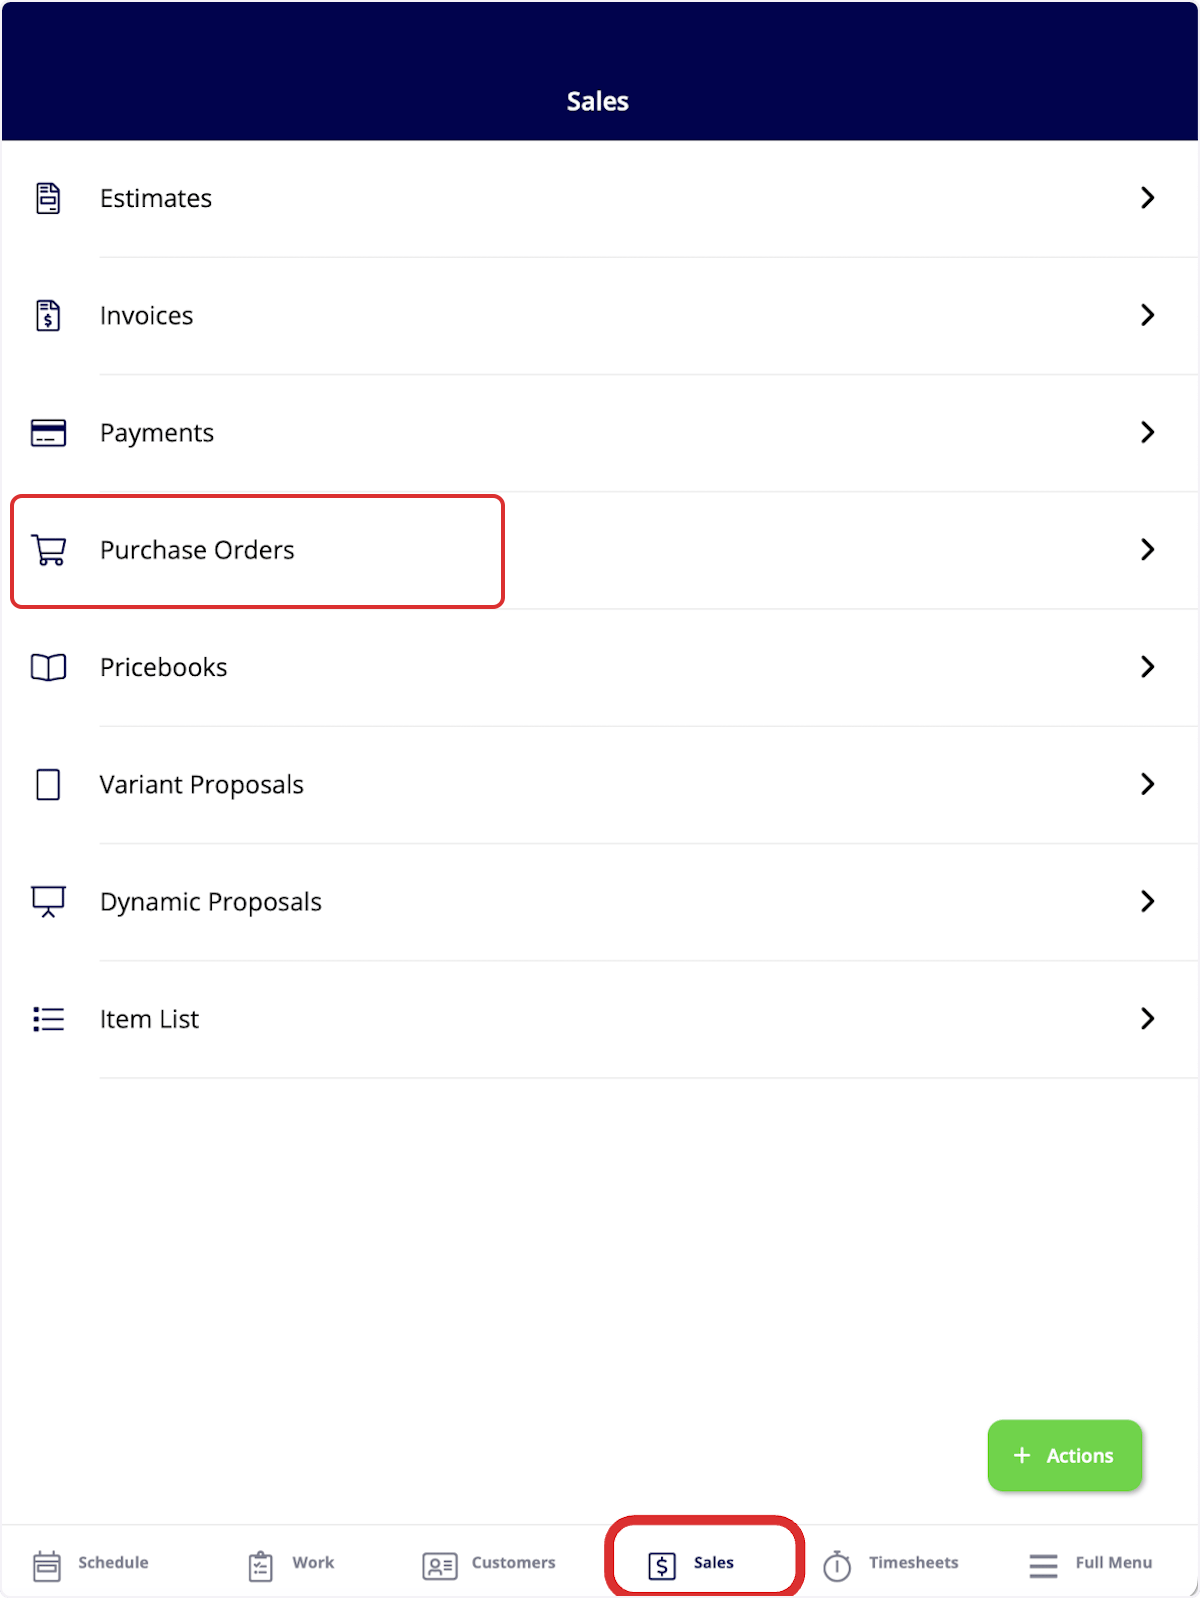 You can sort existing purchase orders using the tabs at the top of the screen, or create a new purchase order using the *Create New* button.
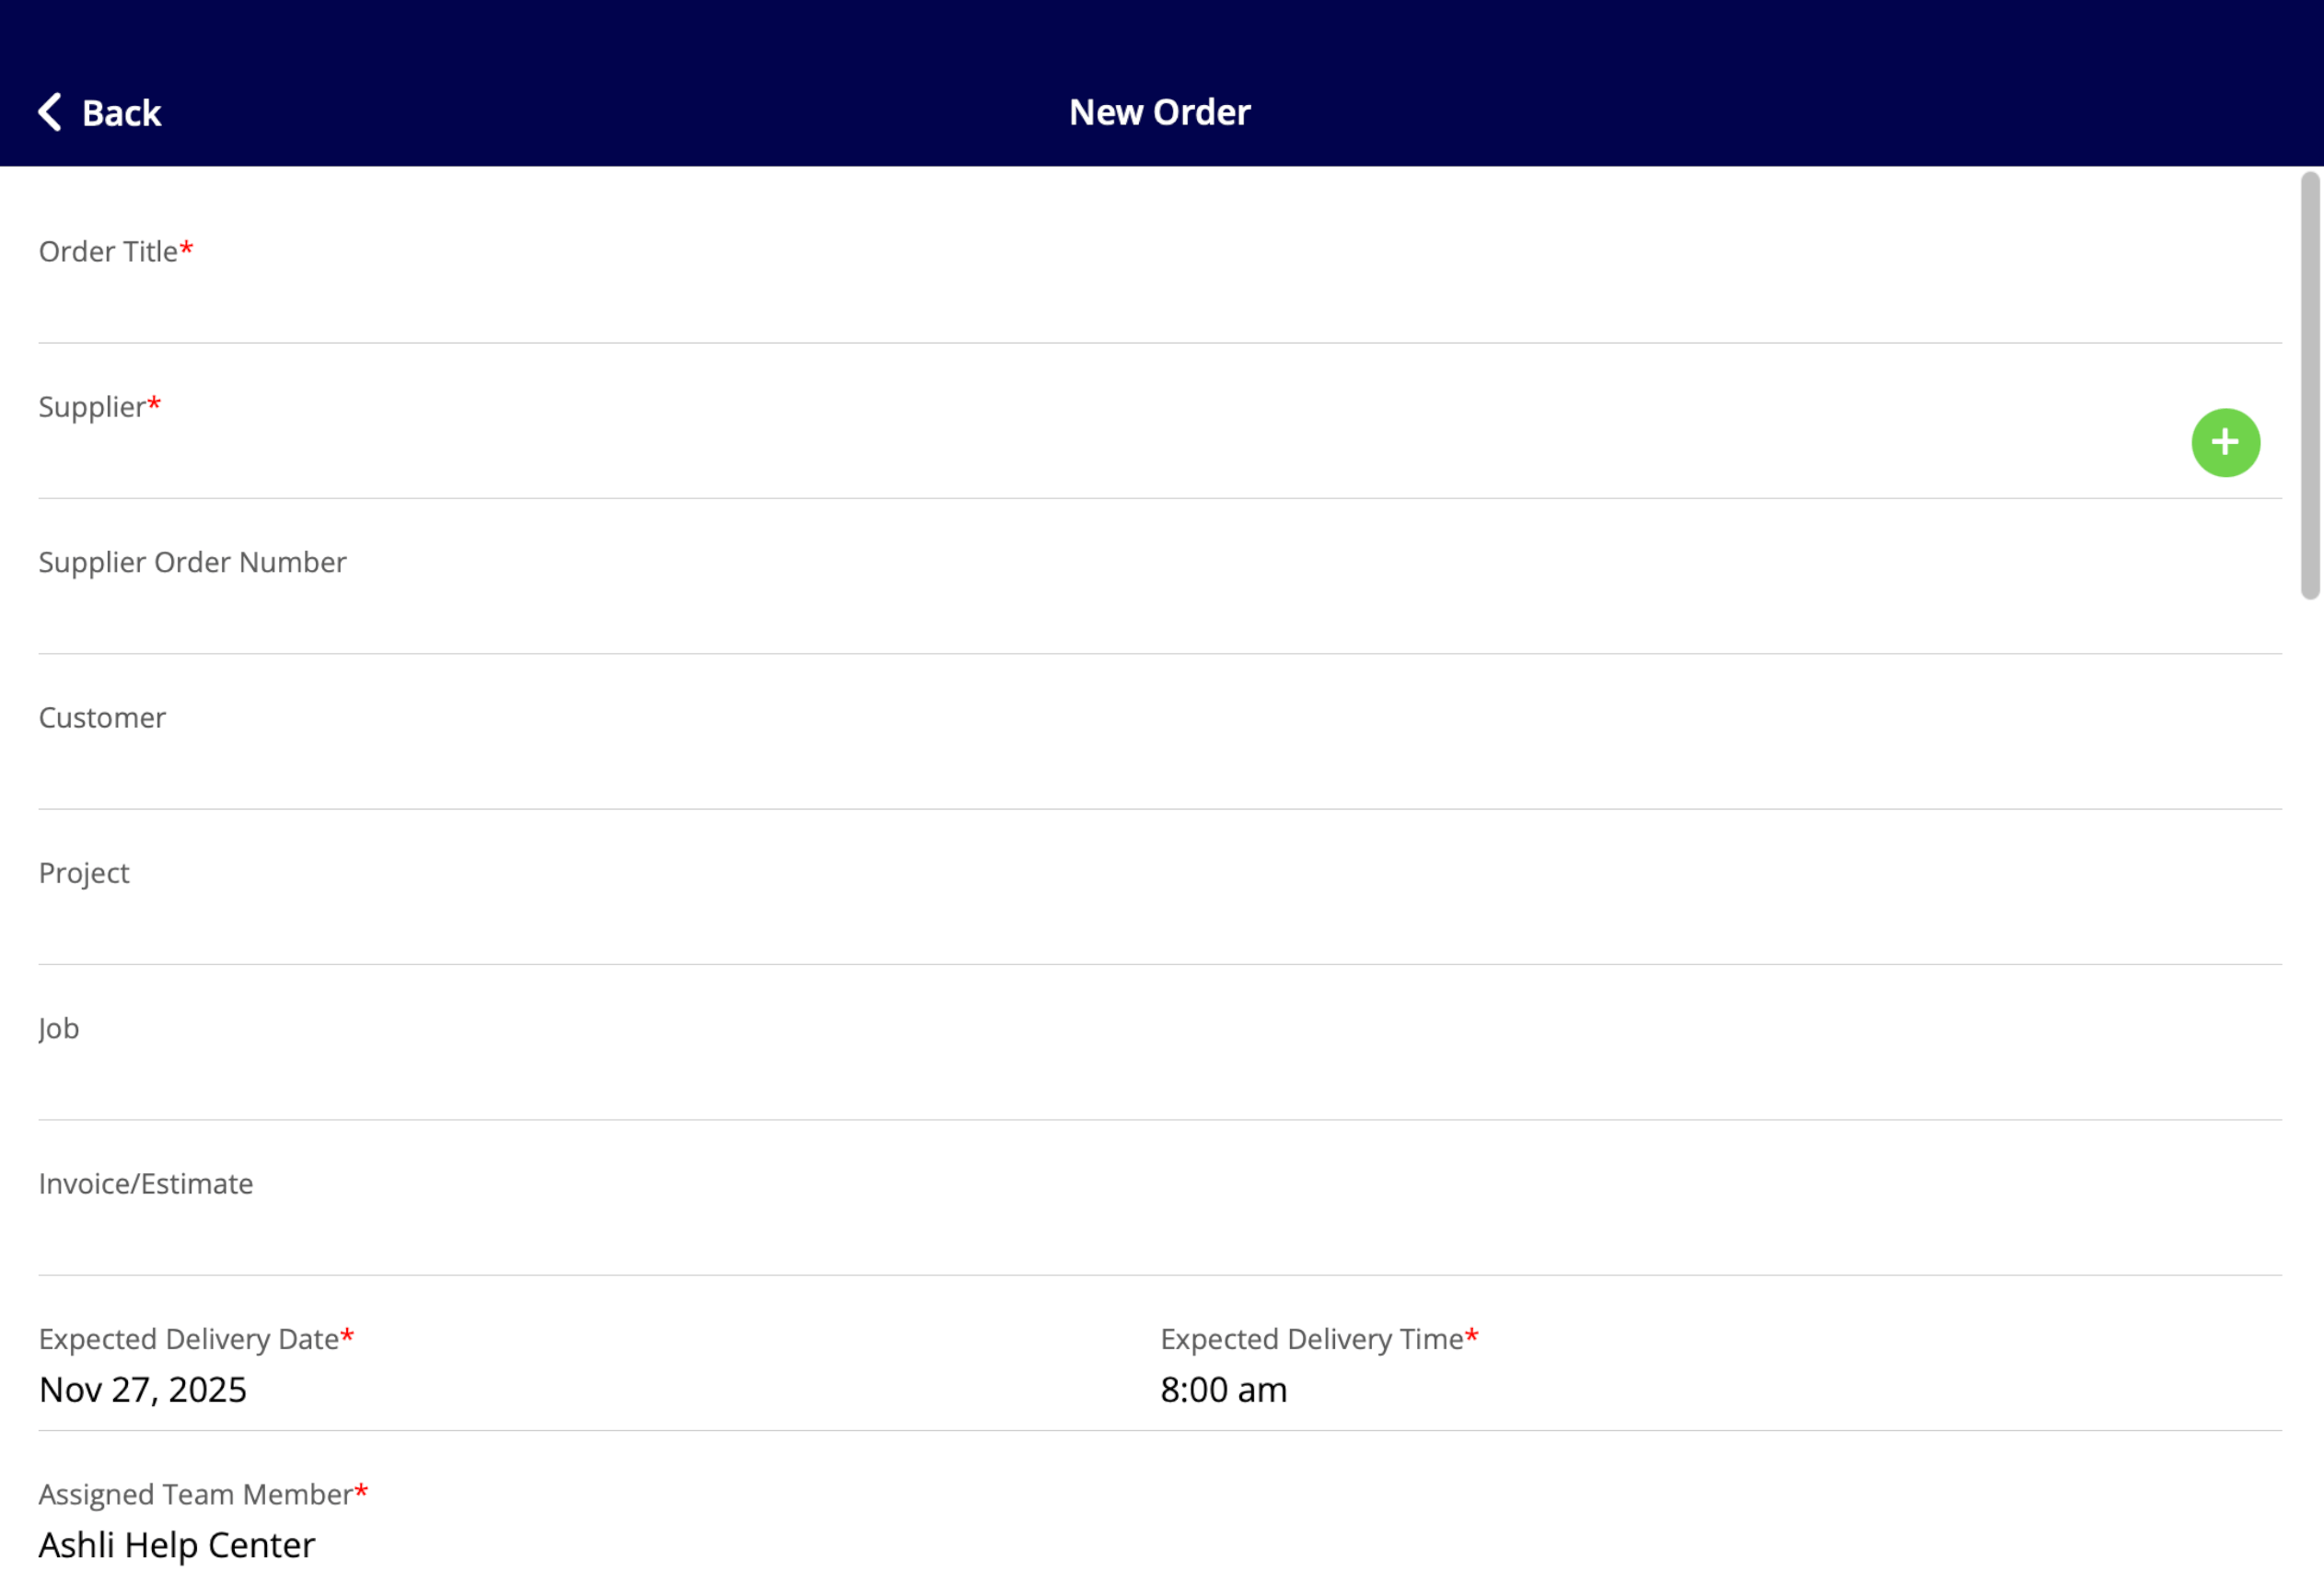
 Once creating a new purchase order, fill in all pertinent details and attach an existing supplier or create a new supplier.
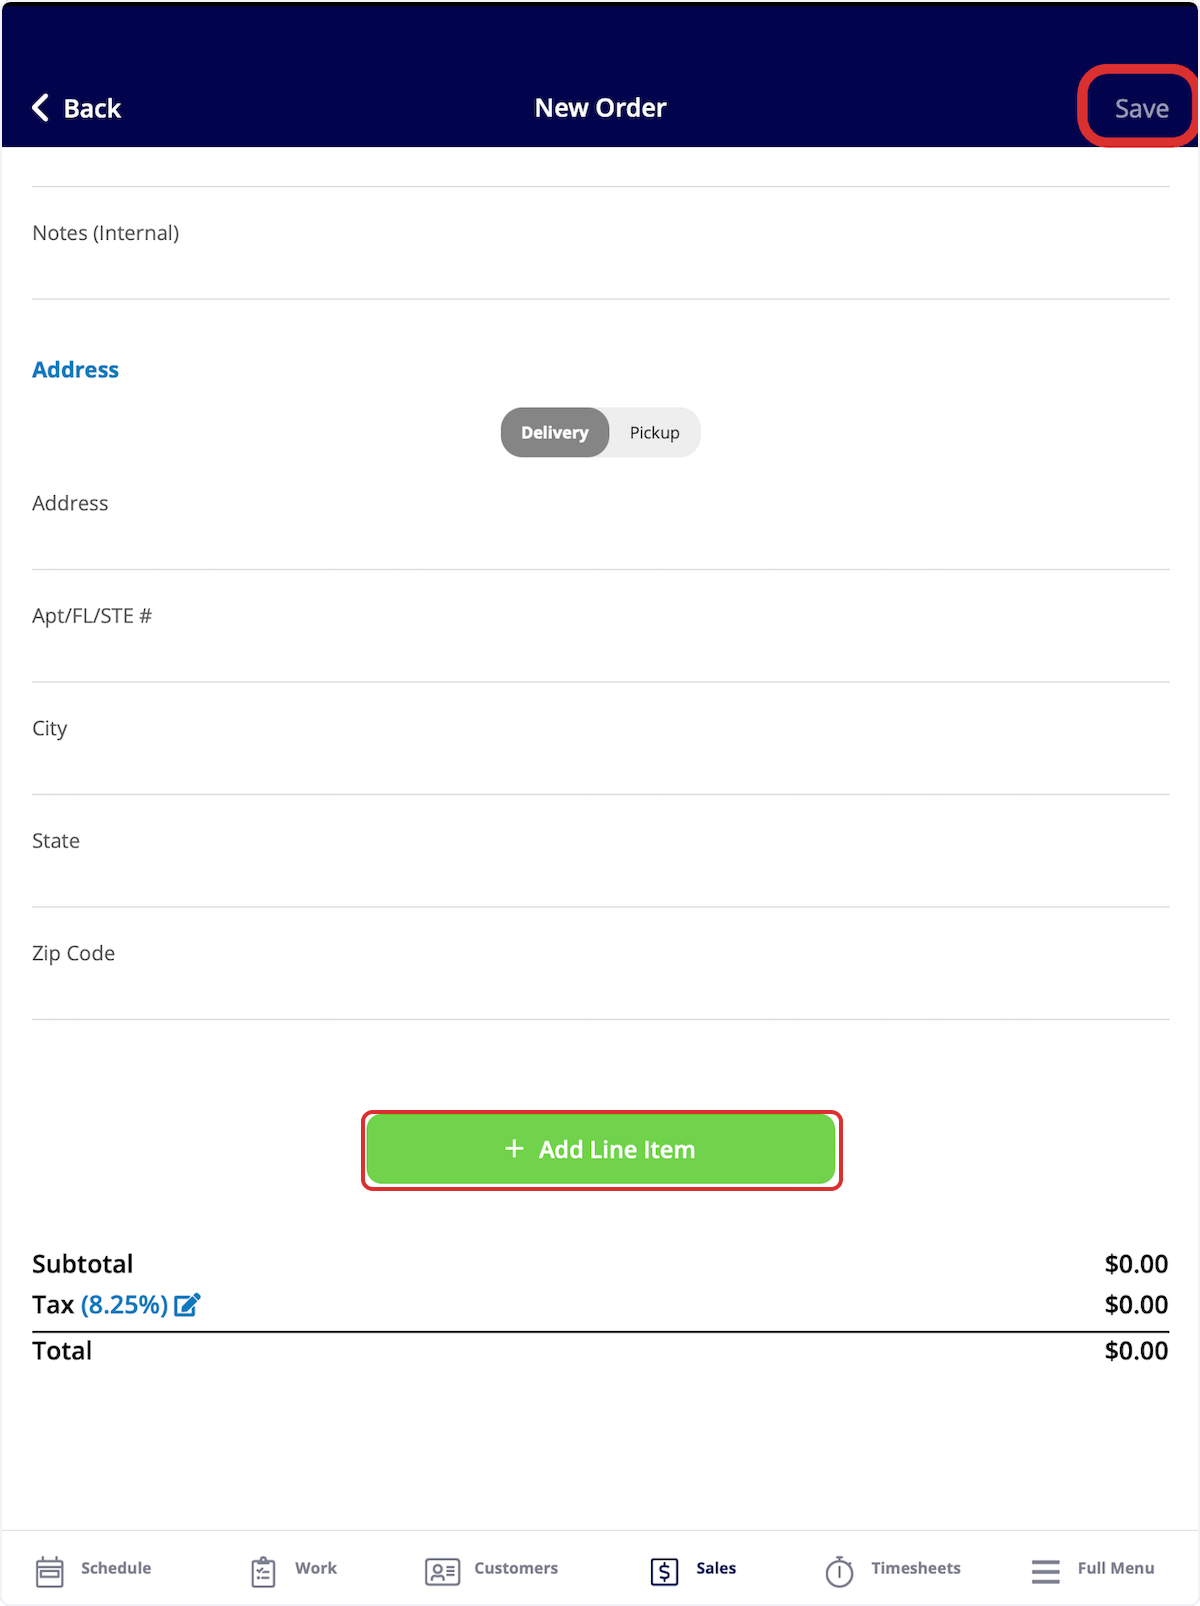
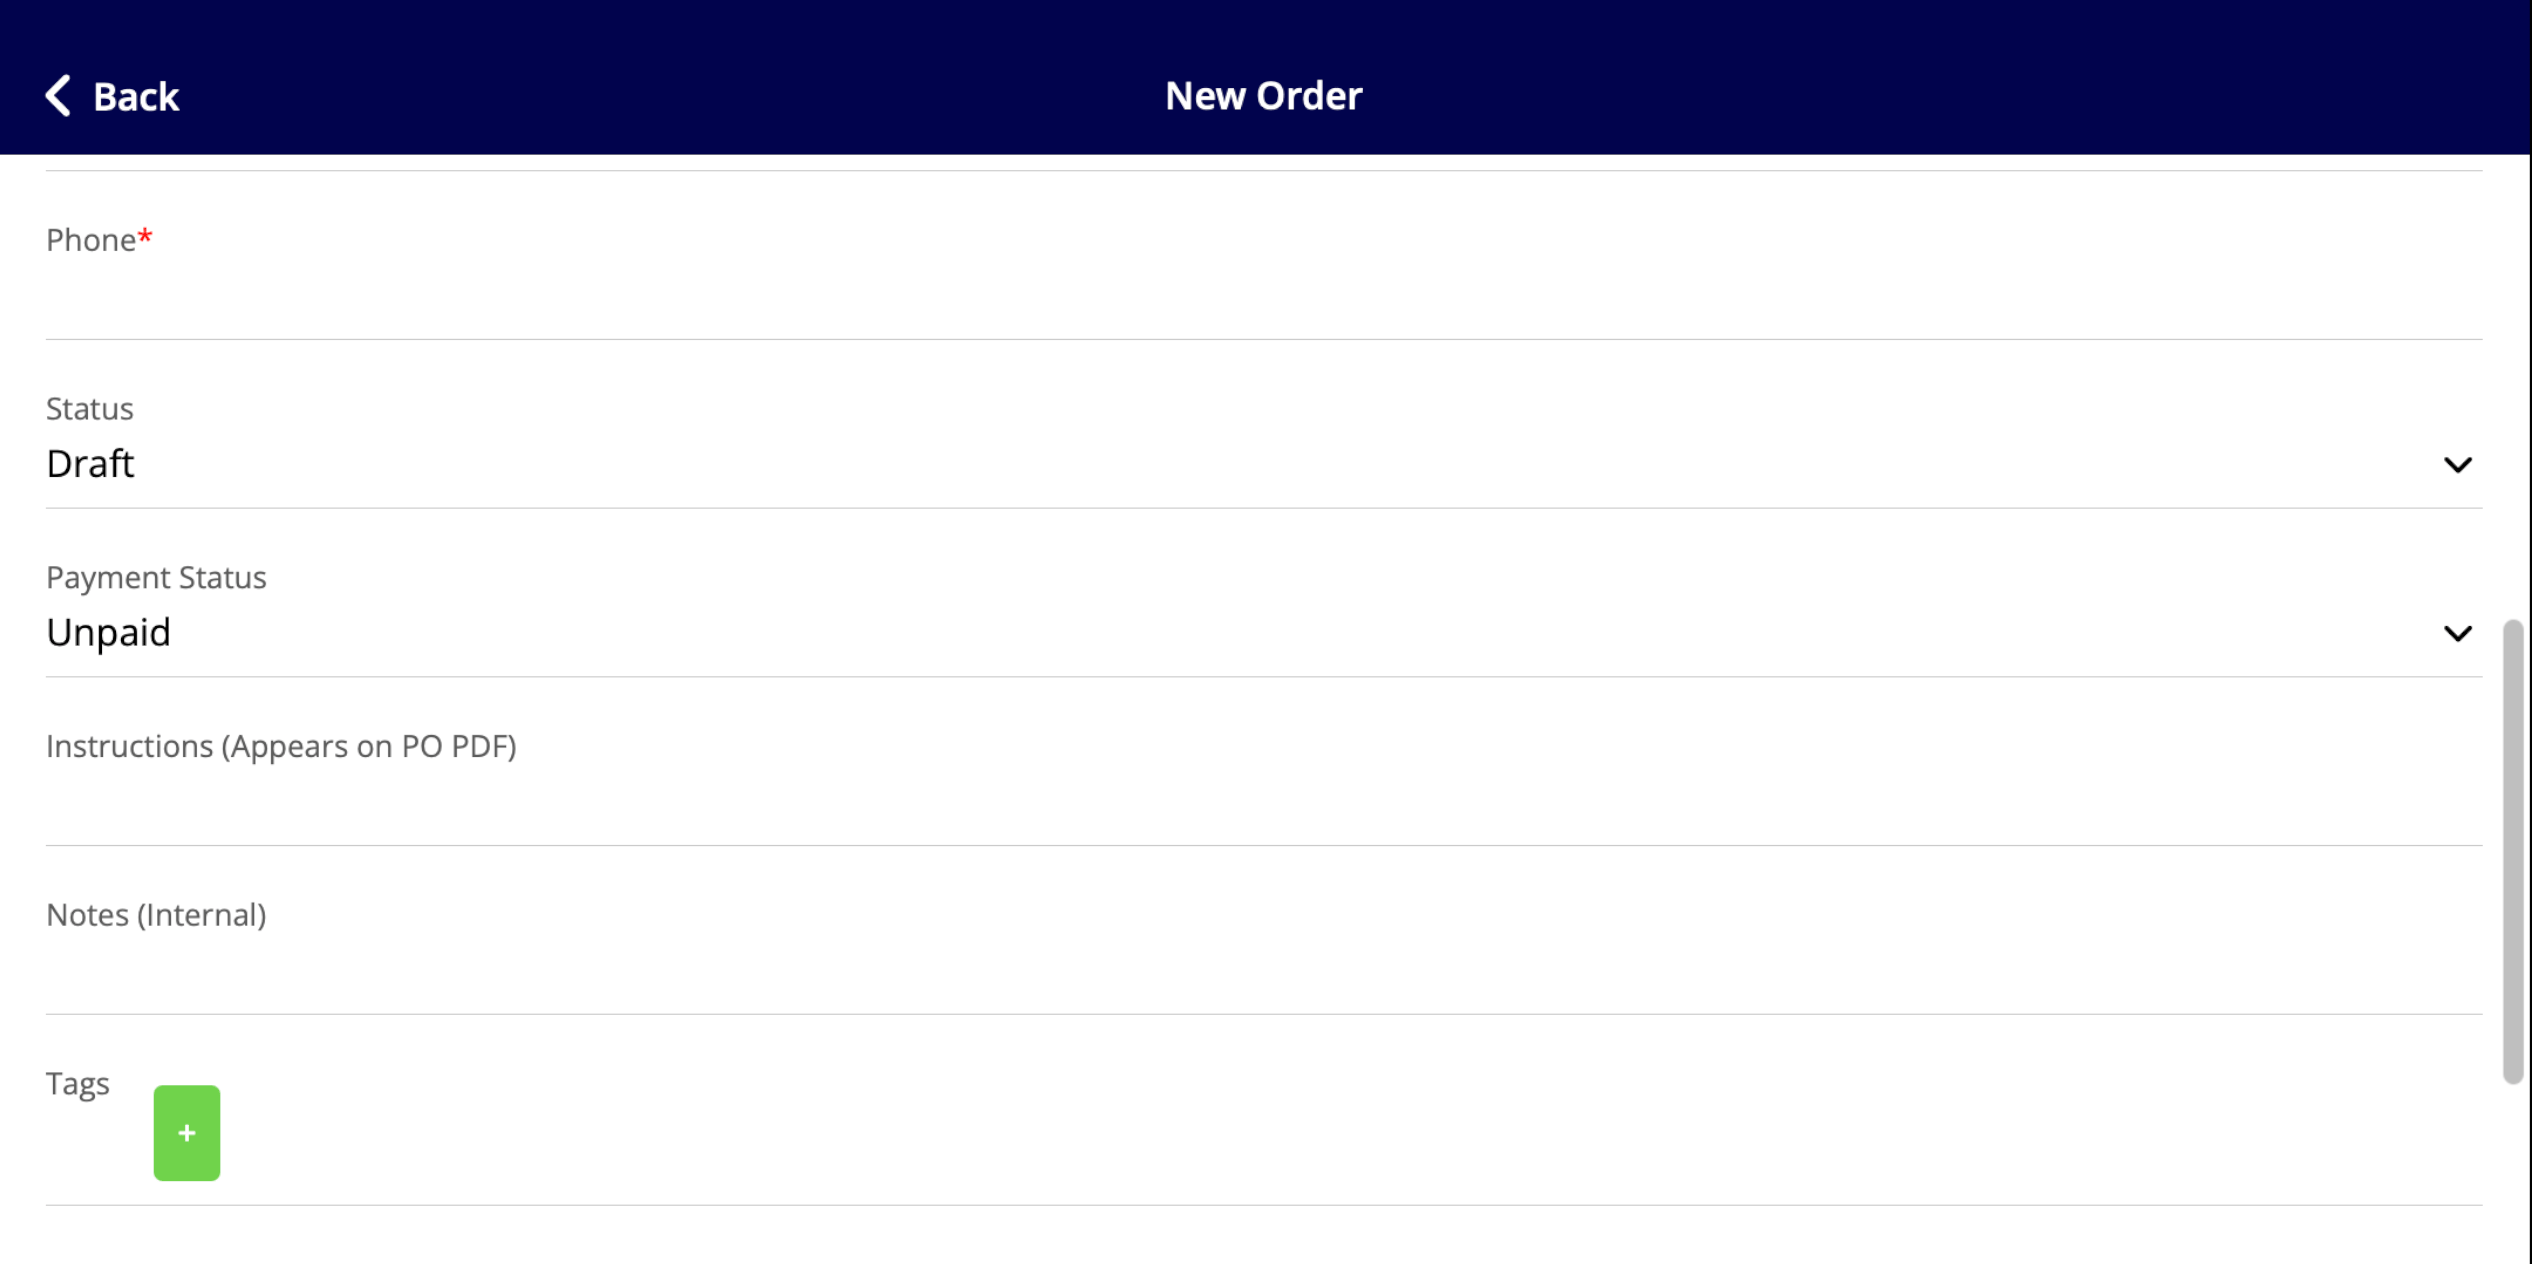 To add items to your purchase order, select *Add Line Item*. Once completed, click *Save* in the top right corner to send your purchase order.
 ***
# FAQs
**What does the 'Order Date Offset' mean?**
The 'Order Date Offset' determines how FieldPulse calculates the Order Date for purchase orders. For example, if the Order Date Offset is set to **1** and you create a purchase order today, the Order Date will automatically be set to **tomorrow**. In essence, the Order Date Offset specifies how many days after the purchase order creation date you want the items to be ordered.
***
# FAQs
**What does the 'Order Date Offset' mean?**
The 'Order Date Offset' determines how FieldPulse calculates the Order Date for purchase orders. For example, if the Order Date Offset is set to **1** and you create a purchase order today, the Order Date will automatically be set to **tomorrow**. In essence, the Order Date Offset specifies how many days after the purchase order creation date you want the items to be ordered.
 **Can I resend Purchase Orders to vendors after they have already been sent?**
Yes, it is possible to resend Purchase Orders (POs) to vendors after the initial submission.
For specific suppliers like Reece, The Granite Group, and City Electric Supply, the order is integrated directly into their systems. If you need to make any changes to your order with these suppliers, please contact their branch directly.
For suppliers that do not have a PO integration with our platform, you can edit your PO and change its status back to *Draft* before resending it. However, we recommend reaching out to the supplier. Resending the PO may lead to the supplier receiving and potentially fulfilling two separate orders, so it’s best to confirm with them before taking any action.
**Can I manually change the “next number” of my Purchase Orders?**
Yes, you can manually change the “next number” of your Purchase Orders by navigating to *Company Settings > Orders > General* and locating the field titled *Next Order #*.
**Can I resend Purchase Orders to vendors after they have already been sent?**
Yes, it is possible to resend Purchase Orders (POs) to vendors after the initial submission.
For specific suppliers like Reece, The Granite Group, and City Electric Supply, the order is integrated directly into their systems. If you need to make any changes to your order with these suppliers, please contact their branch directly.
For suppliers that do not have a PO integration with our platform, you can edit your PO and change its status back to *Draft* before resending it. However, we recommend reaching out to the supplier. Resending the PO may lead to the supplier receiving and potentially fulfilling two separate orders, so it’s best to confirm with them before taking any action.
**Can I manually change the “next number” of my Purchase Orders?**
Yes, you can manually change the “next number” of your Purchase Orders by navigating to *Company Settings > Orders > General* and locating the field titled *Next Order #*.
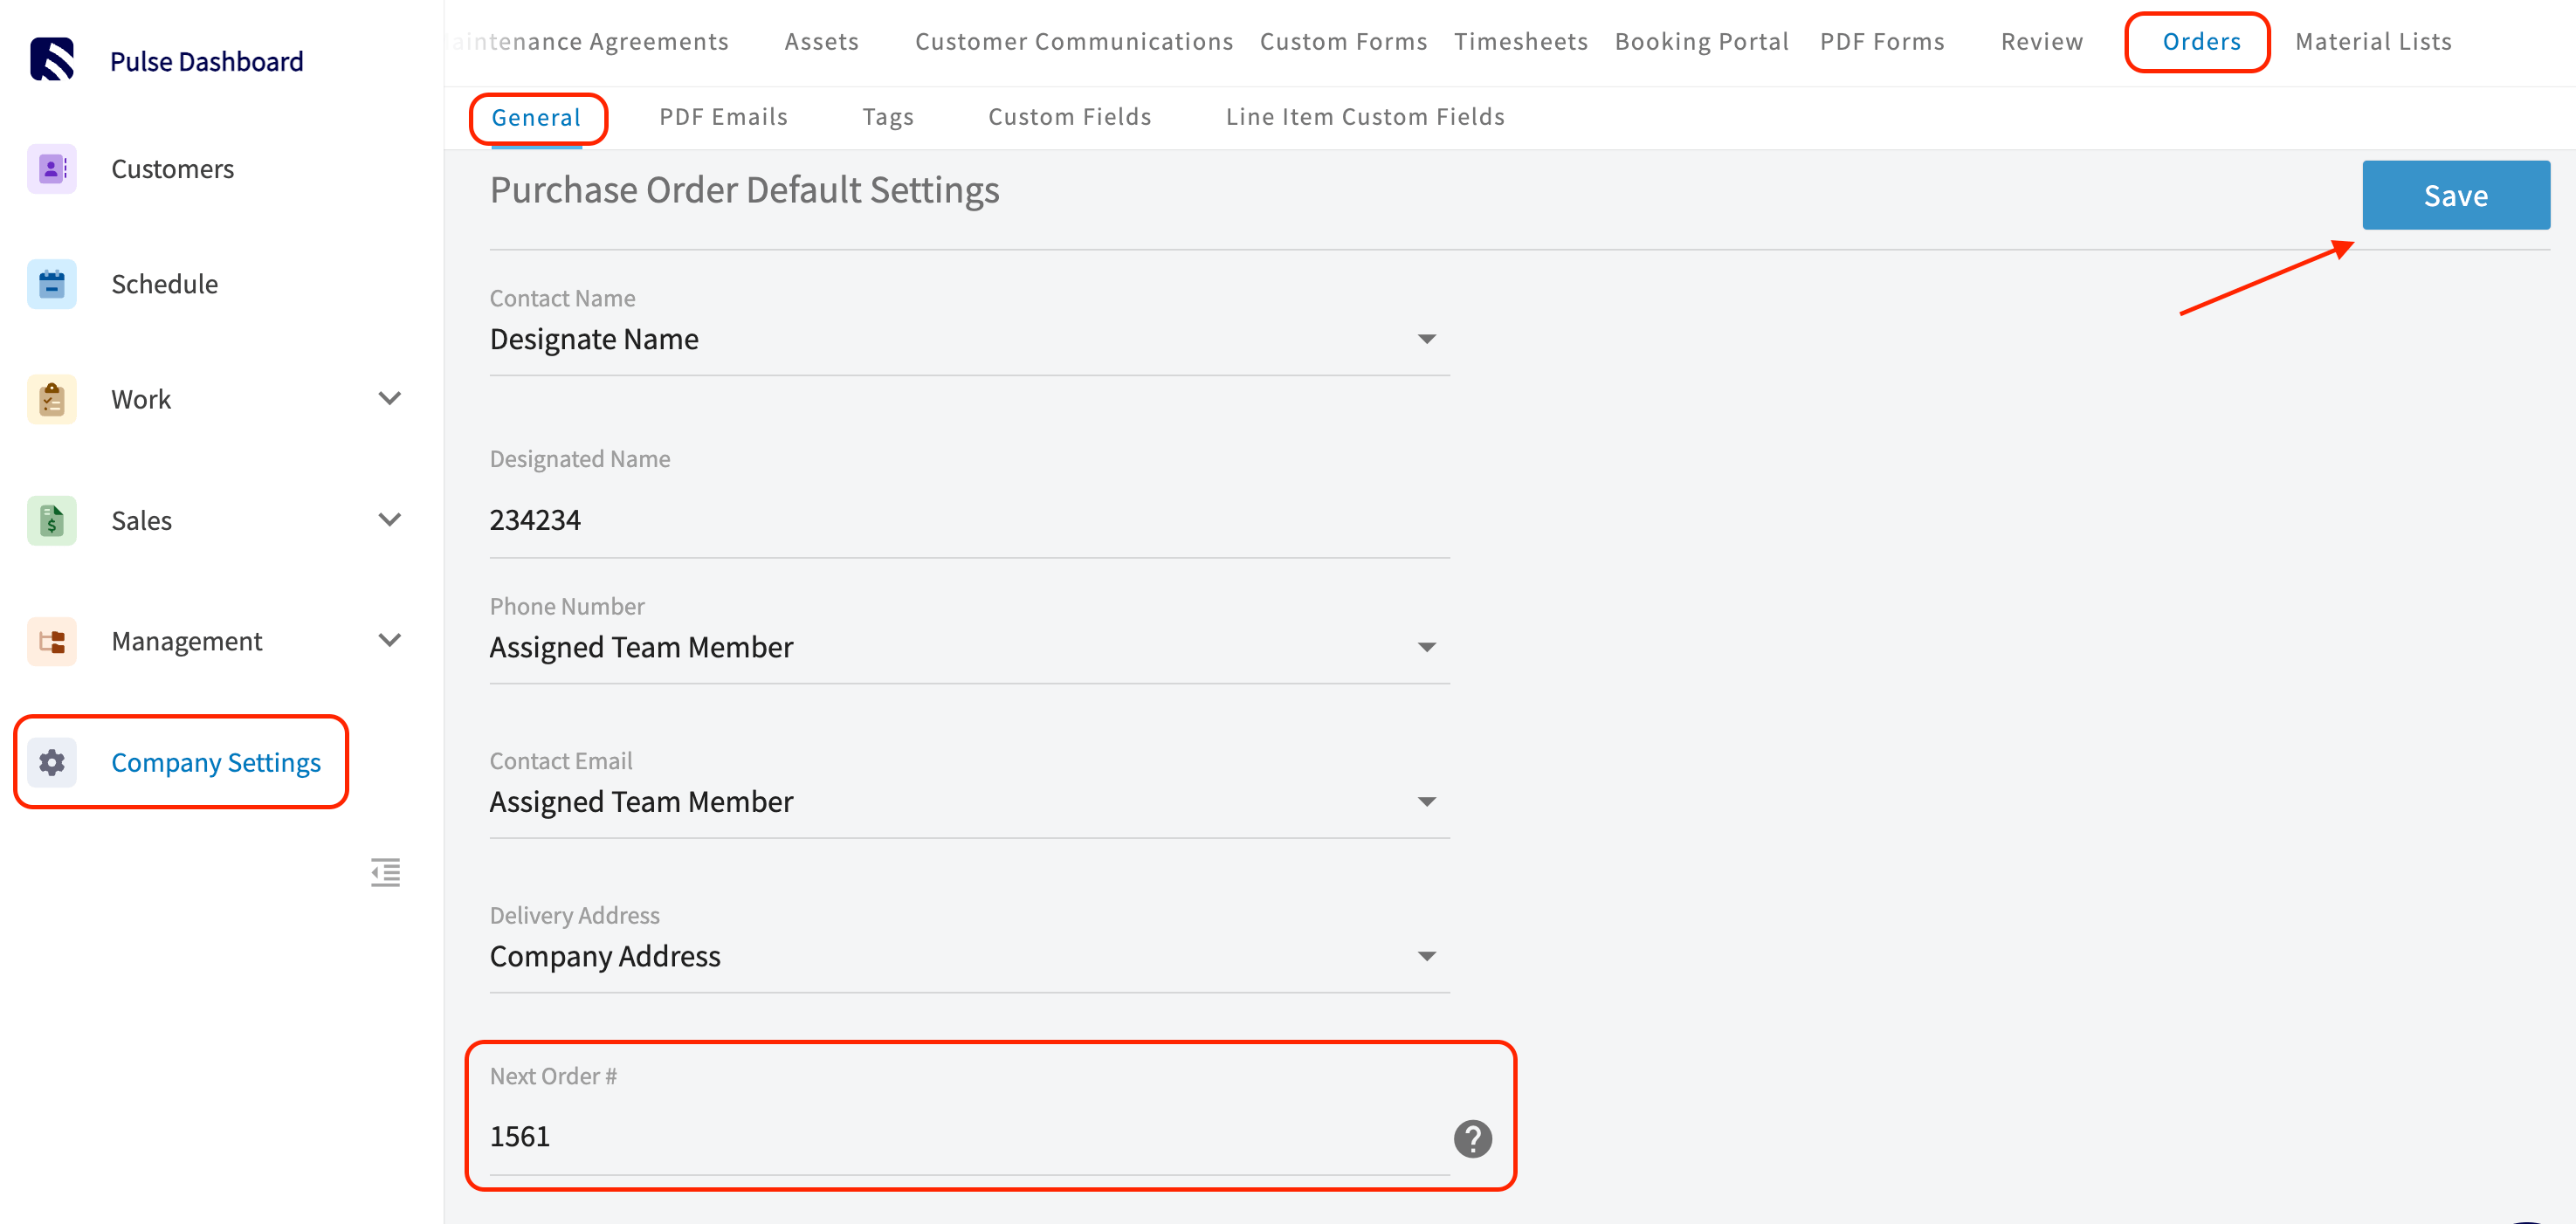 After saving, the next created purchase order will use this number and numbering will auto-increment from there.
**How does FieldPulse generate Purchase Orders when Auto-Replenishment is triggered?**
When an item reaches its Auto Re-order Level, a Purchase Order is generated immediately with no delay or batching. The system uses the following logic to determine what gets created:
* **Supplier Grouping:** Items that hit their reorder threshold at the same time and share the same supplier are grouped into a single PO.
* **Draft Consolidation:** If a Draft PO already exists for that supplier, new items are appended to it rather than creating a new one.
* **Unassigned Suppliers:** Items with no supplier assigned always generate their own standalone PO.
***
# Video Tutorials
## Web App
## Mobile
***
**Have additional questions?**
*Contact us at [support@fieldpulse.com](mailto:support@fieldpulse.com) or use the chat feature in the bottom right corner of your screen.*
## Related topics
- [Purchase Orders](/using-fieldpulse/purchase-orders/index.md)
- [ClearPath Widgets: Related Records](/features-add-ons/clearpath/clearpath-widgets/clearpath-widgets-related-records.md)
- [The Granite Group Integration](/integrations-partners/suppliers-distributors/the-granite-group-integration.md)
- [Character Limits & Validations](/troubleshooting-technical-specs/character-limits-validations.md)
- [Purchase Order Reports](/using-fieldpulse/reporting/raw-data-reporting-tutorials/purchase-order-reports.md)
After saving, the next created purchase order will use this number and numbering will auto-increment from there.
**How does FieldPulse generate Purchase Orders when Auto-Replenishment is triggered?**
When an item reaches its Auto Re-order Level, a Purchase Order is generated immediately with no delay or batching. The system uses the following logic to determine what gets created:
* **Supplier Grouping:** Items that hit their reorder threshold at the same time and share the same supplier are grouped into a single PO.
* **Draft Consolidation:** If a Draft PO already exists for that supplier, new items are appended to it rather than creating a new one.
* **Unassigned Suppliers:** Items with no supplier assigned always generate their own standalone PO.
***
# Video Tutorials
## Web App
## Mobile
***
**Have additional questions?**
*Contact us at [support@fieldpulse.com](mailto:support@fieldpulse.com) or use the chat feature in the bottom right corner of your screen.*
## Related topics
- [Purchase Orders](/using-fieldpulse/purchase-orders/index.md)
- [ClearPath Widgets: Related Records](/features-add-ons/clearpath/clearpath-widgets/clearpath-widgets-related-records.md)
- [The Granite Group Integration](/integrations-partners/suppliers-distributors/the-granite-group-integration.md)
- [Character Limits & Validations](/troubleshooting-technical-specs/character-limits-validations.md)
- [Purchase Order Reports](/using-fieldpulse/reporting/raw-data-reporting-tutorials/purchase-order-reports.md)