> ## Documentation Index
> Fetch the complete documentation index at: https://help.fieldpulse.com/llms.txt
> Use this file to discover all available pages before exploring further.
# Creating a Job
> Book a new job from web or mobile, link the customer, assign techs, and set a date so it lands on the schedule instantly.
# Overview
Got a new job to schedule? You can create one in FieldPulse from anywhere, whether you're at your desk on the web app or out in the field on mobile. Link it to a customer, assign your team, set a date, and hit save. Your team gets notified and the job appears on their schedule.
***
# On Web: Admin Experience
Users can create job records for customers and assign them to team members. Job records can be created in different ways, but we’ll walk you through creating a job record from the Jobs tab in the left-side menu.
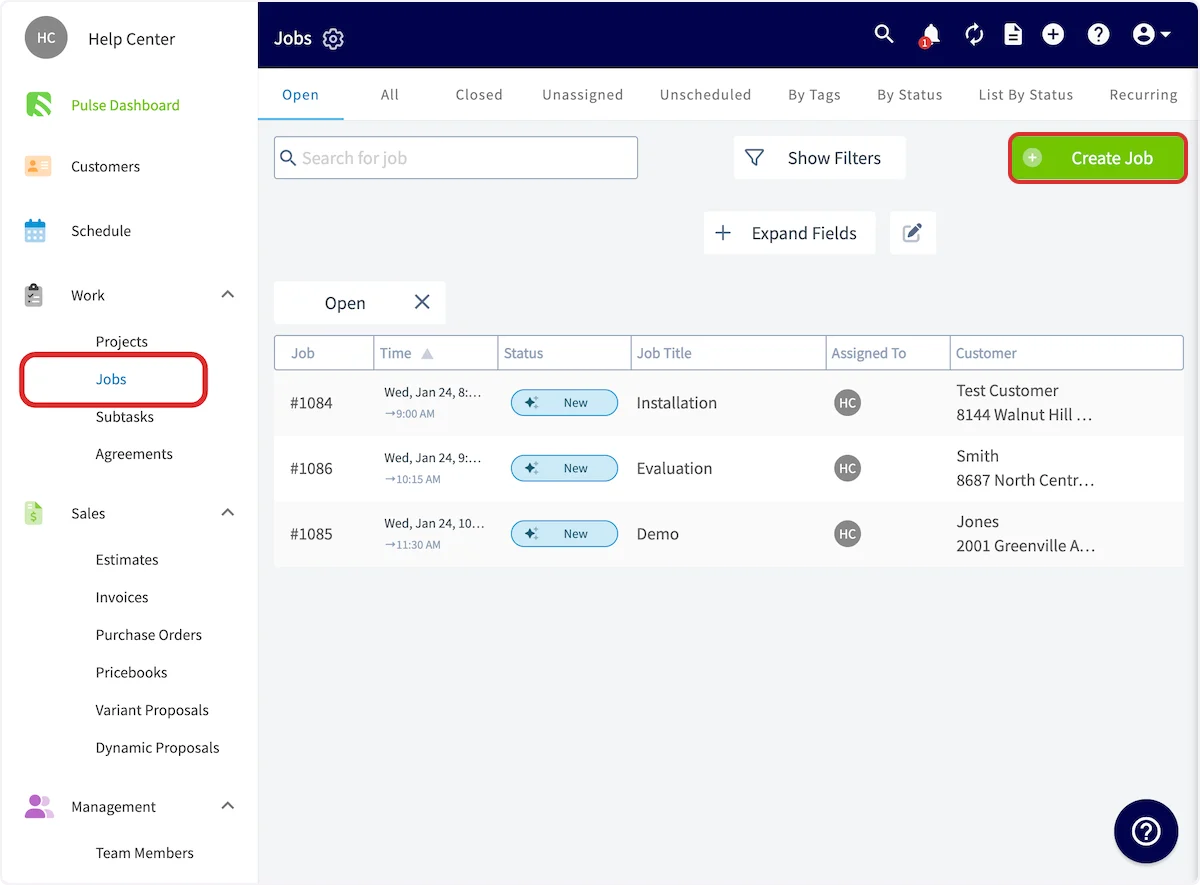
Begin by selecting *Jobs* under *Work* in the left-side menu, then click *Create Job*.
 If you have created Job Templates, you can quickly insert them by selecting *Import Template*. Learn more about Job Templates [the Job Templates guide](/using-fieldpulse/work/job-templates).
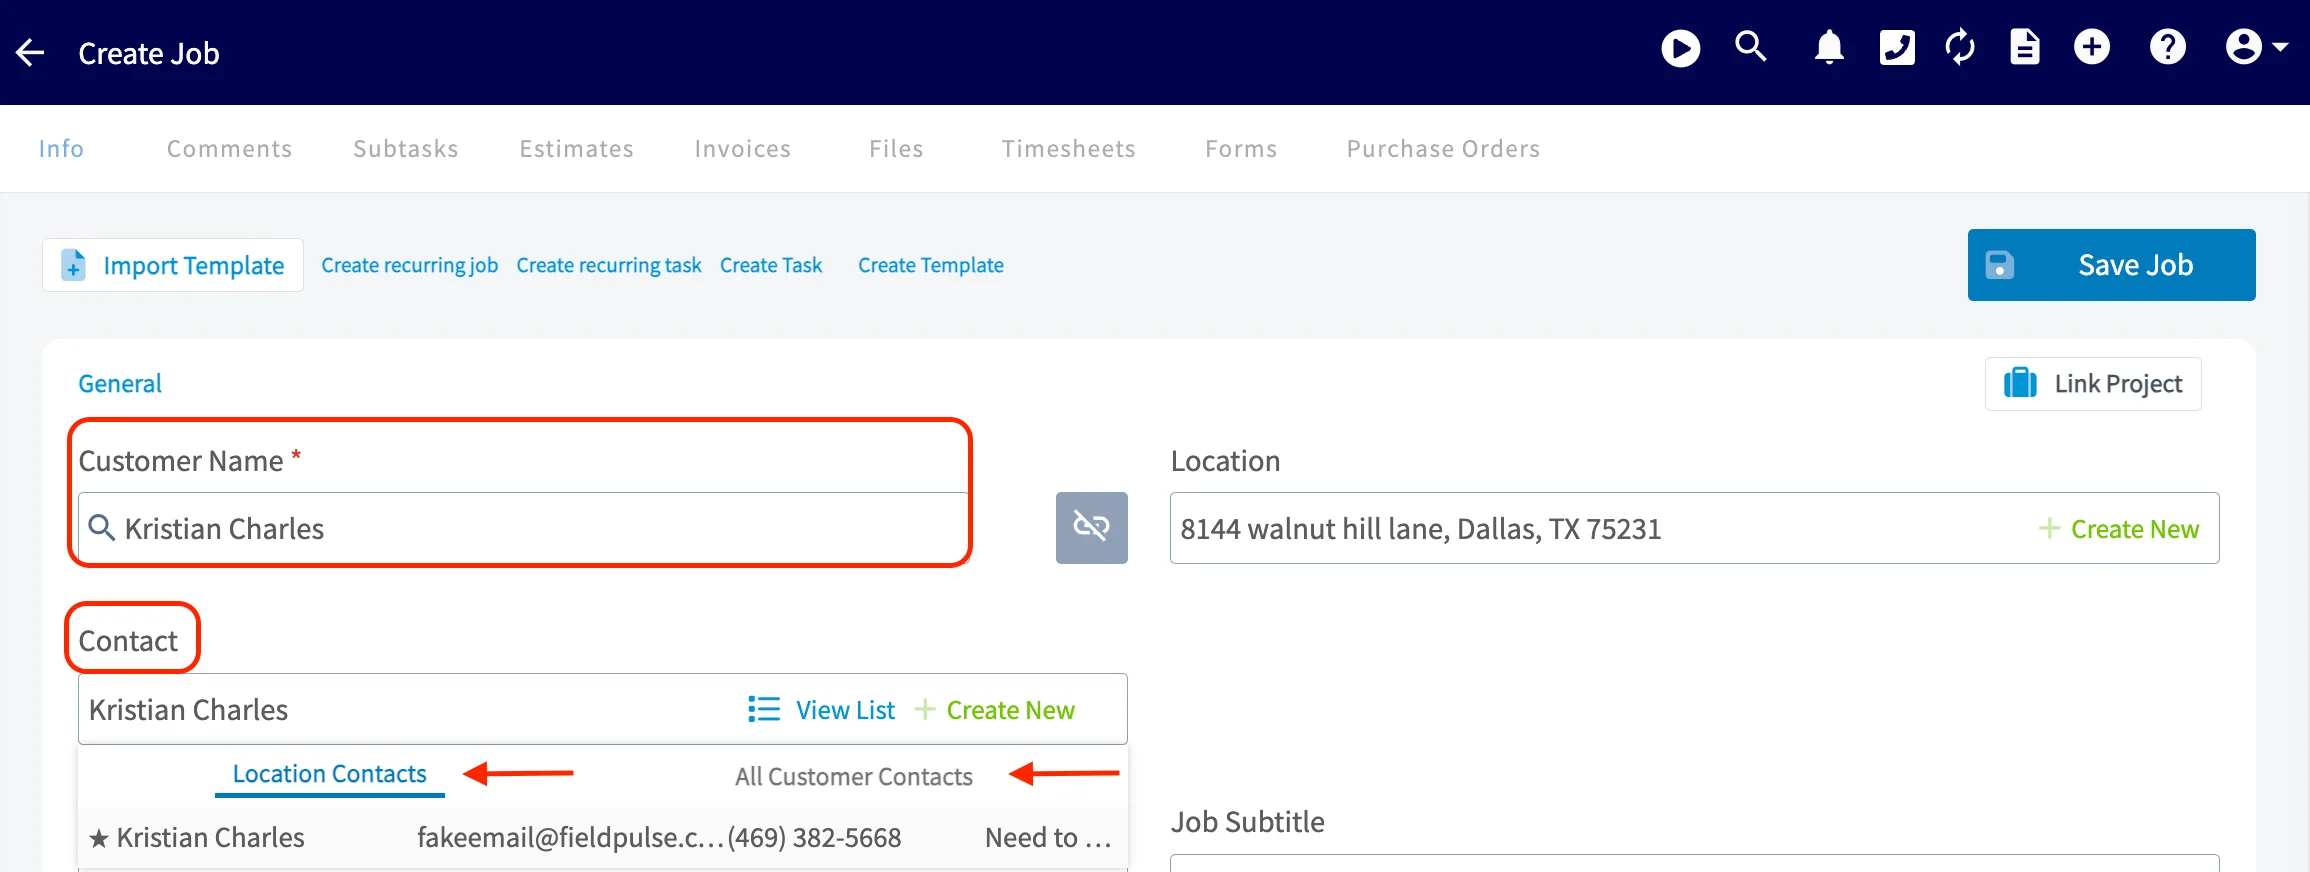
Now, you'll need to link a customer to the job record. You can select an existing customer, or create a new customer. If you don't want to link a customer, consider using a task. To learn more about tasks, visit the [Creating a Task](/using-fieldpulse/work/creating-a-task) article.
When you link a customer, notice that the *Contact* field will appear below. Here you can choose a contact who is associated with the specific location you are performing the work at or choose any contact who is associated with the linked customer.
If you have created Job Templates, you can quickly insert them by selecting *Import Template*. Learn more about Job Templates [the Job Templates guide](/using-fieldpulse/work/job-templates).
Now, you'll need to link a customer to the job record. You can select an existing customer, or create a new customer. If you don't want to link a customer, consider using a task. To learn more about tasks, visit the [Creating a Task](/using-fieldpulse/work/creating-a-task) article.
When you link a customer, notice that the *Contact* field will appear below. Here you can choose a contact who is associated with the specific location you are performing the work at or choose any contact who is associated with the linked customer.
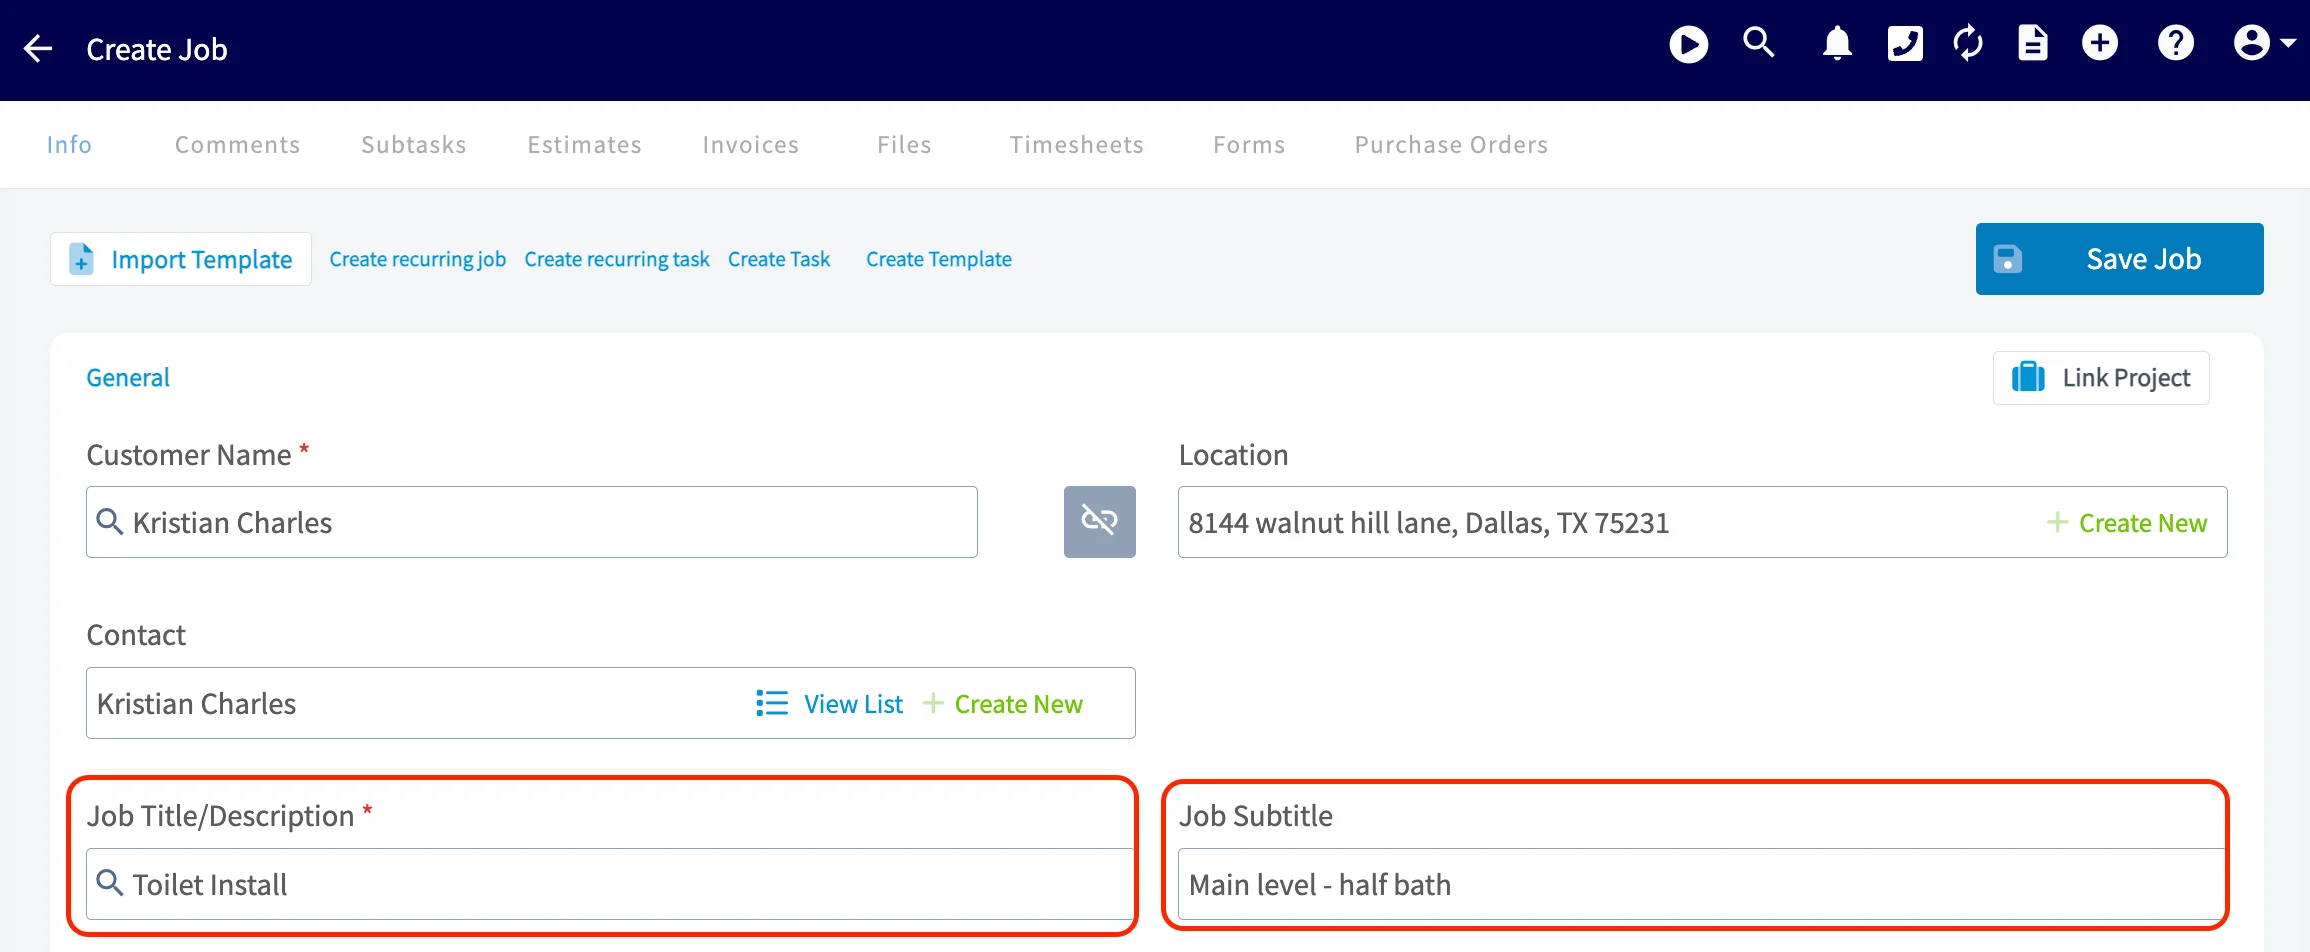
 Enter a title and subtitle (if applicable) for your job that describes the work to be performed. ***Note: The subtitle may not be greater than 150 characters.***
 ## Assigning Users to a Job/Service
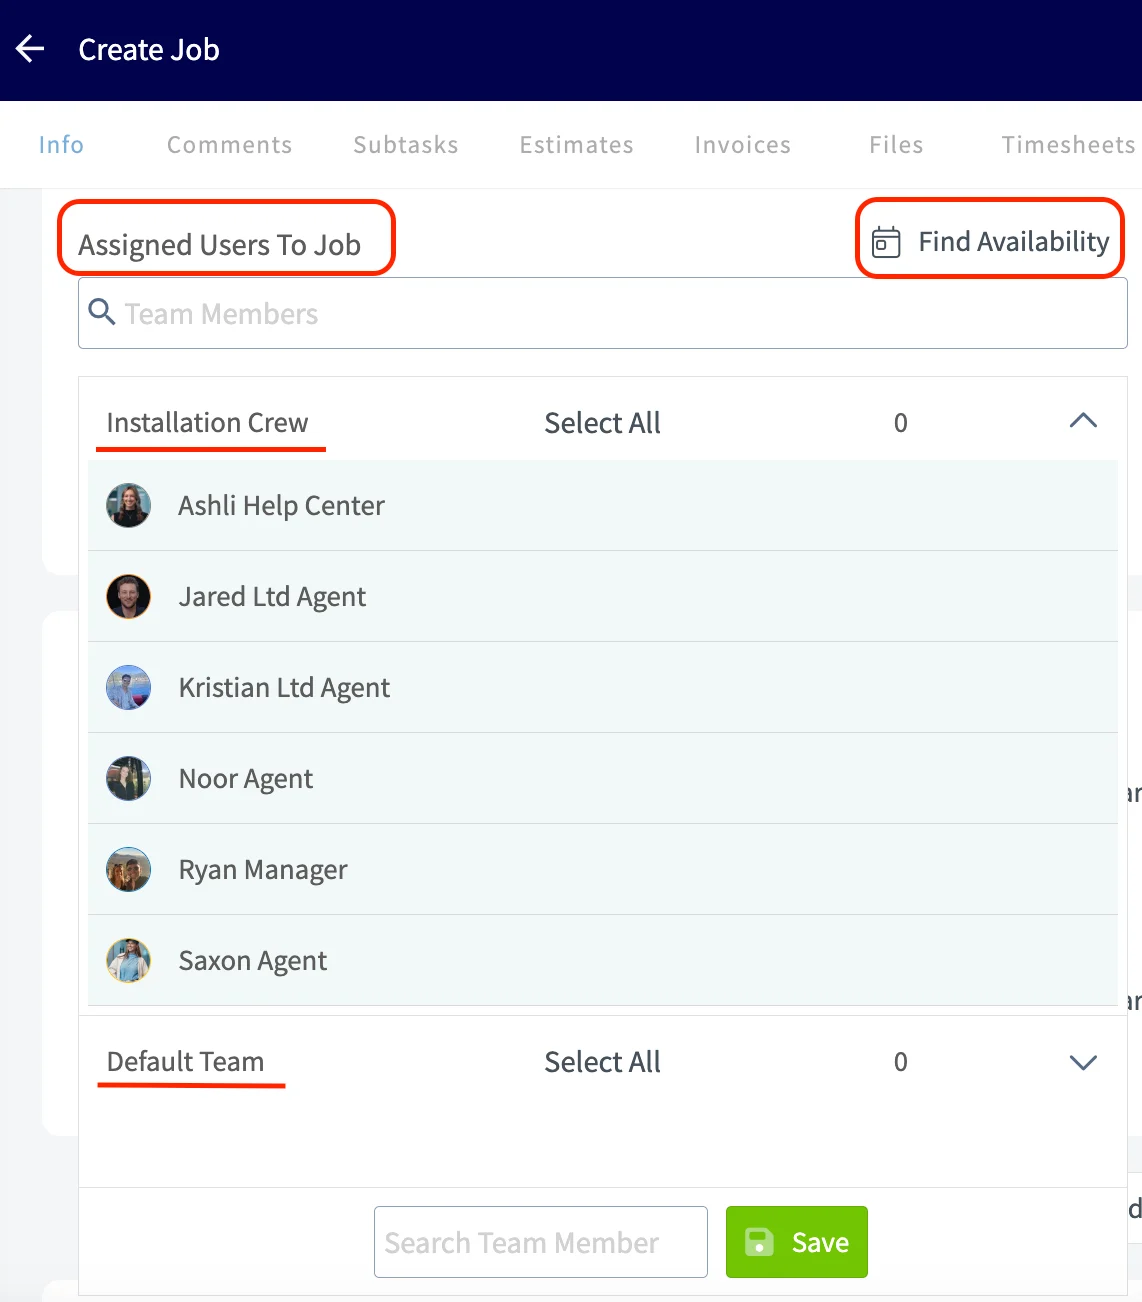
Use the *Assigned Users to Job* field to select team members for the job. You can select individual team members, multiple team members, or entire teams. Once you've selected team member(s), click *Save* to add them to the job. You can utilize the *Find Availability* button and FieldPulse will automatically suggest time slots based on your scheduling requirements and let you know which employee is available.
## Assigning Users to a Job/Service
Use the *Assigned Users to Job* field to select team members for the job. You can select individual team members, multiple team members, or entire teams. Once you've selected team member(s), click *Save* to add them to the job. You can utilize the *Find Availability* button and FieldPulse will automatically suggest time slots based on your scheduling requirements and let you know which employee is available.
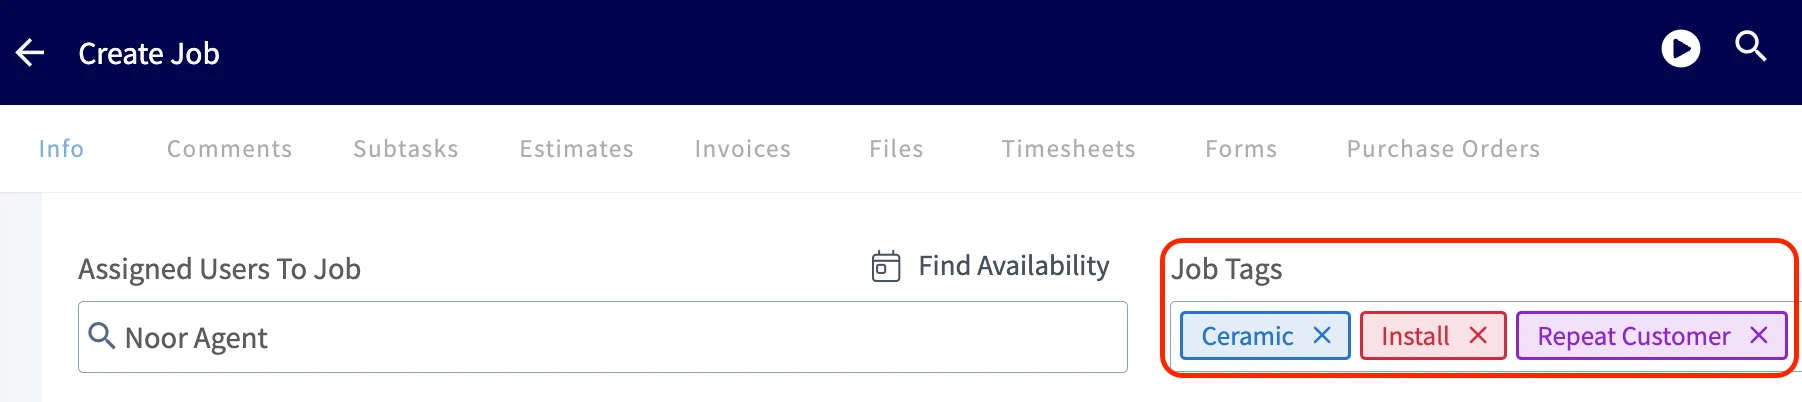
 ## Job Tags
Now, you can add job tags if needed. You can use job tags to organize your jobs and color code them to make the schedule easier to read at a glance. You can use this field to search for existing tags or create a new one, just be sure to press *Enter* after typing a new tag. Learn more about job tags [the job tags guide](/using-fieldpulse/work/custom-tags-for-jobs).
## Job Tags
Now, you can add job tags if needed. You can use job tags to organize your jobs and color code them to make the schedule easier to read at a glance. You can use this field to search for existing tags or create a new one, just be sure to press *Enter* after typing a new tag. Learn more about job tags [the job tags guide](/using-fieldpulse/work/custom-tags-for-jobs).
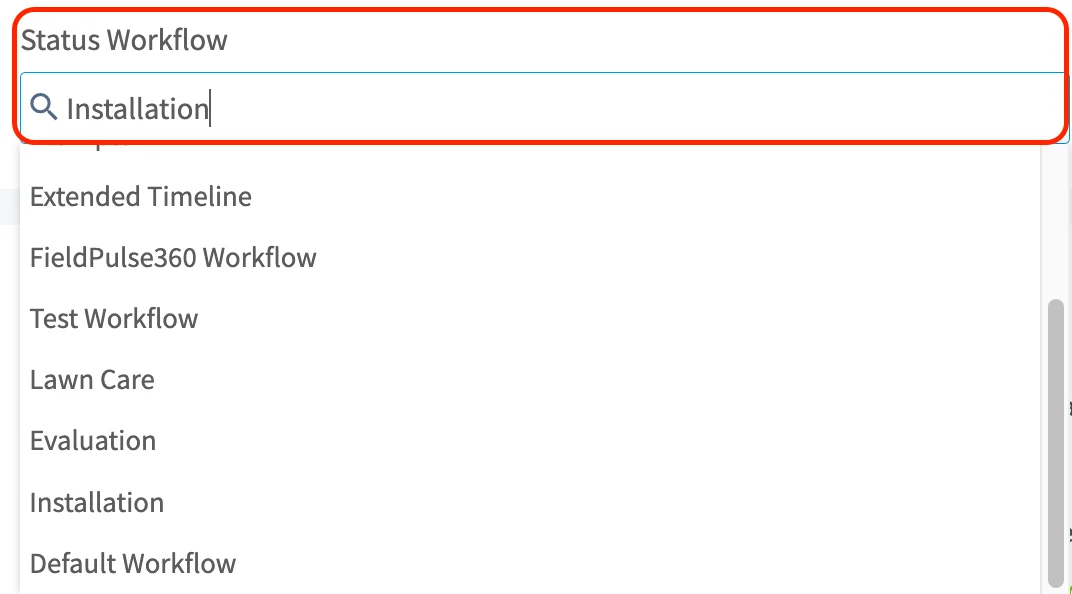
 ## Selecting a Custom Status Workflow Unique to the Service
Here you can select one of the unique custom status workflows you've created within *Company Settings*. [the Custom Status Workflows guide](/using-fieldpulse/work/custom-status-workflows) to learn more about *Custom Status Workflows*.
## Selecting a Custom Status Workflow Unique to the Service
Here you can select one of the unique custom status workflows you've created within *Company Settings*. [the Custom Status Workflows guide](/using-fieldpulse/work/custom-status-workflows) to learn more about *Custom Status Workflows*.
 ## Scheduling the Job/Service
Use the date and time options to schedule the job. To find open availability in your team members’ schedules, click *Find Availability* to open a giant chart view of your schedule. FieldPulse will also notify you of scheduling conflicts when you select a date and time for a job.
*Note:* If you'd like to disable scheduling conflict notifications, simply uncheck the scheduling conflicts checkbox. This setting will carry over to future jobs as well.
## Scheduling the Job/Service
Use the date and time options to schedule the job. To find open availability in your team members’ schedules, click *Find Availability* to open a giant chart view of your schedule. FieldPulse will also notify you of scheduling conflicts when you select a date and time for a job.
*Note:* If you'd like to disable scheduling conflict notifications, simply uncheck the scheduling conflicts checkbox. This setting will carry over to future jobs as well.
 You can also set a Customer Arrival Window date/time on jobs. An arrival window helps to minimize the time customers spend waiting for service. This can be used in customer communication templates to let your customers know when to expect you and your team.
 To learn how to set working hours for multi-day jobs, [setting working hours for multi-day jobs](/using-fieldpulse/scheduling-dispatch/setting-working-hours-for-multi-day-jobs).
## Adding a Site Visit
You can also add further site visits by clicking *Site Visits*. To learn more about site visits, click [the site visits guide](/using-fieldpulse/work/site-visits).
To learn how to set working hours for multi-day jobs, [setting working hours for multi-day jobs](/using-fieldpulse/scheduling-dispatch/setting-working-hours-for-multi-day-jobs).
## Adding a Site Visit
You can also add further site visits by clicking *Site Visits*. To learn more about site visits, click [the site visits guide](/using-fieldpulse/work/site-visits).
 ## Job Notes
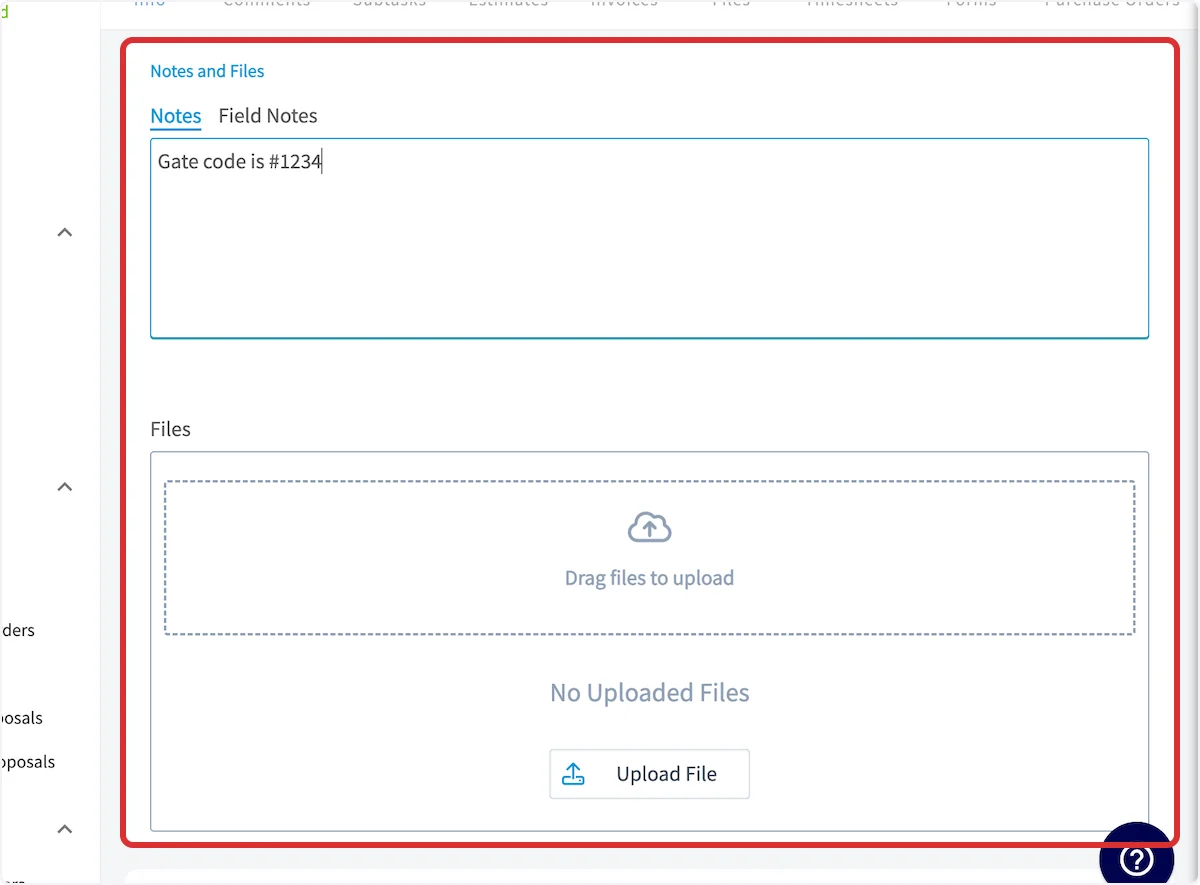
Enter any notes relevant to the job in the *Notes* field. You can also attach any important files as well. *(**Note:** only administrations and managers can add Notes on a job record.) Field Notes* can be added by the service agent while they are working on the job.
## Job Notes
Enter any notes relevant to the job in the *Notes* field. You can also attach any important files as well. *(**Note:** only administrations and managers can add Notes on a job record.) Field Notes* can be added by the service agent while they are working on the job.
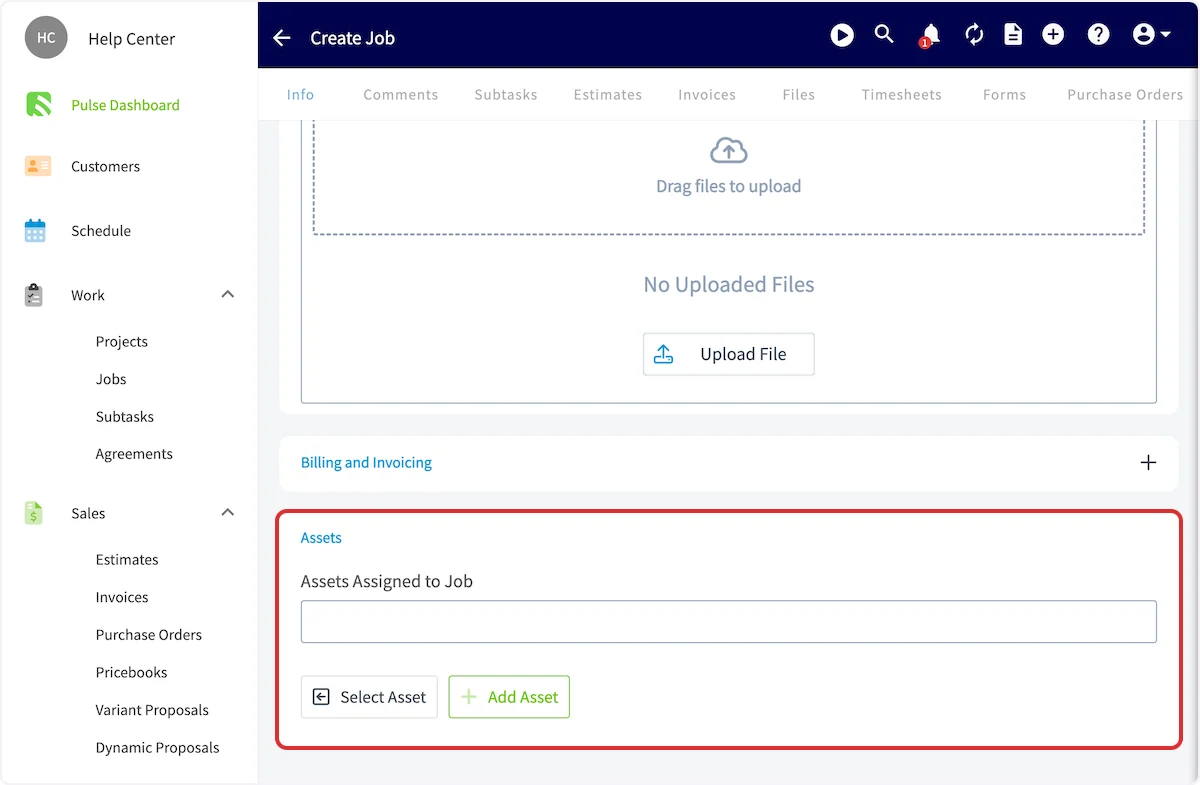
 ## Attaching an Asset
If you'd like to attach an existing asset to the job record or create a new asset, you can do that at the end of the job record. To learn more about assets, click [the assets guide](/using-fieldpulse/work/assets).
## Attaching an Asset
If you'd like to attach an existing asset to the job record or create a new asset, you can do that at the end of the job record. To learn more about assets, click [the assets guide](/using-fieldpulse/work/assets).
 ## Saving the Job
Be sure to press *Save Job* when you have added all pertinent details. Upon saving the job record, the assigned team members will automatically receive a notification of their newly assigned work and it will appear on their schedules.
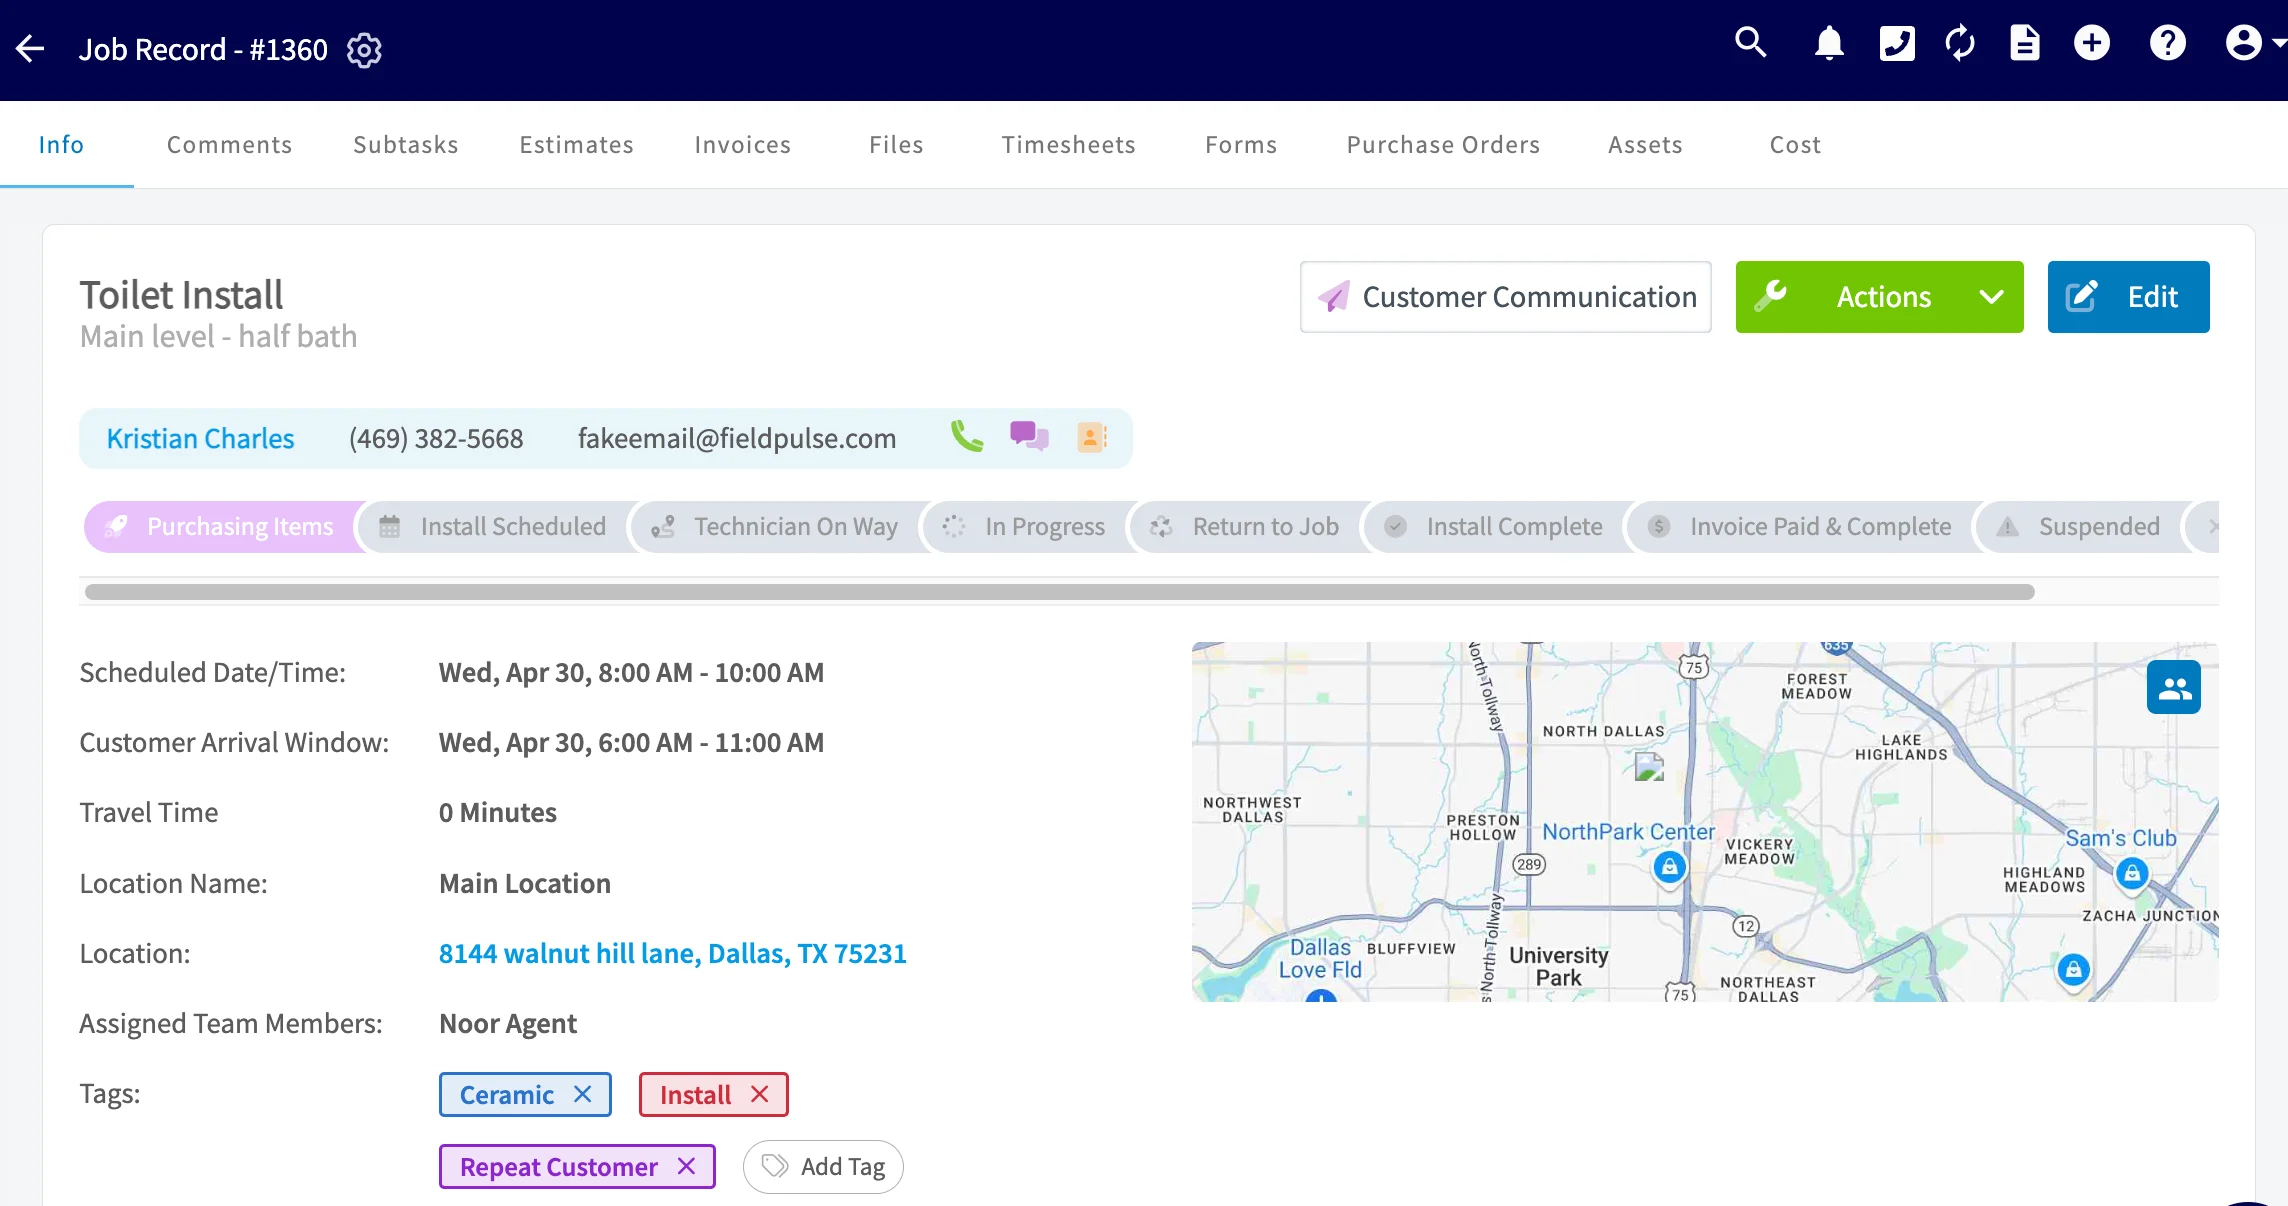
The newly created job will look like this:
## Saving the Job
Be sure to press *Save Job* when you have added all pertinent details. Upon saving the job record, the assigned team members will automatically receive a notification of their newly assigned work and it will appear on their schedules.
The newly created job will look like this:
 ***
# On Mobile: Field Experience
There are several areas where you can create a job in the mobile app:
1. *Pulse Dashboard*
2. *Schedule* tab on the bottom menu
3. *Work* tab on the bottom menu
4. *Customer* tab on the bottom menu
## **Method 1: Pulse Dashboard**
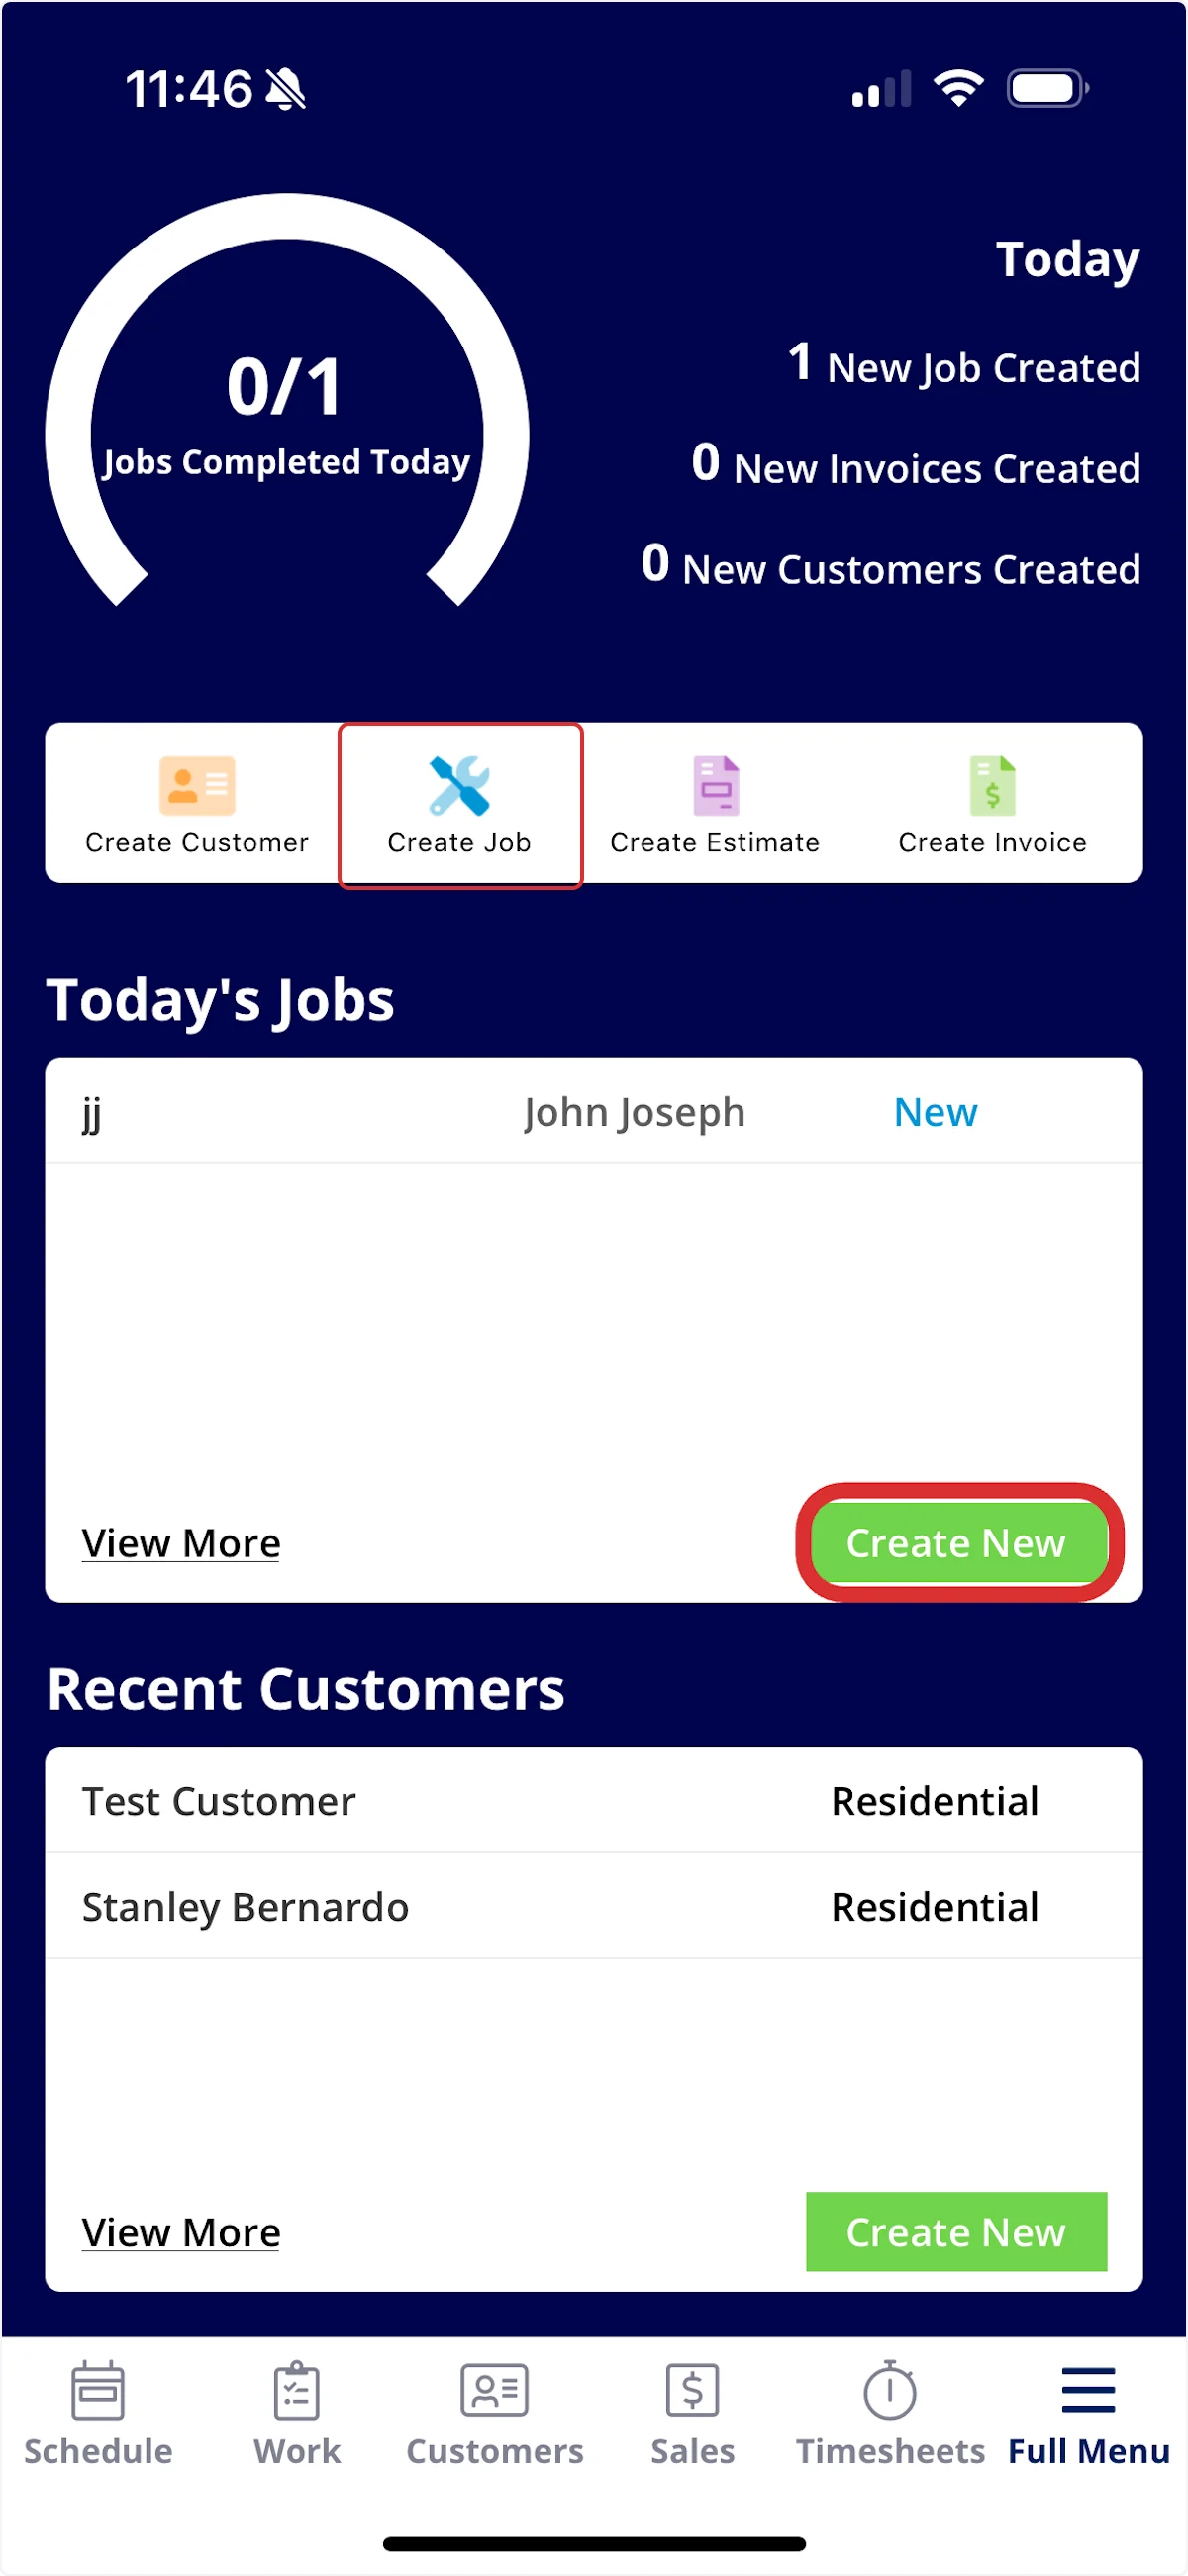
From the *Pulse Dashboard*, you can select *Create Job* towards the top of the screen or select *Create New* under *Today's Jobs*. Both will allow you to create and save a new job record.
***
# On Mobile: Field Experience
There are several areas where you can create a job in the mobile app:
1. *Pulse Dashboard*
2. *Schedule* tab on the bottom menu
3. *Work* tab on the bottom menu
4. *Customer* tab on the bottom menu
## **Method 1: Pulse Dashboard**
From the *Pulse Dashboard*, you can select *Create Job* towards the top of the screen or select *Create New* under *Today's Jobs*. Both will allow you to create and save a new job record.
 ## **Method 2: *Schedule* Tab**
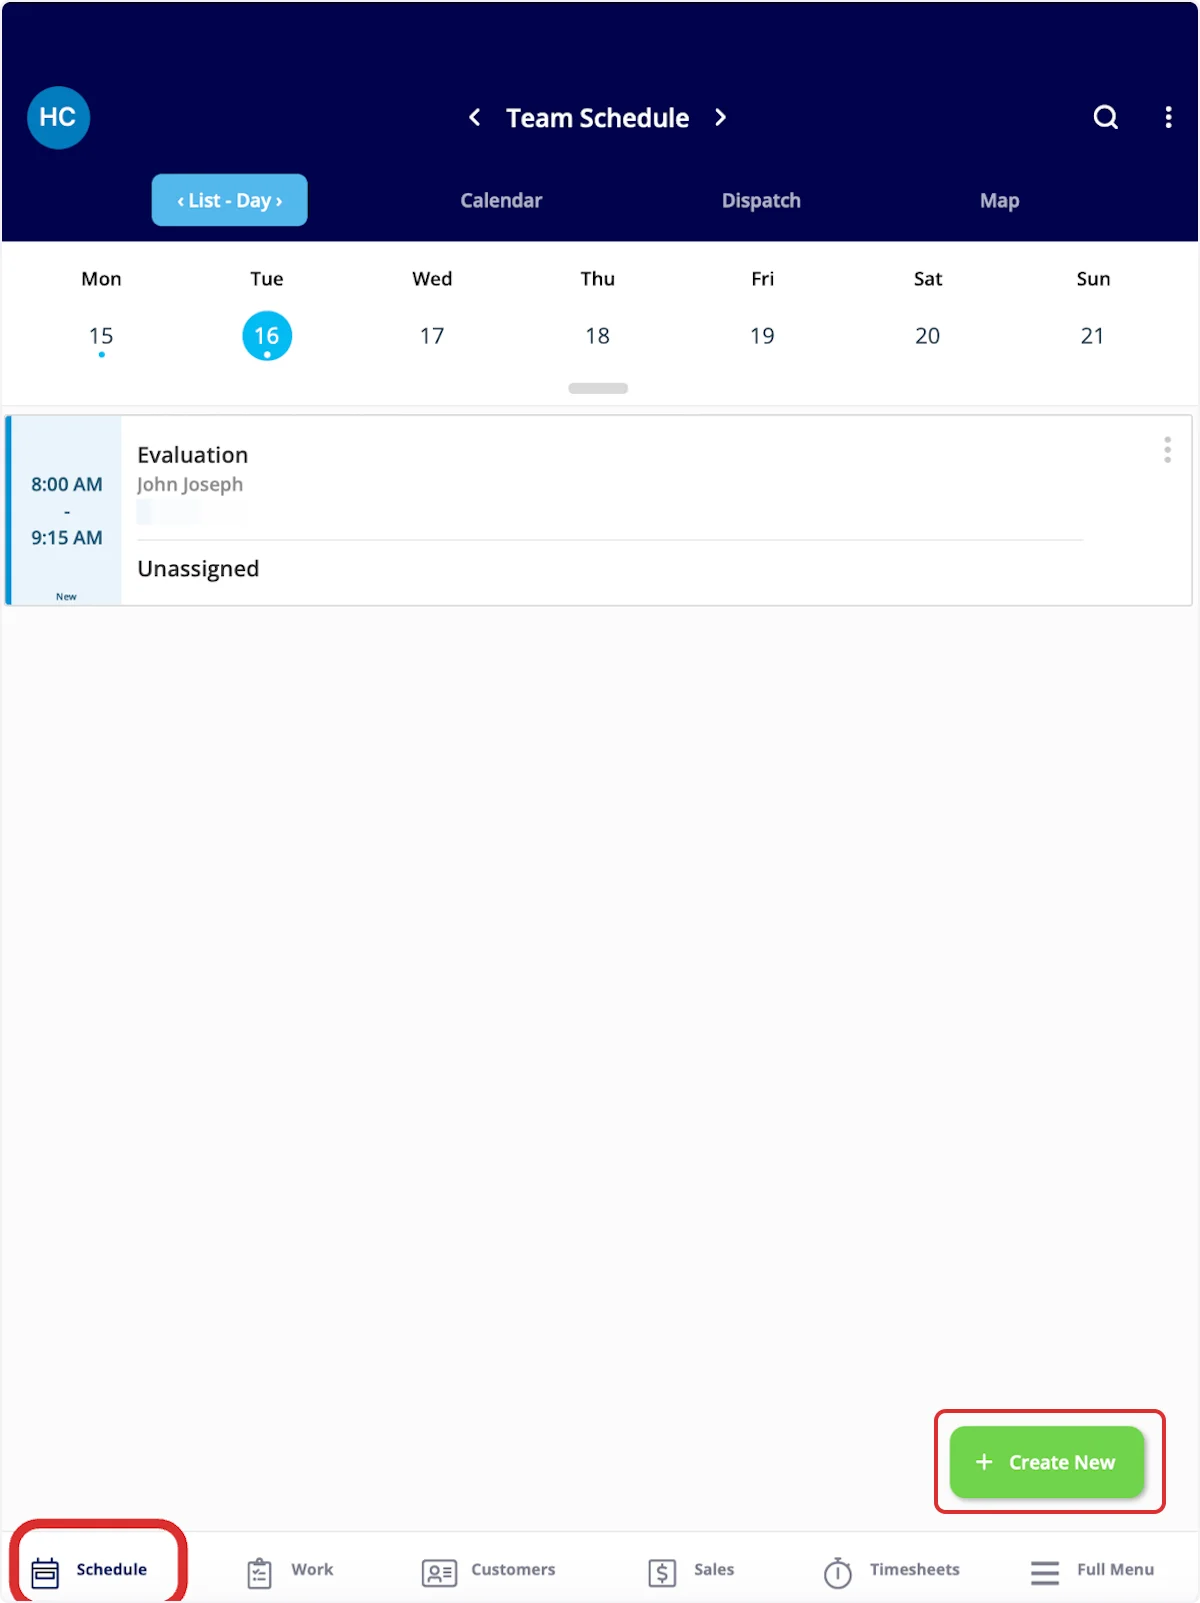
From the *Schedule* tab in the bottom menu, you can select *Create New*. This will allow you to create and save a new job record.
## **Method 2: *Schedule* Tab**
From the *Schedule* tab in the bottom menu, you can select *Create New*. This will allow you to create and save a new job record.
 ## **Method 3: *Work* Tab**
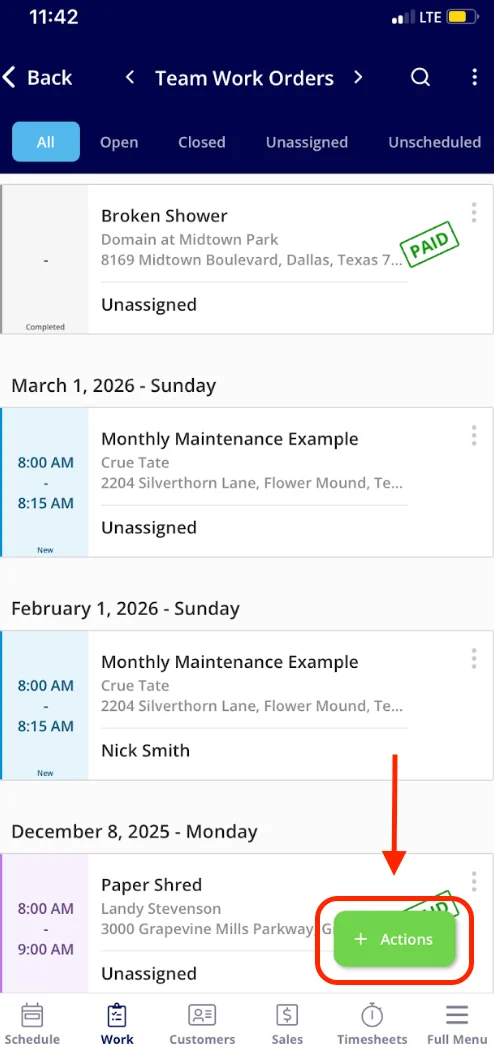
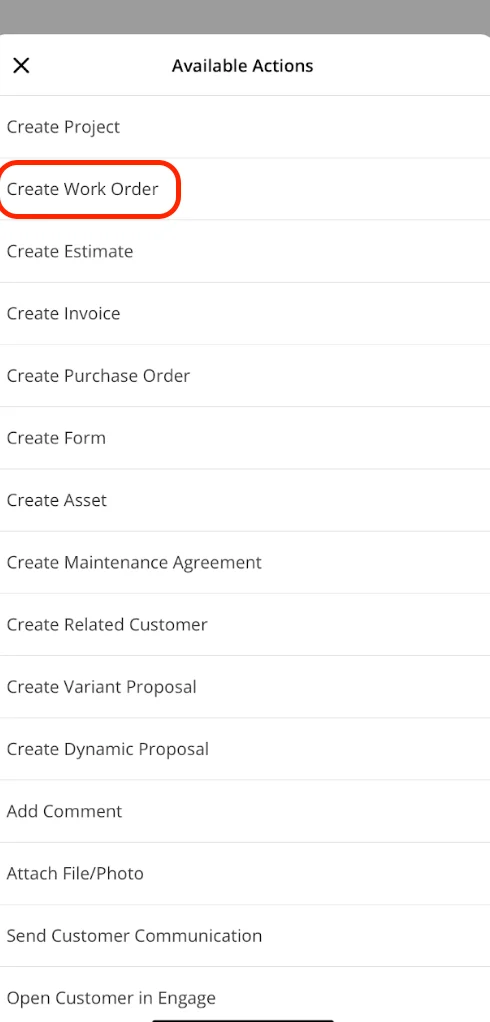
From the *Work* tab in the bottom menu, you can select *Work Orders* or *Actions*. *Actions* will present you with a menu of work-related actions, including creating a job. Alternatively, *Jobs* will show you all of your jobs, as well as allow you to create a new job.
## **Method 3: *Work* Tab**
From the *Work* tab in the bottom menu, you can select *Work Orders* or *Actions*. *Actions* will present you with a menu of work-related actions, including creating a job. Alternatively, *Jobs* will show you all of your jobs, as well as allow you to create a new job.
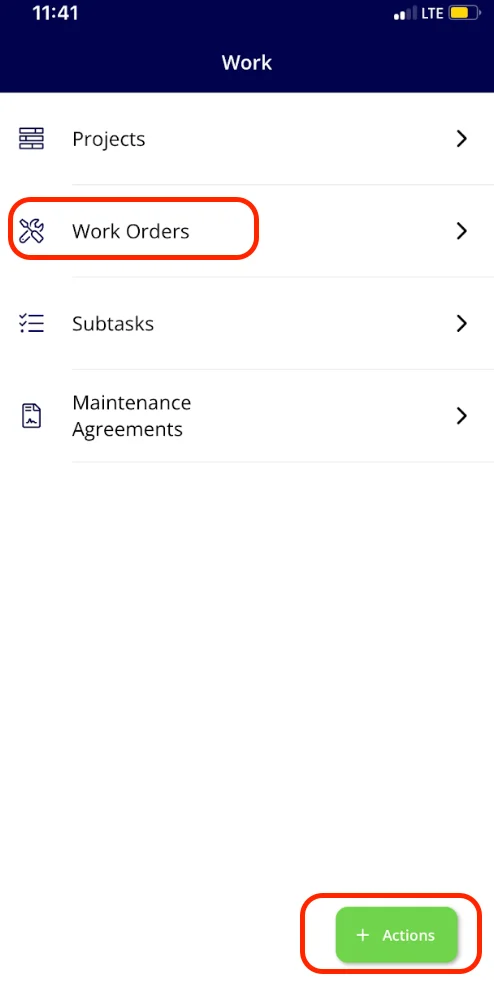 If you selected *Work Orders*, click the *Actions* button to create a new job.
 ## **Method 4: *Customers* Tab**
From the *Customers* tab in the bottom menu, click on a customer to open their customer record.
## **Method 4: *Customers* Tab**
From the *Customers* tab in the bottom menu, click on a customer to open their customer record.
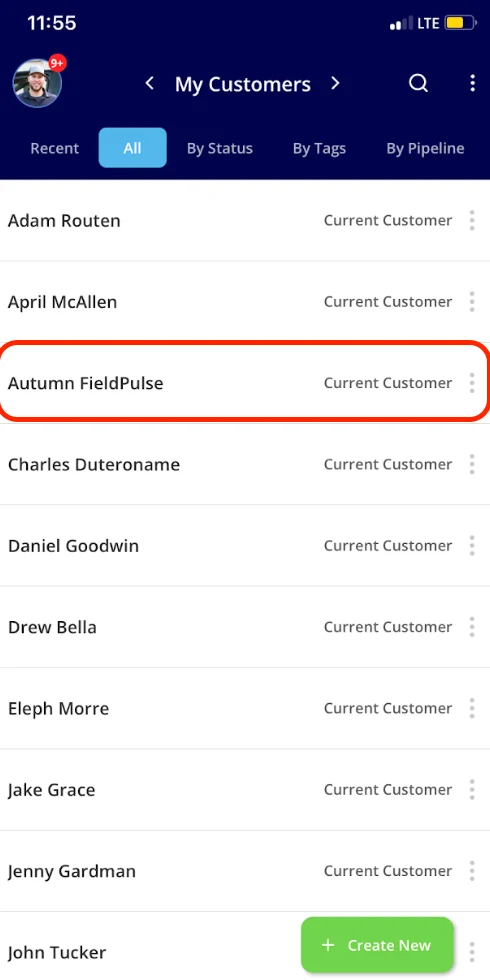 From here, you can select *Work Orders* to view existing jobs for this customer and create a new one. Additionally, you can select *Actions*, which will present you with a menu of customer-related actions, including creating a work order.
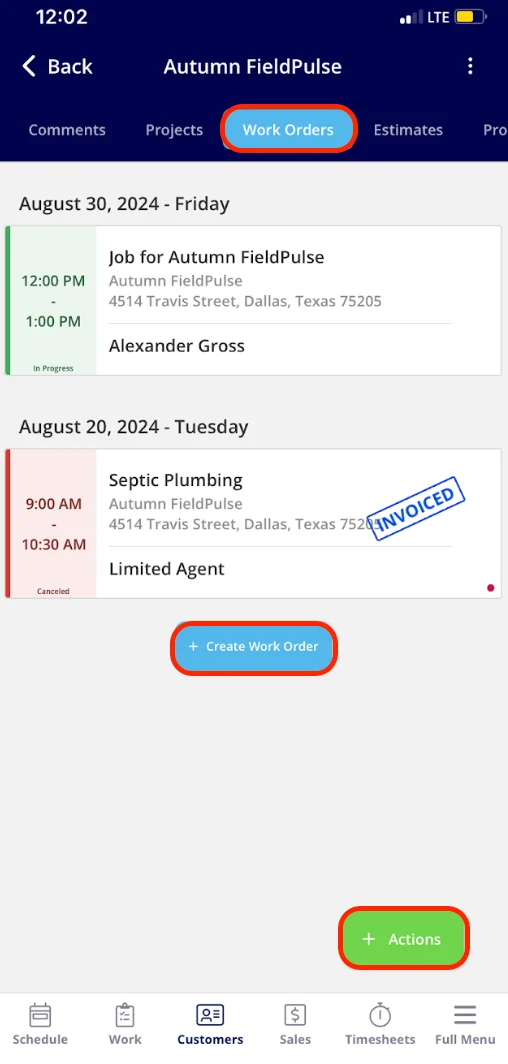 If you selected *Actions*, click *Create Job* to create a new job.
 ## **Adding Job Details**
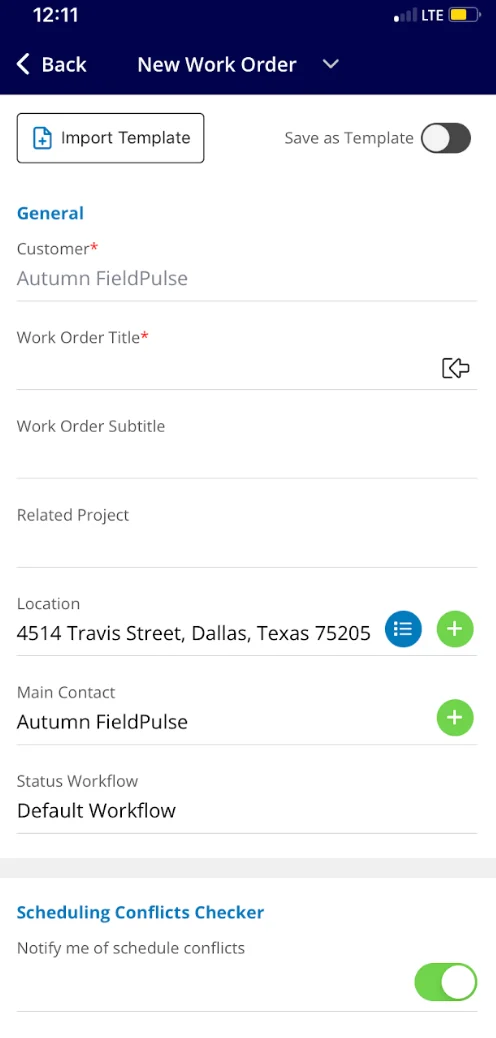
From here, you can begin filling in the job details. You will need to attach a customer. You can use a current customer or create a new customer. You also have the ability to customize the job title.
## **Adding Job Details**
From here, you can begin filling in the job details. You will need to attach a customer. You can use a current customer or create a new customer. You also have the ability to customize the job title.
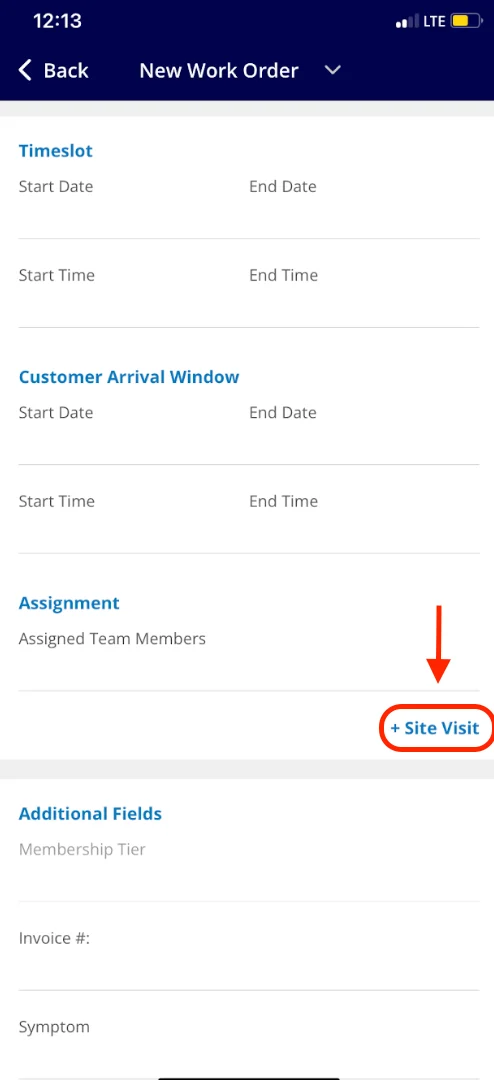
 If the job you are scheduling requires an additional visit, you can select *Site Visit* to schedule the next occurrence.
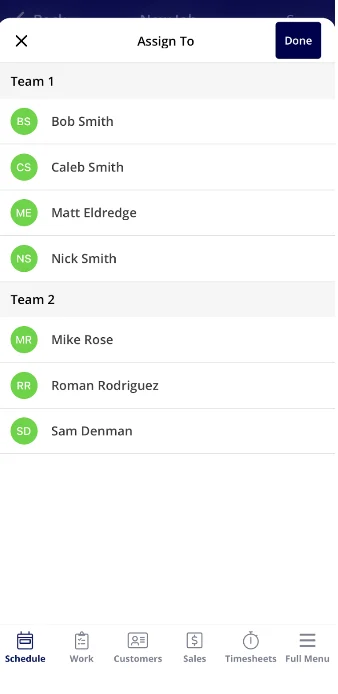
 You can then assign teams or team members to the job.
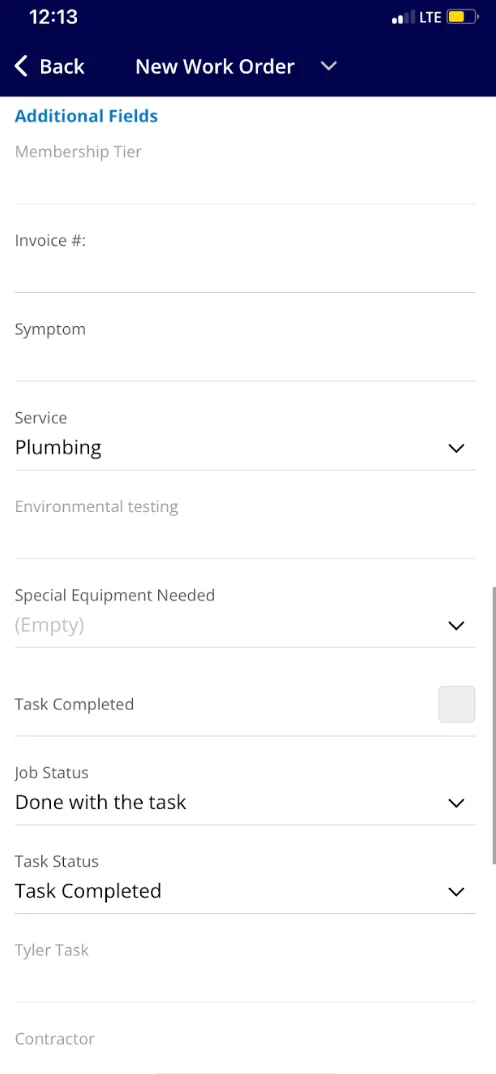
 If additional fields have been added, here is where you would view and fill them out:
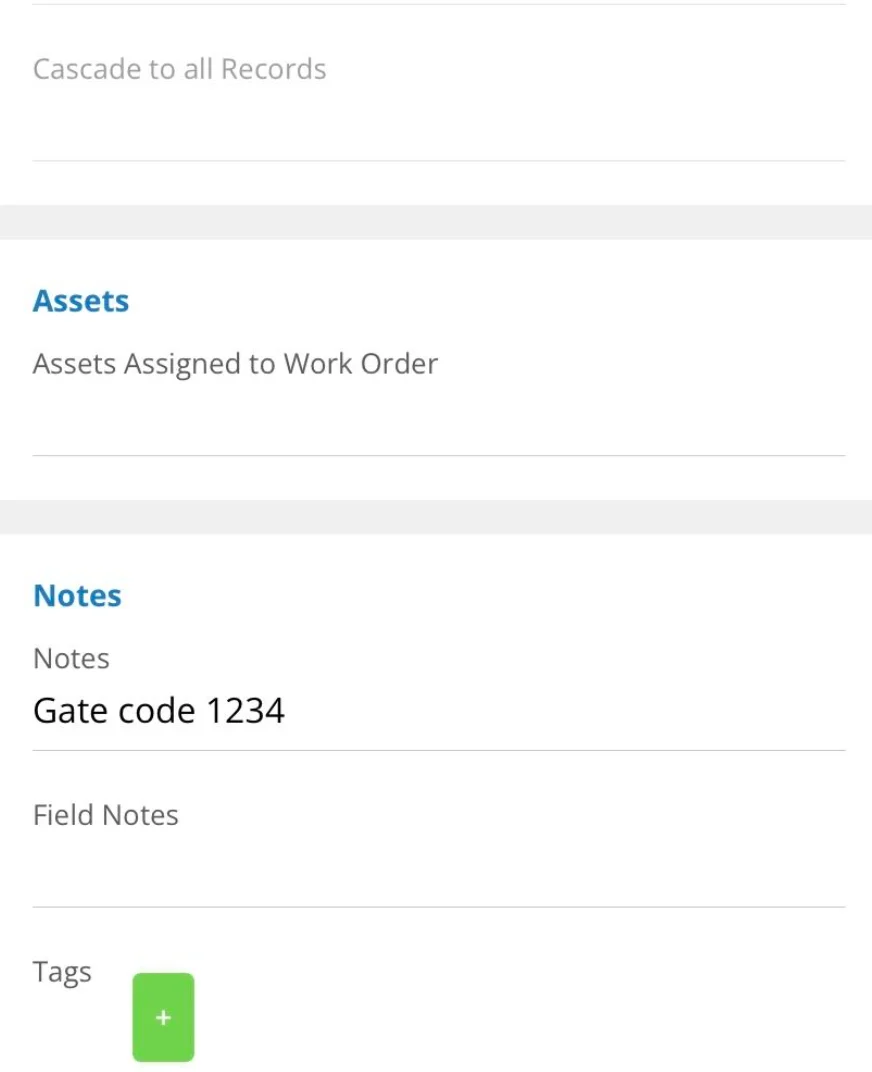
 Here is where you can add any assets to the work order as well as notes and tags.
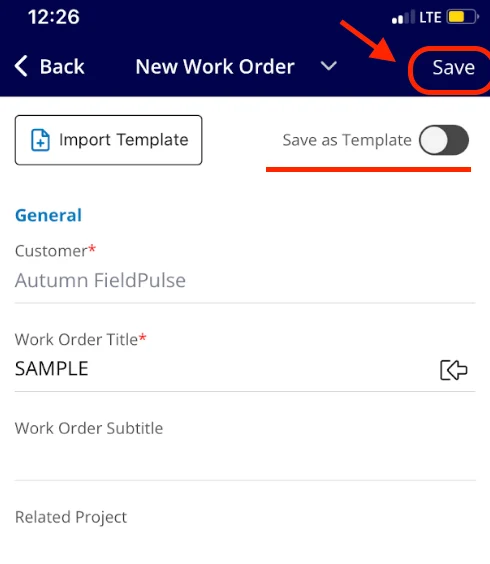
 When you are finished entering the details ***(required fields must be filled out before the Save button will appear)***, click *Save* in the top right corner. You also have the option to save the job as a template by turning the toggle on.
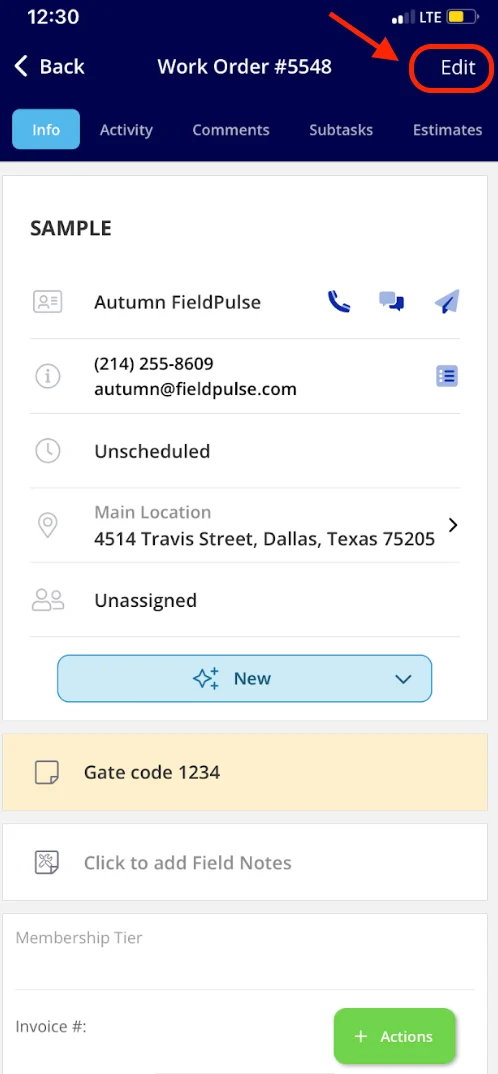
 After saving, you'll see all the details of the job appear. If you want to edit the job again in the future, select *Edit* in the top right corner.
 If you click the *Schedule* tab in the bottom menu, you'll be able to view the newly scheduled job on the calendar.
***
# FAQs
**Can I manually change the “next number” of my Job Records?**
Yes, you can manually change the “next number” of your Job Records by navigating to *Company Settings > Jobs > General* and locating the field titled *Next Job #*. After saving, the next created job will use this number and numbering will auto-increment from there.
***
# Video Tutorial
## Web App
## Mobile App
***
**Have additional questions?**
*Contact us at [support@fieldpulse.com](mailto:support@fieldpulse.com) or use the chat feature in the bottom right corner of your screen.*
If you click the *Schedule* tab in the bottom menu, you'll be able to view the newly scheduled job on the calendar.
***
# FAQs
**Can I manually change the “next number” of my Job Records?**
Yes, you can manually change the “next number” of your Job Records by navigating to *Company Settings > Jobs > General* and locating the field titled *Next Job #*. After saving, the next created job will use this number and numbering will auto-increment from there.
***
# Video Tutorial
## Web App
## Mobile App
***
**Have additional questions?**
*Contact us at [support@fieldpulse.com](mailto:support@fieldpulse.com) or use the chat feature in the bottom right corner of your screen.*