
Who uses this: Admins have full access. Team Managers and Service Agents can view, create, or edit maintenance agreements based on the Maintenance Agreement permissions on their profile. Limited Agents cannot access maintenance agreements. Availability: All regions · included in the FieldPulse subscription.A maintenance agreement is the record that holds recurring service for one customer: the routines that define the work, the jobs, the billing, the reminders, and the signed contract. You set the agreement up once, and FieldPulse tracks each occurrence from there.
Overview
Using Maintenance Agreements before October 17, 2026? Click here to learn how your existing Maintenance Agreements migrated to the new structure with the revamp.
Each agreement has one plan type, and every routine on the agreement follows it. A Scheduled agreement generates occurrences on a calendar frequency, such as every six months. An On-Demand agreement gives the customer a set number of included visits per period, and your team claims a visit when the customer calls. An agreement cannot mix both plan types.
A routine is a recurring service only on a Scheduled agreement. On an On-Demand agreement, a routine is a pool of included visits, not a recurring schedule.
Your company can rename Maintenance Agreements (for example, to Memberships or Protection Plans) and Routines (for example, to Schedules or Programs) in Company Settings > Maintenance Agreements > General. This article uses the default names.
Two setup guides support this article:
- To create agreements automatically when you sell a line item, see Setting Up Maintenance Agreement Automation.
- To build your own agreement statuses, see Custom Status Workflows.
Video walkthrough
Before you begin
- Enable Maintenance Agreements. Go to Company Settings, select Features & Plugins from the top menu, find Maintenance Agreements, and select Enable.
- Create a job template for each routine that should generate jobs. See Setting Up Job Templates.
- Decide how you bill the customer: link an existing recurring billing, create a new recurring billing, or create a manual billing schedule.
On web
Start a new agreement
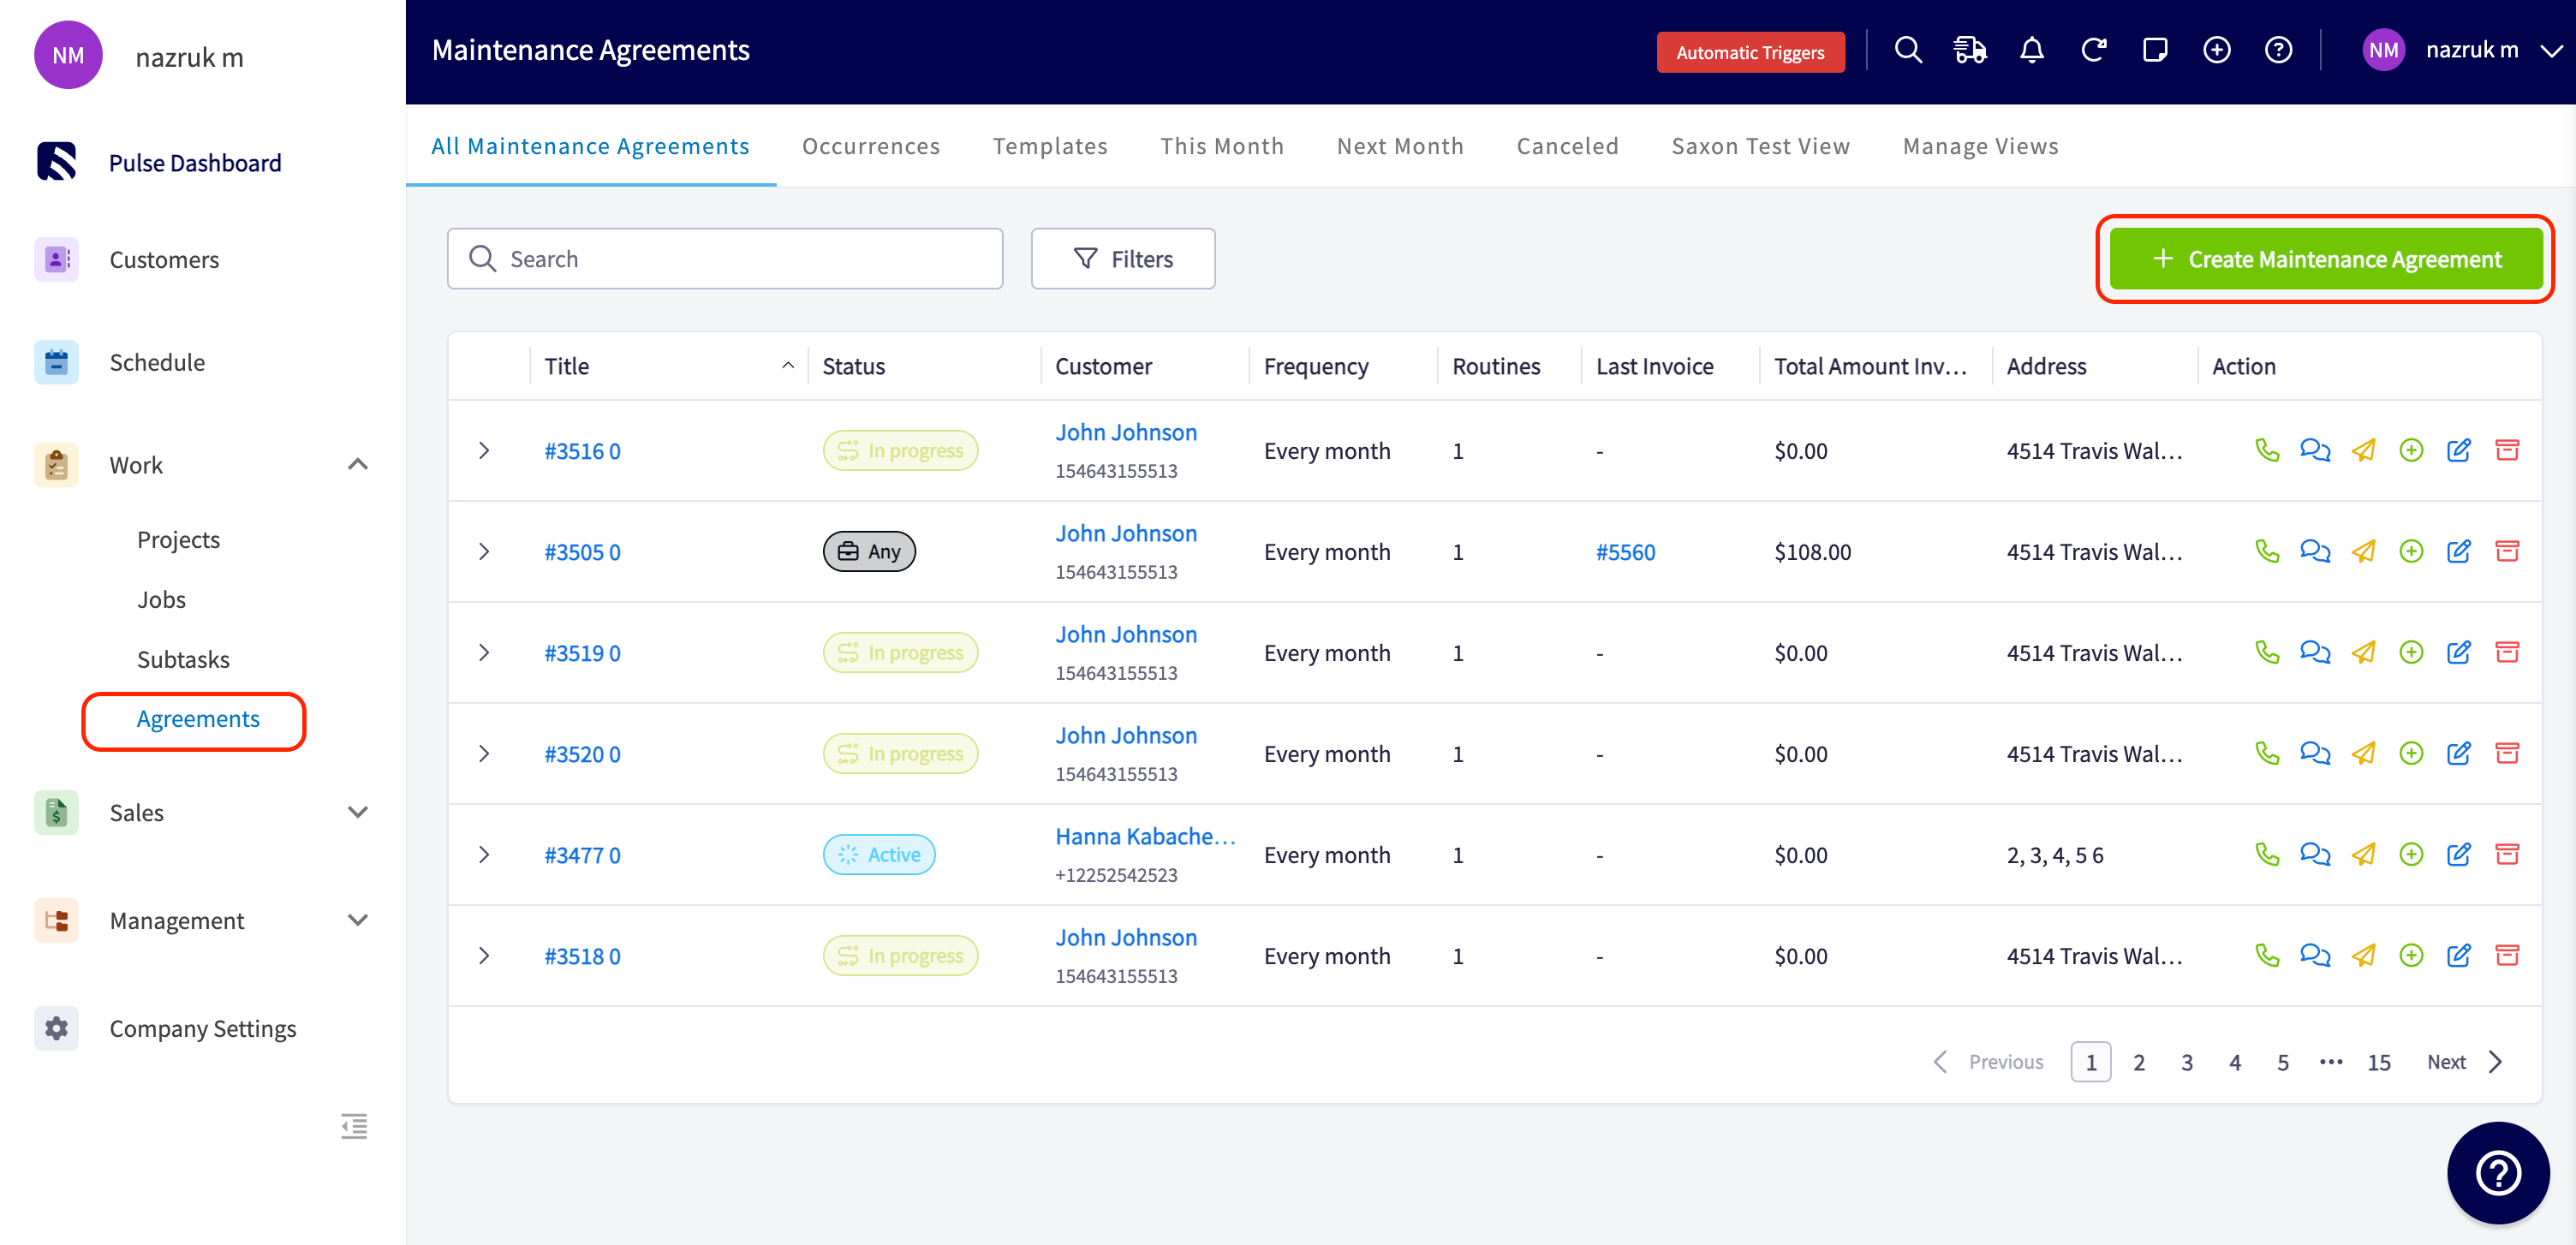
- Select Agreements in the left menu, then select Create Maintenance Agreement. You can also select the + menu at the top right, then Maintenance Agreement.
- (Optional) Select Import Template at the top of the form to fill in the agreement from a saved template.
Step 1: General
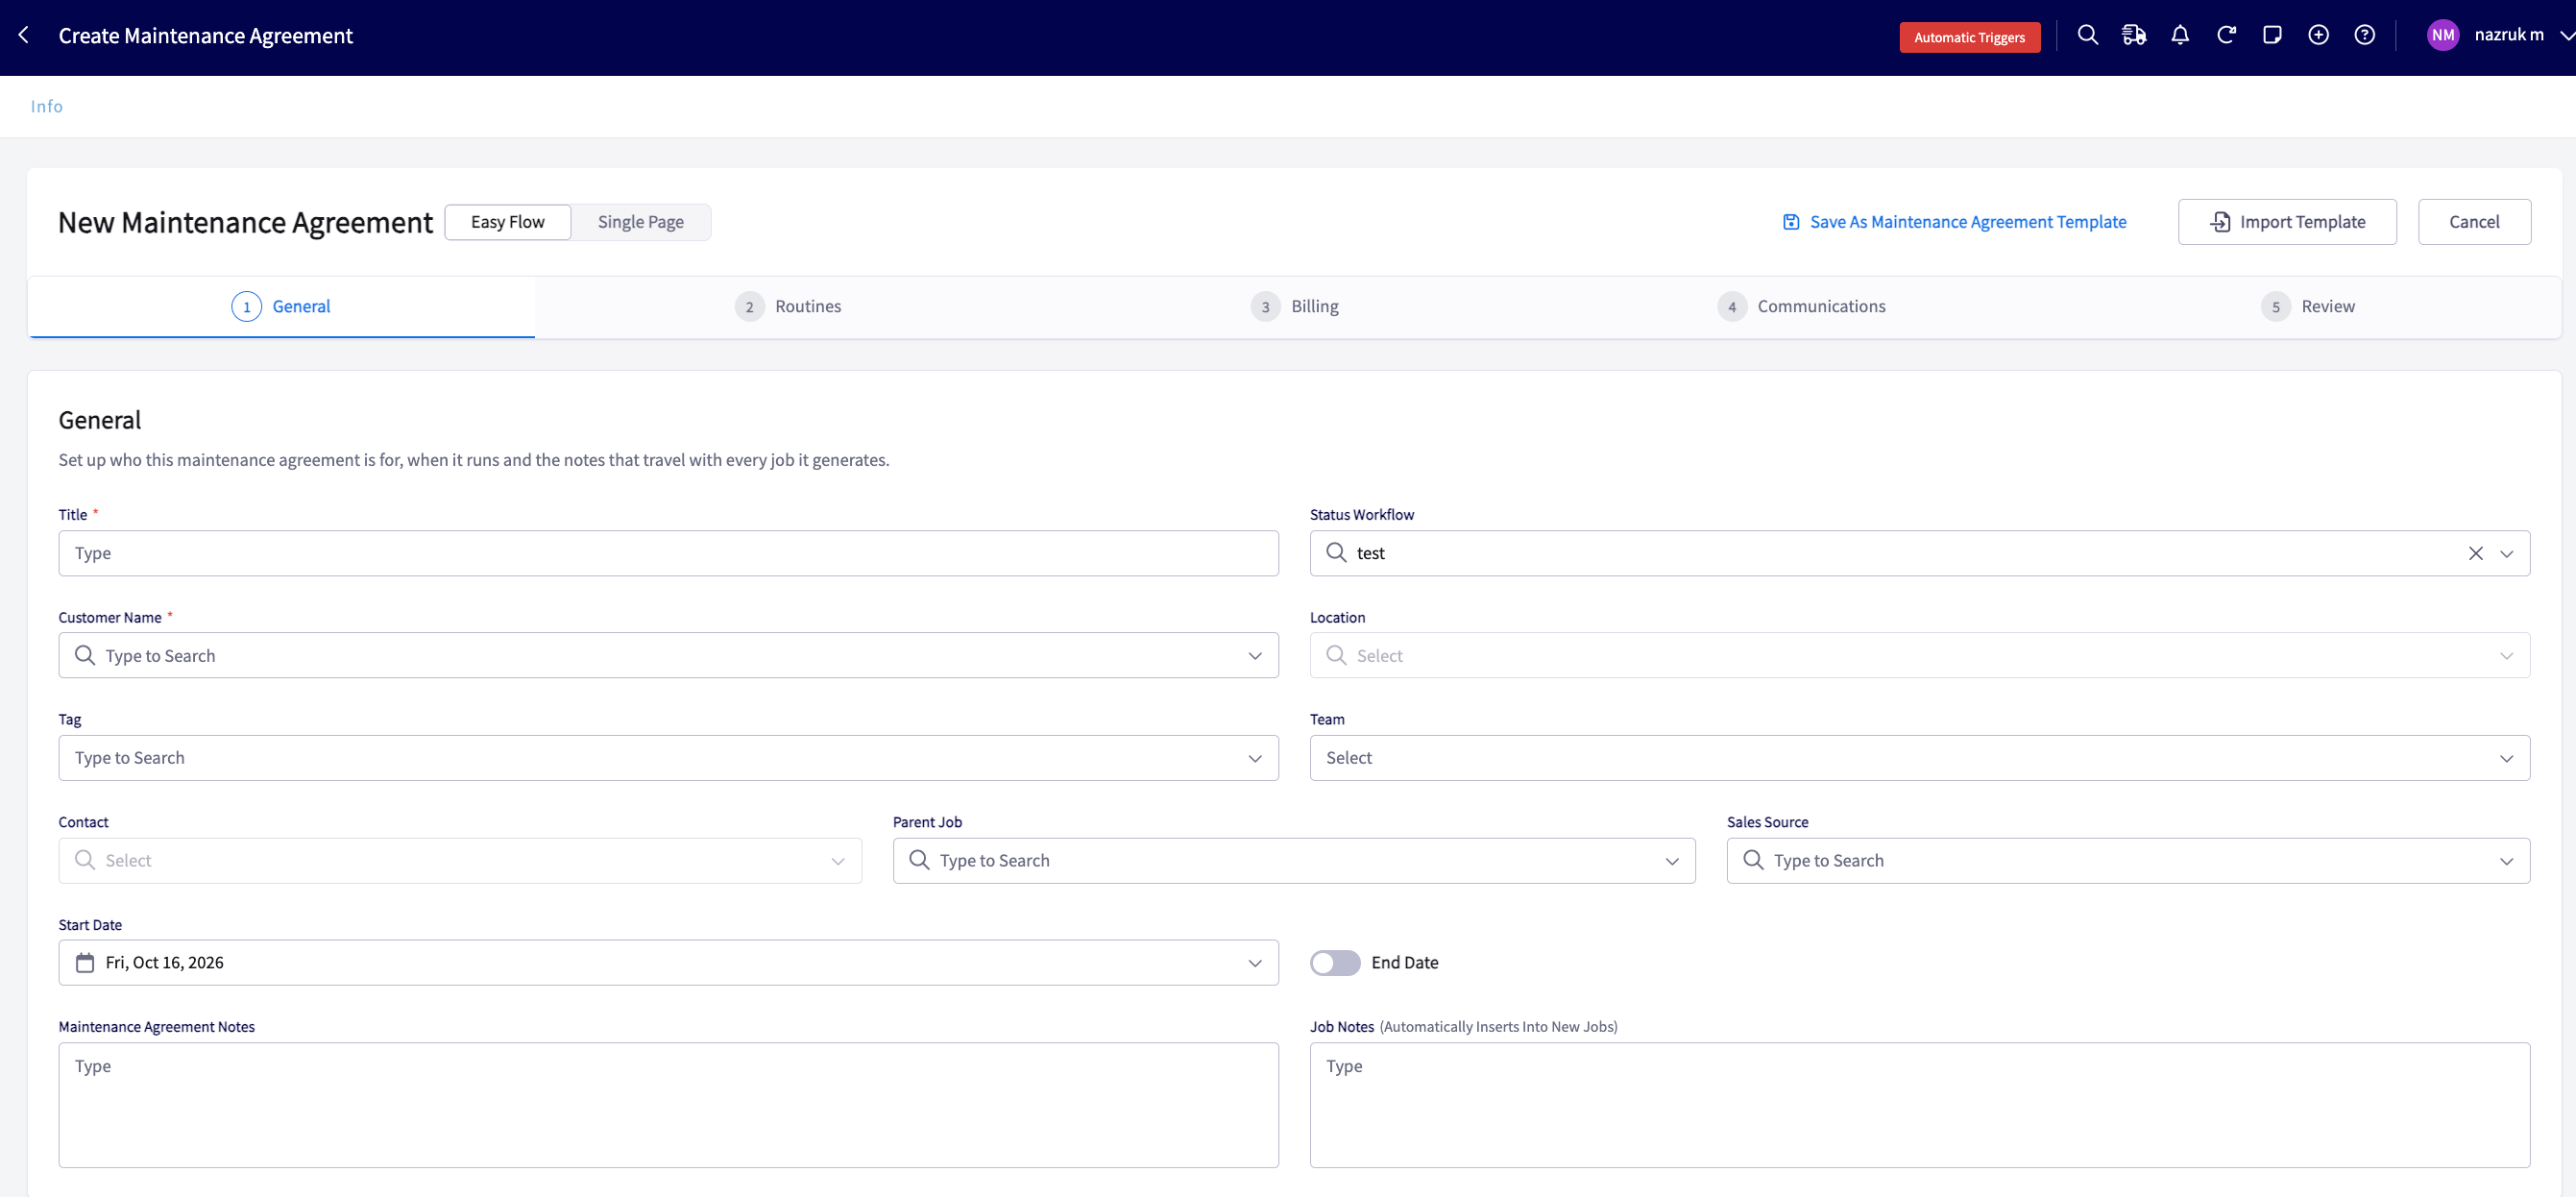
- Enter a title for the agreement.
- Link the customer and select the customer location.
- Select the status workflow and the agreement’s status. Admins must activate a custom workflow before agreements can use it. See Custom Status Workflows.
- Review the contact. The contact defaults to the location contact, and every agreement communication goes to this contact. Select the contact book icon to choose a different contact from the customer record.
- (Optional) Assign a team and add tags.
- Set the start date. The start date defaults to today, and you can select a future date to prepare an upcoming agreement.
- Turn on End Date and set a date if the agreement has an end. Leave End Date off for an agreement that runs indefinitely. Every routine on the agreement follows these dates.
- Add Maintenance Agreement Notes for internal context. Your customer does not see agreement notes.
- Add Job Notes to insert that text into every job the agreement generates.
- Fill in any custom fields.
- Select Save As Maintenance Agreement Template only if you are building a template. This option hides the customer, location, contact, and status so the template stays generic.
Step 2: Routines
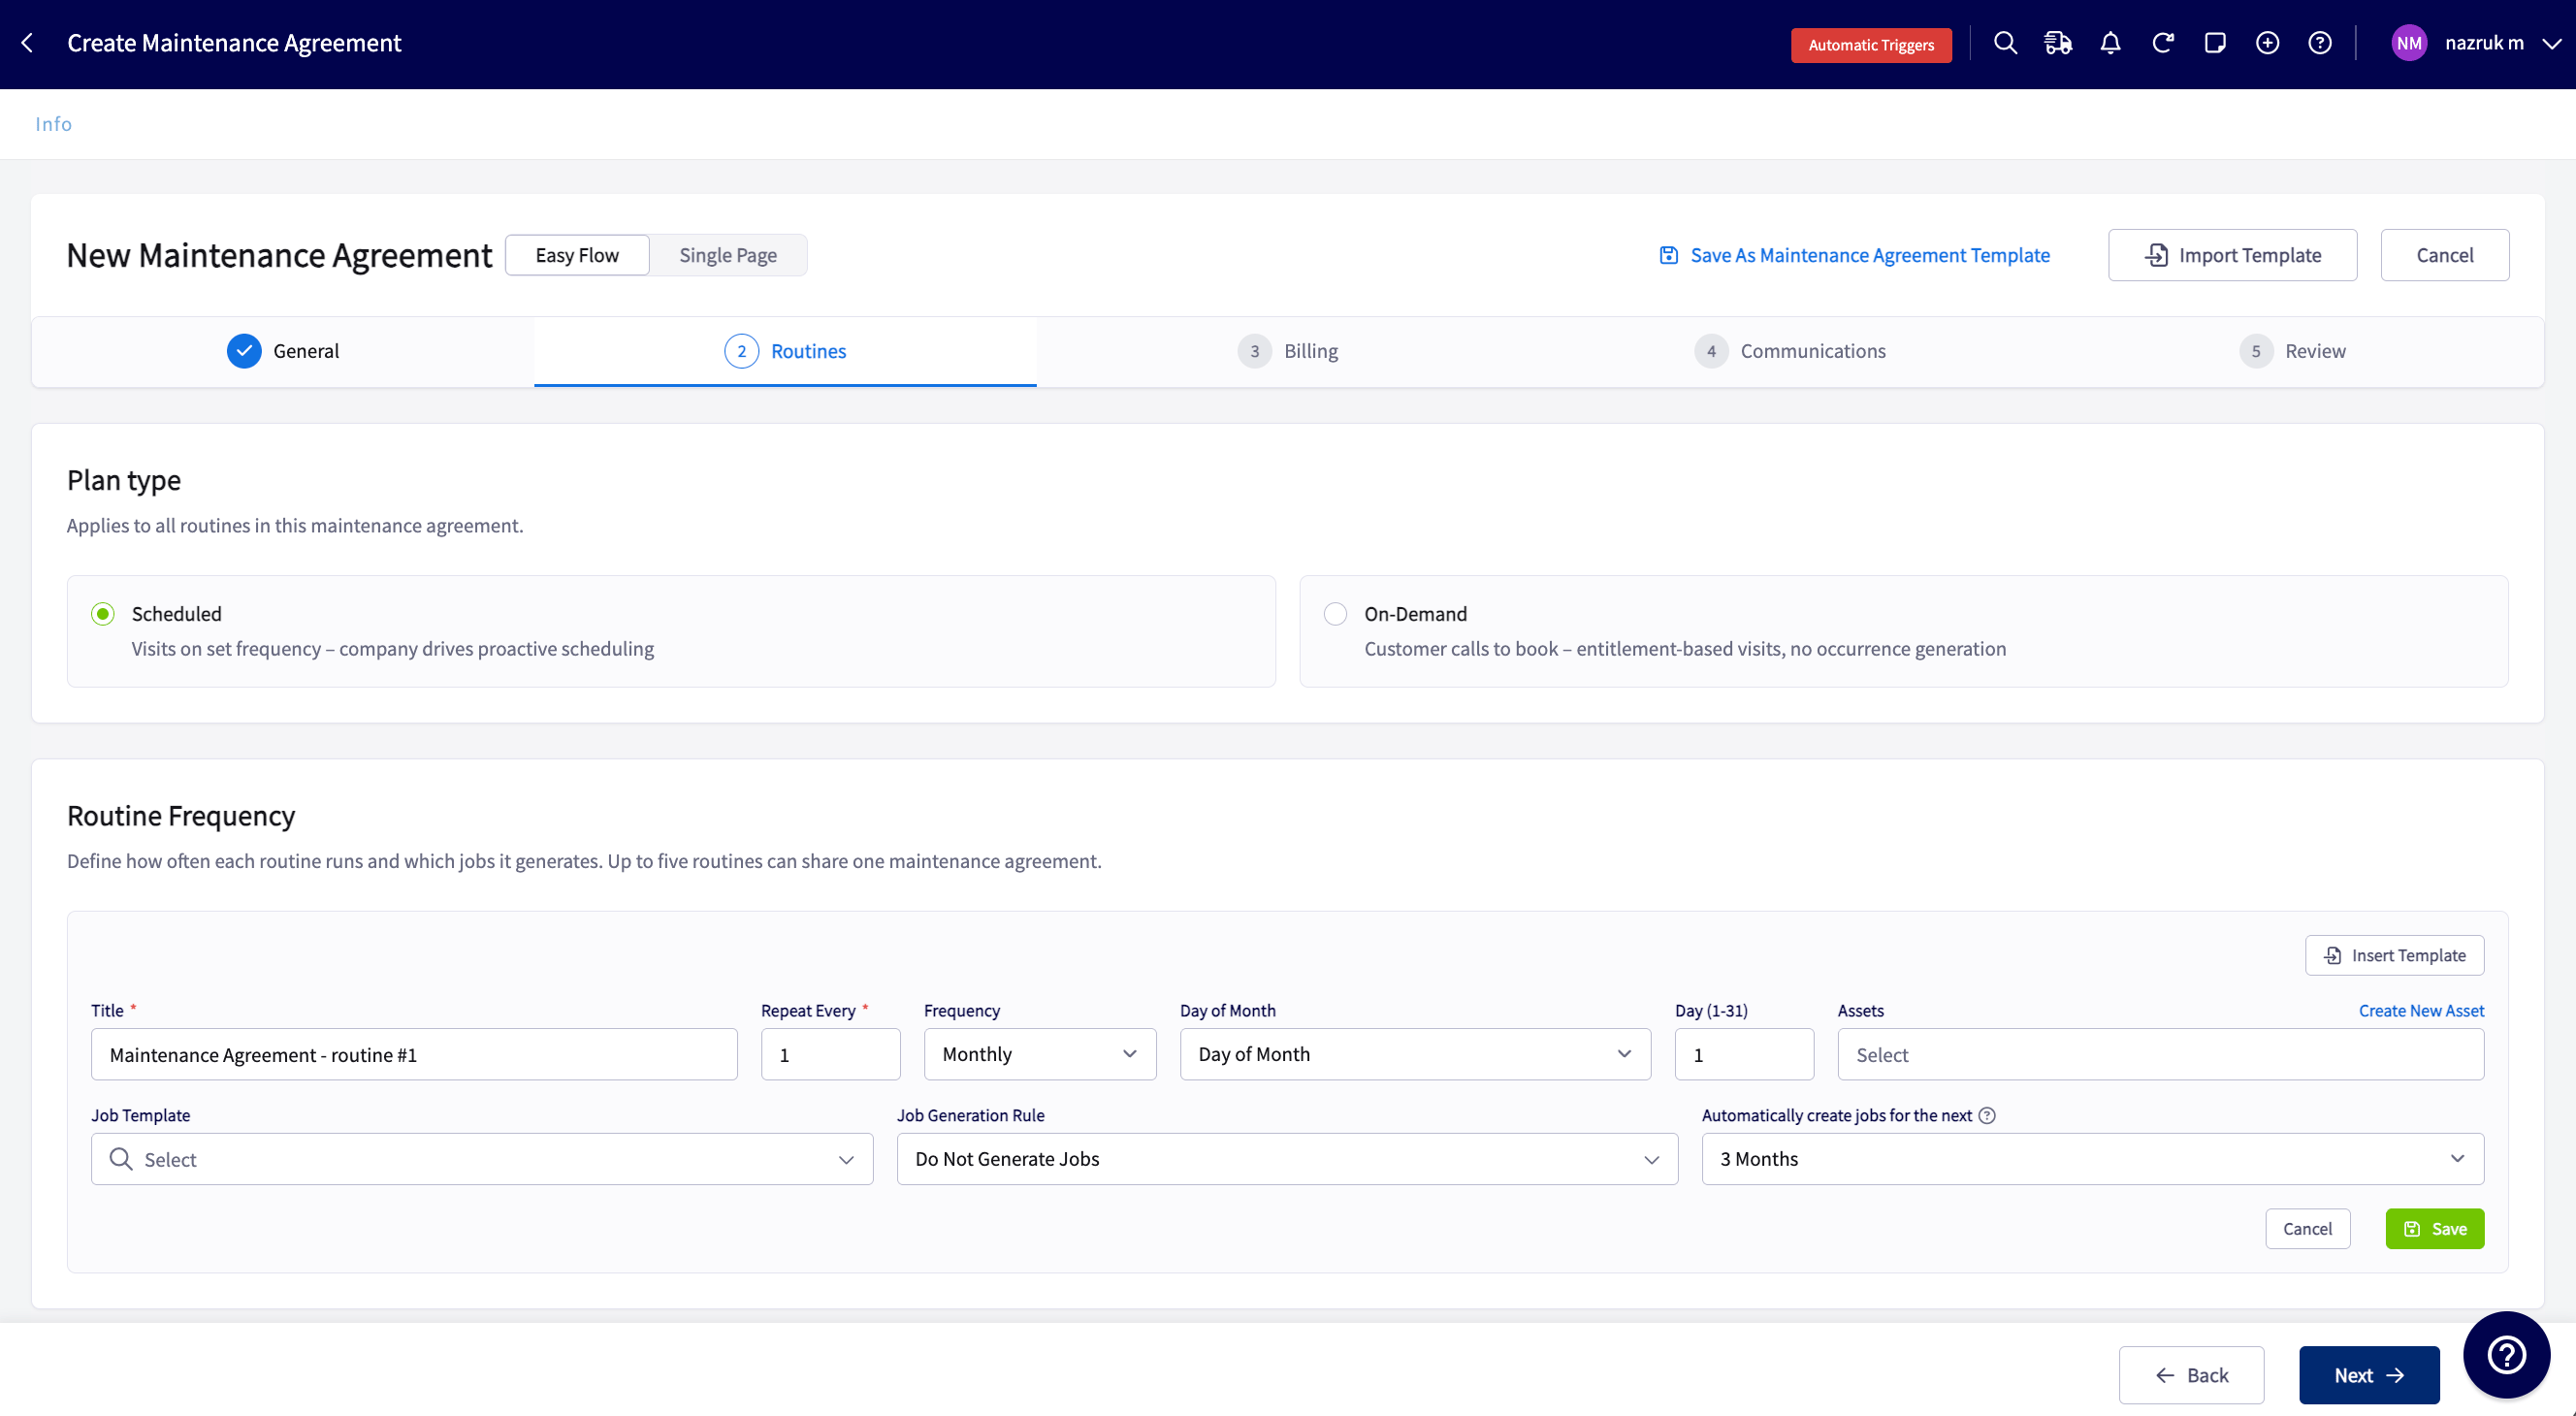
Every agreement needs at least one routine and can hold up to 5. Routines inherit the agreement’s start and end dates, so each routine sets only its own frequency.- Select the plan type: Scheduled or On-Demand. This choice applies to every routine on the agreement.
- Select Add Routine for each additional service the agreement covers.
Scheduled routines
- Select the routine’s frequency. Choose Custom to repeat every set number of days, weeks, months, or years. For a weekly custom frequency, also choose the day of the week.
- Link the assets this routine covers. In Assets, choose from the customer’s existing assets, or select Create New Asset to create and link a new one.
- Select a job template. The template supplies the job’s layout, line items, and details.
- Select a job generation rule. The table below describes each rule.
- Choose how far ahead FieldPulse creates jobs in Automatically create jobs for the next.
The job generation window works on a rolling basis. If you widen the window on a live agreement, FieldPulse creates the jobs that now fall inside it. If you narrow the window, FieldPulse removes only the future jobs that nobody has changed, and keeps every job a team member has edited.
Combine overlapping occurrences
When occurrences from two or more routines on a Scheduled agreement land on the same day, FieldPulse can generate one job instead of two, so one team completes both occurrences in a single trip.- Select Configure on the Overlapping Routines Detected banner.
- In Configure Combined Visits, select the routines to combine.
- Select the job template for the combined job.
- Select the job generation logic and the job generation window.
- Select Save.
On-Demand routines
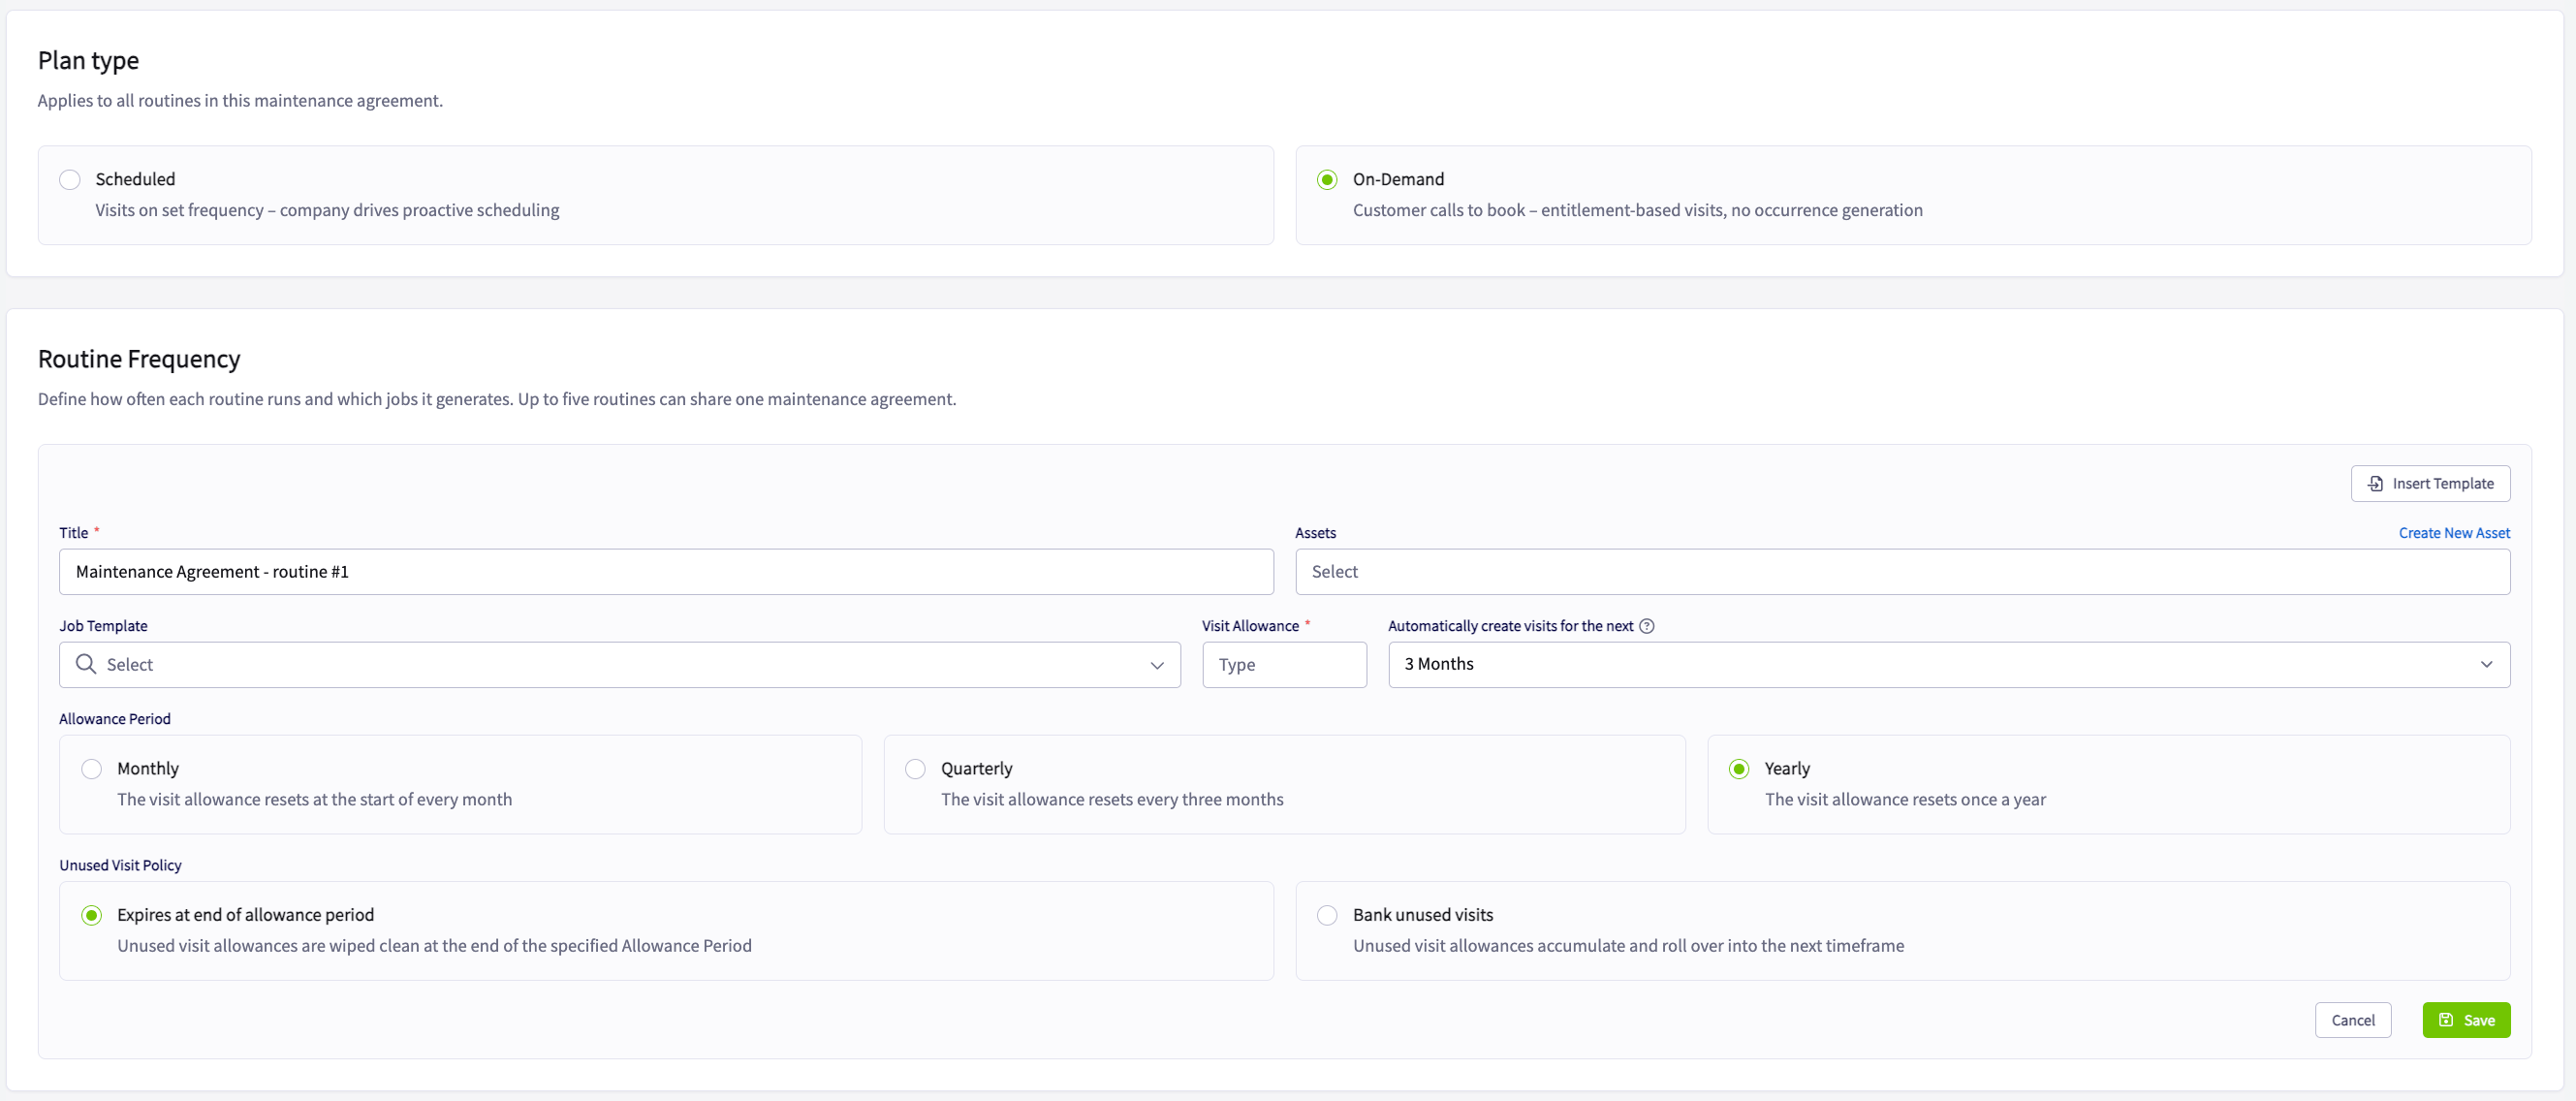
- Enter or review the routine title.
- Select a job template. FieldPulse uses the template when your team creates a job for a claimed visit.
- Link the assets this routine covers.
- Enter the number of visits the customer can claim in Visit Allowance.
- Select the Allowance Period: Monthly, Quarterly, or Yearly. The period starts on the agreement’s start date.
- Choose the Unused Visit Policy: Expires at end of allowance period wipes unused visits at the end of the period, and Bank unused visits carries them into the next period.
Occurrence statuses
Each occurrence shows a status so your team can see where the work stands.Step 3: Billing
The billing selector at the top of the step offers three options.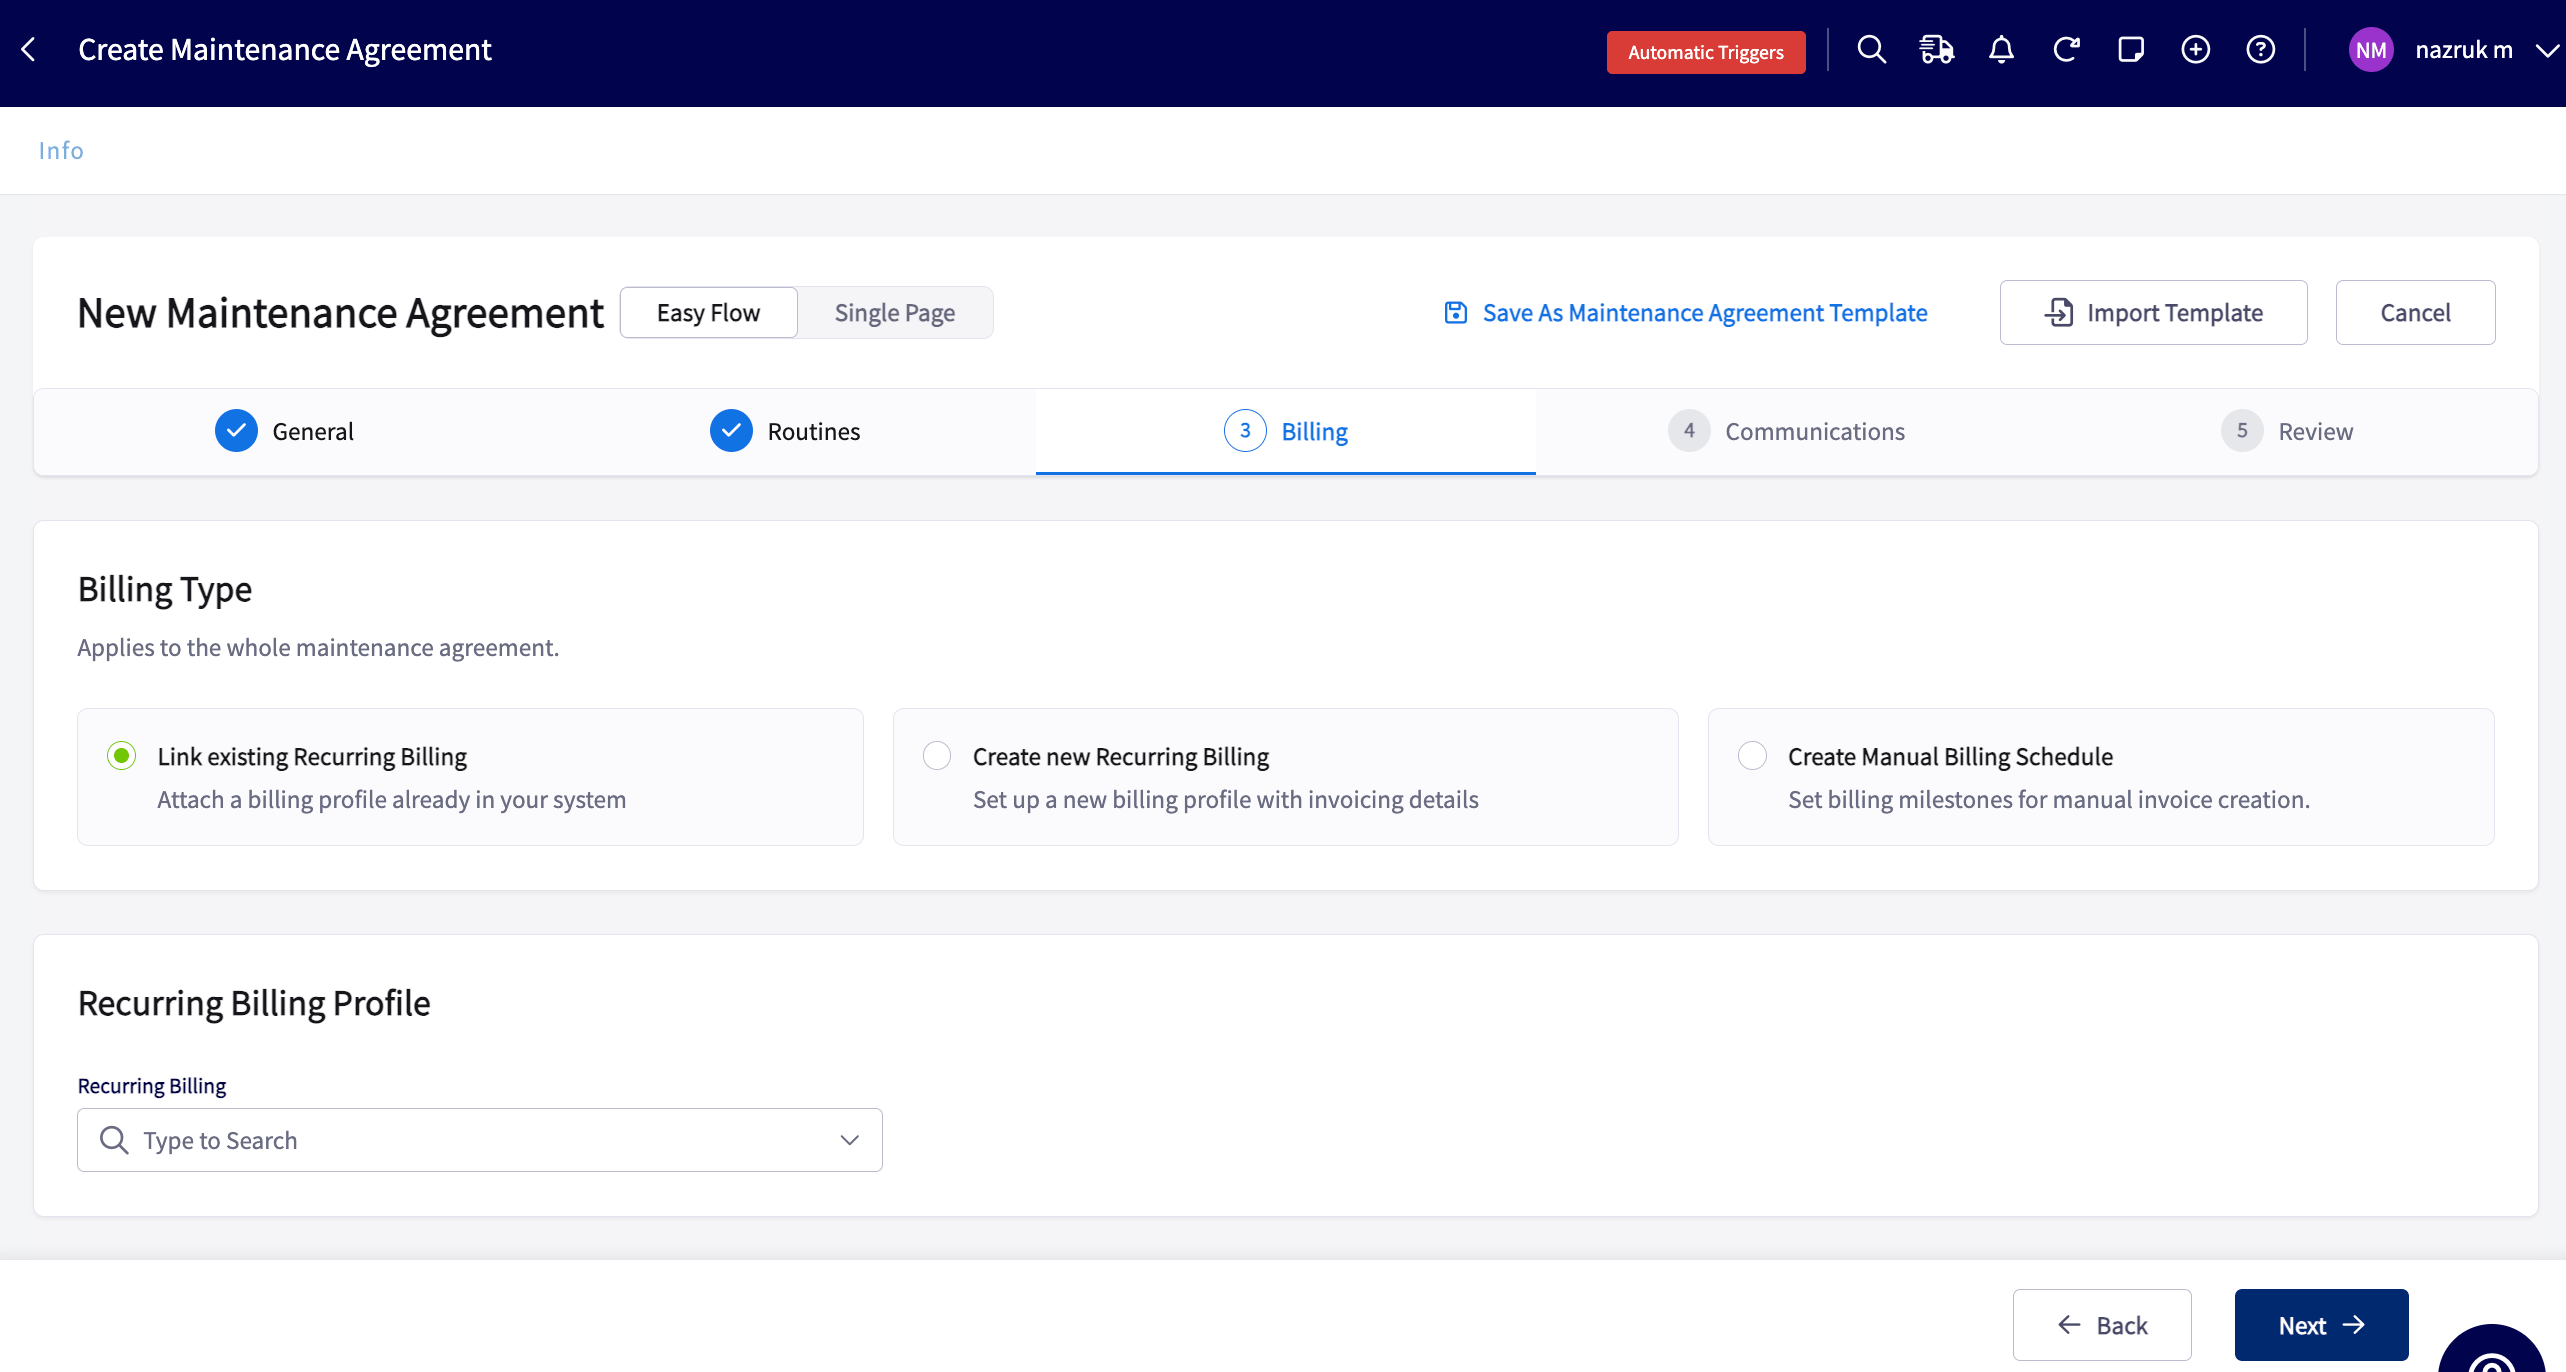
When a recurring billing is created or linked to a maintenance agreement, the recurring billing ends on the agreement’s end date. This overrides any end date on a recurring billing you created earlier.
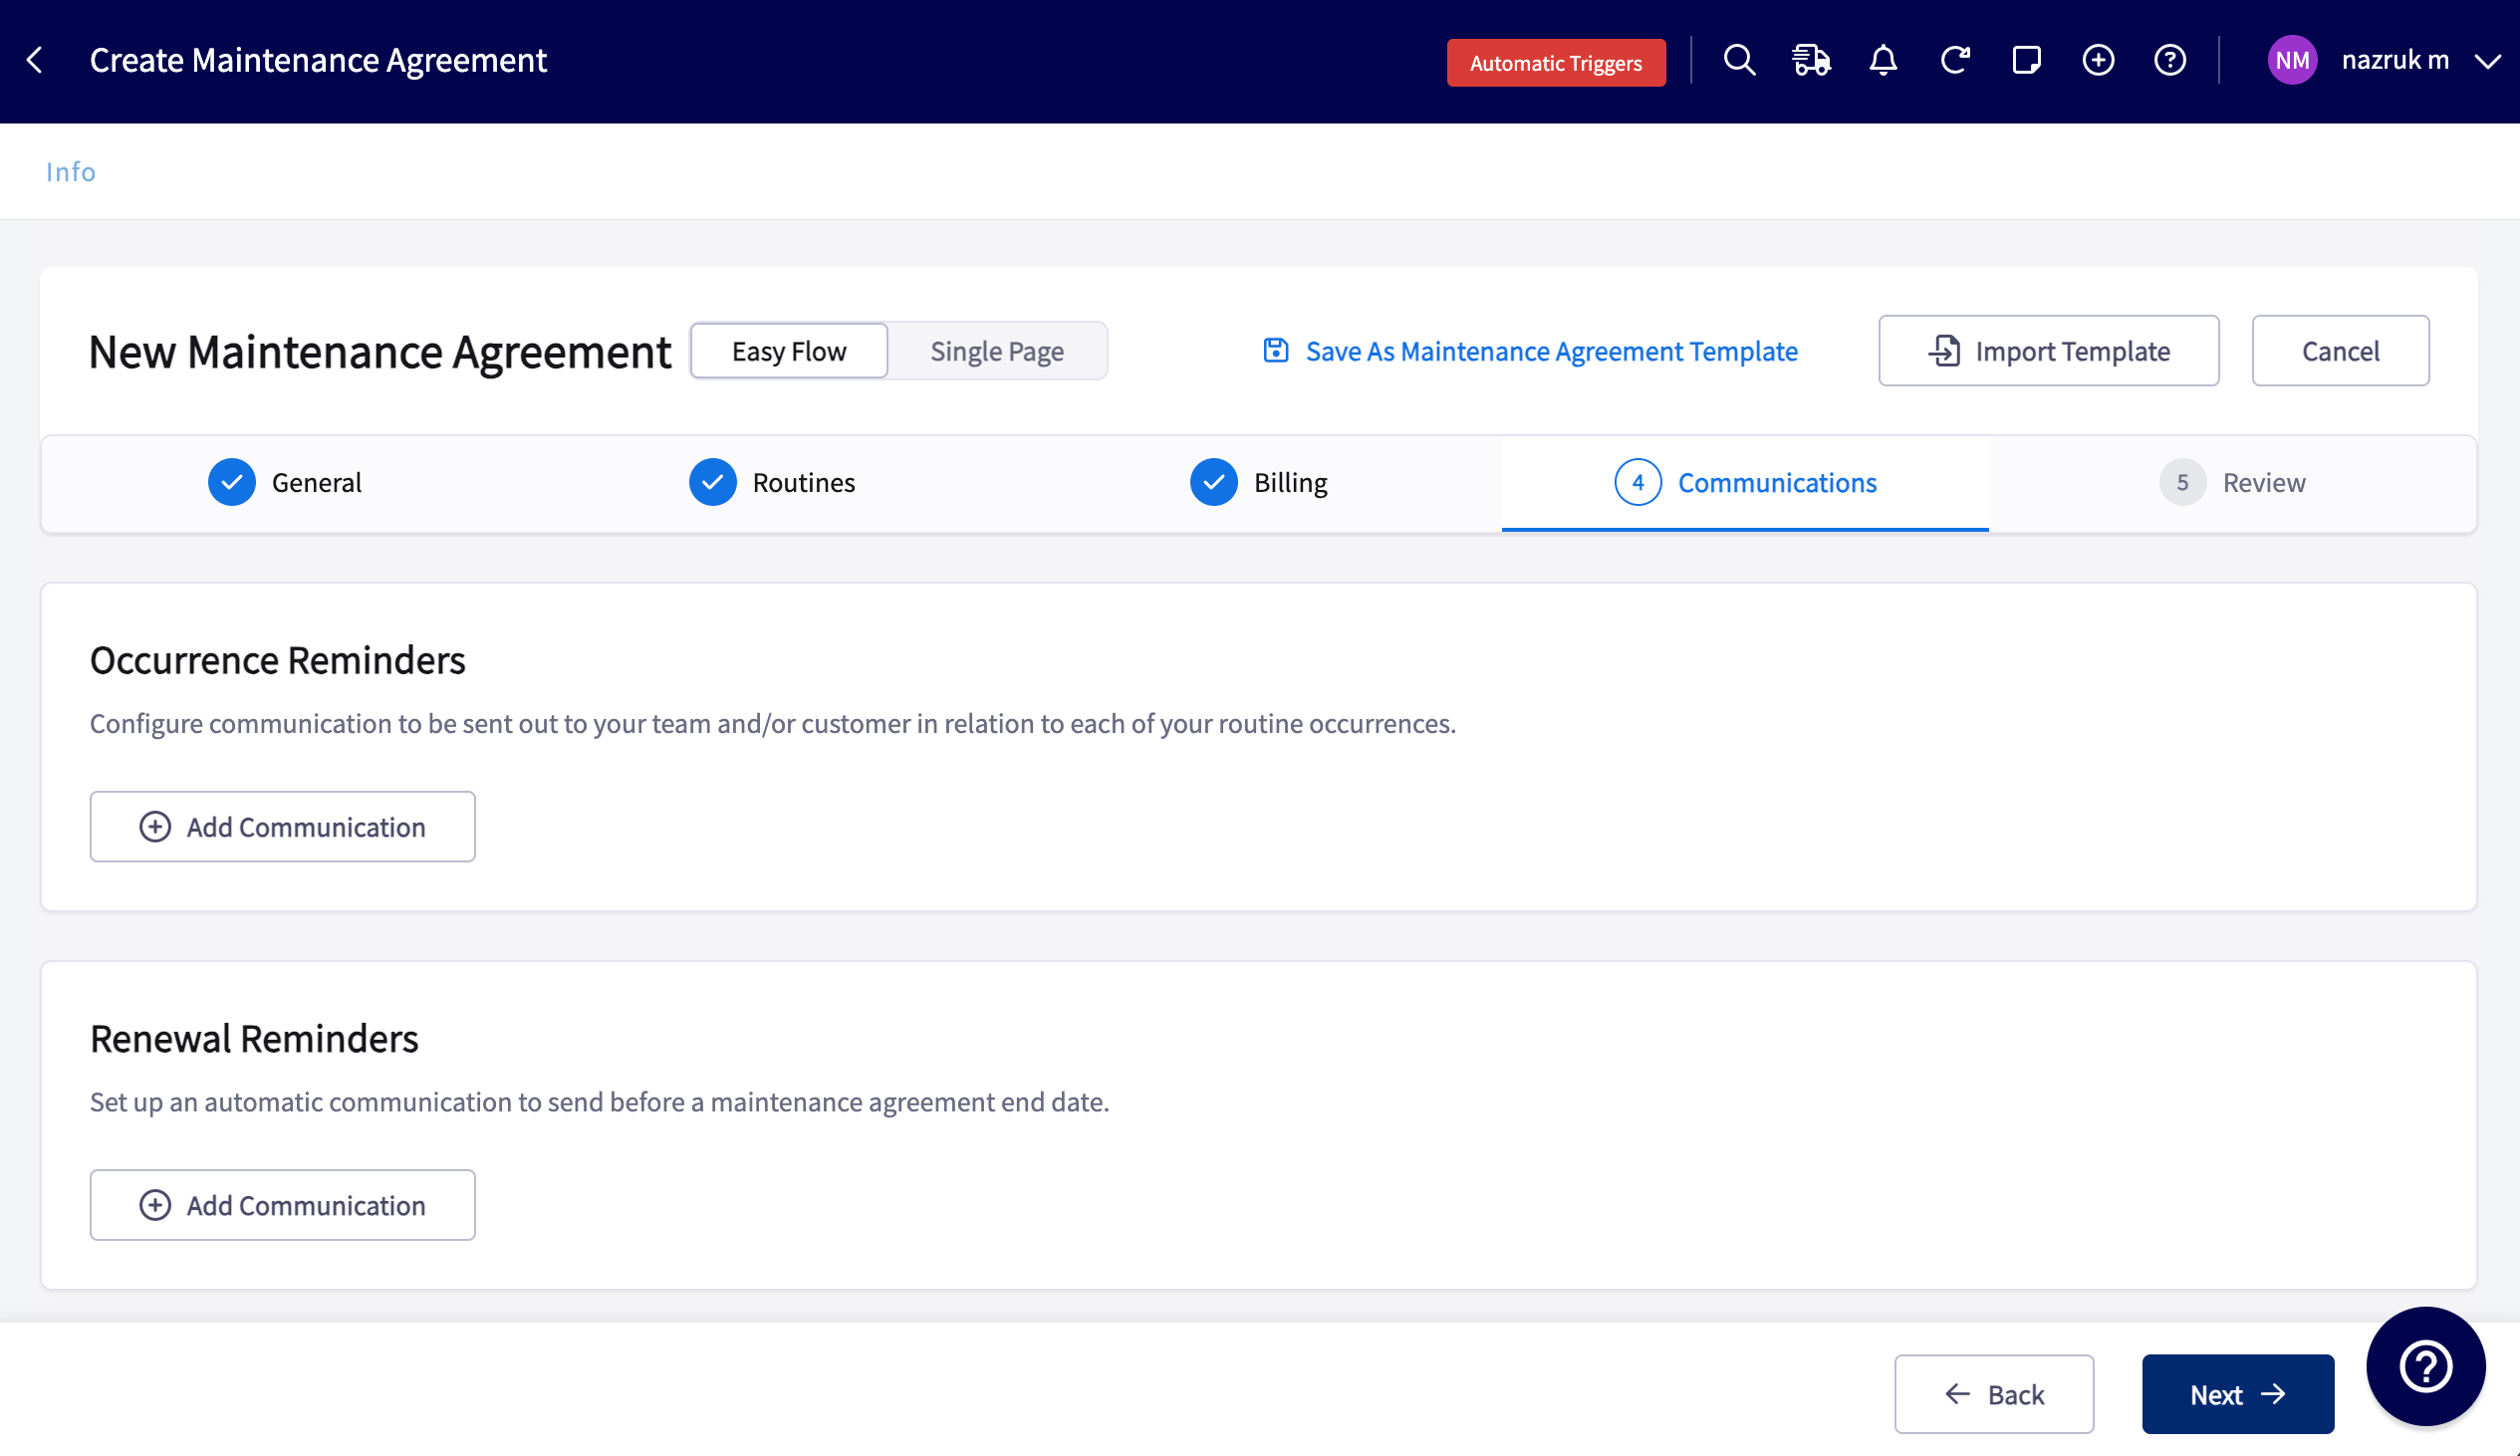
Step 4: Communications
Occurrence reminders send before an occurrence, and renewal reminders send before the agreement ends.Occurrence reminders
Occurrence reminders work only for Scheduled routines. On-Demand routines do not support them.- Select Email or SMS.
- If the agreement has more than one routine, select the Routine Scope: all routines, several routines, or a single routine.
- Enter how many days before the occurrence date FieldPulse sends the message.
- Choose which occurrence statuses receive the reminder. FieldPulse skips the message at send time if the occurrence does not match your selection.
- Choose the recipients: internal team members, the customer by checking Send to Customer, or both.
- Write the message. For email, enter the Subject and Body, or select Import Template. For SMS, enter the message body, or select Insert Template. Customer fields fill in automatically, and job fields fill in when the occurrence has a linked job.
- Select Add Communication to stack more rules on the same agreement. For example, send an SMS 7 days before and an email 1 day before.
Renewal reminders
The Renewal Reminders section appears only when the agreement has End Date turned on with a date set. Renewal reminders work at the agreement level, so they do not depend on any routine.- Select Email or SMS.
- Enter how many days before the agreement’s end date FieldPulse sends the reminder.
- Choose the internal recipients, and check Send to Customer to include the customer.
- Write the message. For email, enter the Subject and Body, or select Import Template. For SMS, enter the message body, or select Insert Template.
- Select Add Communication to add more reminders, each with its own timing, channel, and recipients. For example, email your account owner 5 months out, email the customer a renewal template 1 month out, and text the customer 14 days out.
Step 5: Review and activate
The review screen summarizes everything you entered in Steps 1 through 4.- Review the summary.
- Select Save as Draft to hold the agreement without starting it, or select Save and Activate to start it immediately.
Other ways to create an agreement
From a job
Open the job and use the Actions menu to create the agreement from it. When you save the agreement, FieldPulse asks whether to link the job as the first occurrence.- In the Link Job to Maintenance Agreement Occurrences pop-up, select the routines the job completed. If the agreement has several routines, you can select one, some, or all of them.
- Select Yes, Link Job to link the job to the first occurrence of each selected routine. Select No, Keep Job Separate to keep the job as the sales origin only.
- Select Yes, Link as Billing Sequence 1 to count the invoice as the first billing. FieldPulse skips the first automatic invoice, and the agreement’s end date does not change.
- Select No, Keep Invoice Separate to treat the invoice as a standalone bill. Recurring billing then creates its own invoice for the first billing sequence.
From an asset
Open the asset record and select Create Maintenance Agreement.From an estimate or invoice
- Open an estimate or invoice that has a line item linked to a maintenance agreement template.
- Select Actions, then Create Maintenance Agreement.
- Select Yes to generate the agreement from the linked template and set the estimate or invoice as the agreement’s Sales Source. Select No, create from scratch to open a blank agreement instead.
Use templates
There are three kinds of templates. Maintenance Agreement Templates hold a full agreement setup. Scheduled Routine Templates and On-Demand Routine Templates each hold one routine that you can reuse across agreements. Scheduled Routine Templates and On-Demand Routine Templates can only be created on the Webapp, but can be used in the Mobile app. To create a maintenance agreement template:- Select Agreements, then select Create Maintenance Agreement.
- Select Save As Maintenance Agreement Template before you enter any details. FieldPulse hides the customer, location, contact, and status so the template stays generic.
- Complete the agreement steps, then save. FieldPulse opens the template record, which has Contracts, Forms, and Files tabs. Anything you add there copies into every agreement created from the template.
- Select Agreements, then the Templates tab.
- Select the Scheduled Routine Templates or On-Demand Routine Templates sub-tab.
- Select Create New Scheduled Routine or Create New On-Demand Routine.
- Complete the routine fields in the slide-out, then save.
- To start an agreement from a maintenance agreement template, select Import Template on the create form, or open the template and select Create Maintenance Agreement from Template.
- To add a routine template to an agreement, select Insert Template in the Routines step. FieldPulse lists only the routine templates that match the agreement’s plan type.
- To start an agreement from one routine, select the + icon on a routine template’s row.
Connect a job to an occurrence
You can manually connect an existing job to an agreement’s occurrence. The connection rules depend on the plan type.
Choose the place that fits where you are working:
- Occurrences tab: Select the link icon on an occurrence that has no job, search by job title or job number, and select the job. The list shows jobs for the agreement’s customer in any status, including past and completed jobs, limited to the jobs you have permission to open.
- Agreement record: Open the Jobs tab, find the occurrence or visit without a job, and select Link Existing Job.
- Job record: Select Link Maintenance Agreement while you create or edit the job, or select Actions, then Connect to Maintenance Agreement. Choose the agreement, then the routine if the agreement has more than one, then an occurrence without a linked job. The job then shows the agreement title, the routine, and the occurrence, with an unlink icon.
Schedule jobs for occurrences
Scheduling an occurrence means assigning a date, time, and technician to its job, whether the job was generated automatically or created manually. To create and schedule a job manually:- Select Agreements, then the Occurrences tab.
- Find the occurrence that shows No Job and select +.
- Review the job. FieldPulse fills in the customer details and the routine’s job template.
- Enter the date, time, and any notes, then select Save Job.
- Open the Schedule tab and select the hourglass icon.
- Select the filter icon, then filter for jobs associated with maintenance agreements.
- Select a job and assign it a date, time, and technician.
Find agreements and occurrences
The Agreements tab lists every maintenance agreement, and the Occurrences tab lists every occurrence across all agreements. Select the expand arrow on an agreement row to see each routine’s next occurrence, its due date, and its linked job. The Templates tab holds your saved templates. Select the filter button on the Agreements or Occurrences tab to open the filter panel on the right. Select Save as View to keep a set of filters as its own tab, and select Manage Views to reorder your saved views or choose the one that opens first. To export data, use the maintenance agreement reports under Management > Reporting.Edit an agreement
Open the agreement and select Edit. When you select Save, the Scope of Change pop-up asks how to apply your edits.
Three changes always apply to the future only, whichever option you choose. A routine frequency change updates occurrences from the next one forward. A recurring billing amount or frequency change updates only future invoices that are still in Draft status. A change to the job template linked to a routine updates the jobs created from that routine, but keeps the existing schedule assignees the same, so your technician assignments aren’t overwritten. FieldPulse never changes a job in Completed, Canceled, Dispatched, In Progress, or Closed status, and it skips those jobs when you save.
Send a contract
Send a maintenance agreement to your customer as a contract they can review and accept.- Open the maintenance agreement, then select Contracts in the top menu.
- Select Create Contract to build a new contract, or open an attached contract to review or resend it.
- Select Send to email the contract to the customer.
On mobile
Create and manage agreements
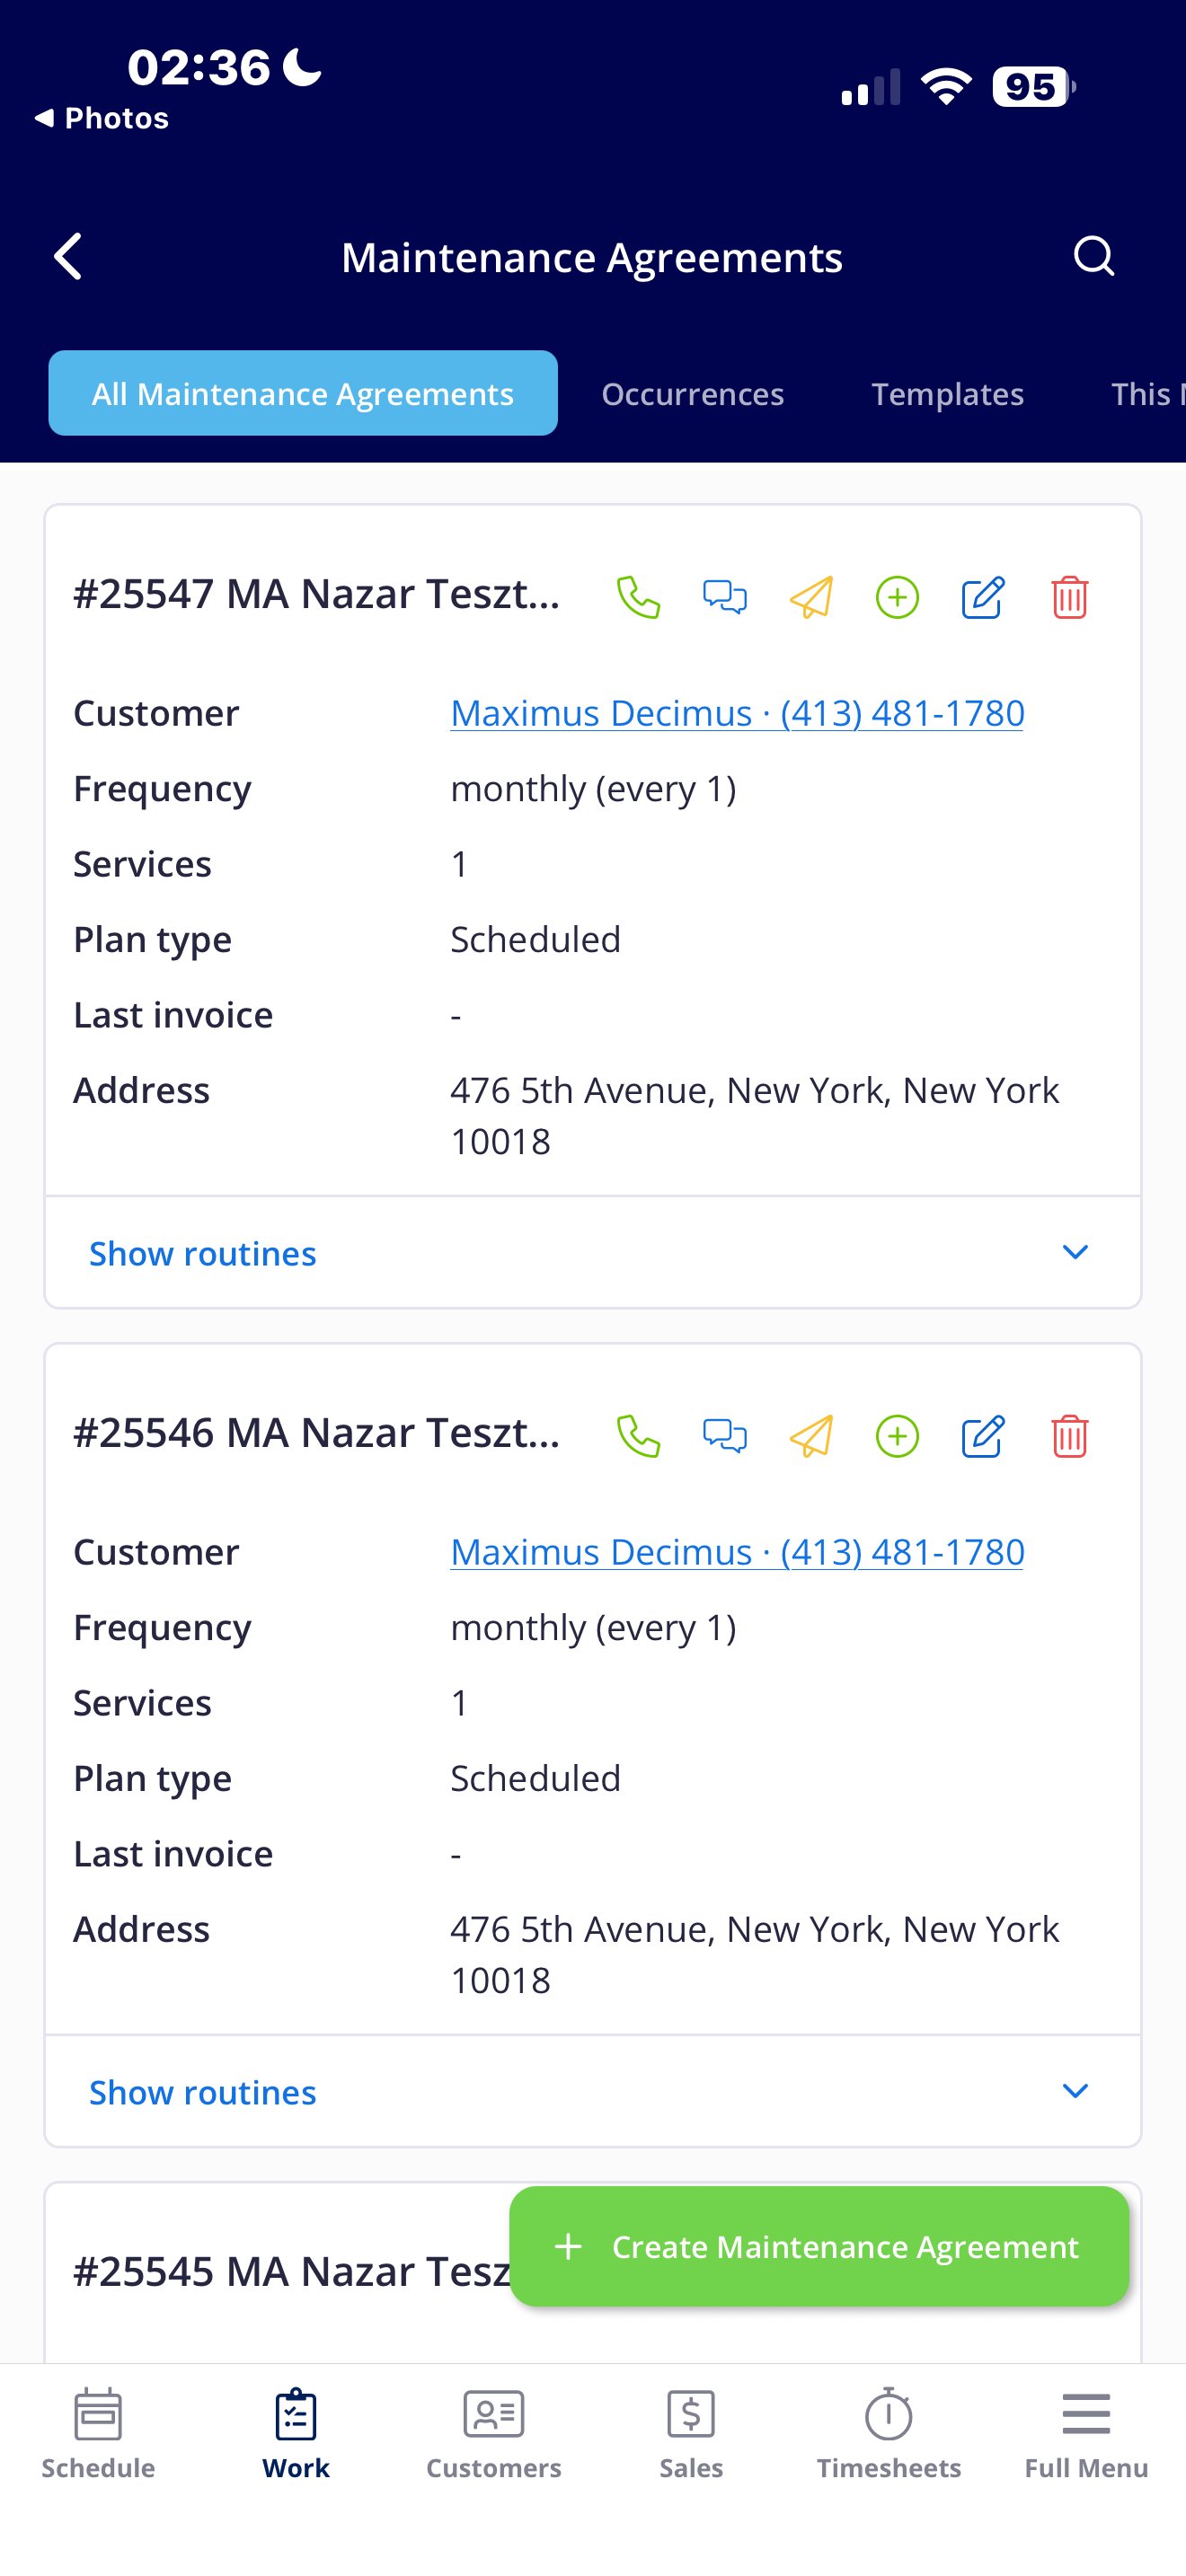
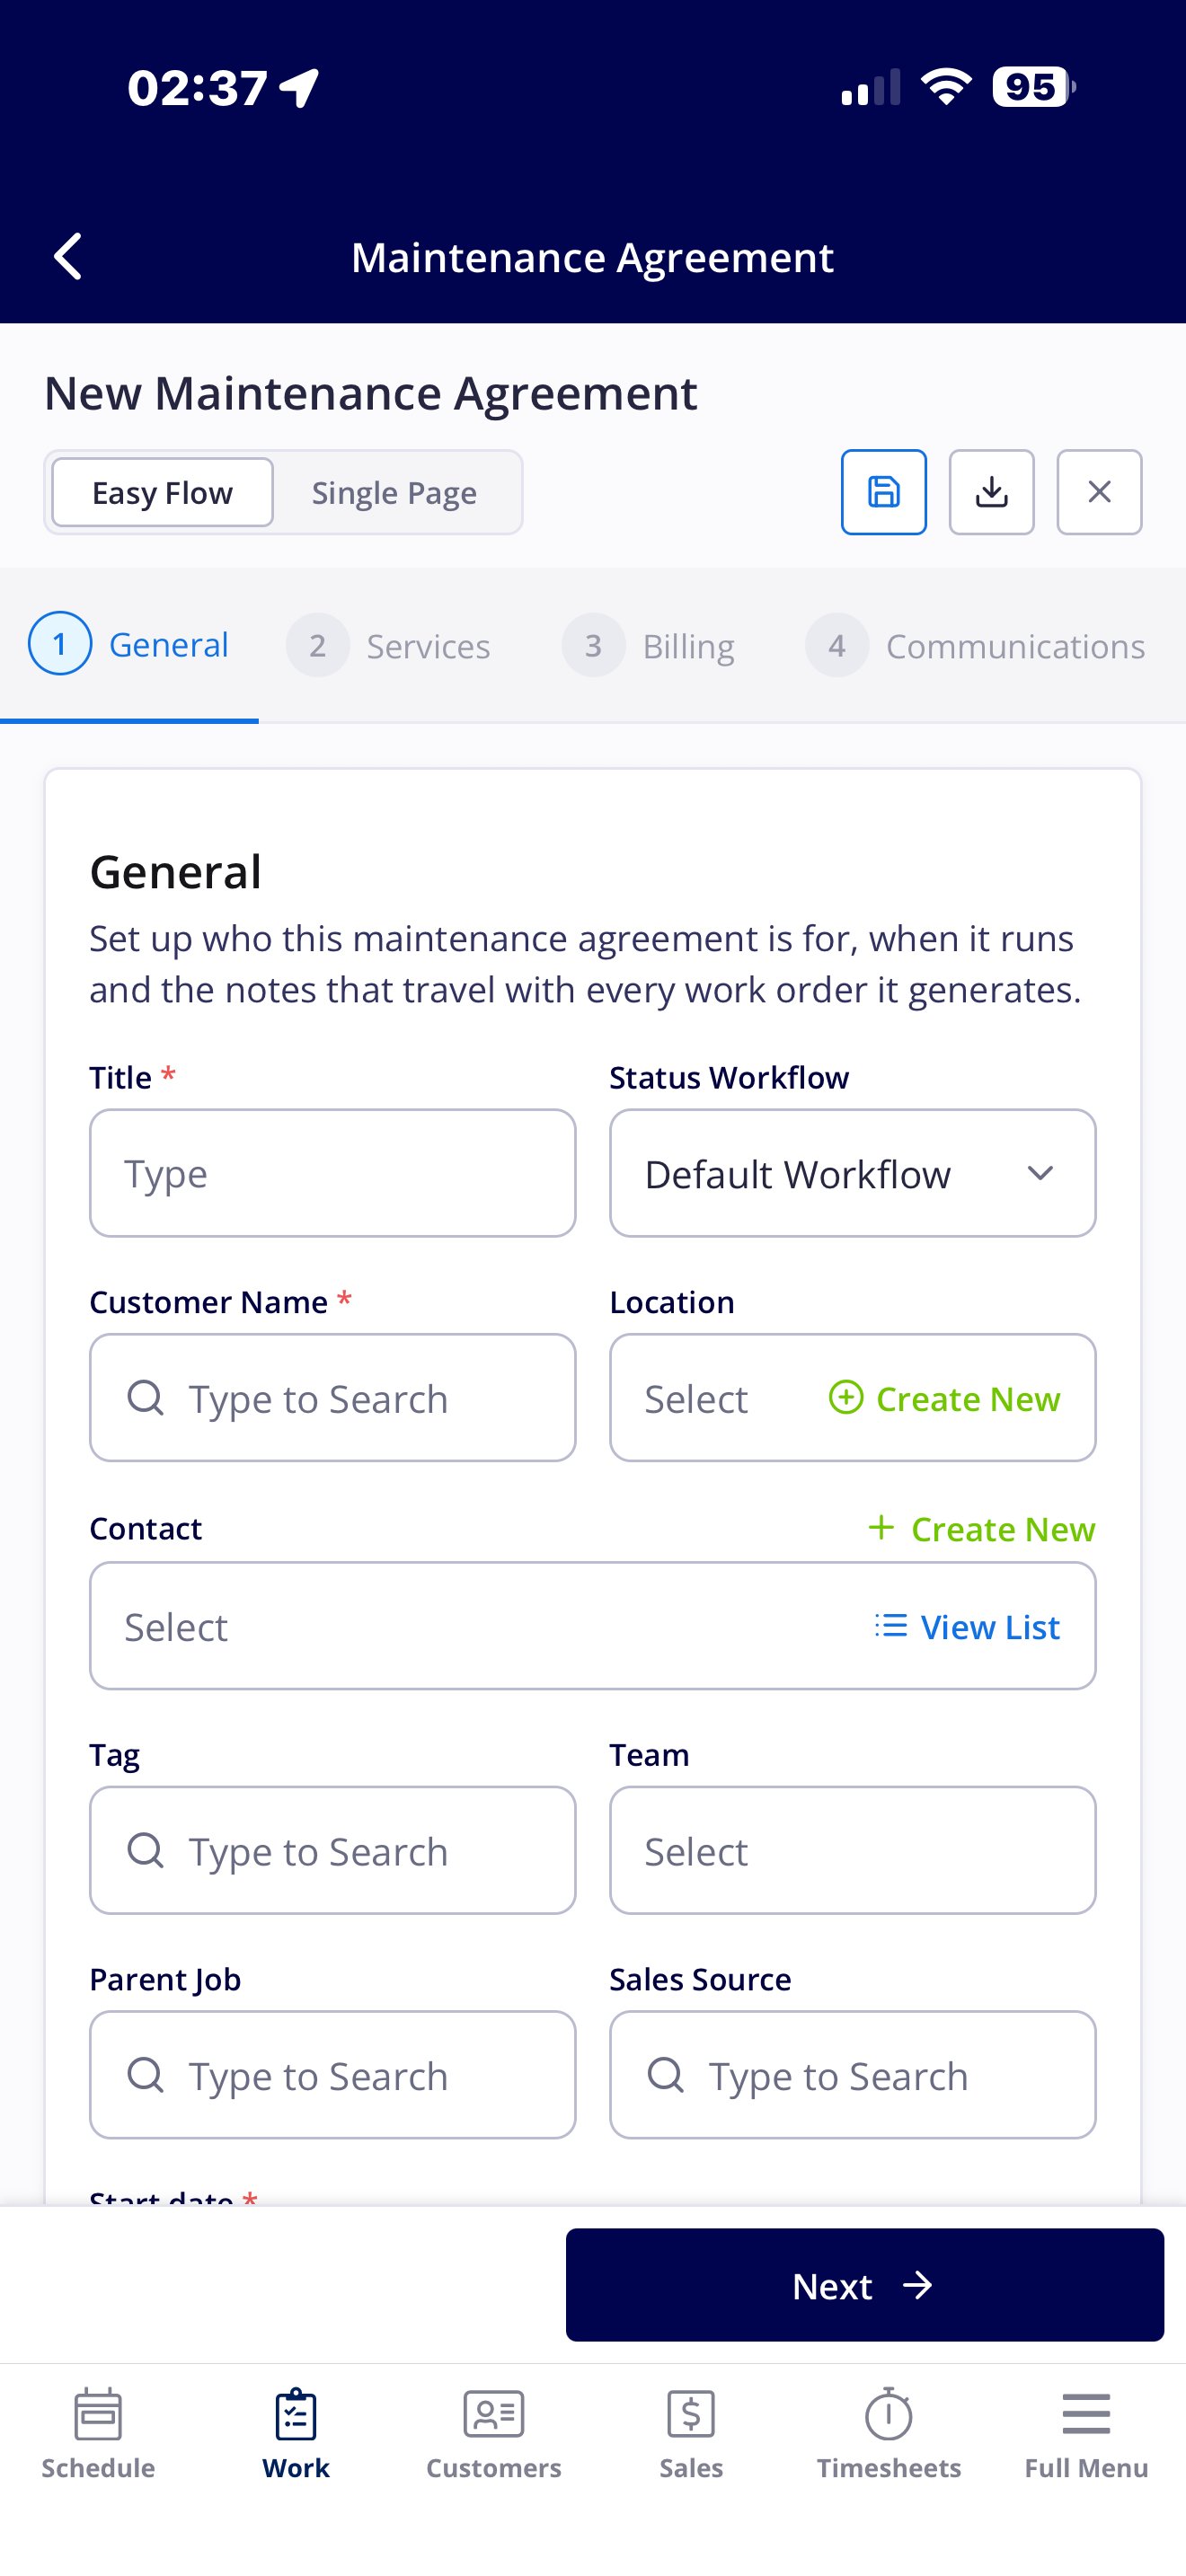
- Create an agreement from the + menu, where Maintenance Agreement appears at the bottom of the list.
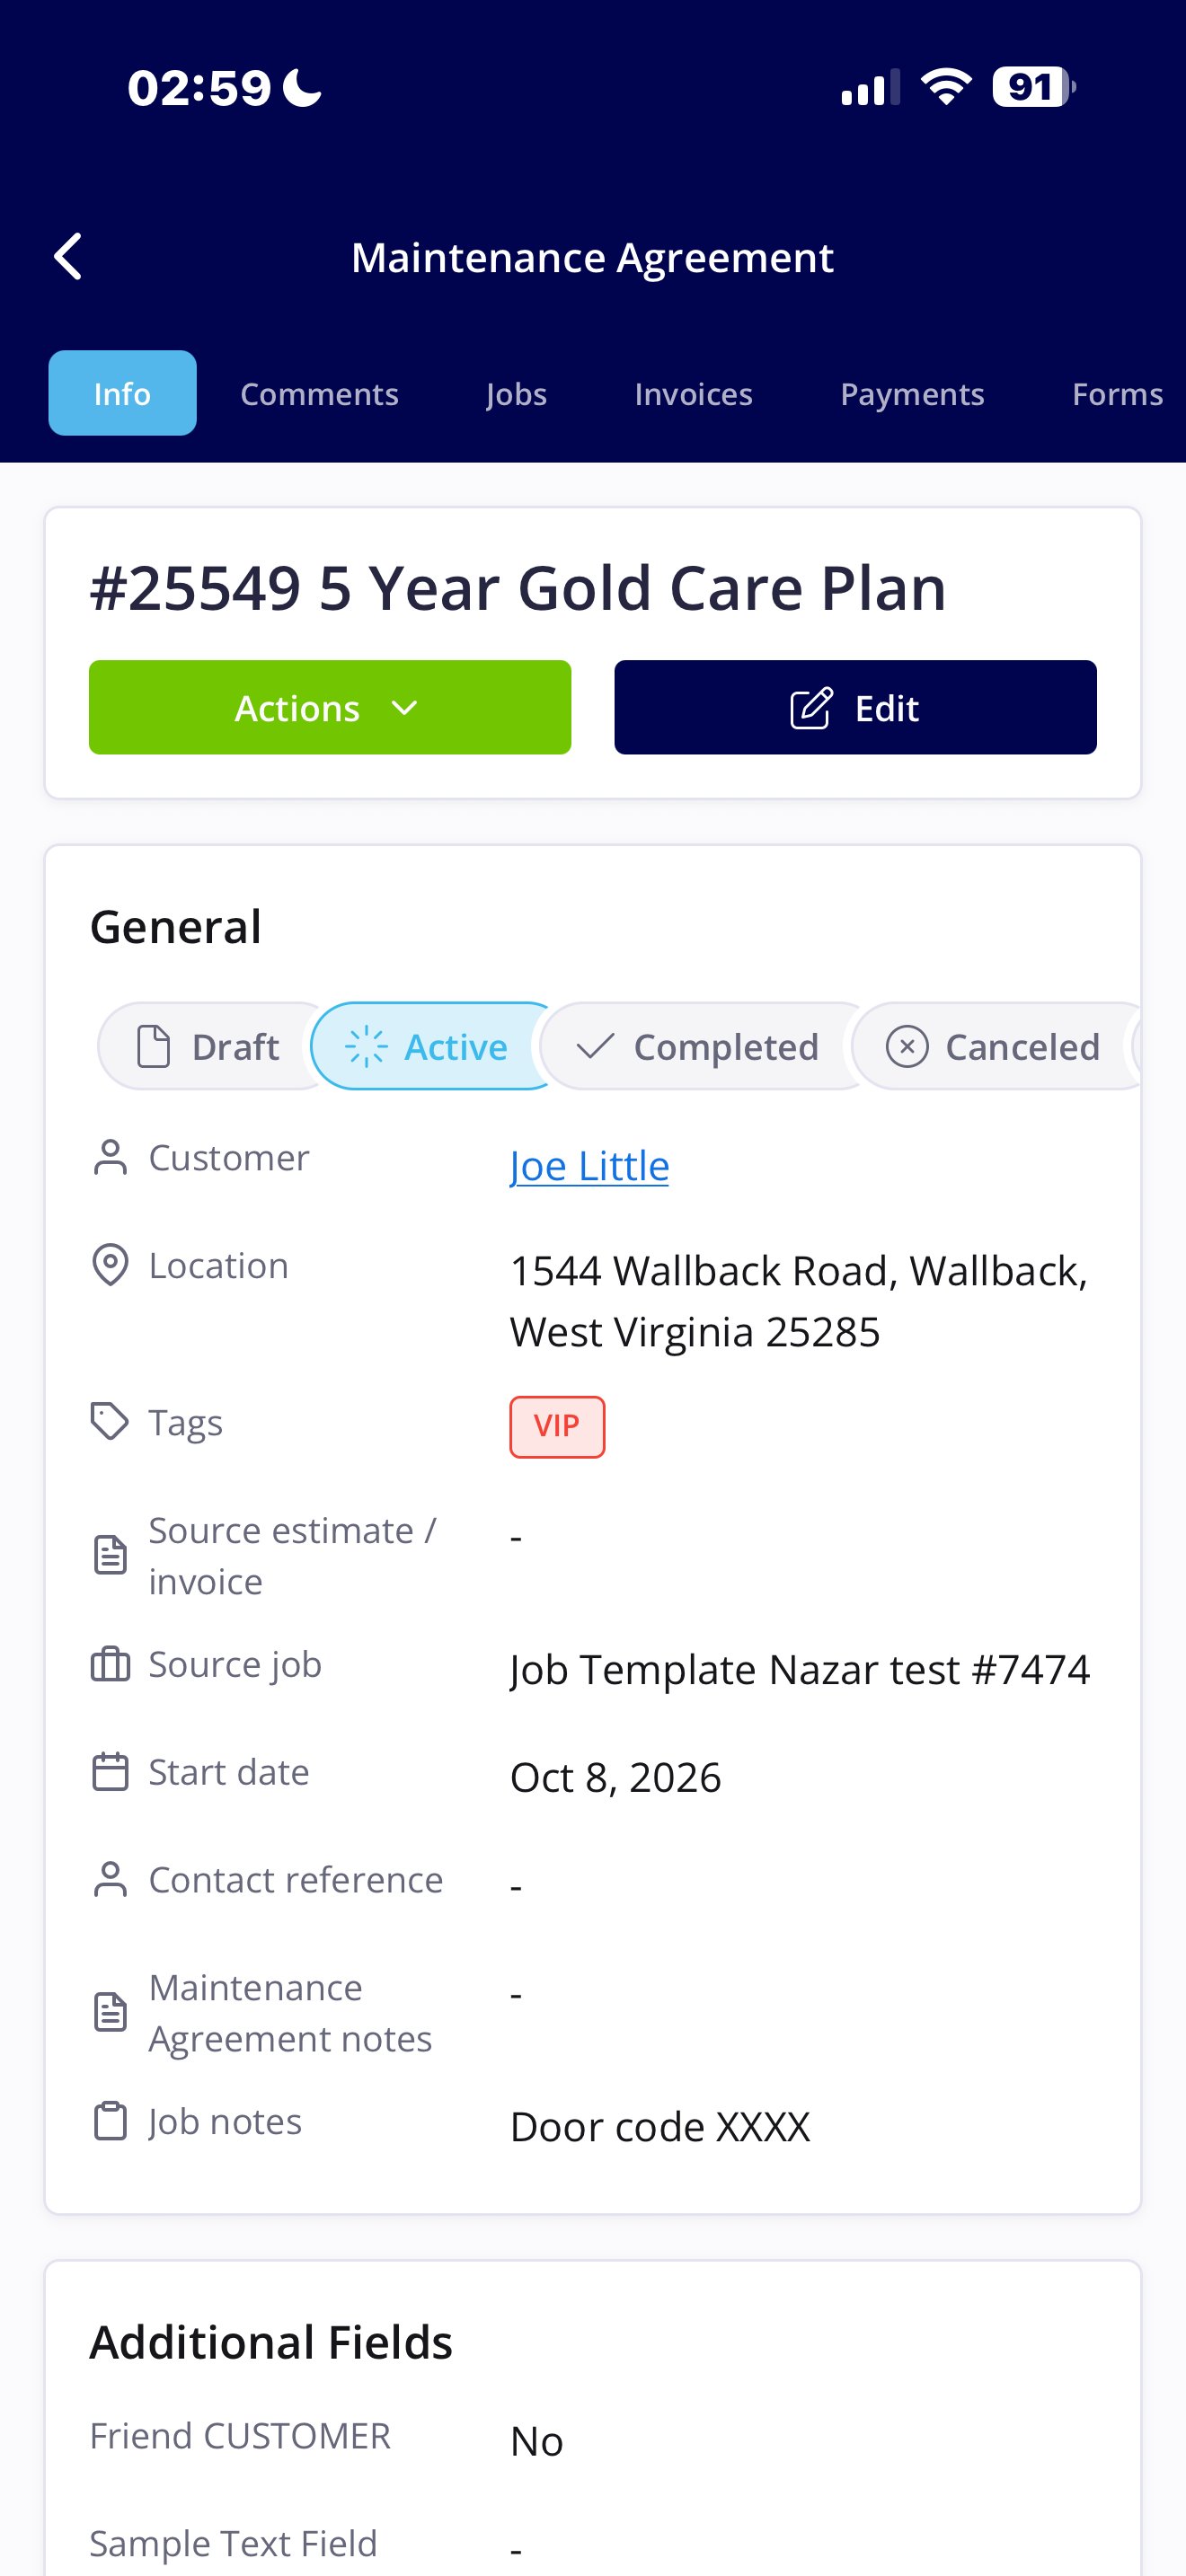
- Open the Work tab to view, create, and edit agreements. The mobile tabs match the tabs on web, and you can import a template.
- Open a customer record and select Maintenance Agreements at the top to view, edit, or create an agreement for that customer.
- Open a job or invoice to see its linked agreement at the top of the record.
- Claim or link an On-Demand visit from the field.
What stays on web
Recurring billing setup is not available on mobile. Create and manage recurring billings on web. You can view invoices created from a recurring billing on mobile. Filters, saved views, custom status workflows, and Company Settings also stay on web.FAQs
Can I mix Scheduled and On-Demand routines on the same agreement? No. All routines on one agreement share a single plan type. Choose Scheduled or On-Demand for the whole agreement. Can a customer claim an On-Demand visit through the customer portal? No. Your team claims On-Demand visits. Customer portal self-service for maintenance agreements is not available. How is an On-Demand routine different from a Scheduled routine that I leave unscheduled? A Scheduled routine creates dated occurrences on a calendar, even when their jobs are unscheduled. An On-Demand routine creates no recurring schedule and instead tracks an included-visit allowance, and each visit is Available, Claimed, or Expired. Can I link an estimate as the first billing occurrence? No. Payment is collected on an invoice, so only an invoice can serve as the first billing occurrence. An estimate can start an agreement, and you can link the agreement’s invoice as the first billing. Can I delete one routine without losing its job history? Yes. FieldPulse asks you to choose between deleting the routine and all of its jobs, or stopping future occurrences while keeping the routine’s past jobs. If I delete an agreement, do I lose the jobs and invoices it created? No. When you archive a maintenance agreement, FieldPulse asks whether you also want to archive its linked jobs. If you choose yes, the agreement and its linked jobs are archived. If you choose no, only the agreement is archived, and the jobs stay as standalone records, unlinked from the agreement. Invoices are never affected. Invoices from recurring billing or the billing plan stay as they are. Archiving does stop all future job generation and recurring billing, so no new jobs or invoices are created after that point. What does it take to mark an agreement Completed? The end date must be today or earlier, every job must be Completed or Canceled, and every invoice must be Fully Paid or Void. Completing the agreement stops future job generation and recurring billing. I activated my agreement. Why can’t I see its jobs and invoices yet? FieldPulse creates the initial jobs and invoices after you activate the agreement, and this can take up to several minutes. Wait for the loading page to finish before you create anything manually, so you do not create duplicates. How does occurrence and job generation work for routines? Two settings on each routine work together. Automatically create jobs for the next X months sets how far ahead occurrences are created (FieldPulse checks nightly and adds new ones as months come into range), and Job generation rule decides whether each new occurrence gets a job: Do not generate jobs creates none, while Generate job, keep unscheduled creates an unscheduled job for each. On-Demand routines use the same window to create visits on a rolling basis, but jobs are never created automatically. Your team creates or links the job when a visit is claimed. A job is only created automatically at the moment its occurrence is created. Existing occurrences are left alone.Related articles
- Setting Up Maintenance Agreement Automation
- Custom Status Workflows
- Setting Up Recurring Billing
- How to Manage Assets
- Setting Up Job Templates
- How to Create Maintenance Agreement Reports