If you’d like the Dimensional Pricebook enabled in your FieldPulse account, please reach out to our team at support@fieldpulse.com or use the chat feature in the bottom right corner of your screen.
Overview
The Dimensional Pricebook lets your business price products based on a unit of measure and the specific dimensions your customer needs. That means accurate, tailored quotes for your customers and a faster pricing process for your team. It’s built for trades where size drives cost: glass fabrication, fencing, flooring, drywall and insulation. Instead of guessing or hand-calculating, your estimators and technicians enter the actual dimensions and the Pricebook handles the math. This brings a smoother pricing flow, easier edits after a flat rate job has been added to an Estimate or Invoice record and more accurate calculations when item options share a unit of measure with the base item.Prerequisites
Before you set up Dimensional Pricing, make sure you have the following in place:- The Dimensional Pricebook feature enabled on your account. Contact our support team if it isn’t yet enabled in your account.
- Item Options enabled in Company Settings > Estimates & Invoices > Advanced.
- At least one Pricebook created. New to the Pricebook? Start with our Pricebook article.
- Admin-level permissions to configure your Line Items, Item Options, and Pricebook settings.
On Web: Admin Experience
This section walks through the full setup, what each option does, and what we recommend by default.Step 1: Turn on Item Options
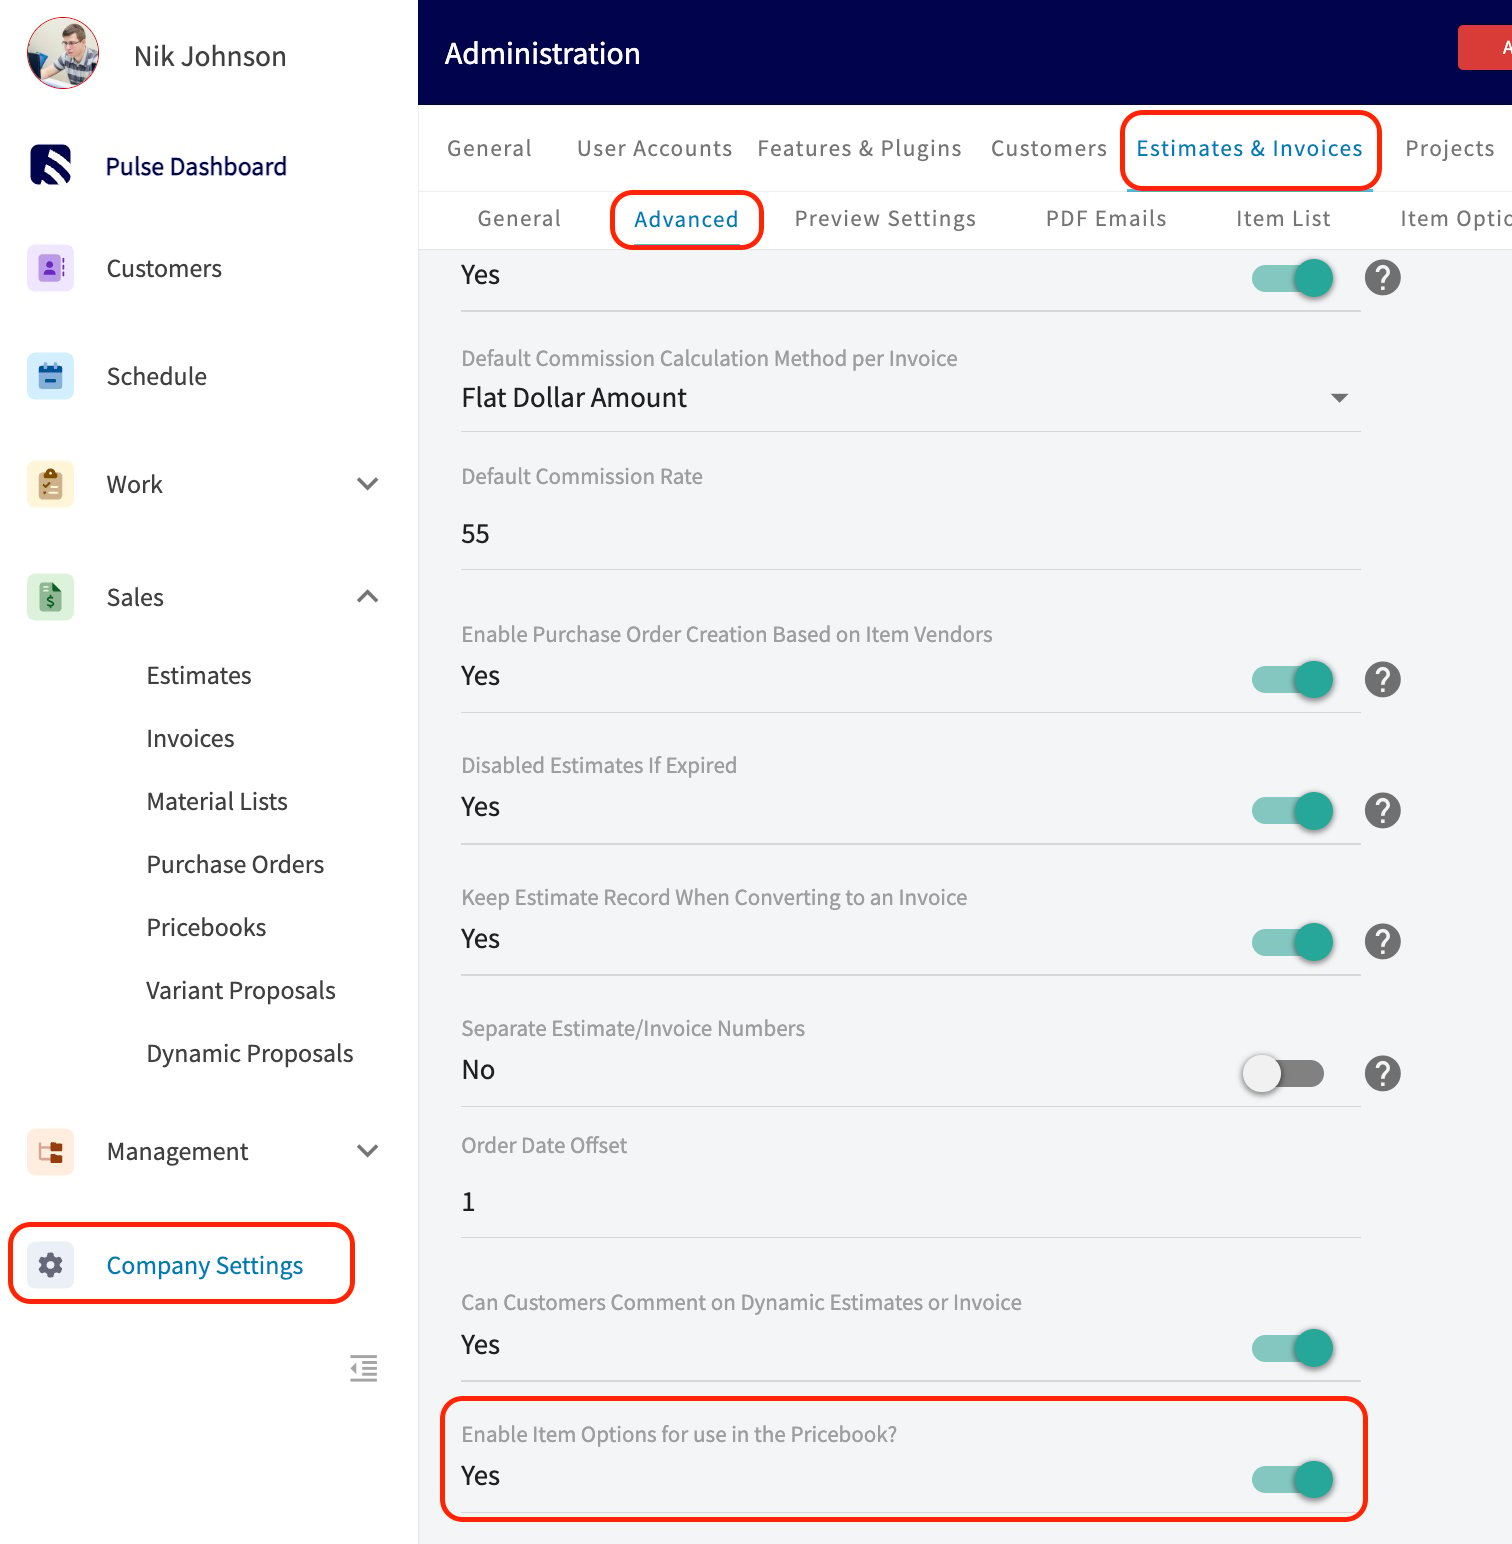
Item Options are how you choose color, thickness, edge type, finish, or any other product variant. Each option flows directly into the line item description on the Estimate or Invoice record, so your team and your customer see exactly what’s being quoted. Here’s how to enable them:- Navigate to Company Settings > Estimates & Invoices tab > Advanced subtab.
- Find the toggle labeled Enable Item Options for use in the Pricebook? and switch it on.
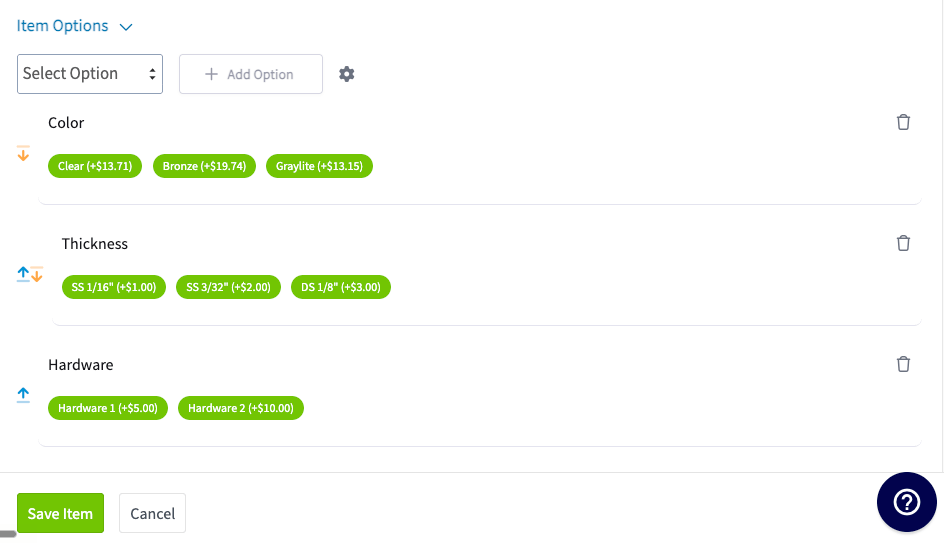
Step 2: Create your item options
Once enabled, go to Company Settings > Estimates & Invoices tab > Item Options subtab. Click Add Item Option and fill in the fields below.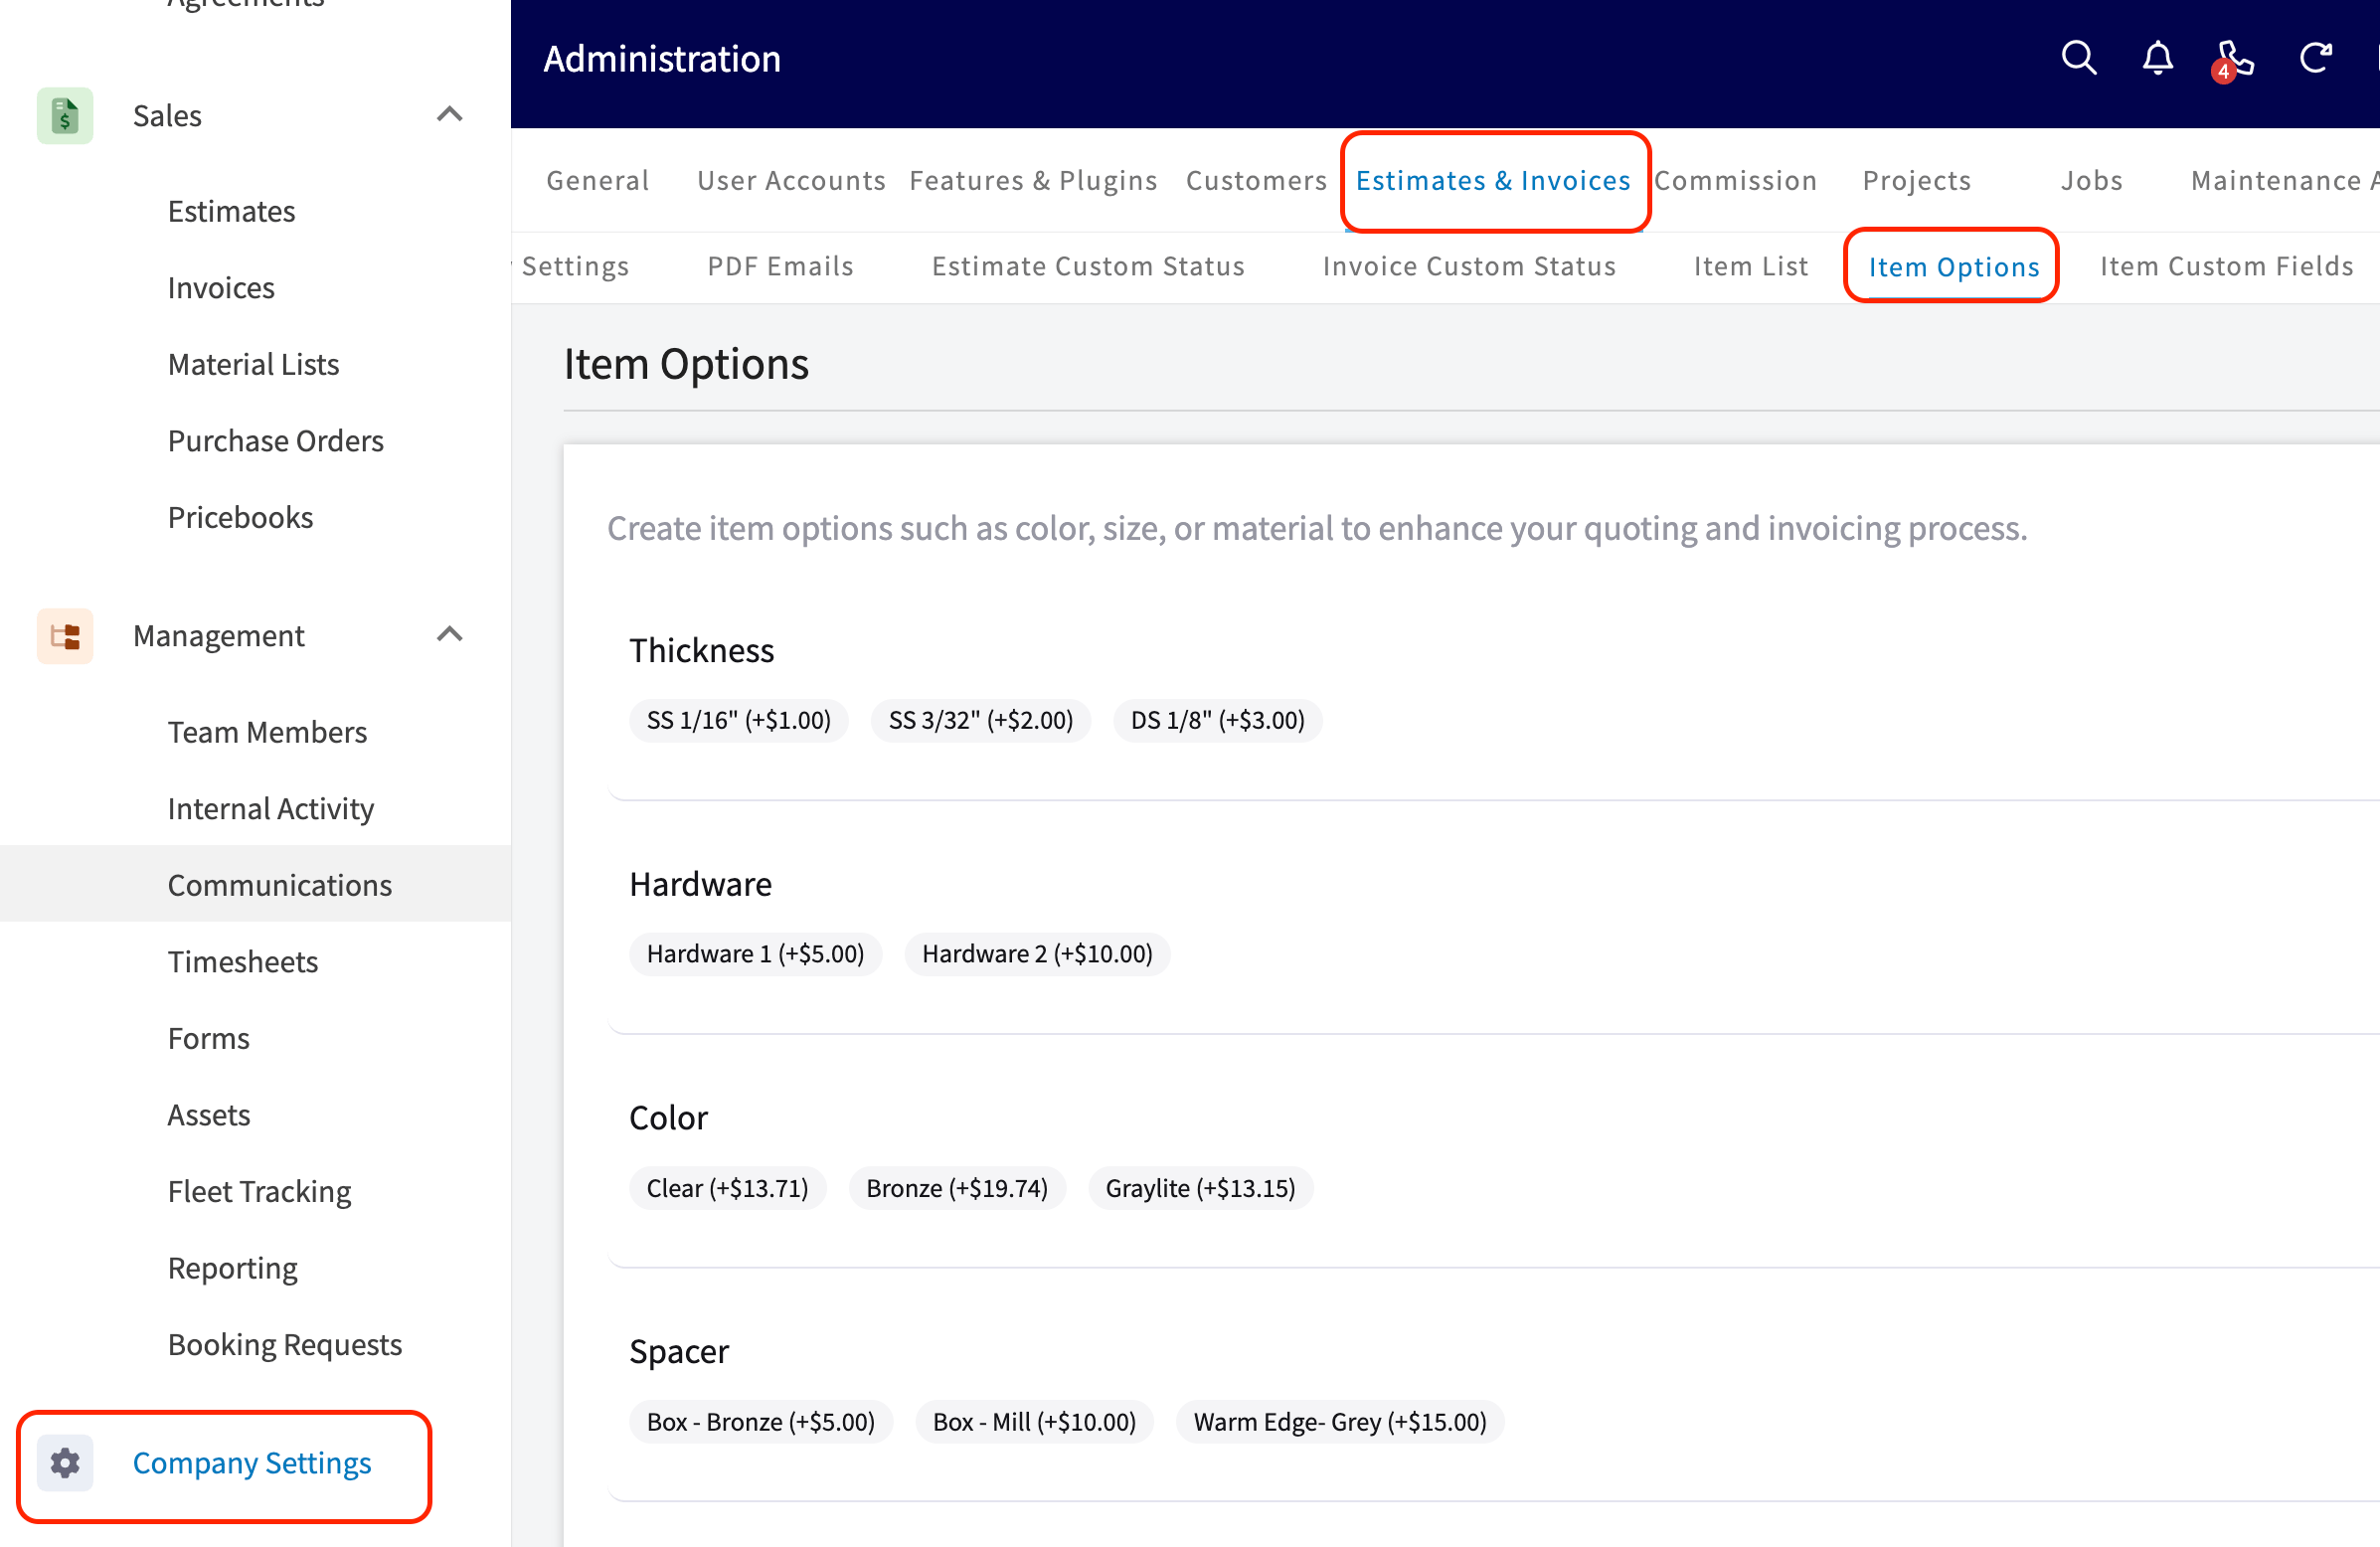
- Option Name (required): The name your team and customers will see. For example, Glass Color, Thickness, or Edge Type.
- Required Checkbox: Forces your team to make a selection before adding the line item.
- Allow Multi-Select: Lets a single option carry more than one value.
- Pricing Method: Choose Flat Pricing (a fixed amount per value) or Pricing Based on a Unit of Measure (linear inch, united whole inch, square feet, or square inches).
- Add Option Value: Name each value, set the additional unit cost and price, drag to reorder, and delete any you don’t need. The order here controls how values appear in your Pricebook.
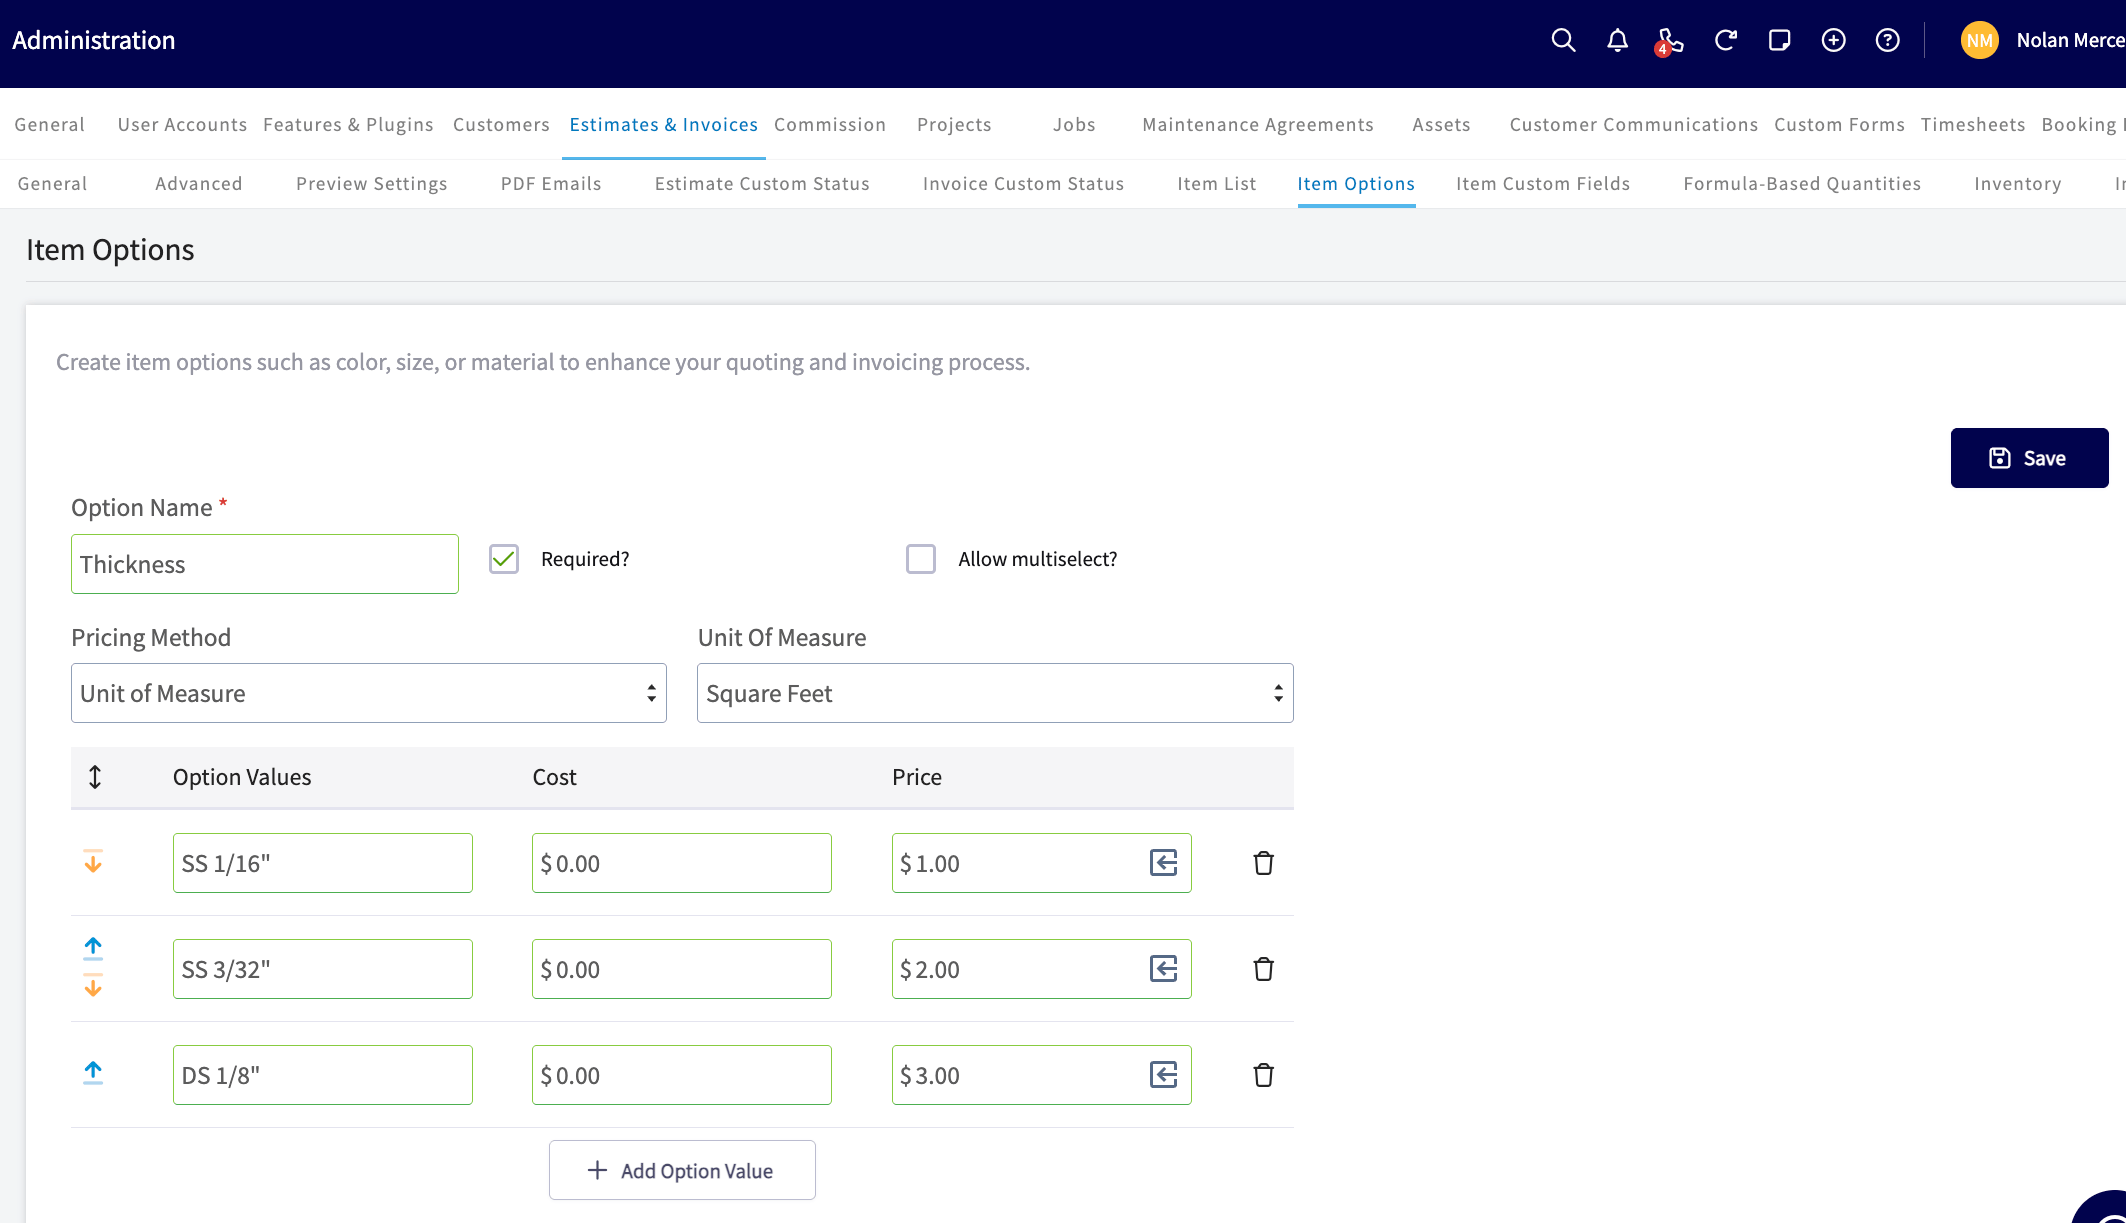
🚀 FieldPulse Pro Tip: Put your most-used option values at the top. Estimators read options in that order, so ordering them here saves time on every quote.
Step 3: Configure your line items
Open any item in your Item List and you’ll see new fields. These apply when the item is used inside a Dimensional Pricebook.- Unit of Measure: Pick one. Square feet (length x width), square inches (length x width ÷ 144), linear inches (length x width x 2, common for glass perimeter), or united whole inch (length + width). When set, this overrides the basic unit cost and price.
- Round Up to Next Even Inch: The system orders to your precise measurements but rounds up for customer-facing pricing. So an area measured at 11.3” x 12.4” prices at 12” x 14”.
- Maximum Size: Sets a hard ceiling for what the item can be sold at. For example, you can’t sell a 1/8” glass sheet at 200 square feet because it’d be too thin to hold up.
- Minimum Charge: When this toggle is on, you set the minimum quantity that must be charged. If your minimum is 3 square feet and the customer’s area is 2 square feet, the cost and price is calculated as 3 square feet.
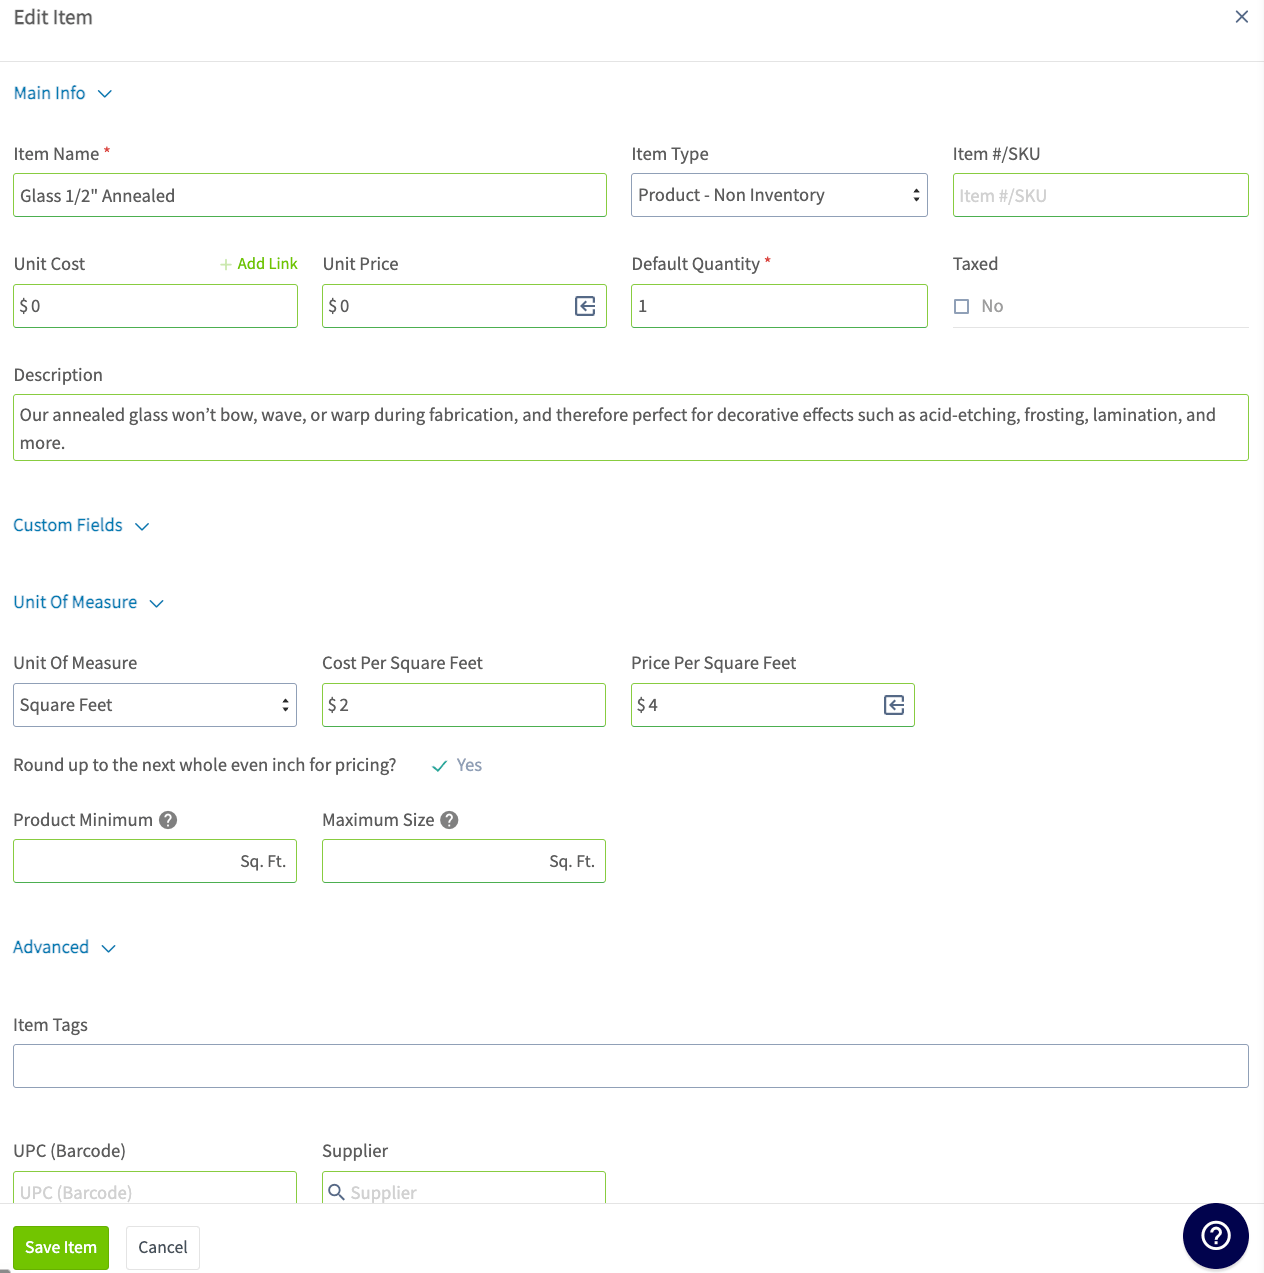
- Assign Dimensional Item Options to the line item you are creating/editing.
If your item option uses the same unit of measure as the base item AND Round Up to Next Even Inch is on for the base item, that rounding now applies to the option’s pricing too.The result is that the base charge and the option charge use the same square footage, so your totals match what your estimators expect.
Step 4: Enable Dimensional Pricing on a Pricebook
Open the Pricebook you want to update, or create a new one. On the Basic Info & Set Up tab, scroll to the bottom and you’ll see two toggles:- Enable Dimensional Pricing: Turn this on to allow size-based pricing in this Pricebook.
- Enforce Product Size Limits: When on, items only display in the Pricebook if the calculated area fits within the size limits you set on each item.
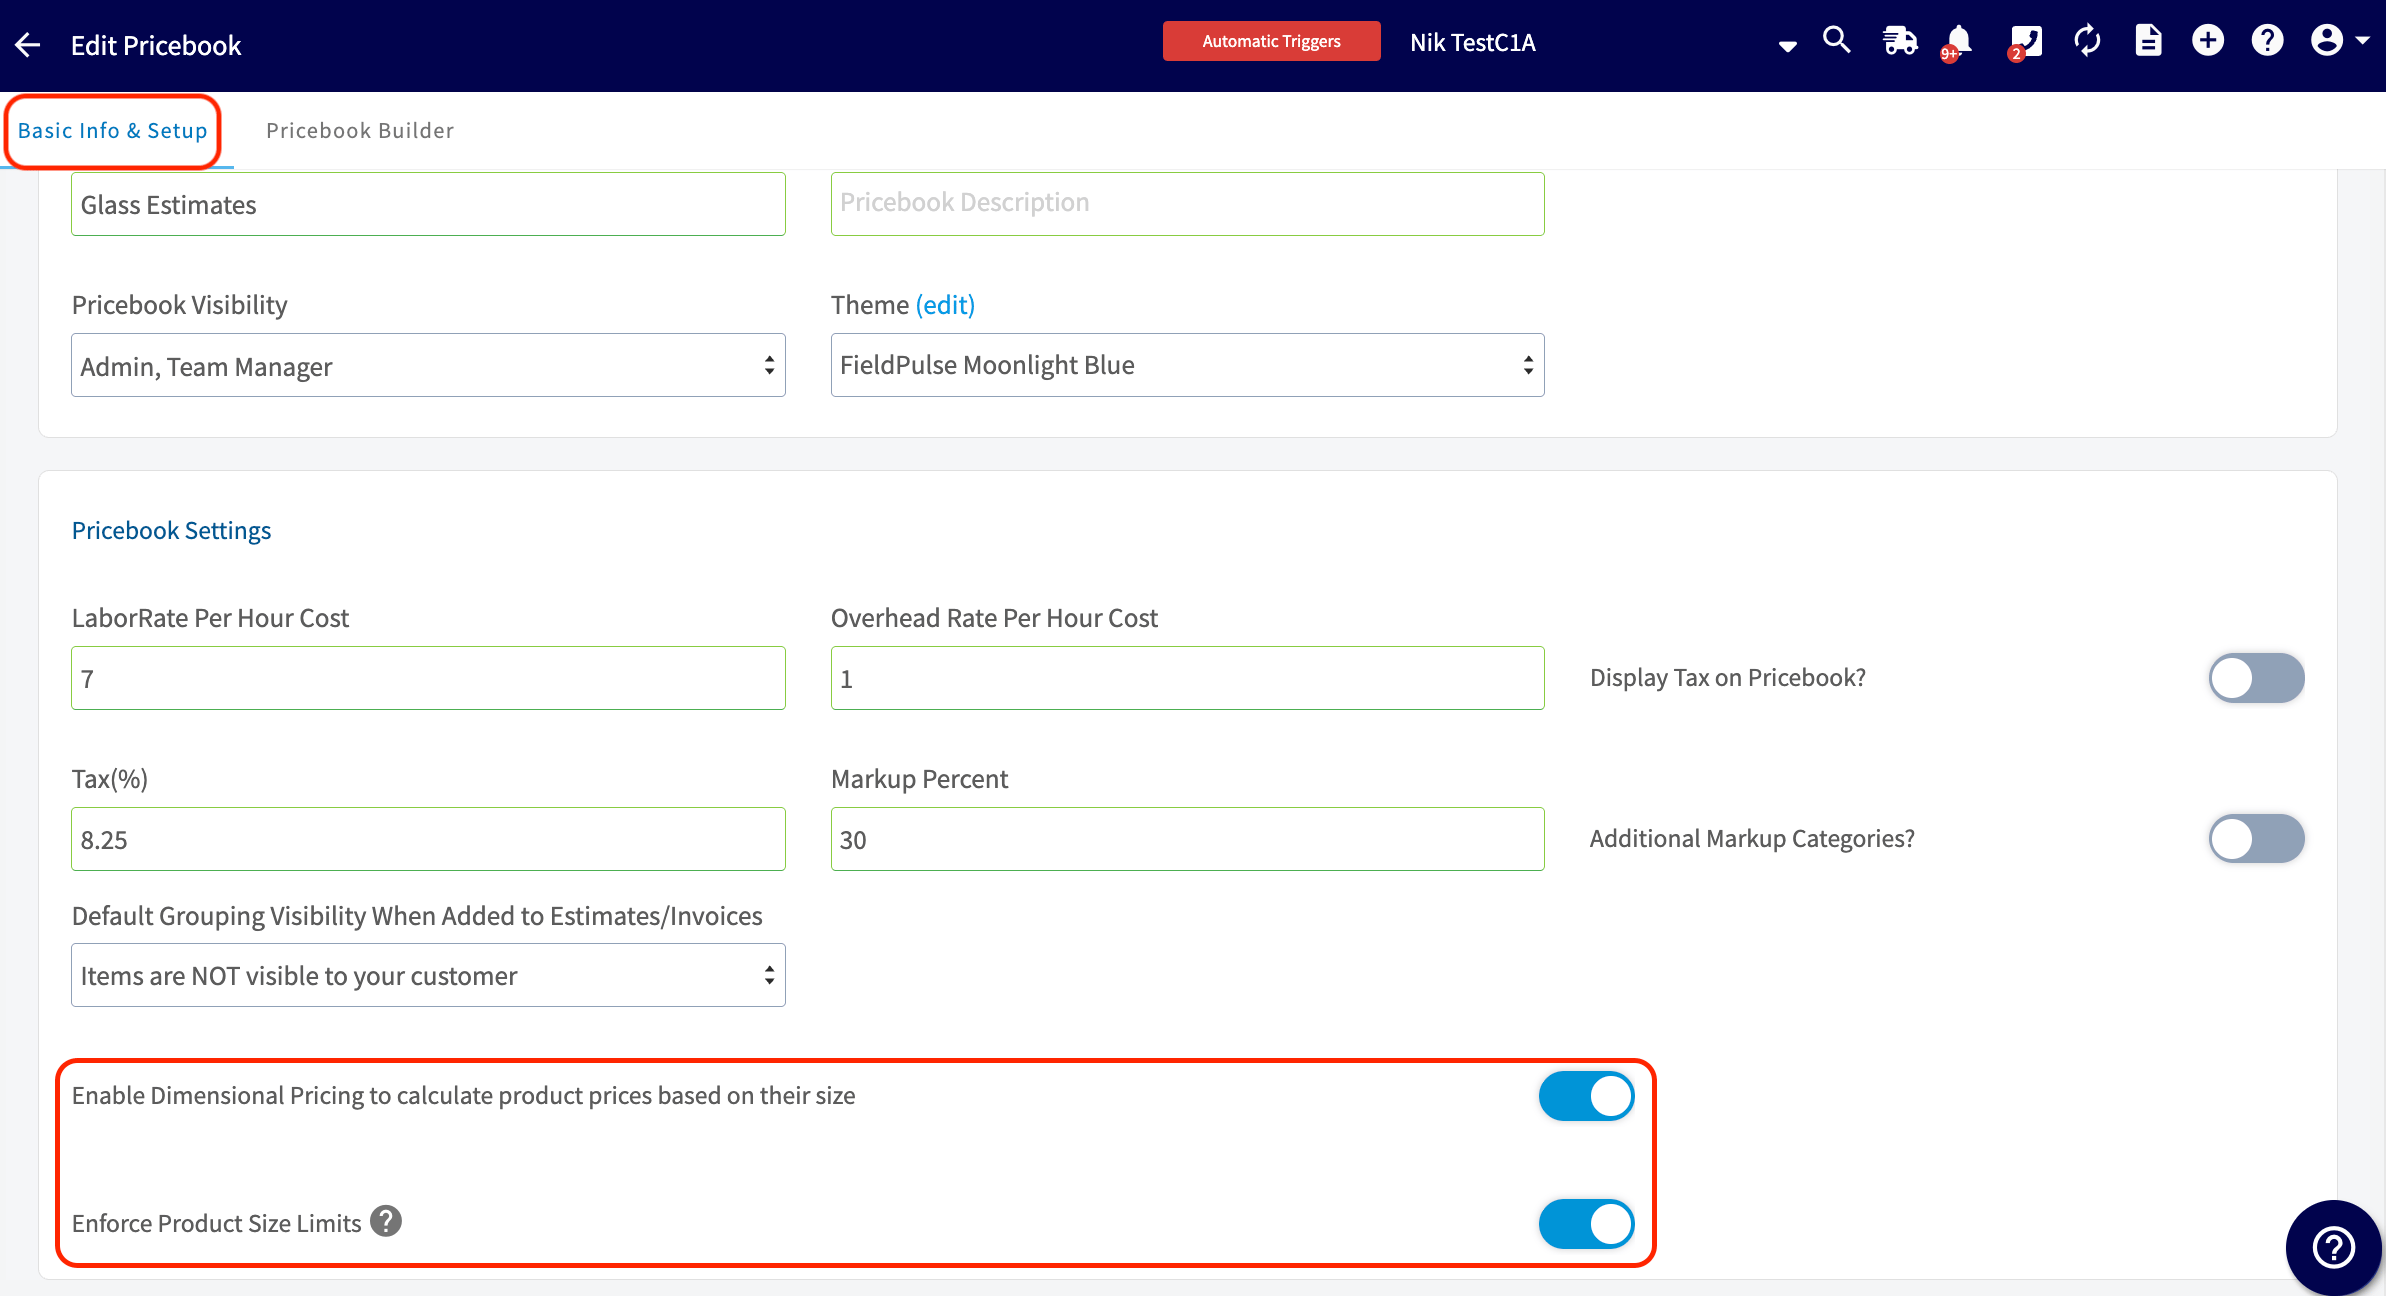
Once enabled, be sure that you add your Dimensional Items to the flat rate jobs within your Pricebook.
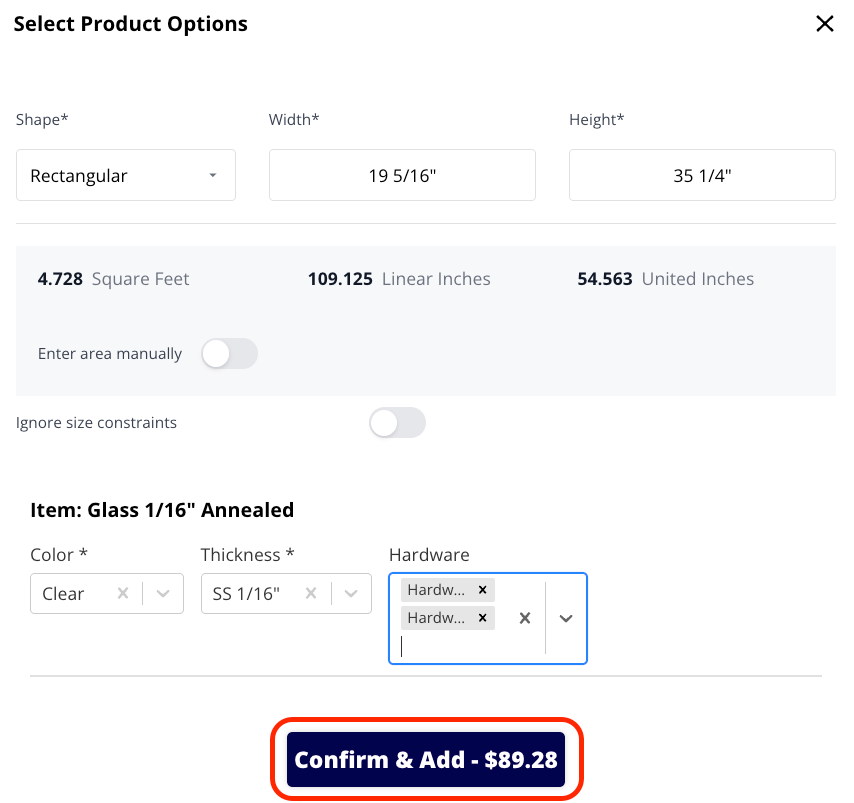
Step 5: How estimators use the Pricebook
Estimators pick the flat rate job first, then enter dimensions, rather than the other way around. It’s faster, and it stops your team from bouncing back to the home screen every time they want to try a different item. Here’s the flow:- Open the Pricebook and search or navigate categories to find the flat rate job (or grouping).
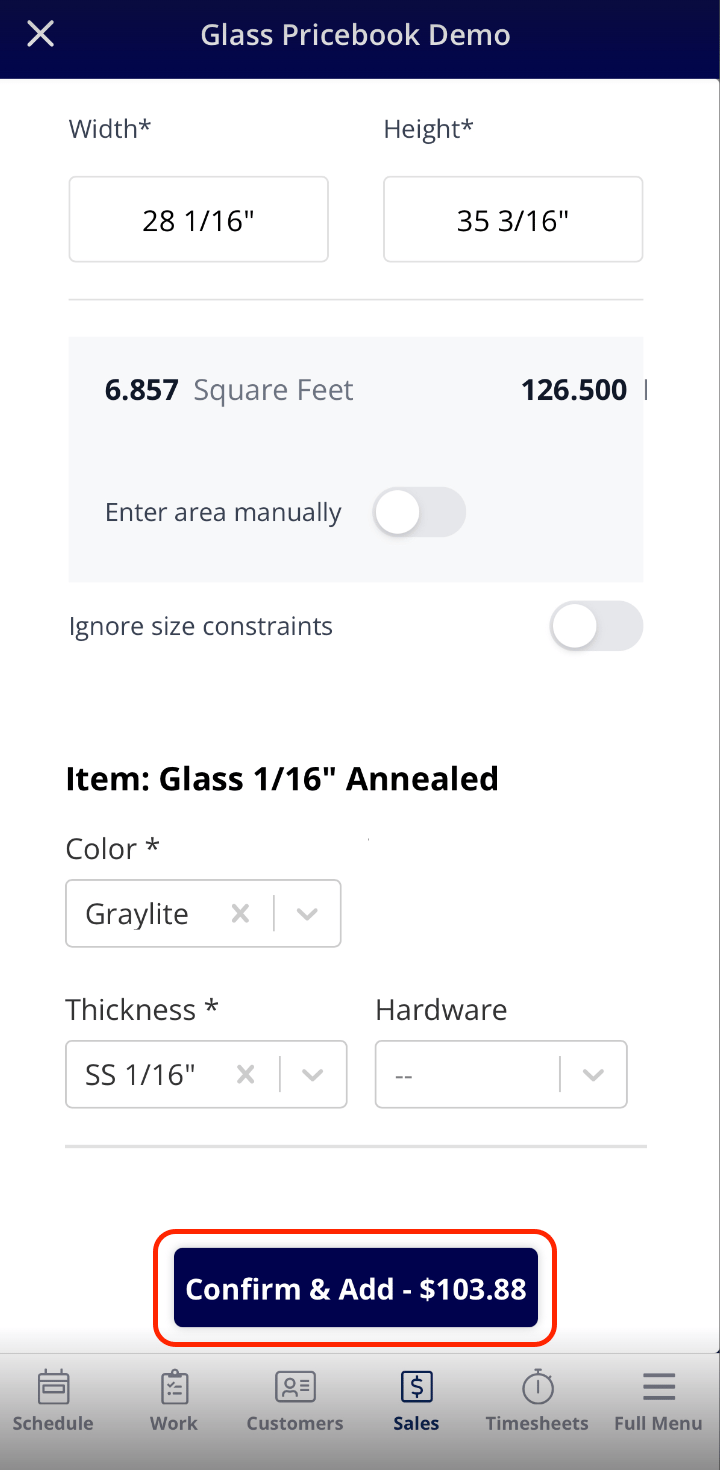
- Click the Job. If any item inside uses a unit of measure, a dimensional calculator popup opens.
- Enter the size (required), fractional dimensions (required), and shape. Square uses width x height; circle uses radius.
- Select item options. If an option is set to required, your estimator must make a selection before continuing.
- The pricing recalculates as options are picked. The submit button updates to read Confirm & Add - with the calculated total price for that flat rate job so your team knows exactly what they’re committing to before clicking.

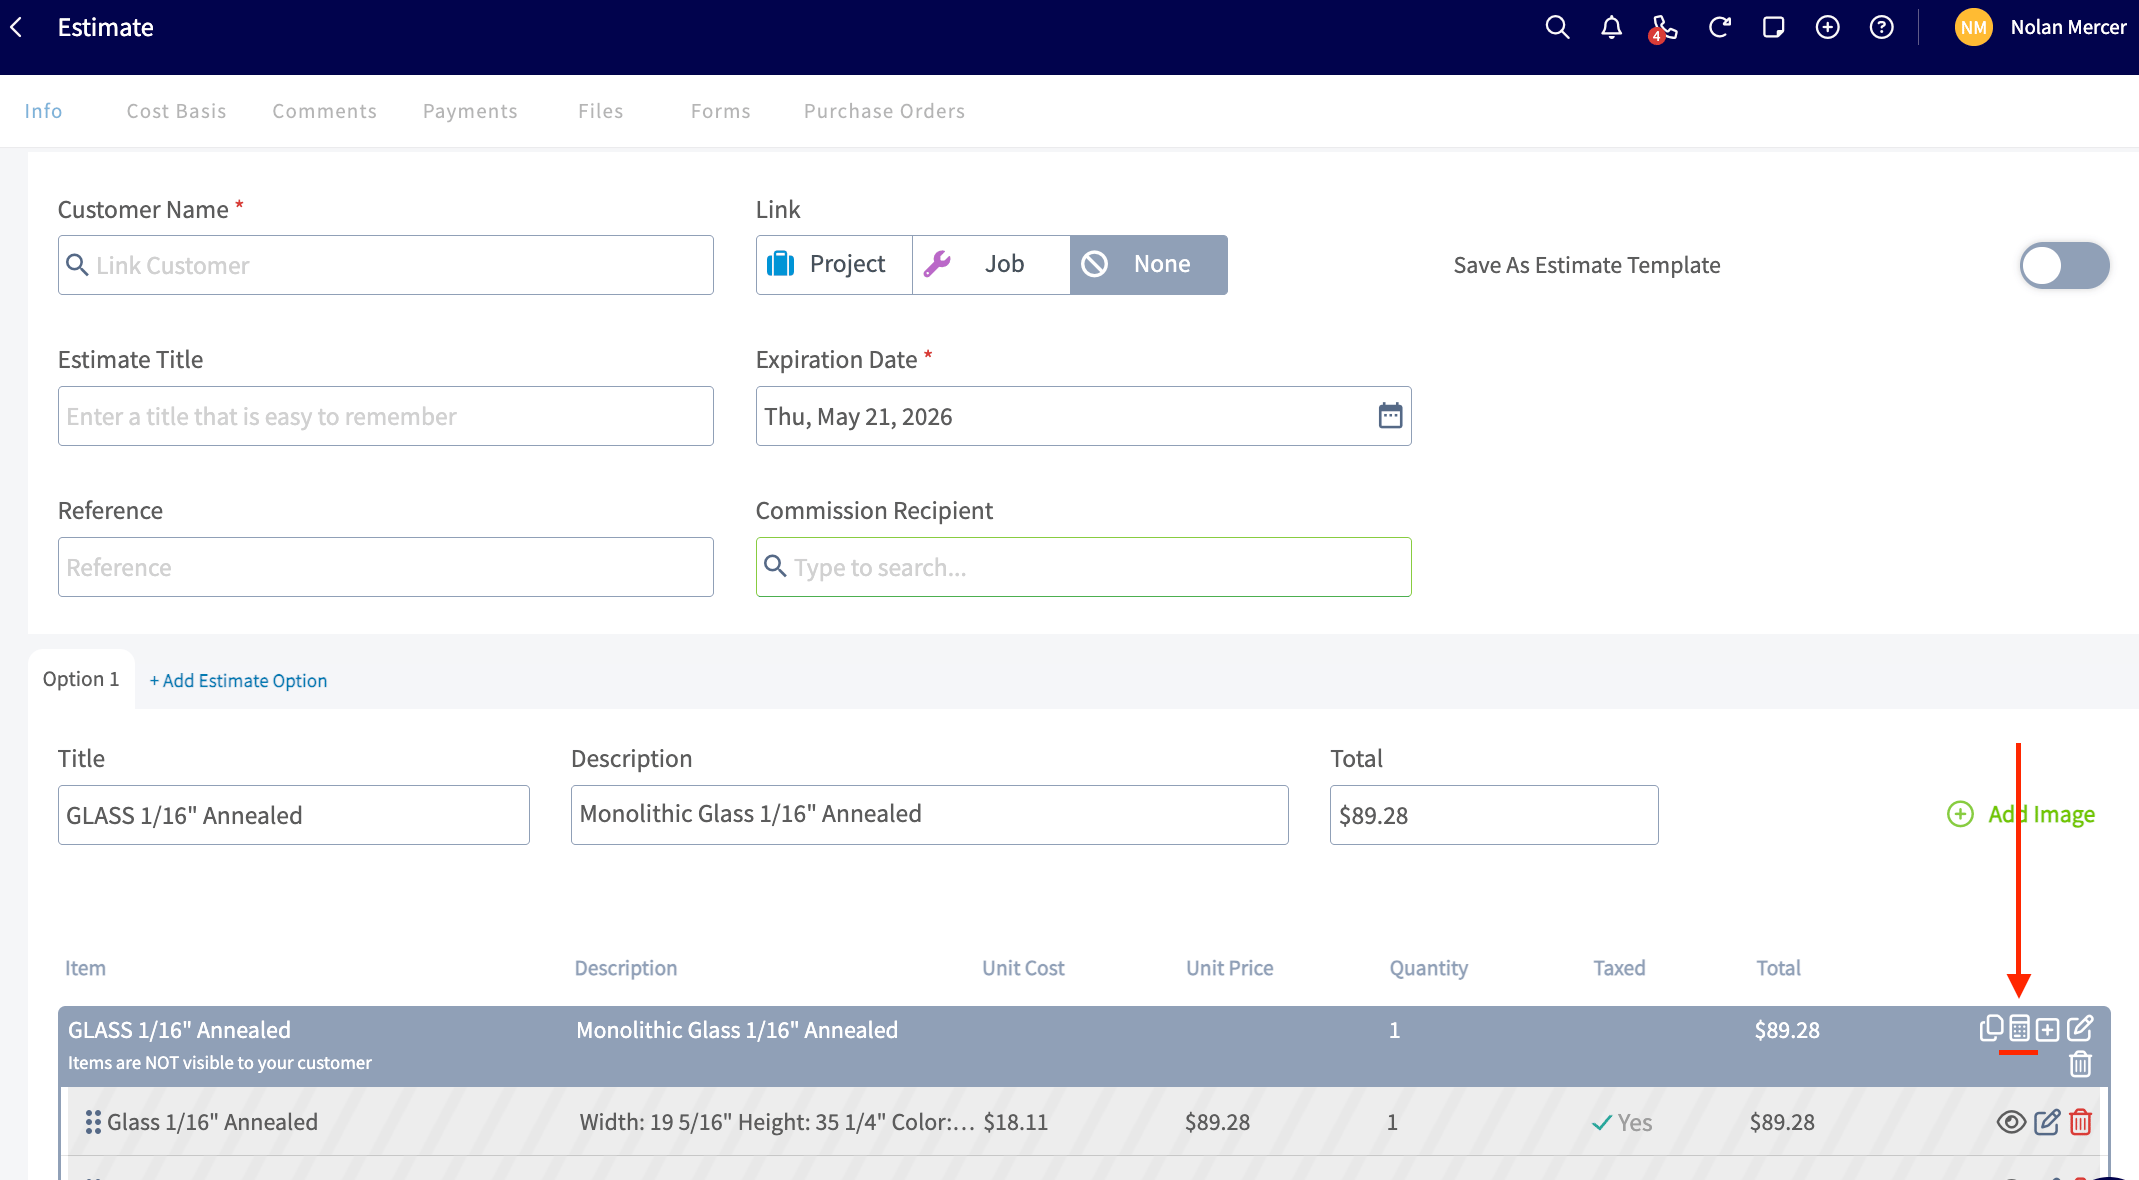
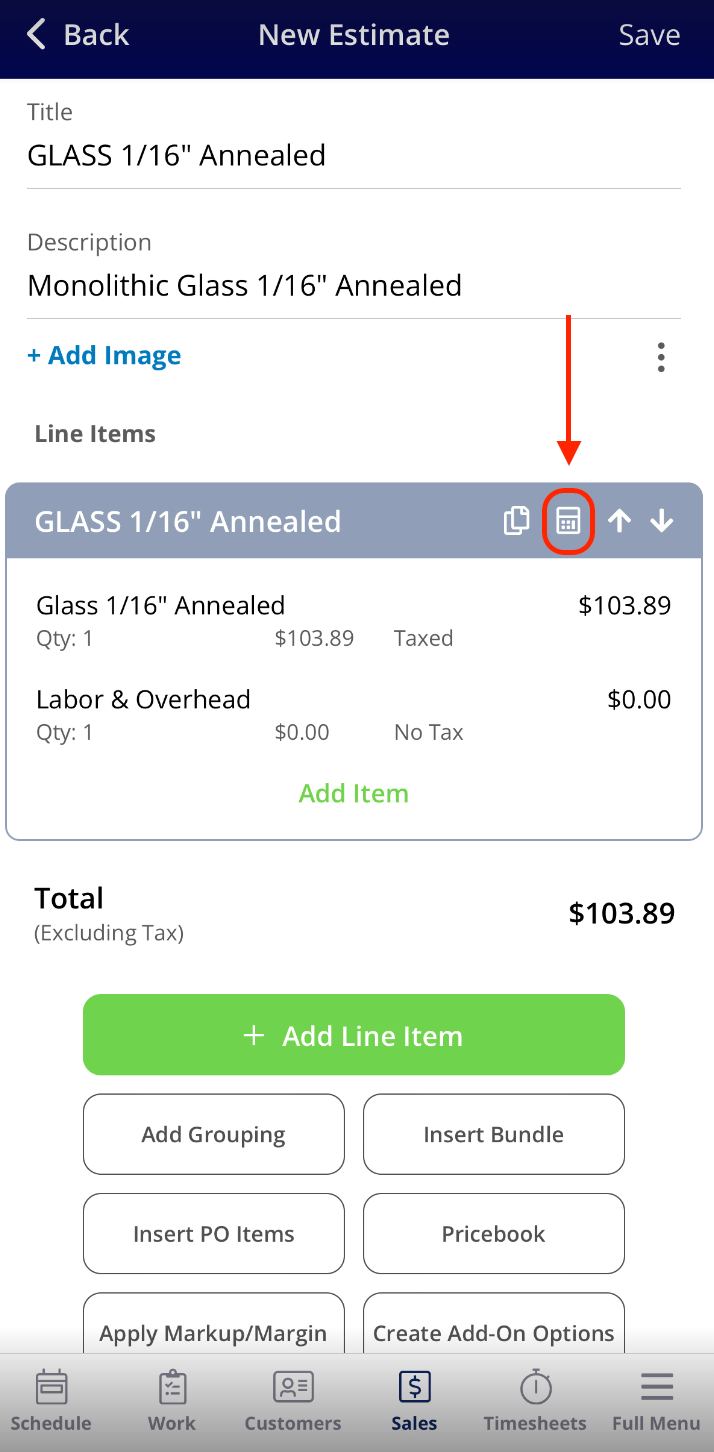
Step 6: Edit a flat rate job without starting over
- Find the line item on your Estimate or Invoice record.
- Click the calculator icon to Change Options on the flat rate job grouping header.
- The Pricebook re-opens with all current selections pre-populated.
- Adjust dimensions, options, or shape, then click Confirm & Add. The line item updates in place.
Step 7: Duplicate a flat rate job on an Estimate or Invoice
Need to add the same configuration multiple times, like five matching windows but each with different dimensions? You can duplicate a flat rate job directly on your Estimate or Invoice records. Sizes, item options, and details all copy over. Then click the calculator icon on each copy to adjust dimensions per piece.
🚀 FieldPulse Pro Tip: This duplicate feature works on every flat rate job, not just those that came from a Dimensional Pricebook.
A note on markups and pricing precision
Dimensional pricing calculates first. Any flat rate job markups apply on top. This keeps your pricing accurate and your markups predictable. Pricing also supports two decimal values (for example, $0.74), so you can set rates with precision.Import Your Dimensional Items in Bulk
If you’re setting up a lot of items at once, you don’t have to add them one by one. Once Dimensional Pricebook and Item Options are enabled, the Mass Import tools let you bring everything in at scale. Here’s how to get there:- Navigate to Company Settings > Estimates & Invoices tab > Item List subtab > Mass Import.
- Item Import: Standard, non-dimensional line items.
- Serialized Item Import: Non-dimensional line items that need serial-number tracking.
-
Dimensional Item Option Import: Creates your item options (like color, thickness, or edge type) and their values in bulk. This import has two tabs:
- The first tab is where you define your Dimensional Item Options: name, whether it’s required, pricing method, and unit of measure.
- The second tab is where you define the values selectable for each option, along with their associated pricing.
- Dimensional Item Import: Brings in your actual dimensional items and ties them to the item options you’ve already imported.
Order matters here. Import your Dimensional Item Options and their values first. Once those are in place, verify and upload the Dimensional Item Import.
On Mobile: Field Experience
For technicians in the field, the Dimensional Pricebook works the same way on the mobile app as it does on the web, with a couple of mobile-friendly tweaks. We’re assuming your admin has already set everything up. Here’s how to build an Estimate or Invoice from the field using the Dimensional Pricebook:- Open the Estimate or Invoice record and tap Add from Pricebook.
- Tap the flat rate job you need. The price will reflect $0 until you’ve entered your dimensions.
- The dimensional calculator opens. Enter the size, fractional measurements, and shape.
- Select any Item Options. The keyboard no longer pops up automatically on options, so just tap each option to choose a value.
- Confirm the total shown on the button (Confirm & Add - with the calculated total price) and tap to add.
- Find the Line Item on the Estimate or Invoice.
- Tap the calculator icon next to the line.
- Update dimensions, options, or shape, then confirm.
🚀 FieldPulse Pro Tip: If your customer wants multiple identical pieces with different dimensions (a common one is matching windows for a whole-house replacement), tap the duplicate icon on the Line Item first, then tap the calculator on each copy to set its specific size. It’s faster than re-adding from the Pricebook every time.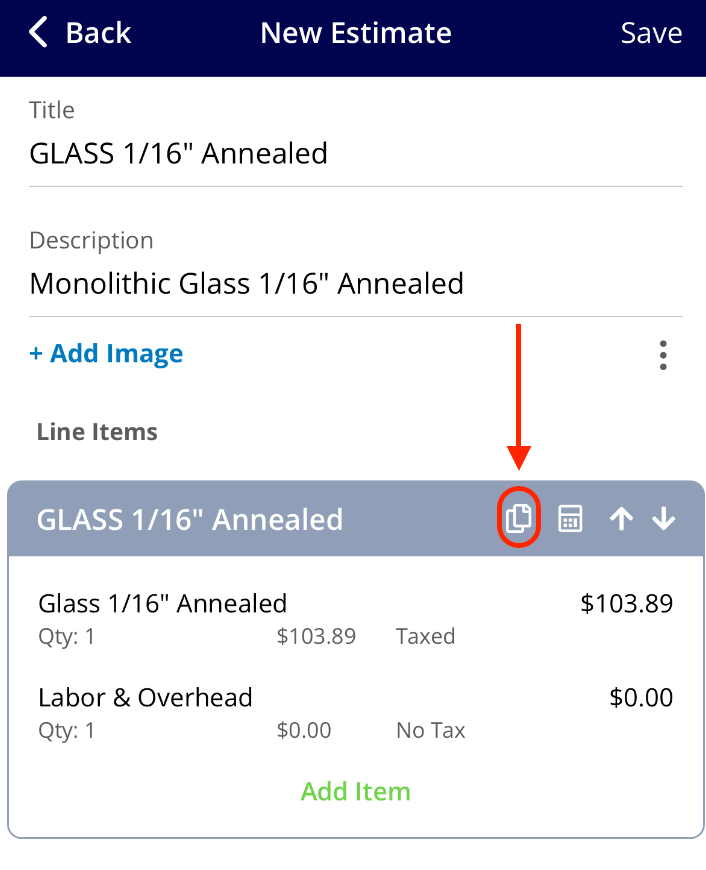
Video Tutorial
Have additional questions? Contact us at support@fieldpulse.com or use the chat feature in the bottom right corner of your screen.